battery replacement OPEL FRONTERA 1998 Workshop Manual
[x] Cancel search | Manufacturer: OPEL, Model Year: 1998, Model line: FRONTERA, Model: OPEL FRONTERA 1998Pages: 6000, PDF Size: 97 MB
Page 1060 of 6000

ENGINE COOLING6B–7
Water Pump
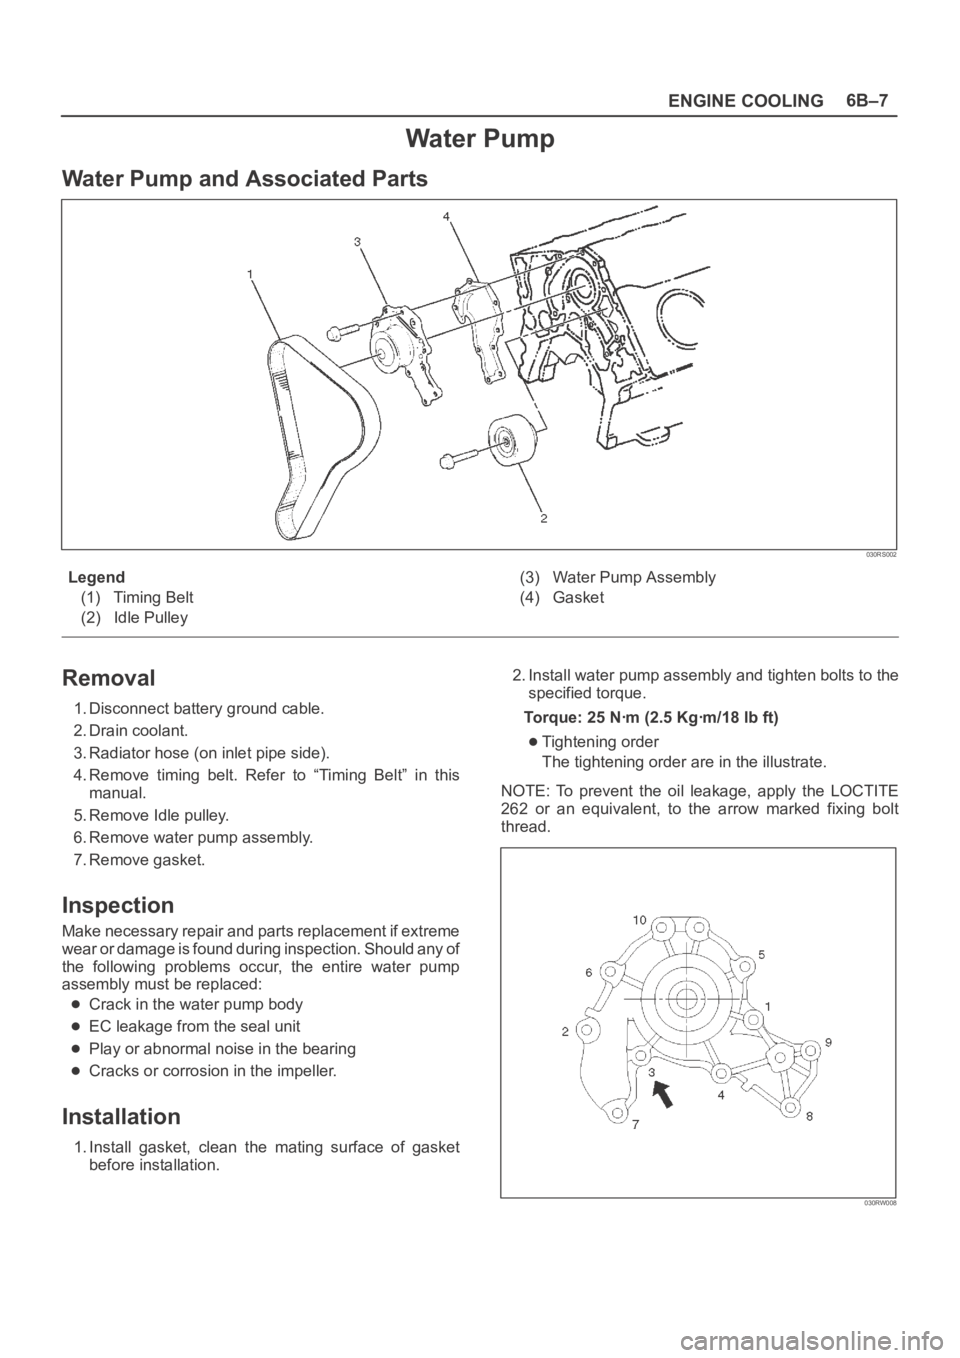
Water Pump and Associated Parts
030RS002
Legend
(1) Timing Belt
(2) Idle Pulley(3) Water Pump Assembly
(4) Gasket
Removal
1. Disconnect battery ground cable.
2. Drain coolant.
3. Radiator hose (on inlet pipe side).
4. Remove timing belt. Refer to “Timing Belt” in this
manual.
5. Remove Idle pulley.
6. Remove water pump assembly.
7. Remove gasket.
Inspection
Make necessary repair and parts replacement if extreme
wear or damage is found during inspection. Should any of
the following problems occur, the entire water pump
assembly must be replaced:
Crack in the water pump body
EC leakage from the seal unit
Play or abnormal noise in the bearing
Cracks or corrosion in the impeller.
Installation
1. Install gasket, clean the mating surface of gasket
before installation.2. Install water pump assembly and tighten bolts to the
specified torque.
Torque: 25 Nꞏm (2.5 Kgꞏm/18 lb ft)
Tightening order
The tightening order are in the illustrate.
NOTE: To prevent the oil leakage, apply the LOCTITE
262 or an equivalent, to the arrow marked fixing bolt
thread.
030RW008
Page 1061 of 6000

6B–8
ENGINE COOLING
3. Idle pulley
Install idle pulley and tighten bolt to the specified
torque.
Torque: 52 Nꞏm (5.3 Kgꞏm/38 lb ft)4. Timing beltInstall timing belt. Refer to timing belt installation
step in “Timing Belt” in this manual.
5. Connect radiator inlet hose and replenish EC.
6. Connect battery ground cable.
Thermostat
Thermostat and Associated Parts
031RW001
Legend
(1) Thermostat Housing
(2) Thermostat
(3) Outlet Pipe
Removal
1. Disconnect battery ground cable.
2. Drain engine coolant from the radiator and engine.
3. Disconnect radiator hose from the inlet pipe.
4. Remove thermostat housing.
5. Remove thermostat(2).
Inspection
Suspend the thermostat in a water–filled container using
thin wire. Place a thermometer next to the thermostat.
Do not directly heat the thermostat.
Gradually increase the water temperature. Stir the water
so that the entire water is same temperature.
031RS003Confirm the temperature when the valve first begins to
open.
Valve opening temperature 74.5C
78.5C
(166.1
F 173.3F)
Confirm the temperature when the valve is fully opened.
Valve full open temperature and lift More than
8.5mm (0.33 in) at 90
C (194F)
Make necessary repair and parts replacement if extreme
wear or damage is found during inspection.
Installation
1. Install thermostat into the outlet pipe(4) making sure
that the air hole is in the up position.
2. Install thermostat housing and tighten bolts to the
specified torque.
Torque: 25 Nꞏm (2.5 Kgꞏm/18 lb ft)
3. Installation rubber hose.
4. Replenish engine coolant (EC).
5. Start engine and check for EC leakage.
Page 1080 of 6000

ENGINE ELECTRICAL6D1–1
ENGINE
ENGINE ELECTRICAL
CONTENTS
Service Precaution 6D1–1. . . . . . . . . . . . . . . . . . . . . .
Battery 6D1–2. . . . . . . . . . . . . . . . . . . . . . . . . . . . . . . . .
General Description 6D1–2. . . . . . . . . . . . . . . . . . . .
Diagnosis 6D1–2. . . . . . . . . . . . . . . . . . . . . . . . . . . . .
Battery Charging 6D1–3. . . . . . . . . . . . . . . . . . . . . . Jump Starting 6D1–3. . . . . . . . . . . . . . . . . . . . . . . . .
Battery Removal 6D1–4. . . . . . . . . . . . . . . . . . . . . .
Battery Installation 6D1–4. . . . . . . . . . . . . . . . . . . . .
Main Data and Specifications 6D1–5. . . . . . . . . . .
Service Precaution
WARNING: IF SO EQUIPPED WITH A
SUPPLEMENTAL RESTRAINT SYSTEM (SRS),
REFER TO THE SRS COMPONENT AND WIRING
LOCATION VIEW IN ORDER TO DETERMINE
WHETHER YOU ARE PERFORMING SERVICE ON OR
NEAR THE SRS COMPONENTS OR THE SRS
WIRING. WHEN YOU ARE PERFORMING SERVICE
ON OR NEAR THE SRS COMPONENTS OR THE SRS
WIRING, REFER TO THE SRS SERVICE
INFORMATION. FAILURE TO FOLLOW WARNINGS
COULD RESULT IN POSSIBLE AIR BAG
DEPLOYMENT, PERSONAL INJURY, OR
OTHERWISE UNNEEDED SRS SYSTEM REPAIRS.
CAUTION: Always use the correct fastener in the
proper location. When you replace a fastener, use
ONLY the exact part number for that application.
ISUZU will call out those fasteners that require a
replacement after removal. ISUZU will also call out
the fasteners that require thread lockers or thread
sealant. UNLESS OTHERWISE SPECIFIED, do not
use supplemental coatings (Paints, greases, or other
corrosion inhibitors) on threaded fasteners or
fastener joint interfaces. Generally, such coatings
adversely affect the fastener torque and the joint
clamping force, and may damage the fastener. When
you install fasteners, use the correct tightening
sequence and specifications. Following these
instructions can help you avoid damage to parts and
systems.
Page 1193 of 6000

6E–76
ENGINE DRIVEABILITY AND EMISSIONS
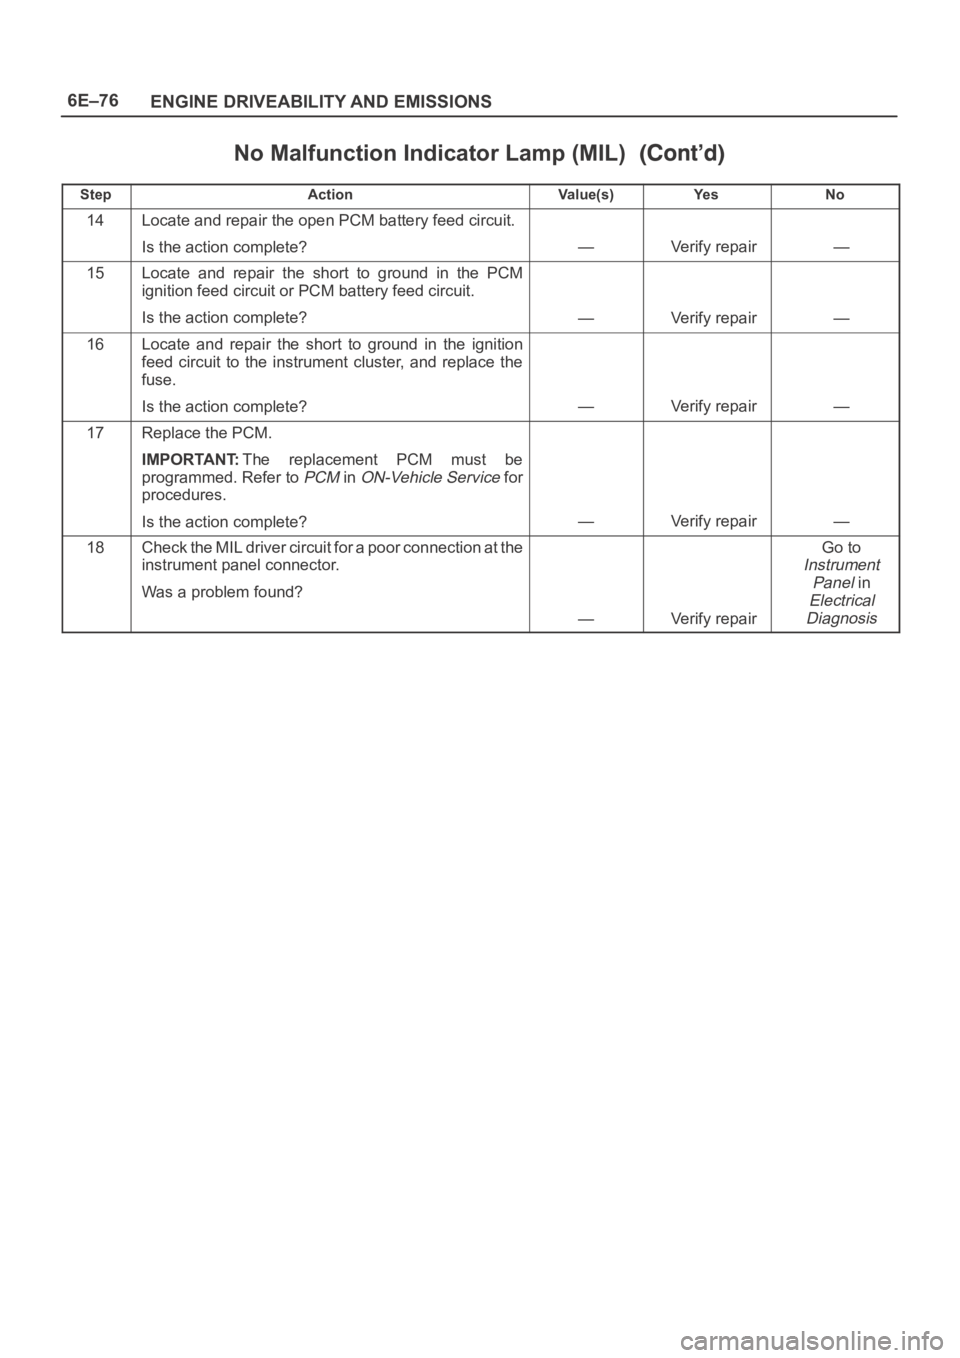
No Malfunction Indicator Lamp (MIL)
StepNo Ye s Va l u e ( s ) Action
14Locate and repair the open PCM battery feed circuit.
Is the action complete?
—Verify repair—
15Locate and repair the short to ground in the PCM
ignition feed circuit or PCM battery feed circuit.
Is the action complete?
—Verify repair—
16Locate and repair the short to ground in the ignition
feed circuit to the instrument cluster, and replace the
fuse.
Is the action complete?
—Verify repair—
17Replace the PCM.
IMPORTANT:The replacement PCM must be
programmed. Refer to
PCM in ON-Vehicle Service for
procedures.
Is the action complete?
—Verify repair—
18Check the MIL driver circuit for a poor connection at the
instrument panel connector.
Was a problem found?
—Verify repair
Go to
Instrument
Panel
in
Electrical
Diagnosis
Page 1355 of 6000

6E–238
ENGINE DRIVEABILITY AND EMISSIONS
DTC P0562 – System Voltage Low
StepActionVa l u e ( s )Ye sNo
1Was the “On-Board Diagnostic (OBD) System Check”
performed?
—Go to Step 2
Go to OBD
System
Check
2Using a Tech 2, measure the battery voltage at the
battery.
Is the battery voltage greater than the specified value?
11.5 VGo to Step 3
Charge
battery, then
go to
Step 3
31. Using a Tech 2.
2. Select “Ignition Volts” on the Tech 2.
3. Start the engine and raise the engine speed to the
specified value.
4. Load the electrical system by turning on the
headlights, high blower, etc.
Is the ignition voltage approximately equal to the
specified value?
2000 RPM
12.8-14.1 V
Go to Step 4
Go to
Starting/Char
ging
41. Ignition “OFF.”
2. Disconnect the PCM connector at the PCM.
3. Using a DVM, measure the battery voltage at the
PCM connector A-4.
Is it approximately equal to battery voltage?
—
Check for
excessive
current draw
with ignition
“OFF,” engine
“OFF.”
Go to Step 5
51. Check for faulty connections at the PCM harness
terminals.
2. Repair as necessary.
Was a repair necessary?
—Verify repairGo to Step 6
6Check for an open battery feed circuit to the PCM.
Is the action complete?
—Verify repairGo to Step 7
7Replace the PCM.
IMPORTANT:The replacement PCM must be
programmed. Refer to
UBS 98model year Immobilizer
Workshop Manual.
Is the action complete?—Verify repair—
Page 1356 of 6000

6E–239 ENGINE DRIVEABILITY AND EMISSIONS
Diagnostic Trouble Code (DTC) P0563 System Voltage High
Circuit Description
The powertrain control module (PCM) monitors the
system voltage on the ignition feed terminals to the PCM.
A system voltage DTC will set whenever the voltage is
above a calibrated value.
Conditions for Setting the DTC
Ignition “ON.”
System voltage is above 16 volts for 15 minutes.
Action Taken When the DTC Sets
The PCM will not illuminate the malfunction indicator
lamp (MIL).
The PCM will store as Failure Records only conditions
which were present when the DTC was set. This
information will not be stored as Freeze Frame data.
Conditions for Clearing the MIL/DTC
A history DTC P0563 will clear after 40 consecutive
warm-up cycles have occurred without a fault.
DTC P0563 can be cleared by using the Tech 2 “Clear
Info” function or by disconnecting the PCM battery
feed.
Diagnostic Aids
If the DTC sets when an accessory is operated, check for
a poor connection or excessive current draw.
DTC P0563 – System Voltage High
StepActionVa l u e ( s )Ye sNo
1Was the “ON-Board Diagnostic (OBD) System Check”
performed?
—Go to Step 2
Go to OBD
System
Check
2Using a Tech 2, measure the battery voltage at the
battery.
Is the battery voltage less than the specified value?
11 . 5 VGo to Step 3Go to Step 4
31. Charge the battery and clean the battery terminals.
2. Clean the battery ground cable connection if
corrosion is indicated.
Is the battery voltage less than the specified value?
11 . 5 V
Replace
battery
Go to Step 4
41. Turn “OFF” all the accessories.
2. Install a Tech 2.
3. Select the ignition voltage parameter on the Tech 2.
4. Start the engine and raise the engine RPM to the
specified value.
Is the voltage more than 2.5 volts greater than the
measurement taken in step 2 or 3?
2000 RPM
Go to
Starting/Char
ging
Go to Step 5
5Replace the PCM.
IMPORTANT:The replacement PCM must be
programmed. Refer to
UBS 98 model year Immobilizer
Workshop Manual.
Is the action complete?—Verify repair—
Page 1357 of 6000

6E–240
ENGINE DRIVEABILITY AND EMISSIONS
Diagnostic Trouble Code (DTC) P0601 PCM Memory
Circuit Description
The powertrain control module (PCM) used in this vehicle
utilizes an electrically erasable programmable read-only
memory (EEPROM). The EEPROM contains program
information and the calibrations required for engine,
transmission, and powertrain diagnostics operation.
Unlike the PROM used in past applications, the EEPROM
is not replaceable.
Conditions for Setting the DTC
The PCM detects an internal program fault (check sum
error).
Action Taken When the DTC Sets
The PCM will not illuminate the malfunction indicator
lamp (MIL).
The PCM will store conditions which were present
when the DTC was set in the Failure Records data only.
Conditions for Clearing the MIL/DTC
DTC P0601 can be cleared by using the Tech 2 “Clear
Info” function or by disconnecting the PCM battery
feed.
Diagnostic Aids
DTC P0601 indicates that the contents of the
EEPROM have changed since the PCM was
programmed. The only possible repair is PCM
replacement.
DTC P0601 – PCM Memory
StepActionVa l u e ( s )Ye sNo
1Was the “On-Board Diagnostic (OBD) System Check”
performed?
—Go to Step 2
Go to OBD
System
Check
2Replace the PCM.
IMPORTANT:The replacement PCM must be
programmed. Refer to
UBS 98model year Immobilizer
Workshop Manual.
Is the action complete?—Verify repair—
Page 1365 of 6000

6E–248
ENGINE DRIVEABILITY AND EMISSIONS
Diagnostic Trouble Code (DTC) P1380 ABS Rough Road ABS System Fault
Circuit Description
The powertrain control module (PCM) monitors ABS fault
signal. When PCM receives fault signal, PCM will set
DTC P1380.
Conditions for Setting the DTC
Vehicle speed is more than 5 mph.
Load is less than 99%.
Engine revolution is less than 6250 rpm.
PCM receives ABS fault signals from ABS unit.
Ignition on.
Misfire DTCs exist.
100 test failures within 120 test samples.
Action Taken When the DTC Sets
The PCM will store DTC 1380 only, no MIL turn on.
Conditions for Clearing the MIL/DTC
A history DTC P1380 will clear after 40 consecutive
warm-up cycles have occurred without a fault.
DTC 1380 can be cleared by using Tech-2 or
disconnecting the PCM battery feed.
Diagnostic Aids
Check for the following conditions:
PCM and ABS communication line short circuit to other
line may cause faulty signal. Inspect communication
line.
Follow ABS ECU diagnosis procedure, refer to ABS
procedure page.
DTC P1380 – ABS Rough Road ABS System Fault
StepActionVa l u e ( s )Ye sNo
1Was the “On-Board Diagnostic (OBD) System Check”
performed?
—Go to Step 2
Go to OBD
System
Check
21. Ignition “ON,” engine “OFF”, review and record
Tech 2 Failure Records Data.
2. Operate the vehicle within Failure Records
conditions as noted.
3. Using a Tech 2, monitor “Specific DTC” info for DTC
P1380 and Misfire DTCs until the DTC P1380 and
Misfire DTCs test runs. Note the result.
Does the Tech 2 indicates DTC P1380 and Misfire
DTCs failed this ignition?
—
Refer to ABS
diagnosis
After inspect
ABS, unit re-
peat
Step 2
Still problem
exists, go to
Step 3
Clear DTC by
Te c h 2
3Check short circuit among communication line of
PCM/ABS and others.
Was short circuit?
—
Repair wiring
Verify repair
Go to Step 4
4Replace the PCM.
IMPORTANT:The replacement PCM must be
programmed. Refer to
UBS 98model year Immobilizer
Workshop Manual.
Is the action complete?—Verify repair—
Page 1374 of 6000

6E–257 ENGINE DRIVEABILITY AND EMISSIONS
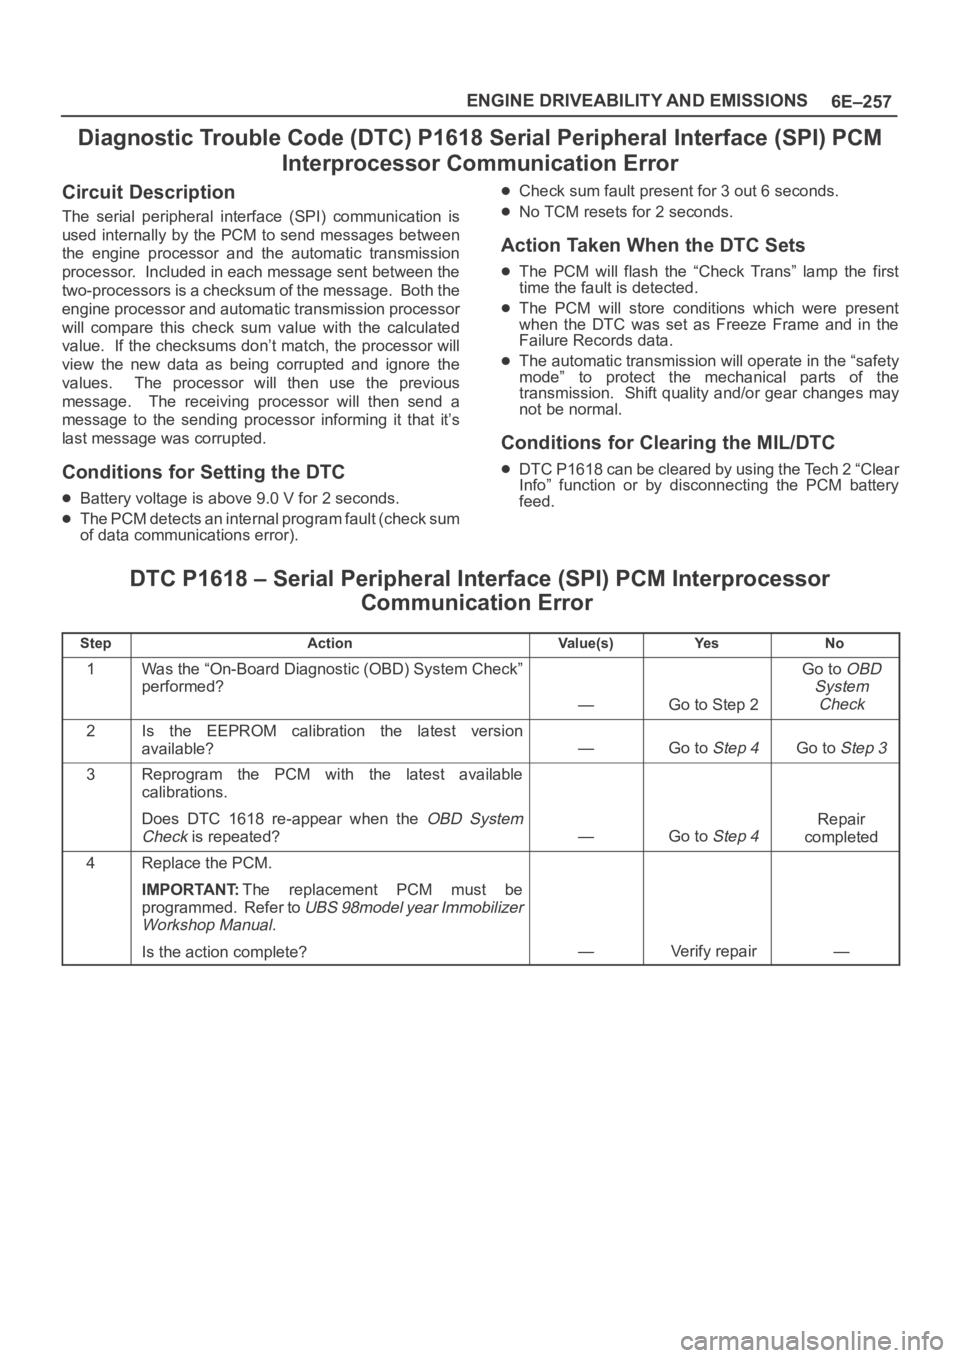
Diagnostic Trouble Code (DTC) P1618 Serial Peripheral Interface (SPI) PCM
Interprocessor Communication Error
Circuit Description
The serial peripheral interface (SPI) communication is
used internally by the PCM to send messages between
the engine processor and the automatic transmission
processor. Included in each message sent between the
two-processors is a checksum of the message. Both the
engine processor and automatic transmission processor
will compare this check sum value with the calculated
value. If the checksums don’t match, the processor will
view the new data as being corrupted and ignore the
values. The processor will then use the previous
message. The receiving processor will then send a
message to the sending processor informing it that it’s
last message was corrupted.
Conditions for Setting the DTC
Battery voltage is above 9.0 V for 2 seconds.
The PCM detects an internal program fault (check sum
of data communications error).
Check sum fault present for 3 out 6 seconds.
No TCM resets for 2 seconds.
Action Taken When the DTC Sets
The PCM will flash the “Check Trans” lamp the first
time the fault is detected.
The PCM will store conditions which were present
when the DTC was set as Freeze Frame and in the
Failure Records data.
The automatic transmission will operate in the “safety
mode” to protect the mechanical parts of the
transmission. Shift quality and/or gear changes may
not be normal.
Conditions for Clearing the MIL/DTC
DTC P1618 can be cleared by using the Tech 2 “Clear
Info” function or by disconnecting the PCM battery
feed.
DTC P1618 – Serial Peripheral Interface (SPI) PCM Interprocessor
Communication Error
StepActionVa l u e ( s )Ye sNo
1Was the “On-Board Diagnostic (OBD) System Check”
performed?
—Go to Step 2
Go to OBD
System
Check
2Is the EEPROM calibration the latest version
available?
—Go to Step 4Go to Step 3
3Reprogram the PCM with the latest available
calibrations.
Does DTC 1618 re-appear when the
OBD System
Check
is repeated?—Go to Step 4
Repair
completed
4Replace the PCM.
IMPORTANT:The replacement PCM must be
programmed. Refer to
UBS 98model year Immobilizer
Workshop Manual.
Is the action complete?—Verify repair—
Page 1378 of 6000

6E–261 ENGINE DRIVEABILITY AND EMISSIONS
DTC P1640 – Driver-1-Input High Voltage
StepNo Ye s Va l u e ( s ) Action
13Repair the open circuit between the fuse and the PCM
driver terminal for the affected circuit.
Is the action complete?
—Verify repair—
141. Connect the PCM.
2. Start the engine and let it idle.
3. Backprobe the affected terminal at the PCM with a
DVM.
Was the voltage equal to the specified value?
+BGo to Step 16Go to Step 15
151. Run the engine at idle.
2. Check for battery voltage at the fuse for the affected
circuit.
Was battery voltage available at the fuse?
—Go to Step 11Go to Step 10
16Replace the PCM.
IMPORTANT:The replacement PCM must be
programmed. Refer to
UBS 98model year Immobilizer
Workshop Manual.
Is the action complete?—Verify repair—