clutch OPEL GT-R 1973 Service Manual
[x] Cancel search | Manufacturer: OPEL, Model Year: 1973, Model line: GT-R, Model: OPEL GT-R 1973Pages: 625, PDF Size: 17.22 MB
Page 572 of 625

REFRIGERANT COMPONENTS ALL MODELSSB-632. Install condenser into car and secure with 4 at-
taching screws. See Figure
9B-101.3. Untape discharge line and pipe and install using
new o-rings lubricated with No. 525 viscosity oil.
Figure
99.102 Condenser - Receiver - Dehydrator
O-Rings. GT
4. Untape and install inlet and outlet pipes into the
receiver-dehydrator using new o-rings lubricated
with No. 525 viscosity oil.
Figure
98-103 Condenser Assembly - GT
5. Evacuate system. Refer to EVACUATING SYS-
TEM.
6. While system is being evacuated, install the char-
coal cannistor, washer jar, battery tray and battery
and connect negative battery cable.
7. Charge system. Refer to CHARGING SYS-
TEM.
DISASSEMBLY AND REASSEMBLY OF CLUTCH
DRIVE PLATE AND SHAFT SEALIt is not necessary to remove the compressor or dis-connect refrigerant lines to remove or install clutch
parts on the GT, however, the compressor must be
removed from the Opel 1900
- Manta.
Disassembly
1. Firmly clamp holding fixture (J-9396) in a vise
and attach compressor assembly to fixture (see Figwe
9B-104).
-_ .s -Figure SE-104 Removing or Installing Shaft Nut
2. Hold hub of clutch drive plate with wrench
(J-9403). Using special thin wall 9/16 inch socket
(J-9399) and 3/g inch drive, remove shaft nut.
3. Install threaded hub puller (J-9401) onto hub of
clutch drive plate (see Figure
9B-105). Hold body of
hub puller with wrench, tighten center screw of hub
puller, and lift off clutch drive plate and woodruff
key.Figure SE-105 Removing Clutch Drive Plate
Page 573 of 625

9B-64 1973 OPEL SERVICE MANUAL
4. Using No. 21 Truarc pliers (J-5403) take out
retainer ring from hub of clutch drive plate (see Fig-
ure 9B-106). Lift our spacer.
Figure 95.106 Removing
or Installing Retainer Ring inClutch Drive Plate5. If compressor has an absorbent sleeve in the neck,
pry out the sleeve retainer and remove the sleeve.
Remove the seal seat retainer ring, using No. 21
Truarc pliers, Tool J-5403, (see Figure
9B-107).
SEAL SEATFigure 98.107 Removing or Installing Shaft Seal Seat
Retaining Ring6. Thoroughly clean the area inside the compressor
neck surrounding the shaft, the
ezxposed portion of
the seal seat and the shaft itself of any dirt or foreign
material. This is absolutely necessary to prevent any
such material from getting into
t:he compressor.
7. Remove the seal seat (see Figure 9B-108) using
Tool J-23128. Insert Tool
J-2312E; into seal seat and
tighten, using a twisting motion remove the seal seat.96-82
Figure SE-108 Removing or Installing Ceramic Shaft
Seal seat
8. Remove the seal assembly, using Tool J-9392.
Press tool downward on seal while twisting it clock-
wise to engage the tabs of the seal assembly. Gently
but firmly, pull tool straight out (see Figure
9B-109).9. Remove the seal seat
“0” ring, using Tool J-9553
(see Figure
9B-110).10. Recheck the inside of the compressor neck and
the shaft. Be sure these areas are perfectly clean
before installing new parts.
Reassembly
1. Coat the new seal seat
“0” ring with clean refrig-
eration oil and install it in its groove in the compres-
sor neck. Tool J-21508 may be used to accomplish
this. (See Figure
9B;,lll)2. Coat the
“0” ring and seal face of the new seal
assembly with clean refrigeration oil. Carefully
mount the seal assembly to Tool J-9392 by engaging
the tabs of the seal with the tangs of the tool.
3. Place seal protector, Tool J-22974, over end of
shaft and carefully slide the new seal assembly onto
the shaft. Gently twist the tool clockwise while push-
ing the seal assembly down the shaft until the seal
Page 575 of 625

9B-66 1973 OPEL SERVICE MANUAL
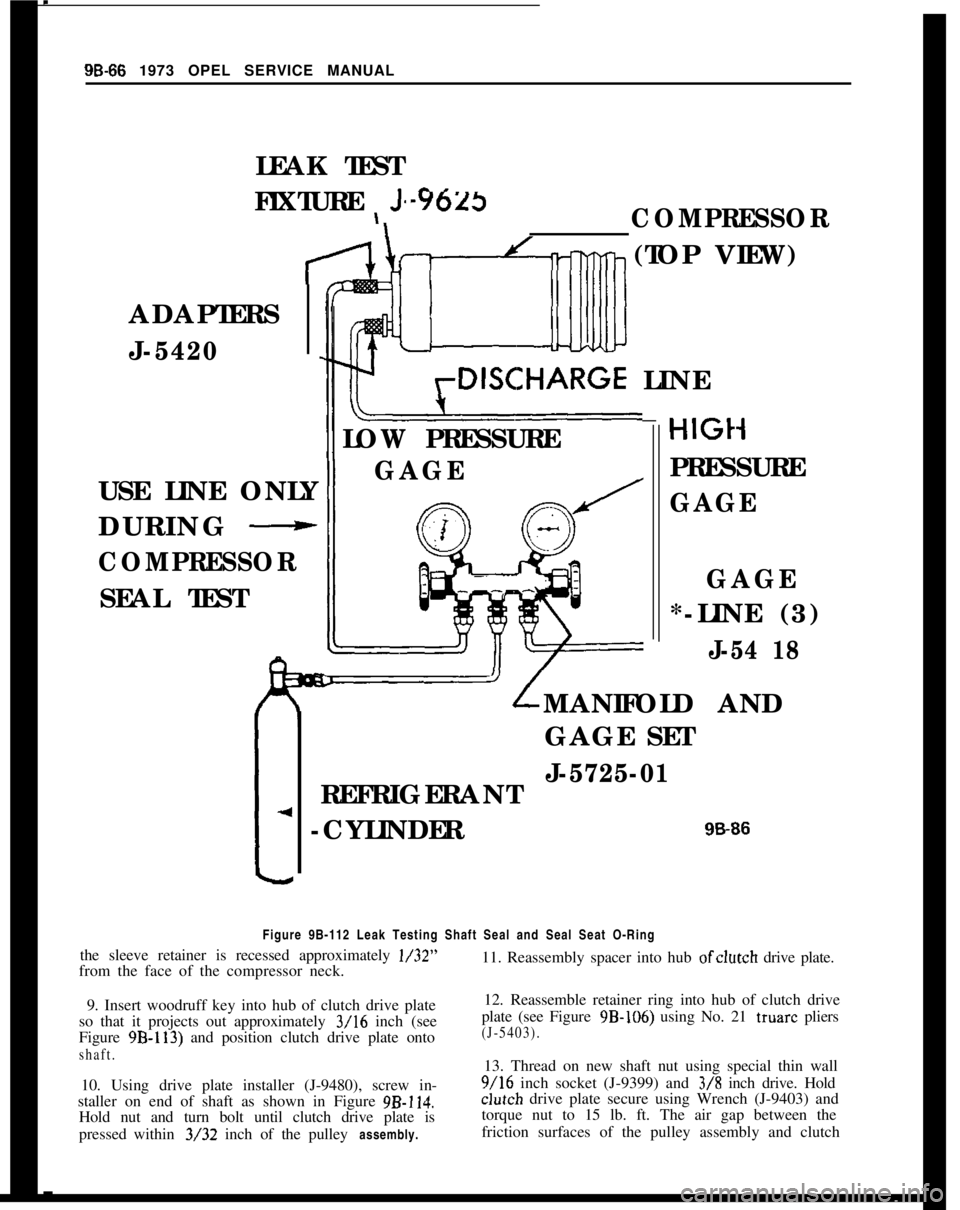
LEAK TEST
FIXTURE
\ Js - s ---Y623
\COMPRESSOR
ADAPTERS
J-5420
USE LINE ONLY
DURING
-
COMPRESSOR
SEAL TEST
-4
-
It-’rDISCHARGE LINE
-
LOW PRESSUREHIGt
GAGE
4
PRESSURE
GAGE
(TOP VIEW)
GAGE
*-LINE (3)
J-54 18
GAGE SET
REFRIGERANT
J-5725-01
-CYLINDER
LMANIFOLD AND
9&86
Figure 9B-112 Leak Testing Shaft Seal and Seal Seat O-Ring
the sleeve retainer is recessed approximately l/32”
from the face of the compressor neck. 11. Reassembly spacer into hub ofclutch
drive plate.
9. Insert woodruff key into hub of clutch drive plate
so that it projects out approximately
3/16 inch (see
Figure
9B-113) and position clutch drive plate onto
shaft.
10. Using drive plate installer (J-9480), screw in-
staller on end of shaft as shown in Figure
9B-114.
Hold nut and turn bolt until clutch drive plate is
pressed within
3/32 inch of the pulley assembly.
12. Reassemble retainer ring into hub of clutch drive
plate (see Figure
9B-106) using No. 21 truarc pliers
(J-5403).
13. Thread on new shaft nut using special thin wall
9/16 inch socket (J-9399) and 3/8 inch drive. Hold
clut~ch drive plate secure using Wrench (J-9403) and
torque nut to 15 lb. ft. The air gap between the
friction surfaces of the pulley assembly and clutch
Page 576 of 625

REFRIGERANT COMPONENTS ALL MODELS9B- 67
Figure 9B-1 13 Positioning Clutch Drive Plate on Shaft
PLATE ON UNTlL THERE
IS APPROXIMATELY
3/32”-
. l m l GAP BETWEEN SURFACE
OF
PLATFigure
98-1 14 Installing Clutch Drive Plate
drive plate should be approximately l/32 to l/16
inch (see Figure
9B-115).
Flgure 98-1 16 Torquing Shaft Nut
BE98.89
DISASSEMBLY OF PULLEY ASSEMBLY, AND
COIL AND HOUSING ASSEMBLY
It is not necessary to remove the compressor or dis-connect refrigerant lines to remove or install clutch
parts on the GT, however, the compressor must be
removed from the Opel 1900
- Manta.
Disassembly
1. Disassemble clutch drive plate.
2. Using No. 26 Truarc pliers (J-6435) remove bear-ing to head retainer ring (see Figure
9B-116).Figure
9B-1 16 Removing or Installing Bearing to
Head Retainer Ring3. Place puller pilot (J-9395) on,hub of front head
and take off pulley assembly (see Figure
9B-117),using pulley puller (J-8433).
Puller pilot (J-9395) must be used. If force is exertedon shaft, damage will result to the internal parts of
the compressor.4. Remove bearing to pulley retaining ring with a
small screwdriver (see Figure
9B-118).5. Drive out bearing (see Figure
9B-119) by use of
puller Pilot (J-9398) and Handle (J-8092).
Do not take out pulley bearing unless it is going to
be replaced as removal may damage bearing.6. Mark position of coil and housing assembly in
relationship to shell of compressor, remove coil and
housing retainer ring (see Figure
9B-120) using No.
Page 578 of 625

REFRIGERANT COMPONENTS ALL MODELS96.69
J-9481\J-8092
/BEARING
Disassembly of Rear Head, Oil Pump, Rear
Discharge Valve Plate, and Rear Suction Valve
Reed Disc
If compressor is not going to be disassembled any
further than removal of rear head, oil pump, rear
discharge valve plate, or rear suction valve reed disc,
omit Steps “1, 2 and
4”.
1. Disassemble clutch drive plate and shaft seal.
2. Disassemble pulley assembly, and coil and hous-
ing assembly.
3. Clean surface of compressor shell and dry with
compressed air.
4. Remove compressor from holding fixture
(J-
9396), unscrew drain screw. Drain, measure and re-
cord amount of oil in compressor.
Figure
98-121 Installing Bearing into Pulley Assembly 5. Reinstall compressor in holding fixture (J-9396)
positioned as shown in Figure 9B-123.
Figure SB-122 Installing Pulley Assembly
6. Reassemble clutch drive plate.
DISASSEMBLY AND REASSEMBLY OF INTERNAL
PARTS OF COMPRESSOR AND LEAK TESTING
COMPRESSOR
A clean work area and a place for each part removed
is required to properly disassemble and reassemble compressor. The internal parts of the compressor
must be kept free of dirt or foreign material.
When working with compressor, under no circum-
stances should compressor be rested on pulley end.
PRESSURE
Figure 96.123 Compressor Installed in Holding
Fixture
6. Unscrew and discard four lock nuts from rear of
compressor, and lift off rear head by tapping it with
a mallet. If Teflon sealing surface is damaged (see
Figure
9B-124), replace rear head. Clean or replace
suction screen as necessary.
7. Pencil mark top side of both oil pump rotors and
lift out rotors. Replace both oil pump inner and outer
rotors if one or both are damaged or worn.
Page 589 of 625

96-80 1973 OPEL SERVICE MANUAL
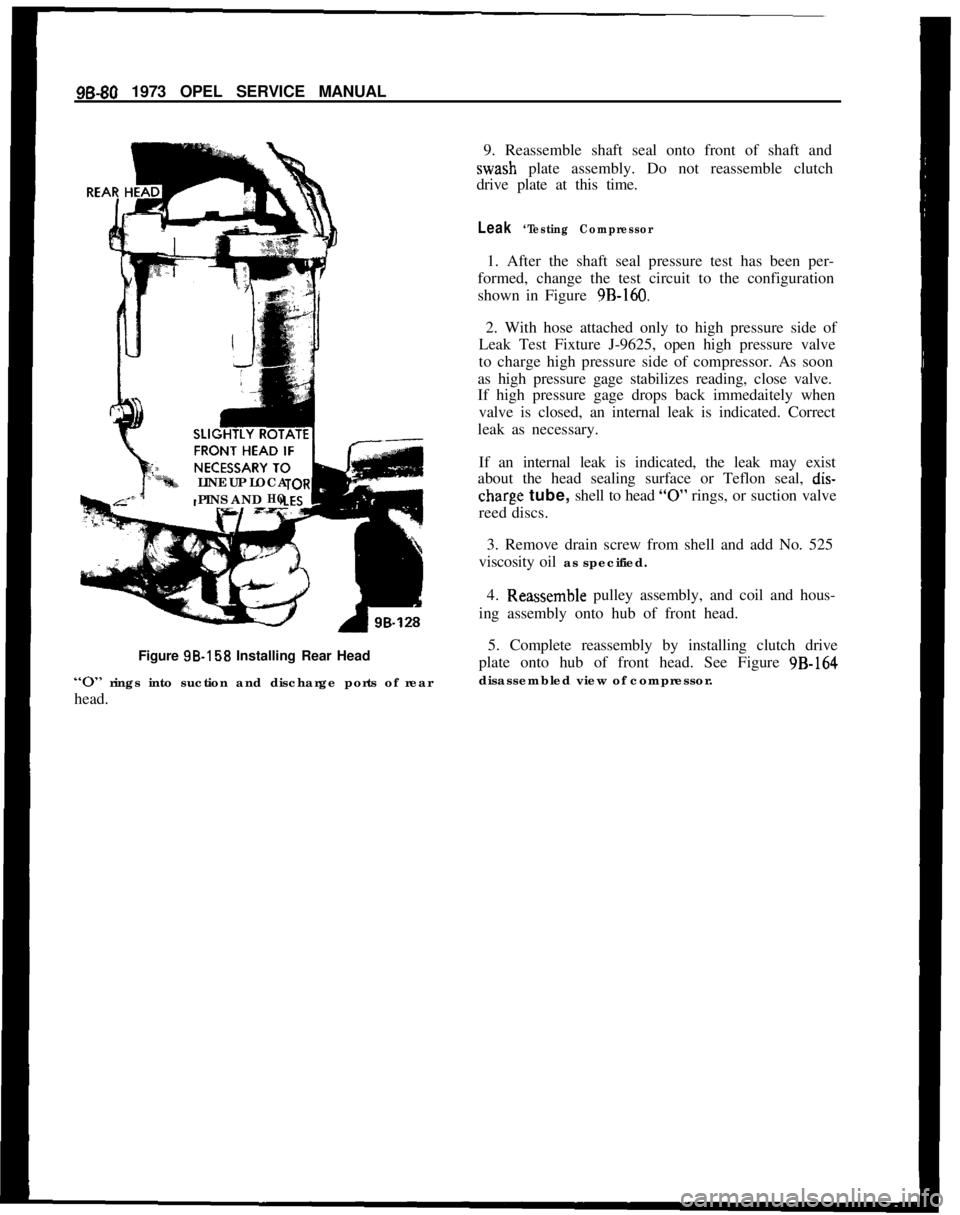
LINE UP LOCA
PINS AND
HOFigure SB-158 Installing Rear Head
“0” rings into suction and discharge ports of rear
head.9. Reassemble shaft seal onto front of shaft andwash plate assembly. Do not reassemble clutch
drive plate at this time.
Leak ‘Testing Compressor1. After the shaft seal pressure test has been per-
formed, change the test circuit to the configuration
shown in Figure 9B-160.
2. With hose attached only to high pressure side of
Leak Test Fixture J-9625, open high pressure valve
to charge high pressure side of compressor. As soon
as high pressure gage stabilizes reading, close valve.
If high pressure gage drops back immedaitely when
valve is closed, an internal leak is indicated. Correct
leak as necessary.
If an internal leak is indicated, the leak may exist
about the head sealing surface or Teflon seal,
dis-
charg,e tube, shell to head “0” rings, or suction valve
reed discs.
3. Remove drain screw from shell and add No. 525
viscosity oil as specified.
4.
R~eassemble pulley assembly, and coil and hous-
ing assembly onto hub of front head.
5. Complete reassembly by installing clutch drive
plate onto hub of front head. See Figure 9B-164
disassembled view of compressor.
Page 591 of 625

r98-82 1973 OPEL SERVICE MANUAL
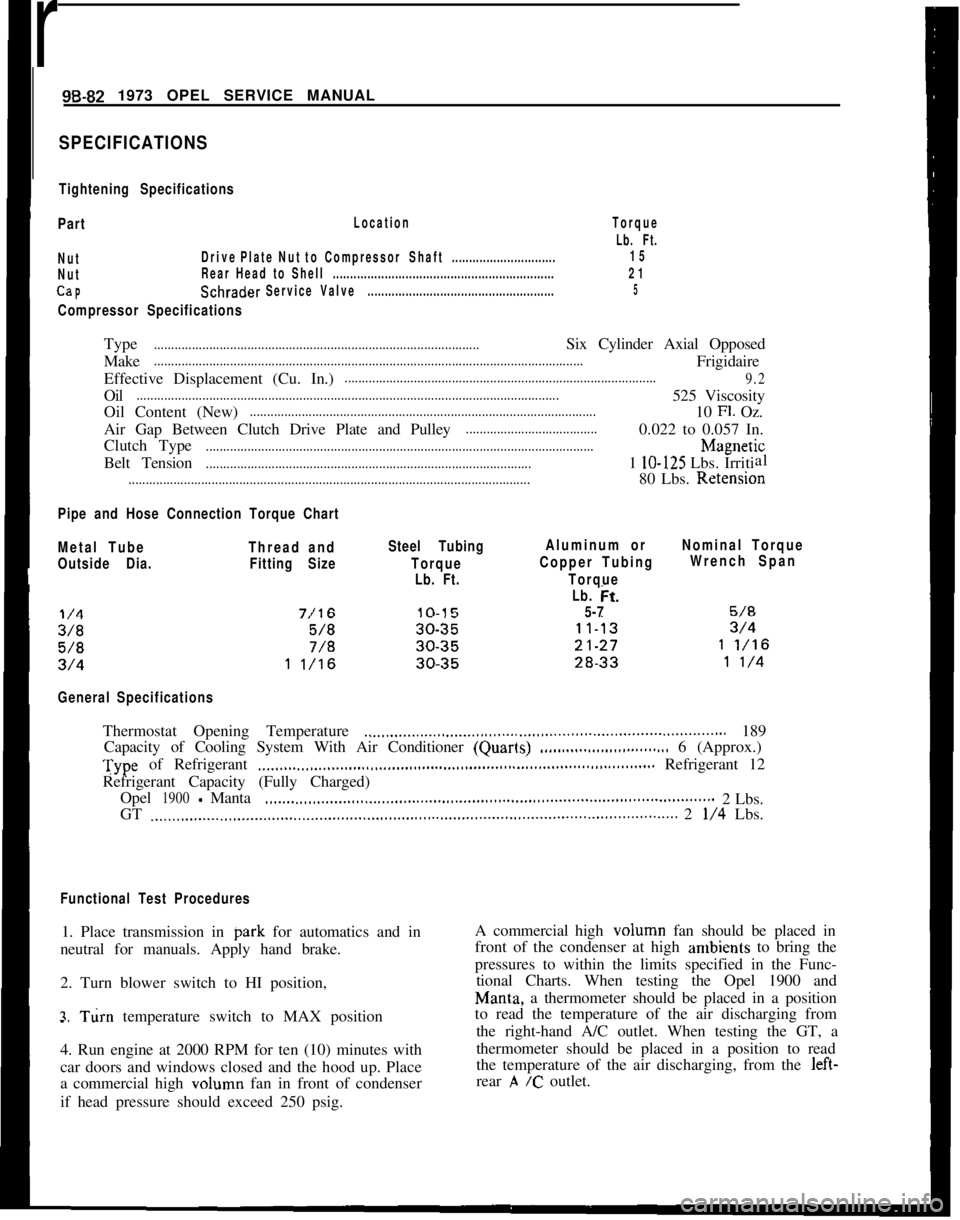
SPECIFICATIONS
Tightening Specifications
Part
Location
NutDrivePlateNut toCompressorShaft..............................
NutRear Head to Shell................................................................
CaPSchraderServiceValve......................................................
Compressor Specifications
Torque
Lb. Ft.
15
21
5Type
..............................................................................................Six Cylinder Axial Opposed
Make
............................................................................................................................Frigidaire
Effective Displacement (Cu. In.)
..........................................................................................
9.2Oil
..........................................................................................................................525 Viscosity
Oil Content (New)
....................................................................................................10 Fl. Oz.
Air Gap Between Clutch Drive Plate and Pulley
......................................0.022 to 0.057 In.
Clutch Type
................................................................................................................h4agnetic
Belt Tension
..............................................................................................1 lo-125 Lbs. Irritial
....................................................................................................................80 Lbs. Retension
Pipe and Hose Connection Torque Chart
Metal TubeThread andSteel TubingAluminum orNominal Torque
I
Outside Dia.Fitting SizeTorqueCopper TubingWrench Span
Lb. Ft.Torque
Lb. tit.
5-7
General SpecificationsThermostat Opening Temperature
.._.....,,,...__....,,.............................................................. 189
Capacity of Cooling System With Air Conditioner (Quarls)
.,,..___....___............... 6 (Approx.)Type of Refrigerant
.___,,,._...,.,,,.__.....,,,.......,,,,.......,,,...................,,,......,,,............ Refrigerant 12
Refrigerant Capacity (Fully Charged)
Opel
1900-Manta,,._....,,,,._...._.,,,,.......,,,........,,............................................................2 Lbs.
GT
,..__..,..,..__..,,,.......,,,,.......,,,........,,,.,......,,,,,......,,.,,........,,.......,,..........,,............... 2 l/4 Lbs.
Functional Test Procedures1. Place transmission in park for automatics and in
neutral for manuals. Apply hand brake.
2. Turn blower switch to HI position,
3. Turn temperature switch to MAX position-.
4. Run engine at 2000 RPM for ten (10) minutes with
car doors and windows closed and the hood up. Place
a commercial high volumn fan in front of condenser
if head pressure should exceed 250 psig.A commercial high volumn fan should be placed in
front of the condenser at high ambients to bring the
pressures to within the limits specified in the Func-
tional Charts. When testing the Opel 1900 and
Man& a thermometer should be placed in a position
to read the temperature of the air discharging from
the right-hand A/C outlet. When testing the GT, a
thermometer should be placed in a position to read
the temperature of the air discharging, from the left-
rear
,A /c outlet.
Page 592 of 625

REFRIGERANT COMPONENTS ALL MODELS9B- 83
FUNCTIONAL TEST - OPEL 1900.
MANTA
Temp. of Air Entering
Cond.
Engine RPM
Camp. Head Pressure*
Suction Press.’
Discharge Air Temperature*
*When compressor clutch disengages,
FUNCTIIONAL TEST - GT
Temp. of Air Entering Cond.
Engine RPM
Camp. Head Pressure”
Suction Press.”
Discharge~Air Temperature*
“When compressor clutch disengages70
8090100110
20002000200020002000
155.165195.205200-210
250.260270.280
1922222729
38-4340.4542-47
45-5047-52
708090100110
2000
2000200020002000
125.135145.155180-190
210-220150.260
1720202224
37-42
38.4339-4440-4545-50
Page 594 of 625

REFRIGERANT COMPONENTS ALL MODELSSB- 85
123 45 6 7a910 11 12 131415 lb1718 19
_202122232425 26 272a2930313233 34 35 3b
I. Rear Head13. Coil and Housing
Assemblv
2. Rear Head to Shell “0” Ring
3. Rear Discharge Valve Plate14. coil Housiq Retaining Ring25. Thrust Race
4. Rear Suction Reed Plate
15. Pulley and Bearing Assembly26. Thrust &zarin~27.16. Pulley BearingThrust Race
28.
5.
PistonRingCompressor Shell6. Piston Drive Ball17. Pulley Bearing Retainer Ring
18. Pulley and
Bearing Retainer Ring29. Cylinder Assembh30.Shaft Seal
7. Ball Seat (Shae Disc)
8. Piston
19. Clutch Hub and Drive Plate Assembly 31. Shaft Seal Seat “0” Rjn820. Oil Pump Gears
32. Shaft Seal sear
9. Front Suction Reed Plate
10. Front Discharge Valve Plate21. Mainshaft
Bearing (Rear)
22. Oil inlet Tube “0” Ring33. Shaft Seal Seat Rrrainer Ring
11. Fr&t Head to Shell “0” Rin8 23. Oil Inlet Tube34. Spacer
12. Front Head24. Wobble
(Skash) Plate and Mainshaft35. Clutch flub Retainer Ring36:Shaft Nut
Assembly98.131Figure 98.162 Compressor Section View
Page 599 of 625

AIR CONDITIONER SYSTEM -OPEL 1900 - MANTA9B- 91FAN DOES NOT RUN Correct electrical fault.
FAN RUNS
- Check air velocity.
NOT OK Clean evaporator inlets.
Clean evaporator core.
Clean evaporator outlets.
OK Check refrigeration (refer to Refrigeration
Diagnosis Guide).
MAINTENANCE AND ADJUSTMENTS
ADJUSTMENT OF THERMOSTATIC SWITCHThe system makes use of a thermostatic switch with
a self-supporting air sensing capillary. This capillary
controls the switch by sensing the temperature of the
air leaving the evaporator fins.
Checking for Proper Operation
I. Install the gauge set and set up the vehicle as
described under FUNCTIONAL TESTING SYS-
TEM iti Refrigerant Components Section.
2. Movement of the temperature control knob
should result in a definite change in suction pressure
and cycling of the compressor clutch.
3. If compressor continues to operate regardless of
the knob adjustment, it indicates that the switch
points are fused, which will lead to evaporator
freeze- up. The switch should be replaced.
Adjusting Switch
If, after ihe foregoing checks, the switch seems to be
operating correctly, adjust for proper setting if neces-
sary, as
~follows:1. Set up car as described in FUNCTIONAL
TESTING SYSTEM in Refrigerant Components
Section.2. The suction side of the system, read on the low
pressure gauge, should pull down to the pressure
shown in the chart in SPECIFICATIONS in Refrig-
erant Components Section.
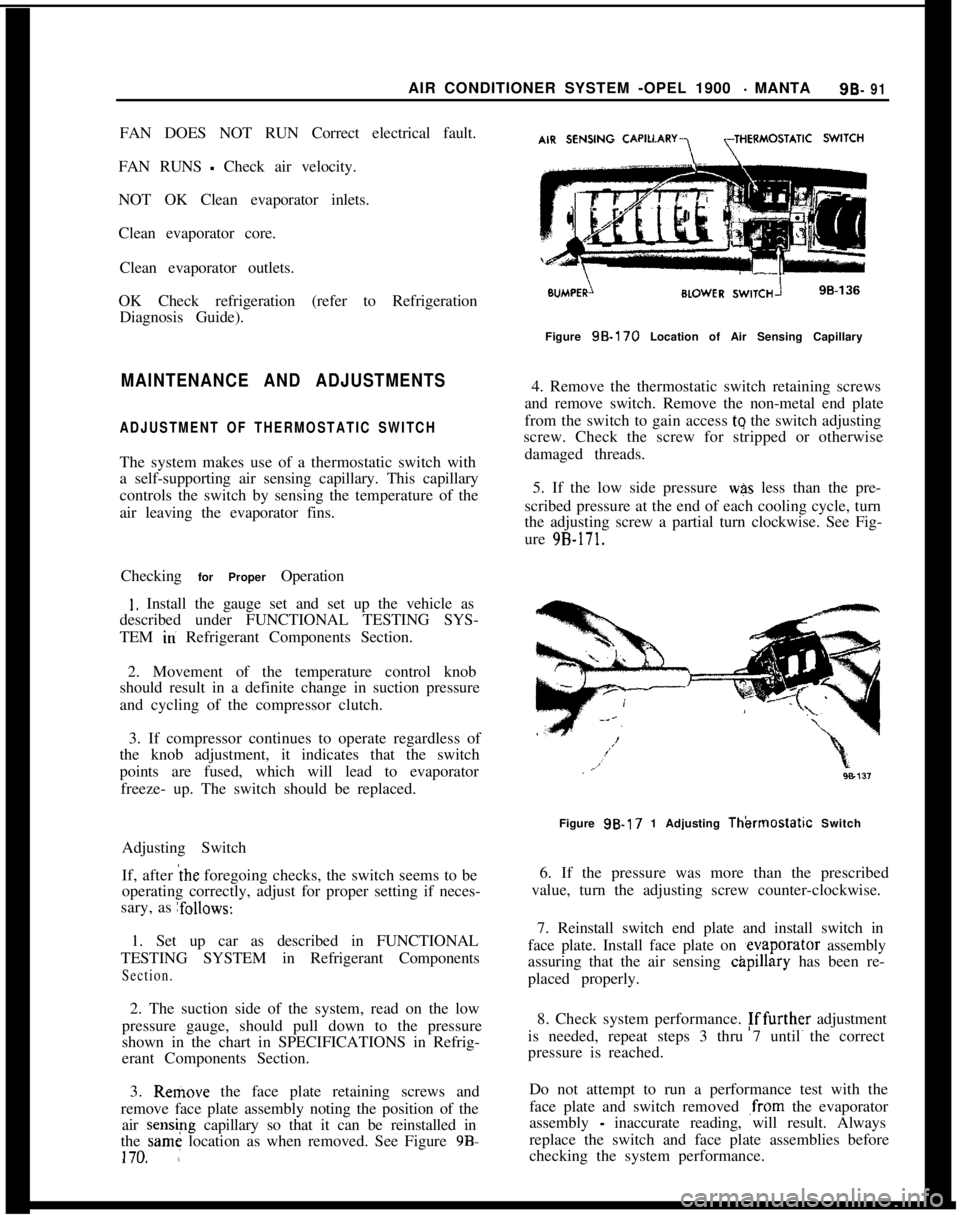
3. Remove the face plate retaining screws and
remove face plate assembly noting the position of the
air sensipg capillary so that it can be reinstalled in
the same location as when removed. See Figure 98.170. ,:Figure
98.170 Location of Air Sensing Capillary
4. Remove the thermostatic switch retaining screws
and remove switch. Remove the non-metal end plate
from the switch to gain access tq the switch adjusting
screw. Check the screw for stripped or otherwise
damaged threads.
5. If the low side pressure
was less than the pre-
scribed pressure at the end of each cooling cycle, turn
the adjusting screw a partial turn clockwise. See Fig-
ure
9B-171.Figure 9B-17 1 Adjusting
Thkmosfatic Switch
6. If the pressure was more than the prescribed
value, turn the adjusting screw counter-clockwise.
7. Reinstall switch end plate and install switch in
face plate. Install face plate on ,evaporator assembly
assuring that the air sensing
c&pillary has been re-
placed properly.
8. Check system performance. Fffurther adjustment
is needed, repeat steps 3 thru 7 until the correct
pressure is reached.
Do not attempt to run a performance test with the
face plate and switch removed
,from the evaporator
assembly
- inaccurate reading, will result. Always
replace the switch and face plate assemblies before
checking the system performance.