light OPEL GT-R 1973 Service Manual
[x] Cancel search | Manufacturer: OPEL, Model Year: 1973, Model line: GT-R, Model: OPEL GT-R 1973Pages: 625, PDF Size: 17.22 MB
Page 555 of 625
98-46 1973 OPEL SERVICE MANUAL
shut off vacuum pump. Open refrigerant control
valve and allow some refrigerant to enter system.
Locate and repair all leaks.
7. After evacuating for 15 minutes, add l/2 lb. of
refrigerant to system. Purge this
l/2 lb. and reevacu-
ate for 15 minutes. This second evacuation is to be
certain that as much contamination is removed from
the system as possible.
8. Only after evacuating as above, system is ready
for charging. Note reading on sight glass of charging
cylinder. If it does not contain a sufficient amount
for a full charge, till to proper level.
9. Close low pressure valve on charging station.
Fully open station refrigerant control valve and al-
low all liquid refrigerant to enter system. When full
charge of refrigerant has entered system, turn off
refrigerant control valve and close both hand shut-
off valves.
10. If full charge of refrigerant will not enter system,
close high pressure control and refrigerant control
valves. Start engine and run at low idle with com-
pressor operating. Crack refrigerant control valve
and low pressure control on station. Watch low side
gauge and keep gauge below 50 psi by regulating
refrigerant control valve. Closing valve will lower
pressure. This is to prevent liquid refrigerant from
reaching the compressor while the compressor is op-
erating. When required charge has entered system,
close refrigerant control valve and close low pressure
control.
11. System is now charged and should be perform-
ance- tested before removing gauges.
Adding Refrigerant
The following procedure should be used in adding
small amounts of refrigerant that may have been lost
by leaks or while opening system for servicing the
compressor. Before adding refrigerent to replace that
lost by leaks, check for evidence of oil loss and add
oil if necessary.
This procedure will only apply if the air inlet temper-
ature is above 70 degrees F. at the condenser.
1. Remove caps from compressor gauge fittings.
Attach gauge set to gauge fittings, making sure
adapter (J- 5420) is between low pressure gauge hose
and suction gauge fitting, and J-9459 is between high
pressure gauge hose and discharge gauge fitting.
2. Start engine, turn air conditioning temperature
control knob to full cold position, blower switch to
Max Hi. Operate for ten
(IO) minutes at 2000 RPM
to stabilize system.
3. Observe the refrigerant through the sight glasscover of receiver-dehydrator with the system operat-
ing,
IO see if there are any bubbles evident.
a. If no bubbles are evident, then bleed system slowly
through the discharge valve until bubbles appear in
the receiver-dehydrator. Add 1 lb. of refrigerant as
explained under “Charging the
ISystem”.b. If bubbles are visible in the receiver-dehydrator
with the temperature control krlob in the full cold
position and the blower at MAX speed, it indicates
a partial or complete plug in a line, a shortage of
refrigerant, or both. Correct condition. Add refriger-
ant
u~ntil the sight glass clears, then add another 1 lb.
of refrigerant.
4. Attach flexible hose from center fitting of gauge
set loosely to refrigerant drum or on disposable can
valvxs. Open high and low pressure valves on the
gauge set slightly to purge pressure gauge lines of air.
Tighten fitting of refrigerant drum or can when satis-
fied ihat all air has been removed from gauge lines.
Close (clockwise) both hand shut-off valves or gauge
set.5. Partially charge system.
REFRIGERANT DRUM METHOD:
A. Place pail containing hot water that does not have
a temperature exceeding 125 degrees F. on scales,
place refrigerant drum in pa” containing water, note
weig,ht and only open low pressure valve on gauge
set.B. Start engine, turn temperature control knob to full
cold position and place blower switch in Max Hi.
Operate engine for 10 minutes at 2000 RPM to sta-
bilize system.
C. With compressor operating, slowly open valve on
refrigerant drum and allow refrigerant to flow into
system (through manifold gauge set) until liquid in-
dicator clears up and immediately shut off valve ai
gauge set or on refrigerant drum. Check weight of
refrigerant drum and pail of water. Then slowly open
valve on gauge set (or refrigerant drum) and add one
more lb. of refrigerant. Note total amount of refriger-
ant added.
DISPOSABLE CAN METHOD:
A. Make sure the outlet valve on the J-6271 valve is
fully clockwise and attach the J-6271 to a 1 lb. can
of refrigerant by backing off the valve from the top
of the retainer, slipping the valve onto the can and
turning the valve into the retainer until tight. DO
NOT accidentally open outlet valve during this oper-
ation, as turning the valve into the retainer punctures
the top of the can to make it ready for charging.
.
Page 563 of 625

96-54 1973 OPEL SERVICE MANUAL
valve. The filter screen at the inlet port may be re-
placed. Remove screen by threading a lo-32 NF
screw into old filter screen. With a washer and a nut
on the screw arranged to work as a puller screw, hold
the body of the screw and turn the nut. Insert the
new filter screen into the inlet port and lightly tap
screen only enough to seat.
1. Install expansion valve using new o-rings during
installation. Lubricate o-rings prior to installation
using No. 525 viscosity oil.
2. Install evaporator assembly and case attaching
screws. See Figure 9B-70.3. Install blower motor assembly into case and se-
cure with attaching screws. See Figure
9B-69.4. Install finger guard shields and fan housing case.
See Figure
9B-69.5. Install resistor assembly and electrical connector.
Install blower motor connector. See Figure
9B-69.6. Install assembly into car carefully guiding
evaporator pipes up through cowl opening. See Fig-
ure
9B-71.Figure 93-7 1 Inlet and Outlet Pipes and O-Rings
-Opel 1900 Manta
7. Install two (2) upper attaching evaporator at-
taching nuts. See Figures 9B-66 and
9B-67.8. Install two (2) attaching case mounting bracket
to instrument panel screws. See Figure
9B-67.9. Connect two (2) drain hoses underneath evapora-
tor.10. Install evaporator inlet and outlet pipes retainer
and rubber grommet. See Figure
9B-65.11. Connect vacuum cut-off switch and electrical
wiring, making sure the delay restrictor and checkvalve hoses are installed correctly. See Figures
9B-63and 64.
.gB-72 Delay Restrictor and Check Valve Hose.Assembly
12. Install refrigerant hoses and pipes using new
o-rings on line fittings and evacuate system. Refer to
EVACUATING SYSTEM.
13. While system is being evacuated, install in-line
fuse and left side of distributor duct. See Figure 9B-
61.14. Install glove box.
15. Install negative battery cable and charge system.
Refer to CHARGING SYSTEM.
REMOVAL AND INSTALLATION OF CONDENSER
ASSEMBLY -OPEL 1900. MANTA
Removal
1. Remove negative battery cable from battery.
2. Remove air cleaner.
3. Discharge system. Refer to DISCHARGING
SYSTEM.
4. While system is discharging, remove lower radia-
tor hose from radiator and drain coolant into a suita-
ble container.
5. Remove fan shroud.
6. On vehicles with automatic transmission, un-
screw oil lines from connectors on lower radiator
tank and plug lines. It is essential that no dirt enters
the oil lines. When unscrewing oil lines, hold connec-
tors on lower radiator tank with pliers to avoid leak-
ages. Ensure that no dirt enters oil cooler.
7. Remove upper radiator hose from radiator.
8. Remove lower attaching nut and slide radiator
upward and out of engine compartment.
9. Remove inlet and outlet hoses from condenser
Page 565 of 625
98-56 1973 OPEL SERVICE MANUAL
oil cooler lines to lower radiator tank. It is essential
that no dirt enters the oil lines. When tightening oil
lines hold connectors on lower radiator tank with
pliers to avoid leakages. Ensure that no dirt enters oil
cooler. Torque to 11-15 Ibs. ft.
7. Install fan shroud.
8. Install upper radiator hose.
9. Install lower radiator hose and add collected coo-
lant.
All Opel
1900’s and Manta’s are provided with a
radiator initial fill of an anti-freeze solution contain-
ing corrosion inhibitor. The anti-freeze has either a
glycol or glycerin base and protects the engine
against freezing, down to minus 22 degrees F. (minus
30 degrees C.). Before the start of the cold season,
coolant must be checked with a hydrometer and if
necessary, brought to the necessary specific gravity
by adding anti-freeze. Anti-freeze added, must have
a glycol or glycerin base. As the specific gravities of
all anti-freeze solutions having a glycol or glycerin
base are practically the same, the hydrometer can be
used for all these types. Because of the tolerances of
the hydrometer, or slight differences in specific
gravity, variations of plus or minus 5 degrees can be
expected. Coolant must be checked at a temperature
of plus 68 degrees F. (plus 20 degrees C.).
IO. Install negative battery cable and air cleaner.
11. Charge system. Refer to CHARGING SYS-
TEM.
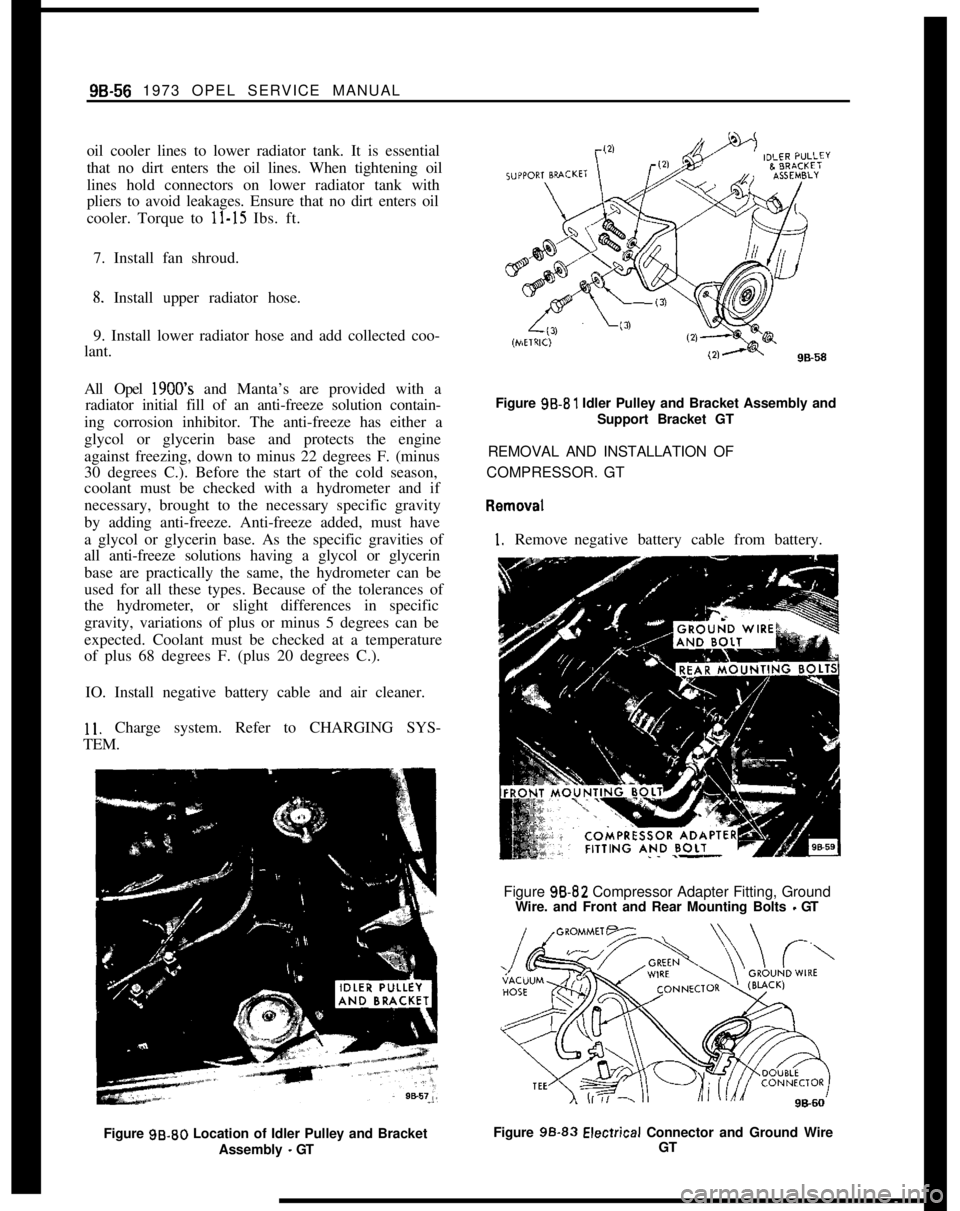
Figure 99.80 Location of Idler Pulley and Bracket
Assembly
- GTFigure 99.81 Idler Pulley and Bracket Assembly and
Support Bracket GT
REMOVAL AND INSTALLATION OF
COMPRESSOR. GT
I. Removenegative battery cable from battery.
Figure 98-82 Compressor Adapter Fitting, Ground
Wire. and Front and Rear Mounting Bolts
- GT
Figure 99.83
Elecirical Connector and Ground Wire
GT
Page 570 of 625

REFRIGERANT COMPONENTS ALL MODELS96.61
CAPILLARY T”BEFigure 98.95 Evaporator and Expansion Valve
Assembly GT
valve from refrigerant lines, and tape closed open
ends of lines and inlet and outlet ports of expansion
valve.
Installation5. Install resistor assembly.
6. Install evaporator assembly into car and install
mounting bracket. See Figure
9B-96.Figure 98.96 Evaporator and Blower Assembly
- GT
If expansion valve or refrigerant lines have been ex-
posed to
,the atmosphere for any amount of time and
moisture may have entered the valve or the system,
flush the system and install new receiver-dehydrator
or valve as necessary.7. Untape the refrigerant lines and the inlet and
outlet pipes from the evaporator and install using
new o-rings on line fittings.
Due to the possible adjustment difficulties involved
if the expansion valve is disassembled, disaisembly of
the valve is not recommended. The valve may be
cleaned by submerging it in a bath of trichlorethy-
lene, alcohol, or similar solvent. Dry by blowing iil-tered compressed air through the outlet port of the
valve. The filter screen at the inlet port may be re-
placed. Remove screen by threading a lo-32 NF
screw intp old filter screen. With a washer and a nut
on the screw arranged to work as a puller screw, hold
the body of the screw and turn the nut. Insert the
new filter screen into the inlet port and lightly tap
screen only enough to seat.
1. Install expansion valve using new o-rings during
installation. Lubricate o-rings prior to installation
using No. 525 viscosity oil.
2. Install evaporator assembly and case attaching
screws.
3. Install blower motor assembly into case and se-
cure with attaching screws.
4. Install finger guard shields and fan housing case.Figure 98-97 Refrigerant Hoses and Hose Clamps
Under Car
- GT
Page 582 of 625
REFRIGERANT COMPONENTS ALL MODELS9B- 73
F
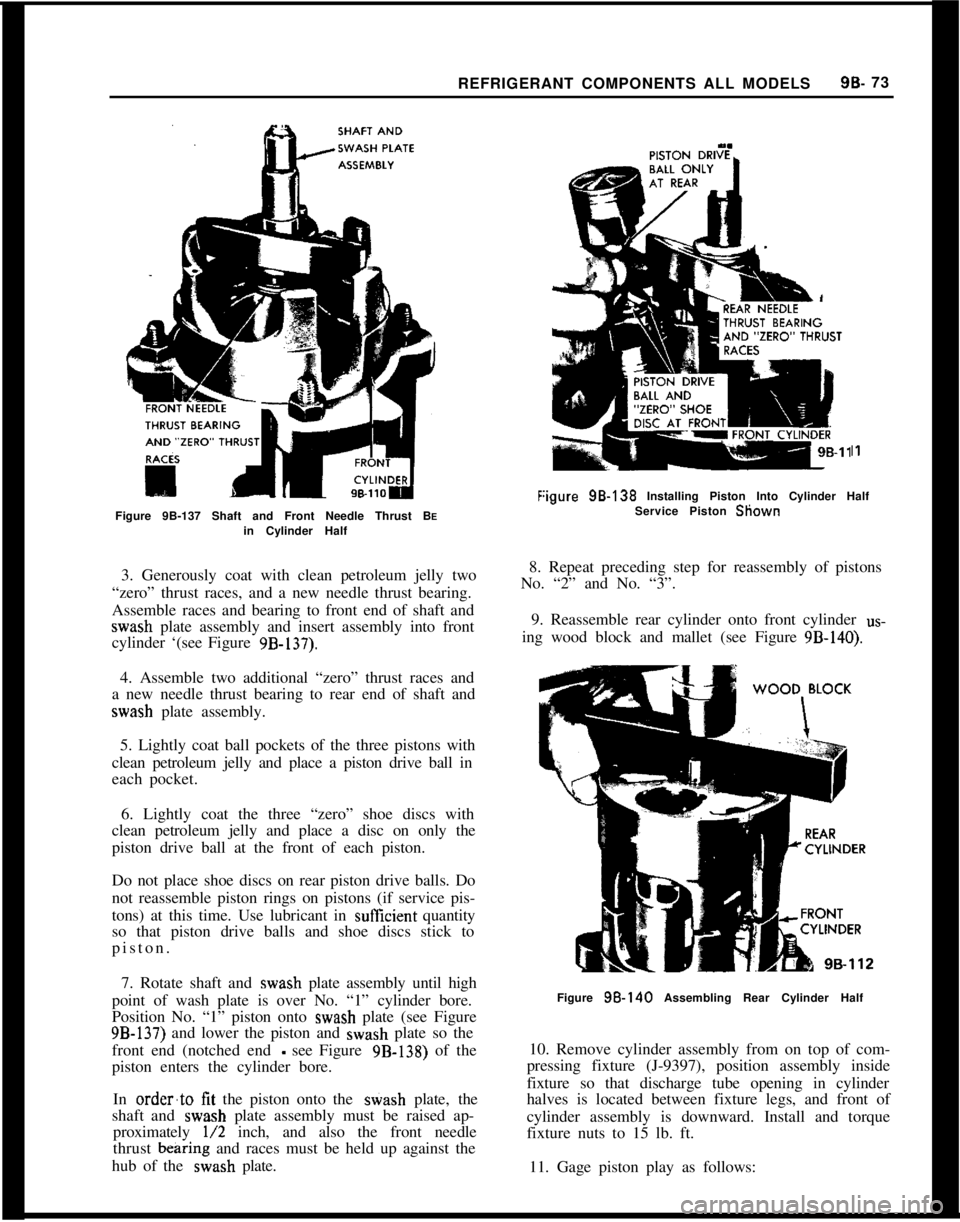
Figure 9B-137 Shaft and Front Needle Thrust BEin Cylinder Half
I1
:igure 98.138 Installing Piston Into Cylinder Half
Service Piston Sliown
3. Generously coat with clean petroleum jelly two
“zero” thrust races, and a new needle thrust bearing.
Assemble races and bearing to front end of shaft and
wash plate assembly and insert assembly into front
cylinder ‘(see Figure
9B-137).
8. Repeat preceding step for reassembly of pistons
No. “2” and No. “3”.
9. Reassemble rear cylinder onto front cylinder
us-
ing wood block and mallet (see Figure 9B-140).
4. Assemble two additional “zero” thrust races and
a new needle thrust bearing to rear end of shaft and
wash plate assembly.
5. Lightly coat ball pockets of the three pistons with
clean petroleum jelly and place a piston drive ball in
each pocket.
6. Lightly coat the three “zero” shoe discs with
clean petroleum jelly and place a disc on only the
piston drive ball at the front of each piston.
Do not place shoe discs on rear piston drive balls. Do
not reassemble piston rings on pistons (if service pis-
tons) at this time. Use lubricant in
sufEcient quantity
so that piston drive balls and shoe discs stick to
piston.
7. Rotate shaft and
wash plate assembly until high
point of wash plate is over No. “1” cylinder bore.
Position No. “1” piston onto
wash plate (see Figure
9B-137) and lower the piston and wash plate so the
front end (notched end
- see Figure 9B-138) of the
piston enters the cylinder bore.
In
order’to tit the piston onto the stiash plate, the
shaft and
wash plate assembly must be raised ap-
proximately
l/2 inch, and also the front needle
thrust
bearing and races must be held up against the
hub of the
wash plate.
Figure 98.140 Assembling Rear Cylinder Half
10. Remove cylinder assembly from on top of com-
pressing fixture (J-9397), position assembly inside
fixture so that discharge tube opening in cylinder
halves is located between fixture legs, and front of
cylinder assembly is downward. Install and torque
fixture nuts to 15 lb. ft.
11. Gage piston play as follows:
Page 585 of 625
9B-76 1973 OPEL SERVICE MANUAL
race. If, for example a feeler gage reading of 0.009
inch results, a thrust race with a number “9”,
stamped on it should be selected.Thrust Race TableSERVICEID NO.THICK-
PART NO. ON RACE
NESS
6556000
0.0920
6556050
5.09656556055
5l/2.09706556060
6.0975
65560656
l/2.09806556070
7.0985
6556075
7l/2.09906556080
8.0995
6556085
8l/2.lOOO6556090
T/2,100s
65560959.lOlO
655610010,101s
655610510 l/2.10206556110
.10256556115
11111/2.10306556120
12.1035The selected thrust race will replace only the “zero”
outer rear thrust race. The remaining three “zero”
thrust races will remain as part of the cylinder assem-
bly.
13. Remove cylinder assembly from inside compress-
ing fixture (J-9397), place on top of compressing
fixture (see Figure 9B-133) and disassemble rear cyl-
inder from front cylinder using rubber mallet or
hammer and wood block.
14. Carefully disassemble one piston at a time from
front cylinder and lay piston, front and rear piston
drive balls and front “zero” shoe disc in respective
slot of parts tray (J-9402). To disassemble, rotatewash plate until piston is at highest point, raise awash plate approximately
l/2 inch and lift out pis-
ton and related parts, one at a time.
15. Remove outer rear ‘?ero” thrust race from shaft
and set it aside for future gaging procedures.
16. Remove previously selected outer rear thrust
race from parts tray, lightly coat with clear pe-
troleum jelly and assemble onto shaft.
Final Reassembly of Cylinder Assembly1. Reassemble piston rings (if service pistons) onto
pistons (ring scraper groove toward center of piston)
and rotate ring so that break or gap in ring can be
squeezed together when piston is being inserted into
cylinder bore.
2. Reassemble piston drive balls, “zero” and se-lected shoe discs onto No. “1” piston, and apply
clear petroleum jelly to piston pockets and shoe discs
so that balls and discs stick to piston. BE SURE to
reassemble balls and shoe discs into their specific
positions on front and rear of piston.
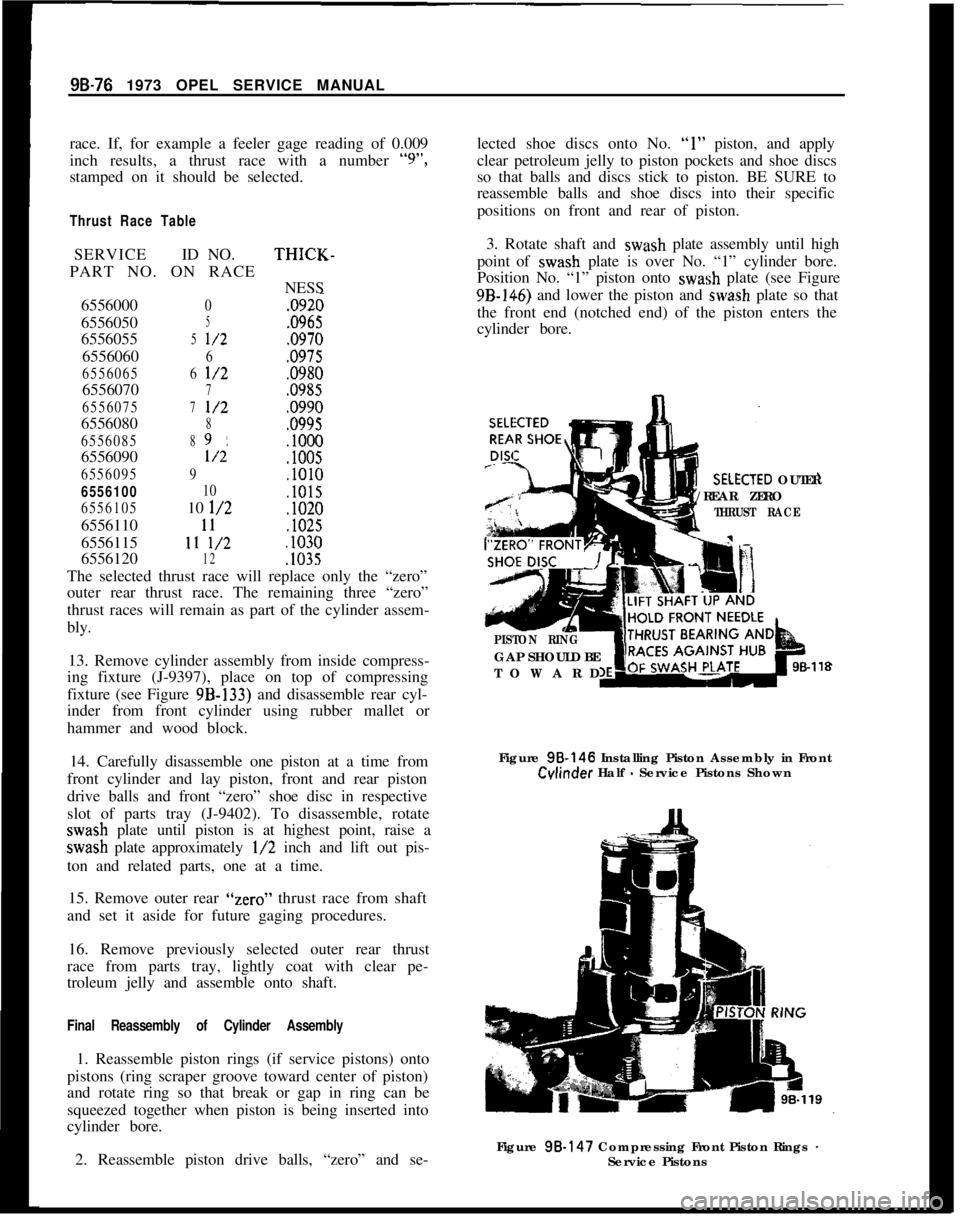
3. Rotate shaft and wash plate assembly until high
point of wash plate is over No. “1” cylinder bore.
Position No. “1” piston onto wash plate (see Figure9B-146) and lower the piston and wash plate so that
the front end (notched end) of the piston enters the
cylinder bore.XTED OUTER
/REAR ZERO
THRUST RACE
PISTON RINGGAP SHOULD BE
TOWARD
98-118Figure 98.146 Installing Piston Assembly in Front
Cvlinder Half - Service Pistons Shown
Figure 98.147 Compressing Front Piston Rings
-Service Pistons
Page 586 of 625
REFRIGERANT COMPONENTS ALL MODELS99.77
In order to tit the piston onto the wash plate and
into the cylinder bore, the wash plate must be raised
approximately l/2 inch, the front needle thrust bear-
ing and races must be held up against the hub of thewash plate, and the service piston rings must be
squeezed together (see Figure
9B-147). Lubricate
cylinder bore, piston assembly and wash plate with
No. 525 viscosity oil to facilitate reassembly.
4. Repeat procedure in Steps 1 and 2 for installation
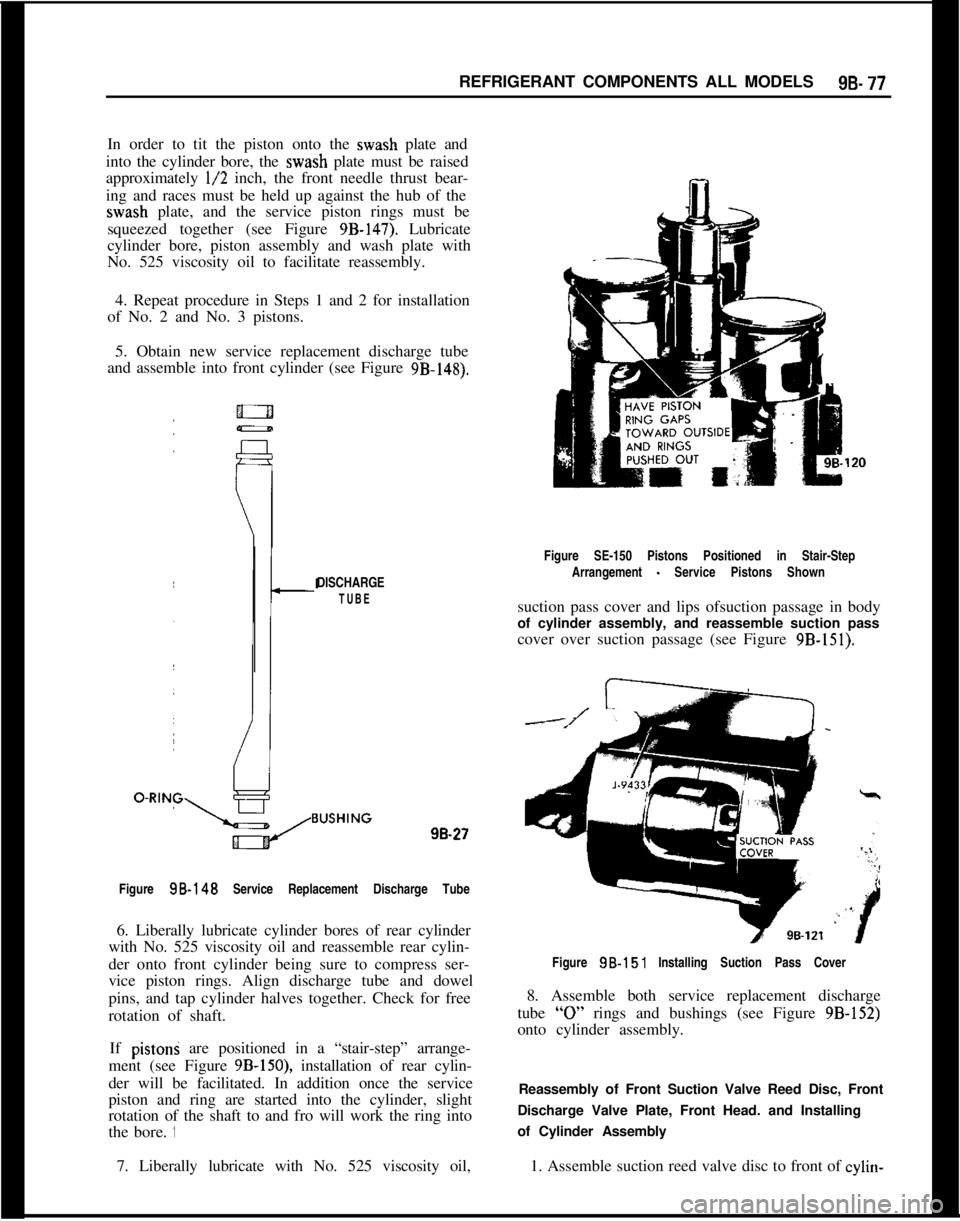
of No. 2 and No. 3 pistons.
5. Obtain new service replacement discharge tube
and assemble into front cylinder (see Figure
9B-148).Figure SE-150 Pistons Positioned in Stair-Step
DISCHARGE
TUBEArrangement
- Service Pistons Shown
suction pass cover and lips ofsuction passage in body
of cylinder assembly, and reassemble suction pass
cover over suction passage (see Figure
9B-151).98.27
Figure
SB-148 Service Replacement Discharge Tube
6. Liberally lubricate cylinder bores of rear cylinder
with No. 525 viscosity oil and reassemble rear cylin-
der onto front cylinder being sure to compress ser-
vice piston rings. Align discharge tube and dowel
pins, and tap cylinder halves together. Check for free
rotation of shaft.
If pistoni are positioned in a “stair-step” arrange-
ment (see Figure
9B-150), installation of rear cylin-
der will be facilitated. In addition once the service
piston and ring are started into the cylinder, slight
rotation of the shaft to and fro will work the ring into
the bore. ‘IFigure
98.151 Installing Suction Pass Cover
8. Assemble both service replacement discharge
tube
“0” rings and bushings (see Figure 9B-152)
onto cylinder assembly.
Reassembly of Front Suction Valve Reed Disc, Front
Discharge Valve Plate, Front Head. and Installing
of Cylinder Assembly
7. Liberally lubricate with No. 525 viscosity oil,1. Assemble suction reed valve disc to front of cylin-
Page 587 of 625
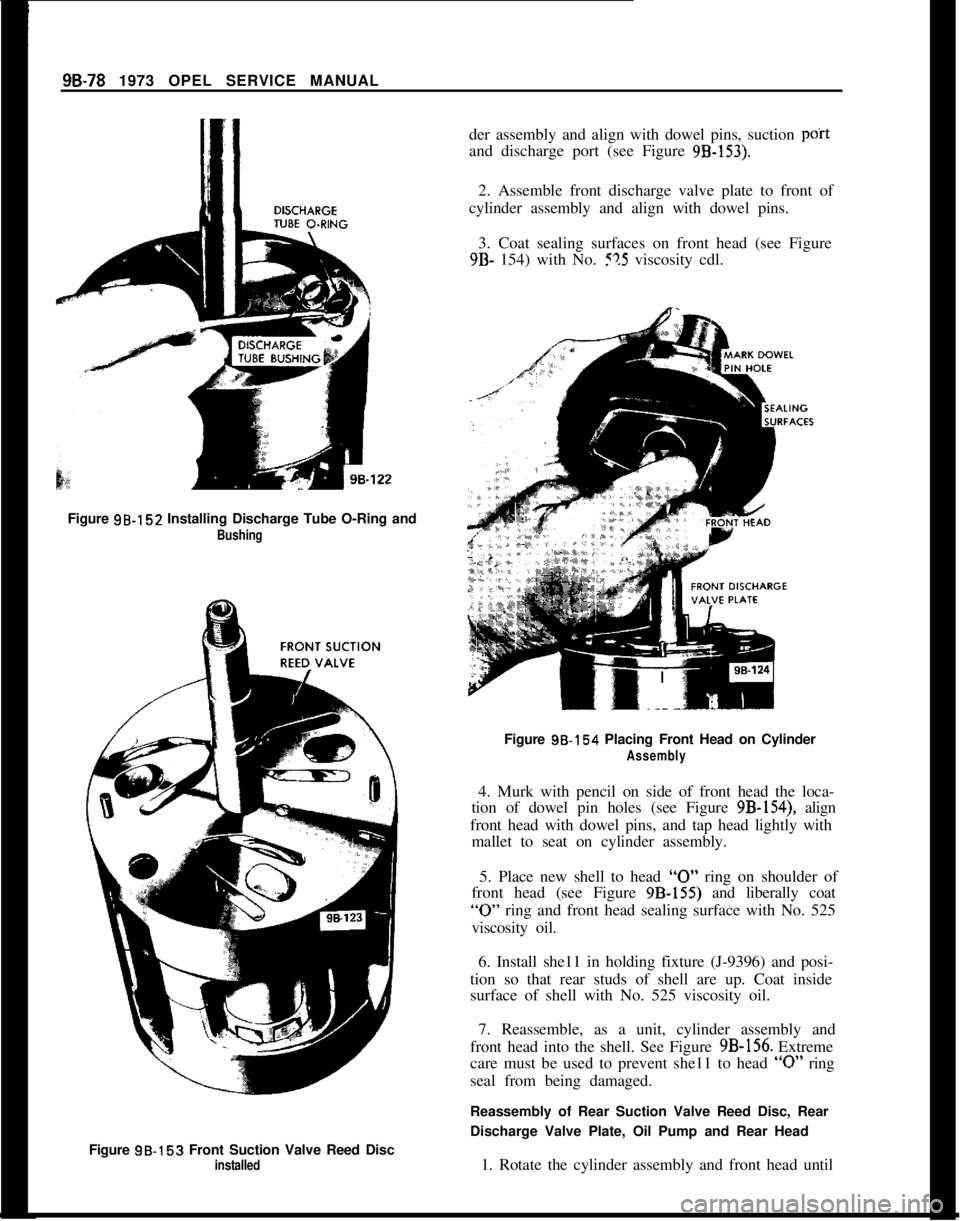
98-78 1973 OPEL SERVICE MANUAL
der assembly and align with dowel pins, suction poitand discharge port (see Figure
9B-153).2. Assemble front discharge valve plate to front of
cylinder assembly and align with dowel pins.
3. Coat sealing surfaces on front head (see Figure9B- 154) with No. !?5 viscosity cdl.
Figure 98.152 Installing Discharge Tube O-Ring and
BushingFigure 98.154 Placing Front Head on Cylinder
Assembly4. Murk with pencil on side of front head the loca-
tion of dowel pin holes (see Figure 9B-154), align
front head with dowel pins, and tap head lightly with
mallet to seat on cylinder assembly.
5. Place new shell to head
“0” ring on shoulder of
front head (see Figure 9B-155) and liberally coat
“0” ring and front head sealing surface with No. 525
viscosity oil.
6. Install she11 in holding fixture (J-9396) and posi-
tion so that rear studs of shell are up. Coat inside
surface of shell with No. 525 viscosity oil.
Figure 9B-153 Front Suction Valve Reed Disc
installed7. Reassemble, as a unit, cylinder assembly and
front head into the shell. See Figure 9B-156. Extreme
care must be used to prevent she11 to head
“0” ring
seal from being damaged.
Reassembly of Rear Suction Valve Reed Disc, Rear
Discharge Valve Plate, Oil Pump and Rear Head
1. Rotate the cylinder assembly and front head until
Page 588 of 625
REFRIGERANT COMPONENTS ALL MODELS9B- 79
HELL TO HEAD
O-RING(BE SURE
INSIDE SHELL
GRASP FRON
Figure SB-156 Installing Front Head and Cylinder
Assembly in Shell
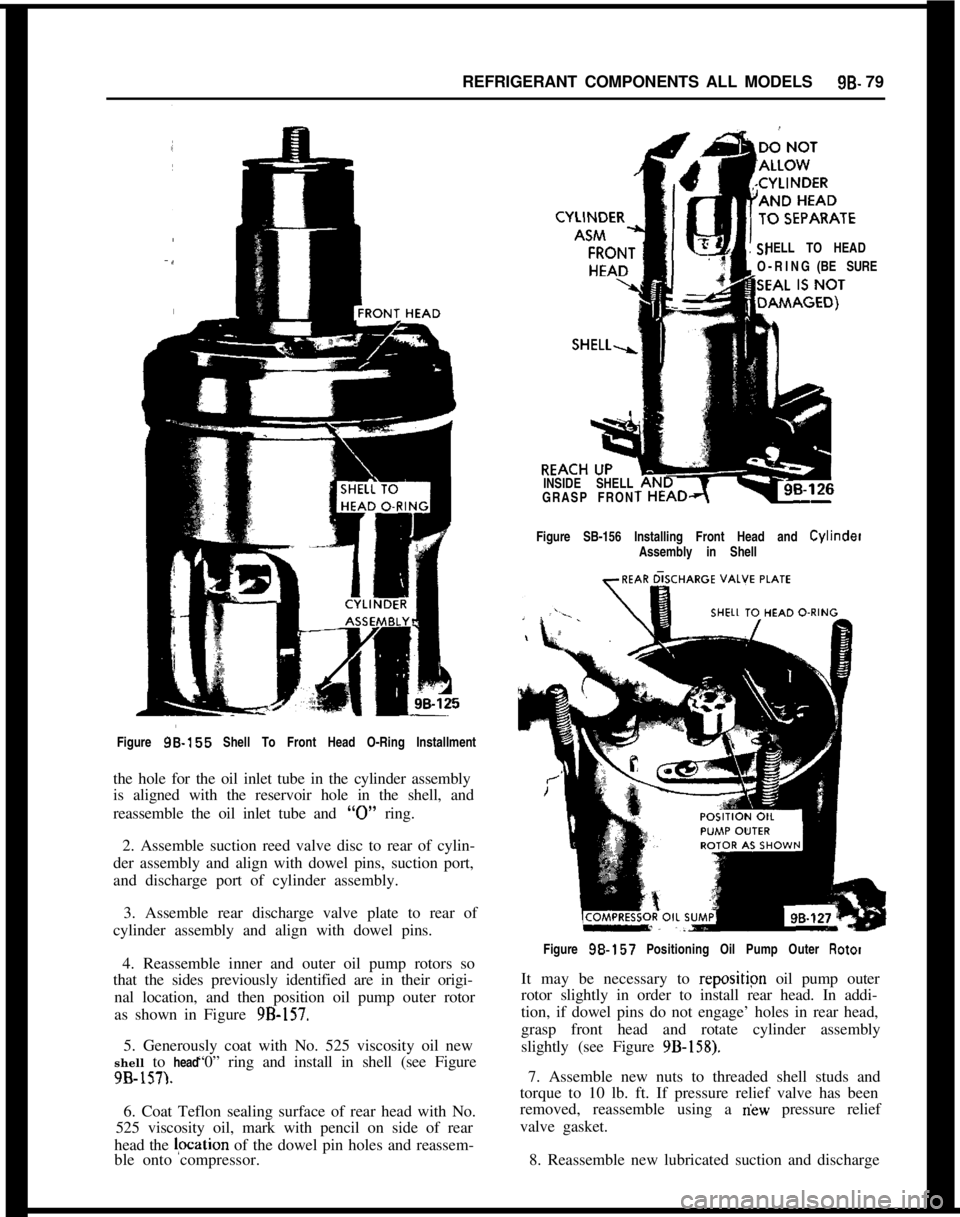
Figure
96-155 Shell To Front Head O-Ring Installment
the hole for the oil inlet tube in the cylinder assembly
is aligned with the reservoir hole in the shell, and
reassemble the oil inlet tube and
“0” ring.
2. Assemble suction reed valve disc to rear of cylin-
der assembly and align with dowel pins, suction port,
and discharge port of cylinder assembly.
3. Assemble rear discharge valve plate to rear of
cylinder assembly and align with dowel pins.
4. Reassemble inner and outer oil pump rotors so
that the sides previously identified are in their origi-
nal location, and then position oil pump outer rotor
as shown in Figure
9B-157.5. Generously coat with No. 525 viscosity oil new
“0” ring and install in shell (see Figure shell to head
9B-157).6. Coat Teflon sealing surface of rear head with No.
525 viscosity oil, mark with pencil on side of rear
head the lpcation of the dowel pin holes and reassem-
ble onto compressor.Figure
98.157 Positioning Oil Pump Outer Rotor
It may be necessary to repositipn oil pump outer
rotor slightly in order to install rear head. In addi-
tion, if dowel pins do not engage’ holes in rear head,
grasp front head and rotate cylinder assembly
slightly (see Figure
9B-158).7. Assemble new nuts to threaded shell studs and
torque to 10 lb. ft. If pressure relief valve has been
removed, reassemble using a
riew pressure relief
valve gasket.
8. Reassemble new lubricated suction and discharge
Page 604 of 625

98.96 1973 OPEL SERVICE MANUALr DARK BLUE
LIGHT BLUE STRIPE
CUTOUT111111DARK GREEN DARK GREEN
,,
I
,\,\
BATTERYl LJ
\flu- +tL-2+- -7- -RESISTOR
A
EXlSilNG‘IWIRE
I
I
IFUSE BLOCK*,*,- I./SWITCH
r
ti‘WIREfIfI
1- IAAI
i$+.-lAC~,‘XESW WIRE
I I
TTEVAPO.RATOREVAPO.RATOR
BLACK WITH RED STRIPE BLACK WITH RED
Sl96-143
Figure 9B-188 Wiring Schematic‘RIPE96-143
Figure 9B-188 Wiring Schematic
SPECIFICATIONS
Blower Motor Type
......................................................................................................12 VDC
Blower Fan Type
..................................................................................................Squirrel Cage