check engine OPEL GT-R 1973 Owner's Guide
[x] Cancel search | Manufacturer: OPEL, Model Year: 1973, Model line: GT-R, Model: OPEL GT-R 1973Pages: 625, PDF Size: 17.22 MB
Page 310 of 625
ENGINE MECHANICAL AND MOUNTS6A- 19
sion. When replacing flywheel use new bolts and
torque to 43 lb.ft.
PISTON, RINGS AND CONNECTING RODS
Removal and Disassembly of Piston
and Rod Assemblies
1. Drain oil.
2. Remove oil pan. 3. Remove cylinder head.
4. Examine the cylinder bores above the ring travel.
If bores are worn so a ridge exists, remove the ridges
with a ridge reamer to avoid damaging rings or
cracking ring lands in pistons during removal.
5. Mark the cylinder number on all pistons, connect-
ing rods and caps. Starting at the front end of the
crankcase, the cylinders are numbered l-2-3-4,
6. Remove cap and bearing shell from number 1
connecting rod.
7. Push the piston and
rod assembly up and out of
top cylinder. Then reinstall cap and bearing shell on
rod.
0
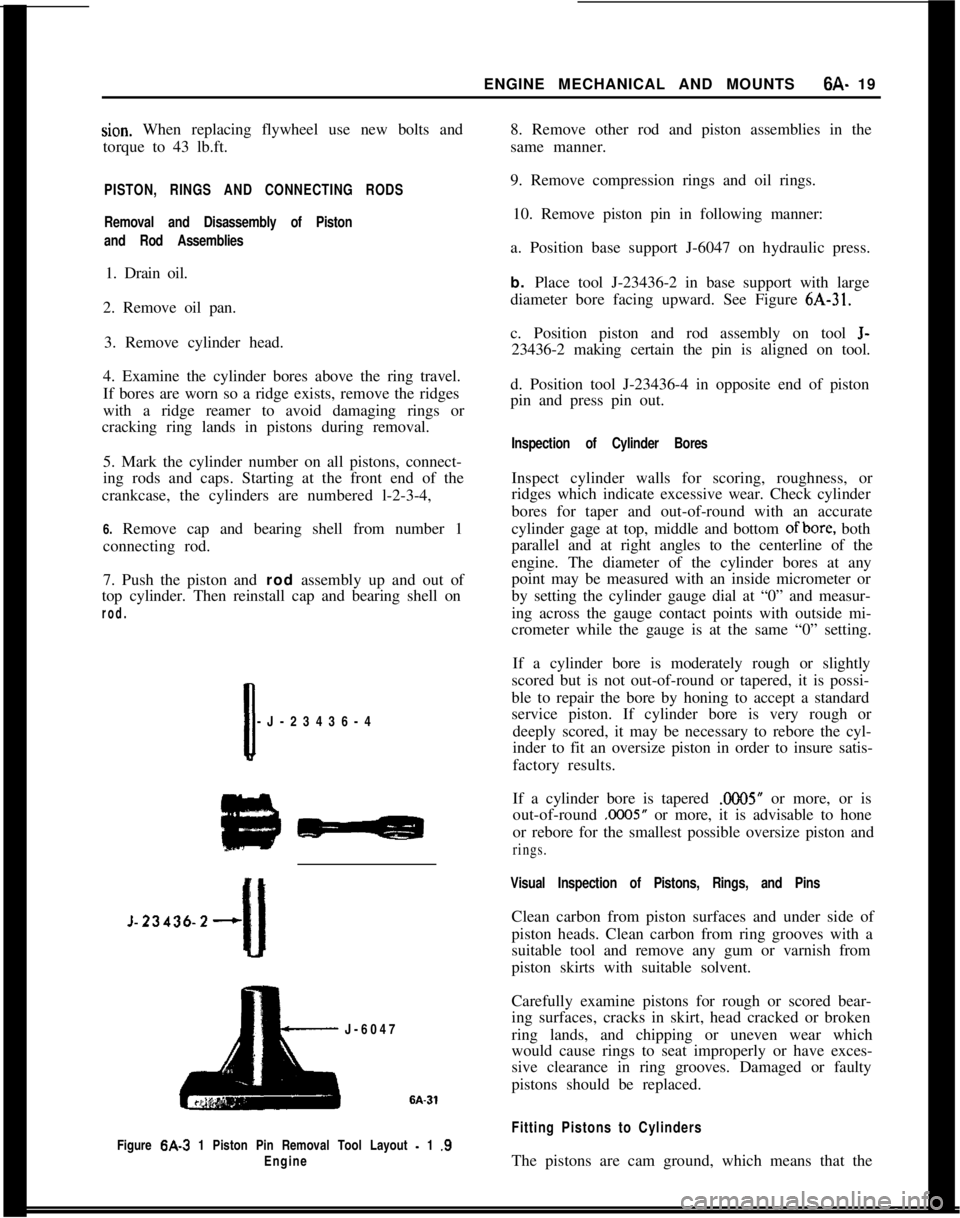
-J-23436-4
J-23436-2+
J-6047
Figure
6A-3 1 Piston Pin Removal Tool Layout - 1 .S
Engine
8. Remove other rod and piston assemblies in the
same manner.
9. Remove compression rings and oil rings.
10. Remove piston pin in following manner:
a. Position base support J-6047 on hydraulic press.
b. Place tool J-23436-2 in base support with large
diameter bore facing upward. See Figure
6A-31.
c. Position piston and rod assembly on tool
J-
23436-2 making certain the pin is aligned on tool.
d. Position tool J-23436-4 in opposite end of piston
pin and press pin out.
Inspection of Cylinder Bores
Inspect cylinder walls for scoring, roughness, or
ridges which indicate excessive wear. Check cylinder
bores for taper and out-of-round with an accurate
cylinder gage at top, middle and bottom
ofbore, both
parallel and at right angles to the centerline of the
engine. The diameter of the cylinder bores at any
point may be measured with an inside micrometer or
by setting the cylinder gauge dial at “0” and measur-
ing across the gauge contact points with outside mi-
crometer while the gauge is at the same “0” setting.
If a cylinder bore is moderately rough or slightly
scored but is not out-of-round or tapered, it is possi-
ble to repair the bore by honing to accept a standard
service piston. If cylinder bore is very rough or deeply scored, it may be necessary to rebore the cyl-
inder to fit an oversize piston in order to insure satis-
factory results.
If a cylinder bore is tapered
.ooO5” or more, or is
out-of-round
.0005” or more, it is advisable to hone
or rebore for the smallest possible oversize piston and
rings.
Visual Inspection of Pistons, Rings, and Pins
Clean carbon from piston surfaces and under side of
piston heads. Clean carbon from ring grooves with a
suitable tool and remove any gum or varnish from
piston skirts with suitable solvent.
Carefully examine pistons for rough or scored bear-
ing surfaces, cracks in skirt, head cracked or broken
ring lands, and chipping or uneven wear which
would cause rings to seat improperly or have exces-
sive clearance in ring grooves. Damaged or faulty
pistons should be replaced.
Fitting Pistons to Cylinders
The pistons are cam ground, which means that the
Page 312 of 625
ENGINE MECHANICAL AND MOUNTS6A- 21
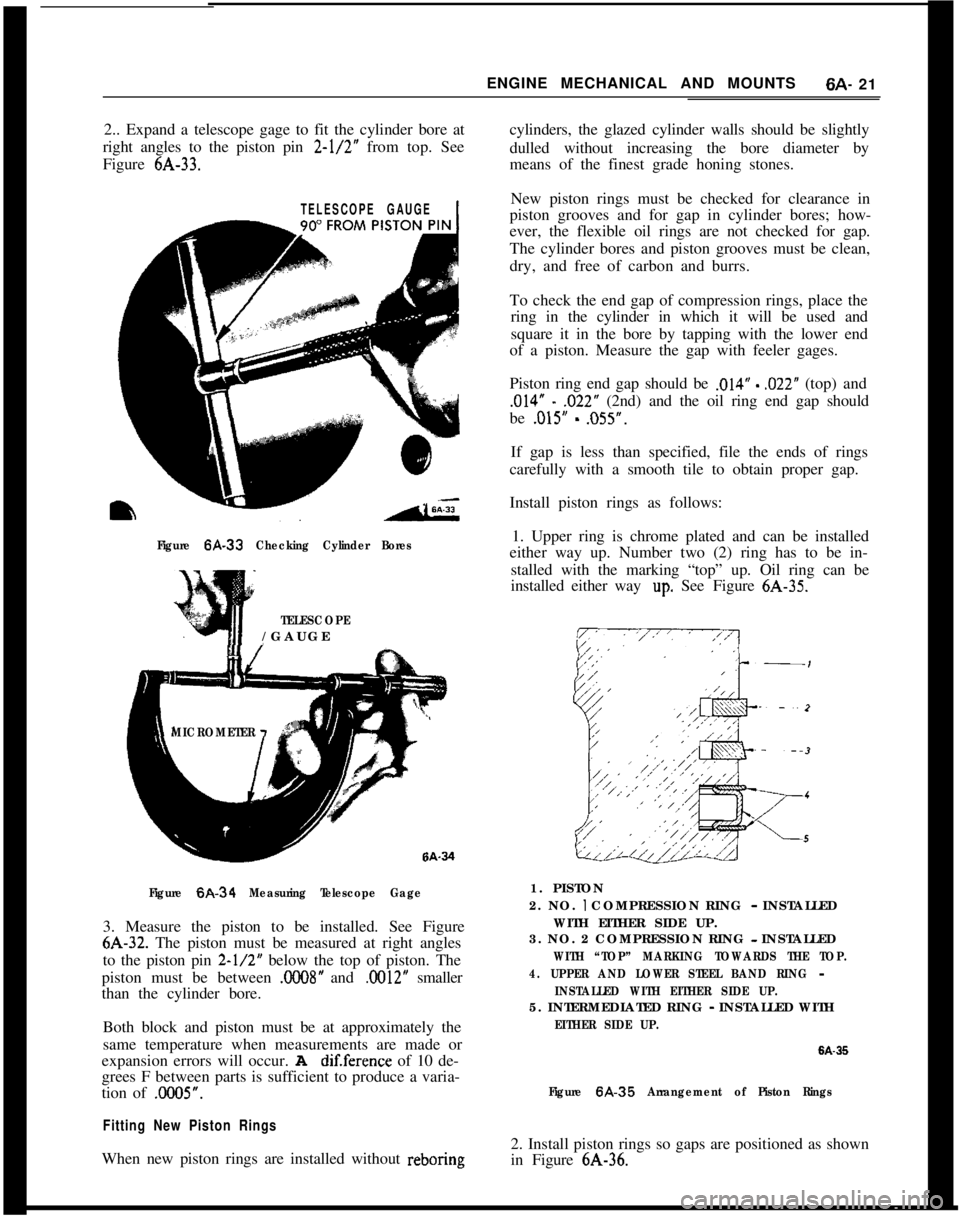
2.. Expand a telescope gage to fit the cylinder bore at
right angles to the piston pin 2-l/2” from top. See
Figure 6A-33.cylinders, the glazed cylinder walls should be slightly
dulled without increasing the bore diameter by
means of the finest grade honing stones.
TELESCOPE GAUGE1
Figure 6A-33 Checking Cylinder Bores
TELESCOPE/GAUGE
MICROMETER
Figure
6A-34 Measuring Telescope Gage3. Measure the piston to be installed. See Figure6A-32. The piston must be measured at right angles
to the piston pin
2-l/2” below the top of piston. The
piston must be between
.C008” and .0012” smaller
than the cylinder bore.
Both block and piston must be at approximately the
same temperature when measurements are made or
expansion errors will occur. A
dif.ference of 10 de-
grees F between parts is sufficient to produce a varia-
tion of .0005”.
Fitting New Piston RingsWhen new piston rings are installed without reboringNew piston rings must be checked for clearance in
piston grooves and for gap in cylinder bores; how-
ever, the flexible oil rings are not checked for gap.
The cylinder bores and piston grooves must be clean,
dry, and free of carbon and burrs.
To check the end gap of compression rings, place the
ring in the cylinder in which it will be used and
square it in the bore by tapping with the lower end
of a piston. Measure the gap with feeler gages.
Piston ring end gap should be
,014” - ,022” (top) and
,014” - ,022” (2nd) and the oil ring end gap should
be
.015” - ,055”.
If gap is less than specified, file the ends of rings
carefully with a smooth tile to obtain proper gap.
Install piston rings as follows:
1. Upper ring is chrome plated and can be installed
either way up. Number two (2) ring has to be in-
stalled with the marking “top” up. Oil ring can be
installed either way
up. See Figure 6A-35.
1. PISTON
2. NO.
I COMPRESSION RING - INSTALLED
WITH EITHER SIDE UP.
3. NO. 2 COMPRESSION RING - INSTALLED
WITH “TOP” MARKING TOWARDS THE TOP.
4. UPPER AND LOWER STEEL BAND RING
-
INSTALLED WITH EITHER SIDE UP.5. INTERMEDIATED RING
- INSTALLED WITH
EITHER SIDE UP.
6A-35
Figure 6A.35 Arrangement of Piston Rings2. Install piston rings so gaps are positioned as shown
in Figure 6A-36.
Page 313 of 625
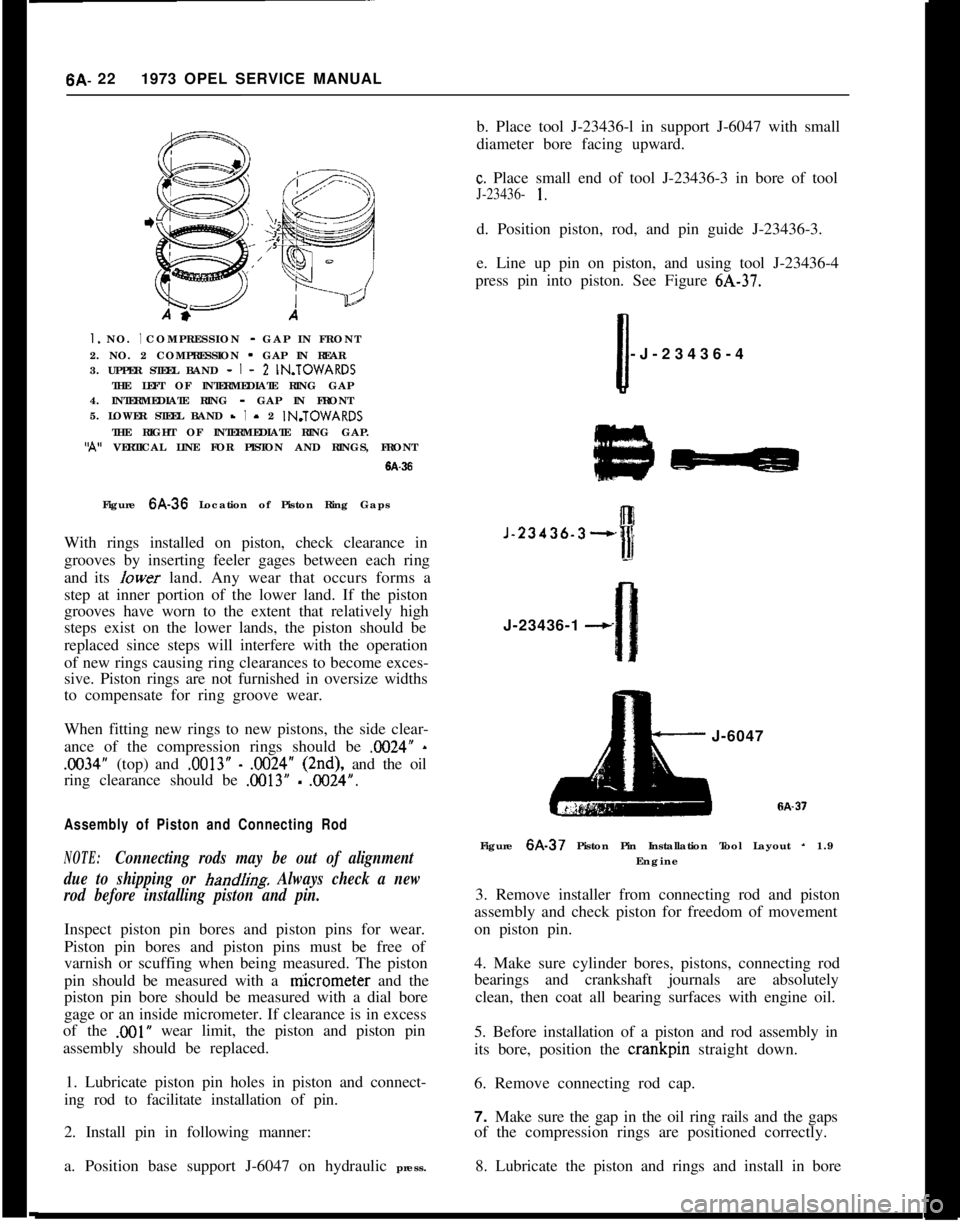
6A- 221973 OPEL SERVICE MANUALI. NO. I COMPRESSION - GAP IN FRONT
2. NO. 2 COMPRESSION - GAP IN REAR
3. UPPER STEEL BAND -
I - 2 IN.TOWARDS
THE LEFT OF INTERMEDIATE RING GAP
4. INTERMEDIATE RING - GAP IN FRONT
5. LOWER STEEL BAND -
I - 2 IN.TOWARDS
THE RIGHT OF INTERMEDIATE RING GAP.‘A” VERTICAL LINE FOR PISTON AND RINGS, FRONT
6A-36Figure 6A-36 Location of Piston Ring Gaps
With rings installed on piston, check clearance in
grooves by inserting feeler gages between each ring
and its Iower land. Any wear that occurs forms a
step at inner portion of the lower land. If the piston
grooves have worn to the extent that relatively high
steps exist on the lower lands, the piston should be
replaced since steps will interfere with the operation
of new rings causing ring clearances to become exces-
sive. Piston rings are not furnished in oversize widths
to compensate for ring groove wear.
When fitting new rings to new pistons, the side clear-
ance of the compression rings should be X024”
-
.1X34” (top) and .0013” - .OO24” (2nd), and the oil
ring clearance should be
.OO13” - .0024”.
Assembly of Piston and Connecting Rod
NOTE:Connecting rods may be out of alignment
due to shipping or
hand/i& Always check a new
rod before installing piston and pin.Inspect piston pin bores and piston pins for wear.
Piston pin bores and piston pins must be free of
varnish or scuffing when being measured. The piston
pin should be measured with a niicrometer and the
piston pin bore should be measured with a dial bore
gage or an inside micrometer. If clearance is in excess
of the
,001” wear limit, the piston and piston pin
assembly should be replaced.
1. Lubricate piston pin holes in piston and connect-
ing rod to facilitate installation of pin.
2. Install pin in following manner:
a. Position base support J-6047 on hydraulic press.b. Place tool J-23436-l in support J-6047 with small
diameter bore facing upward.
c. Place small end of tool J-23436-3 in bore of tool
J-23436- 1.d. Position piston, rod, and pin guide J-23436-3.
e. Line up pin on piston, and using tool J-23436-4
press pin into piston. See Figure 6A-37.
Ii-J-23436-4
J-23436-3--,J-23436-1
--cJ-6047
Figure 6A-37 Piston Pin Installation Tool Layout
- 1.9
Engine
3. Remove installer from connecting rod and piston
assembly and check piston for freedom of movement
on piston pin.
4. Make sure cylinder bores, pistons, connecting rod
bearings and crankshaft journals are absolutely
clean, then coat all bearing surfaces with engine oil.
5. Before installation of a piston and rod assembly in
its bore, position the crankpin straight down.
6. Remove connecting rod cap.
7. Make sure the gap in the oil ring rails and the gaps
of the compression rings are positioned correctly.
8. Lubricate the piston and rings and install in bore
Page 314 of 625
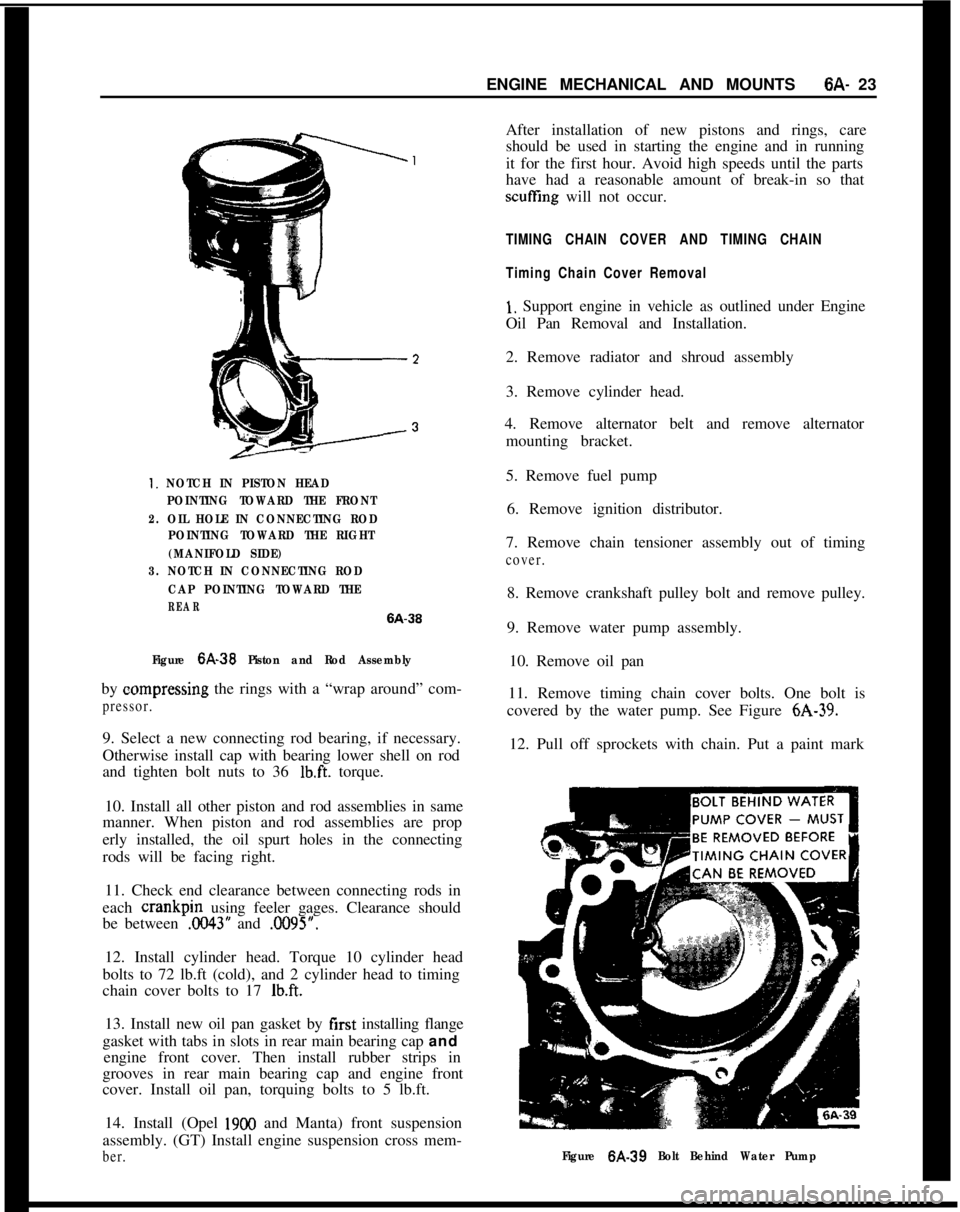
ENGINE MECHANICAL AND MOUNTS6A- 231. NOTCH IN PISTON HEAD
POINTING TOWARD THE FRONT
2. OIL HOLE IN CONNECTING ROD
POINTING TOWARD THE RIGHT
(MANIFOLD SIDE)
3. NOTCH IN CONNECTING ROD
CAP POINTING TOWARD THE
REAR6A-36
Figure
6A-39 Piston and Rod Assemblyby oompressing the rings with a “wrap around” com-
pressor.9. Select a new connecting rod bearing, if necessary.
Otherwise install cap with bearing lower shell on rod
and tighten bolt nuts to 36
lb.ft. torque.
10. Install all other piston and rod assemblies in same
manner. When piston and rod assemblies are prop
erly installed, the oil spurt holes in the connecting
rods will be facing right.
11. Check end clearance between connecting rods in
each crankpin using feeler gages. Clearance should
be between
.0043” and .0095”.
12. Install cylinder head. Torque 10 cylinder head
bolts to 72 lb.ft (cold), and 2 cylinder head to timing
chain cover bolts to 17
lb.ft.13. Install new oil pan gasket by first installing flange
gasket with tabs in slots in rear main bearing cap and
engine front cover. Then install rubber strips in
grooves in rear main bearing cap and engine front
cover. Install oil pan, torquing bolts to 5 lb.ft.
14. Install (Opel
1900 and Manta) front suspension
assembly. (GT) Install engine suspension cross mem-
ber.After installation of new pistons and rings, care
should be used in starting the engine and in running
it for the first hour. Avoid high speeds until the parts
have had a reasonable amount of break-in so that
scuffling will not occur.
TIMING CHAIN COVER AND TIMING CHAIN
Timing Chain Cover Removal
1, Support engine in vehicle as outlined under Engine
Oil Pan Removal and Installation.
2. Remove radiator and shroud assembly
3. Remove cylinder head.
4. Remove alternator belt and remove alternator
mounting bracket.
5. Remove fuel pump
6. Remove ignition distributor.
7. Remove chain tensioner assembly out of timing
cover.8. Remove crankshaft pulley bolt and remove pulley.
9. Remove water pump assembly.
10. Remove oil pan
11. Remove timing chain cover bolts. One bolt is
covered by the water pump. See Figure 6A-39.
12. Pull off sprockets with chain. Put a paint mark
Figure 6A-39 Bolt Behind Water Pump
Page 315 of 625
6A- 24 1973 OPEL SERVICE: MANUAL
on front side of timing chain to permit reinstallation
in original position.
Timing Chain Cover and Timing
Chain installation
Reinstall timing chain cover by reversing removal
procedures, pay particular attention to the following
points.
1. Clean all parts, check for wear and replace as
required. The Parts Department supplies either the two sprockets complete with chain or the chain
alone. It is not permissible to replace sprockets alone.
The chain tensioner is, with the, exception of the
tensioner body, only available as a complete unit.
2. Turn crankshaft so that key for sprocket is on top
and vertical. Assemble chain’, with camshaft
sprocket, then put chain on crankshaft sprocket al-
ready installed. Be sure paint dot
on chain is in front
so that chain moves in same direction as prior to
disassembly.
3. Make sure camshaft sprocket mark is in alignment
with mark on support and chain in parallel with
damper block.
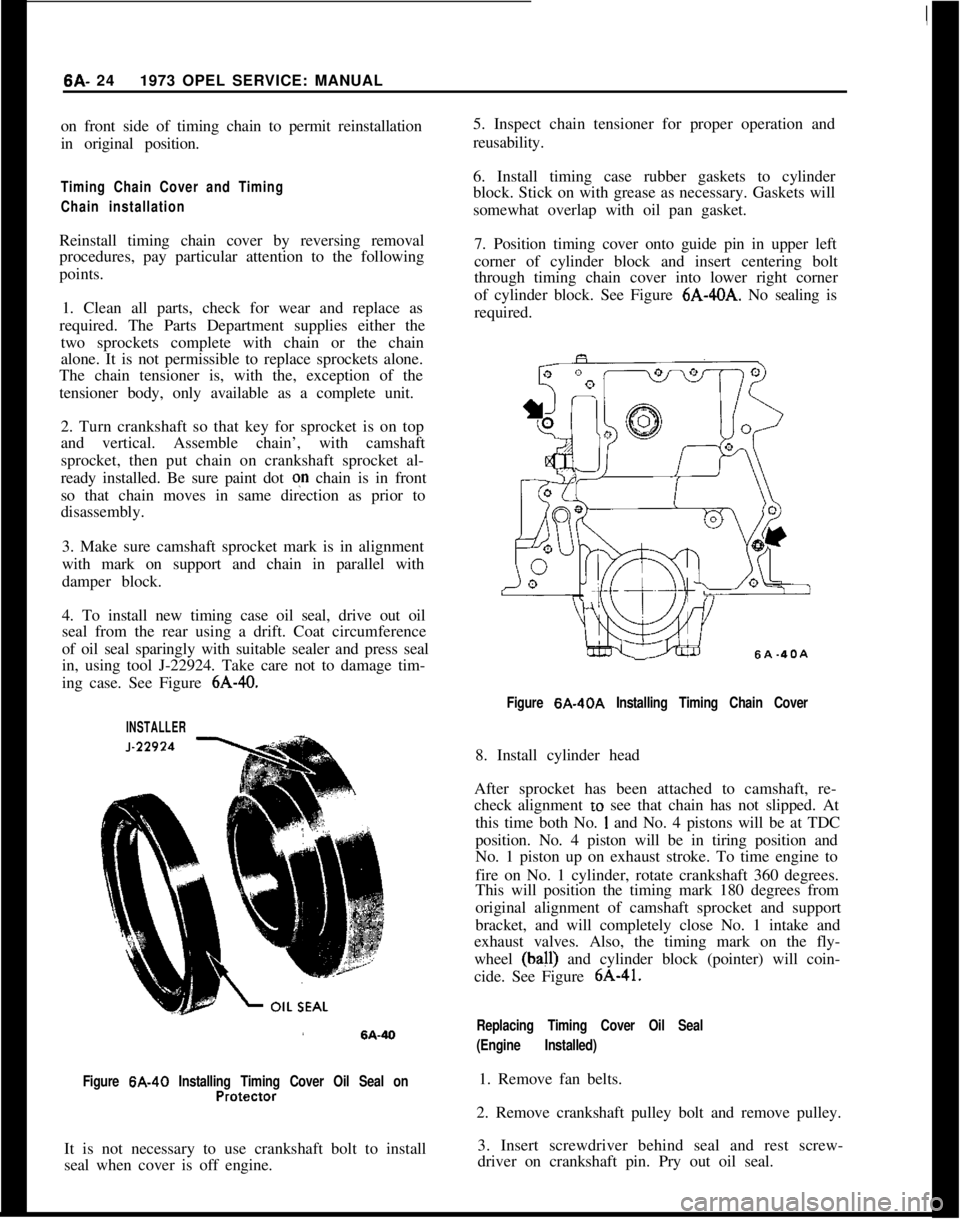
4. To install new timing case oil seal, drive out oil
seal from the rear using a drift. Coat circumference
of oil seal sparingly with suitable sealer and press seal
in, using tool J-22924. Take care not to damage tim-
ing case. See Figure
6A-40. 5. Inspect chain tensioner for proper operation and
reusability.
6. Install timing case rubber gaskets to cylinder
block. Stick on with grease as necessary. Gaskets will
somewhat overlap with oil pan gasket.
7. Position timing cover onto guide pin in upper left
corner of cylinder block and insert centering bolt
through timing chain cover into lower right corner
of cylinder block. See Figure
6A-40A. No sealing is
required.
SA-40.4
Figure 6A-40A Installing Timing Chain Cover
INSTALLER
Figure 6A-40 Installing Timing Cover Oil Seal onProtector
It is not necessary to use crankshaft bolt to install
seal when cover is off engine. 8. Install cylinder head
After sprocket has been attached to camshaft, re-
check alignment
LO see that chain has not slipped. At
this time both No.
1 and No. 4 pistons will be at TDC
position. No. 4 piston will be in tiring position and
No. 1 piston up on exhaust stroke. To time engine to
fire on No. 1 cylinder, rotate crankshaft 360 degrees.
This will position the timing mark 180 degrees from
original alignment of camshaft sprocket and support
bracket, and will completely close No. 1 intake and
exhaust valves. Also, the timing mark on the fly-
wheel
(ball) and cylinder block (pointer) will coin-
cide. See Figure
6A-41.
Replacing Timing Cover Oil Seal
(Engine Installed)
1. Remove fan belts.
2. Remove crankshaft pulley bolt and remove pulley. 3. Insert screwdriver behind seal and rest screw-
driver on crankshaft pin. Pry out oil seal.
Page 318 of 625
ENGINE MECHANICAL AND MOUNTS6A- 27
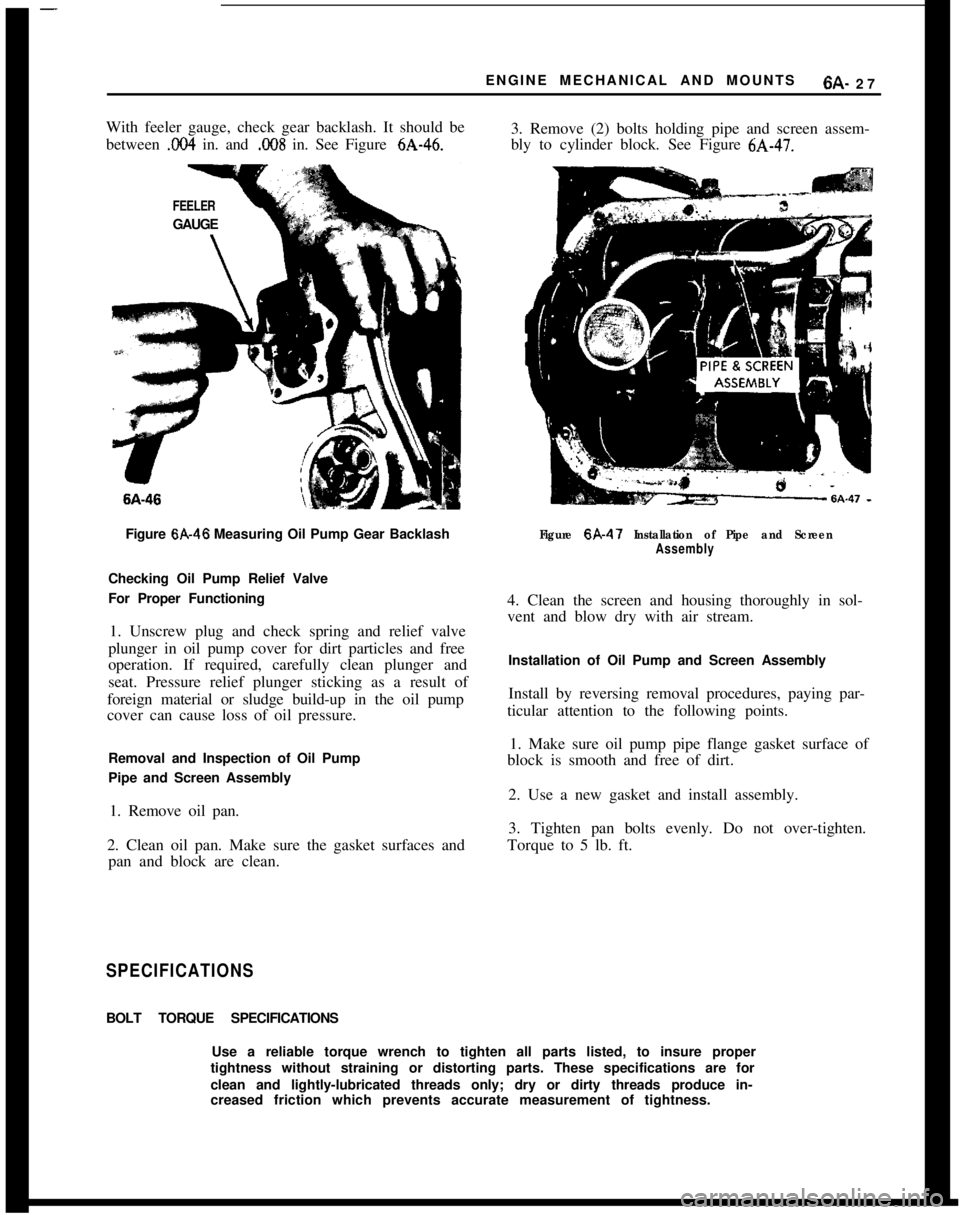
With feeler gauge, check gear backlash. It should be
between
.I?04 in. and .C!OS in. See Figure 6A-46.3. Remove (2) bolts holding pipe and screen assem-
bly to cylinder block. See Figure 6A-47.
FEELERGAUGE6A-46
Figure 6A-46 Measuring Oil Pump Gear Backlash
Checking Oil Pump Relief Valve
For Proper Functioning
1. Unscrew plug and check spring and relief valve
plunger in oil pump cover for dirt particles and free
operation. If required, carefully clean plunger and
seat. Pressure relief plunger sticking as a result of
foreign material or sludge build-up in the oil pump
cover can cause loss of oil pressure.
Removal and Inspection of Oil Pump
Pipe and Screen Assembly
1. Remove oil pan.
2. Clean oil pan. Make sure the gasket surfaces and
pan and block are clean.
Figure 6A-47 Installation of Pipe and Screen
Assembly4. Clean the screen and housing thoroughly in sol-
vent and blow dry with air stream.
Installation of Oil Pump and Screen Assembly
Install by reversing removal procedures, paying par-
ticular attention to the following points.
1. Make sure oil pump pipe flange gasket surface of
block is smooth and free of dirt.
2. Use a new gasket and install assembly.
3. Tighten pan bolts evenly. Do not over-tighten.
Torque to 5 lb. ft.
SPECIFICATIONSBOLT TORQUE SPECIFICATIONS
Use a reliable torque wrench to tighten all parts listed, to insure proper
tightness without straining or distorting parts. These specifications are for
clean and lightly-lubricated threads only; dry or dirty threads produce in-
creased friction which prevents accurate measurement of tightness.
Page 323 of 625
66.321973 OPEL SERVICE MANUAL
COOLING SYSTEM
CONTENTS
Subject
DESCRIPTION AND OPERATION:
Cooling System and Water Pump
. . . . . . . . . . . . . . . . . . . . . . . . . . . . . . . .DIAGNOSIS: (Not Applicable)
MAINTENANCE AND ADJUSTMENTS:
Checking and Filling Cooling System
. . . . . . . . . . . . . . . . . . . . . . . .Draining
andFlushingCoolingSystem. . . . . . . . . . . . . . . . . . . . . .Conditioning the Cooling System
. . . . . . . . . . . . . . . . . . . . . . . . . . . . . . . .Using and Testing Anti-Freeze Solutions
. . . . . . . . . . . . . . . . . .Fan Belt Adjustment or Replacement
. . . . . . . . . . . . . . . . . . . . . . . .Radiator Thermostat Inspection and Test
. . . . . . . . . . . . . . . .MAJOR REPAIR:
Water Pump Removal
. . . . . . . . . . . . . . . . . . . . . . . . . . . . . . . . . . . . . . . . . . . . . . . . . . . . .Radiator
Removal. . . . . . . . . . . . . . . . . . . . . . . . . . . . . . . . . . . . . . . . . . . . . . . . . . . . . . . . . . . . . .SPECIFICATIONS:
Cooling System Capacities
. . . . . . . . . . . . . . . . . . . . . . . . . . . . . . . . . . . . . . . . . . . .Page No.
68-32
6B-32
68-32
68-33
68-33
68-33
68-33
68-34
68-34
6B-35
DESCRIPTION AND OPERATION
COOLING SYSTEM AND WATER PUMPThe coiling system is of the conventional pressurized
type. A centrifugal pump arranged in timing case
serves to circulate the coolant.
When the thermostat is closed, the coolant will re-
turn to the pump via a by-pass for swift and uniform
warming up of the engine the coolant circulates
through the radiator, only when the engine has
reached normal operating temperature.
The heater system branches off the cooling system
ahead of thermostat in flow direction so that the
heater is in operation before engine has reached full
operating temperature.
MAINTENANCE AND ADJUSTMENTS
Checking and Filling Cooling SystemThe coolant level should be checked only when the
engine is cold and only enough coolant should be
added to bring the level halfway between core andtank top. It is unnecessary and undesirable to remove
the radiator cap and check the coolant level each
time the car stops at a filling station for gasoline or
oil, since the engine is usually hot at such times.
WARNING: Never remove the radiator cap quickly
when engine is HOT Sudden release of cooling
sys-
tern pressure may cause the coolant to boil and some
of it may be ejected from the radiator
filler neck,
resulting in
inl’ury to persons or damage to the car
finish.If it is necessary at any time to remove the radiator
cap when engine is hot, rotate the cap counterclock-
wise until first stop is reached. Leave cap in this
position until all pressure in cooling system has been
released, then turn cap past the first stop and remove
it.
Draining and Flushing
Cooling SystemThe cooling system should be completely drained
and the recommended coolant installed every two (2)
years.To drain the cooling system, remove radiator cap,
remove lower radiator hose from the lower tank and
Page 324 of 625
COOLING SYSTEM6B- 33
remove drain plug on right.side of cylinder block. Set
heater temperature control valve at full heat posi-
tion. After the cooling system is drained, and plugs
reinstalled, fill the system with clean water. Run the
engine long enough to open the thermostat for com-
plete circulation through the system, then com-
pletely drain the cooling system before sediment has
a chance to settle.
Conditioning the Cooling System
“Rust Inhibitor and Stop Leak”, or equivalent listed
under Group 8.800 is recommended for use in the
cooling system, particularly when preparing for in-
stallation of anti-freeze solution. This material stops
small seepage leaks, has rust preventive properties
and its soluble oil is effective in eliminating a squeal-
ing noise which sometimes develops at the water
pump seal washer. Instructions for its application are
printed on the conditioner bottle.
It is very important to make certain that the cooling
system is properly prepared before an anti-freeze so-
lution is installed, otherwise loss of solution through
leakage may occur or seepage may result in damage
to the engine. The cooling system should be drained
and flushed as described under Draining and Flush-
ing Cooling System. All joints should be checked for
leakage and corrected, and the conditioner described
above should be added with the anti-freeze solution.
Inspect the water pump, radiator core, heater and
defroster cores, water jacket plugs, and edge of cylin-
der head gaskets for evidence of water leaks. Tighten
all hose clamps in the cooling and heating systems
and replace any deteriorated hoses.
Using and Testing Anti-Freeze
Solutions
Inhibited year around (ethylene glycol type) engine
coolant solution which is formulated to withstand
two full calendar years of normal operation without
draining or adding inhibitors should be used at all
times. Freeze protection should be provided to pro-
tect against corrosion. When adding solution due to
loss of coolant for any reason or in areas where tem-
peratures lower than minus 20 degrees F. may be
encountered, a sufficient amount of any of the sev-
eral brands of year around coolant (Ethylene Glycol
base) compatible to GM Specification 1899-M avail-
able on the market should be used. Water or alcohol
base coolants are not recommended for this vehicle
at any time.
If for any reason water only is used as a coolant in
an emergency, it is extremely important that Buick
Heavy Duty Cooling System Protector and Water
Pump Lubricant or equivalent be added to the cool-
ing system as soon as possible. If any other cooling
System protector is used, be certain it is labeled toindicate that it meets General Motors Specification
GM 1894-M. It should be recognized that this is only
a temporary measure. The manufacture intends that
permanent type coolant solution be used year around
in the cooling system.
The cooling system should be completely drained
and the recommended coolant installed every two (2)years.It is advisable to test the anti-freeze solution at inter-
vals during the winter to make certain that the solu-
tion has not been weakened. Use only hydrometers
which are calibrated to read both the specific gravity
and the temperature, and have a table or other means
of converting the freezing point at various tempera-
tures of solution. Disregarding the temperature of
the solution when making the test may cause an error
as large as 30 degrees F. Care must be exercised to
use the correct float or table for the particular type
of anti-freeze being tested.
Fan Belt Adjustment or Replacement
A tight fan belt will cause rapid wear of the alterna-
tor and water pump bearings. A loose belt will slip
and wear excessively and will cause noise, engine
over-heating, and unsteady alternator output. A fan
belt which is cracked or frayed, or which is worn so
that it bottoms in the pulleys should be replaced. The
fan belt may be replaced by loosening the alternator
brace at alternator, slightly loosening the alternator
mounting bolts and moving alternator inward to pro-
vide maximum slack in the belt.
The alternator must be moved outward to adjust the
fan belt. After the generator brace and mounting
bolts are securely tightened, the fan belt tension
should be 45 lb. using Tensioner J-23600.
WARNING: Zfa
fan blade is bent or damaged in any
way, no attempt should be made to repair and reuse
the damaged part. A bent or damaged fan assembly
should always be replaced with a new
fal. assembly.
It is essential that fan assemblies remain in proper
balance and proper balance cannot be assured once
a fan assembly has been bent or damaged. A fan
assembly that is not in proper balance could fail and
fly apart during subsequent
we creating an ex-
tremely dangerous condition.
Radiator Thermostat Inspection and Test
A sticking radiator thermostat will prevent the cool-
ing system from functioning properly. If the thermo-
stat sticks in the open position, the engine will warm
up very slowly. If the thermostat sticks in the closed
position, the engine will overheat.
The thermostat may be removed for inspection and
Page 325 of 625
6B- 341973 OPEL SERVICE MANUAL
test by partially draining the cooling system and dis-
connecting the water outlet housing from the ther-
mostat housing which is mounted on the right front
side of cylinder head.
The standard thermostat valve should start to open
at 189 degrees F and fully open at approximately 212
degrees F. If thermostat does not operate at specified
temperatures, it should be replaced as it cannot be
repaired.MAJOR REPAIR
WATER PUMP REPAIRSThe water pump bearing outer race is shrunk fit into
the water pump cover. For this reason the cover,
shaft bearing, and hub are not repairable.
Water Pump RemovalOpel radiators do not have a drain plug. Drain radia-
tor by first, loosening radiator cap, then remove
lower hose from lower radiator tank.
1. Drain coolant into a clean container. Remove
radiator and shroud.
2. Remove fan belt.
3. Remove fan blade and pulley on water pump shaft.
4. Disconnect inlet hose and heater hose from water
pump. Remove bolts, pump assembly and gasket
from timing chain cover.
5. Check pump shaft bearing for end play or rough-
ness in operation. If bearings are not in serviceable
condition, the assembly must be replaced.
Water Pump Installation1. Make sure the gasket surfaces on pump and timing
chain covers are clean. Install pump assembly with
new gasket. Bolts must be tightened uniformly.
Torque to 11 lb. ft.
2. Install radiator and shroud. Connect radiator hose
to pump inlet and heater hose to nipple.
3. Install fan pulley and fan blade, tighten attaching
bolts securely. Install belts and adjust for proper
tension.4. Fill cooling system and check
,for leaks at pump
and hose joints.
RADIATOR REMOVAL AND INSTALLATION
RemovalI. Loosen radiator cap, then remove lower radiator
hose and drain radiator coolant into suitable con-
tainer.
2. On vehicles with automatic transmission, unscrew
oil lines from connectors on lower radiator tank and
plug lines. On GT models with automatic transmis-
sion the lines have to be disconnected at the coupling
before removing from the tank. It is essential that no
dirt enters the oil lines. When unscrewing oil lines,
hold connectors on lower radiator tank with pliers to
avoid leakages. Ensure that no dirt enters oil cooler.
3. Remove lower attaching nut and slide radiator
upward and out of engine compartment.
Installation1. Install radiat,or into engine compartment and se-
cure lower attaching nut.
2. On vehicles with automatic transmissions, fasten
oil cooler lines to lower radiator tank. It is essential
that no dirt enters the oil lines. When tightening oil
lines, hold connectors on lower radiator tank with
pliers to avoid leakages. Ensure that no dirt enters oil
cooler. Torque to 1 I-15
lbs.ft.3. Install lower radiator hose and add collected coo-
lant.
All Opels are provided with a radiator initial fill of
an antifreeze solution containing corrosion inhibitor.
The antifreeze has either a glycol or glycerin base
and protects the engine against freezing, down to
minus 22 degrees F. (minus 30 degrees C.). Before
the start of the cold season, coolant must be checked
with a hydrometer and if necessary, brought to the
necessary specific gravity by adding anti-freeze with
a glycol or glycerin base. As the specific gravities of
all anti- freeze solutions having a glycol or glycerin
base are practically the same, the hydrometer can be
used for all these types. Because of the tolerances of
the hydrometer, or slight differences in specific
gravity, variations of plus or minus 5 degrees can be
expected. Coolant must be checked at a temperature
of plus 68 degrees F. (plus 20 degrees C.)
Page 327 of 625
6C- 361973 OPEL SERVICE MANUAL
FUEL SYSTEM
ALL MODELS
CONTENTS
Subject
DESCRIPTION AND OPERATION:
Fuel Pump. . . . . . . . . . . . . . . . . . . . . . . . . . . . . . . . . . . . . . . . . . . . . . . . . . . . . . . . . . . . . . . . .. . . . . . . . . . .Evaporation Control System
. . . . . . . . . . . . . . . . . . . . . . . . . . . . . . . . . . . . . . . . . .DIAGNOSIS:
(Not Applicable)
MAINTENANCE AND ADJUSTMENTS:
Cleaning Fuel Pump Strainer.,....................................
*.Evaporation Control System
. . . . . . . . . . . , . . . . . . . . . . . . . . . . . . . . . . . . . . . . . .MAJOR REPAIR:
Fuel Tank
. . . . . . . . . . . . . . . . . . . . . . . . . . . . . . . . . . . . . . . . . . . . . . . . . . . . . . . . . . . . . . . . . . . . . . . . . . . . . .Fuel Lines and Fuel Tank Gauge Units
. . . . . . . . . . . . . . . . . . . . . .SPECIFICATIONS:
Fuel System Specifications
. . . . . . . . . . . . . . . . . . . . . . . . . . . . . . . . . . . . . . . . . . .Page No.6C-366C-376C-376C-386C-396C-416C-41
DESCRIPTION AND OPERATION
FUEL PUMPThe 1.9 liter engine uses a push rod type fuel pump.
The push rod is actuated by an eccentric on the
distributor shaft. The push rod is held in contact
with the eccentric at all times by a push rod spring.
Each time the push rod is on the high part of the
eccentric, the lighter diaphragm spring will push the
diaphragm to replace any fuel used in the carburetor.
The diaphragm seldom operates through a full
stroke; under normal driving conditions, the dia-
phragm moves only a few tenths of an inch.
Fuel pump pressure is determined by the compres-
sion of the diaphragm spring. Low pressure or pres-
sure leak- down generally indicates a leaky
diaphragm or check valves.
Two holes in the lower part of the fuel pump serve
to ventilate the space below the diaphragm and to
drain any fuel which may have entered. If any fuel
comes from these holes, this indicates a defective
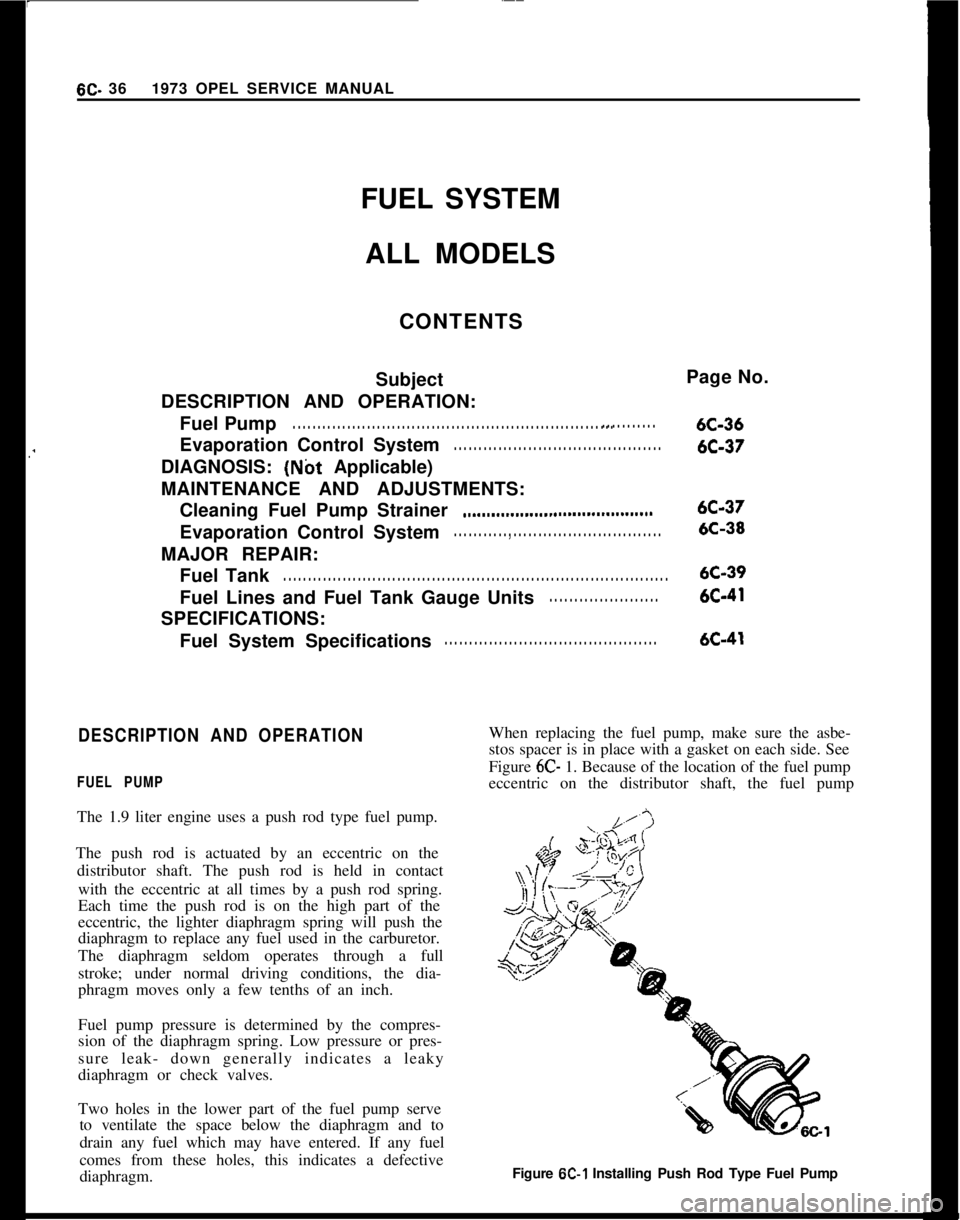
diaphragm.When replacing the fuel pump, make sure the asbe-
stos spacer is in place with a gasket on each side. See
Figure 6C- 1. Because of the location of the fuel pump
eccentric on the distributor shaft, the fuel pump
Figure
6C-1 Installing Push Rod Type Fuel Pump