check engine OPEL GT-R 1973 Workshop Manual
[x] Cancel search | Manufacturer: OPEL, Model Year: 1973, Model line: GT-R, Model: OPEL GT-R 1973Pages: 625, PDF Size: 17.22 MB
Page 329 of 625
6C- 381973 OPEL SERVICE MANUALCAUTION:Because the fuel pump is below fuel tank
level, fuel
will drain from the tank. when the supply
hne is disconnected from the fuel pump.1. Pull fuel supply line and rubber connector from
fuel pump. Plug rubber connector to prevent fuel
loss.2. Remove fuel pump cap, gasket and plastic
strainer.
3. Cover center opening in sediment bowl with finger
and blow out sediment bowl with compressed air.
4. Wash plastic strainer in solvent; if strainer does
not clean-up or is damaged, replace strainer.
5. Install clean parts, noting the following:
(a) Strainer must be properly seated with projections
facing upward.(b) A new cap gasket must be positioned over
strainer.
(c) Sealing ring must be in place on cap retaining
screw.6. Reconnect fuel supply line. Start engine and check
for leaks.
EVAPORATION CONTROL SYSTEMProper performance of the system requires the use of
a non-vented fuel tank cap, hose connections be leak-
free, and all hoses routed correctly to avoid a
pinched or blocked line.
Maintenance requirements demand only that the ac-
cumulator purge air tilter, an oiled foam filter assem-
bled in the bottom of the canister, be replaced at
12,CKO mile intervals. Under extremely dusty condi-
tions, more frequent attention may be required.
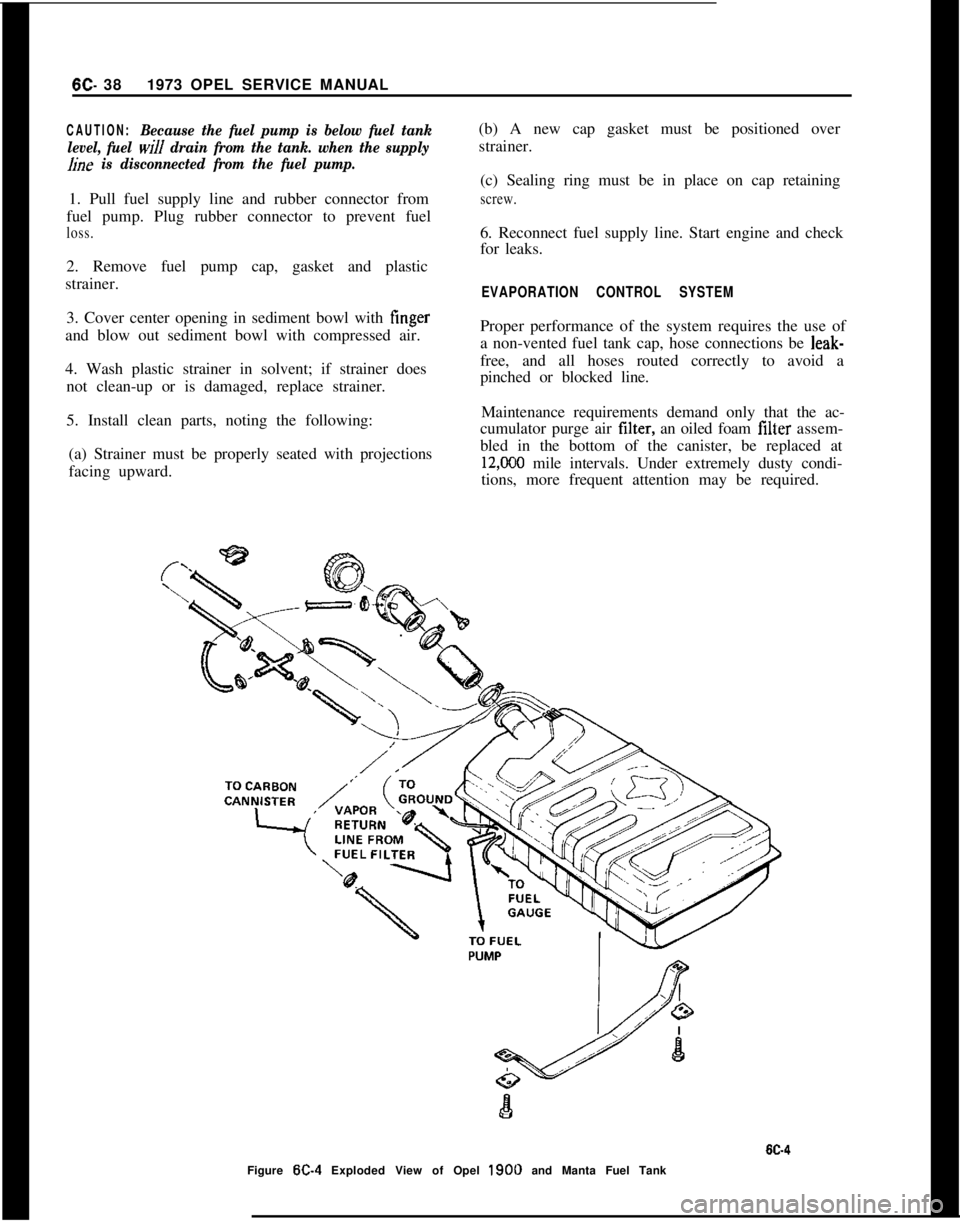
Figure
W-4 Exploded View of Opel 1900 and Manta Fuel Tank
Page 340 of 625
CARBURETOR AND THROTTLE LINKAGE6E- 49DIAGNOSIS
CARBURETORCondition I
Hesitation or Stall Upon Light AccelerationCorrection
1. Check spark plugs and plug gap. Plug gap should
be
,030 in.
2. Check dwell and timing.
3. Adjust carburetor.
4. Accelerator pump should discharge fuel between
throttle plate and venturi wall with engine off. If aim
is not correct, use needlenose pliers to slightly bend
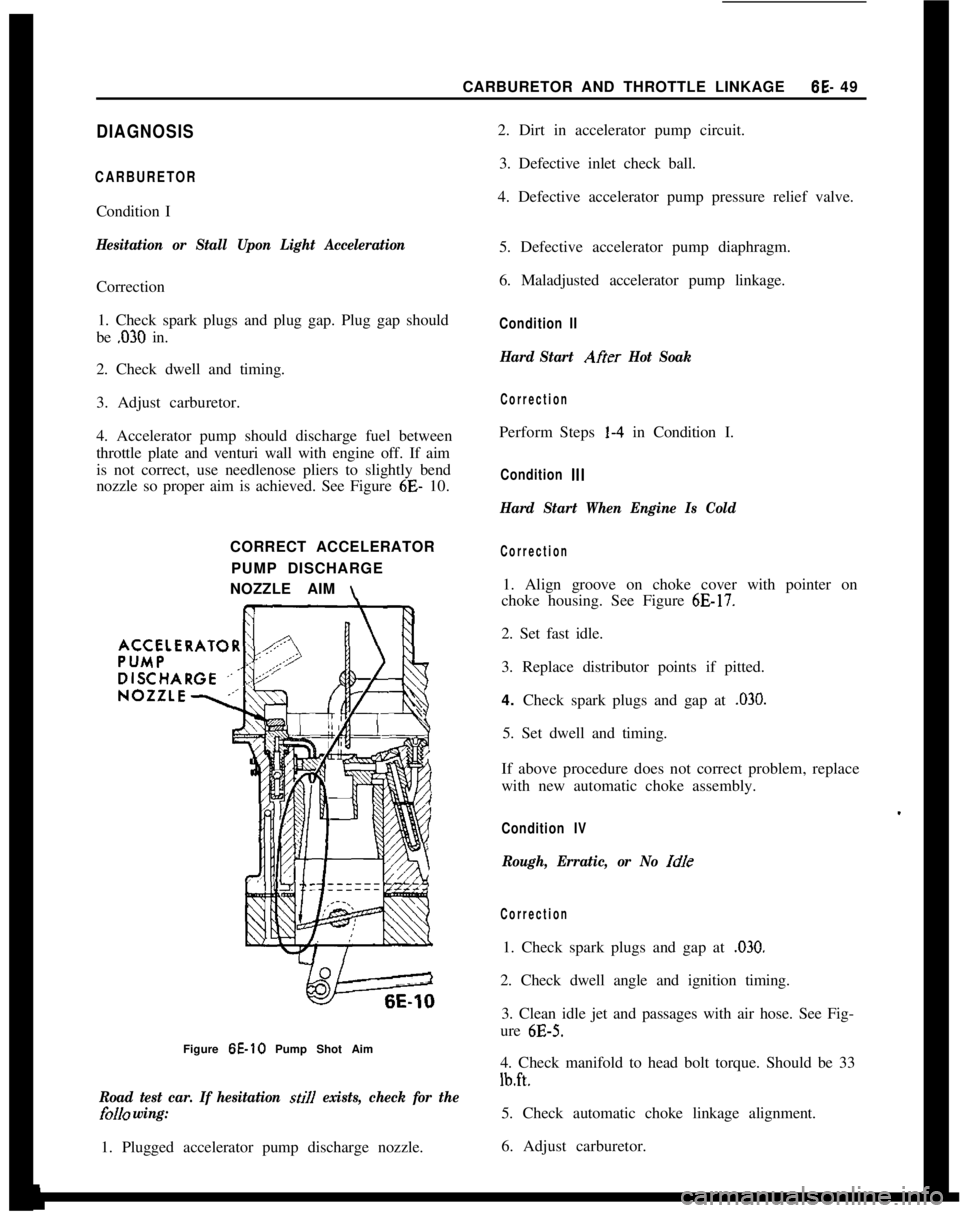
nozzle so proper aim is achieved. See Figure 6E- 10.
CORRECT ACCELERATOR
PUMP DISCHARGE
NOZZLE AIM
\Figure 6E-10 Pump Shot Aim
Road test car. If hesitation still exists, check for the
folI0 wing:1. Plugged accelerator pump discharge nozzle.2. Dirt in accelerator pump circuit.
3. Defective inlet check ball.
4. Defective accelerator pump pressure relief valve.
5. Defective accelerator pump diaphragm.
6. Maladjusted accelerator pump linkage.
Condition II
Hard Start Afier Hot Soak
CorrectionPerform Steps l-4 in Condition I.
Condition Ill
Hard Start When Engine Is Cold
Correction1. Align groove on choke cover with pointer on
choke housing. See Figure
6E-17.2. Set fast idle.
3. Replace distributor points if pitted.
4. Check spark plugs and gap at
,030.5. Set dwell and timing.
If above procedure does not correct problem, replace
with new automatic choke assembly.
Condition IV
Rough, Erratic, or No Idle
Correction1. Check spark plugs and gap at
,030.2. Check dwell angle and ignition timing.
3. Clean idle jet and passages with air hose. See Fig-
ure
6E-5.4. Check manifold to head bolt torque. Should be 33
lb.ft.5. Check automatic choke linkage alignment.
6. Adjust carburetor.
Page 341 of 625
6E- 501973 OPEL SERVICE MANUALMAINTENANCE AND ADJUSTMENTS
IDLE SPEED ADJUSTMENT
Note:
Idle speeds of 600 to 800 R.P.M. are normal
for engines with less than
3,ooO miles.Prior to making any adjustment to the carburetor,
the following items must be checked for proper oper-
ation and/or setting:
1. Valve Adjustment (Hydraulic lifters can be im-
properly adjusted.)
2. Dwell Angle.
3. Ignition Timing.
4. Spark Plug Gap.
5. Exhaust Gas Recirculation Valve (See “Check-
ing” under EXHAUST GAS RECIRCULATION
SYSTEM.)
After it has been ascertained that the above items are
properly adjusted and operating correctly and idle
R.P.M. is still not within specifications, proceed as
follows:
1. With air cleaner installed, run engine until normal
operating temperature is reached.
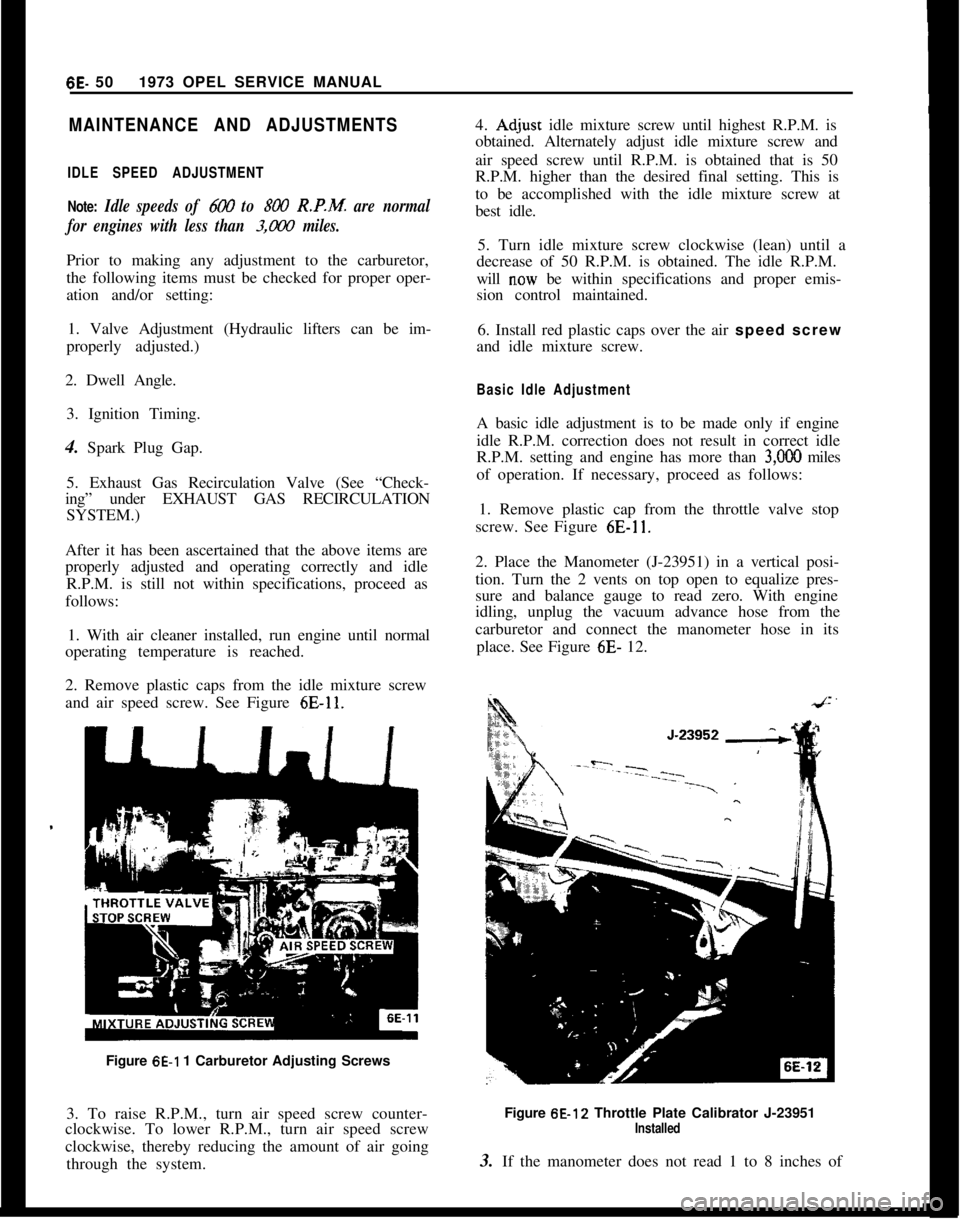
2. Remove plastic caps from the idle mixture screw
and air speed screw. See Figure
6E-11.Figure
6E-1 1 Carburetor Adjusting Screws
3. To raise R.P.M., turn air speed screw counter-
clockwise. To lower R.P.M., turn air speed screw
clockwise, thereby reducing the amount of air going
through the system.4.
Ad,just idle mixture screw until highest R.P.M. is
obtained. Alternately adjust idle mixture screw and
air speed screw until R.P.M. is obtained that is 50
R.P.M. higher than the desired final setting. This is
to be accomplished with the idle mixture screw at
best idle.
5. Turn idle mixture screw clockwise (lean) until a
decrease of 50 R.P.M. is obtained. The idle R.P.M.
will
n.ow be within specifications and proper emis-
sion control maintained.
6. Install red plastic caps over the air speed screw
and idle mixture screw.
Basic Idle AdjustmentA basic idle adjustment is to be made only if engine
idle R.P.M. correction does not result in correct idle
R.P.M. setting and engine has more than
3,OOO miles
of operation. If necessary, proceed as follows:
1. Remove plastic cap from the throttle valve stop
screw. See Figure
6E-11.2. Place the Manometer (J-23951) in a vertical posi-
tion. Turn the 2 vents on top open to equalize pres-
sure and balance gauge to read zero. With engine
idling, unplug the vacuum advance hose from the
carburetor and connect the manometer hose in its
place. See Figure 6E- 12.
Figure 6E-12 Throttle Plate Calibrator J-23951
Installed3. If the manometer does not read 1 to 8 inches of
Page 342 of 625
CARBURETOR AND THROTTLE LINKAGE6E- 51
water, adjust the throttle stop screw to read 6 inches
of water (3 inches down and 3 inches up).
4. Disconnect manometer and reconnect the vacuum
advance hose.
5. Adjust idle air speed screw and mixture screw to
obtain maximum idle at 850 to 900 R.P.M. (auto-
matic transmission) or 900 to 950 R.P.M. (manual
transmission).
6. Make final adjustment by turning idle mixture
screw in to reduce idle speed 50 R.P.M.
7. Install red plastic caps over the air speed screw
and idle mixture screw. Replace plastic cap over the
throttle valve stop screw and secure in place with
Loctite.
Fast Idle Speed Adjustment
1. Remove air cleaner cover.
2. With engine off, open the throttle halfway and
close the choke valve, release the throttle, then re-
lease the choke.
3. Start engine without moving the throttle. Adjust
to 3200 to 3300 R.P.M. using 2 nuts on fast idle rod.
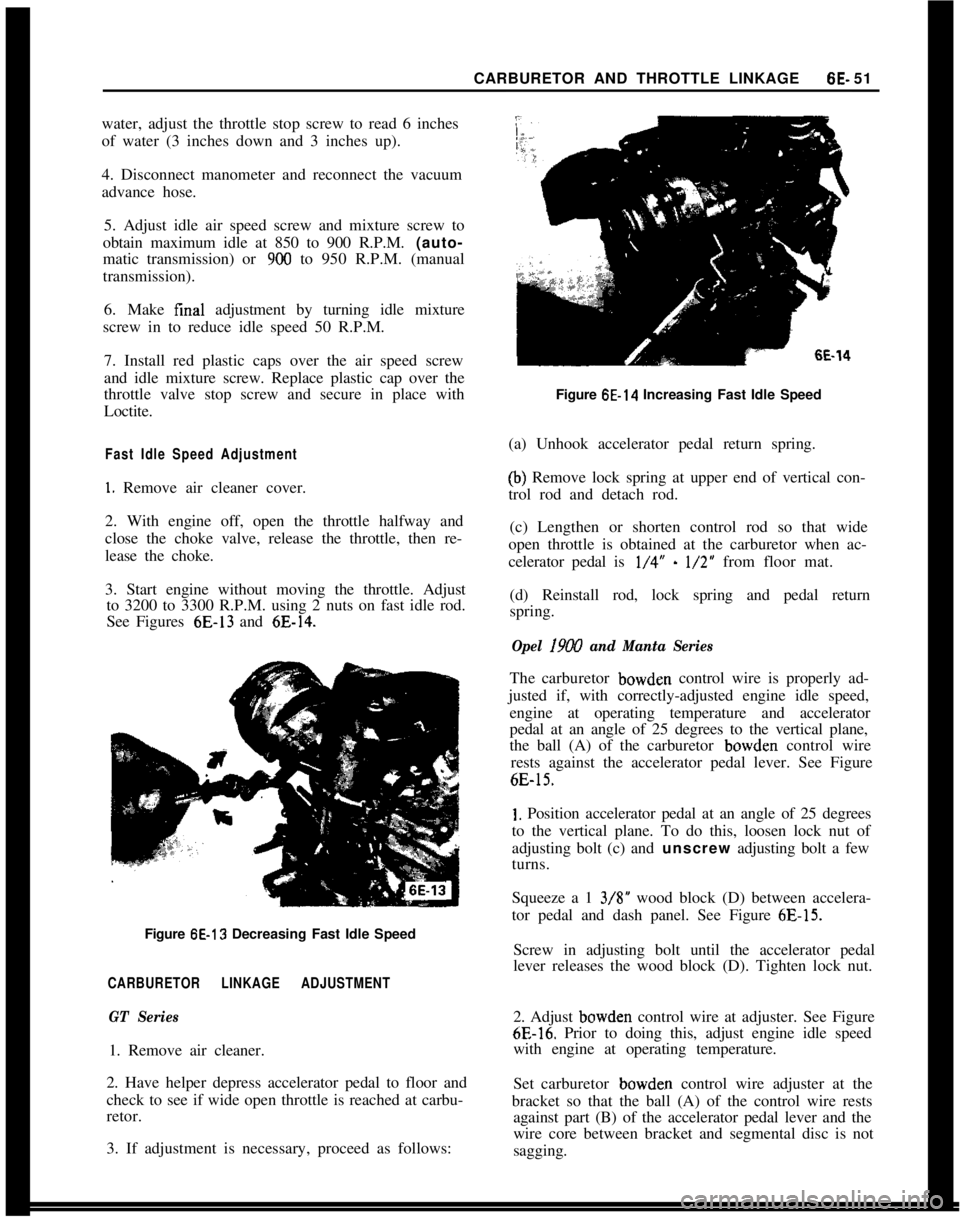
See Figures 6E-13 and
6E-14.Figure
6E-13 Decreasing Fast Idle Speed
CARBURETOR LINKAGE ADJUSTMENT
GT Series1. Remove air cleaner.
2. Have helper depress accelerator pedal to floor and
check to see if wide open throttle is reached at carbu-
retor.
3. If adjustment is necessary, proceed as follows:
6E-14Figure
6E-14 Increasing Fast Idle Speed
(a) Unhook accelerator pedal return spring.
(b) Remove lock spring at upper end of vertical con-
trol rod and detach rod.
(c) Lengthen or shorten control rod so that wide
open throttle is obtained at the carburetor when ac-
celerator pedal is
l/4” - l/2” from floor mat.
(d) Reinstall rod, lock spring and pedal return
spring.
Opel 19W and Manta SeriesThe carburetor bowden control wire is properly ad-
justed if, with correctly-adjusted engine idle speed,
engine at operating temperature and accelerator
pedal at an angle of 25 degrees to the vertical plane,
the ball (A) of the carburetor bowden control wire
rests against the accelerator pedal lever. See Figure
6E-15.
1. Position accelerator pedal at an angle of 25 degrees
to the vertical plane. To do this, loosen lock nut of
adjusting bolt (c) and unscrew adjusting bolt a few
turns.
Squeeze a 1 3/S” wood block (D) between accelera-
tor pedal and dash panel. See Figure
6E-15.Screw in adjusting bolt until the accelerator pedal
lever releases the wood block (D). Tighten lock nut.
2. Adjust bowden control wire at adjuster. See Figure
6E-16. Prior to doing this, adjust engine idle speed
with engine at operating temperature.
Set carburetor bowden control wire adjuster at the
bracket so that the ball (A) of the control wire rests
against part (B) of the accelerator pedal lever and the
wire core between bracket and segmental disc is not
sagging.
Page 353 of 625
6F. 62 1973 OPEL SERVICE MANUAL
bleed into the vacuum line, allowing more manifold
vacuum to reach the vacuum motor. Whenever there
is nine inches or more of vacuum in the vacuum
motor, the diaphragm spring is compressed, the door
is opened.
When the engine is not running, the diaphragm
spring will always hold the door closed. However,
when the engine is running, the position of the door
depends on the air temperature in the air cleaner.
When starting a cold engine (air cleaner temperature
under 85 degrees), the air door will open immedi-
ately. This is because the air bleed valve in the sensor
is closed so that full manifold vacuum, is applied in
the vacuum motor. As soon as the air cleaner starts
receiving hot air from the heat stove, the sensor will
cause the air door to close partially, mixing cold air
with the hot air as necessary to regulate air cleaner
temperature within 20 degrees of the ideal 115 de-
grees air inlet temperature.
If underhood air temperature rises to 135 degrees,
the air bleed valve in the sensor will be wide open so
that vacuum to the vacuum motor approaches zero.
The diaphragm spring in the vacuum motor will hold
the air door closed tightly. If underhood temperature
rises above 135 degrees, carburetor inlet air tempera-
ture will also rise above 135 degrees.
While air cleaner temperature is being regulated, ac-
celerating the engine hard will cause the vacuum
level in the intake manifold and in the vacuum motor
to drop. Whenever vacuum drops below 5 inches, the
diaphragm spring will close the air
door in order to
get the
maxumum outside air flow required for max-
imum acceleration.
The carburetor is set by the manufacturer for
800-
850 RPM (automatic transmission) or 850-900 RPM
(manual transmission) and 1.5 to 2.5 percent CO.
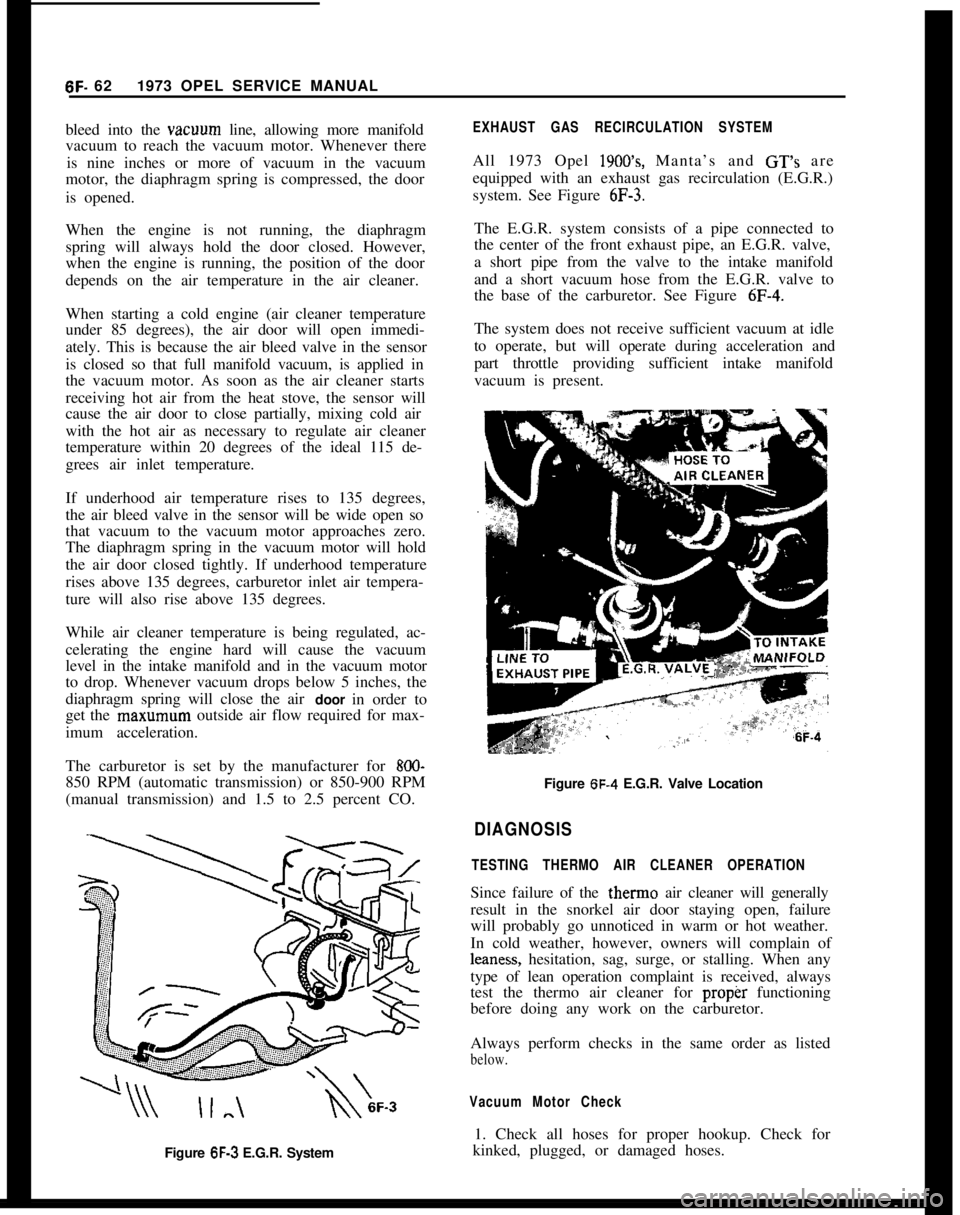
Figure 6F-3 E.G.R. System
EXHAUST GAS RECIRCULATION SYSTEM
All 1973 Opel 1900’s, Manta’s and GT’s are
equipped with an exhaust gas recirculation (E.G.R.)
system. See Figure
6F-3.
The E.G.R. system consists of a pipe connected to
the center of the front exhaust pipe, an E.G.R. valve,
a short pipe from the valve to the intake manifold
and a short vacuum hose from the E.G.R. valve to
the base of the carburetor. See Figure
6F-4.
The system does not receive sufficient vacuum at idle
to operate, but will operate during acceleration and
part throttle providing sufficient intake manifold
vacuum is present.
Figure 6F-4 E.G.R. Valve Location
DIAGNOSIS
TESTING THERMO AIR CLEANER OPERATION
Since failure of the therm0 air cleaner will generally
result in the snorkel air door staying open, failure
will probably go unnoticed in warm or hot weather.
In cold weather, however, owners will complain of
leaness, hesitation, sag, surge, or stalling. When any
type of lean operation complaint is received, always
test the thermo air cleaner for
proper functioning
before doing any work on the carburetor.
Always perform checks in the same order as listed
below.
Vacuum Motor Check
1. Check all hoses for proper hookup. Check for
kinked, plugged, or damaged hoses.
Page 354 of 625
EMISSION CONTROL SYSTEMS6F- 63
2. With the engine “OFF”, observe damper doorposition through snorkel opening. If position of snor-kel makes observation difficult “se the aid of a mir-
ror. At this point damper door should be in such a
position that the heat stove passage is covered (snor-
kel passage open). If not, check for binds in linkage.3. Apply at least nine in. Hg. of vacuum to dia-
phragm assembly through hose disconnected at sen-
sor “nit. This can be done by mouth. Damper door
should completely close snorkel passage whenvacuum is applied. If not, check to see if linkage is
hooked up correctly and for a vacuum leak.
4. With vacuum applied, bend or clamp hose to trapvacuum in diaphragm assembly. Damper door
should remain in position (closed snorkel passage). Ifit does not, there is a vacuum leak in diaphragm
assembly. Replace diaphragm assembly.
Sensor Check
Quick Check of System:
1. Start test with engine cold, air cleaner at a temper-ature below 85 degrees. If the engine has been in
recent “se, allow it to cool.
2. Observe the air door before starting the engine: it
should be closed.3. Start the engine and allow it to idle. Immediately
after starting the engine, the air door should open.
4. As the engine warms up, the air door should start
to close, and the air cleaner should become warm tothe hand.
5. The system is operating normally as described
above. If the air cleaner fails to operate as above or
if correct operation of the air cleaner is still in doubt,
proceed to the thermometer check.
Thermometer Check of Sensor:1. Start test with air cleaner temperature below 85
degrees. IF ENGINE HAS BEEN RUN RE-
CENTLY, ALLOW IT TO COOL DOWN. Whileengine is cooling, remove air cleaner cover and in-
stall a temperature gage such as J- 22973 as close as
possible to
se&r. Keinstall air cleaner cover. Let car
stand idle for
l/2 hour or more before proceeding to
step 2.2. Start the engine. Air door should open immedi-
ately if engine is cool enough. When air door starts
to close (in a few minutes), remove air cleaner cover
and read temperature gage. It must
read 115 degreesplus or minus 20 degrees.
3. If air door does not start to close at temperatureindicated, temperature sensor is defective and must
be replaced.
EXHAUST GAS RECIRCULATION SYSTEM
TestingThe exhaust gas recirculation valve is to be checked
at 12,000 mile intervals “sing the following proce-
dure:1. With engine at operating temperature, connect a
tachometer to engine and note R.P.M. at idle.
2. Disconnect vacuum hose at the intake manifold
that goes to the air cleaner.
3. Disconnect vacuum hose for exhaust gas recircula-tion valve from the throttle valve and connect it to
the intake manifold where vacuum hose to air
cleaner was connected.4. Engine speed should decrease between
100-240R.P.M. from previously noted R.P.M.
5. If the R.P.M. decrease is less than 100 R.P.M., theexhaust gas recirculation valve and fitting going into
the intake manifold must be removed, cleaned, and’
reinstalled.
MAINTENANCE AND ADJUSTMENTS
EXHAUST GAS RECIRCULATION SYSTEM
CleaningClean the exhaust gas recirculation valve and fitting
with a piece of stiff wire removing all exhaust depos-
its.
CAUTION:Do not soak in solvent. After
r.einstafIing the valve and fitting, check op
eration as outlined under “Testing”. If
vahe does not operate properly after a
thorough cleaning, replace it.
MAJOR REPAIR
REMOVAL AND REPLACEMENT OECS UNITSThe damper door is not serviceable. The air cleaner
assembly must be replaced if the damper door is
defective.
R And R Vacuum Motor
1. Remove vacuum
motor retainer spring. See Figure
6F-5.
Page 356 of 625
TUNE-UP
ALL MODELS
CONTENTS
Subject
DESCRIPTION AND OPERATION:
Purpose of a Tune-Up. . . . . . . . . . . . . . . . . . . . . . . . . . . . . . . . . . . . . . . . . . . . . . . . . , . . . .DIAGNOSIS: (Not Applicable)
MAINTENANCE AND ADJUSTMENTS:
EngineTune-UpMechanicalOperations. . . . . . . . . . . . . . . . . . . .
EngineTune-UpInstrumentChecks. . . . . . . . . . . . . . . . . . . . . . . . . . . .MAJOR REPAIR: (Not Applicable)
SPECIFICATIONS:
Tune-Uo Soecifications and Adjustments
. . . . . . . . . . . . . . . .Page No.6G-65
6G-6566-6766-68
DESCRIPTION AND OPERATION
PURPOSE OF TUNE-UP
The purpose of an engine tune-up is to restore powerand performance that may have been lost through,
loss of adjustment, wear, corrosion, or deterioration
of one or more parts or units. In the normal operat-
ion of an engine, these changes take place gradually
at quite a number of points so that it is seldom advis-able to attempt an improvement in performance by
correcting one or two items only. Time will be savedand more lasting results will be assured by following
a definite and thorough procedure of analysis and
correction of all items affecting power and perform-
ance. Because of Federal laws, limiting exhaust emis-sions, it is even more important that the engines
tune-up is done accurately, using the specifications
listed and the tune-up sticker found in each engine
compartment.
Economical, trouble free operation can better be as-sured if a complete tune-up is performed at first 4
months or
6,ooO miles of operation - then at 12
month or 12,000 mile intervals.
The parts or units which affect power and perform-
ance may be divided, into three groups (1) compres-sion, (2) ignition and (3) carburetion. The tune-up
procedure should cover these groups in the order
given. While the items affecting compression and
ignition may be handled according to individual
preference, correction of items in the carburetiongroup should not be attemplcu
ulllll all items in
compression and ignition have been satisfactorily
corrected.
MAINTENANCE AND ADJUSTMENTS
ENGINE TUNE-UP OPERATIONS
CompressionTo make sure hydrocarbon and carbon monoxide
emissions will be within limits, it is very important
that the adjustments be followed exactly.
The suggested procedure for engine tune-up is as
follows:1. Remove all spark plugs.
2. Position throttle and choke valve in full open posi-tion.
3. Connect jumper wire between distributor terminalof coil and ground on engine to avoid high tension
sparking while cranking engine.
4. Hook up starter remote control cable and turn
ignition switch to “on” position.
5. Firmly insert compression gage in spark plug port.Crank engine to obtain highest possible reading.
Page 357 of 625
6G- 661973 OPEL SERVICE MANUAL
6. Check compression of each cylinder. Repeat
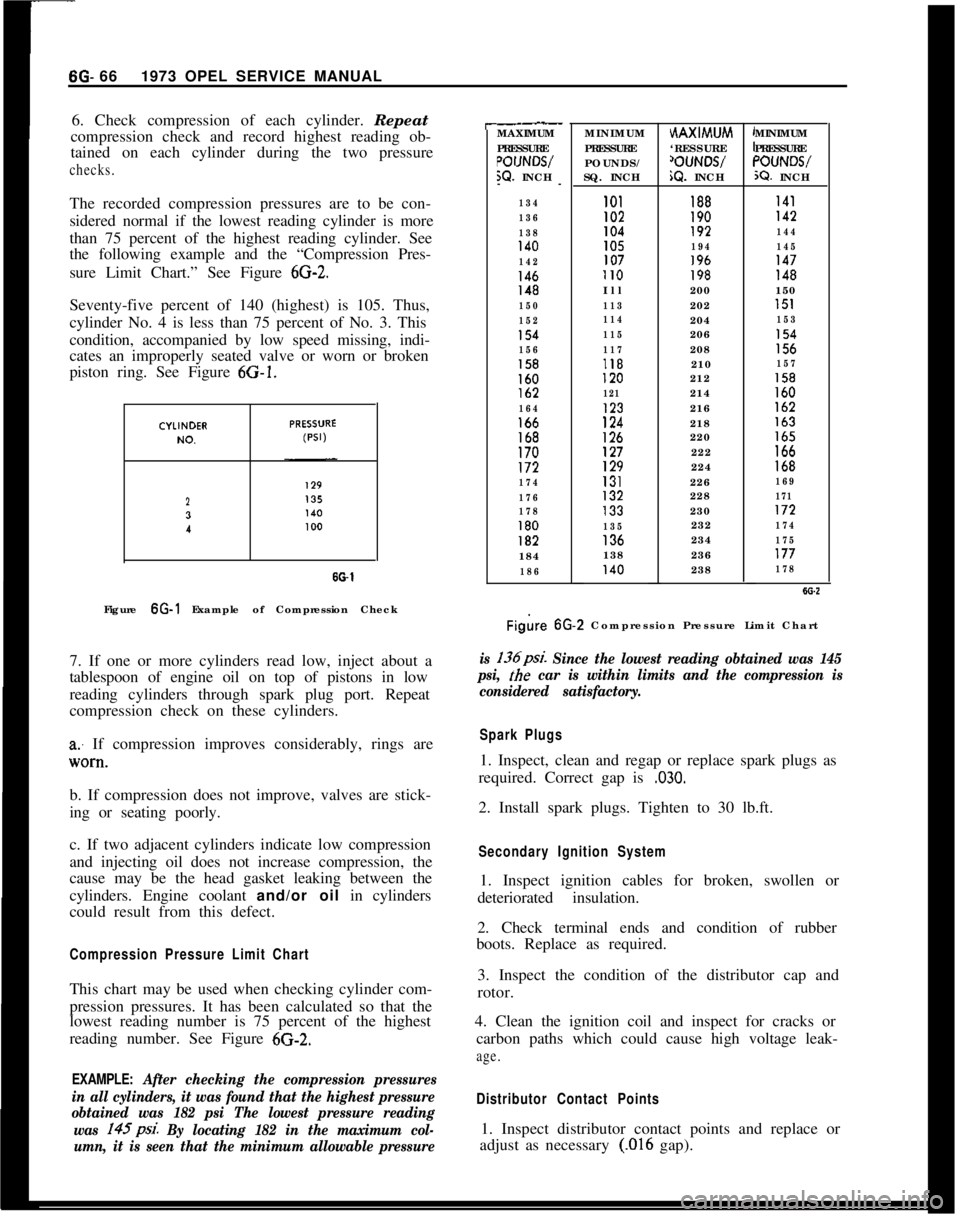
compression check and record highest reading ob-
tained on each cylinder during the two pressurechecks.The recorded compression pressures are to be con-
sidered normal if the lowest reading cylinder is more
than 75 percent of the highest reading cylinder. See
the following example and the “Compression Pres-
sure Limit Chart.” See Figure
6G-2.Seventy-five percent of 140 (highest) is 105. Thus,
cylinder No. 4 is less than 75 percent of No. 3. This
condition, accompanied by low speed missing, indi-
cates an improperly seated valve or worn or broken
piston ring. See Figure 6G-1.
23
I
SO-1Figure 6G-1 Example of Compression Check
7. If one or more cylinders read low, inject about a
tablespoon of engine oil on top of pistons in low
reading cylinders through spark plug port. Repeat
compression check on these cylinders.
a: If compression improves considerably, rings are
lV0*tl.b. If compression does not improve, valves are stick-
ing or seating poorly.
c. If two adjacent cylinders indicate low compression
and injecting oil does not increase compression, the
cause may be the head gasket leaking between the
cylinders. Engine coolant and/or oil in cylinders
could result from this defect.
Compression Pressure Limit ChartThis chart may be used when checking cylinder com-
pression pressures. It has been calculated so that the
lowest reading number is 75 percent of the highest
reading number. See Figure 6G-2.
EXAMPLE: After checking the compression pressures
in all cylinders, it was found that the highest pressure
obtained was 182 psi The lowest pressure reading
was 145psi.
By locating 182 in the maximum col-
umn, it is seen that the minimum allowable pressure
r-.__MAXIMUM
PRESSURE
POIJNWW. INCH
--
134
136
138
140
142
146148
150
152
154
156
158160lb2
164166168170172
174
176
178
180182184
186MINIMUM
PRESSURE
POUNDS/
SQ. INCHHAXIMUM
‘RESSURE
‘OUNWiQ. INCHMINIMUM
PRESSURE“OUNWX?. INCH
101188I41I02190142104192144105194145107196147II0198148Ill200150
113202151
114204153
115206154
117208156118210157120212158
121214160123216162
124218163
126220165127222166129224168131226169132228171133230172
135232174136234175138236177140238178
Figire 6G.2 Compression Pressure Limit Chart
is 136psi. Since the lowest reading obtained was 145
psi,
the car is within limits and the compression is
considered satisfactory.
Spark Plugs1. Inspect, clean and regap or replace spark plugs as
required. Correct gap is
,030.2. Install spark plugs. Tighten to 30 lb.ft.
Secondary Ignition System1. Inspect ignition cables for broken, swollen or
deteriorated insulation.
2. Check terminal ends and condition of rubber
boots. Replace as required.
3. Inspect the condition of the distributor cap and
rotor.
4. Clean the ignition coil and inspect for cracks or
carbon paths which could cause high voltage leak-
age.
Distributor Contact Points1. Inspect distributor contact points and replace or
adjust as necessary
(.016 gap).
Page 358 of 625
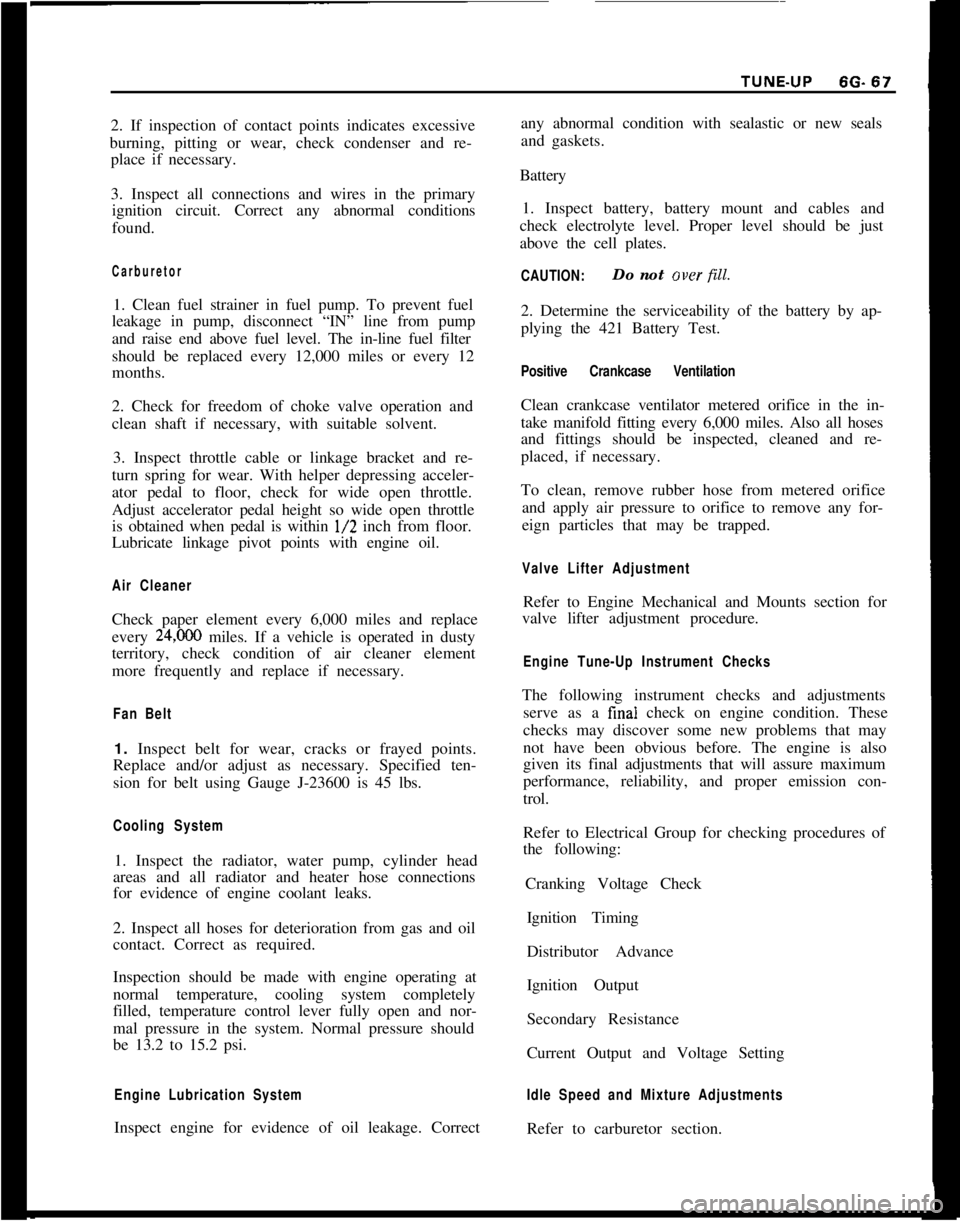
2. If inspection of contact points indicates excessive
burning, pitting or wear, check condenser and re-
place if necessary.
3. Inspect all connections and wires in the primary
ignition circuit. Correct any abnormal conditions
found.Carburetor1. Clean fuel strainer in fuel pump. To prevent fuel
leakage in pump, disconnect “IN” line from pump
and raise end above fuel level. The in-line fuel filter
should be replaced every 12,000 miles or every 12
months.
2. Check for freedom of choke valve operation and
clean shaft if necessary, with suitable solvent.
3. Inspect throttle cable or linkage bracket and re-
turn spring for wear. With helper depressing acceler-
ator pedal to floor, check for wide open throttle.
Adjust accelerator pedal height so wide open throttle
is obtained when pedal is within
l/2 inch from floor.
Lubricate linkage pivot points with engine oil.
Air CleanerCheck paper element every 6,000 miles and replace
every
24,ooO miles. If a vehicle is operated in dusty
territory, check condition of air cleaner element
more frequently and replace if necessary.
Fan Belt1. Inspect belt for wear, cracks or frayed points.
Replace and/or adjust as necessary. Specified ten-
sion for belt using Gauge J-23600 is 45 lbs.
Cooling System1. Inspect the radiator, water pump, cylinder head
areas and all radiator and heater hose connections
for evidence of engine coolant leaks.
2. Inspect all hoses for deterioration from gas and oil
contact. Correct as required.
Inspection should be made with engine operating at
normal temperature, cooling system completely
filled, temperature control lever fully open and nor-
mal pressure in the system. Normal pressure should
be 13.2 to 15.2 psi.
Engine Lubrication SystemInspect engine for evidence of oil leakage. Correctany abnormal condition with sealastic or new seals
and gaskets.
Battery
1. Inspect battery, battery mount and cables and
check electrolyte level. Proper level should be just
above the cell plates.
CAUTION:Do not over fill.
2. Determine the serviceability of the battery by ap-
plying the 421 Battery Test.
Positive Crankcase VentilationClean crankcase ventilator metered orifice in the in-
take manifold fitting every 6,000 miles. Also all hoses
and fittings should be inspected, cleaned and re-
placed, if necessary.
To clean, remove rubber hose from metered orifice
and apply air pressure to orifice to remove any for-
eign particles that may be trapped.
Valve Lifter AdjustmentRefer to Engine Mechanical and Mounts section for
valve lifter adjustment procedure.
Engine Tune-Up Instrument ChecksThe following instrument checks and adjustments
serve as a final check on engine condition. These
checks may discover some new problems that may
not have been obvious before. The engine is also
given its final adjustments that will assure maximum
performance, reliability, and proper emission con-
trol.
Refer to Electrical Group for checking procedures of
the following:
Cranking Voltage Check
Ignition Timing
Distributor Advance
Ignition Output
Secondary Resistance
Current Output and Voltage Setting
Idle Speed and Mixture AdjustmentsRefer to carburetor section.
Page 363 of 625
7A- 21973 OPEL SERVICE MANUALDIAGNOSIS
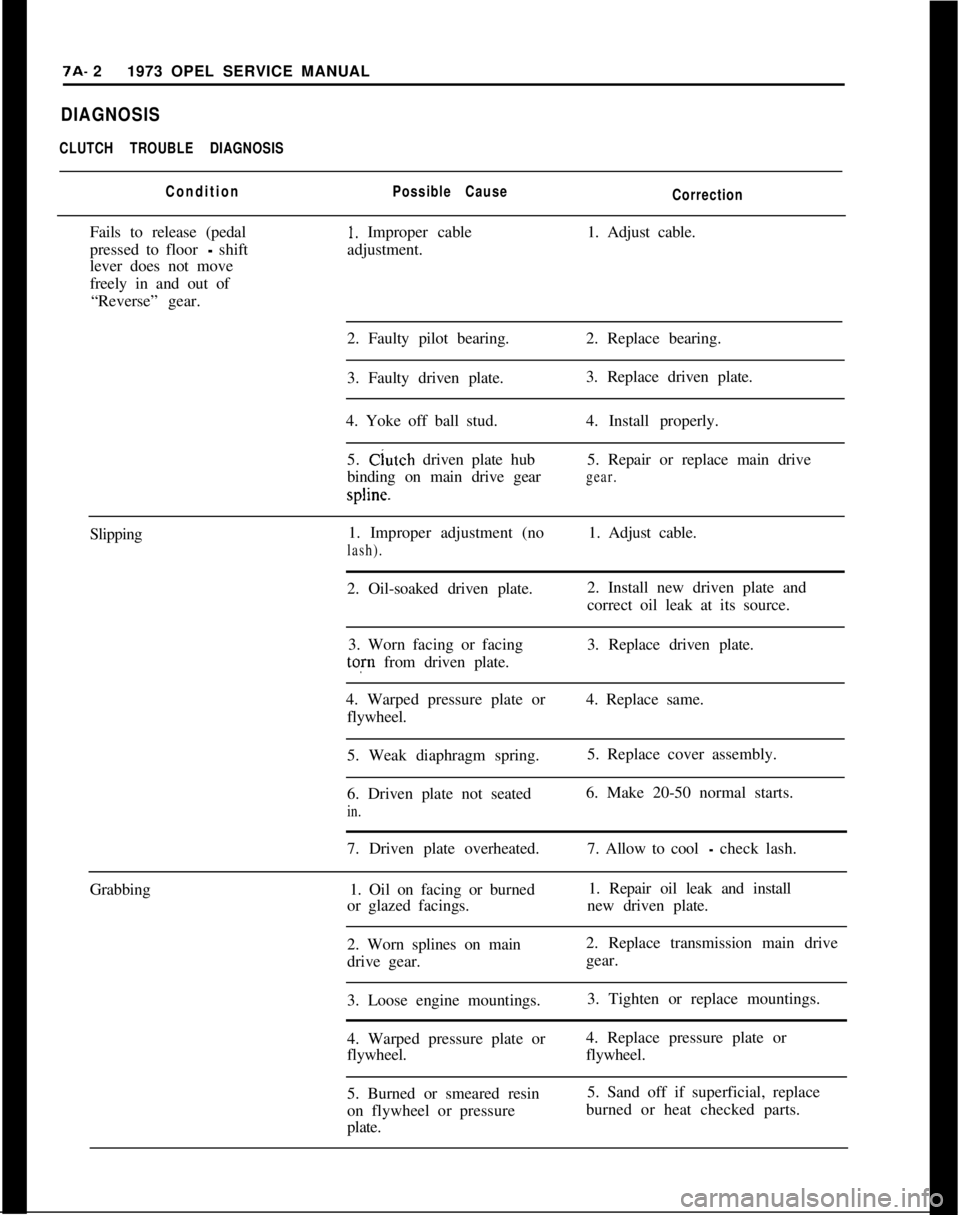
CLUTCH TROUBLE DIAGNOSIS
ConditionPossible Cause
CorrectionFails to release (pedal
1. Improper cable1. Adjust cable.
pressed to floor
- shiftadjustment.
lever does not move
freely in and out of
“Reverse” gear.
2. Faulty pilot bearing.2. Replace bearing.
3. Faulty driven plate.3. Replace driven plate.
4. Yoke off ball stud.4. Install properly.
5. Clutch driven plate hub5. Repair or replace main drive
binding on main drive gear
gear.spline.
Slipping1. Improper adjustment (no1. Adjust cable.
lash).2. Oil-soaked driven plate.2. Install new driven plate and
correct oil leak at its source.
3. Worn facing or facing3. Replace driven plate.tofn from driven plate.
4. Warped pressure plate or4. Replace same.
flywheel.
5. Weak diaphragm spring.5. Replace cover assembly.
6. Driven plate not seated6. Make 20-50 normal starts.
in.7. Driven plate overheated.7. Allow to cool
- check lash.
Grabbing1. Oil on facing or burned1. Repair oil leak and install
or glazed facings.new driven plate.
2. Worn splines on main2. Replace transmission main drive
drive gear.gear.
3. Loose engine mountings.3. Tighten or replace mountings.
4. Warped pressure plate or4. Replace pressure plate or
flywheel.flywheel.
5. Burned or smeared resin5. Sand off if superficial, replace
on flywheel or pressureburned or heat checked parts.
plate.