height PEUGEOT 108 2015 Owners Manual
[x] Cancel search | Manufacturer: PEUGEOT, Model Year: 2015, Model line: 108, Model: PEUGEOT 108 2015Pages: 271, PDF Size: 7.42 MB
Page 9 of 271
7
108_en_Chap00b_vue-ensemble_ed01-2015
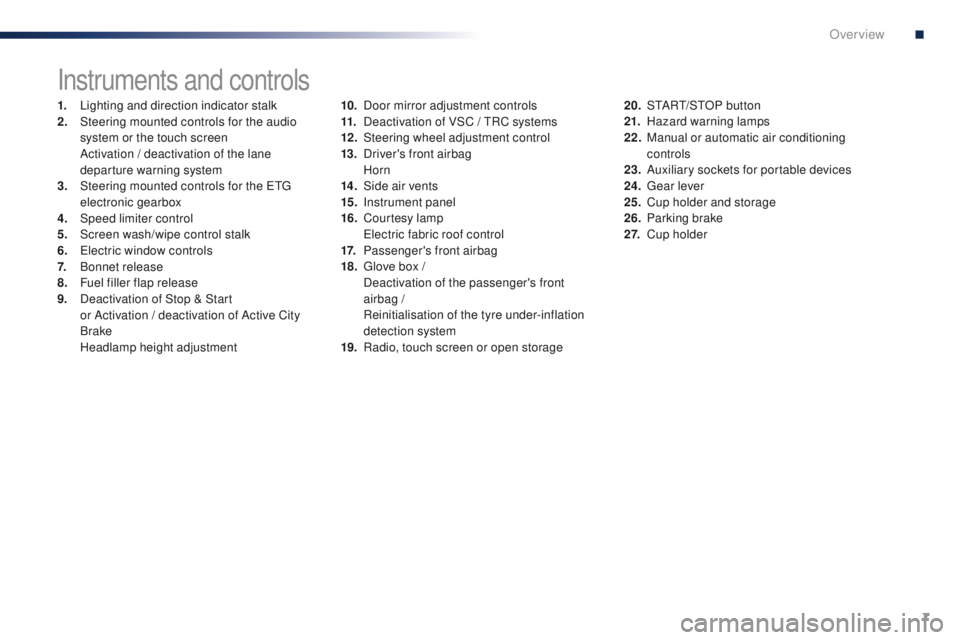
Instruments and controls
1. Lighting and direction indicator stalk
2. Steering mounted controls for the audio
system or the touch screen
A
ctivation / deactivation of the lane
departure warning system
3.
S
teering mounted controls for the etg
electronic gearbox
4.
Spe
ed limiter control
5.
S
creen wash/wipe control stalk
6.
e
le
ctric window controls
7.
B
onnet release
8.
F
uel filler flap release
9.
D
eactivation of Stop & Start
or
Activation / deactivation of Active City
Brake
H
eadlamp height adjustment 10. D
oor mirror adjustment controls
11. D eactivation of VSC / tR C systems
12 .
S
teering wheel adjustment control
13.
D
river's front airbag
Horn
14 .
S
ide air vents
15.
I
nstrument panel
16.
C
ourtesy lamp
e
le
ctric fabric roof control
17.
P
assenger's front airbag
18.
g
l
ove box /
D
eactivation of the passenger's front
airbag /
R
einitialisation of the tyre under-inflation
detection system
19.
R
adio, touch screen or open storage20. S
tA Rt/ S tO P button
21. H azard warning lamps
22.
M
anual or automatic air conditioning
controls
23.
A
uxiliary sockets for portable devices
24.
g
ea
r lever
25.
C
up holder and storage
26.
P
arking brake
2 7.
C
up holder
.
Over view
Page 47 of 271
45
108_en_Chap03_confort_ed01-2015
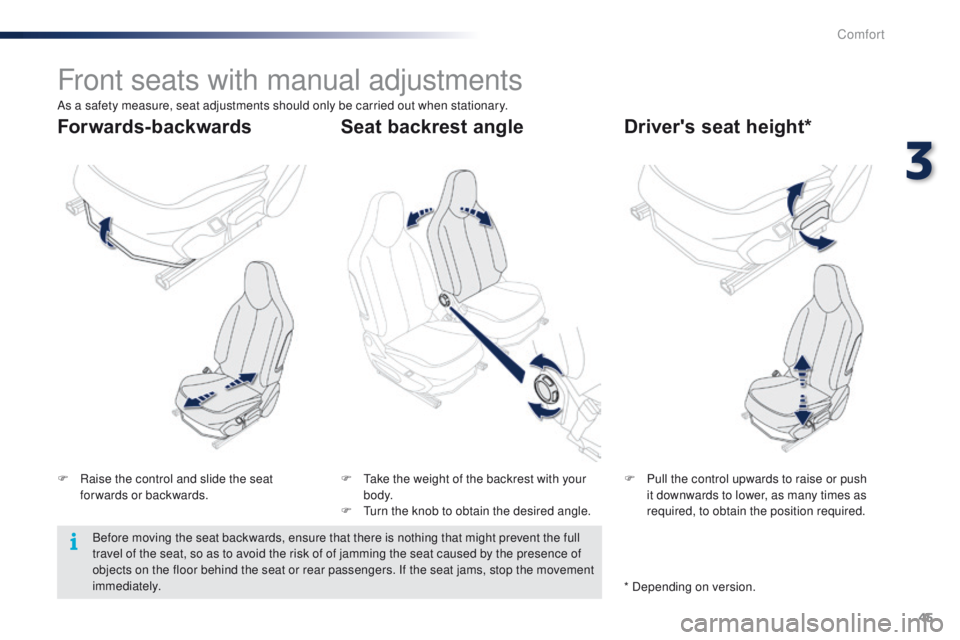
Front seats with manual adjustments
F Raise the control and slide the seat forwards or backwards. F
P ull the control upwards to raise or push
it downwards to lower, as many times as
required, to obtain the position required.
F
ta ke the weight of the backrest with your
b o dy.
F
t
u
rn the knob to obtain the desired angle.
Forwards-backwards Driver's seat height*
Seat backrest angle
As a safety measure, seat adjustments should only be carried out when stationary.
Before moving the seat backwards, ensure that there is nothing that might prevent the full
travel of the seat, so as to avoid the risk of of jamming the seat caused by the presence of
objects on the floor behind the seat or rear passengers. If the seat jams, stop the movement
immediately. * Depending on version.
3
Comfort
Page 52 of 271
50
108_en_Chap03_confort_ed01-2015
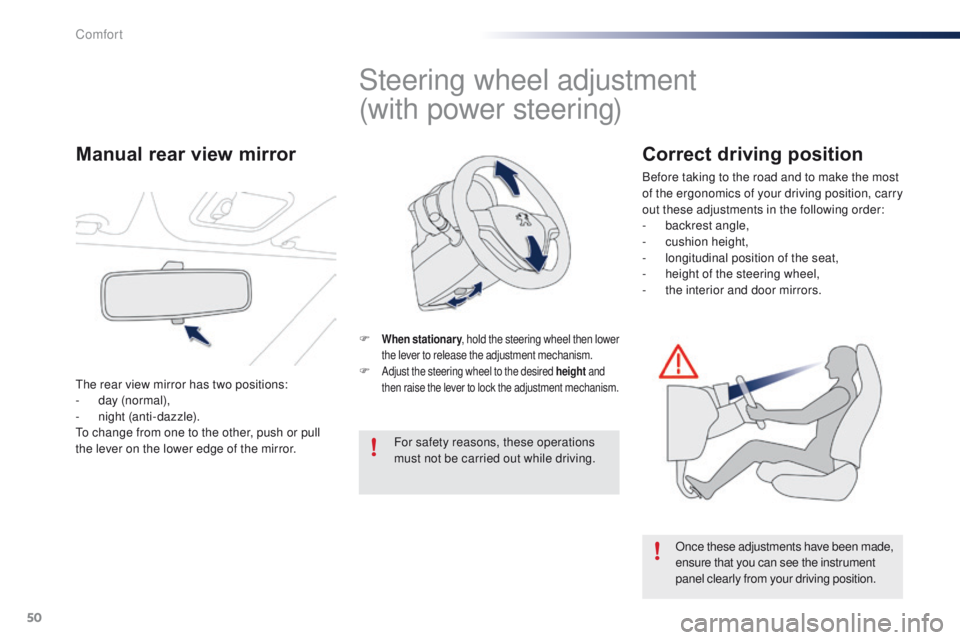
Steering wheel adjustment
(with power steering)
F When stationary, hold the steering wheel then lower
the lever to release the adjustment mechanism.
F Adjust the steering wheel to the desired height and
then raise the lever to lock the adjustment mechanism.
For safety reasons, these operations
must not be carried out while driving.
Once these adjustments have been made,
ensure that you can see the instrument
panel clearly from your driving position.
Manual rear view mirror
the rear view mirror has two positions:
- d ay (normal),
-
n
ight (anti-dazzle).
to c
hange from one to the other, push or pull
the lever on the lower edge of the mirror.
Correct driving position
Before taking to the road and to make the most
of the ergonomics of your driving position, carry
out these adjustments in the following order:
-
b
ackrest angle,
-
c
ushion height,
-
l
ongitudinal position of the seat,
-
hei
ght of the steering wheel,
-
t
he interior and door mirrors.
Comfort
Page 100 of 271
98
108_en_Chap06_visibilite_ed01-2015
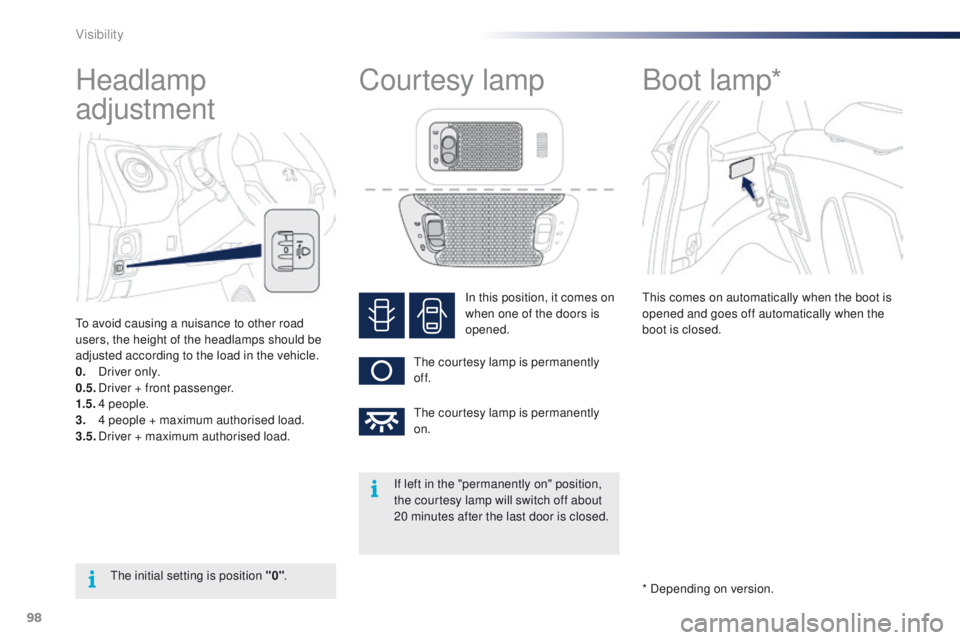
Headlamp
adjustment
to avoid causing a nuisance to other road
users, the height of the headlamps should be
adjusted according to the load in the vehicle.
0.
D
river only.
0.5.
D
river + front passenger.
1.5.
4
people.
3.
4 p
eople + maximum authorised load.
3.5.
D
river + maximum authorised load.
th
e initial setting is position "0" . In this position, it comes on
when one of the doors is
opened.
th
e courtesy lamp is permanently
of f.
th
e courtesy lamp is permanently
on.
Courtesy lamp Boot lamp*
this comes on automatically when the boot is
opened and goes off automatically when the
boot is closed.
If left in the "permanently on" position,
the courtesy lamp will switch off about
20 minutes after the last door is closed. * Depending on version.
Visibility
Page 133 of 271
131
108_en_Chap08_securite-enfants_ed01-2015
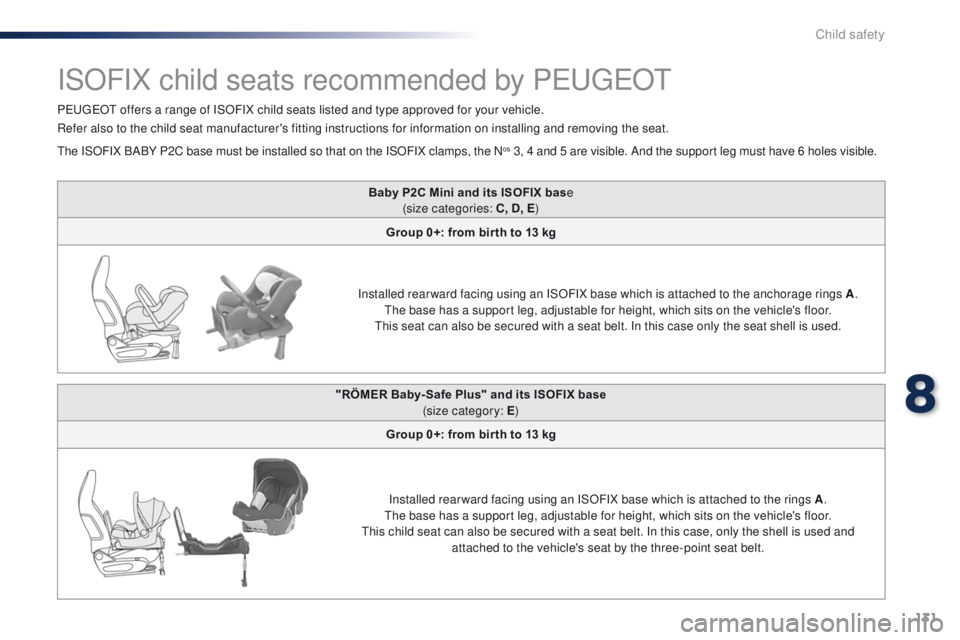
Baby P2C Mini and its ISOFIX base
(size categories: C, D, E )
Group 0+: from bir th to 13 kg
Installed rear ward facing using an ISOFIX base which is attached to the anchorage rings A .
th
e base has a support leg, adjustable for height, which sits on the vehicle's floor.
th
is seat can also be secured with a seat belt. In this case only the seat shell is used.
ISOFIX child seats recommended by Pe ugeOt
PeugeOt offers a range of ISOFIX child seats listed and type approved for your vehicle.
Refer also to the child seat manufacturer's fitting instructions for information on installing and removing the seat.
th
e ISOFIX BABY P2C base must be installed so that on the ISOFIX clamps, the N
os 3, 4 and 5 are visible. And the support leg must have 6 holes visible.
"RÖMER Baby- Safe Plus" and its ISOFIX base (size category: E )
Group 0+: from bir th to 13 kg
Installed rear ward facing using an ISOFIX base which is attached to the rings A .
th
e base has a support leg, adjustable for height, which sits on the vehicle's floor.
th
is child seat can also be secured with a seat belt. In this case, only the shell is used and attached to the vehicle's seat by the three-point seat belt.
8
Child safety
Page 134 of 271
132
108_en_Chap08_securite-enfants_ed01-2015
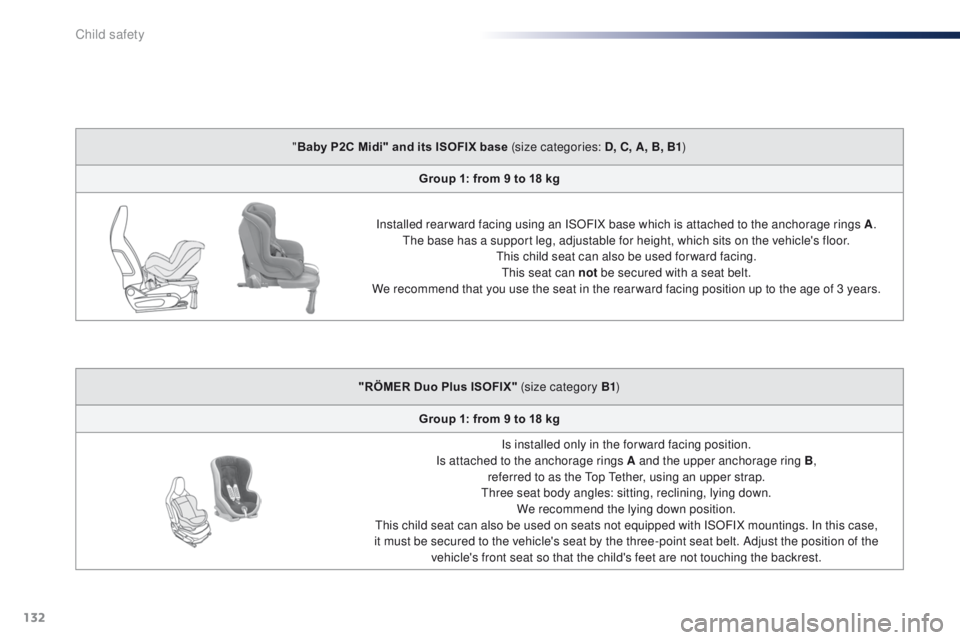
"Baby P2C Midi" and its ISOFIX base (size categories: D, C, A, B, B1 )
Group 1: from 9 to 18 kg
Installed rear ward facing using an ISOFIX base which is attached to the anchorage rings A .
th
e base has a support leg, adjustable for height, which sits on the vehicle's floor.
th
is child seat can also be used for ward facing.
th
is seat can not be secured with a seat belt.
We recommend that you use the seat in the rear ward facing position up to the age of 3 years.
"RÖMER Duo Plus ISOFIX" (size category B1 )
Group 1: from 9 to 18 kg Is installed only in the forward facing position.
Is attached to the anchorage rings A and the upper anchorage ring B, referred to as the
t
o
p t
e
ther, using an upper strap.
th
ree seat body angles: sitting, reclining, lying down.We recommend the lying down position.
th
is child seat can also be used on seats not equipped with ISOFIX mountings. In this case,
it must be secured to the vehicle's seat by the three-point seat belt. Adjust the position of the vehicle's front seat so that the child's feet are not touching the backrest.
Child safety
Page 170 of 271
168
108_en_Chap09_info-pratiques_ed01-2015
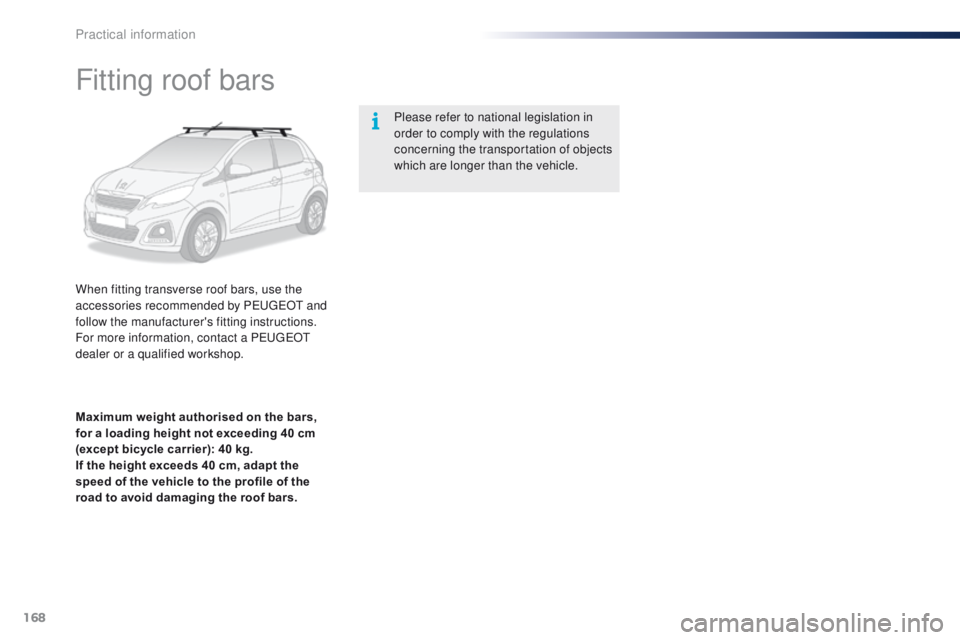
Fitting roof bars
When fitting transverse roof bars, use the
accessories recommended by PeugeOt and
follow the manufacturer's fitting instructions.
For more information, contact a P
e
uge
Ot
dealer or a qualified workshop. Please refer to national legislation in
order to comply with the regulations
concerning the transportation of objects
which are longer than the vehicle.
Maximum weight authorised on the bars,
for a loading height not exceeding 40 cm
(except bicycle carrier): 40 kg.
If the height exceeds 40 cm, adapt the
speed of the vehicle to the profile of the
road to avoid damaging the roof bars.
Practical information
Page 248 of 271
246
108_en_Chap13_recherche-visuelle_ed01-2015
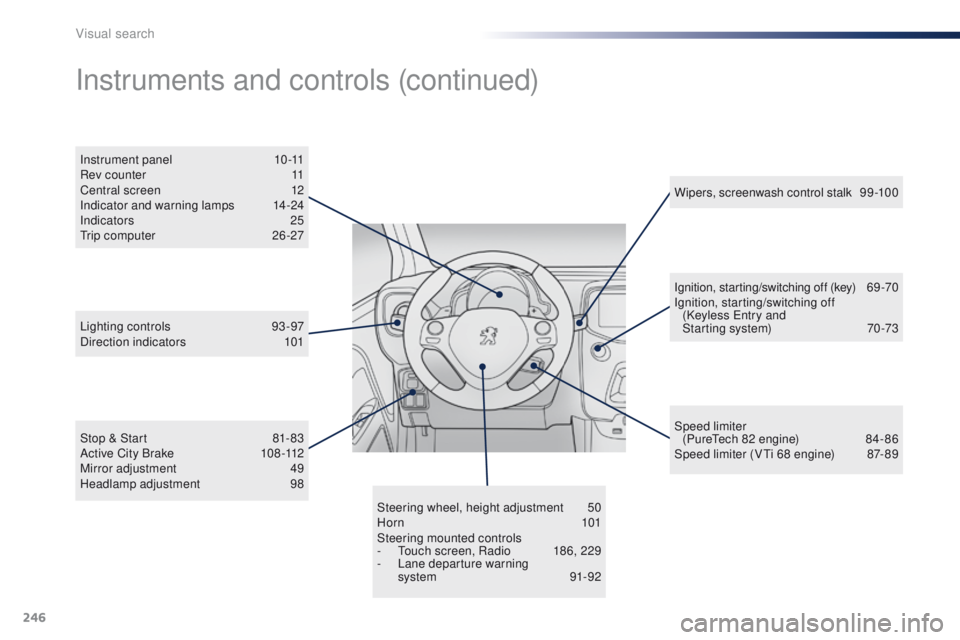
Steering wheel, height adjustment 50
Horn 101
Steering mounted controls
-
t
o
uch screen, Radio
1
86, 229
-
L
ane departure warning
system
91-92Ignition, starting/switching off (key)
6
9 -70
Ignition, starting/switching off (Keyless e
n
try and
Starting system)
7
0 -73
Instrument panel
1
0 -11
Rev counter
1
1
Central screen
1
2
Indicator and warning lamps
1
4-24
Indicators
25tr
ip computer
2
6 -27
Instruments and controls (continued)
Lighting controls 93
-97
Direction indicators 1 01
Stop & Start
8
1- 83
Active City Brake
1
08 -112
Mirror adjustment
4
9
Headlamp adjustment
9
8 Wipers, screenwash control stalk
9
9 -100
Speed limiter (Pure
te
ch 82 engine)
8
4- 86
Speed limiter (V
ti 6
8 engine)
87
- 89
Visual search