power steering PEUGEOT 108 2015 Owners Manual
[x] Cancel search | Manufacturer: PEUGEOT, Model Year: 2015, Model line: 108, Model: PEUGEOT 108 2015Pages: 271, PDF Size: 7.42 MB
Page 19 of 271
17
108_en_Chap01_controle-de-marche_ed01-2015
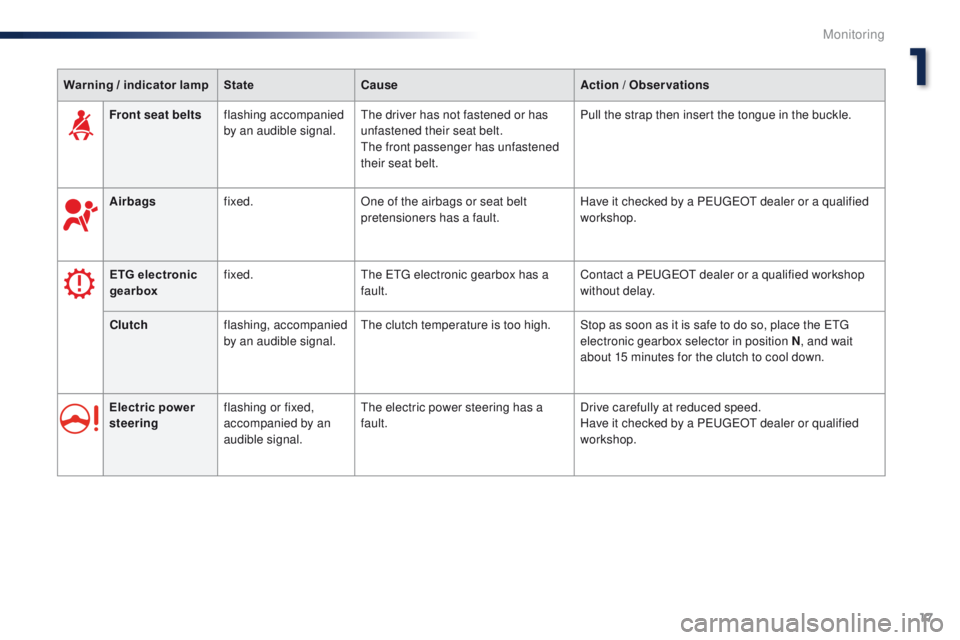
Front seat beltsflashing accompanied
by an audible signal.th e driver has not fastened or has
unfastened their seat belt.
the
front passenger has unfastened
their seat belt. Pull the strap then insert the tongue in the buckle.
Warning / indicator lamp
StateCause Action / Observations
Electric power
steering flashing or fixed,
accompanied by an
audible signal.
th
e electric power steering has a
fault. Drive carefully at reduced speed.
Have it checked by a P
e
uge
Ot
dealer or qualified
workshop.
Airbags
fixed. One of the airbags or seat belt
pretensioners has a fault. Have it checked by a P
e
uge
Ot
dealer or a qualified
workshop.
ETG electronic
gearbox fixed.
th
e etg electronic gearbox has a
fault. Contact a P
e
uge
Ot
dealer or a qualified workshop
without delay.
Clutch flashing, accompanied
by an audible signal.
th
e clutch temperature is too high. Stop as soon as it is safe to do so, place the etg
electronic gearbox selector in position N , and wait
about 15 minutes for the clutch to cool down.
1
Monitoring
Page 52 of 271
50
108_en_Chap03_confort_ed01-2015
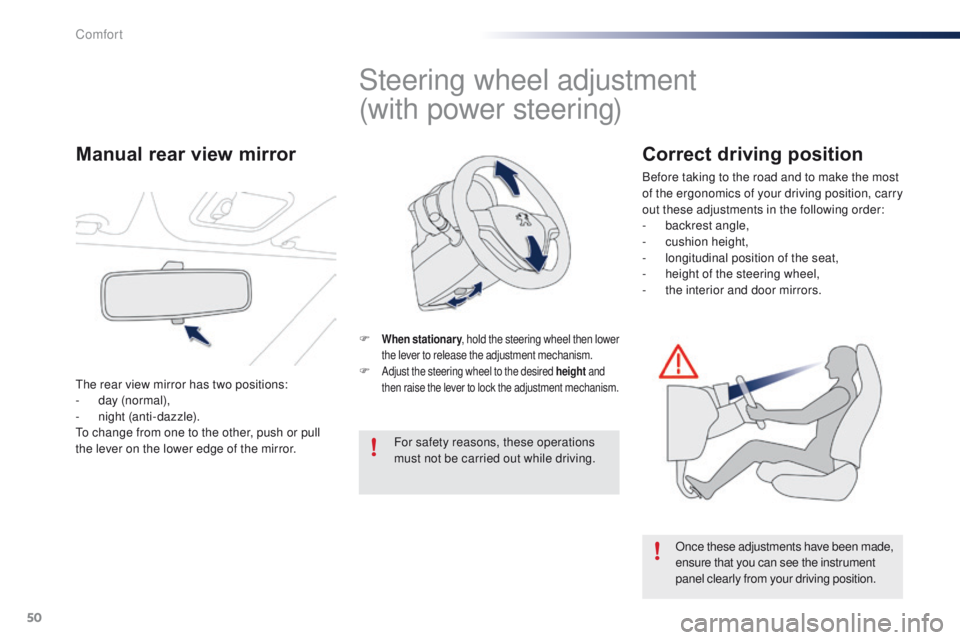
Steering wheel adjustment
(with power steering)
F When stationary, hold the steering wheel then lower
the lever to release the adjustment mechanism.
F Adjust the steering wheel to the desired height and
then raise the lever to lock the adjustment mechanism.
For safety reasons, these operations
must not be carried out while driving.
Once these adjustments have been made,
ensure that you can see the instrument
panel clearly from your driving position.
Manual rear view mirror
the rear view mirror has two positions:
- d ay (normal),
-
n
ight (anti-dazzle).
to c
hange from one to the other, push or pull
the lever on the lower edge of the mirror.
Correct driving position
Before taking to the road and to make the most
of the ergonomics of your driving position, carry
out these adjustments in the following order:
-
b
ackrest angle,
-
c
ushion height,
-
l
ongitudinal position of the seat,
-
hei
ght of the steering wheel,
-
t
he interior and door mirrors.
Comfort
Page 83 of 271

81
108_en_Chap05_conduite_ed01-2015
Stop & Start (Vti 68 S&S engine)
Operation
Going into engine STOP mode
this indicator lamp comes on in the
instrument panel and the engine
goes into standby automatically:
-
w
hen stationary, in neutral, and you
release the clutch pedal.
Never refuel with the engine in S
tO
P
mode; you must switch off the ignition
with the button. For smoother operation, during
parking manoeuvres S
tO
P mode is
not available for a few seconds after
coming out of reverse gear.
S
tO
P mode does not affect the
vehicle's systems, such as for example,
braking, power steering...
Special cases: STOP mode not
available
StOP mode is not invoked principally when:
- t he driver's door is open,
-
t
he driver's seat belt is not fastened,
-
t
he engine is needed to maintain a
comfortable temperature in the passenger
compartment,
-
d
emisting is active,
-
s
ome special conditions (battery charge,
engine temperature, braking assistance,
vehicle stopped on a steep gradient, high
altitude...) where the engine is needed to
assure control of a system.
th
e Stop & Start
system puts the engine temporarily into standby - S
tO
P mode - during stops in the traffic (red lights, traffic jams, or other...). t
h
e
engine restarts automatically - S
tA
R
t
mode - as soon as you want to move off.
t
h
e restart takes place instantly, quickly and silently.
Per fect for urban use, the Stop & Start system reduces fuel consumption and exhaust emissions as well as the noise level when stationary.
Stop & Start time counters
A partial time counter counts the periods in
StO P mode during a journey.
It is displayed in the trip computer once the
Stop & Start acts.
Press one of the screen management buttons
to return to the previous display.
A global time counter counts the periods in
S
tO
P mode since the last reset.
When it is displayed, press one of the screen
management buttons to reset the counter.
5
Driving
Page 158 of 271
156
108_en_Chap09_info-pratiques_ed01-2015
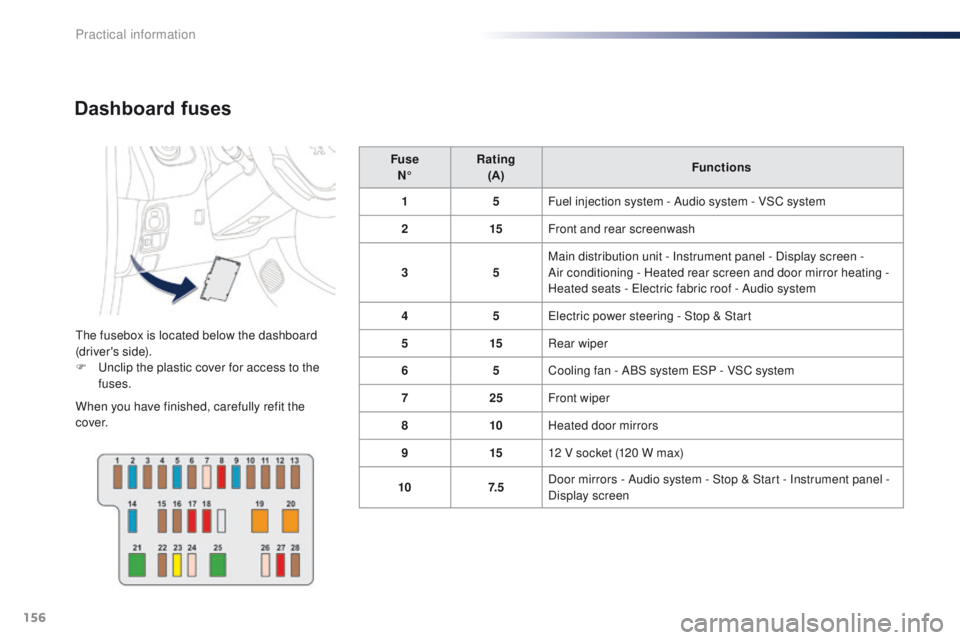
Dashboard fuses
the fusebox is located below the dashboard
(driver's side).
F u
n
clip the plastic cover for access to the
fuses.
When you have finished, carefully refit the
c ove r. Fuse
N° Rating
(A) Functions
1 5Fuel injection system - Audio system - VSC system
2 15Front and rear screenwash
3 5Main distribution unit - Instrument panel - Display screen -
Air conditioning - Heated rear screen and door mirror heating -
Heated seats - e
l
ectric fabric roof - Audio system
4 5
el
ectric power steering - Stop & Start
5 15Rear wiper
6 5Cooling fan - ABS system
e
S
P - VSC system
7 25Front wiper
8 10Heated door mirrors
9 1512 V socket (120 W max)
10 7. 5Door mirrors - Audio system - Stop & Start - Instrument panel -
Display screen
Practical information
Page 163 of 271
161
108_en_Chap09_info-pratiques_ed01-2015
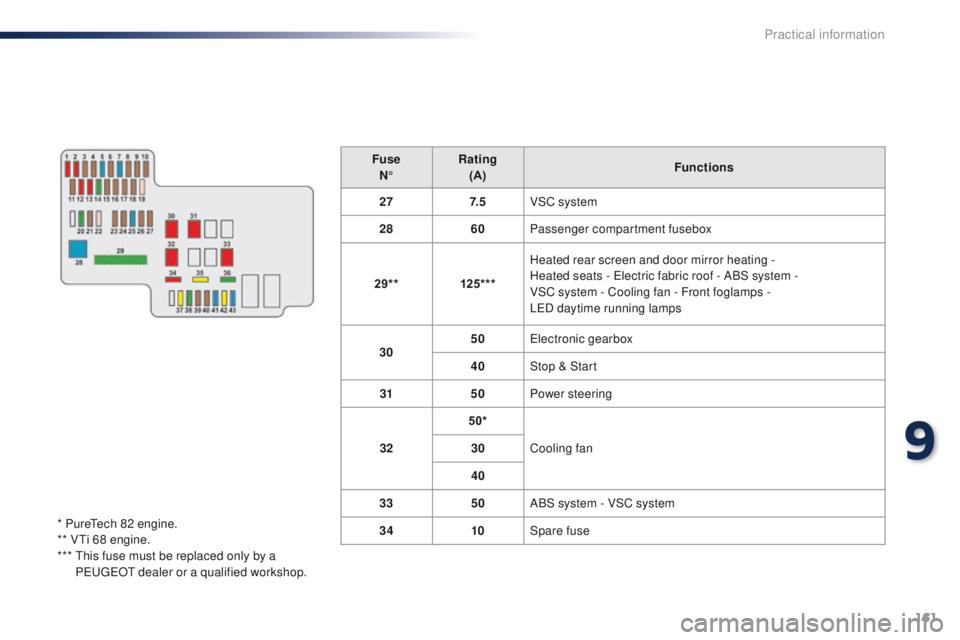
FuseN° Rating
(A) Functions
27 7. 5VSC system
28 60Passenger compartment fusebox
29** 125***Heated rear screen and door mirror heating -
Heated seats -
e
l
ectric fabric roof - ABS system -
VSC system - Cooling fan - Front foglamps -
L
e
D
daytime running lamps
30 50
ele
ctronic gearbox
40 Stop & Start
31 50Power steering
32 50*
Cooling fan
30
40
33 50ABS system - VSC system
34 10Spare fuse
* Pure
te
ch 82 engine.
** V
ti 6
8 engine.
***
t
h
is fuse must be replaced only by a
P
e
uge
Ot
dealer or a qualified workshop.
9
Practical information
Page 169 of 271
167
108_en_Chap09_info-pratiques_ed01-2015
towing the vehicle
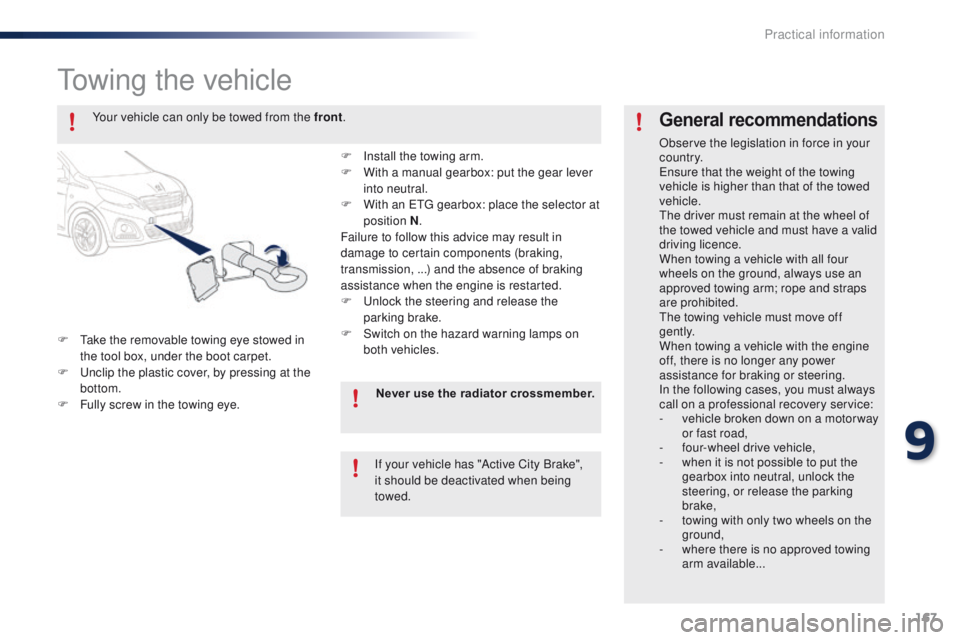
F take the removable towing eye stowed in the tool box, under the boot carpet.
F
u
n
clip the plastic cover, by pressing at the
bottom.
F
F
ully screw in the towing eye.
General recommendations
Observe the legislation in force in your
c o unt r y.
en
sure that the weight of the towing
vehicle is higher than that of the towed
vehicle.
th
e driver must remain at the wheel of
the towed vehicle and must have a valid
driving licence.
When towing a vehicle with all four
wheels on the ground, always use an
approved towing arm; rope and straps
are prohibited.
th
e towing vehicle must move off
g e nt l y.
When towing a vehicle with the engine
off, there is no longer any power
assistance for braking or steering.
In the following cases, you must always
call on a professional recovery service:
-
v
ehicle broken down on a motor way
or fast road,
-
f
our-wheel drive vehicle,
-
w
hen it is not possible to put the
gearbox into neutral, unlock the
steering, or release the parking
brake,
-
t
owing with only two wheels on the
ground,
-
w
here there is no approved towing
arm available...
Your vehicle can only be towed from the front
.
F
I
nstall the towing arm.
F
W
ith a manual gearbox: put the gear lever
into neutral.
F
W
ith an
etg
gearbox: place the selector at
position N .
Failure to follow this advice may result in
damage to certain components (braking,
transmission, ...) and the absence of braking
assistance when the engine is restarted.
F
u
n
lock the steering and release the
parking brake.
F
S
witch on the hazard warning lamps on
both vehicles.
Never use the radiator crossmember.
If your vehicle has "Active City Brake",
it should be deactivated when being
towed.
9
Practical information
Page 252 of 271
250
108_en_Chap14_index-alpha_ed01-2015
Main beam .............................................. 93, 150
Maintenance ..................................................... 8
Manual mode
.................................................. 75
Mat
.................................................................. 64
Menus (audio)
..............188, 190, 200, 206, 208
Menus (
tou
ch screen)
.................................. 18
7
Mirrorlink connection
.............................214 -216
Mirror, rear view
.............................................. 50
Mirrors, door .................................................... 49
Mountings for ISOFIX seats
.................13 0, 13 3
Number plate lamps
...................................... 15
3Parcel shelf, rear
.............................................
65
P
arking brake
..........................................
74 , 17 8
Passenger compartment filter
......................
17 7
Pedal, clutch.................................................. 17 7
Port, u
S
B
..................................
6
1, 63, 196, 233
Power steering ................................................
17
Protecting children ..................115 , 117, 12 1 -13 5
Puncture
........................................................13 8
M
N
P
Level, brake fluid ...........................................17 5
Levels and checks ................................. 173 -178
Lighting bulbs (replacement)
................. 1
4 9 -15 3
Lighting control stalk
.................................93 -97
Lighting dimmer
..............................
................26
Lighting, guide-me home
................................97
Lighting on reminder
....................................... 95
Loading
............................................................. 8
Locating your vehicle
...................................... 31
L
ocking/unlocking a door from the inside....... 37
Low fuel level
.......................................... 25, 13 6Oil filter ...............
...........................................
17 7
Oil level .......................................................... 174
Opening the bonnet
...................................... 17
2
Opening the boot
..............................
........33, 38
Opening the doors
...............................
...........33
Operation indicator lamps
.........................14 -24
O
Removing the mat ........................................... 64
Replacing bulbs ..................................... 14 9 -15 3
Replacing the air filter
...................................17 7
Replacing the oil filter
................................... 17
7
Replacing the passenger compartment filter
............................................................. 17 7
Replacing wiper blades .................................166
Reversing camera
........................................... 90
Reversing lamps
........................................... 152
Roof bars
....................................................... 16
8
Roof, electric fabric
......................................... 41
Routine checks
..................................... 17 7, 178
Screen menu
................188, 190, 200, 206, 208
Screenwash
.................................................. 10 0
Screenwash reservoir
...................................176
Seat adjustment
...............................
.........45, 47
Seat belts
.................................. 4
7, 113 -115 , 12 7
Seat, rear, folding backrest
.............................47
Seats, rear
................................................. 46, 47
Servicing
...............................
............................8
Setting the clock
....................................... 28, 29
Sidelamps
....................................................... 93
Side repeater
..............................
..................153
Snow chains
.................................................. 14
8
Spare wheel
...............................
...................143
Speed limiter
............................................. 84, 87
Speedometer
............................................ 1 0 , 11
Starting the vehicle
.......................69, 70, 72, 75
Starting using another battery
...................... 16
4
Steering mounted controls, audio
........18 6, 229
Steering wheel adjustment
............................. 50
S
Radio ..................................................... 192, 230
RDS ....................................................... 193, 230
Rear demisting
................................................ 60
R
ear foglamp ........................................... 9 5, 152
Rear quarter panel windows
...........................40
Rear screen (demisting)
..................................60
Recharging the battery
................................. 16
5
Remote control
.......................................... 3
1, 3 6
Removing and fitting a fuse
...................15 4 -16 2
Removing a wheel
........................................ 145
R
Alphabetical index