key Peugeot 207 CC 2012 Owner's Guide
[x] Cancel search | Manufacturer: PEUGEOT, Model Year: 2012, Model line: 207 CC, Model: Peugeot 207 CC 2012Pages: 224, PDF Size: 7.1 MB
Page 144 of 224
9
!
i
PRACTICAL INFORMATION
142
Do not charge the batteries without
disconnecting the terminals fi rst.
Do not disconnect the terminals
while the engine is running.
The batteries contain harmful sub-
stances such as sulphuric acid and
lead. They must be disposed of in
accordance with regulations and
must not, in any circumstances, be
discarded with household waste.
Take used remote control batteries
and vehicle batteries to a special
collection point.
Charging the battery using a
battery charger
�)
Disconnect the battery from the ve-
hicle.
�)
Follow the instructions for use pro-
vided by the manufacturer of the
charger.
�)
Reconnect starting with the nega-
tive terminal (-).
�)
Check that the terminals and connec-
tors are clean. If they are covered with
sulphate (whitish or greenish deposit),
remove them and clean them.
It is advisable to disconnect the
battery if the vehicle is to be left un-
used for more than one month.
Before disconnecting the
battery
Wait 2 minutes after switching off
the ignition before disconnecting
the battery.
Close the windows and the doors
before disconnecting the battery.
Following reconnection of the
battery
Following reconnection of the bat-
tery, switch on the ignition and wait
1 minute before starting to permit ini-
tialisation of the electronic systems.
However, if slight diffi culties are en-
countered following this operation,
contact a PEUGEOT dealer or a
qualifi ed workshop.
Referring to the corresponding sec-
tion, you must yourself reinitialise:
- the remote control key,
- the one-touch electric windows,
- the GPS satellite navigation
system.
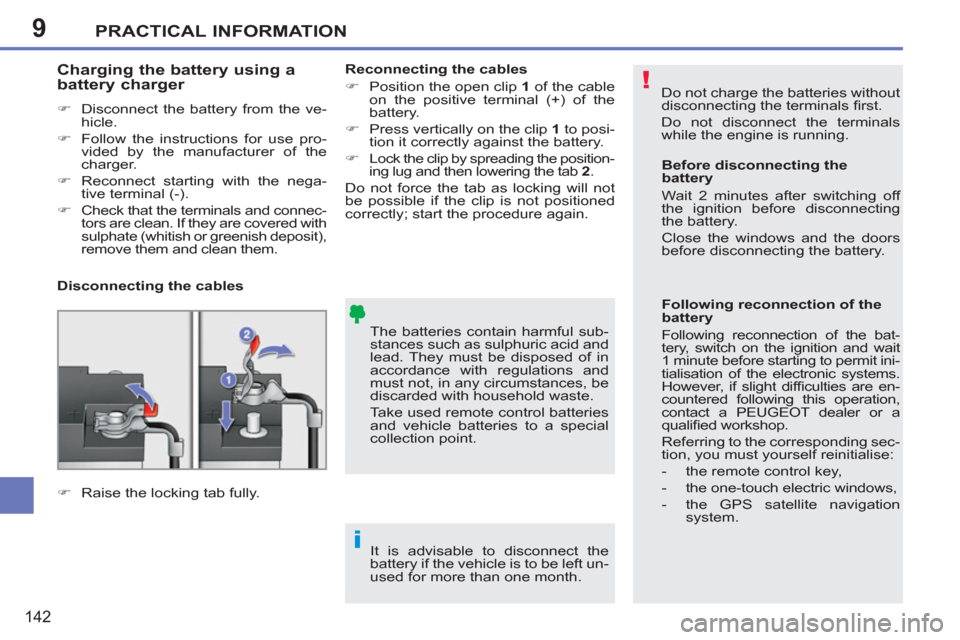
Disconnecting the cables
Reconnecting the cables
�)
Position the open clip 1
of the cable
on the positive terminal (+) of the
battery.
�)
Press vertically on the clip 1
to posi-
tion it correctly against the battery.
�)
Lock the clip by spreading the position-
ing lug and then lowering the tab 2
.
Do not force the tab as locking will not
be possible if the clip is not positioned
correctly; start the procedure again.
�)
Raise the locking tab fully.
Page 165 of 224

163
04
1
2
3
5
6
4
NAVIGATION - GUIDANCE
SELECTING A DESTINATION
Press the NAV button again or select
the Navigation Menu function and
press the dial to confi rm.
Select the "Destination in
put"
function and press the dial to
confi rm. Pr
ess the NAV button.
Select the letters of the town one
by one confi rming each time by pressing the dial.
Once the country has been selected,
turn the dial and select the townfunction. Press the dial to confi rm. Insert the
SD card in the front panel reader and leave it there to use the
Navigation functions.
The navi
gation SD card data must not be modifi ed.
Map data updates are available
from PEUGEOT dealers.
A pre-set list (by entering the fi rst few letters) of the towns in thecountry selected can be accessed via the LIST button on the virtual
keypad.
Select the "Address input" function
and press the dial to confi rm.
The list o
f the last 20 destinations appears under the NavigationMenu function.
Navigation Menu
Destination input
Address input
Page 170 of 224
168
04
8
6
7
4
3
5
2
1
NAVIGATION - GUIDANCE
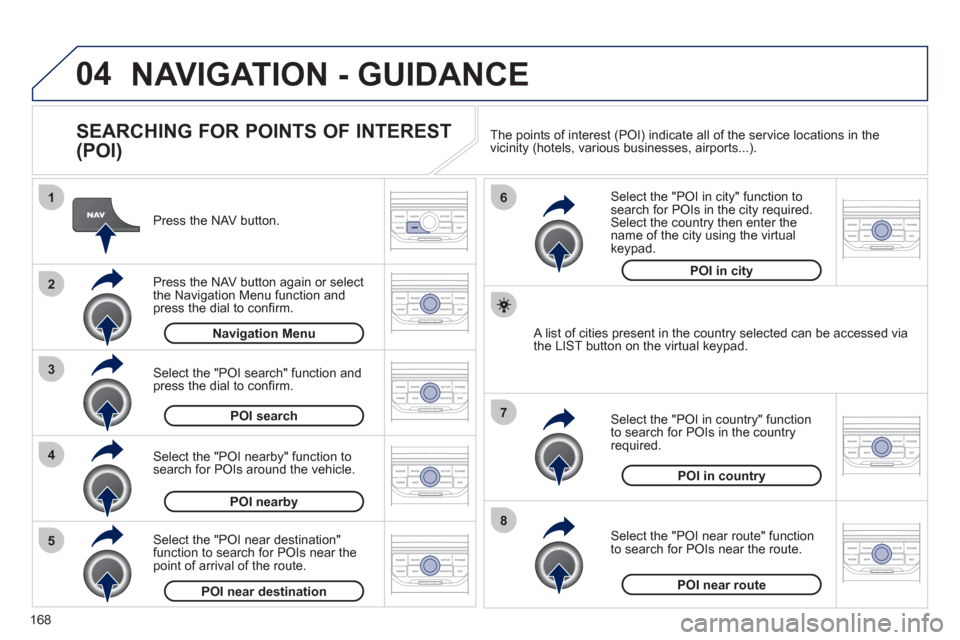
SEARCHING FOR POINTS OF INTEREST
(POI)
Press the NAV button.
Press the NAV button again or select
the Navigation Menu function and press the dial to confi rm.
Select the "POI nearby" function to search for POIs around the vehicle.
Select the "POI search" function and press the dial to confi rm. Navigation Menu
POI search
POI nearby
Select the "POI in city" function tosearch for POIs in the city required.Select the country then enter the name of the city using the virtual
keypad.
Select the "POI near route" function
to search for POIs near the route.
Select the "P
OI in country" function
to search for POIs in the country
required.
Select the "POI near destination"function to search for POIs near thepoint of arrival of the route.
POI near destinationPOI near route
POI in country
POI in city
A list of cities present in the country selected can be accessed via
the LIST button on the virtual keypad. The points o
f interest (POI) indicate all of the service locations in the
vicinity (hotels, various businesses, airports...).
Page 175 of 224
173
06
3 2 1 1
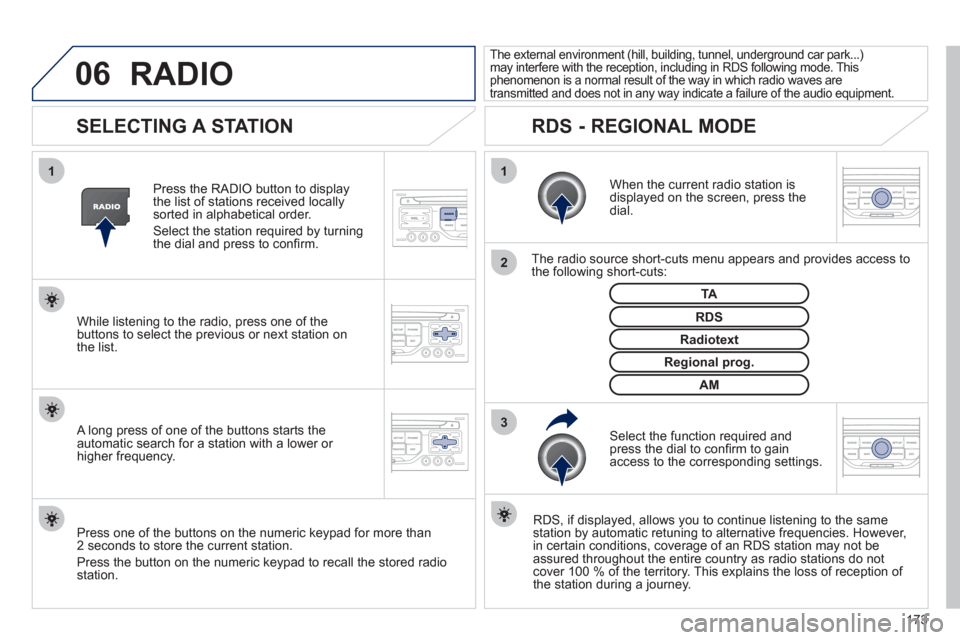
SELECTING A STATION
When the current radio station isdisplayed on the screen, press thedial.
The radio source short-cuts menu appears and provides access to
the following short-cuts:
Select the function re
quired and press the dial to confi rm to gain
access to the corresponding settings.
TA
RDS, if displayed, allows you to continue listening to the same station by automatic retuning to alternative frequencies. However,
in certain conditions, coverage of an RDS station may not be
assured throughout the entire country as radio stations do notcover 100 % of the territory. This explains the loss of reception of
the station during a journey.
The external environment (hill, building, tunnel, underground car park...)may interfere with the reception, including in RDS following mode. Thisphenomenon is a normal result of the way in which radio waves are
transmitted and does not in any way indicate a failure of the audio equipment.
RDS - REGIONAL MODE
Press the RADIO button to display
the list of stations received locally sorted in alphabetical order.
Select the station required by turningthe dial and press to confi rm.
Re
gional prog.
Radiotext
RDSWhile listening to the radio, press one of the
buttons to select the previous or next station on
the list.
Press one o
f the buttons on the numeric keypad for more than
2 seconds to store the current station.
Press the button on the numeric keypad to recall the stored radio
station.
AM
A long press of one of the buttons starts theautomatic search for a station with a lower or
higher frequency.
RADIO
Page 181 of 224
179
08
1
3 2
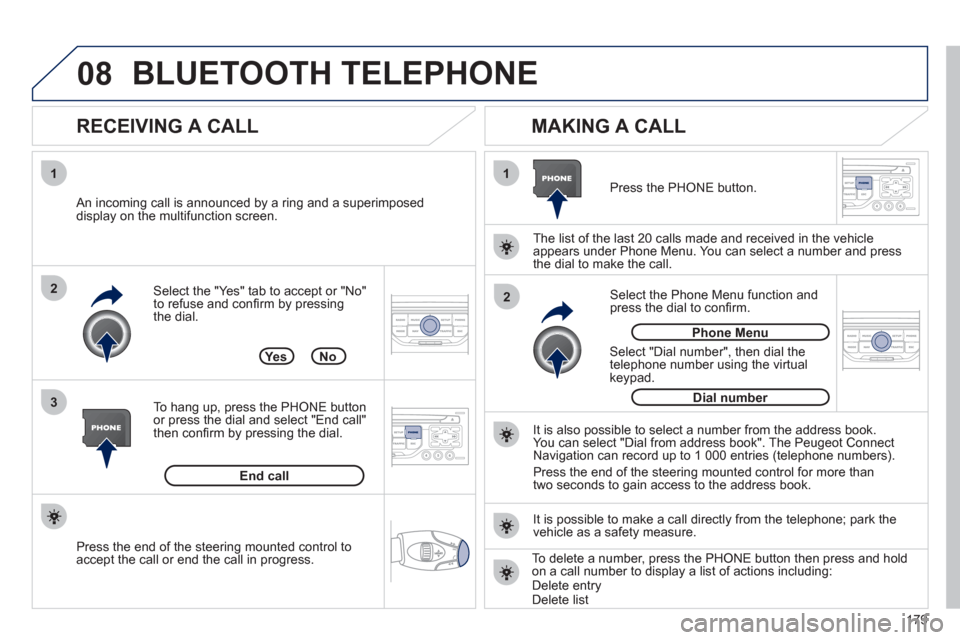
2 1Select the "Yes" tab to accept or "No"
to refuse and confi rm by pressing
the dial.
RECEIVING A CALL
MAKING A CALL
An incoming call is announced by a ring and a superimposed
display on the multifunction screen.
Yes
To han
g up, press the PHONE button
or press the dial and select "End call"then confi rm by pressing the dial.
End callPress the PH
ONE button.
Select "Dial number"
, then dial the
telephone number using the virtualkeypad.
Select the Phone Menu function and
press the dial to confi rm.
The list of the last 2
0 calls made and received in the vehicle
appears under Phone Menu. You can select a number and press
the dial to make the call.
No
It is also possible to select a number from the address book. You can select "Dial from address book". The Peugeot Connect
Navigation can record up to 1 000 entries (telephone numbers).
Press the end o
f the steering mounted control for more than
two seconds to gain access to the address book.
Phone Menu
Dial number
It is possible to make a call directl
y from the telephone; park the
vehicle as a safety measure.
BLUETOOTH TELEPHONE
Press the end of the steering mounted control to
accept the call or end the call in progress.To delete a number, press the PHONE button then press and hold
on a call number to display a list of actions including:Delete entryDelete list
Page 202 of 224
200
06
2
1
2
1
OK
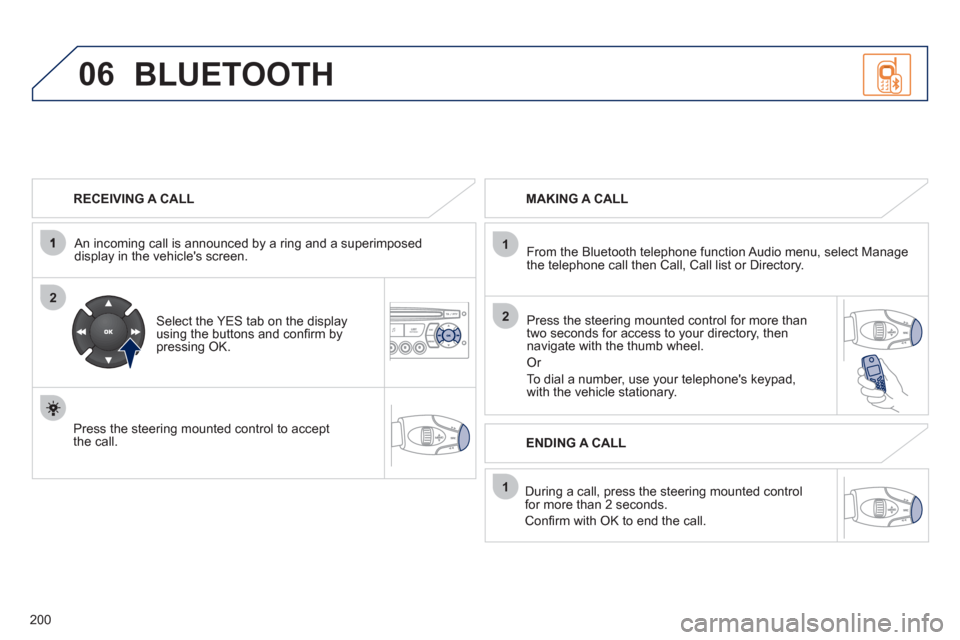
RECEIVING A CALL
An incomin
g call is announced by a ring and a superimposed
display in the vehicle's screen.
Select the YES tab on the display
using the buttons and confi rm bypressing OK.
Press the steering mounted control to accept
the call.
MAKING A CALL
From the Bluetooth telephone
function Audio menu, select Manage
the telephone call then Call, Call list or Directory.
Press the steerin
g mounted control for more than
two seconds for access to your directory, then navigate with the thumb wheel.
Or
To dial a number, use your telephone's keypad,with the vehicle stationary.
Durin
g a call, press the steering mounted control
for more than 2 seconds.
Confi rm with OK to end the call.
BLUETOOTH
ENDING A CALL
Page 203 of 224
201
1
2
3
SOURCE
06
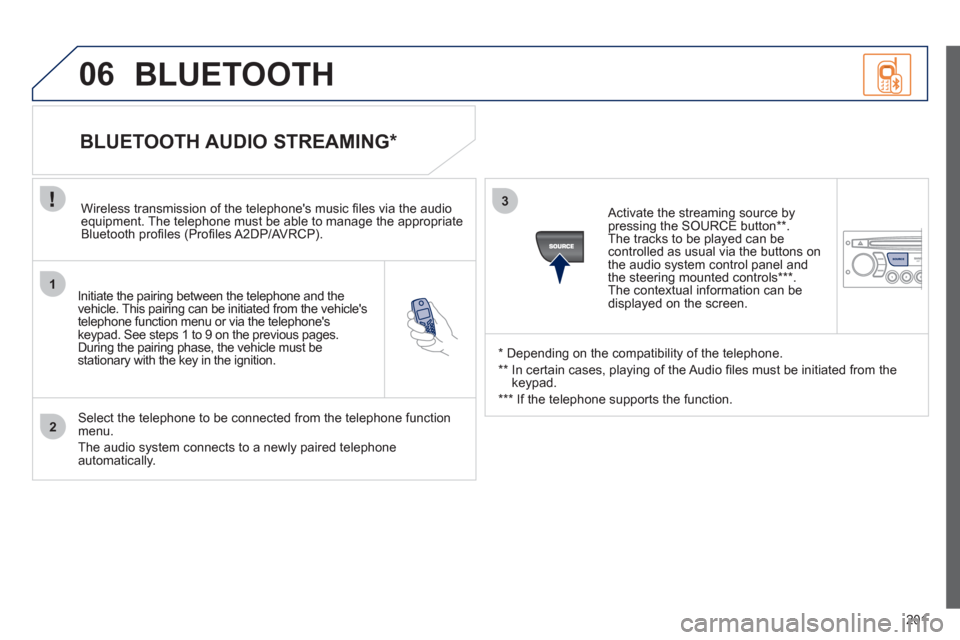
Initiate the pairing between the telephone and the
vehicle. This pairing can be initiated from the vehicle's
telephone function menu or via the telephone's
ke
ypad. See steps 1 to 9 on the previous pages.During the pairing phase, the vehicle must bestationary with the key in the ignition.
Select the telephone to be connected from the telephone function
menu.
The audio system connects to a newly paired telephone automatically.
BLUETOOTH AUDIO STREAMING *
Wireless transmission of the telephone's music fi les via the audioequipment. The telephone must be able to manage the appropriate
Bluetooth profi les (Profi les A2DP/AV RCP).
*
Depending on the compatibility of the telephone.
**
In certain cases, playing of the Audio fi les must be initiated from the
keypad.
***
If the tele
phone supports the function.
Activate the streamin
g source by
pressing the SOURCE button ** .The tracks to be played can becontrolled as usual via the buttons on
the audio system control panel andthe steering mounted controls *** .
The contextual information can bedisplayed on the screen.
BLUETOOTH
Page 213 of 224
211
VISUAL SEARCH
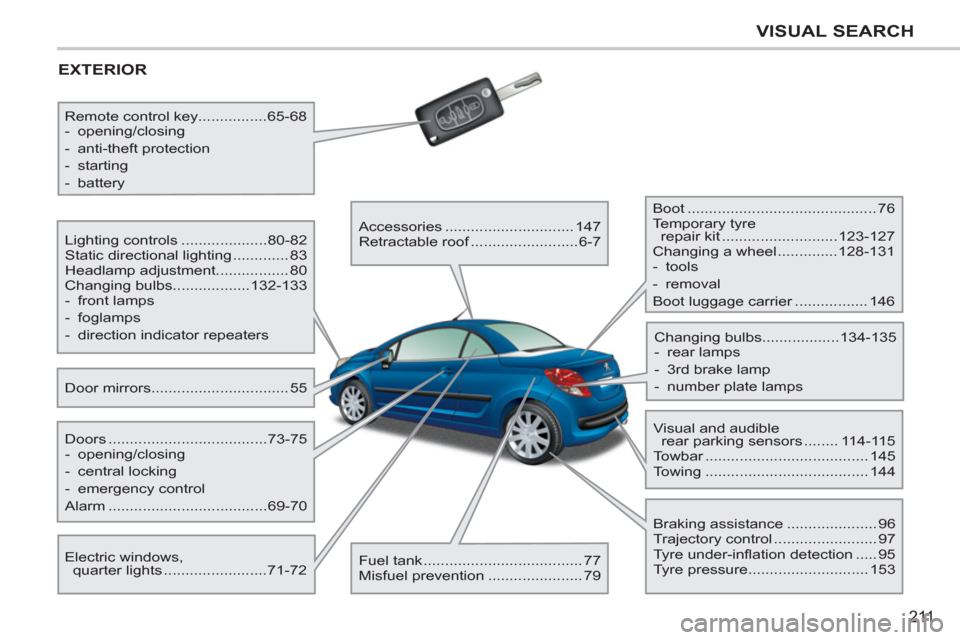
EXTERIOR
Door mirrors ................................ 55 Lighting controls ....................80-82
Static directional lighting ............. 83
Headlamp adjustment................. 80
Changing bulbs..................132-133
- front lamps
- foglamps
- direction indicator repeaters
Electric windows,
quarter lights ........................71-72 Doors .....................................73-75
- opening/closing
- central locking
- emergency control
Alarm .....................................69-70 Remote control key................65-68
- opening/closing
- anti-theft protection
- starting
- battery
Accessories .............................. 147
Retractable roof .........................6-7
Fuel tank ..................................... 77
Misfuel prevention ...................... 79 Boot ............................................ 76
Temporary tyre
repair kit ...........................123-127
Changing a wheel ..............128-131
- tools
- removal
Boot luggage carrier ................. 146
Visual and audible
rear parking sensors ........ 114-115
Towbar ...................................... 145
Towing ...................................... 144 Changing bulbs..................134-135
- rear lamps
- 3rd brake lamp
- number plate lamps
Braking assistance ..................... 96
Trajectory control ........................ 97
Tyre under-in
fl ation detection ..... 95
Tyre pressure............................ 153
Page 218 of 224
216
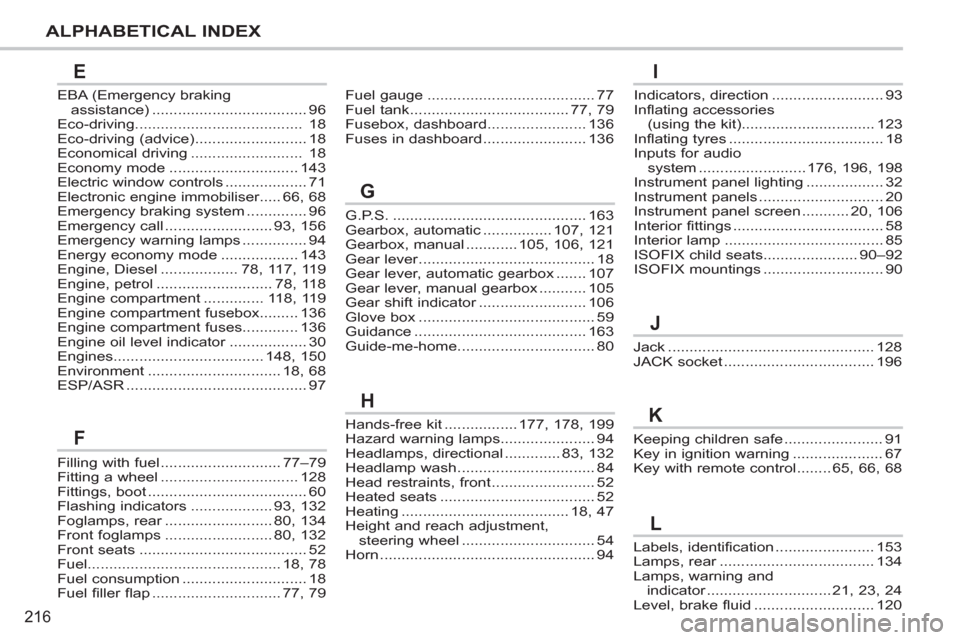
ALPHABETICAL INDEX
Labels, identification.......................153Lamps, rear....................................r134Lamps, warning andindicator.............................r21,23,24Level, brake fluid............................120
L
Filling with fuel............................77–79Fitting a wheel................................128Fittings, boot.....................................60Flashing indicators...................93,132Foglamps, rear.........................r80,134Front foglamps.........................80,132Front seats.......................................52Fuel.............................................18,78Fuel consumption.............................18Fuel filler flap..............................77,79
Indicators, direction..........................93Inflating accessories (using the kit)...............................123Inflating tyres ....................................18Inputs for audiosystem .........................176,196,198Instrument panel lighting ..................32Instrument panels .............................20Instrument panel screen...........20,106Interior fittings...................................58Interior lamp.....................................85ISOFIX child seats......................90–92ISOFIX mountings ............................90
Jack ................................................128JACK socket ...................................196
EBA (Emergency braking
assistance)....................................96Eco-driving.......................................18Eco-driving (advice)..........................18Economical driving..........................18Economy mode..............................143Electric window controls ...................71Electronic engine immobiliser.....66,68Emergency braking system ..............96Emergency call .........................93,156Emergency warning lamps ...............94Energy economy mode ..................143Engine, Diesel..................78,117,119Engine, petrol...........................78,118Engine compartment..............118,119Engine compartment fusebox.........136Engine compartment fuses.............136Engine oil level indicator..................r30Engines...................................148,150Environment ...............................18,68ESP/ASR..........................................97
G.P.S..............................................163Gearbox, automatic................107, 121Gearbox, manual............105,106, 121Gear lever.........................................r18Gear lever, automatic gearbox.......107Gear lever, manual gearbox...........105Gear shift indicator.........................r106Glove box.........................................59Guidance........................................163Guide-me-home................................80
Keeping children safe .......................91Key in ignition warning.....................67Key with remote control ........65,66,68
Fuel gauge.......................................77Fuel tank.....................................77, 79Fusebox, dashboard.......................136Fuses in dashboard........................136
Hands-free kit.................177, 178, 199Hazard warning lamps......................94Headlamps, directional.............83, 132Headlamp wash................................84Head restraints, front........................52Heated seats....................................52Heating.......................................18, 47Height and reach adjustment,
steering wheel...............................54Horn..................................................94
E
F
G
H
I
J
K