height Peugeot 306 Break 2002 Owner's Manual
[x] Cancel search | Manufacturer: PEUGEOT, Model Year: 2002, Model line: 306 Break, Model: Peugeot 306 Break 2002Pages: 131, PDF Size: 2.25 MB
Page 2 of 131
YOUR 306 AT A GLANCE3
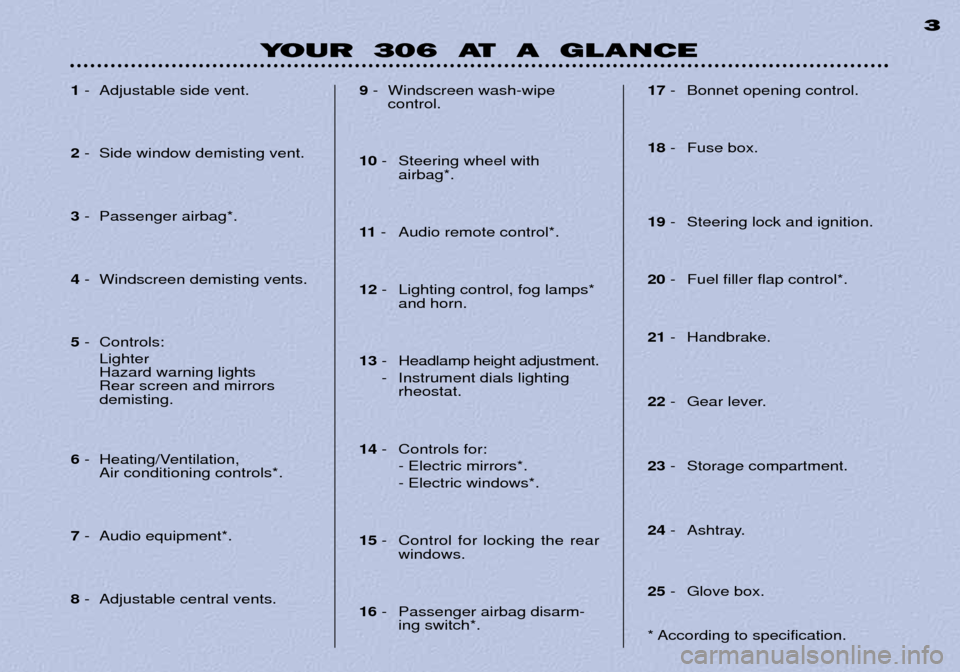
1
- Adjustable side vent.
2 - Side window demisting vent.
3 - Passenger airbag*.
4 - Windscreen demisting vents.
5 - Controls:
Lighter Hazard warning lightsRear screen and mirrors demisting.
6 - Heating/Ventilation,
Air conditioning controls*.
7 - Audio equipment*.
8 - Adjustable central vents. 9
- Windscreen wash-wipe
control.
10 - Steering wheel with
airbag*.
11 - Audio remote control*.
12 - Lighting control, fog lamps*
and horn.
13 - Headlamp height adjustment.
- Instrument dials lighting rheostat.
14 - Controls for:
- Electric mirrors*. - Electric windows*.
15 - Control for locking the rear
windows.
16 - Passenger airbag disarm-
ing switch*. 17
- Bonnet opening control.
18 - Fuse box.
19 - Steering lock and ignition.
20 - Fuel filler flap control*.
21 - Handbrake.
22 - Gear lever.
23 - Storage compartment.
24 - Ashtray.
25 - Glove box.
* According to specification.
Page 7 of 131
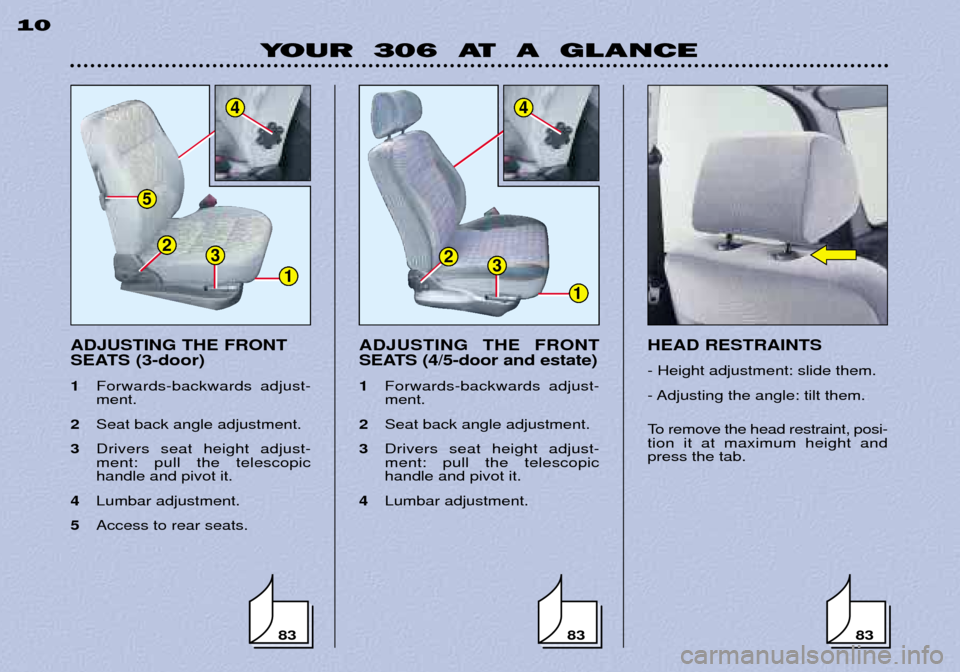
ADJUSTING THE FRONT
SEATS (3-door) 1Forwards-backwards adjust- ment.
2 Seat back angle adjustment.
3 Drivers seat height adjust-ment: pull the telescopichandle and pivot it.
4 Lumbar adjustment.
5 Access to rear seats. ADJUSTING THE FRONT
SEATS (4/5-door and estate) 1
Forwards-backwards adjust- ment.
2 Seat back angle adjustment.
3 Drivers seat height adjust-ment: pull the telescopichandle and pivot it.
4 Lumbar adjustment.
YOUR 306 AT A GLANCE
10
HEAD RESTRAINTS - Height adjustment: slide them.
- Adjusting the angle: tilt them.
To remove the head restraint, posi- tion it at maximum height andpress the tab.
838383
5
1
4
2323
1
4
Page 9 of 131
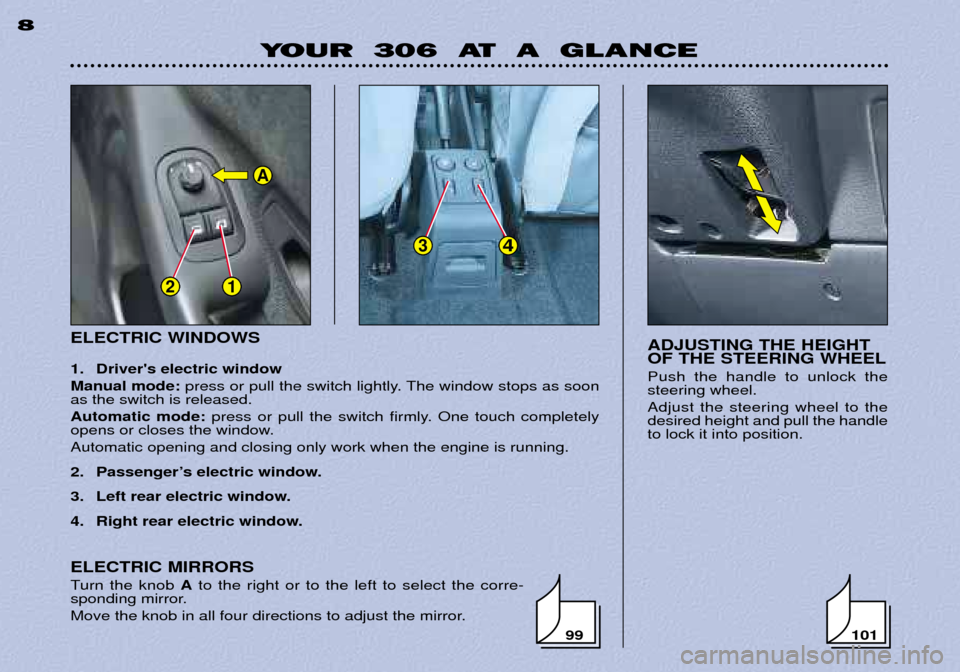
ELECTRIC WINDOWS
1. Driver's electric window Manual mode: press or pull the switch lightly. The window stops as soon
as the switch is released.Automatic mode: press or pull the switch firmly. One touch completely
opens or closes the window. Automatic opening and closing only work when the engine is running.
2. PassengerÕs electric window.
3. Left rear electric window.
4. Right rear electric window.
YOUR 306 AT A GLANCE
8
ADJUSTING THE HEIGHT OF THE STEERING WHEEL Push the handle to unlock the steering wheel. Adjust the steering wheel to the desired height and pull the handleto lock it into position.
101
21
ELECTRIC MIRRORS
Turn the knob
Ato the right or to the left to select the corre-
sponding mirror.
Move the knob in all four directions to adjust the mirror.
34
A
99
Page 31 of 131
101
YOUR 306 IN DETAIL
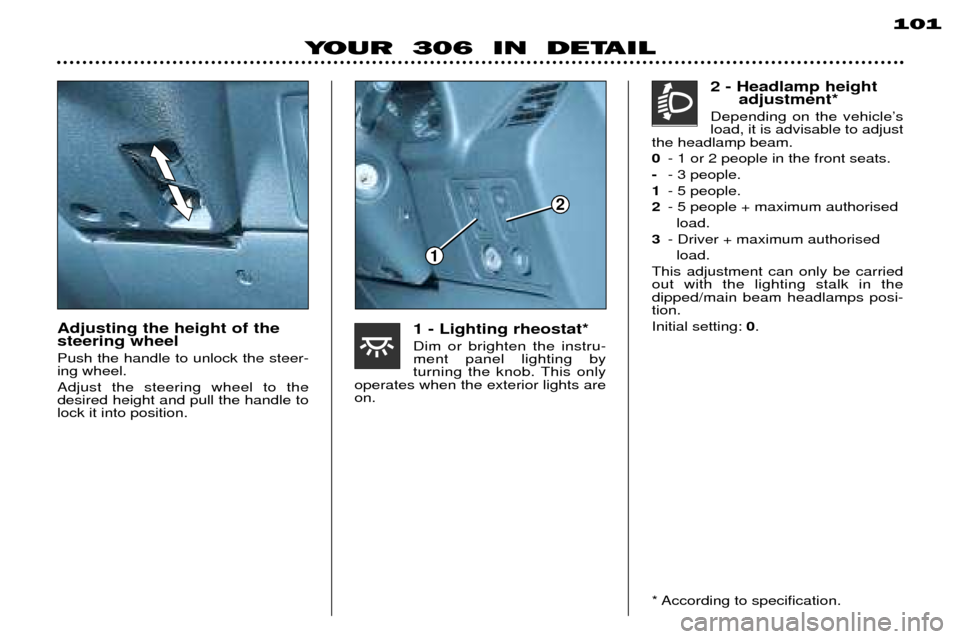
Adjusting the height of the steering wheel Push the handle to unlock the steer- ing wheel. Adjust the steering wheel to the desired height and pull the handle tolock it into position.1 - Lighting rheostat* Dim or brighten the instru- ment panel lighting by
turning the knob. This only
operates when the exterior lights areon. 2 - Headlamp height
adjustment*
Depending on the vehicleÕsload, it is advisable to adjust
the headlamp beam. 0 - 1 or 2 people in the front seats.
- - 3 people.
1 - 5 people.
2 - 5 people + maximum authorised
load.
3 - Driver + maximum authorised
load.
This adjustment can only be carried out with the lighting stalk in thedipped/main beam headlamps posi-tion. Initial setting: 0.
* According to specification.
1
2
Page 62 of 131
YOUR 306 IN DETAIL 83
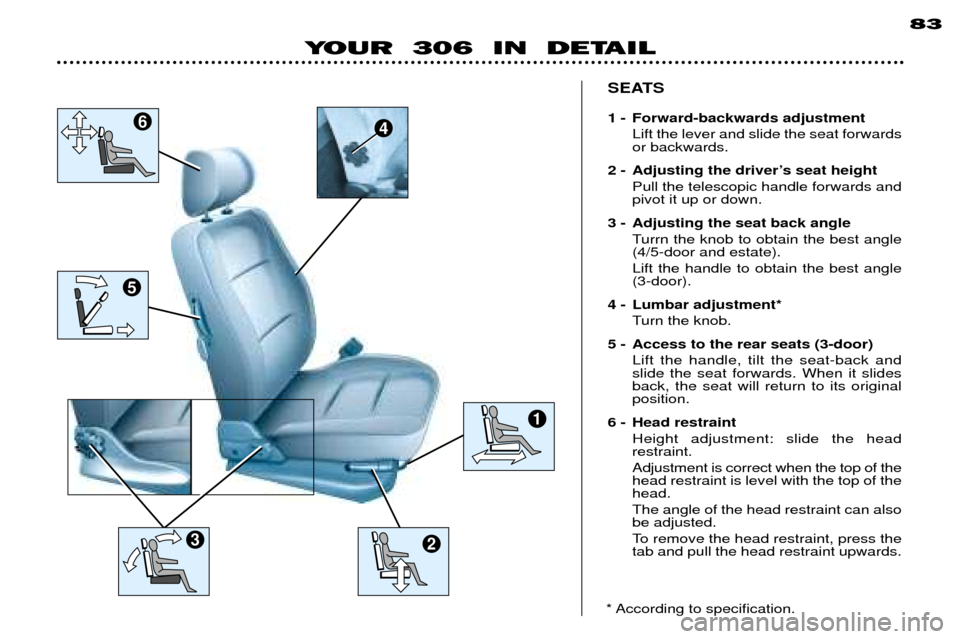
SEATS
1 - Forward-backwards adjustment Lift the lever and slide the seat forwards or backwards.
2 - Adjusting the driverÕs seat height Pull the telescopic handle forwards andpivot it up or down.
3 - Adjusting the seat back angle Turrn the knob to obtain the best angle(4/5-door and estate). Lift the handle to obtain the best angle (3-door).
4 - Lumbar adjustment* Turn the knob.
5 - Access to the rear seats (3-door) Lift the handle, tilt the seat-back andslide the seat forwards. When it slidesback, the seat will return to its originalposition.
6 - Head restraint Height adjustment: slide the headrestraint. Adjustment is correct when the top of the head restraint is level with the top of thehead. The angle of the head restraint can also be adjusted.
To remove the head restraint, press the tab and pull the head restraint upwards.
* According to specification.
6
5
4
2
1
3
Page 66 of 131
87
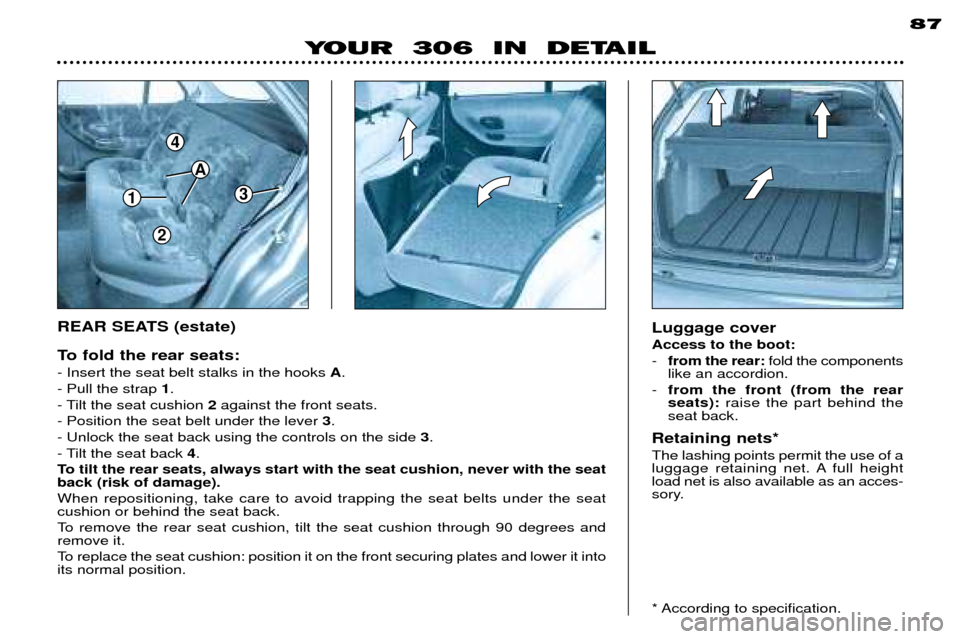
Luggage cover Access to the boot: -from the rear: fold the components
like an accordion.
- from the front (from the rear seats): raise the part behind the
seat back.
Retaining nets* The lashing points permit the use of a
luggage retaining net. A full heightload net is also available as an acces-
sory.
* According to specification.
1
4
3
A
2
YOUR 306 IN DETAIL
REAR SEATS (estate)
To fold the rear seats: - Insert the seat belt stalks in the hooks A.
- Pull the strap 1.
- Tilt the seat cushion 2against the front seats.
- Position the seat belt under the lever 3.
- Unlock the seat back using the controls on the side 3.
- Tilt the seat back 4.
To tilt the rear seats, always start with the seat cushion, never with the seat back (risk of damage). When repositioning, take care to avoid trapping the seat belts under the seat cushion or behind the seat back.
To remove the rear seat cushion, tilt the seat cushion through 90 degrees and remove it.
To replace the seat cushion: position it on the front securing plates and lower it into its normal position.
Page 69 of 131
89
YOUR 306 IN DETAIL
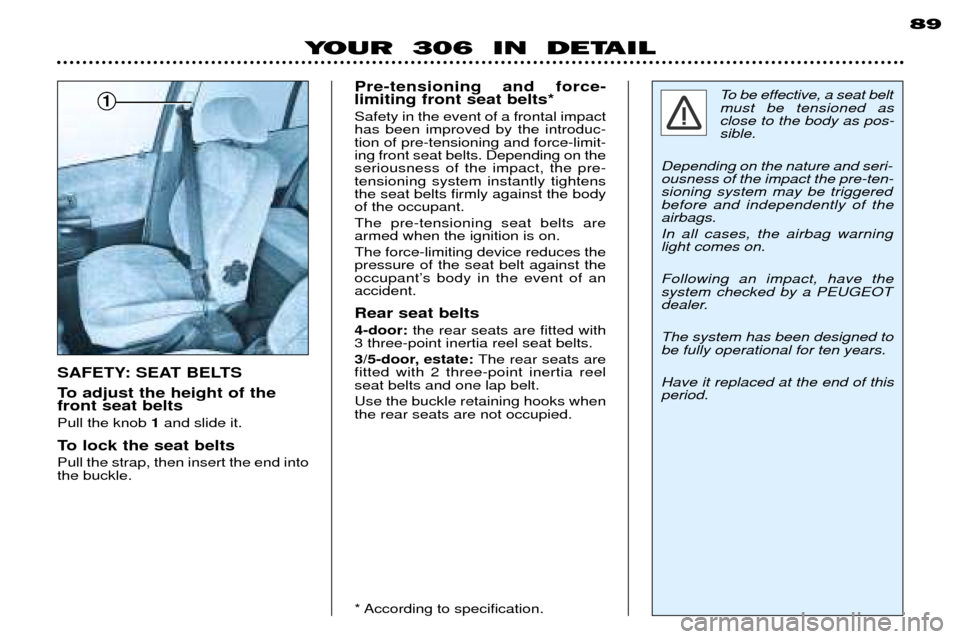
To adjust the height of the front seat belts Pull the knob 1and slide it.
To lock the seat beltsPull the strap, then insert the end into the buckle. Pre-tensioning and force-limiting front seat belts* Safety in the event of a frontal impact has been improved by the introduc-tion of pre-tensioning and force-limit-ing front seat belts. Depending on theseriousness of the impact, the pre-tensioning system instantly tightensthe seat belts firmly against the bodyof the occupant. The pre-tensioning seat belts are armed when the ignition is on. The force-limiting device reduces the pressure of the seat belt against the
occupantÕs body in the event of anaccident. Rear seat belts 4-door:
the rear seats are fitted with
3 three-point inertia reel seat belts.
3/5-door, estate: The rear seats are
fitted with 2 three-point inertia reel seat belts and one lap belt. Use the buckle retaining hooks when the rear seats are not occupied.
* According to specification. To be effective, a seat belt must be tensioned asclose to the body as pos-sible.
Depending on the nature and seri-ousness of the impact the pre-ten-sioning system may be triggeredbefore and independently of theairbags. In all cases, the airbag warning light comes on. Following an impact, have the system checked by a PEUGEOT
dealer. The system has been designed to be fully operational for ten years. Have it replaced at the end of this period.
1
SAFETY: SEAT BELTS