reset Peugeot 307 SW 2003 Owner's Manual
[x] Cancel search | Manufacturer: PEUGEOT, Model Year: 2003, Model line: 307 SW, Model: Peugeot 307 SW 2003Pages: 183, PDF Size: 2.31 MB
Page 24 of 183
14-04-2003
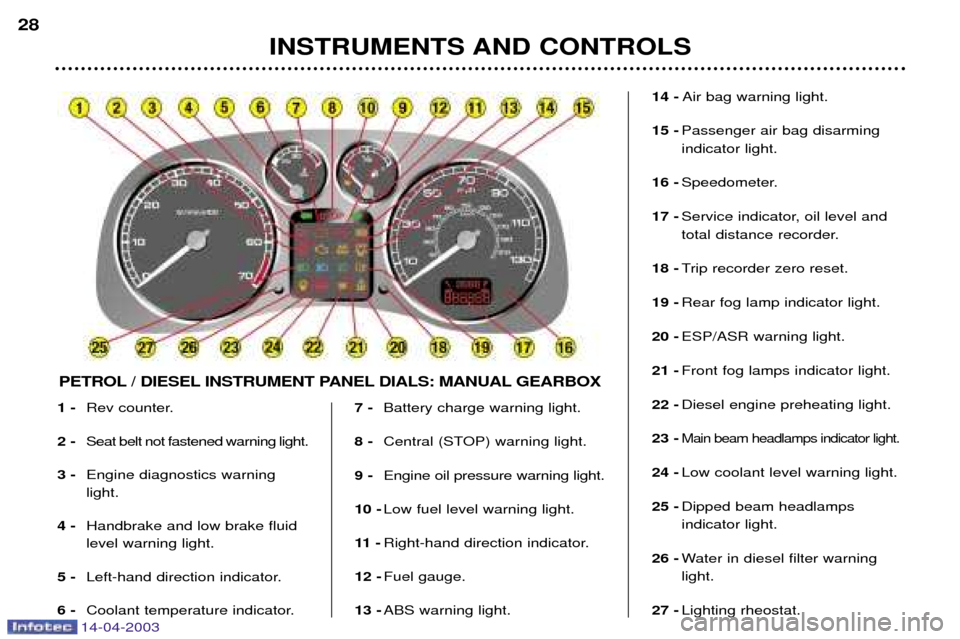
1 -Rev counter.
2 - Seat belt not fastened warning light.
3 - Engine diagnostics warning light.
4 - Handbrake and low brake fluidlevel warning light.
5 - Left-hand direction indicator.
6 - Coolant temperature indicator. 7 -
Battery charge warning light.
8 - Central (STOP) warning light.
9 - Engine oil pressure warning light.
10 - Low fuel level warning light.
11 - Right-hand direction indicator.
12 - Fuel gauge.
13 - ABS warning light. 14 -
Air bag warning light.
15 - Passenger air bag disarming indicator light.
16 - Speedometer.
17 - Service indicator, oil level and
total distance recorder.
18 - Trip recorder zero reset.
19 - Rear fog lamp indicator light.
20 - ESP/ASR warning light.
21 - Front fog lamps indicator light.
22 - Diesel engine preheating light.
23 -
Main beam headlamps indicator light.
24 - Low coolant level warning light.
25 - Dipped beam headlampsindicator light.
26 - Water in diesel filter warninglight.
27 - Lighting rheostat.
INSTRUMENTS AND CONTROLS
28
PETROL / DIESEL INSTRUMENT PANEL DIALS: MANUAL GEARBOX
Page 25 of 183
14-04-2003
INSTRUMENTS AND CONTROLS29
1 -
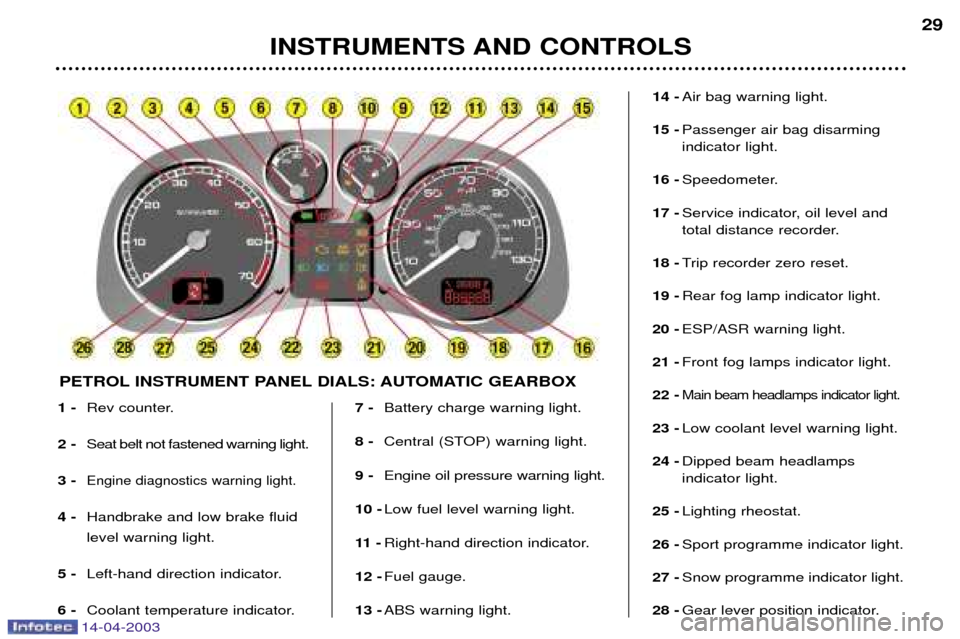
Rev counter.
2 - Seat belt not fastened warning light.
3 -
Engine diagnostics warning light.
4 - Handbrake and low brake fluid level warning light.
5 - Left-hand direction indicator.
6 - Coolant temperature indicator. 7 -
Battery charge warning light.
8 - Central (STOP) warning light.
9 - Engine oil pressure warning light.
10 - Low fuel level warning light.
11 - Right-hand direction indicator.
12 - Fuel gauge.
13 - ABS warning light. 14 -
Air bag warning light.
15 - Passenger air bag disarming indicator light.
16 - Speedometer.
17 - Service indicator, oil level and
total distance recorder.
18 - Trip recorder zero reset.
19 - Rear fog lamp indicator light.
20 - ESP/ASR warning light.
21 - Front fog lamps indicator light.
22 -
Main beam headlamps indicator light.
23 - Low coolant level warning light.
24 - Dipped beam headlampsindicator light.
25 - Lighting rheostat.
26 - Sport programme indicator light.
27 - Snow programme indicator light.
28 - Gear lever position indicator.
PETROL INSTRUMENT PANEL DIALS: AUTOMATIC GEARBOX
Page 31 of 183
14-04-2003
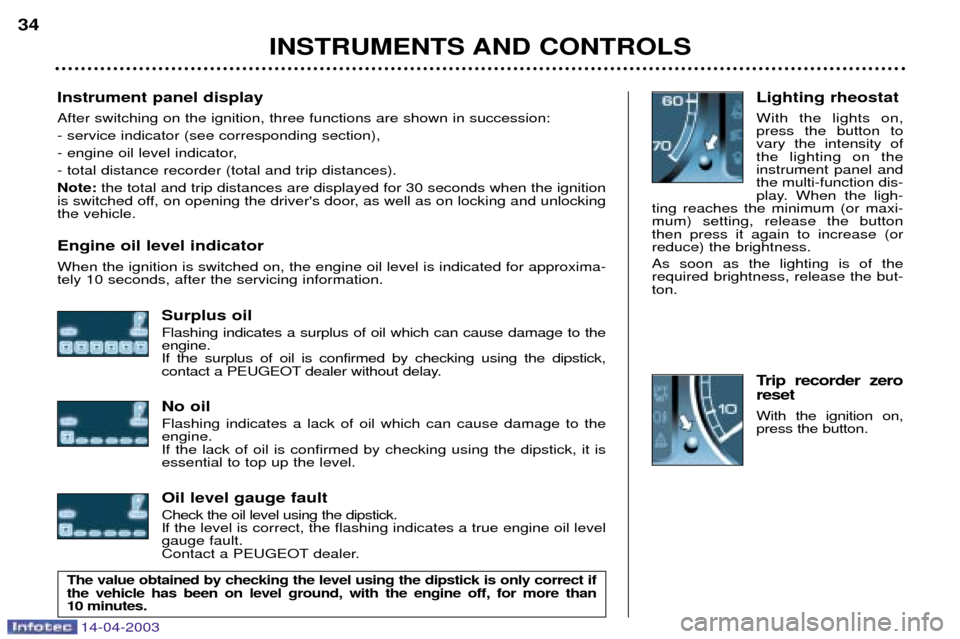
Instrument panel display After switching on the ignition, three functions are shown in succession: - service indicator (see corresponding section),
- engine oil level indicator,- total distance recorder (total and trip distances).Note:the total and trip distances are displayed for 30 seconds when the ignition
is switched off, on opening the driver's door, as well as on locking and unlocking the vehicle. Engine oil level indicator When the ignition is switched on, the engine oil level is indicated for approxima- tely 10 seconds, after the servicing information.
Surplus oil Flashing indicates a surplus of oil which can cause damage to the engine.If the surplus of oil is confirmed by checking using the dipstick,
contact a PEUGEOT dealer without delay. No oil Flashing indicates a lack of oil which can cause damage to the engine.If the lack of oil is confirmed by checking using the dipstick, it isessential to top up the level. Oil level gauge fault Check the oil level using the dipstick.
If the level is correct, the flashing indicates a true engine oil levelgauge fault.
Contact a PEUGEOT dealer. Lighting rheostat With the lights on, press the button tovary the intensity ofthe lighting on theinstrument panel andthe multi-function dis-
play. When the ligh-
ting reaches the minimum (or maxi-mum) setting, release the buttonthen press it again to increase (orreduce) the brightness. As soon as the lighting is of the required brightness, release the but-ton.
Trip recorder zero reset With the ignition on, press the button.
INSTRUMENTS AND CONTROLS
34
The value obtained by checking the level using the dipstick is only correct if the vehicle has been on level ground, with the engine off, for more than 10 minutes.
Page 65 of 183
14-04-2003
YOUR 307 SW IN DETAIL
64
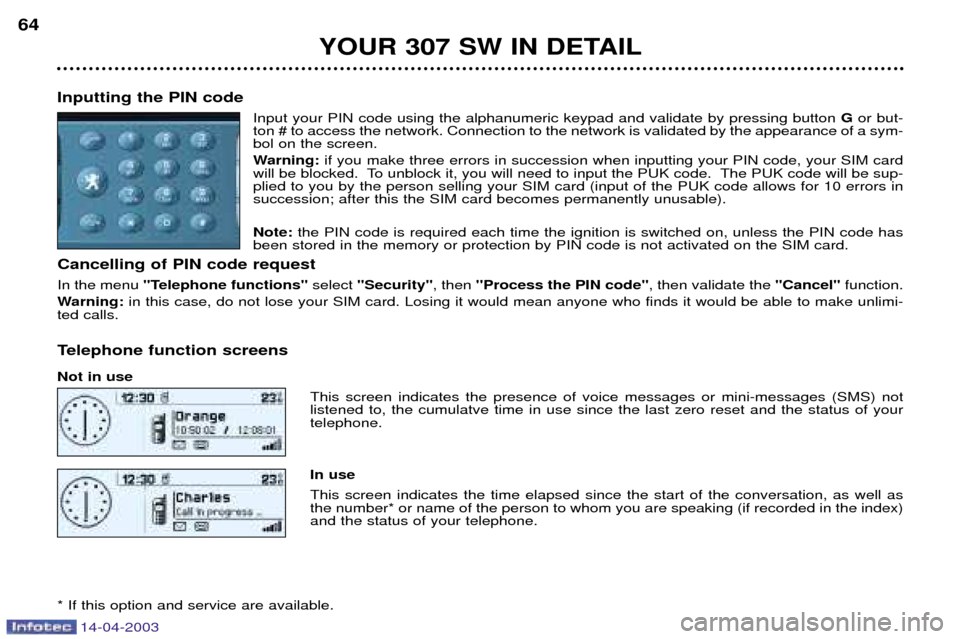
Inputting the PIN code Input your PIN code using the alphanumeric keypad and validate by pressing button Gor but-
ton # to access the network. Connection to the network is validated by the appearance of a sym- bol on the screen.
Warning: if you make three errors in succession when inputting your PIN code, your SIM card
will be blocked. To unblock it, you will need to input the PUK code. The PUK code will be sup- plied to you by the person selling your SIM card (input of the PUK code allows for 10 errors insuccession; after this the SIM card becomes permanently unusable). Note: the PIN code is required each time the ignition is switched on, unless the PIN code has
been stored in the memory or protection by PIN code is not activated on the SIM card.
Cancelling of PIN code request In the menu ''Telephone functions'' select ''Security'' , then ''Process the PIN code'' , then validate the ''Cancel''function.
Warning: in this case, do not lose your SIM card. Losing it would mean anyone who finds it would be able to make unlimi-
ted calls.
Telephone function screens Not in use This screen indicates the presence of voice messages or mini-messages (SMS) not listened to, the cumulatve time in use since the last zero reset and the status of yourtelephone. In use This screen indicates the time elapsed since the start of the conversation, as well as the number* or name of the person to whom you are speaking (if recorded in the index)and the status of your telephone.
* If this option and service are available.
Page 67 of 183
14-04-2003
YOUR 307 SW IN DETAIL
66
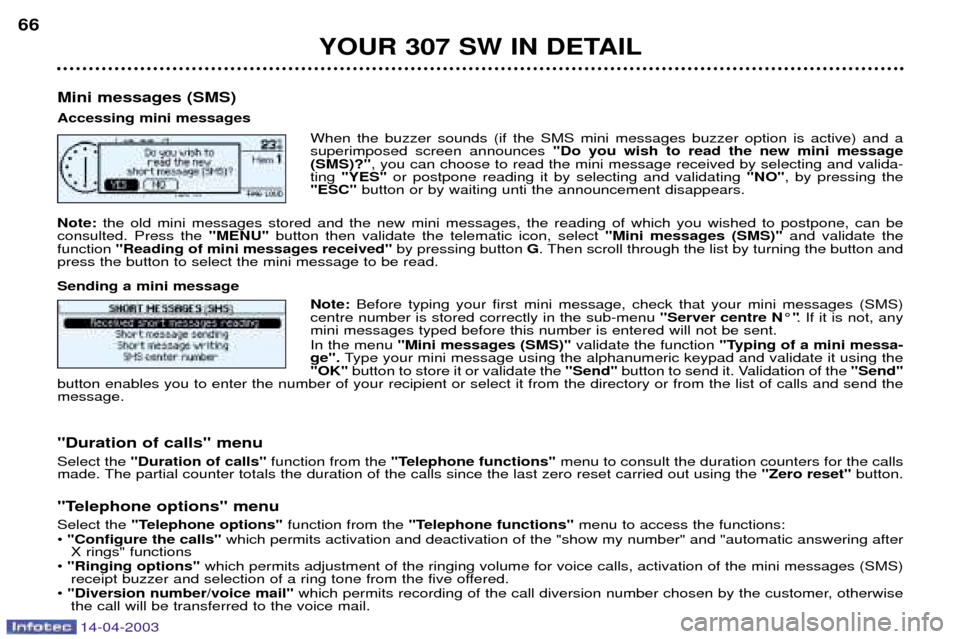
Mini messages (SMS) Accessing mini messages When the buzzer sounds (if the SMS mini messages buzzer option is active) and a superimposed screen announces "Do you wish to read the new mini message
(SMS)?" , you can choose to read the mini message received by selecting and valida-
ting "YES" or postpone reading it by selecting and validating "NO", by pressing the
"ESC" button or by waiting unti the announcement disappears.
Note: the old mini messages stored and the new mini messages, the reading of which you wished to postpone, can be
consulted. Press the "MENU" button then validate the telematic icon, select "Mini messages (SMS)" and validate the
function "Reading of mini messages received" by pressing button G. Then scroll through the list by turning the button and
press the button to select the mini message to be read. Sending a mini message
Note: Before typing your first mini message, check that your mini messages (SMS)
centre number is stored correctly in the sub-menu "Server centre N¡". If it is not, any
mini messages typed before this number is entered will not be sent. In the menu "Mini messages (SMS)" validate the function "Typing of a mini messa-
ge". Type your mini message using the alphanumeric keypad and validate it using the
"OK" button to store it or validate the "Send"button to send it. Validation of the "Send"
button enables you to enter the number of your recipient or select it from the directory or from the list of calls and send the message. "Duration of calls" menu Select the "Duration of calls" function from the"Telephone functions" menu to consult the duration counters for the calls
made. The partial counter totals the duration of the calls since the last zero reset carried out using the "Zero reset"button.
"Telephone options" menuSelect the "Telephone options" function from the "Telephone functions" menu to access the functions:
¥ "Configure the calls" which permits activation and deactivation of the "show my number" and "automatic answering after
X rings" functions
¥ "Ringing options" which permits adjustment of the ringing volume for voice calls, activation of the mini messages (SMS)
receipt buzzer and selection of a ring tone from the five offered.
¥ "Diversion number/voice mail" which permits recording of the call diversion number chosen by the customer, otherwise
the call will be transferred to the voice mail.
Page 81 of 183
14-04-2003
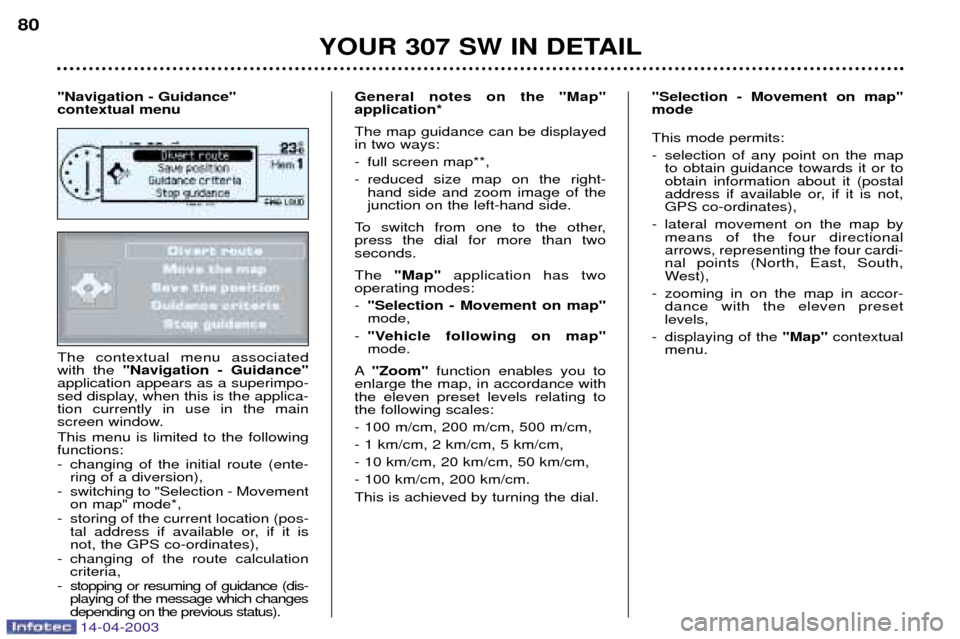
The contextual menu associated with the "Navigation - Guidance"
application appears as a superimpo-
sed display, when this is the applica-tion currently in use in the main
screen window. This menu is limited to the following functions:
- changing of the initial route (ente- ring of a diversion),
- switching to "Selection - Movement on map" mode*,
- storing of the current location (pos- tal address if available or, if it is not, the GPS co-ordinates),
- changing of the route calculation criteria,
- stopping or resuming of guidance (dis- playing of the message which changesdepending on the previous status). General notes on the "Map"application* The map guidance can be displayed in two ways:
- full screen map**,
- reduced size map on the right-
hand side and zoom image of the junction on the left-hand side.
To switch from one to the other,press the dial for more than twoseconds. The "Map" application has two
operating modes: - "Selection - Movement on map" mode,
- "Vehicle following on map"mode.
A "Zoom" function enables you to
enlarge the map, in accordance withthe eleven preset levels relating tothe following scales: - 100 m/cm, 200 m/cm, 500 m/cm,- 1 km/cm, 2 km/cm, 5 km/cm,- 10 km/cm, 20 km/cm, 50 km/cm,- 100 km/cm, 200 km/cm.This is achieved by turning the dial. This mode permits:
- selection of any point on the map
to obtain guidance towards it or to obtain information about it (postal
address if available or, if it is not,GPS co-ordinates),
- lateral movement on the map by means of the four directionalarrows, representing the four cardi-nal points (North, East, South,
West),
- zooming in on the map in accor- dance with the eleven presetlevels,
- displaying of the "Map" contextual
menu.
YOUR 307 SW IN DETAIL
80
"Navigation - Guidance" contextual menu
"Selection - Movement on map"mode
Page 82 of 183
14-04-2003
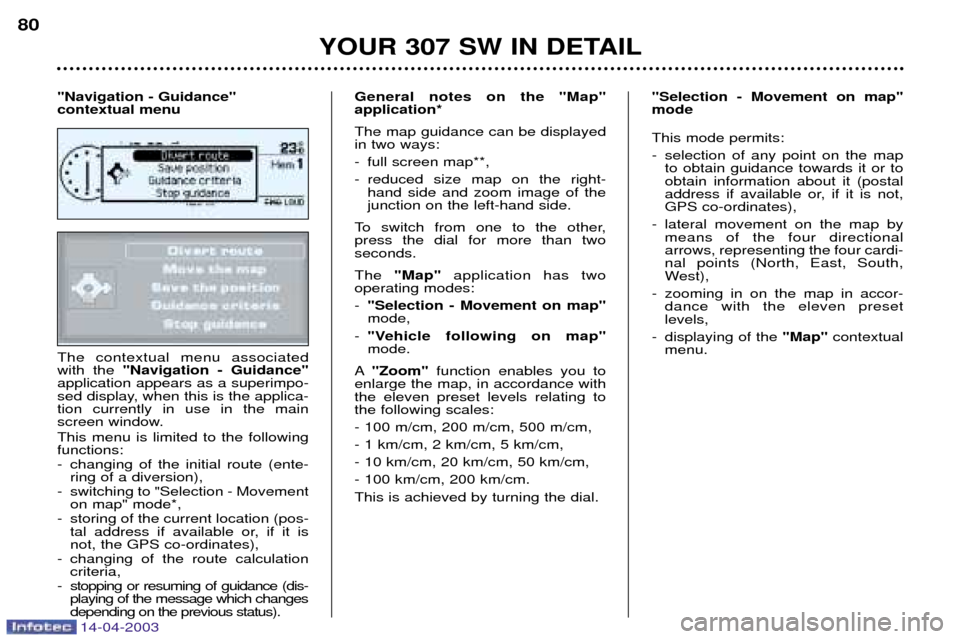
The contextual menu associated with the "Navigation - Guidance"
application appears as a superimpo-
sed display, when this is the applica-tion currently in use in the main
screen window. This menu is limited to the following functions:
- changing of the initial route (ente- ring of a diversion),
- switching to "Selection - Movement on map" mode*,
- storing of the current location (pos- tal address if available or, if it is not, the GPS co-ordinates),
- changing of the route calculation criteria,
- stopping or resuming of guidance (dis- playing of the message which changesdepending on the previous status). General notes on the "Map"application* The map guidance can be displayed in two ways:
- full screen map**,
- reduced size map on the right-
hand side and zoom image of the junction on the left-hand side.
To switch from one to the other,press the dial for more than twoseconds. The "Map" application has two
operating modes: - "Selection - Movement on map" mode,
- "Vehicle following on map"mode.
A "Zoom" function enables you to
enlarge the map, in accordance withthe eleven preset levels relating tothe following scales: - 100 m/cm, 200 m/cm, 500 m/cm,- 1 km/cm, 2 km/cm, 5 km/cm,- 10 km/cm, 20 km/cm, 50 km/cm,- 100 km/cm, 200 km/cm.This is achieved by turning the dial. This mode permits:
- selection of any point on the map
to obtain guidance towards it or to obtain information about it (postal
address if available or, if it is not,GPS co-ordinates),
- lateral movement on the map by means of the four directionalarrows, representing the four cardi-nal points (North, East, South,
West),
- zooming in on the map in accor- dance with the eleven presetlevels,
- displaying of the "Map" contextual
menu.
YOUR 307 SW IN DETAIL
80
"Navigation - Guidance" contextual menu
"Selection - Movement on map"mode
Page 83 of 183
14-04-2003
YOUR 307 SW IN DETAIL81
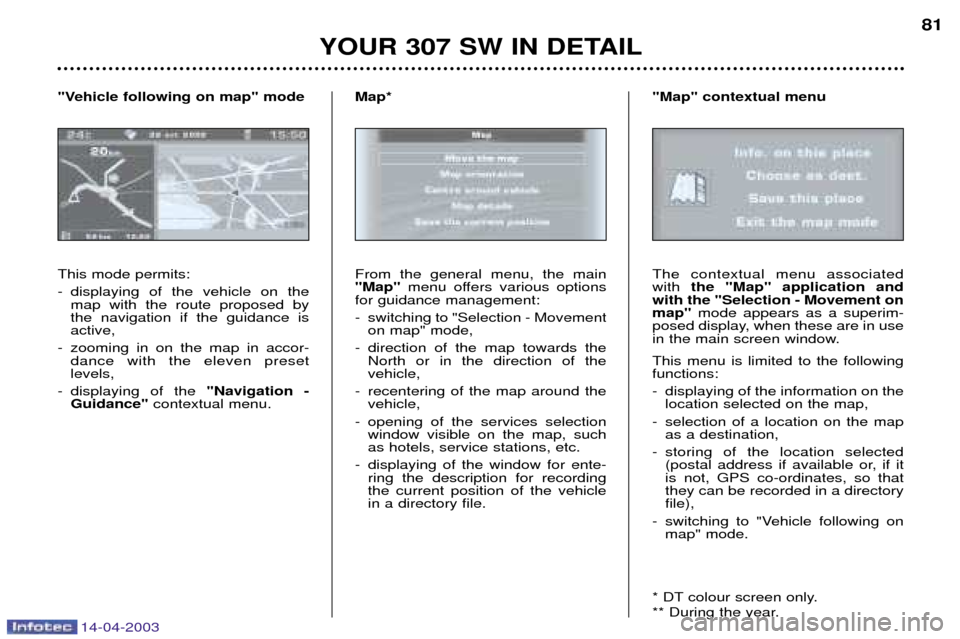
This mode permits:
- displaying of the vehicle on the map with the route proposed by the navigation if the guidance isactive,
- zooming in on the map in accor- dance with the eleven presetlevels,
- displaying of the "Navigation -
Guidance" contextual menu.
"Vehicle following on map" mode
From the general menu, the main "Map"
menu offers various options
for guidance management:
- switching to "Selection - Movement on map" mode,
- direction of the map towards the North or in the direction of the vehicle,
- recentering of the map around the vehicle,
- opening of the services selection window visible on the map, suchas hotels, service stations, etc.
- displaying of the window for ente- ring the description for recordingthe current position of the vehiclein a directory file.
Map*The contextual menu associated with
the "Map" application and
with the "Selection - Movement onmap" mode appears as a superim-
posed display, when these are in use
in the main screen window. This menu is limited to the following functions:
- displaying of the information on the location selected on the map,
- selection of a location on the map as a destination,
- storing of the location selected (postal address if available or, if it is not, GPS co-ordinates, so thatthey can be recorded in a directoryfile),
- switching to "Vehicle following on map" mode.
* DT colour screen only.
** During the year.
"Map" contextual menu
Page 122 of 183
14-04-2003
YOUR 307 SW IN DETAIL
114
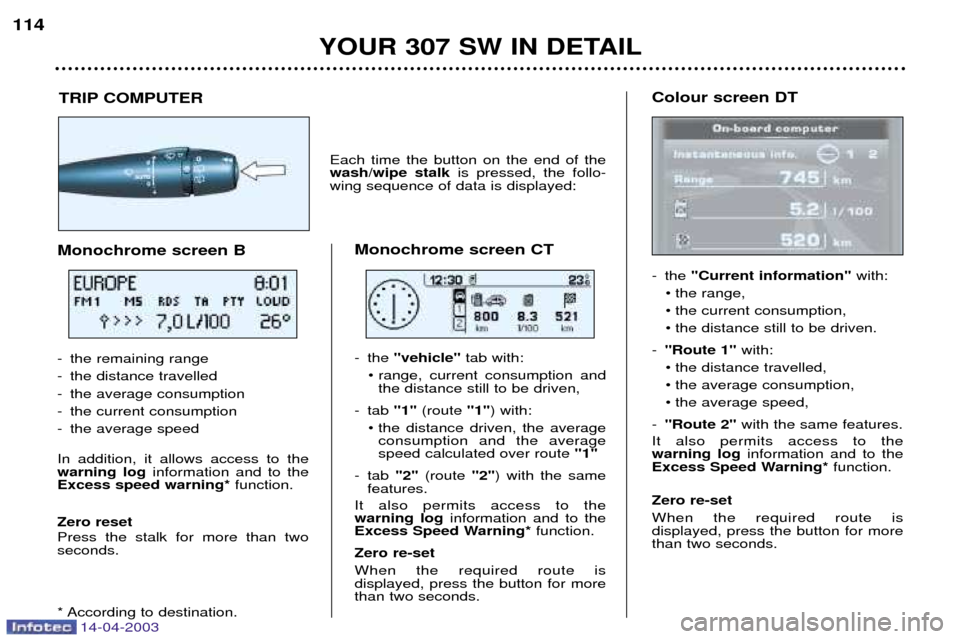
Colour screen DT
- the "Current information" with:
¥ the range,
¥ the current consumption,
¥ the distance still to be driven.
- "Route 1" with:
¥ the distance travelled,
¥ the average consumption,
¥ the average speed,
- "Route 2" with the same features.
It also permits access to the warning log information and to the
Excess Speed Warning* function.
Zero re-set When the required route is displayed, press the button for morethan two seconds.
TRIP COMPUTER
Each time the button on the end of the wash/wipe stalk is pressed, the follo-
wing sequence of data is displayed:
Monochrome screen CT
- the "vehicle" tab with:
¥ range, current consumption and the distance still to be driven,
- tab "1"(route "1") with:
¥ the distance driven, the average consumption and the average speed calculated over route "1"
- tab "2"(route "2") with the same
features.
It also permits access to the warning log information and to the
Excess Speed Warning* function.
Zero re-set When the required route is displayed, press the button for morethan two seconds.
Monochrome screen B
- the remaining range
- the distance travelled
- the average consumption
- the current consumption
- the average speed In addition, it allows access to the warning log information and to the
Excess speed warning* function.
Zero reset Press the stalk for more than two seconds.
* According to destination.
Page 124 of 183
14-04-2003
YOUR 307 SW IN DETAIL
114
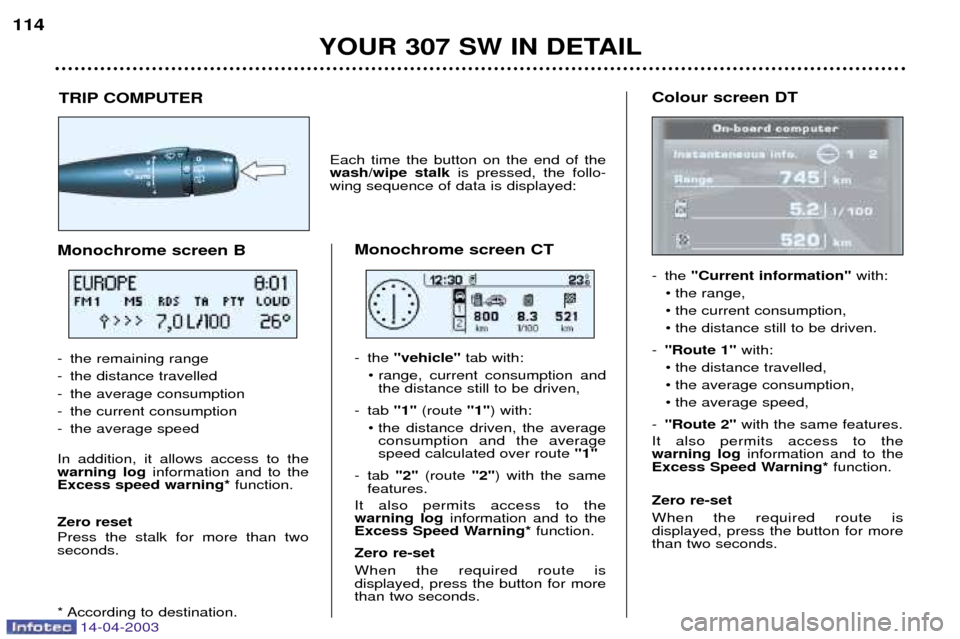
Colour screen DT
- the "Current information" with:
¥ the range,
¥ the current consumption,
¥ the distance still to be driven.
- "Route 1" with:
¥ the distance travelled,
¥ the average consumption,
¥ the average speed,
- "Route 2" with the same features.
It also permits access to the warning log information and to the
Excess Speed Warning* function.
Zero re-set When the required route is displayed, press the button for morethan two seconds.
TRIP COMPUTER
Each time the button on the end of the wash/wipe stalk is pressed, the follo-
wing sequence of data is displayed:
Monochrome screen CT
- the "vehicle" tab with:
¥ range, current consumption and the distance still to be driven,
- tab "1"(route "1") with:
¥ the distance driven, the average consumption and the average speed calculated over route "1"
- tab "2"(route "2") with the same
features.
It also permits access to the warning log information and to the
Excess Speed Warning* function.
Zero re-set When the required route is displayed, press the button for morethan two seconds.
Monochrome screen B
- the remaining range
- the distance travelled
- the average consumption
- the current consumption
- the average speed In addition, it allows access to the warning log information and to the
Excess speed warning* function.
Zero reset Press the stalk for more than two seconds.
* According to destination.