Peugeot 308 2014 - RHD (UK, Australia) Manual Online
Manufacturer: PEUGEOT, Model Year: 2014, Model line: 308, Model: Peugeot 308 2014Pages: 400, PDF Size: 10.01 MB
Page 81 of 400
79
3
Comfort
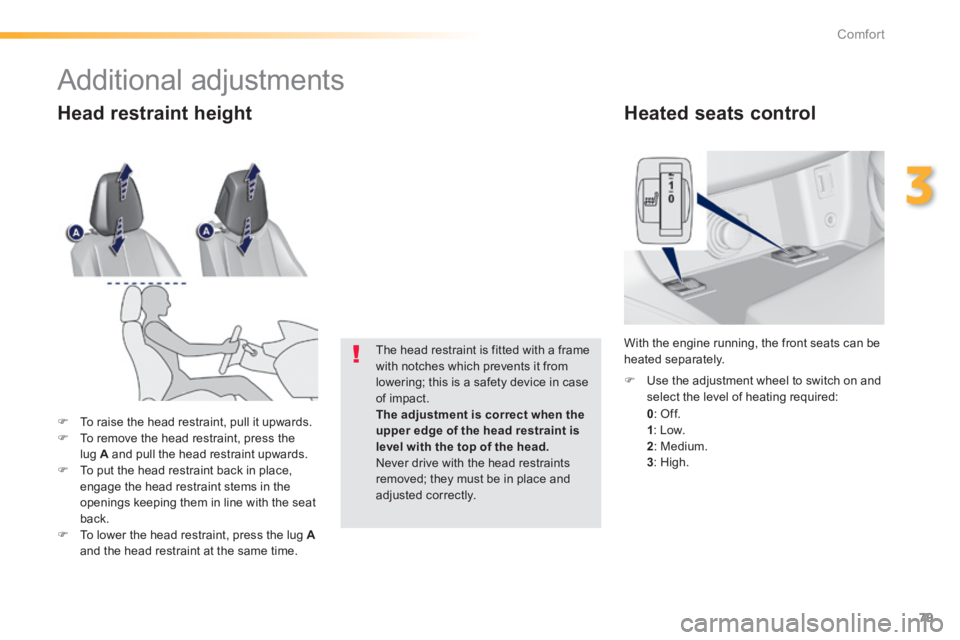
Heated seats control
0 : Off.
1 : Low. 2 : Medium. 3 : High.
Use the adjustment wheel to switch on and select the level of heating required:
With the engine running, the front seats can be heated separately.
To raise the head restraint, pull it upwards. To remove the head restraint, press the lug A and pull the head restraint upwards. To put the head restraint back in place, engage the head restraint stems in the openings keeping them in line with the seat back. To lower the head restraint, press the lug Aand the head restraint at the same time.
The head restraint is fitted with a frame with notches which prevents it from lowering; this is a safety device in case of impact. The adjustment is correct when the
upper edge of the head restraint is level with the top of the head. Never drive with the head restraints removed; they must be in place and adjusted correctly.
Head restraint height
Additional adjustments
Page 82 of 400
80
Comfort
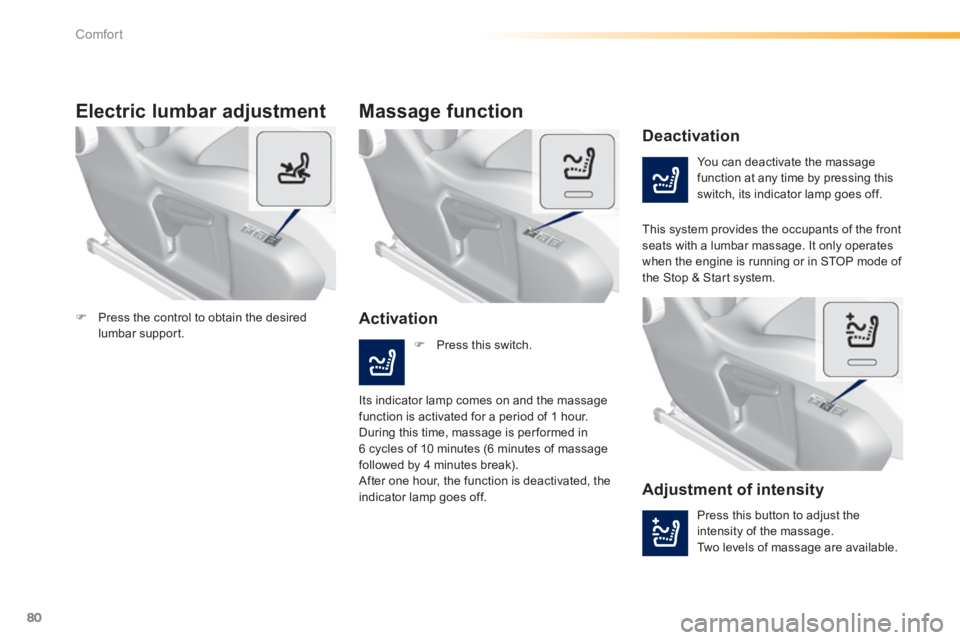
Electric lumbar adjustment
You can deactivate the massage function at any time by pressing this switch, its indicator lamp goes off.
Deactivation
Activation
Massage function
This system provides the occupants of the front seats with a lumbar massage. It only operates when the engine is running or in STOP mode of the Stop & Start system.
Press this switch.
Its indicator lamp comes on and the massage function is activated for a period of 1 hour. During this time, massage is per formed in 6 cycles of 10 minutes (6 minutes of massage followed by 4 minutes break). After one hour, the function is deactivated, the indicator lamp goes off. Adjustment of intensity
Press this button to adjust the intensity of the massage. Two levels of massage are available.
Press the control to obtain the desired lumbar support.
Page 83 of 400
81
3
Comfort
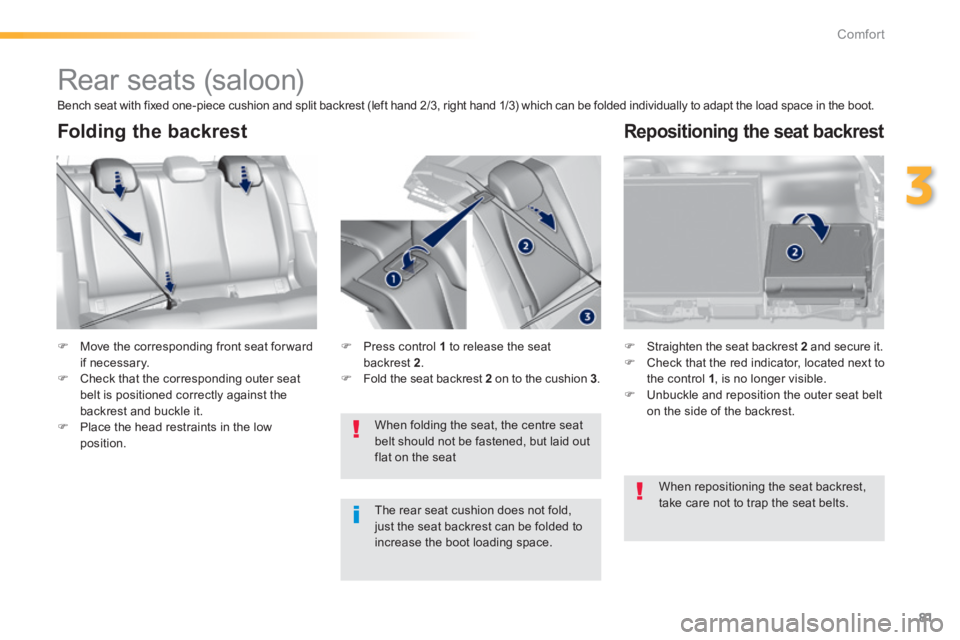
Rear seats (saloon)
Move the corresponding front seat for ward if necessary. Check that the corresponding outer seat belt is positioned correctly against the backrest and buckle it. Place the head restraints in the low position.
Straighten the seat backrest 2 and secure it. Check that the red indicator, located next to the control 1 , is no longer visible. Unbuckle and reposition the outer seat belt on the side of the backrest. When folding the seat, the centre seat
belt should not be fastened, but laid out flat on the seat
Press control 1 to release the seat backrest 2 . Fold the seat backrest 2 on to the cushion 3 .
Folding the backrest Repositioning the seat backrest
Bench seat with fixed one-piece cushion and split backrest (left hand 2/3, right hand 1/3) which can be folded individually to adapt the load space in the boot.
The rear seat cushion does not fold, just the seat backrest can be folded to increase the boot loading space.
When repositioning the seat backrest, take care not to trap the seat belts.
Page 84 of 400
82
Comfort
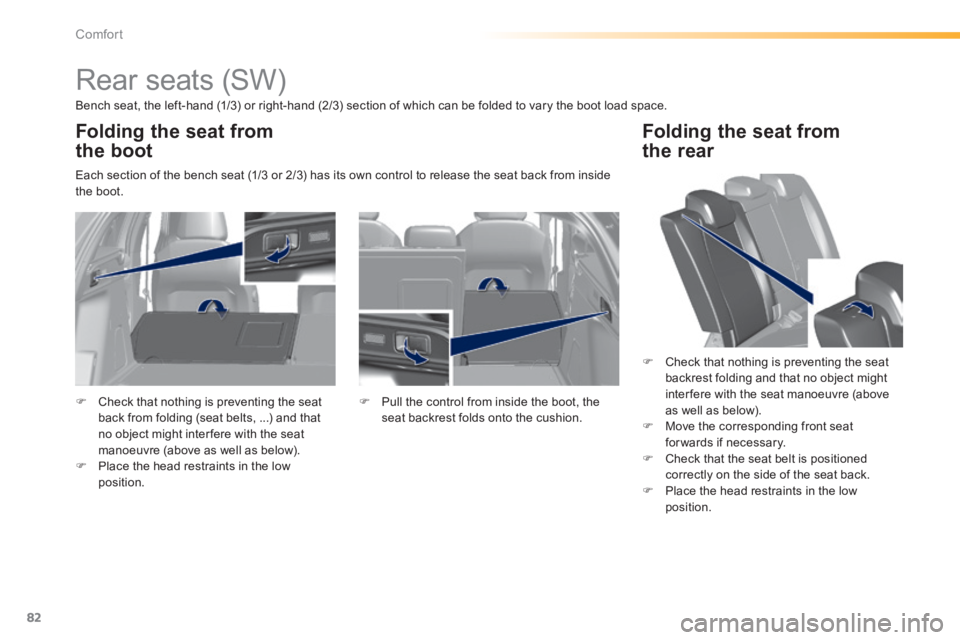
Rear seats (SW)
Bench seat, the left-hand (1/3) or right-hand (2/3) section of which can be folded to vary the boot load space.
Each section of the bench seat (1/3 or 2/3) has its own control to release the seat back from inside the boot.
Folding the seat from
the boot
Check that nothing is preventing the seat back from folding (seat belts, ...) and that no object might inter fere with the seat manoeuvre (above as well as below). Place the head restraints in the low position.
Pull the control from inside the boot, the seat backrest folds onto the cushion.
Folding the seat from
the rear
Check that nothing is preventing the seat backrest folding and that no object might inter fere with the seat manoeuvre (above as well as below). Move the corresponding front seat for wards if necessary. Check that the seat belt is positioned correctly on the side of the seat back. Place the head restraints in the low position.
Page 85 of 400
83
3
Comfort
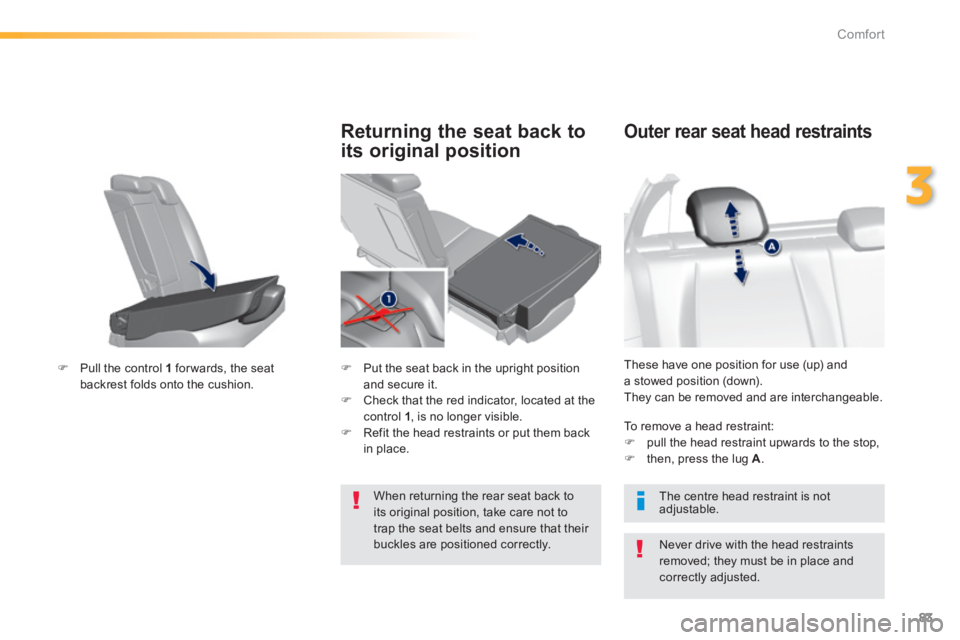
These have one position for use (up) and a stowed position (down). They can be removed and are interchangeable.
Outer rear seat head restraints
Never drive with the head restraints removed; they must be in place and correctly adjusted.
To remove a head restraint: pull the head restraint upwards to the stop, then, press the lug A .
The centre head restraint is not adjustable.
Pull the control 1 for wards, the seat backrest folds onto the cushion.
Returning the seat back to
its original position
Put the seat back in the upright position and secure it. Check that the red indicator, located at the control 1 , is no longer visible. Refit the head restraints or put them back in place.
When returning the rear seat back to its original position, take care not to trap the seat belts and ensure that their buckles are positioned correctly.
Page 86 of 400
84
Comfort
Interior fi ttings
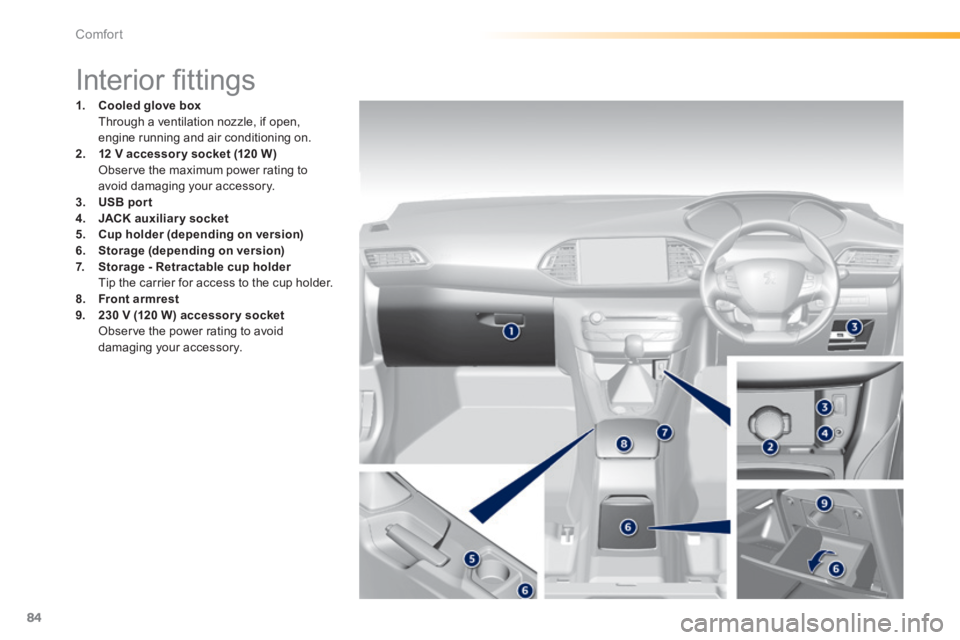
1. Cooled glove box Through a ventilation nozzle, if open, engine running and air conditioning on. 2. 12 V accessory socket (120 W ) Observe the maximum power rating to avoid damaging your accessory .3. USB por t4. JACK auxiliary socket
5. Cup holder (depending on version)6. Storage (depending on version)7. Storage - Retractable cup holder Storage - Retractable cup holder Storage - Retractable cup holder Tip the carrier for access to the cup holder. 8. Front armrest9. 230 V (120 W) accessory socket Observe the power rating to avoid damaging your accessory.
Page 87 of 400
85
3
Comfort
Mats Removable carpet protection.
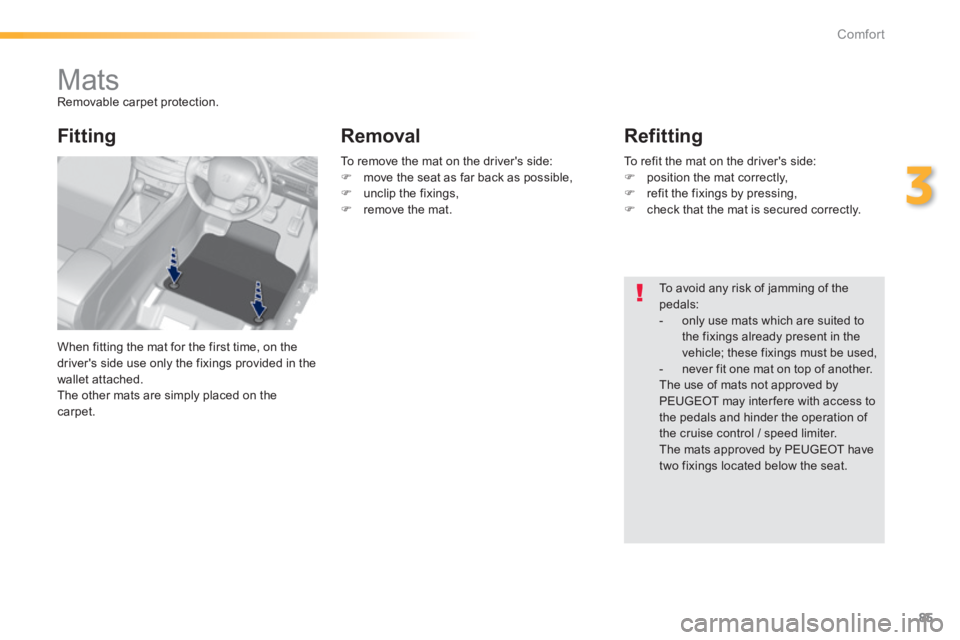
When fitting the mat for the first time, on the driver's side use only the fixings provided in the wallet attached. The other mats are simply placed on the carpet.
Fitting Removal Refitting
To avoid any risk of jamming of the pedals: - only use mats which are suited to the fixings already present in the vehicle; these fixings must be used, - never fit one mat on top of another. The use of mats not approved by PEUGEOT may inter fere with access to the pedals and hinder the operation of
the cruise control / speed limiter. The mats approved by PEUGEOT have two fixings located below the seat.
To remove the mat on the driver's side: move the seat as far back as possible, unclip the fixings, remove the mat.
To refit the mat on the driver's side: position the mat correctly, refit the fixings by pressing, check that the mat is secured correctly.
Page 88 of 400
86
Comfort
Front armrest
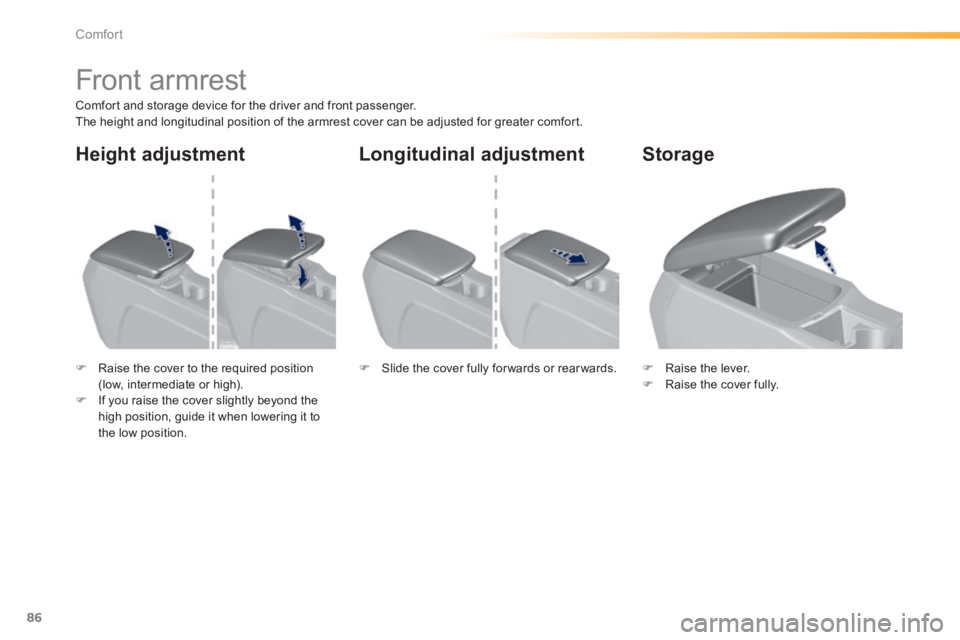
Comfort and storage device for the driver and front passenger. The height and longitudinal position of the armrest cover can be adjusted for greater comfort.
Raise the cover to the required position (low, intermediate or high). If you raise the cover slightly beyond the high position, guide it when lowering it to
the low position.
Raise the lever. Raise the cover fully. Slide the cover fully for wards or rear wards.
Storage Longitudinal adjustment Height adjustment
Page 89 of 400
87
3
Comfort
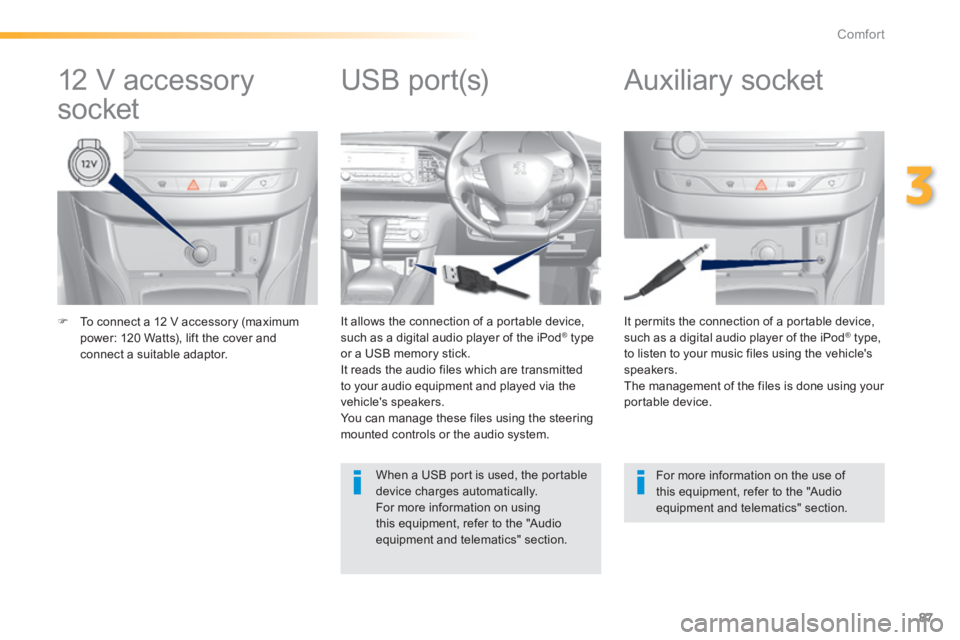
To connect a 12 V accessory (maximum power: 120 Watts), lift the cover and connect a suitable adaptor.
It permits the connection of a portable device, such as a digital audio player of the iPod ® type, ® type, ®
to listen to your music files using the vehicle's speakers. The management of the files is done using your portable device.
It allows the connection of a portable device, such as a digital audio player of the iPod ® type ® type ®
or a USB memory stick. It reads the audio files which are transmitted to your audio equipment and played via the vehicle's speakers. You can manage these files using the steering mounted controls or the audio system.
12 V accessory
socket Auxiliary socket
USB port(s)
For more information on the use of this equipment, refer to the "Audio equipment and telematics" section.
When a USB port is used, the portable device charges automatically. For more information on using this equipment, refer to the "Audio equipment and telematics" section.
Page 90 of 400
88
Comfort
230 V / 50 Hz power socket
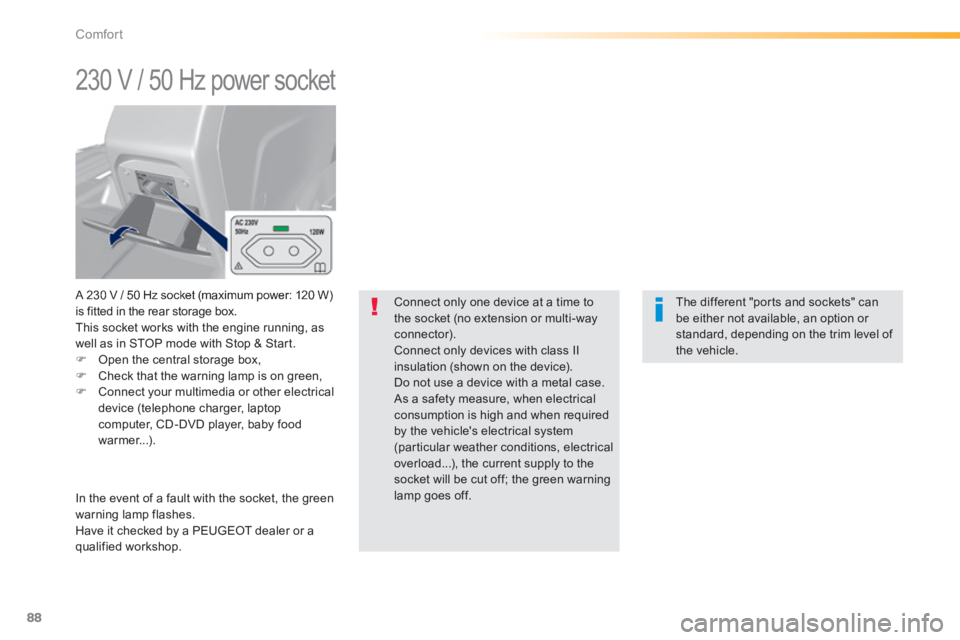
A 230 V / 50 Hz socket (maximum power: 120 W) is fitted in the rear storage box. This socket works with the engine running, as well as in STOP mode with Stop & Start. Open the central storage box, Check that the warning lamp is on green, Connect your multimedia or other electrical device (telephone charger, laptop computer, CD-DVD player, baby food warmer...).
In the event of a fault with the socket, the green warning lamp flashes. Have it checked by a PEUGEOT dealer or a qualified workshop.
Connect only one device at a time to the socket (no extension or multi-way connector). Connect only devices with class II insulation (shown on the device). Do not use a device with a metal case. As a safety measure, when electrical consumption is high and when required
by the vehicle's electrical system (particular weather conditions, electrical overload...), the current supply to the socket will be cut off; the green warning lamp goes off.
The different "ports and sockets" can be either not available, an option or standard, depending on the trim level of the vehicle.