PEUGEOT 308 2015 Manual PDF
Manufacturer: PEUGEOT, Model Year: 2015, Model line: 308, Model: Peugeot 308 2015Pages: 344, PDF Size: 12.22 MB
Page 71 of 344
69
The electric functions of the driver's
seat are active for approximately
one minute after opening the front door.
They are deactivated approximately
one
minute after the ignition is switched
off and in economy mode.
To reactivate them, switch on the ignition.
Before moving the seat backwards,
ensure that there is nothing that might
prevent the full travel of the seat, so
as to avoid the risk of of jamming the
seat caused by the presence of objects
on the floor behind the seat or rear
passengers. If the seat jams, stop the
movement immediately.
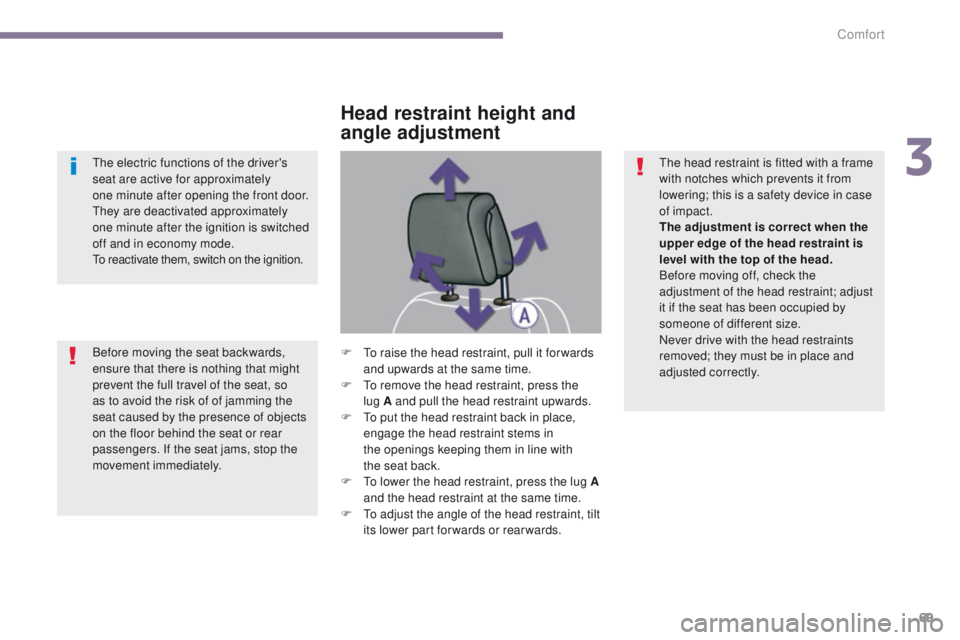
Head restraint height and
angle adjustment
F To raise the head restraint, pull it for wards and upwards at the same time.
F
T
o remove the head restraint, press the
lug
A and pull the head restraint upwards.
F
T
o put the head restraint back in place,
engage the head restraint stems in
the
openings keeping them in line with
the
seat back.
F
T
o lower the head restraint, press the lug A
and the head restraint at the same time.
F
T
o adjust the angle of the head restraint, tilt
its lower part forwards or rearwards. The head restraint is fitted with a frame
with notches which prevents it from
lowering; this is a safety device in case
of impact.
The adjustment is correct when the
upper edge of the head restraint is
level with the top of the head.
Before moving off, check the
adjustment of the head restraint; adjust
it if the seat has been occupied by
someone of different size.
Never drive with the head restraints
removed; they must be in place and
adjusted correctly.
3
Comfort
Page 72 of 344
70
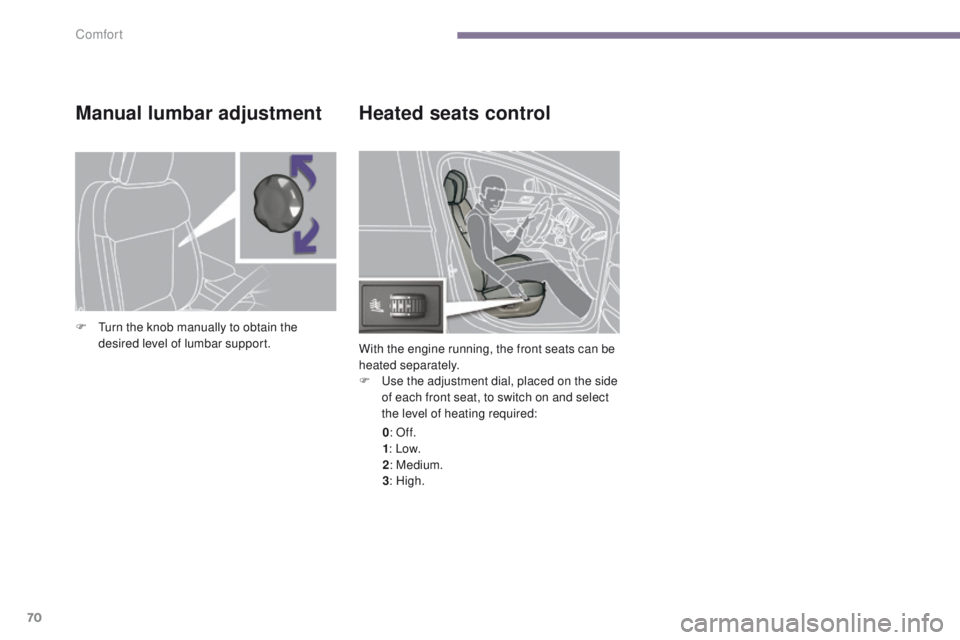
Heated seats control
With the engine running, the front seats can be
heated separately.
F
U
se the adjustment dial, placed on the side
of each front seat, to switch on and select
the level of heating required:
0 : Of f.
1 : Low.
2 : Medium.
3 : High.
Manual lumbar adjustment
F Turn the knob manually to obtain the
desired level of lumbar support.
Comfort
Page 73 of 344
71
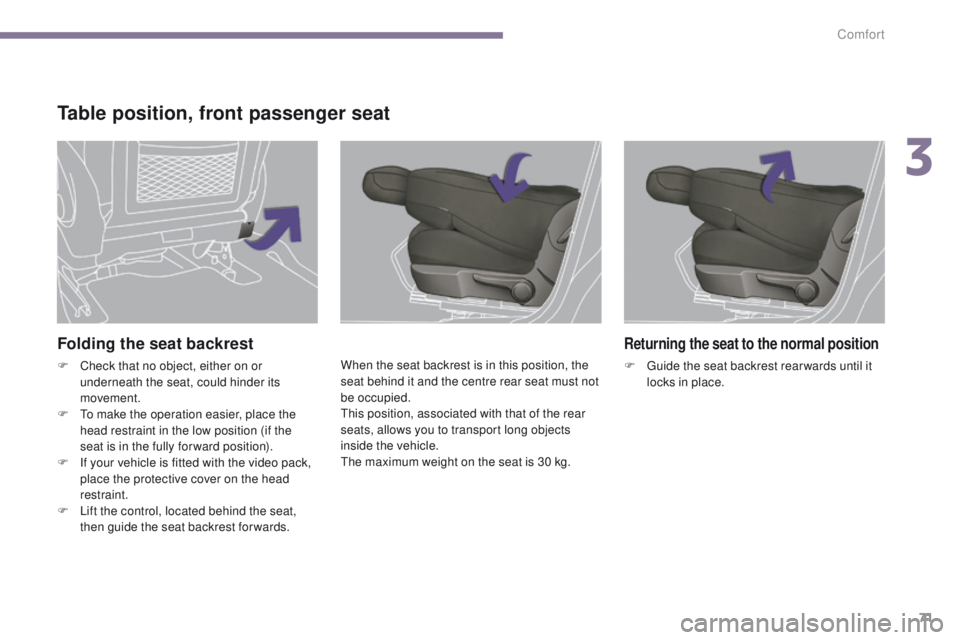
Folding the seat backrest
F Check that no object, either on or underneath the seat, could hinder its
movement.
F
T
o make the operation easier, place the
head restraint in the low position (if the
seat is in the fully for ward position).
F
I
f your vehicle is fitted with the video pack,
place the protective cover on the head
restraint.
F
L
ift the control, located behind the seat,
then guide the seat backrest for wards. When the seat backrest is in this position, the
seat behind it and the centre rear seat must not
be occupied.
This position, associated with that of the rear
seats, allows you to transport long objects
inside the vehicle.
The maximum weight on the seat is 30 kg.
Table position, front passenger seat
Returning the seat to the normal position
F Guide the seat backrest rear wards until it
locks in place.
3
Comfort
Page 74 of 344
72
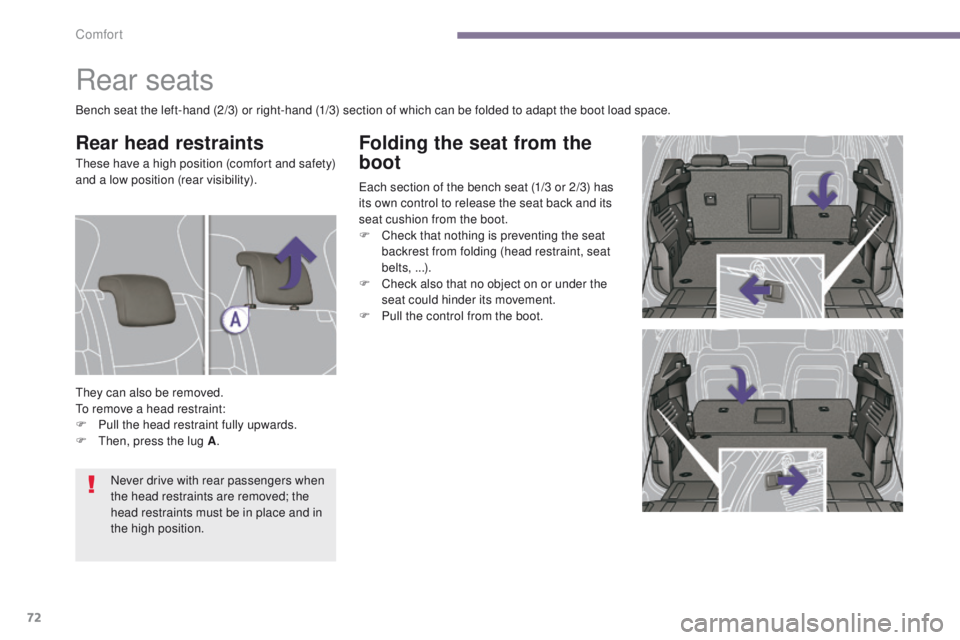
Folding the seat from the
boot
Each section of the bench seat (1/3 or 2/3) has
its own control to release the seat back and its
seat cushion from the boot.
F
C
heck that nothing is preventing the seat
backrest from folding (head restraint, seat
belts, ...).
F
C
heck also that no object on or under the
seat could hinder its movement.
F
P
ull the control from the boot.
Rear seats
Rear head restraints
They can also be removed.
To remove a head restraint:
F
P
ull the head restraint fully upwards.
F
T
hen, press the lug A .
Bench seat the left-hand (2/3) or right-hand (1/3) section of which can be folded to adapt the boot load space.
These have a high position (comfort and safety)
and a low position (rear visibility).
Never drive with rear passengers when
the head restraints are removed; the
head restraints must be in place and in
the high position.
Comfort
Page 75 of 344
73
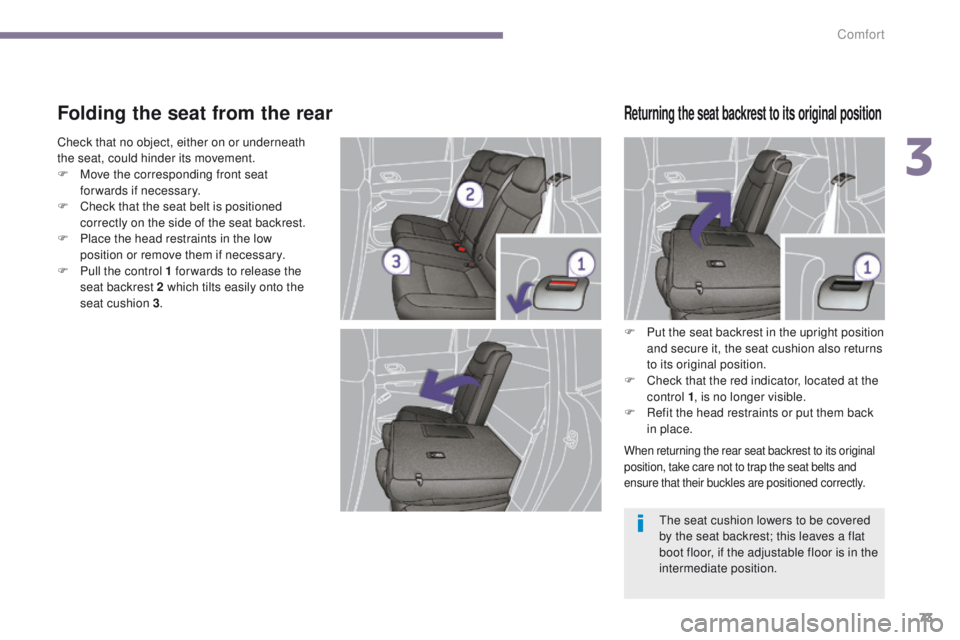
Folding the seat from the rear
F Put the seat backrest in the upright position and secure it, the seat cushion also returns
to its original position.
F
C
heck that the red indicator, located at the
control 1 , is no longer visible.
F
R
efit the head restraints or put them back
in place.
When returning the rear seat backrest to its original
position, take care not to trap the seat belts and
ensure that their buckles are positioned correctly.
The seat cushion lowers to be covered
by the seat backrest; this leaves a flat
boot floor, if the adjustable floor is in the
intermediate position.
Returning the seat backrest to its original position
Check that no object, either on or underneath
the seat, could hinder its movement.
F
M
ove the corresponding front seat
forwards if necessary.
F
C
heck that the seat belt is positioned
correctly on the side of the seat backrest.
F
P
lace the head restraints in the low
position or remove them if necessary.
F
P
ull the control 1 for wards to release the
seat backrest 2 which tilts easily onto the
seat cushion 3 .
3
Comfort
Page 76 of 344
74
Mirrors
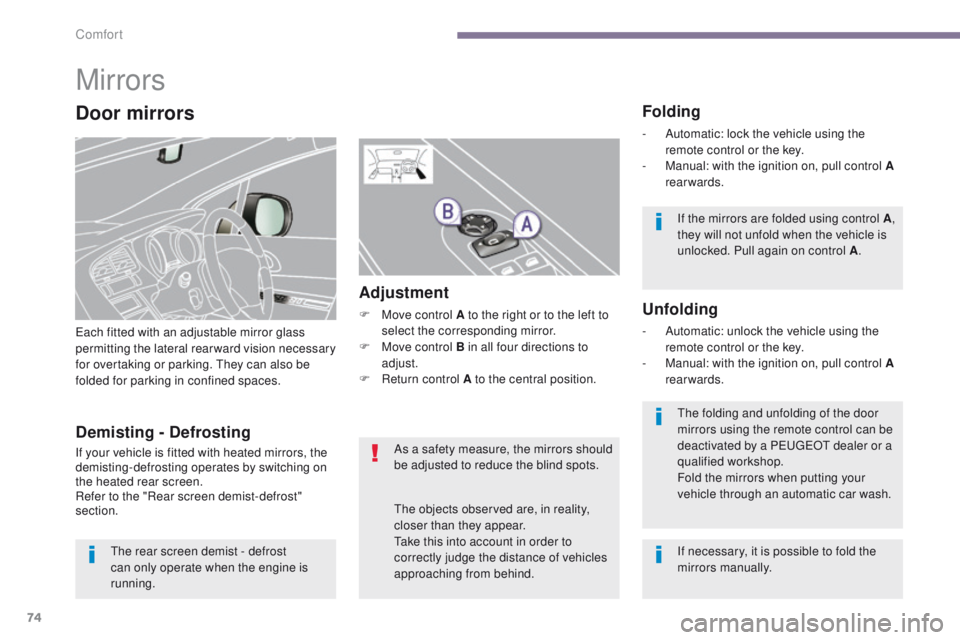
Each fitted with an adjustable mirror glass
permitting the lateral rearward vision necessary
for overtaking or parking. They can also be
folded for parking in confined spaces.
Folding
- Automatic: lock the vehicle using the remote control or the key.
-
M
anual: with the ignition on, pull control A
rearwards.
Unfolding
- Automatic: unlock the vehicle using the remote control or the key.
-
M
anual: with the ignition on, pull control A
rearwards.
Adjustment
F Move control A to the right or to the left to select the corresponding mirror.
F
M
ove control B in all four directions to
adjust.
F
R
eturn control A to the central position.
Demisting - Defrosting
If your vehicle is fitted with heated mirrors, the
demisting-defrosting operates by switching on
the heated rear screen.
Refer to the "Rear screen demist-defrost"
section. If the mirrors are folded using control A
,
they will not unfold when the vehicle is
unlocked. Pull again on control A .
The folding and unfolding of the door
mirrors using the remote control can be
deactivated by a PEUGEOT dealer or a
qualified workshop.
Fold the mirrors when putting your
vehicle through an automatic car wash.
The rear screen demist - defrost
can only operate when the engine is
running. As a safety measure, the mirrors should
be adjusted to reduce the blind spots.
The objects observed are, in reality,
closer than they appear.
Take this into account in order to
correctly judge the distance of vehicles
approaching from behind.
Door mirrors
If necessary, it is possible to fold the
mirrors manually.
Comfort
Page 77 of 344
75
Adjustment
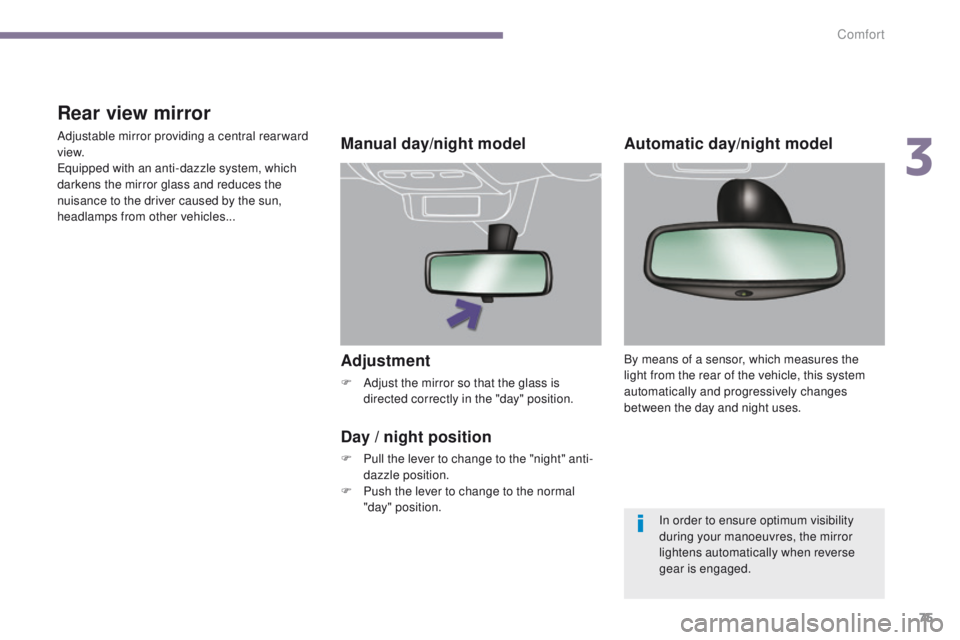
F Adjust the mirror so that the glass is directed correctly in the "day" position.
Manual day/night model
Day
/ night position
F Pull the lever to change to the "night" anti-dazzle position.
F
P
ush the lever to change to the normal
"day" position.
Rear view mirror
Adjustable mirror providing a central rearward
view.
Equipped with an anti-dazzle system, which
darkens the mirror glass and reduces the
nuisance to the driver caused by the sun,
headlamps from other vehicles...Automatic day/night model
By means of a sensor, which measures the
light from the rear of the vehicle, this system
automatically and progressively changes
between the day and night uses.
In order to ensure optimum visibility
during your manoeuvres, the mirror
lightens automatically when reverse
gear is engaged.
3
Comfort
Page 78 of 344
76
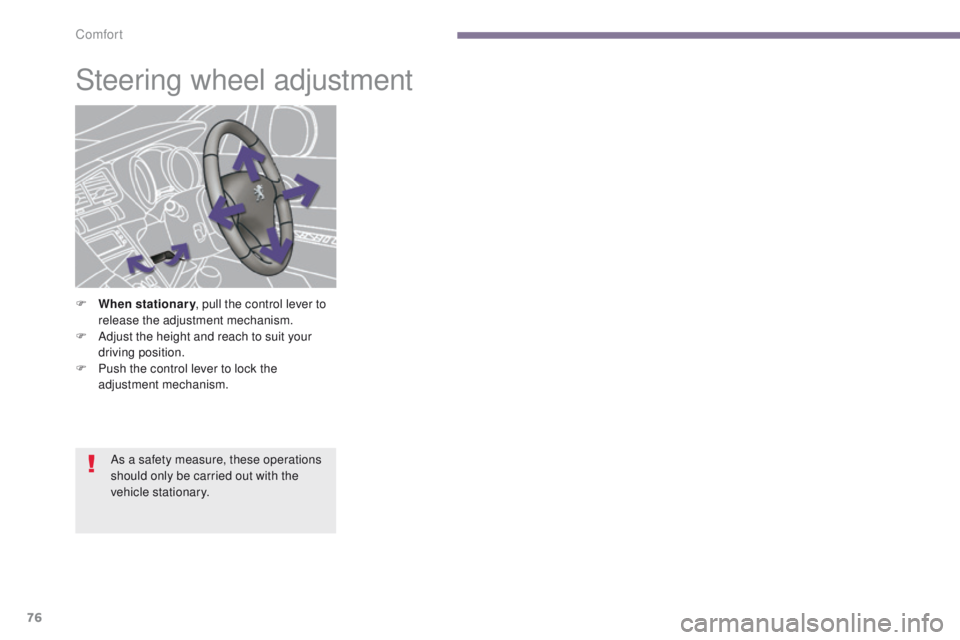
Steering wheel adjustment
F When stationary, pull the control lever to
release the adjustment mechanism.
F
A
djust the height and reach to suit your
driving position.
F
P
ush the control lever to lock the
adjustment mechanism.
As a safety measure, these operations
should only be carried out with the
vehicle stationary.
Comfort
Page 79 of 344
77
Lighting controls
Main lighting
The various front and rear lamps of the vehicle
are designed to adapt the lighting progressively
in relation to the climatic conditions and so
improve the driver's visibility:
-
s
idelamps, to be seen,
-
d
ipped beam headlamps to see without
dazzling other drivers,
-
m
ain beam headlamps to see clearly when
the road is clear,
-
d
irectional headlamps for improved
visibility when cornering.
Additional lighting
Other lamps are installed to fulfil the
requirements of particular driving conditions:
-
a r
ear foglamp to be seen from a distance,
-
f
ront foglamps for even better visibility,
-
d
aytime running lamps to be seen during
t h e d ay.
Function settings
You can activate / deactivate the following
l ighting functions:
-
a
utomatic guide-me-home lighting,
-
a
utomatic illumination of headlamps,
-
d
irectional lighting.
Travelling abroad
If using your vehicle in a country that
drives on the other side of the road, the
headlamps must be adjusted to avoid
dazzling on-coming drivers.
Contact an official dealer or a qualified
workshop.
In some weather conditions (e.g. low
temperature or humidity), the presence
of misting on the internal sur face of the
glass of the headlamps and rear lamps
is normal; it disappears after the lamps
have been on for a few minutes.
4
Visibility
Page 80 of 344
78
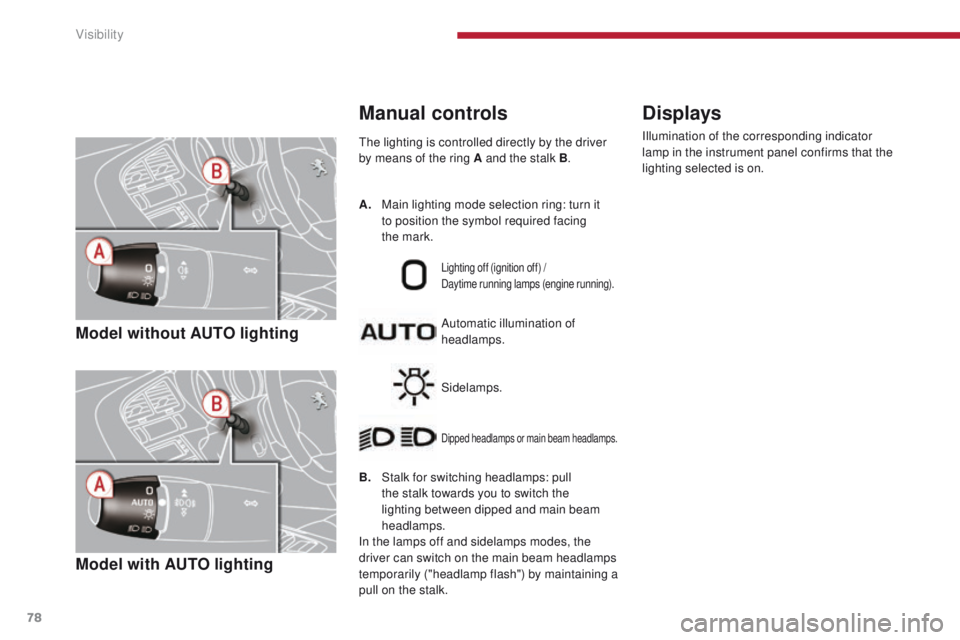
Model without AUTO lighting
Model with AUTO lighting
The lighting is controlled directly by the driver
by means of the ring A and the stalk B.
B.
S
talk for switching headlamps: pull
the stalk towards you to switch the
lighting between dipped and main beam
headlamps.
In the lamps off and sidelamps modes, the
driver can switch on the main beam headlamps
temporarily ("headlamp flash") by maintaining a
pull on the stalk. Automatic illumination of
headlamps.
Lighting off (ignition off) /
Daytime running lamps (engine running).
Sidelamps.
Dipped headlamps or main beam headlamps.
Displays
Illumination of the corresponding indicator
lamp in the instrument panel confirms that the
lighting selected is on.
Manual controls
A. Main lighting mode selection ring: turn
it
to position the symbol required facing
the
mark.
Visibility