display Peugeot 508 RXH 2014 Owner's Guide
[x] Cancel search | Manufacturer: PEUGEOT, Model Year: 2014, Model line: 508 RXH, Model: Peugeot 508 RXH 2014Pages: 338, PDF Size: 10.81 MB
Page 62 of 338
60
If dashes are displayed continuously
while driving in place of the digits,
contact a P
e
uge
Ot
dealer or a
qualified workshop.
th
is function is only displayed from
20 mph (30 km/h).
th
is value may vary following a change
in the style of driving or the relief,
resulting in a significant change in the
current fuel consumption.
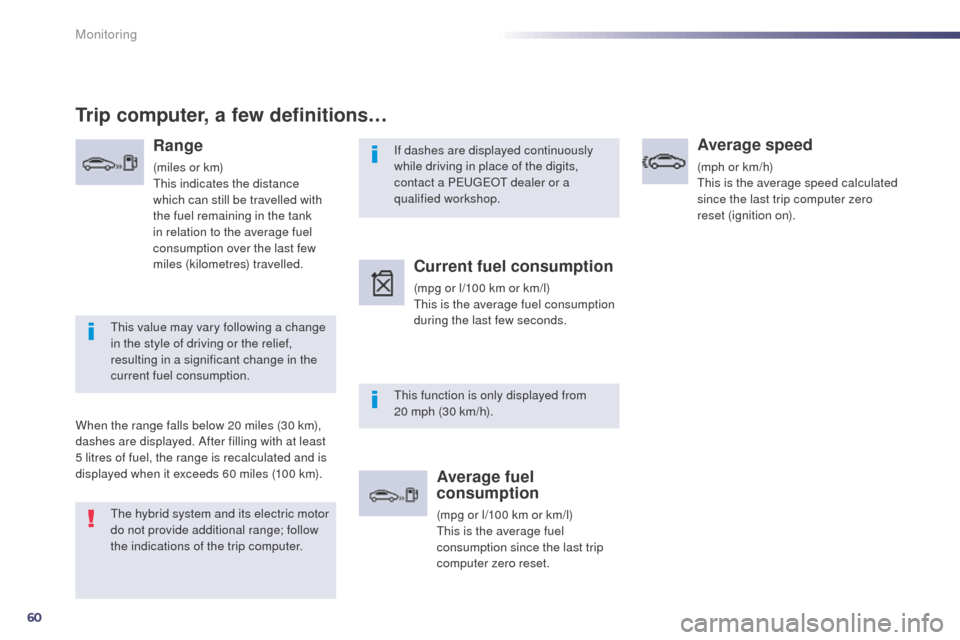
Trip computer, a few definitions…
Range
(miles or km)th is indicates the distance
which can still be travelled with
the fuel remaining in the tank
in relation to the average fuel
consumption over the last few
miles (kilometres) travelled.
When the range falls below 20 miles (30 km),
dashes are displayed. After filling with at least
5 litres of fuel, the range is recalculated and is
displayed when it exceeds 60 miles (100 km).
Current fuel consumption
(mpg or l/100 km or km/l)th is is the average fuel consumption
during the last few seconds.
Average fuel
consumption
(mpg or l/100 km or km/l)th is is the average fuel
consumption since the last trip
computer zero reset.
Average speed
(mph or km/h)th is is the average speed calculated
since the last trip computer zero
reset (ignition on).
th
e hybrid system and its electric motor
do not provide additional range; follow
the indications of the trip computer.
Monitoring
Page 63 of 338
61
508RXH_en_Chap01_controle-de-marche_ed01-2014
touch screen
It gives access to:
- m enus for adjusting settings for vehicle
functions and systems,
-
a
udio and display configuration menus,
-
a
udio system and telephone controls and
the display of associated information.
And, depending on equipment, it allows:
-
t
he display of alert messages and the
visual parking sensors information,
-
a
ccess to the controls for the navigation
system and Internet services, and the
display of associated information.General operation
Recommendations
It is necessary to press firmly, particularly for
"flick" gestures (scrolling through lists, moving
the map...).
A light wipe is not enough.
th
e screen does not recognise pressing with
more than one finger.
th
is technology allows use at all temperatures
and when wearing gloves.
Do not use pointed objects on the touch
screen.
Do not touch the touch screen with wet hands.
us
es a soft clean cloth to clean the touch
screen.
State of indicator lamps
Some buttons contain an indicator lamp that
gives the state of the corresponding function.
gr
een indicator: you have switched on the
corresponding function.
Orange indicator: you have switched off the
corresponding function.
For reasons of safety, the driver
should only carr y out operations
that require close attention, with the
vehicle stationary.
Some functions are not accessible
when driving.
1
Monitoring
Page 64 of 338
62
use this button to go to the
secondary page.
us
e this button to return to the
primary page.
us
e this button for access to
additional information and to the
settings for certain functions.
us
e this button to confirm.
us
e this button to quit.
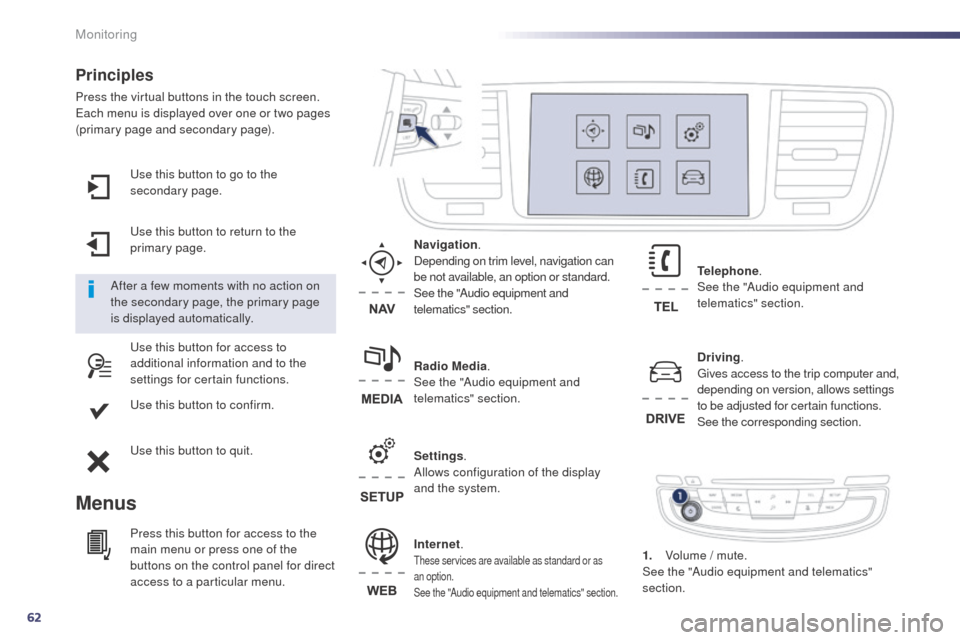
Principles
Press the virtual buttons in the touch screen.each menu is displayed over one or two pages
(primary page and secondary page).
Menus
Driving . gi
ves access to the trip computer and,
depending on version, allows settings
to be adjusted for certain functions.
See the corresponding section.
Internet.
these services are available as standard or as
an option.
See the "Audio equipment and telematics" section.
Telephone .
See the "Audio equipment and
telematics" section.
Radio Media .
See the "Audio equipment and
telematics" section. Navigation .
Depending on trim level, navigation can
be not available, an option or standard.
See the "Audio equipment and
telematics" section.
Settings .
Allows configuration of the display
and the system.
After a few moments with no action on
the secondary page, the primary page
is displayed automatically.
Press this button for access to the
main menu or press one of the
buttons on the control panel for direct
access to a particular menu. 1.
V
olume / mute.
See the "Audio equipment and telematics"
section.
Monitoring
Page 65 of 338
63
508RXH_en_Chap01_controle-de-marche_ed01-2014
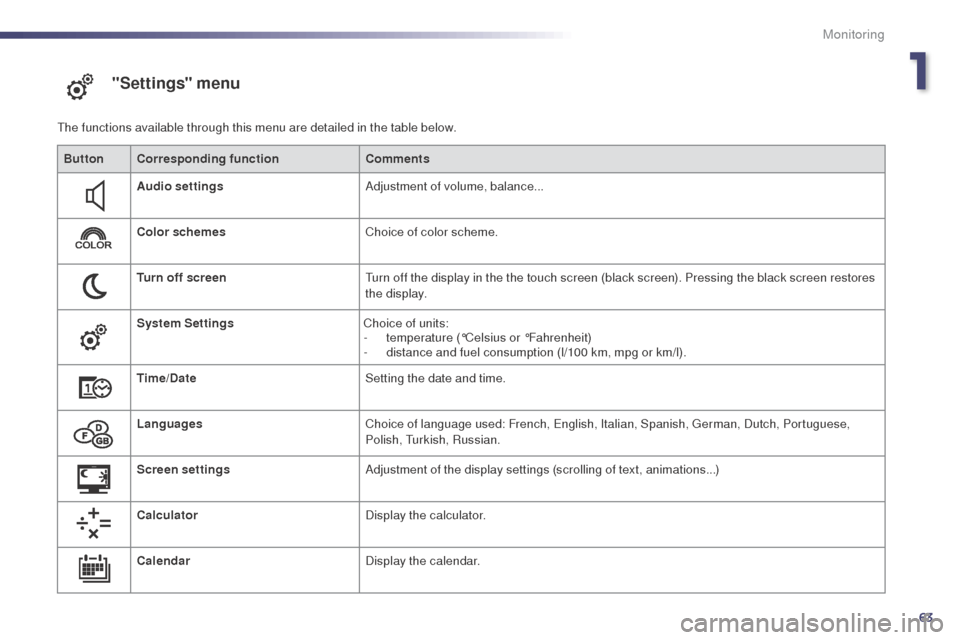
"Settings" menu
the functions available through this menu are detailed in the table below.Button Corresponding function Comments
Audio settings Adjustment of volume, balance...
Color schemes Choice of color scheme.
Turn off screen
tu
rn off the display in the the touch screen (black screen). Pressing the black screen restores
the display.
System Settings Choice of units:
-
t
emperature (°Celsius or °Fahrenheit)
-
d
istance and fuel consumption (l/100 km, mpg or km/l).
Time/Date Setting the date and time.
Languages Choice of language used: French,
e
n
glish, Italian, Spanish, g
e
rman, Dutch, Portuguese,
Polish,
t
u
rkish, Russian.
Screen settings Adjustment of the display settings (scrolling of text, animations...)
Calculator Display the calculator.
Calendar Display the calendar.
1
Monitoring
Page 75 of 338
73
508RXH_en_Chap02_ouvertures_ed01-2014
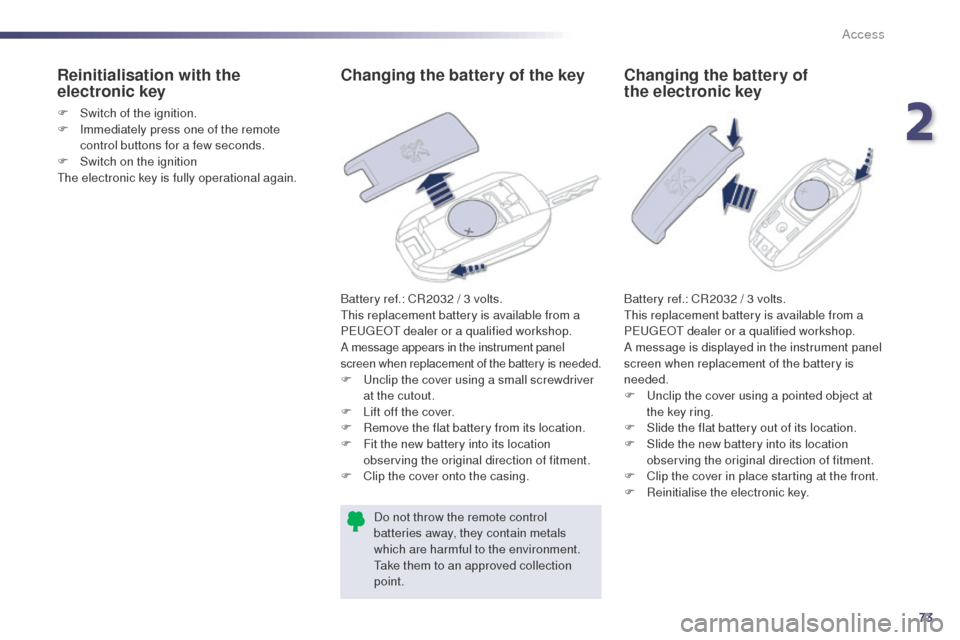
Changing the battery of the key
Battery ref.: CR2032 / 3 volts.this replacement battery is available from a
P
e
uge
Ot
dealer or a qualified workshop.
A message appears in the instrument panel
screen when replacement of the battery is needed.
F unclip the cover using a small screwdriver at the cutout.
F
L
ift off the cover.
F
R
emove the flat battery from its location.
F
F
it the new battery into its location
observing the original direction of fitment.
F
C
lip the cover onto the casing.Do not throw the remote control
batteries away, they contain metals
which are harmful to the environment.
ta
ke them to an approved collection
point.
Reinitialisation with the
electronic key
F Switch of the ignition.
F I mmediately press one of the remote
control buttons for a few seconds.
F
S
witch on the ignition
th
e electronic key is fully operational again.
Changing the battery of
the electronic key
Battery ref.: CR2032 / 3 volts.this replacement battery is available from a
P
e
uge
Ot
dealer or a qualified workshop.
A message is displayed in the instrument panel
screen when replacement of the battery is
needed.
F
u
n
clip the cover using a pointed object at
the key ring.
F
S
lide the flat battery out of its location.
F
S
lide the new battery into its location
observing the original direction of fitment.
F
C
lip the cover in place starting at the front.
F
R
einitialise the electronic key.
2
Access
Page 83 of 338
81
508RXH_en_Chap02_ouvertures_ed01-2014
Closing
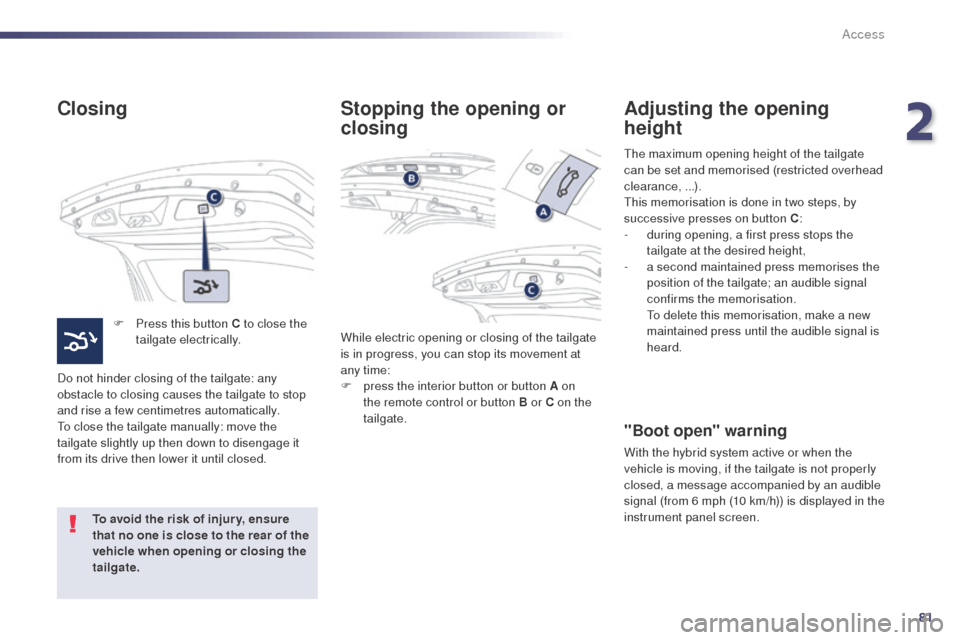
F Press this button C to close the tailgate electrically.
Do not hinder closing of the tailgate: any
obstacle to closing causes the tailgate to stop
and rise a few centimetres automatically.
to c
lose the tailgate manually: move the
tailgate slightly up then down to disengage it
from its drive then lower it until closed.
To avoid the risk of injur y, ensure
that no one is close to the rear of the
vehicle when opening or closing the
tailgate. While electric opening or closing of the tailgate
is in progress, you can stop its movement at
any time:
F
p
ress the interior button or button A on
the remote control or button B or C on the
tailgate.
Stopping the opening or
closing Adjusting the opening
height
"Boot open" warning
With the hybrid system active or when the
vehicle is moving, if the tailgate is not properly
closed, a message accompanied by an audible
signal (from 6 mph (10 km/h)) is displayed in the
instrument panel screen.
the
maximum opening height of the tailgate
can be set and memorised (restricted overhead
clearance, ...).
th
is memorisation is done in two steps, by
successive presses on button C :
-
d
uring opening, a first press stops the
tailgate at the desired height,
-
a s
econd maintained press memorises the
position of the tailgate; an audible signal
confirms the memorisation.
t
o d
elete this memorisation, make a new
maintained press until the audible signal is
heard.
2
Access
Page 90 of 338
88
508RXH_en_Chap03_confort_ed01-2014
Storing driving positions
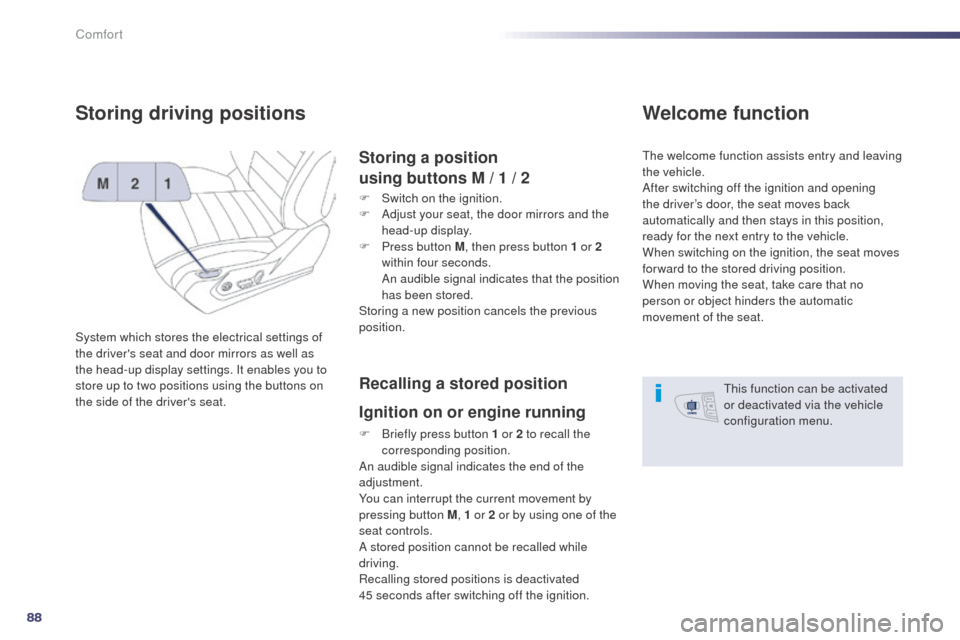
System which stores the electrical settings of
the driver's seat and door mirrors as well as
the head-up display settings. It enables you to
store up to two positions using the buttons on
the side of the driver's seat.
Storing a position
using buttons M / 1 / 2
F Switch on the ignition.
F
A djust your seat, the door mirrors and the
head-up display.
F
P
ress button M , then press button 1 or 2
within four seconds.
A
n audible signal indicates that the position
has been stored.
Storing a new position cancels the previous
position.
Recalling a stored position
Ignition on or engine running
F Briefly press button 1 or 2 to recall the corresponding position.
An audible signal indicates the end of the
adjustment.
You can interrupt the current movement by
pressing button M , 1 or 2 or by using one of the
seat controls.
A stored position cannot be recalled while
driving.
Recalling stored positions is deactivated
45
seconds after switching off the ignition.
Welcome function
the welcome function assists entry and leaving
the vehicle.
After switching off the ignition and opening
the driver’s door, the seat moves back
automatically and then stays in this position,
ready for the next entry to the vehicle.
When switching on the ignition, the seat moves
for ward to the stored driving position.
When moving the seat, take care that no
person or object hinders the automatic
movement of the seat.
th
is function can be activated
or deactivated via the vehicle
configuration menu.
Comfort
Page 100 of 338
98
508RXH_en_Chap03_confort_ed01-2014
PeugeOt Connect uS B
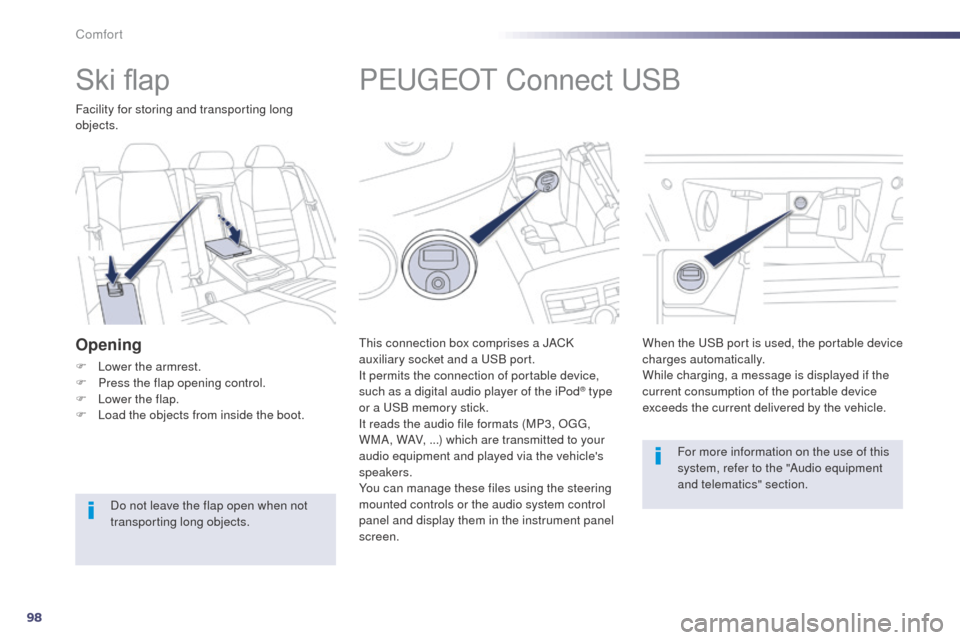
this connection box comprises a JACK
auxiliary socket and a
uS B port.
It permits the connection of portable device,
such as a digital audio player of the iPod
® type
or a
uS
B memory stick.
It reads the audio file formats (MP3, O
g
g
,
W
MA, WAV, ...) which are transmitted to your
audio equipment and played via the vehicle's
speakers.
You can manage these files using the steering
mounted controls or the audio system control
panel and display them in the instrument panel
screen. When the
u
S
B port is used, the portable device
charges automatically.
While charging, a message is displayed if the
current consumption of the portable device
exceeds the current delivered by the vehicle.
For more information on the use of this
system, refer to the "Audio equipment
and telematics" section.
Ski flap
Facility for storing and transporting long
objects.
Opening
F Lower the armrest.
F P ress the flap opening control.
F
L
ower the flap.
F
L
oad the objects from inside the boot.
Do not leave the flap open when not
transporting long objects.
Comfort
Page 108 of 338
106
508RXH_en_Chap03_confort_ed01-2014
Dual-zone digital air conditioning
Automatic operation
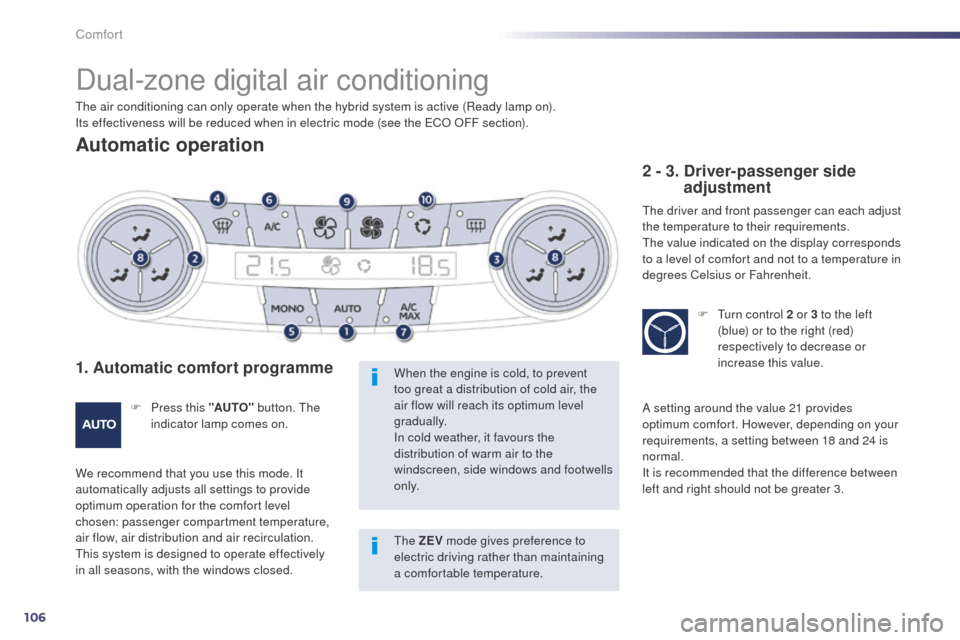
1. Automatic comfort programme
F Press this "AUTO" button. th e
indicator lamp comes on.
We recommend that you use this mode. It
automatically adjusts all settings to provide
optimum operation for the comfort level
chosen: passenger compartment temperature,
air flow, air distribution and air recirculation.
th
is system is designed to operate effectively
in all seasons, with the windows closed. When the engine is cold, to prevent
too great a distribution of cold air, the
air flow will reach its optimum level
gradually.
In cold weather, it favours the
distribution of warm air to the
windscreen, side windows and footwells
o n l y.
2 - 3. Driver-passenger side
adjustment
the driver and front passenger can each adjust
the temperature to their requirements.
th
e value indicated on the display corresponds
to a level of comfort and not to a temperature in
degrees Celsius or Fahrenheit.
F
t
u
rn control 2 or 3 to the left
(blue) or to the right (red)
respectively to decrease or
increase this value.
A setting around the value 21 provides
optimum comfort. However, depending on your
requirements, a setting between 18 and 24 is
normal.
It is recommended that the difference between
left and right should not be greater 3.
th
e air conditioning can only operate when the hybrid system is active (Ready lamp on).
Its effectiveness will be reduced when in electric mode (see the
e
C
O OFF section).
th
e ZEV mode gives preference to
electric driving rather than maintaining
a comfortable temperature.
Comfort
Page 109 of 338
107
508RXH_en_Chap03_confort_ed01-2014
On entering the vehicle, if the interior
temperature is much colder or warmer
than the comfort value, there is no
need to change the value displayed in
order to obtain the comfort required.
th
e system corrects the difference
in temperature automatically and as
quickly as possible.
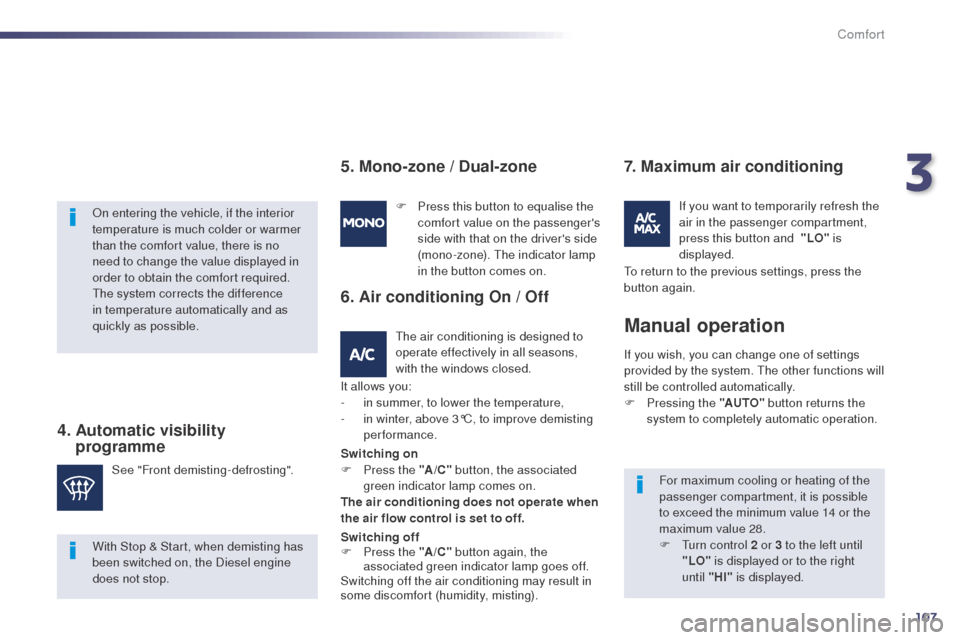
4. Automatic visibility programme
For maximum cooling or heating of the
passenger compartment, it is possible
to exceed the minimum value 14 or the
maximum value 28.
F
t
u
rn control 2 or 3 to the left until
"LO" is displayed or to the right
until "HI" is displayed.
See "Front demisting-defrosting". F
P
ress this button to equalise the
comfort value on the passenger's
side with that on the driver's side
(mono-zone).
t
h
e indicator lamp
in the button comes on.
If you wish, you can change one of settings
provided by the system. t
h
e other functions will
still be controlled automatically.
F
P
ressing the "AUTO"
button returns the
system to completely automatic operation.
Manual operation
5. Mono-zone / Dual-zone
the air conditioning is designed to
operate effectively in all seasons,
with the windows closed.
6. Air conditioning On / Off
It allows you:
-
i n summer, to lower the temperature,
-
i
n winter, above 3°C, to improve demisting
performance.
7. Maximum air conditioning
If you want to temporarily refresh the
air in the passenger compartment,
press this button and
"LO" is
displayed.
With Stop & Start, when demisting has
been switched on, the Diesel engine
does not stop. Switching on
F
P
ress the " A/C" button, the associated
green indicator lamp comes on.
The air conditioning does not operate when
the air flow control is set to off.
Switching off
F
P
ress the "A /C " button again, the
associated green indicator lamp goes off.
Switching off the air conditioning may result in
some discomfort (humidity, misting).
to r
eturn to the previous settings, press the
button again.
3
Comfort