fuse Peugeot 508 RXH 2014 Owner's Manual
[x] Cancel search | Manufacturer: PEUGEOT, Model Year: 2014, Model line: 508 RXH, Model: Peugeot 508 RXH 2014Pages: 338, PDF Size: 10.81 MB
Page 5 of 338
.
.
508RXH_en_Chap00a_sommaire_ed01-2014
Child seats 158
Deactivating the passenger's front airbag
1
61
ISOFIX child seats
1
66
Child lock
1
71
Child safety
Direction indicators 172
em
ergency or assistance call
1
73
H o r n
173
Warning triangle
1
74
Tyre under-inflation detection
1
75
e
SC system
1
77
Seat belts
1
80
Airbags
1
83
Safety
temporary puncture repair kit 1 87
Changing a wheel
1
93
Snow chains
1
98
Changing a bulb
1
99
Changing a fuse
2
05
12 V battery
2
09
Removing - refitting the battery
2
12
en
ergy economy mode
2
16
Changing a wiper blade
2
17
Recovery on a flat-bed
2
18
to
wing a trailer
2
20
Fitting roof bars
2
22
Very cold climate screen
2
23
Accessories
224
Practical information
Opening the bonnet 2 27
Running out of fuel (Diesel)
2
28
Diesel engine
2
29
Checking levels
23
0
Checks
233
Checks
electric motor 2 36
Diesel engine
2
37
Diesel weights
23
8
Dimensions
239
Identification markings
2
40
technical data
emergency or assistance 2 41
JBL equipment
2
43
7-inch touch screen
2
45
Audio equipment and telematics
Alphabetical indexVisual search
Contents
Page 12 of 338
10
508RXH_en_Chap00b_vue-ensemble_ed01-2014
11. Front door window demisting/defrosting vent.
12 .
W
indscreen demisting/defrosting vent.
13.
S
teering lock and starting with the key.
14 .
S
tarting using the electronic key.
15.
A
udio equipment steering wheel controls.
16.
W
iper / screenwash / trip computer stalk.
17.
C
entral locking and hazard warning
buttons.
18.
Screen.
19.
C
entral adjustable air vents.
20.
P
assenger's airbag.
21.
S
ide adjustable air vents.
Instruments and controls
1. Cruise control / speed limiter controls.
2. H eadlamp height adjustment.
3.
L
ighting and direction indicator stalk
4.
I
nstrument panel.
5.
D
river's airbag.
Horn.
6.
g
ea
r selector.
7.
H
Ybrid4 mode selector.
8.
1
2 V accessory socket
u
S
B port / auxiliary socket.
9.
B
onnet release lever.
10.
Fusebox. 22.
gl ove box / Passenger's airbag
deactivation.
23.
e
l
ectric parking brake.
24.
C
entral armrest with storage.
25.
St
orage (according to version).
26.
A
udio system.
2 7.
H
eating / air conditioning controls.
28.
A
larm / Peuge
O
t Connect SOS -
Peuge
O
t Connect Assistance.
29.
Storage.
30.
M
assage / Adaptive lighting / Blind spot
monitoring.
Over view
Page 135 of 338
133
508RXH_en_Chap04_conduite_ed01-2014
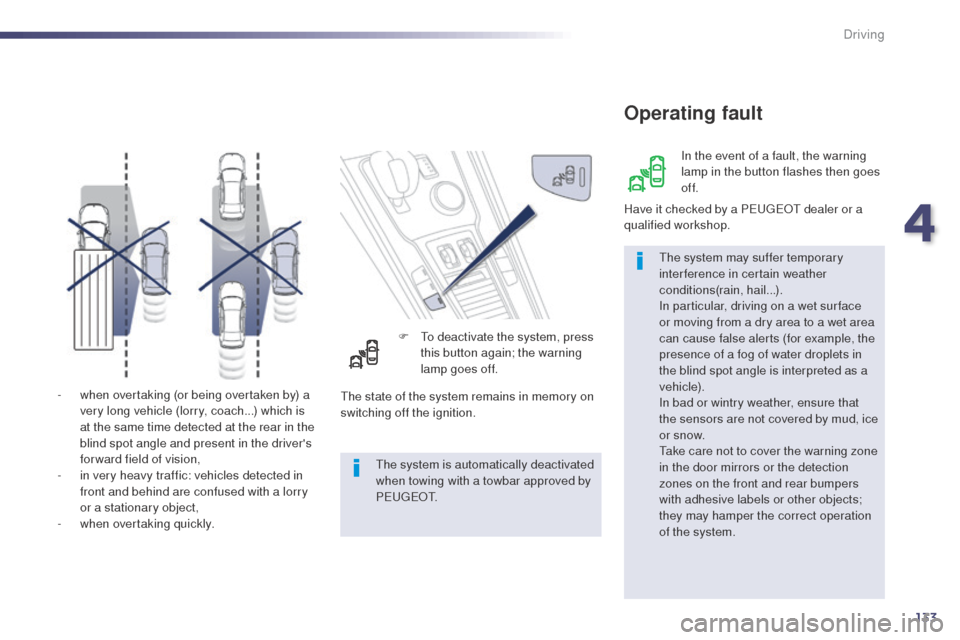
- when overtaking (or being overtaken by) a very long vehicle (lorry, coach...) which is
at the same time detected at the rear in the
blind spot angle and present in the driver's
forward field of vision,
-
i
n very heavy traffic: vehicles detected in
front and behind are confused with a lorry
or a stationary object,
-
w
hen overtaking quickly. F
t
o d
eactivate the system, press
this button again; the warning
lamp goes off.
Operating fault
the system may suffer temporary
interference in certain weather
conditions(rain, hail...).
In particular, driving on a wet sur face
or moving from a dry area to a wet area
can cause false alerts (for example, the
presence of a fog of water droplets in
the blind spot angle is interpreted as a
vehicle).
In bad or wintry weather, ensure that
the sensors are not covered by mud, ice
or snow.
ta
ke care not to cover the warning zone
in the door mirrors or the detection
zones on the front and rear bumpers
with adhesive labels or other objects;
they may hamper the correct operation
of the system. In the event of a fault, the warning
lamp in the button flashes then goes
of f.
Have it checked by a P
e
uge
Ot
dealer or a
qualified workshop.
th
e state of the system remains in memory on
switching off the ignition.
th
e system is automatically deactivated
when towing with a towbar approved by
P
e
u g e
Ot
.
4
Driving
Page 207 of 338
205
508RXH_en_Chap08_info-pratiques_ed01-2014
Changing a fuseProcedure for replacing a failed fuse with a new fuse to rectify a failure of the corresponding function.
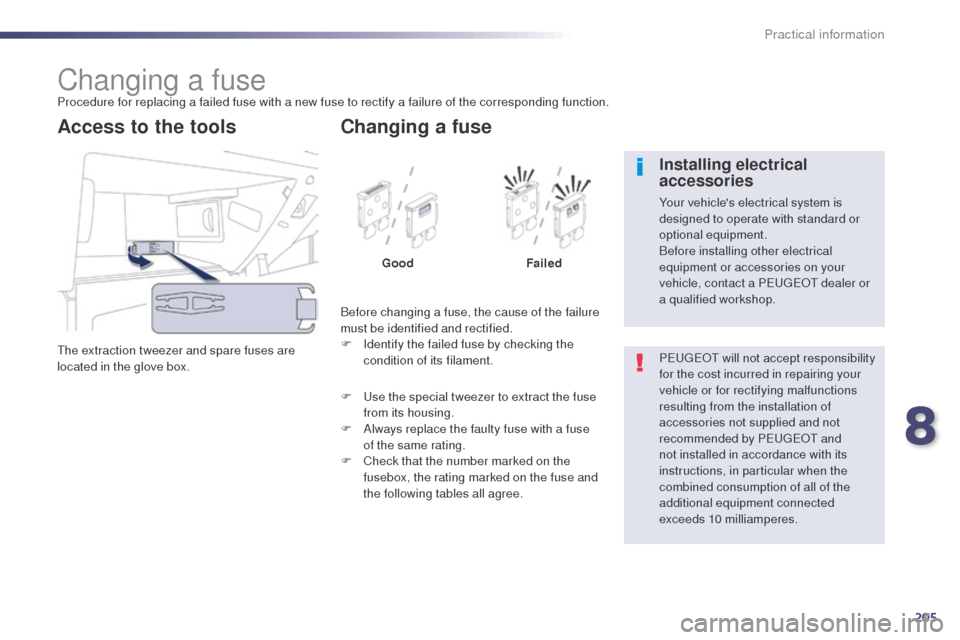
th
e extraction tweezer and spare fuses are
located in the glove box.
Access to the tools
Before changing a fuse, the cause of the failure
must be identified and rectified.
F
I
dentify the failed fuse by checking the
condition of its filament.
Changing a fuse
Good Failed
F
u
s
e the special tweezer to extract the fuse
from its housing.
F
A
lways replace the faulty fuse with a fuse
of the same rating.
F
C
heck that the number marked on the
fusebox, the rating marked on the fuse and
the following tables all agree. P
e
uge
Ot
will not accept responsibility
for the cost incurred in repairing your
vehicle or for rectifying malfunctions
resulting from the installation of
accessories not supplied and not
recommended by P
e
uge
Ot
and
not installed in accordance with its
instructions, in particular when the
combined consumption of all of the
additional equipment connected
exceeds 10 milliamperes.
Installing electrical
accessories
Your vehicle's electrical system is
designed to operate with standard or
optional equipment.
Before installing other electrical
equipment or accessories on your
vehicle, contact a P
e
uge
Ot
dealer or
a qualified workshop.
8
Practical information
Page 208 of 338
206
508RXH_en_Chap08_info-pratiques_ed01-2014
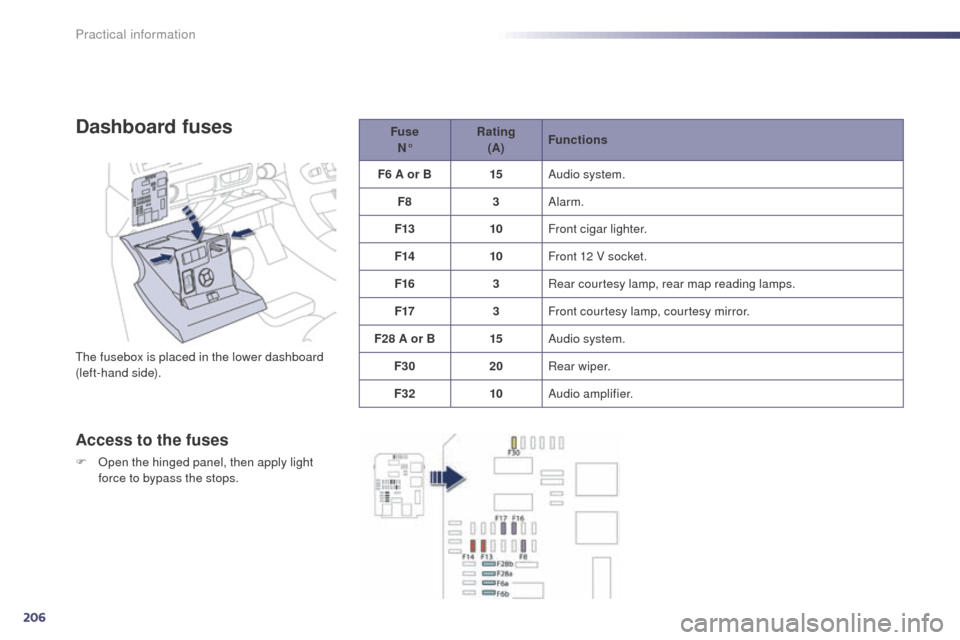
Dashboard fuses
the fusebox is placed in the lower dashboard
(left-hand side).
Access to the fuses
F Open the hinged panel, then apply light force to bypass the stops. Fuse
N° Rating
(A) Functions
F6 A or B 15Audio system.
F8 3Alarm.
F13 10Front cigar lighter.
F14 10Front 12 V socket.
F16 3Rear courtesy lamp, rear map reading lamps.
F17 3Front courtesy lamp, courtesy mirror.
F28 A or B 15Audio system.
F30 20Rear wiper.
F32 10Audio amplifier.
Practical information
Page 209 of 338
207
508RXH_en_Chap08_info-pratiques_ed01-2014
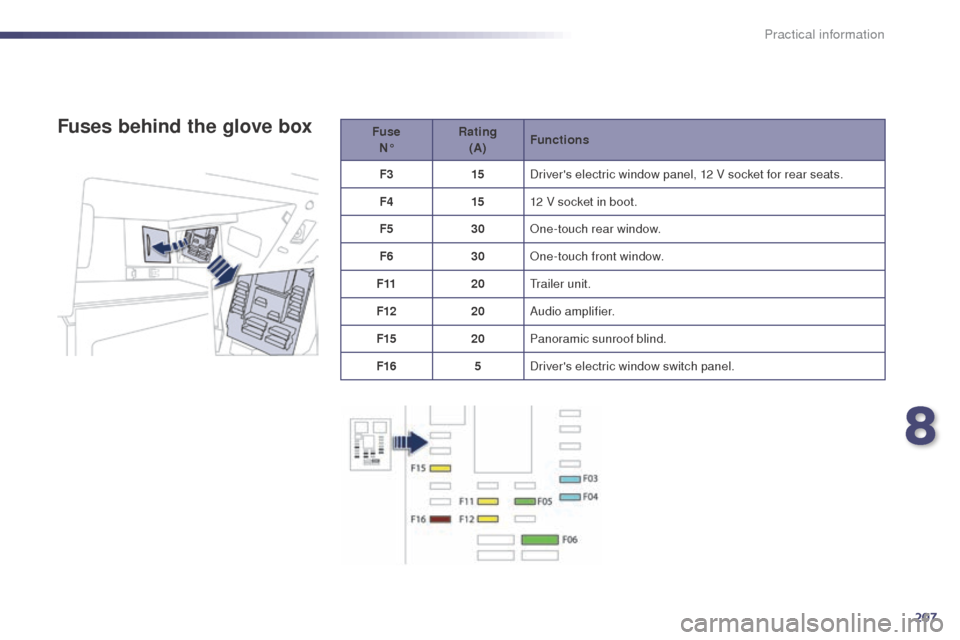
Fuse N° Rating
(A) Functions
F3 15Driver's electric window panel, 12 V socket for rear seats.
F4 1512 V socket in boot.
F5 30One-touch rear window.
F6 30One-touch front window.
F11 20
tr
ailer unit.
F12 20Audio amplifier.
F15 20Panoramic sunroof blind.
F16 5Driver's electric window switch panel.Fuses behind the glove box
8
Practical information
Page 210 of 338
208
508RXH_en_Chap08_info-pratiques_ed01-2014
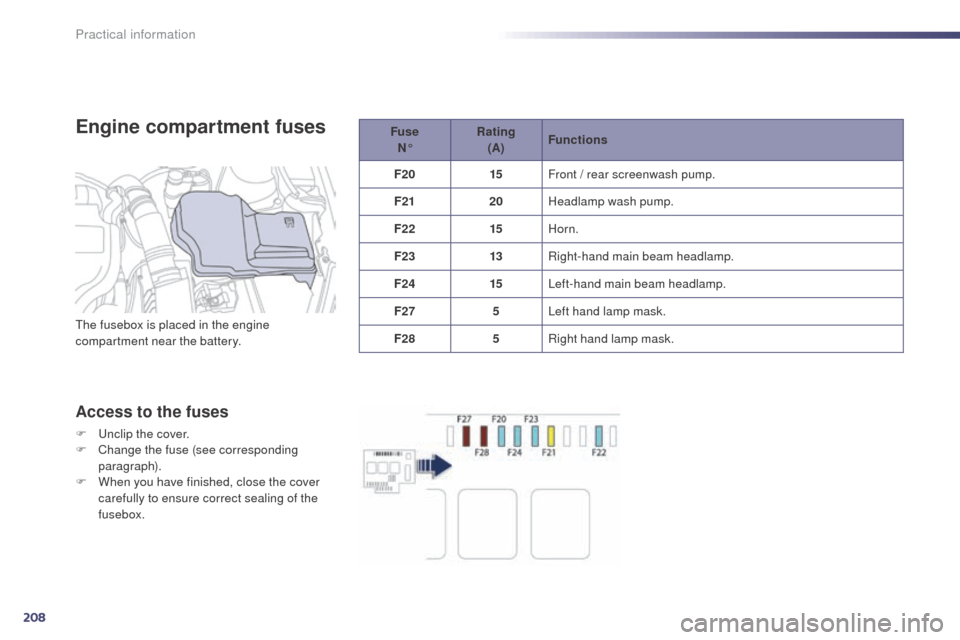
Engine compartment fuses
Access to the fuses
F unclip the cover.
F C hange the fuse (see corresponding
paragraph).
F
W
hen you have finished, close the cover
carefully to ensure correct sealing of the
fusebox. Fuse
N° Rating
(A) Functions
F20 15Front / rear screenwash pump.
F21 20Headlamp wash pump.
F22 15Horn.
F23 13Right-hand main beam headlamp.
F24 15Left-hand main beam headlamp.
F27 5Left hand lamp mask.
F28 5Right hand lamp mask.
th
e fusebox is placed in the engine
compartment near the battery.
Practical information
Page 211 of 338
209
508RXH_en_Chap08_info-pratiques_ed01-2014
12 V battery
the presence of this label indicates
the use of a 12 V lead-acid battery with
special technology and specification, for
which the involvement of a P
e
uge
Ot
dealer or qualified workshop is required
when replacing or disconnecting the
battery.
Failure to observe this recommendation
may cause premature wear of the
battery.
th
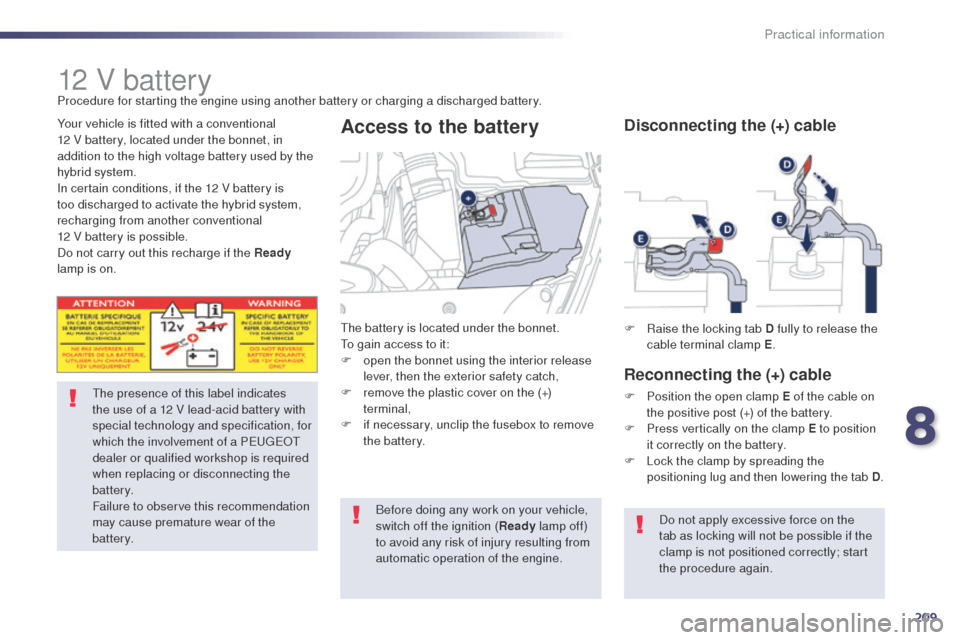
e battery is located under the bonnet.
to g
ain access to it:
F
o
pen the bonnet using the interior release
lever, then the exterior safety catch,
F r emove the plastic cover on the (+)
terminal,
F
i
f necessary, unclip the fusebox to remove
the battery.
Access to the battery
Before doing any work on your vehicle,
switch off the ignition ( Ready lamp off)
to avoid any risk of injury resulting from
automatic operation of the engine.
Your vehicle is fitted with a conventional
12 V battery, located under the bonnet, in
addition to the high voltage battery used by the
hybrid system.
In certain conditions, if the 12 V battery is
too discharged to activate the hybrid system,
recharging from another conventional
12 V battery is possible.
Do not carry out this recharge if the Ready
lamp is on. Procedure for starting the engine using another battery or charging a discharged battery.
F
Ra
ise the locking tab D fully to release the
cable terminal clamp E .
Disconnecting the (+) cable
Reconnecting the (+) cable
F Position the open clamp E of the cable on
the positive post (+) of the battery.
F
P
ress vertically on the clamp E to position
it correctly on the battery.
F
L
ock the clamp by spreading the
positioning lug and then lowering the tab D .
Do not apply excessive force on the
tab as locking will not be possible if the
clamp is not positioned correctly; start
the procedure again.
8
Practical information
Page 215 of 338
213
508RXH_en_Chap08_info-pratiques_ed01-2014
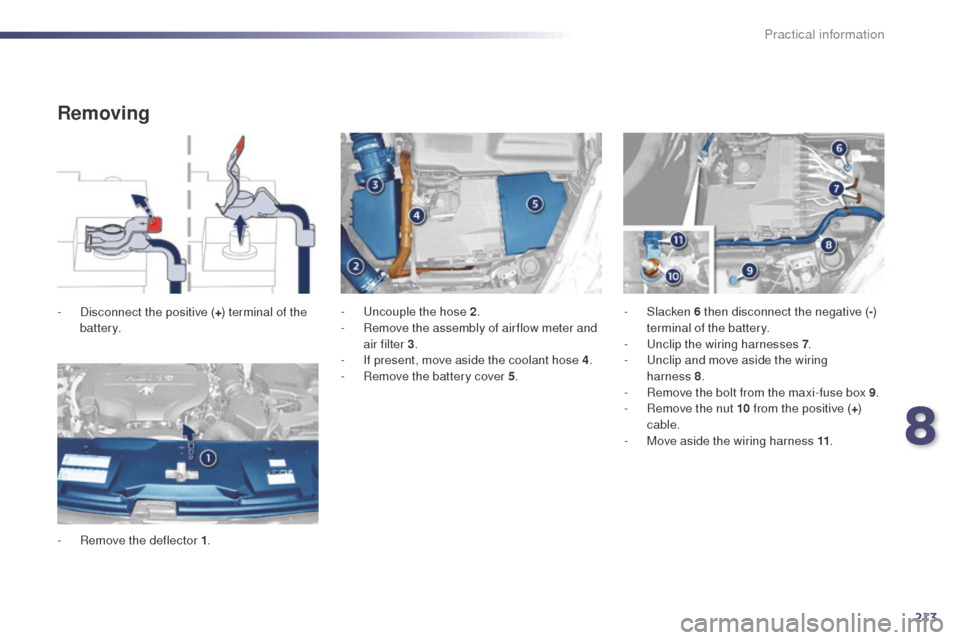
Removing
- Disconnect the positive (+) terminal of the
battery.
-
R
emove the deflector 1 . -
un couple the hose 2
.
- R emove the assembly of air flow meter and
air filter 3 .
-
I
f present, move aside the coolant hose 4.
-
R
emove the battery cover 5.-
Slacken
6 then disconnect the negative ( -)
terminal of the battery.
-
u
nc
lip the wiring harnesses 7.
-
u
n
clip and move aside the wiring
harness
8.
-
R
emove the bolt from the maxi-fuse box 9.
-
R
emove the nut 10 from the positive ( +)
cable.
-
M
ove aside the wiring harness 11.
8
Practical information
Page 227 of 338

225
508RXH_en_Chap08_info-pratiques_ed01-2014
the fitting of electrical equipment
or accessories which are not
recommended by P
e
uge
Ot
may result
in a failure of your vehicle's electronic
system and excessive electrical
consumption.
Please note this precaution. You
are advised to contact a P
e
uge
Ot
representative to be shown the range
of recommended equipment and
accessories.Installation of radio
communication transmitters
Before installing any after-market radio
communication transmitter, you can
contact a P
e
uge
Ot
dealer for the
specification of transmitters which can
be fitted (frequency, maximum power,
aerial position, specific installation
requirements), in line with the
Vehicle
e
l
ectromagnetic Compatibility
Directive (2004/104/
eC
). Depending on the legislation in force in
the country, certain safety equipment
may be compulsory: high visibility
safety vests, warning triangles,
breathalyzers, spare bulbs, spare fuses,
a fire extinguisher, a first aid kit, mud
flaps at the rear of the vehicle.
You can also obtain products for cleaning and
maintenance (exterior and interior) and topping
up fluids (screenwash, ...), as well as refills
(cartridge for temporary tyre repair kit...) from
P
e
uge
Ot d
ealers.
"Multimedia":
audio systems, portable navigation system, ta
kara/Sony portable video screen, Bluetooth
system, speakers, DVD player, Wi-Fi, driving
aids, video support, microwave unit...
8
Practical information