height Peugeot 508 RXH 2014 Owner's Manual
[x] Cancel search | Manufacturer: PEUGEOT, Model Year: 2014, Model line: 508 RXH, Model: Peugeot 508 RXH 2014Pages: 338, PDF Size: 10.81 MB
Page 12 of 338
10
508RXH_en_Chap00b_vue-ensemble_ed01-2014
11. Front door window demisting/defrosting vent.
12 .
W
indscreen demisting/defrosting vent.
13.
S
teering lock and starting with the key.
14 .
S
tarting using the electronic key.
15.
A
udio equipment steering wheel controls.
16.
W
iper / screenwash / trip computer stalk.
17.
C
entral locking and hazard warning
buttons.
18.
Screen.
19.
C
entral adjustable air vents.
20.
P
assenger's airbag.
21.
S
ide adjustable air vents.
Instruments and controls
1. Cruise control / speed limiter controls.
2. H eadlamp height adjustment.
3.
L
ighting and direction indicator stalk
4.
I
nstrument panel.
5.
D
river's airbag.
Horn.
6.
g
ea
r selector.
7.
H
Ybrid4 mode selector.
8.
1
2 V accessory socket
u
S
B port / auxiliary socket.
9.
B
onnet release lever.
10.
Fusebox. 22.
gl ove box / Passenger's airbag
deactivation.
23.
e
l
ectric parking brake.
24.
C
entral armrest with storage.
25.
St
orage (according to version).
26.
A
udio system.
2 7.
H
eating / air conditioning controls.
28.
A
larm / Peuge
O
t Connect SOS -
Peuge
O
t Connect Assistance.
29.
Storage.
30.
M
assage / Adaptive lighting / Blind spot
monitoring.
Over view
Page 83 of 338
81
508RXH_en_Chap02_ouvertures_ed01-2014
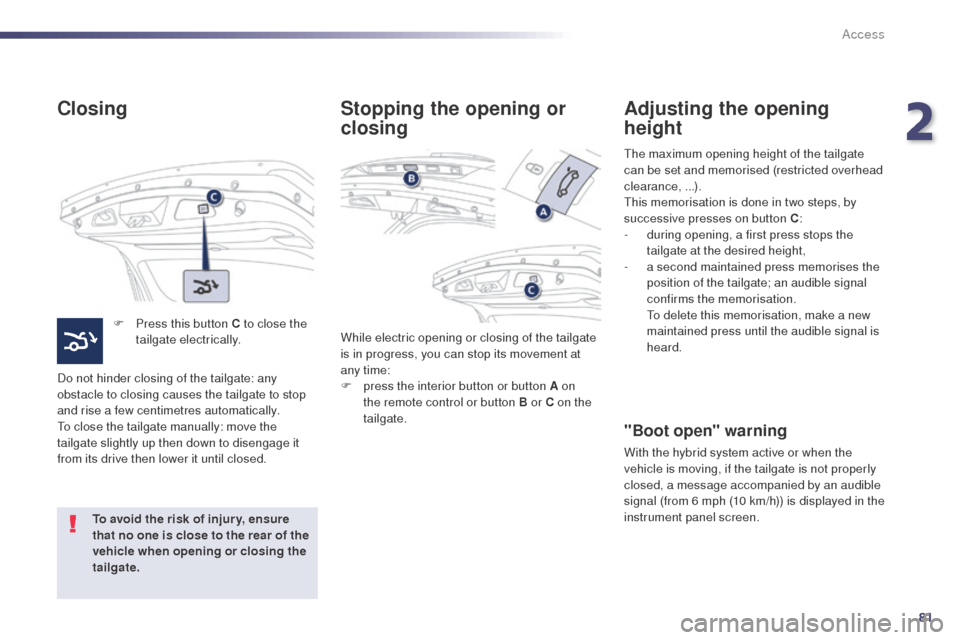
Closing
F Press this button C to close the tailgate electrically.
Do not hinder closing of the tailgate: any
obstacle to closing causes the tailgate to stop
and rise a few centimetres automatically.
to c
lose the tailgate manually: move the
tailgate slightly up then down to disengage it
from its drive then lower it until closed.
To avoid the risk of injur y, ensure
that no one is close to the rear of the
vehicle when opening or closing the
tailgate. While electric opening or closing of the tailgate
is in progress, you can stop its movement at
any time:
F
p
ress the interior button or button A on
the remote control or button B or C on the
tailgate.
Stopping the opening or
closing Adjusting the opening
height
"Boot open" warning
With the hybrid system active or when the
vehicle is moving, if the tailgate is not properly
closed, a message accompanied by an audible
signal (from 6 mph (10 km/h)) is displayed in the
instrument panel screen.
the
maximum opening height of the tailgate
can be set and memorised (restricted overhead
clearance, ...).
th
is memorisation is done in two steps, by
successive presses on button C :
-
d
uring opening, a first press stops the
tailgate at the desired height,
-
a s
econd maintained press memorises the
position of the tailgate; an audible signal
confirms the memorisation.
t
o d
elete this memorisation, make a new
maintained press until the audible signal is
heard.
2
Access
Page 89 of 338
87
508RXH_en_Chap03_confort_ed01-2014
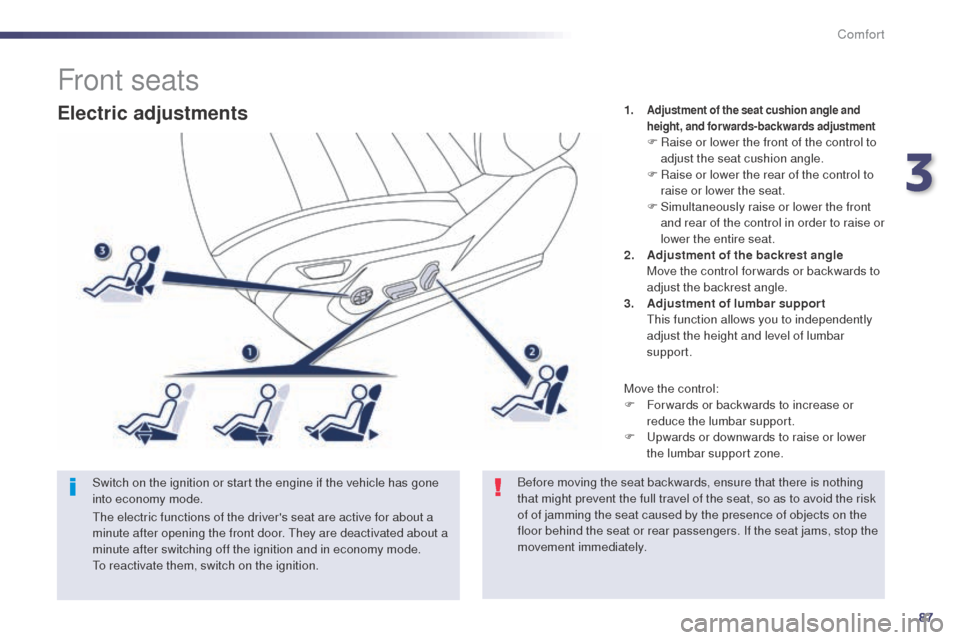
Electric adjustments
Switch on the ignition or start the engine if the vehicle has gone
into economy mode.1.
Adjustment of the seat cushion angle and
height, and forwards-backwards adjustment
F Raise or lower the front of the control to
adjust the seat cushion angle.
F
R
aise or lower the rear of the control to
raise or lower the seat.
F
S
imultaneously raise or lower the front
and rear of the control in order to raise or
lower the entire seat.
2.
A
djustment of the backrest angle
M
ove the control for wards or backwards to
adjust the backrest angle.
3.
A
djustment of lumbar support
t
h
is function allows you to independently
adjust the height and level of lumbar
support.
th
e electric functions of the driver's seat are active for about a
minute after opening the front door.
t
h
ey are deactivated about a
minute after switching off the ignition and in economy mode.
to r
eactivate them, switch on the ignition. Move the control:
F
F
or wards or backwards to increase or
reduce the lumbar support.
F
u
p
wards or downwards to raise or lower
the lumbar support zone.
Front seats
Before moving the seat backwards, ensure that there is nothing
that might prevent the full travel of the seat, so as to avoid the risk
of of jamming the seat caused by the presence of objects on the
floor behind the seat or rear passengers. If the seat jams, stop the
movement immediately.
3
Comfort
Page 91 of 338
89
508RXH_en_Chap03_confort_ed01-2014
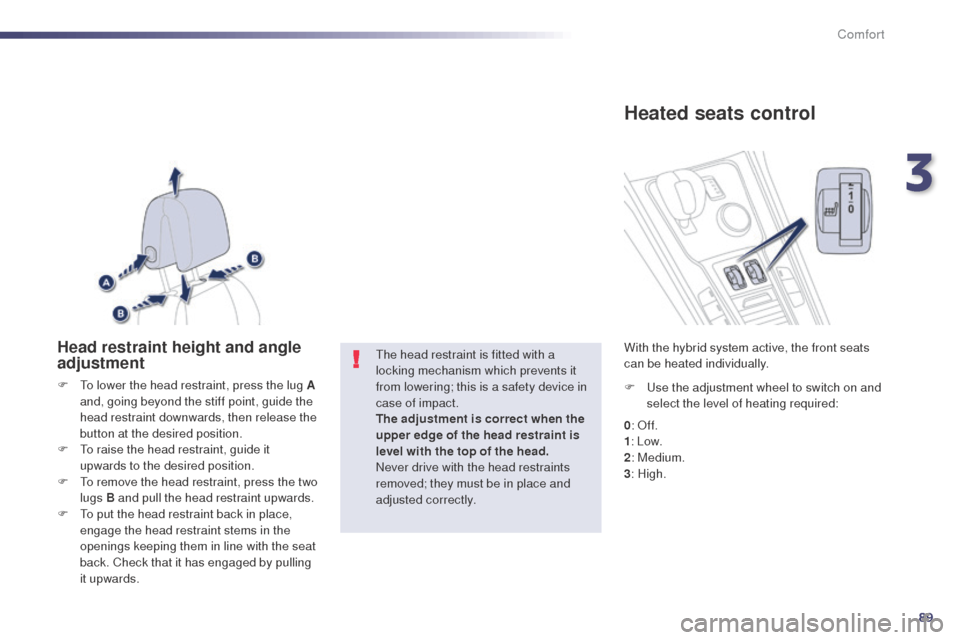
Head restraint height and angle
adjustment
F to lower the head restraint, press the lug A and, going beyond the stiff point, guide the
head restraint downwards, then release the
button at the desired position.
F
t
o r
aise the head restraint, guide it
upwards to the desired position.
F
t
o r
emove the head restraint, press the two
lugs B and pull the head restraint upwards.
F
t
o p
ut the head restraint back in place,
engage the head restraint stems in the
openings keeping them in line with the seat
back. Check that it has engaged by pulling
it upwards.
th
e head restraint is fitted with a
locking mechanism which prevents it
from lowering; this is a safety device in
case of impact.
The adjustment is correct when the
upper edge of the head restraint is
level with the top of the head.
Never drive with the head restraints
removed; they must be in place and
adjusted correctly. F
us e the adjustment wheel to switch on and
select the level of heating required:
With the hybrid system active, the front seats
can be heated individually.
0
: Of f.
1 : Low.
2 : Medium.
3 : High.
Heated seats control
3
Comfort
Page 97 of 338
95
508RXH_en_Chap03_confort_ed01-2014
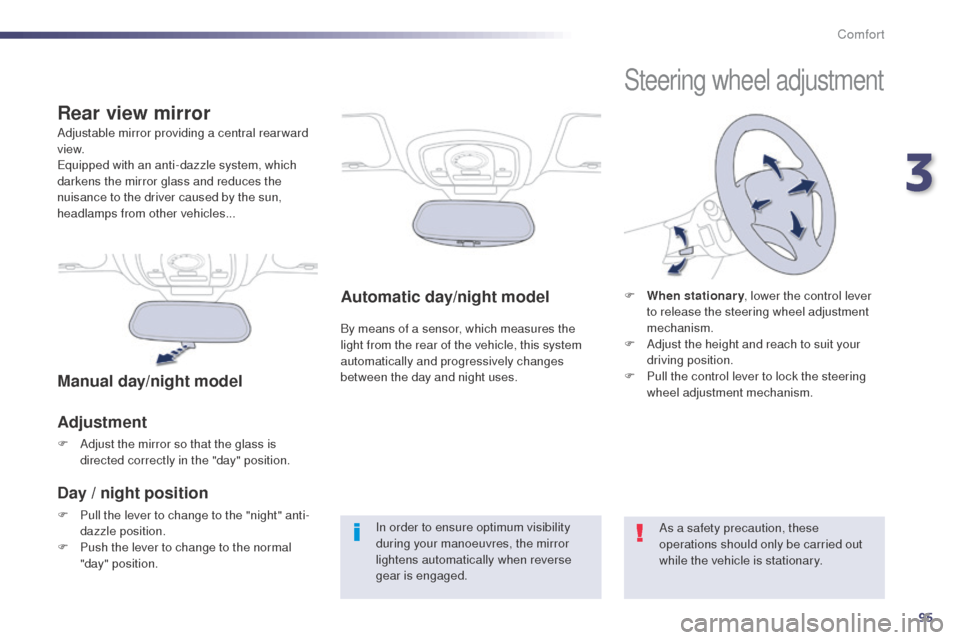
Automatic day/night model
By means of a sensor, which measures the
light from the rear of the vehicle, this system
automatically and progressively changes
between the day and night uses.
Adjustable mirror providing a central rearward
view.
eq
uipped with an anti-dazzle system, which
darkens the mirror glass and reduces the
nuisance to the driver caused by the sun,
headlamps from other vehicles...
Rear view mirror
Manual day/night model
Adjustment
F Adjust the mirror so that the glass is directed correctly in the "day" position.
Day / night position
F Pull the lever to change to the "night" anti-dazzle position.
F
P
ush the lever to change to the normal
"day" position. In order to ensure optimum visibility
during your manoeuvres, the mirror
lightens automatically when reverse
gear is engaged.
Steering wheel adjustment
F When stationary
, lower the control lever
to release the steering wheel adjustment
mechanism.
F
A
djust the height and reach to suit your
driving position.
F
P
ull the control lever to lock the steering
wheel adjustment mechanism.
As a safety precaution, these
operations should only be carried out
while the vehicle is stationary.
3
Comfort
Page 131 of 338
129
508RXH_en_Chap04_conduite_ed01-2014
Head-up display
System which projects various information onto
a smoked strip in the field of vision of the driver
so that they do not have to take their eyes off
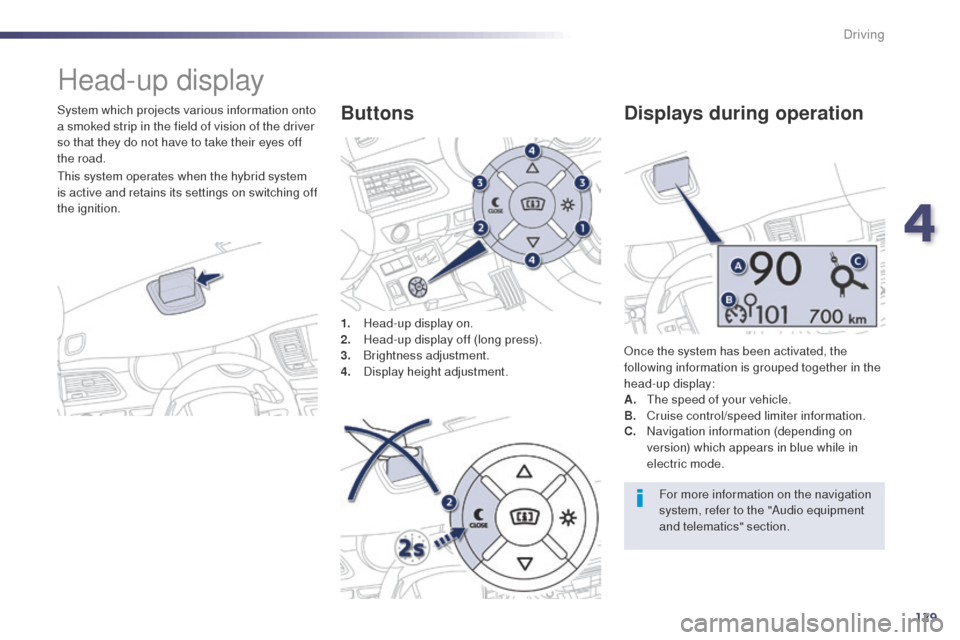
the road.1.
H
ead-up display on.
2.
H
ead-up display off (long press).
3.
Br
ightness adjustment.
4.
D
isplay height adjustment.Buttons
Once the system has been activated, the
following information is grouped together in the
head-up display:
A.
t
h
e speed of your vehicle.
B.
C
ruise control/speed limiter information.
Displays during operation
C. Navigation information (depending on version) which appears in blue while in
electric mode.
For more information on the navigation
system, refer to the "Audio equipment
and telematics" section.
th
is system operates when the hybrid system
is active and retains its settings on switching off
the ignition.
4
Driving
Page 132 of 338
130
508RXH_en_Chap04_conduite_ed01-2014
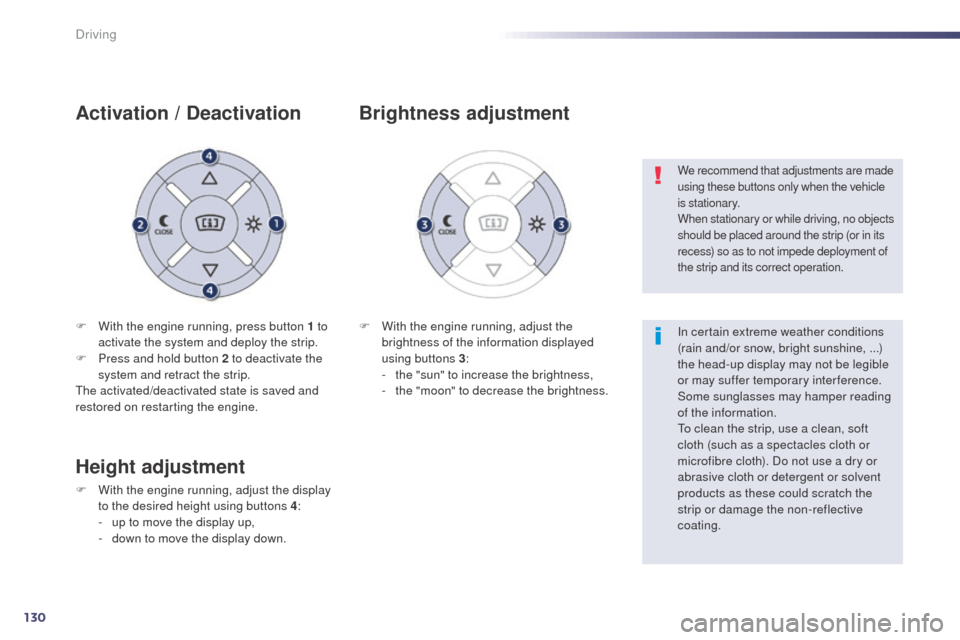
F With the engine running, press button 1 to activate the system and deploy the strip.
F
P
ress and hold button 2 to deactivate the
system and retract the strip.
th
e activated/deactivated state is saved and
restored on restarting the engine.
Activation / Deactivation
F With the engine running, adjust the brightness of the information displayed
using buttons 3 :
-
t
he "sun" to increase the brightness,
-
t
he "moon" to decrease the brightness.
Brightness adjustment
We recommend that adjustments are made
using these buttons only when the vehicle
is stationary.
When stationary or while driving, no objects
should be placed around the strip (or in its
recess) so as to not impede deployment of
the strip and its correct operation.
In certain extreme weather conditions
(rain and/or snow, bright sunshine, ...)
the head-up display may not be legible
or may suffer temporary interference.
Some sunglasses may hamper reading
of the information.
to c
lean the strip, use a clean, soft
cloth (such as a spectacles cloth or
microfibre cloth). Do not use a dry or
abrasive cloth or detergent or solvent
products as these could scratch the
strip or damage the non-reflective
coating.
Height adjustment
F With the engine running, adjust the display to the desired height using buttons 4 :
-
u
p to move the display up,
-
d
own to move the display down.
Driving
Page 152 of 338
150
508RXH_en_Chap05_visibilite_ed01-2014
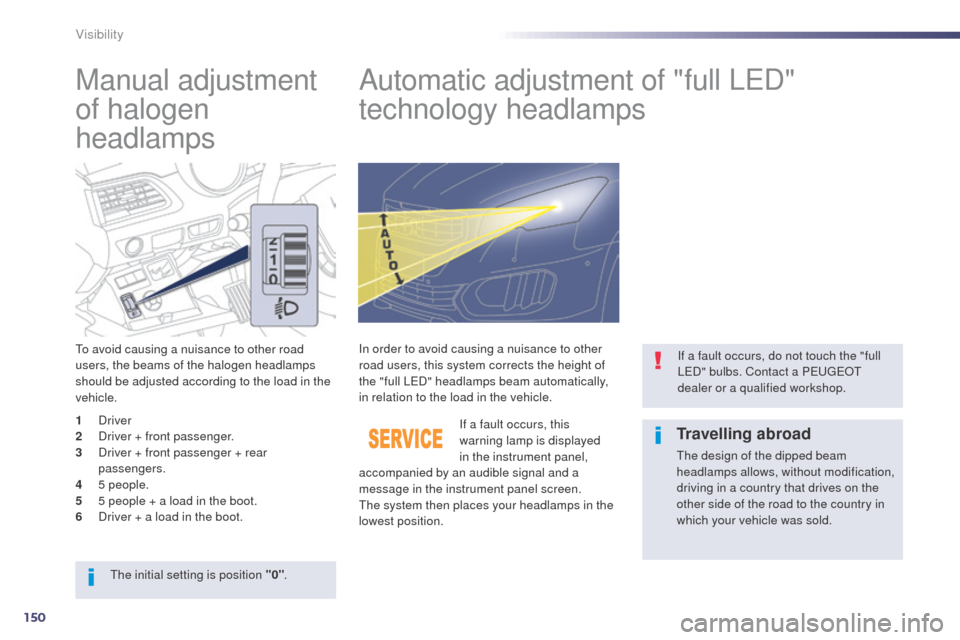
Manual adjustment
of halogen
headlampsAutomatic adjustment of "full LeD
"
technology headlamps
to avoid causing a nuisance to other road
users, the beams of the halogen headlamps
should be adjusted according to the load in the
vehicle.
If a fault occurs, this
warning lamp is displayed
in the instrument panel,
accompanied by an audible signal and a
message in the instrument panel screen.
th
e system then places your headlamps in the
lowest position. In order to avoid causing a nuisance to other
road users, this system corrects the height of
the "full L
e
D
" headlamps beam automatically,
in relation to the load in the vehicle. If a fault occurs, do not touch the "full
L
eD
" bulbs. Contact a P
e
uge
Ot
dealer or a qualified workshop.
th
e initial setting is position "0" .
1
D
river
2
D
river + front passenger.
3
D
river + front passenger + rear
passengers.
4
5
people.
5
5 p
eople + a load in the boot.
6
D
river + a load in the boot.
Travelling abroad
the design of the dipped beam
headlamps allows, without modification,
driving in a country that drives on the
other side of the road to the country in
which your vehicle was sold.
Visibility
Page 167 of 338
165
508RXH_en_Chap06_securite-enfants_ed01-2014
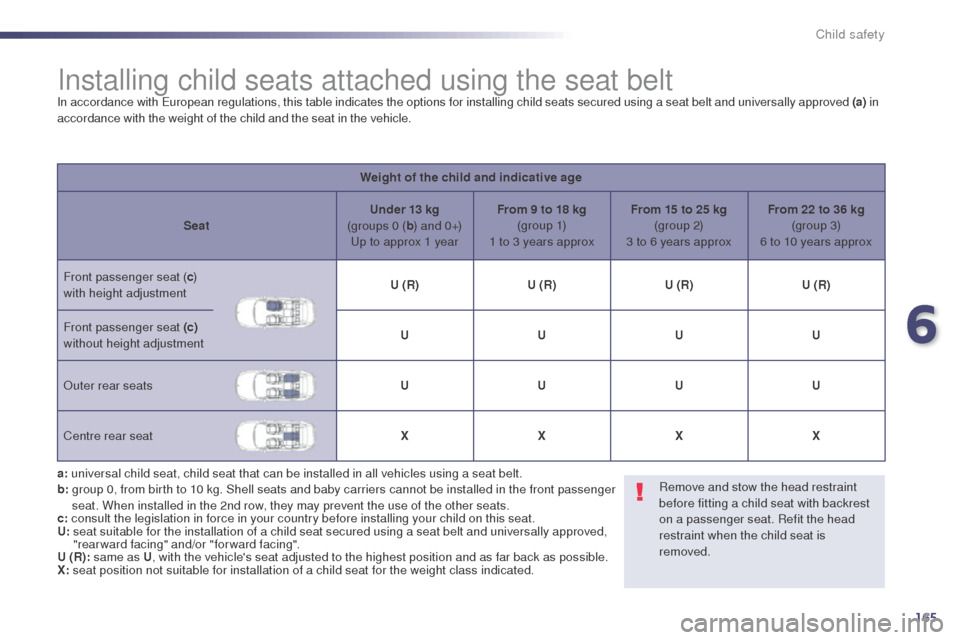
Installing child seats attached using the seat beltIn accordance with european regulations, this table indicates the options for installing child seats secured using a seat belt and universally approved (a) in
accordance with the weight of the child and the seat in the vehicle.
Weight of the child and indicative age
Seat Under 13 kg
(groups 0 ( b) and 0+)
up t
o approx 1 yearFrom 9 to 18 kg
(g r o u p 1)
1 to 3 years approx From 15 to 25 kg
(group 2)
3 to 6 years approx From 22 to 36 kg
(group 3)
6 to 10 years approx
Front passenger seat ( c)
with height adjustment U (R)
U (R)U (R)U (R)
Front passenger seat (c)
without height adjustment U
UUU
Outer rear seats UUUU
Centre rear seat XXXX
a:
u
niversal child seat, child seat that can be installed in all vehicles using a seat belt.
b:
g
roup 0, from birth to 10 kg. Shell seats and baby carriers cannot be installed in the front passenger
seat. When installed in the 2nd row, they may prevent the use of the other seats.
c: consult the legislation in force in your country before installing your child on this seat.
U:
s
eat suitable for the installation of a child seat secured using a seat belt and universally approved,
"rearward facing" and/or "forward facing".
U (R): same as U , with the vehicle's seat adjusted to the highest position and as far back as possible.
X: seat position not suitable for installation of a child seat for the weight class indicated. Remove and stow the head restraint
before fitting a child seat with backrest
on a passenger seat. Refit the head
restraint when the child seat is
removed.
6
Child safety
Page 170 of 338
168
508RXH_en_Chap06_securite-enfants_ed01-2014
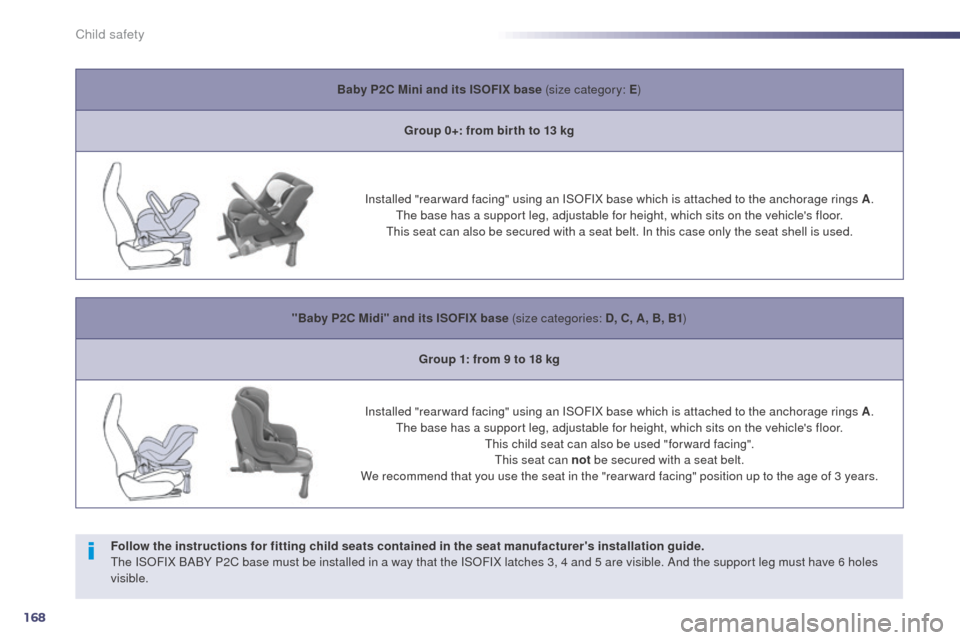
Baby P2C Mini and its ISOFIX base (size category: E)
Group 0+: from bir th to 13 kg
Installed "rear ward facing" using an ISOFIX base which is attached to the anchorage rings A .
th
e base has a support leg, adjustable for height, which sits on the vehicle's floor.
th
is seat can also be secured with a seat belt. In this case only the seat shell is used.
"Baby P2C Midi" and its ISOFIX base (size categories: D, C, A, B, B1 )
Group 1: from 9 to 18 kg
Installed "rear ward facing" using an ISOFIX base which is attached to the anchorage rings A .
th
e base has a support leg, adjustable for height, which sits on the vehicle's floor.
th
is child seat can also be used "for ward facing".
th
is seat can not be secured with a seat belt.
We recommend that you use the seat in the "rear ward facing" position up to the age of 3 years.
Follow the instructions for fitting child seats contained in the seat manufacturer's installation guide.
th
e ISOFIX BABY P2C base must be installed in a way that the ISOFIX latches 3, 4 and 5 are visible. And the support leg must have 6 holes
visible.
Child safety