boot Peugeot 807 2013 Owner's Manual
[x] Cancel search | Manufacturer: PEUGEOT, Model Year: 2013, Model line: 807, Model: Peugeot 807 2013Pages: 234, PDF Size: 9.8 MB
Page 27 of 234
Access
READY TO SET OFF
2
25
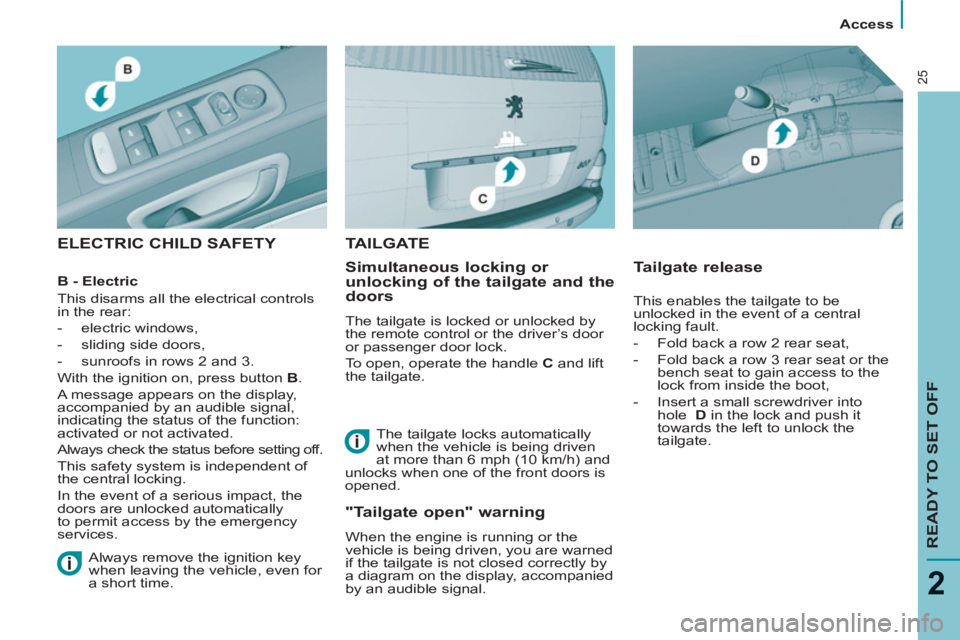
ELECTRIC CHILD SAFETY
Simultaneous locking or
unlocking of the tailgate and the
doors
The tailgate is locked or unlocked by
the remote control or the driver’s door
or passenger door lock.
To open, operate the handle C
and lift
the tailgate.
Tailgate release
The tailgate locks automatically
when the vehicle is being driven
at more than 6 mph (10 km/h) and
unlocks when one of the front doors is
opened.
TAILGATE
"Tailgate open" warning
When the engine is running or the
vehicle is being driven, you are warned
if the tailgate is not closed correctly by
a diagram on the display, accompanied
by an audible signal. This enables the tailgate to be
unlocked in the event of a central
locking fault.
- Fold back a row 2 rear seat,
- Fold back a row 3 rear seat or the
bench seat to gain access to the
lock from inside the boot,
- Insert a small screwdriver into
hole D
in the lock and push it
towards the left to unlock the
tailgate.
B - Electric
This disarms all the electrical controls
in the rear:
- electric windows,
- sliding side doors,
- sunroofs in rows 2 and 3.
With the ignition on, press button B
.
A message appears on the display,
accompanied by an audible signal,
indicating the status of the function:
activated or not activated.
Always check the status before setting off.
This safety system is independent of
the central locking.
In the event of a serious impact, the
doors are unlocked automatically
to permit access by the emergency
services.
Always remove the ignition key
when leaving the vehicle, even for
a short time.
Page 68 of 234
66
Seats
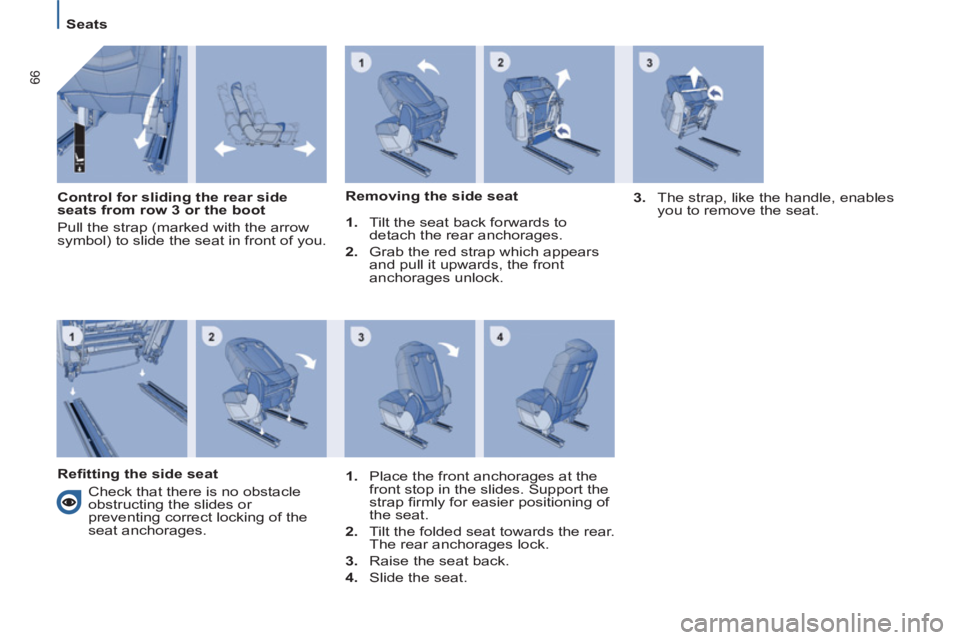
Control for sliding the rear side
seats from row 3 or the boot
Pull the strap (marked with the arrow
symbol) to slide the seat in front of you.
Removing the side seat
1.
Tilt the seat back forwards to
detach the rear anchorages.
2.
Grab the red strap which appears
and pull it upwards, the front
anchorages unlock
.
3.
The strap, like the handle, enables
you to remove the seat.
Refi tting the side seat
Check that there is no obstacle
obstructing the slides or
preventing correct locking of the
seat anchorages.
1.
Place the front anchorages at the
front stop in the slides. Support the
strap fi rmly for easier positioning of
the seat.
2.
Tilt the folded seat towards the rear.
The rear anchorages lock.
3.
Raise the seat back.
4.
Slide the seat
.
Page 71 of 234
EASE OF USE and COMFORT
3
69
Seats
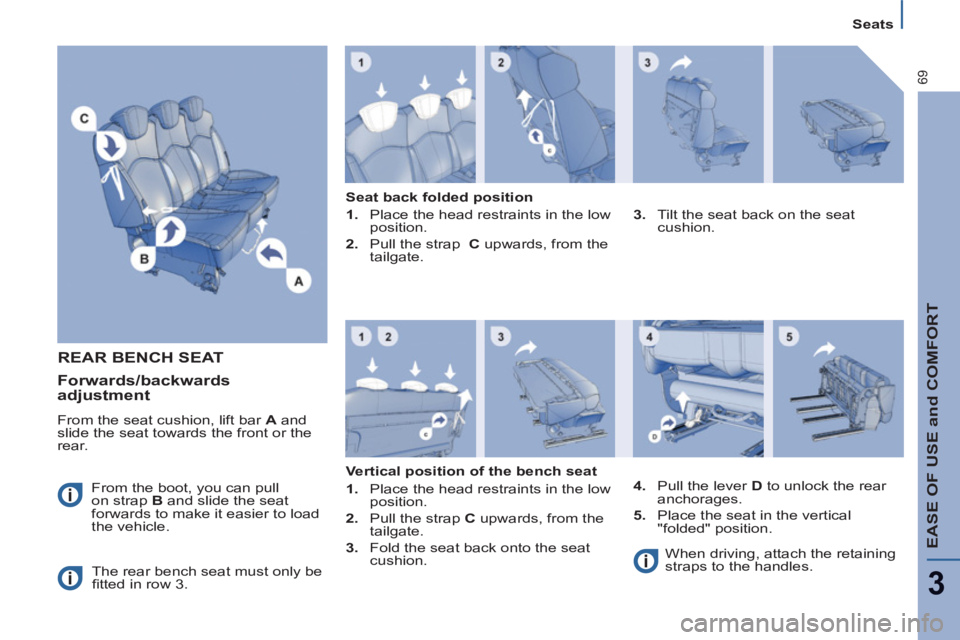
REAR BENCH SEAT
From the boot, you can pull
on strap B
and slide the seat
forwards to make it easier to load
the vehicle.
The rear bench seat must only be
fi tted in row 3.
Seat back folded position
1.
Place the head restraints in the low
position.
2.
Pull the strap C
upwards, from the
tailgate.
3.
Tilt the seat back on the seat
cushion.
Vertical position of the bench seat
1.
Place the head restraints in the low
position.
2.
Pull the strap C
upwards, from the
tailgate.
3.
Fold the seat back onto the seat
cushion.
4.
Pull the lever D
to unlock the rear
anchorages.
5.
Place the seat in the vertical
"folded" position.
When driving, attach the retaining
straps to the handles.
Forwards/backwards
adjustment
From the seat cushion, lift bar A
and
slide the seat towards the front or the
rear.
Page 92 of 234
90
Driving safely
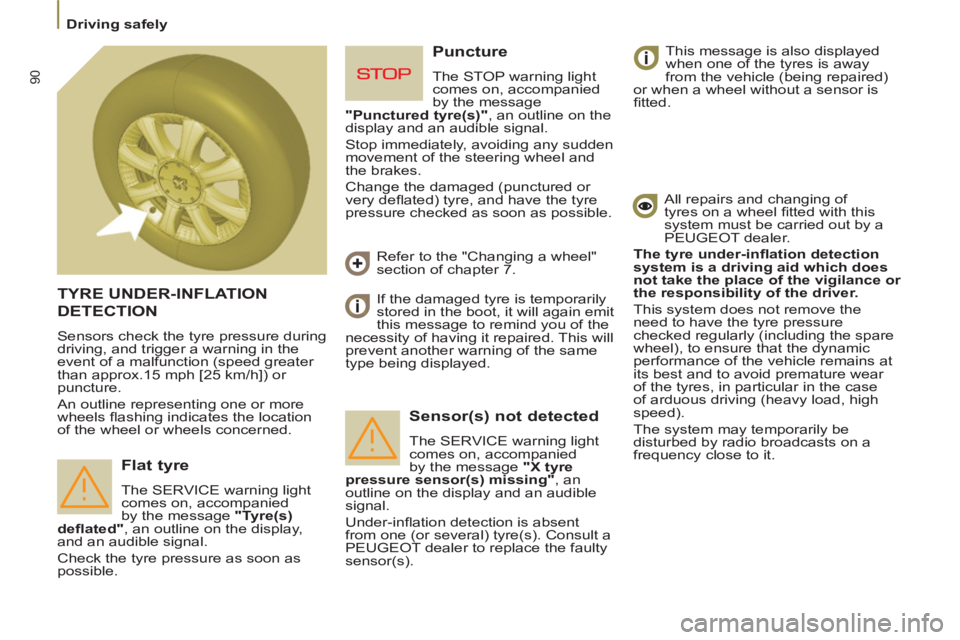
TYRE UNDER-INFLATION
DETECTION
Sensors check the tyre pressure during
driving, and trigger a warning in the
event of a malfunction (speed greater
than approx.15 mph [25 km/h]) or
puncture.
An outline representing one or more
wheels fl ashing indicates the location
of the wheel or wheels concerned.
Flat tyre
The SERVICE warning light
comes on, accompanied
by the message "Tyre(s)
defl ated"
, an outline on the display,
and an audible signal.
Check the tyre pressure as soon as
possible. If the damaged tyre is temporarily
stored in the boot, it will again emit
this message to remind you of the
necessity of having it repaired. This will
prevent another warning of the same
type being displayed.
Sensor(s) not detected
The SERVICE warning light
comes on, accompanied
by the message "X tyre
pressure sensor(s) missing"
, an
outline on the display and an audible
signal.
Under-infl ation detection is absent
from one (or several) tyre(s). Consult a
PEUGEOT dealer to replace the faulty
sensor(s). This message is also displayed
when one of the tyres is away
from the vehicle (being repaired)
or when a wheel without a sensor is
fi tted.
All repairs and changing of
tyres on a wheel fi tted with this
system must be carried out by a
PEUGEOT dealer.
The tyre under-infl ation detection
system is a driving aid which does
not take the place of the vigilance or
the responsibility of the driver.
This system does not remove the
need to have the tyre pressure
checked regularly (including the spare
wheel), to ensure that the dynamic
performance of the vehicle remains at
its best and to avoid premature wear
of the tyres, in particular in the case
of arduous driving (heavy load, high
speed).
The system may temporarily be
disturbed by radio broadcasts on a
frequency close to it.
Puncture
The STOP warning light
comes on, accompanied
by the message
"Punctured tyre(s)"
, an outline on the
display and an audible signal.
Stop immediately, avoiding any sudden
movement of the steering wheel and
the brakes.
Change the damaged (punctured or
very defl ated) tyre, and have the tyre
pressure checked as soon as possible.
Refer to the "Changing a wheel"
section of chapter 7.
Page 109 of 234
107
Other accessories
ACCESSORIES
5
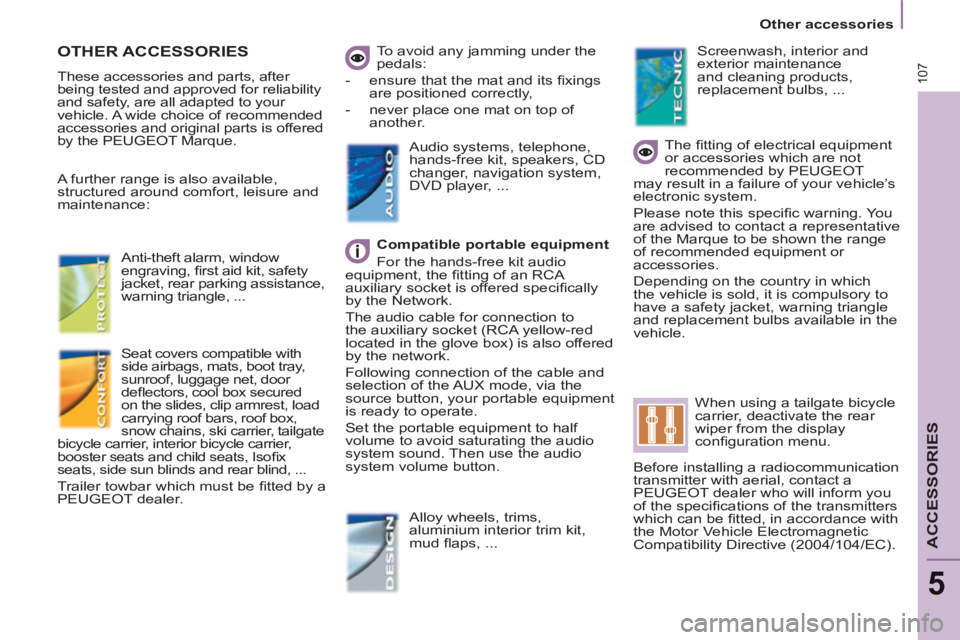
OTHER ACCESSORIES
These accessories and parts, after
being tested and approved for reliability
and safety, are all adapted to your
vehicle. A wide choice of recommended
accessories and original parts is offered
by the PEUGEOT Marque. To avoid any jamming under the
pedals:
- ensure that the mat and its fi xings
are positioned correctly,
- never place one mat on top of
another.
Compatible portable equipment
For the hands-free kit audio
equipment, the fi tting of an RCA
auxiliary socket is offered specifi cally
by the Network.
The audio cable for connection to
the auxiliary socket (RCA yellow-red
located in the glove box) is also offered
by the network.
Following connection of the cable and
selection of the AUX mode, via the
source button, your portable equipment
is ready to operate.
Set the portable equipment to half
volume to avoid saturating the audio
system sound. Then use the audio
system volume button.
Audio systems, telephone,
hands-free kit, speakers, CD
changer, navigation system,
DVD player, ...
Alloy wheels, trims,
aluminium interior trim kit,
mud fl aps, ...
Seat covers compatible with
side airbags, mats, boot tray,
sunroof, luggage net, door
defl ectors, cool box secured
on the slides, clip armrest, load
carrying roof bars, roof box,
snow chains, ski carrier, tailgate
bicycle carrier, interior bicycle carrier,
booster seats and child seats, Isofi x
seats, side sun blinds and rear blind, ...
Trailer towbar which must be fi tted by a
PEUGEOT dealer.
The fi tting of electrical equipment
or accessories which are not
recommended by PEUGEOT
may result in a failure of your vehicle’s
electronic system.
Please note this specifi c warning. You
are advised to contact a representative
of the Marque to be shown the range
of recommended equipment or
accessories.
Depending on the country in which
the vehicle is sold, it is compulsory to
have a safety jacket, warning triangle
and replacement bulbs available in the
vehicle.
Screenwash, interior and
exterior maintenance
and cleaning products,
replacement bulbs, ...
When using a tailgate bicycle
carrier, deactivate the rear
wiper from the display
confi guration menu.
Before installing a radiocommunication
transmitter with aerial, contact a
PEUGEOT dealer who will inform you
of the specifi cations of the transmitters
which can be fi tted, in accordance with
the Motor Vehicle Electromagnetic
Compatibility Directive (2004/104/EC).
A further range is also available,
structured around comfort, leisure and
maintenance:
Anti-theft alarm, window
engraving,
fi rst aid kit, safety
jacket, rear parking assistance,
warning triangle, ...
Page 119 of 234
11 7
QUICK HELP
7
Changing a wheel
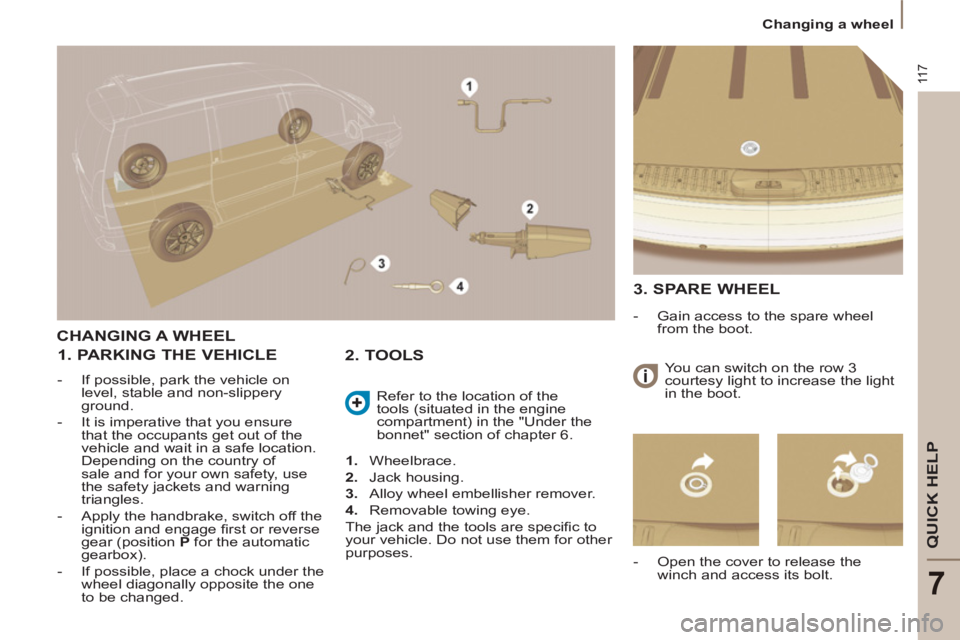
CHANGING A WHEEL
1. PARKING THE VEHICLE
- If possible, park the vehicle on
level, stable and non-slippery
ground.
- It is imperative that you ensure
that the occupants get out of the
vehicle and wait in a safe location.
Depending on the country of
sale and for your own safety, use
the safety jackets and warning
triangles.
- Apply the handbrake, switch off the
ignition and engage fi rst or reverse
gear (position P
for the automatic
gearbox).
- If possible, place a chock under the
wheel diagonally opposite the one
to be changed.
1.
Wheelbrace.
2.
Jack housing.
3.
Alloy wheel embellisher remover.
4.
Removable towing eye.
The jack and the tools are specifi c to
your vehicle. Do not use them for other
purposes. Refer to the location of the
tools (situated in the engine
compartment) in the "Under the
bonnet" section of chapter 6.
2. TOOLS
3. SPARE WHEEL
- Gain access to the spare wheel
from the boot.
- Open the cover to release the
winch and access its bolt. You can switch on the row 3
courtesy light to increase the light
in the boot.
Page 122 of 234
120
Changing a wheel
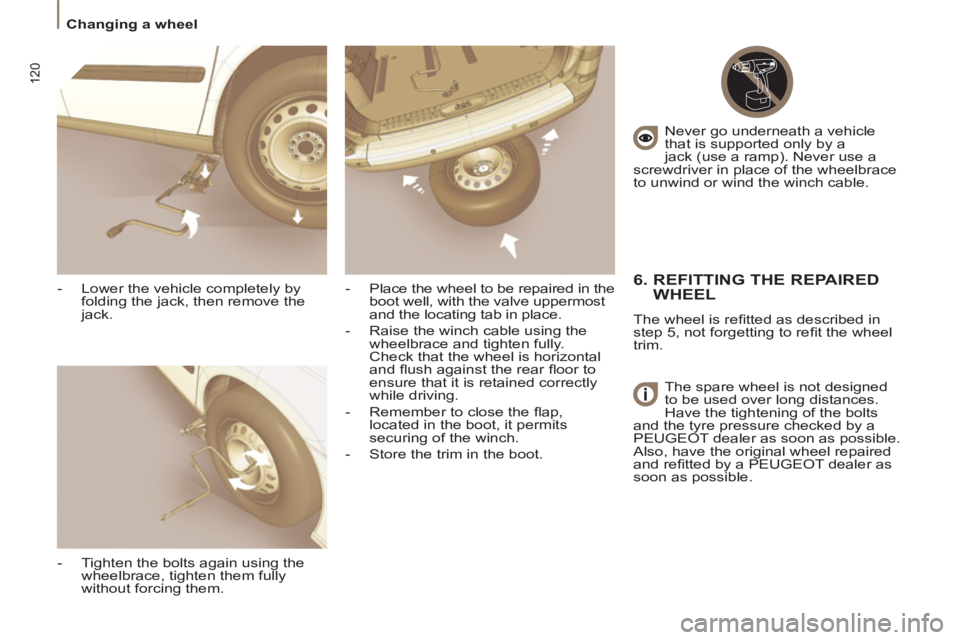
- Lower the vehicle completely by
folding the jack, then remove the
jack.
- Tighten the bolts again using the
wheelbrace, tighten them fully
without forcing them.
- Place the wheel to be repaired in the
boot well, with the valve uppermost
and the locating tab in place.
- Raise the winch cable using the
wheelbrace and tighten fully.
Check that the wheel is horizontal
and fl ush against the rear fl oor to
ensure that it is retained correctly
while driving.
- Remember to close the fl ap,
located in the boot, it permits
securing of the winch.
- Store the trim in the boot. Never go underneath a vehicle
that is supported only by a
jack (use a ramp). Never use a
screwdriver in place of the wheelbrace
to unwind or wind the winch cable.
6. REFITTING THE REPAIRED
WHEEL
The wheel is refi tted as described in
step 5, not forgetting to refi t the wheel
trim.
The spare wheel is not designed
to be used over long distances.
Have the tightening of the bolts
and the tyre pressure checked by a
PEUGEOT dealer as soon as possible.
Also, have the original wheel repaired
and refi tted by a PEUGEOT dealer as
soon as possible.
Page 223 of 234
139
VISUAL SEARCH
10
Exterior
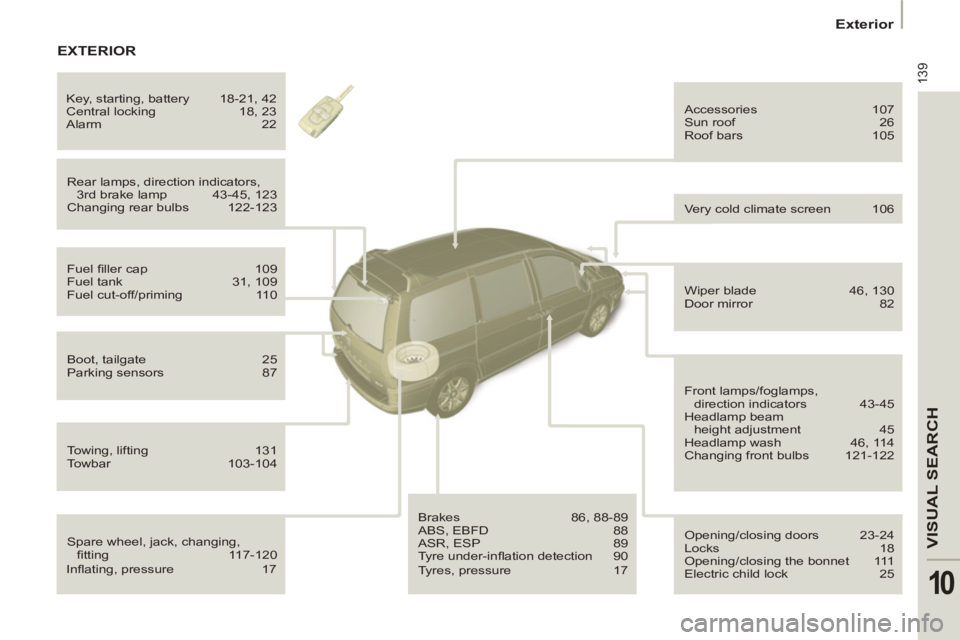
Spare wheel, jack, changing,
fi tting 117-120 Rear lamps, direction indicators,
3rd brake lamp 43-45, 123
Changing rear bulbs 122-123 Accessories 107
Sun roof 26
Roof bars 105
Fuel fi ller cap 109
Fuel tank 31, 109
Fuel cut-off/priming 110
Boot, tailgate 25
Parking sensors 87
Towing, lifting 131
Towbar 103-104
Brakes 86, 88-89
ABS, EBFD 88
ASR, ESP 89
Tyre under-infl ation detection 90 Opening/closing doors 23-24
Locks 18
Opening/closing the bonnet 111
Electric child lock 25
Wiper blade 46, 130
Door mirror 82
Front lamps/foglamps,
direction indicators 43-45
Headlamp beam
height adjustment 45
Headlamp wash 46, 114
Changing front bulbs 121-122 Very cold climate screen 106 Key, starting, battery 18-21, 42
Central locking 18, 23
Alarm 22
EXTERIOR
Infl ating, pressure 17
Tyres, pressure 17
Page 224 of 234
140
Interior
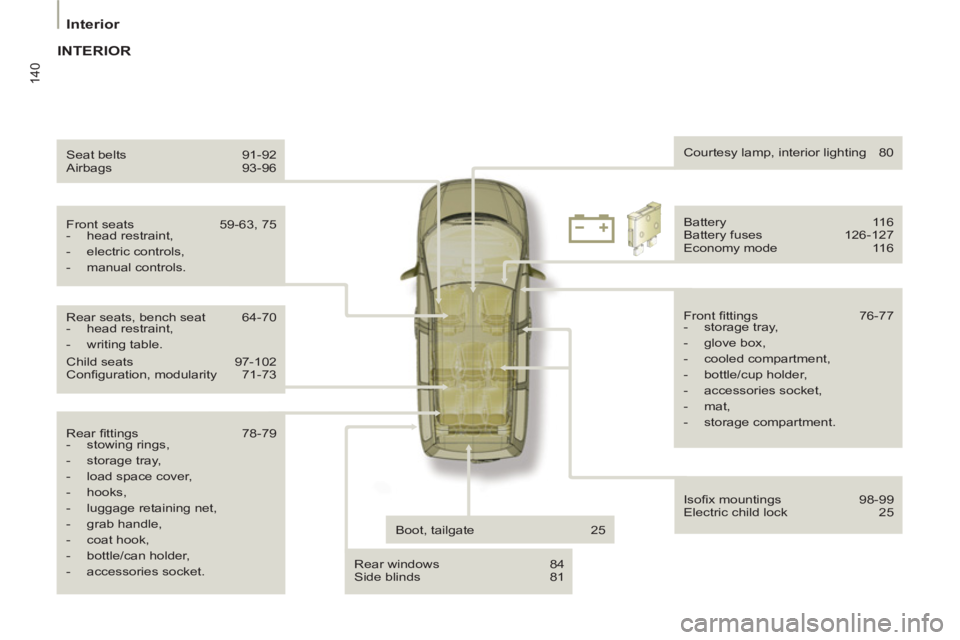
Rear fi ttings 78-79
- stowing rings,
- storage tray,
- load space cover,
- hooks,
- luggage retaining net,
- grab handle,
- coat hook,
- bottle/can holder,
- accessories socket. Boot, tailgate 25
Rear windows 84
Side blinds 81 Front seats 59-63, 75
- head restraint,
- electric controls,
- manual controls. Courtesy lamp, interior lighting 80
Seat belts 91-92
Airbags 93-96
Battery 116
Battery fuses 126-127
Economy mode 116
Front fi ttings 76-77
- storage tray,
- glove box,
- cooled compartment,
- bottle/cup holder,
- accessories socket,
- mat,
- storage compartment.
Isofi x mountings 98-99
Electric child lock 25
Rear seats, bench seat 64-70
- head restraint,
- writing table.
Child seats 97-102
Confi guration, modularity 71-73
INTERIOR
Page 229 of 234
145
VISUAL SEARC
H
10
Environment
Limit the causes of excess consumption
Spread loads throughout the vehicle; place the heaviest
items in the bottom of the boot, as close as possible to the
rear seats.
Limit the loads carried in the vehicle and reduce wind
resistance (roof bars, roof rack, bicycle carrier, trailer...).
Use a roof box in preference.
Remove roof bars and roof racks after use.
At the end of winter, remove snow tyres and refi t your
summer tyres.
Observe the recommendations on maintenance
Check the tyre pressures regularly, when cold, referring to
the label in the door aperture, driver's side.
Carry out this check in particular:
- before a long journey,
- at each change of season,
- after a long period out of use.
Don't forget the spare wheel and the tyres on any trailer or
caravan.
Have your vehicle serviced regularly (engine oil, oil
fi lter, air fi lter...) and observe the schedule of operations
recommended by the manufacturer.
When refuelling, do not continue after the third cut-off of the
nozzle to avoid any overfl ow.
At the wheel of your new vehicle, it is only after the fi rst
1 800 miles (3 000 kilometres) that you will see the fuel
consumption settle down to a consistent average.