sensor Peugeot Bipper 2015 User Guide
[x] Cancel search | Manufacturer: PEUGEOT, Model Year: 2015, Model line: Bipper, Model: Peugeot Bipper 2015Pages: 192, PDF Size: 7.97 MB
Page 118 of 192
11 6
Bipper_en_Chap06_securite_ed02-2014
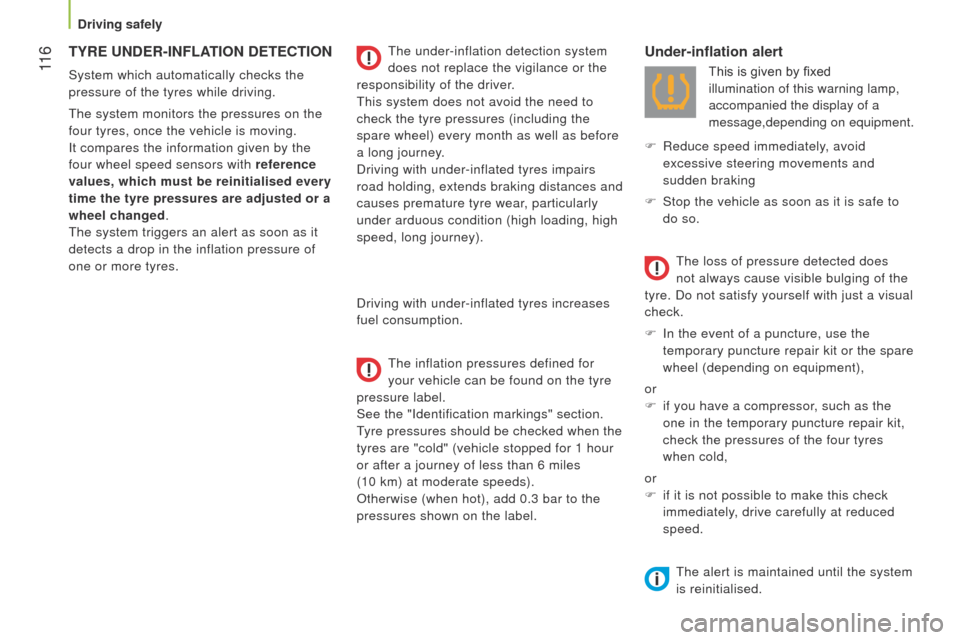
TYRE UNDER-INFLATION DETECTION
System which automatically checks the
pressure of the tyres while driving.
t
he system monitors the pressures on the
four tyres, once the vehicle is moving.
It compares the information given by the
four wheel speed sensors with reference
values, which must be reinitialised every
time the tyre pressures are adjusted or a
wheel changed.
t
he system triggers an alert as soon as it
detects a drop in the inflation pressure of
one or more tyres.
t
he under-inflation detection system
does not replace the vigilance or the
responsibility of the driver.
t
his system does not avoid the need to
check the tyre pressures (including the
spare wheel) every month as well as before
a long journey.
Driving with under-inflated tyres impairs
road holding, extends braking distances and
causes premature tyre wear, particularly
under arduous condition (high loading, high
speed, long journey).
Driving with under-inflated tyres increases
fuel consumption.
t
he inflation pressures defined for
your vehicle can be found on the tyre
pressure label.
See the "Identification markings" section.
tyre pressures should be checked when the
tyres are "cold" (vehicle stopped for 1 hour
or after a journey of less than 6 miles
(10 km) at moderate speeds).
Otherwise (when hot), add 0.3 bar to the
pressures shown on the label.
Under-inflation alert
This is given by fixed
illumination of this warning lamp,
accompanied the display of a
message,depending on equipment.
F
Reduce speed immediately
, avoid
excessive steering movements and
sudden braking
F
Stop the vehicle as soon as it is safe to
do so.
t
he loss of pressure detected does
not always cause visible bulging of the
tyre. Do not satisfy yourself with just a visual
check.
F
In the event of a puncture, use the
temporary puncture repair kit or the spare
wheel (depending on equipment),
or
F
if you have a compressor
, such as the
one in the temporary puncture repair kit,
check the pressures of the four tyres
when cold,
or
F
if it is not possible to make this check
immediately, drive carefully at reduced
speed.
t
he alert is maintained until the system
is reinitialised.
Driving safely
Page 140 of 192
138
Bipper_en_Chap07_accessoire_ed02-2014
In certain cases of particularly arduous
use (towing the maximum load up a steep
slope in high temperatures), the engine
automatically limits its power. In this case,
automatic cutting off of the air conditioning
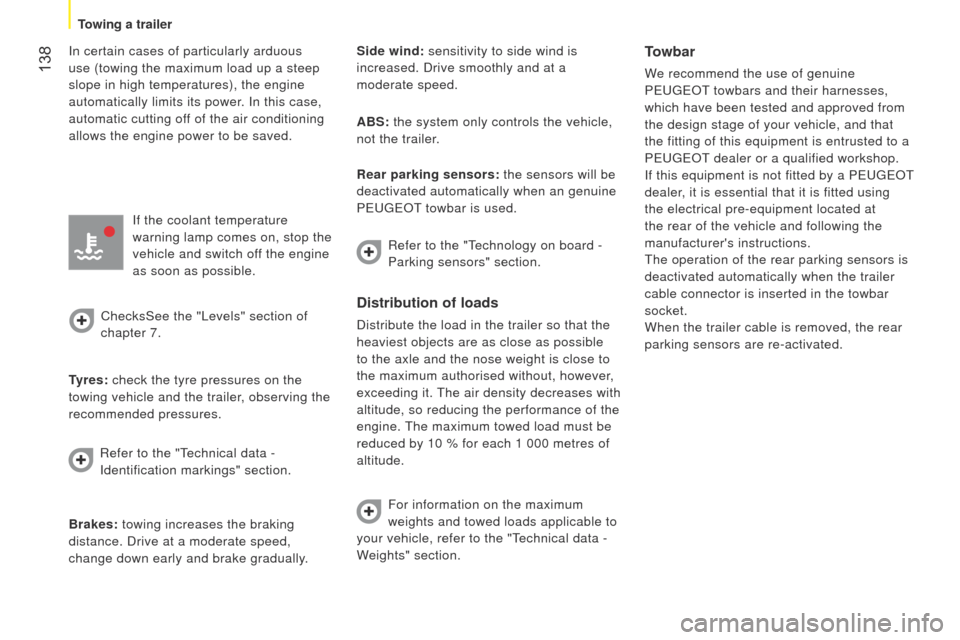
allows the engine power to be saved.If the coolant temperature
warning lamp comes on, stop the
vehicle and switch off the engine
as soon as possible.
ChecksSee the "
l evels" section of
chapter 7.
Tyres: check the tyre pressures on the
towing vehicle and the trailer, observing the
recommended pressures.
Brakes: towing increases the braking
distance. Drive at a moderate speed,
change down early and brake gradually. Side wind: sensitivity to side wind is
increased. Drive smoothly and at a
moderate speed.
ABS: the system only controls the vehicle,
not the trailer.
Distribution of loads
Distribute the load in the trailer so that the
heaviest objects are as close as possible
to the axle and the nose weight is close to
the maximum authorised without, however,
exceeding it.
t
he air density decreases with
altitude, so reducing the performance of the
engine.
t
he maximum towed load must be
reduced by 10 % for each 1 000 metres of
altitude.
Refer to the "
t
echnical data -
Identification markings" section. Rear parking sensors: the sensors will be
deactivated automatically when an genuine
P
euge O t towbar is used.
Towbar
We recommend the use of genuine
P
euge O t towbars and their harnesses,
which have been tested and approved from
the design stage of your vehicle, and that
the fitting of this equipment is entrusted to a
P
euge O t
dealer or a qualified workshop.
If this equipment is not fitted by a P
euge O t
dealer
, it is essential that it is fitted using
the electrical pre-equipment located at
the rear of the vehicle and following the
manufacturer's instructions.
t
he operation of the rear parking sensors is
deactivated automatically when the trailer
cable connector is inserted in the towbar
socket.
When the trailer cable is removed, the rear
parking sensors are re-activated.
Refer to the "
t
echnology on board -
Parking sensors" section.
For information on the maximum
weights and towed loads applicable to
your vehicle, refer to the "
t
echnical data -
Weights" section.
Towing a trailer
Page 142 of 192
140
Bipper_en_Chap07_accessoire_ed02-2014
Range of accessories for private vehicles
Another range is also available from
Peuge O t
dealers.
"Comfort":
insulated module, coat hanger fixed to a
head restraint, reading lamp, rear parking
sensors...
"Transport solutions":
boot liner, rear door net, set of transverse
and longitudinal roof bars, roof boxes...
"Style":
embellishers, secure wheel embellishers... "Security and safety":
anti-intrusion alarm, window etching,
breathalyzer, first aid kit, high visibility vest,
warning triangle, child seats and booster
cushions, snow chains...
"Protection":
rubber mats, over-carpets, 3D mats, seat
covers compatible with lateral airbags, sets
of front and rear mudflaps...
"Multimedia":
audio systems, hands-free kit, speakers,
portable satellite navigation systems, speed
camera detectors, Wi-Fi on board...
By going to a P
euge O t dealer, you can
also obtain cleaning and maintenance
products (interior and exterior) -
including ecological products from the
"
te CHNA
tu
R e " range - products for
topping up (screenwash...), touch-up pens
and paint aerosols for the exact colour of
your vehicle, recharges (cartridge for the
temporary puncture repair kit...), ...
to avoid any risk of jamming of the pedals:
-
ensure that the mat is positioned and
secured correctly,
-
never fit one mat on top of another
.
Equipment
Page 151 of 192
149
Bipper_en_Chap08_verifications_ed02-2014
CHECKS
Bleeding water from the Diesel filter
If this warning lamp comes
on, you must bleed the filter;
otherwise bleed the filter
regularly, every time the engine
oil is changed.
to remove the water
, unscrew the bleed
screw or the water in Diesel sensor, located
at the base of the filter. Operate until all of
the water has flowed out.
t
hen tighten the
bleed screw or the water sensor.
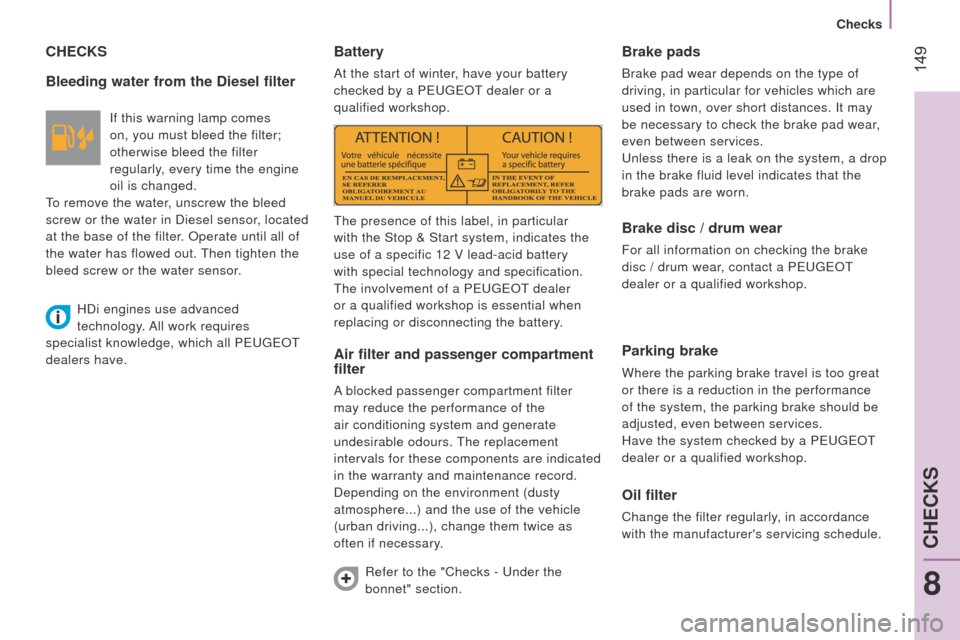
Battery
At the start of winter, have your battery
checked by a P euge O t
dealer or a
qualified workshop.
Air filter and passenger compartment
filter
A blocked passenger compartment filter
may reduce the performance of the
air conditioning system and generate
undesirable odours.
t
he replacement
intervals for these components are indicated
in the warranty and maintenance record.
Depending on the environment (dusty
atmosphere...) and the use of the vehicle
(urban driving...), change them twice as
often if necessary.
Brake pads
Brake pad wear depends on the type of
driving, in particular for vehicles which are
used in town, over short distances. It may
be necessary to check the brake pad wear,
even between services.
u
nless there is a leak on the system, a drop
in the brake fluid level indicates that the
brake pads are worn.
Brake disc / drum wear
For all information on checking the brake
disc / drum wear, contact a P euge O t
dealer or a qualified workshop.
Parking brake
Where the parking brake travel is too great
or there is a reduction in the performance
of the system, the parking brake should be
adjusted, even between services.
Have the system checked by a P
euge O t
dealer or a qualified workshop.
Oil filter
Change the filter regularly, in accordance
with the manufacturer's servicing schedule.
t
he presence of this label, in particular
with the Stop & Start system, indicates the
use of a specific 12 V lead-acid battery
with special technology and specification.
t
he involvement of a P
euge
O
t
dealer
or a qualified workshop is essential when
replacing or disconnecting the battery.
Refer to the "Checks -
u
nder the
bonnet" section.
HDi engines use advanced
technology. All work requires
specialist knowledge, which all P
euge
O
t
dealers have.
8
CHECKS
Checks
Page 155 of 192
153
Bipper_en_Chap09_aide-rapide_ed02-2014
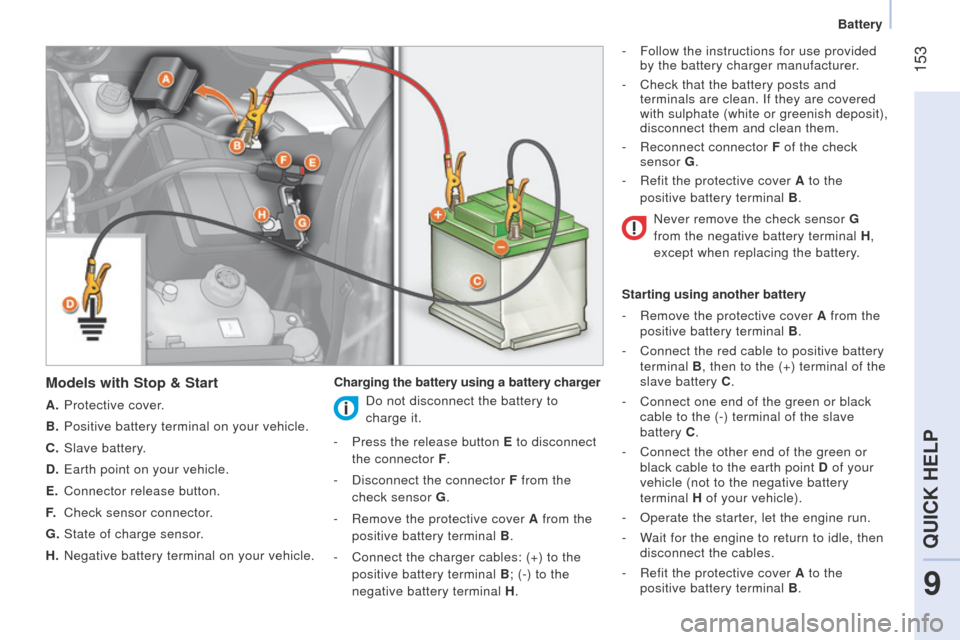
Models with Stop & Start
A. Protective cover.
B.
Positive battery terminal on your vehicle.
C.
Slave battery
.
D.
e arth point on your vehicle.
E.
Connector release button.
F.
Check sensor connector
.
G.
State of charge sensor
.
H.
Negative battery terminal on your vehicle. Charging the battery using a battery charger -
Follow the instructions for use provided
by the battery charger manufacturer.
-
Check that the battery posts and
terminals are clean. If they are covered
with sulphate (white or greenish deposit),
disconnect them and clean them.
-
Reconnect connector
F
of the check
sensor G.
-
Refit the protective cover
A
to the
positive battery terminal B .
Starting using another battery
-
Remove the protective cover
A
from the
positive battery terminal B .
-
Connect the red cable to positive battery
terminal B, then to the (+) terminal of the
slave battery C .
- Connect one end of the green or black
cable to the (-) terminal of the slave
battery C.
-
Connect the other end of the green or
black cable to the earth point D of your
vehicle (not to the negative battery
terminal H of your vehicle).
-
Operate the starter
, let the engine run.
-
W
ait for the engine to return to idle, then
disconnect the cables.
-
Refit the protective cover
A to the
positive battery terminal B .
Do not disconnect the battery to
charge
it.
-
Press the release button
E to disconnect
the connector F .
-
Disconnect the connector
F from the
check sensor G .
-
Remove the protective cover
A from the
positive battery terminal B .
-
Connect the charger cables: (+) to the
positive battery terminal B ; (-) to the
negative battery terminal H .Never remove the check sensor G
from the negative battery terminal H
,
except when replacing the battery.
9
QUICK HELP
Battery
Page 156 of 192
154
Bipper_en_Chap09_aide-rapide_ed02-2014
Batteries contain harmful substances
such as sulphuric acid and lead.
t
hey
must be disposed of in accordance with the
law and must not, in any circumstances be
discarded with household waste.
take used batteries to an authorised waste
disposal site.
It is advisable to disconnect the battery
if the vehicle is not to be used for a
period of more than one month.
to do
this on models with Stop & Start:
-
press the release button
E
to
disconnect connector F ,
-
disconnect connector
F
of check
sensor G.
t
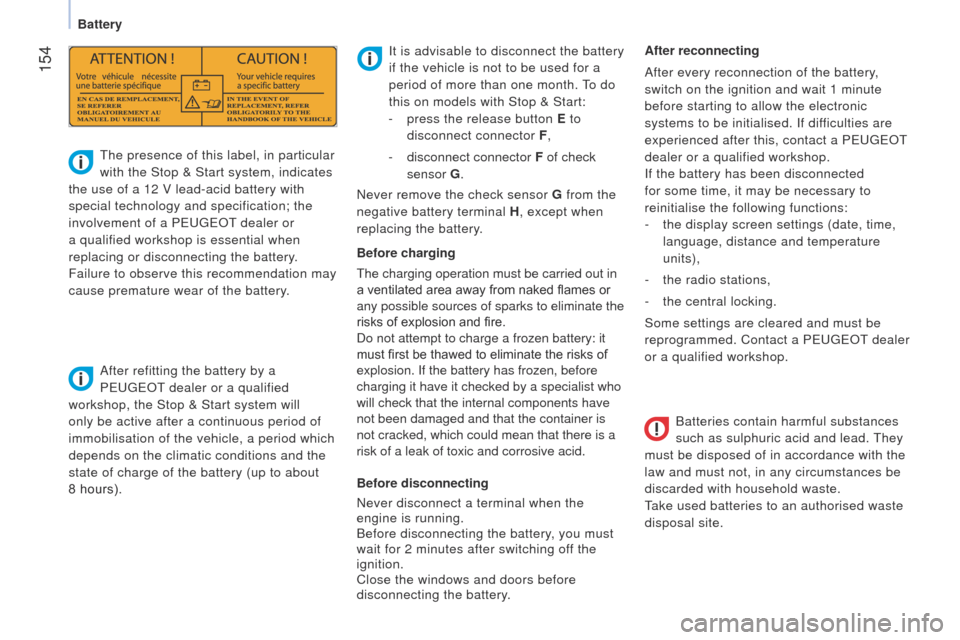
he presence of this label, in particular
with the Stop & Start system, indicates
the use of a 12 V lead-acid battery with
special technology and specification; the
involvement of a P
euge
O
t
dealer or
a qualified workshop is essential when
replacing or disconnecting the battery.
Failure to observe this recommendation may
cause premature wear of the battery.
After refitting the battery by a
P
euge
O
t
dealer or a qualified
workshop, the Stop & Start system will
only be active after a continuous period of
immobilisation of the vehicle, a period which
depends on the climatic conditions and the
state of charge of the battery (up to about
8
hours). Before charging
t
he charging operation must be carried out in
a ventilated area away from naked flames or
any possible sources of sparks to eliminate the
risks of explosion and fire.
Do not attempt to charge a frozen battery: it
must first be thawed to eliminate the risks of
explosion. If the battery has frozen, before
charging it have it checked by a specialist who
will check that the internal components have
not been damaged and that the container is
not cracked, which could mean that there is a
risk of a leak of toxic and corrosive acid.
Before disconnecting
Never disconnect a terminal when the
engine is running.
Before disconnecting the battery, you must
wait for 2 minutes after switching off the
ignition.
Close the windows and doors before
disconnecting the battery. After reconnecting
After every reconnection of the battery,
switch on the ignition and wait 1 minute
before starting to allow the electronic
systems to be initialised. If difficulties are
experienced after this, contact a P
euge O t
dealer or a qualified workshop.
If the battery has been disconnected
for some time, it may be necessary to
reinitialise the following functions:
-
the display screen settings (date, time,
language, distance and temperature
units),
-
the radio stations,
-
the central locking.
Some settings are cleared and must be
reprogrammed. Contact a P euge O t
dealer
or a qualified workshop.
Never remove the check sensor G
from the
negative battery terminal H , except when
replacing the battery.
Battery
Page 170 of 192
168
Bipper_en_Chap09_aide-rapide_ed02-2014
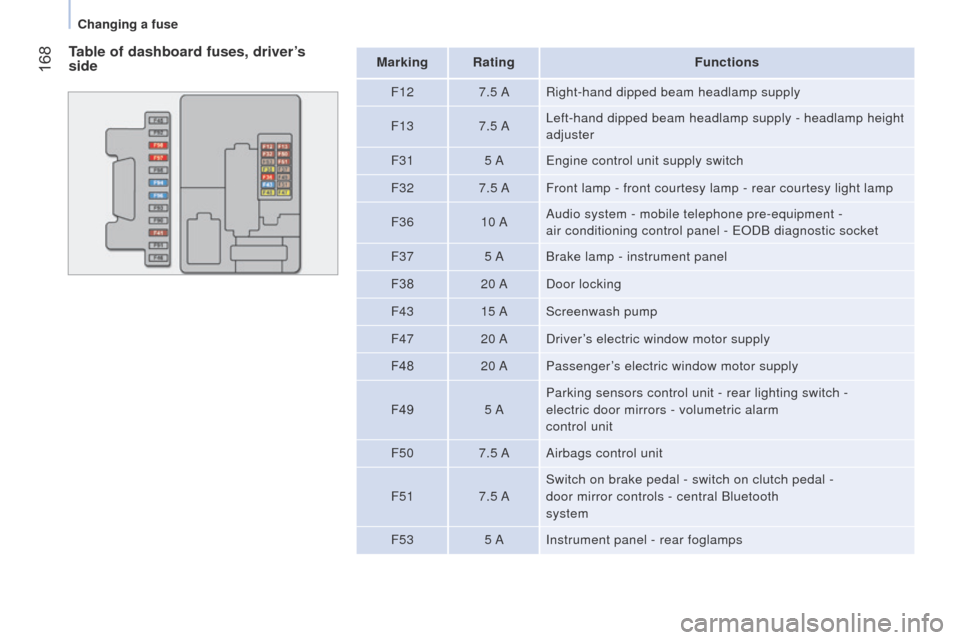
Table of dashboard fuses, driver’s
sideMarking RatingFunctions
F12 7.5 ARight-hand dipped beam headlamp supply
F13 7.5 A
l
eft-hand dipped beam headlamp supply - headlamp height
adjuster
F31 5 A
e
ngine control unit supply switch
F32 7.5 AFront lamp - front courtesy lamp - rear courtesy light lamp
F36 10 AAudio system - mobile telephone pre-equipment -
air conditioning control panel -
e ODB diagnostic socket
F37 5 ABrake lamp - instrument panel
F38 20 ADoor locking
F43 15 AScreenwash pump
F47 20 ADriver’s electric window motor supply
F48 20 APassenger’s electric window motor supply
F49 5 AParking sensors control unit - rear lighting switch -
electric door mirrors - volumetric alarm
control unit
F50 7.5 AAirbags control unit
F51 7.5 ASwitch on brake pedal - switch on clutch pedal -
door mirror controls - central Bluetooth
system
F53 5 AInstrument panel - rear foglamps
Changing a fuse
Page 173 of 192
171
Bipper_en_Chap09_aide-rapide_ed02-2014
Marking RatingFunctions
F16 7.5 A
e
ngine management control unit - electronic gearbox control unit and gear\
lever -
t
20 relay coil
F17 15 ASupply for ignition coil - injectors - engine management control unit (\
1.3 HDi)
F18 7.5 AEngine management control unit (1.3 HDi) - T09 relay coil
F19 7.5 AAir conditioning compressor
F20 30 ASupply for heated rear screen, electric door mirrors heater elements
F21 15 AFuel pump (1.4 petrol and 1.3 HDi)
F22 20 A
e
ngine management control unit (1.3 HDi)
F23 20 AABS hydraulic block electrovalves supply
F24 7.5 AABS
F30 15 AFoglamps
F81 60 APre-heat unit (1.3 HDi)
F82 30 A
e
lectronic gearbox pump - electronic gearbox supply
F84 10 A
e
lectronic gearbox control unit and electrovalves
F85 30 ACigar lighter - 12 V accessory socket
F87 7.5 A
Reversing lamps - water in Diesel sensor - airflow sensor - T02, T05, T14, T17 and T19 relay coils
(except 1.3 HDi)
5 A Reversing lamps - water in Diesel sensor - airflow sensor - T02, T05, T14, T17 and T19 relay coils -
battery state of charge sensor (except 1.3 HDi)
9
QUICK HELP
Changing a fuse