PEUGEOT BOXER 2015 Owners Manual
Manufacturer: PEUGEOT, Model Year: 2015, Model line: BOXER, Model: PEUGEOT BOXER 2015Pages: 276, PDF Size: 8.99 MB
Page 121 of 276
11 9
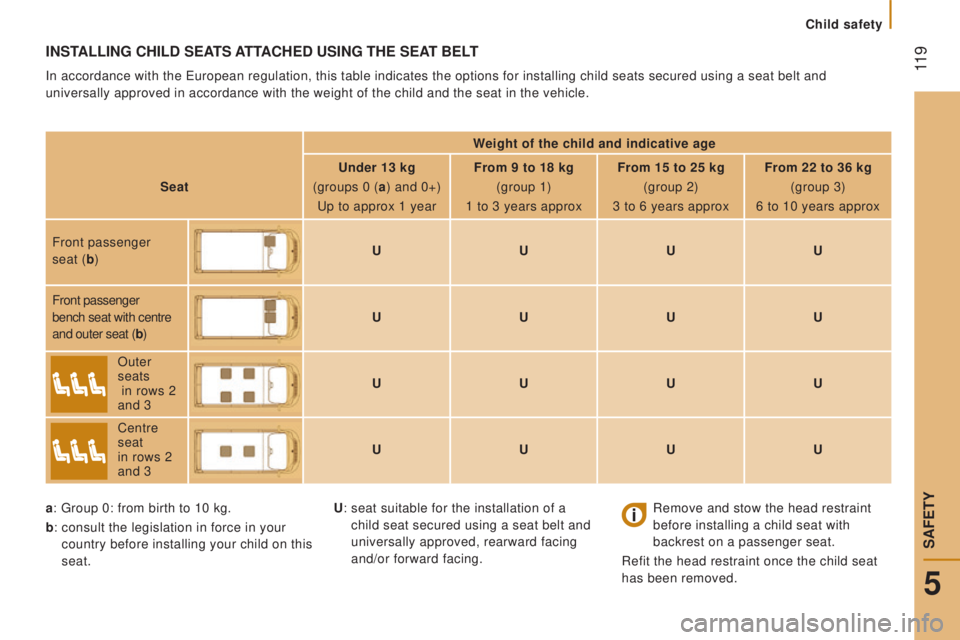
InStALLInG cHILd SEAtS AttAcHEd uSInG tHE SEAt BELt
In accordance with the european regulation, this table indicates the options for installing chil\
d seats secured using a seat belt and
universally approved in accordance with the weight of the child and the \
seat in the vehicle.
Weight of the child and indicative age
Seat
under 13 kg
(groups 0 (
a) and 0+)
up to approx 1 year From 9 to 18 kg
(group 1)
1 to 3 years approx From 15 to 25 kg
(group 2)
3 to 6 years approx From 22 to 36 kg
(group 3)
6 to 10 years approx
Front passenger
seat (b )
u uuu
Front passenger
bench seat with centre
and outer seat (b )
u uuu
Outer
seats
in rows 2
and 3
u uuu
Centre
seat
in rows 2
and 3
u uuu
a: group 0: from birth to 10 kg.
b :
consult the legislation in force in your
country before installing your child on this
seat.
Remove and stow the head restraint
before installing a child seat with
backrest on a passenger seat.
Refit the head restraint once the child seat
has been removed.
u: seat suitable for the installation of a
child seat secured using a seat belt and
universally approved, rearward facing
and/or forward facing.
5
SAFetY
Child safety
Page 122 of 276
120
Good practice
children at the front
the legislation on carrying a child on the
front passenger seat is specific to each
country. Refer to the legislation in force in
your country.
Deactivate the passenger's airbag when a
rearward facing child seat is installed on the
front seat.
Otherwise, the child would risk being
seriously injured or killed if the airbag were
deployed. As a safety precaution, never leave:
-
one or more children alone and
unsupervised in a vehicle,
-
a child or an animal in a vehicle which
is exposed to the sun, with the windows
closed,
-
the keys within reach of children inside
the vehicle.
to prevent accidental opening of the doors,
use the "Child Lock".
take care not to open the rear windows by
more than one third.
to protect young children from the rays of
the sun, fit side blinds to the rear windows. Installing a booster seat
the chest part of the seat belt must be
positioned on the child's shoulder without
touching the neck.
ensure that the lap part of the seat belt
passes correctly over the child's thighs.
P
eugeOt recommends the use of a
booster seat which has a back, fitted with a
seat belt guide at shoulder level.
For the optimum installation of a forward
facing child seat, ensure that the back of
the child seat is as close as possible to the
backrest of the vehicle's seat, or in contact
if possible.
the head restraint must be removed before
installing a child seat with a backrest on the
passenger seat.
ensure that the head restraint is stowed or
attached securely so that it is not thrown
around the vehicle in the event of sharp
braking.
Refit the head restraint as soon as the child
seat is removed.
At the rear, always leave sufficient space
between the front seat and:
-
a rearward facing child seat,
-
the feet of a child seated in a forward
facing child seat.
For this, move the front seat forward and, if
necessary, straighten its backrest as well.
the incorrect installation of a child seat in a
vehicle compromises the child's protection in
the event of an accident.
Check that there is no seat belt or seat belt
buckle under the child seat, as this could
destabilise the seat.
Remember to fasten the seat belts or the
child seat harnesses keeping the slack
relative to the child's body to a minimum,
even for short journeys.
For the installation of a child seat using
the seat belt, ensure that the seat belt is
well tensioned on the child seat and that
it is holding the child seat firmly against
the vehicle's seat. If the passenger seat is
adjustable, move it forward if necessary.
Child safety
Page 123 of 276
121
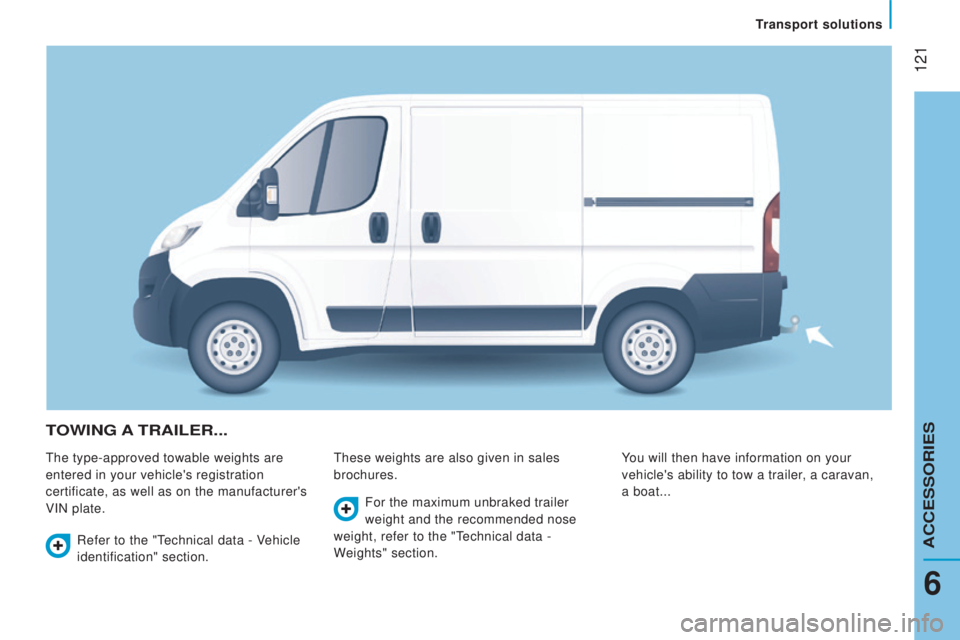
toWInG A trAILEr...
the type-approved towable weights are
entered in your vehicle's registration
certificate, as well as on the manufacturer's
VIN plate.these weights are also given in sales
brochures. You will then have information on your
vehicle's ability to tow a trailer, a caravan,
a boat...
Refer to the "
technical data - Vehicle
identification" section. For the maximum unbraked trailer
weight and the recommended nose
weight, refer to the "
technical data -
W
eights" section.
6
transport solutions
ACCeSSORIeS
Page 124 of 276
122
driving advice
distribution of loads: distribute the load in
the trailer so that the heaviest objects are as
close as possible to the axle and the nose
weight is close to the maximum authorised
without, however, exceeding it.
cooling:
towing a trailer on a slope
increases the coolant temperature.
As the fan is electrically controlled, its
cooling capacity is not dependent on the
engine speed.
On the contrary, use a high gear to lower the
engine speed and reduce your speed.
In all cases, pay attention to the coolant
temperature.
tyres: check the tyre pressures of the
towing vehicle and of the trailer, observing
the recommended pressures.
Fitting a towbar
We recommend the use of genuine
P
eugeOt towbars and their harnesses,
which have been tested and approved from
the design stage of your vehicle and that
the fitting of this equipment is entrusted to a
P
eugeOt dealer.
these genuine towbars are compatible with
the operation of the rear parking sensors
and the reversing camera, if fitted to your
vehicle.
If this equipment is not fitted by a P
eugeOt
dealer, it must be fitted in line with the
manufacturer's instructions.
Good practice
If the coolant temperature
warning lamp comes on, stop the
vehicle and switch off the engine
as soon as possible.
Refer to the "Checks - Levels and
checks" section.
Brakes: towing increases the braking
distance. Drive at a moderate speed,
change down early and brake gradually. Side wind: sensitivity to side wind is
increased. Drive smoothly and at a
moderate speed. ABS: the system only controls the vehicle,
not the trailer.
rear parking sensors:
the system is
deactivated while the vehicle is towing with a
genuine P
eugeOt towbar fitted.
Refer to the "
technical data -
Identification markings" section.
transport solutions
Page 125 of 276
123
rooF cArrYInG SYStEMS
Refer to the "technical data -
Dimensions" section for more
information on the length (L1 to L4) and the
height (H1 to H3) of the vehicle. Maximum load on the roof, evenly
distributed: 150 kg, for all versions,
within the vehicle's weight limit (
gross
Vehicle Weight).
For reasons of safety and to avoid damaging
the roof, it is essential to use a carrying
system (roof bars or roof rack) that is
approved for your vehicle.
Roof bars can only be fitted to an H1 or H2
height van, combi and minibus versions. On
a minibus, check for the presence of roof air
conditioning units.
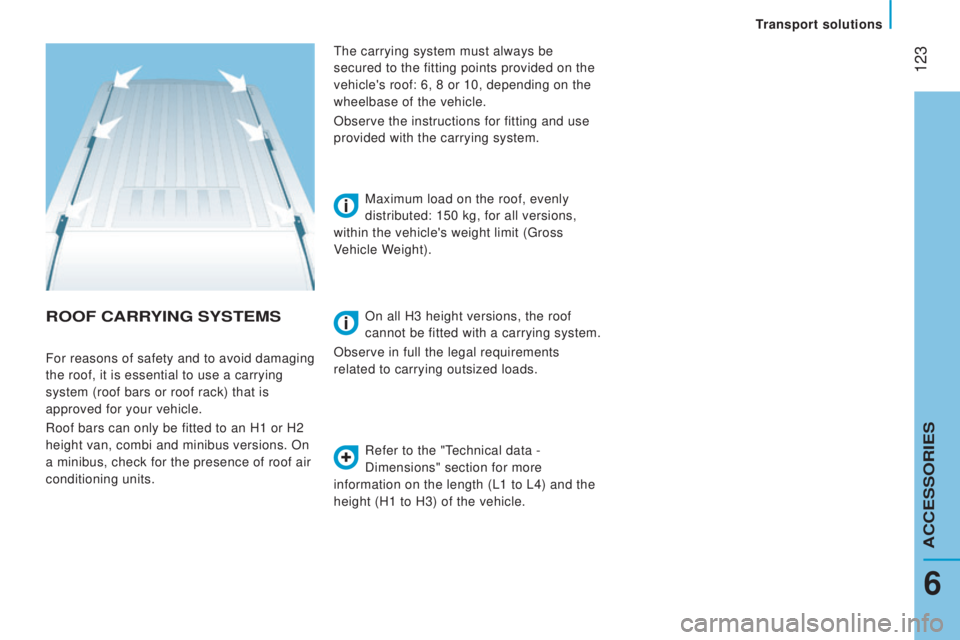
the carrying system must always be
secured to the fitting points provided on the
vehicle's roof: 6, 8 or 10, depending on the
wheelbase of the vehicle.
Observe the instructions for fitting and use
provided with the carrying system.
On all H3 height versions, the roof
cannot be fitted with a carrying system.
Observe in full the legal requirements
related to carrying outsized loads.
6
transport solutions
ACCeSSORIeS
Page 126 of 276
124
otHEr AccESSorIES
these accessories and parts, having been
tested and approved for reliability and
safety
, are all adapted to your vehicle. A
wide range of recommended and genuine
parts is available.
"comfort":
Air deflectors, insulated module, scented air
fresheners, reading lamp, cigarette lighter,
portable ashtray, non-slip seat cushions
,rear parking sensors...
"Protection":
Mats, mudflaps, vehicle protective cover,
seat covers, security grills for rear door
windows, twin rear security doors with
security locks, paint touch-up...
"Security":
Anti-intrusion alarm, vehicle tracking system,
snow chains, non-slip covers, child seats,
first aid kit, warning triangle, high visibility
vest, fire extinguisher, pet safety belt, seat
belt cutter / glass hammer...
"Style":
Alloy wheels...
"Multimedia":
CD player, Wi-Fi on Board, semi-integral
satellite navigation system, hands-free kits,
driving aids, rear multimedia support, DVD
player, navigation mapping update, portable
satellite navigation systems, telephone
carrier, aftermarket digital radio, audio
systems...
"transport solutions":
towbars, towbar wiring harness with
7/13
connector
, 7/7 connector, 13 connector,
interior protection kits, non-slip floor, wheel
arch protector, cab dividers, transverse roof
bars, roof racks, ladder for roof rack, roof
loading runners, loading plate for roof rack... Installation of radiocommunication
transmitters
You are advised to contact a P
eugeOt
dealer before installing accessory
radiocommunication transmitters with
external aerial on your vehicle.
P
eugeOt dealers can advise you on
the specifications (frequency waveband,
maximum output power, aerial position,
specific installation conditions) of the
transmitters which can be fitted, in
accordance with the Vehicle
electromagnetic
Compatibility Directive (2004/104/
eC).
the fitting of electrical equipment or
accessories which are not listed by
P
eugeOt may result in the failure of your
vehicle's electronic system.
W
e request that you take note of this point
and recommend that you contact a dealer
to be shown the range of recommended
equipment and accessories.
Depending on the country in which the
vehicle is sold or operated, it may be
compulsory to have a high visibility vest,
warning triangle, replacement bulbs and
breathalyzer in the vehicle.
to prevent the mat from becoming
caught under the pedals:
-
ensure that the mat and its fixings are
positioned correctly
,
-
never fit one mat on top of another.
equipment
Page 127 of 276
125
SnoW cHAInS
In wintry conditions, snow chains improve
traction as well as the behaviour of the
vehicle when braking.
the snow chains must be fitted only to
the driving wheels.
they must never be
fitted to "space-saver" type spare wheels.
take account of the legislation in force
in your country on the use of snow
chains and the maximum running speed
authorised . Advice on installation
F
If you have to fit the chains during
a journey
, stop the vehicle on a flat
surface on the side of the road.
F
Apply the parking brake and position any
wheel chocks to prevent movement of
your vehicle.
F
Fit the chains following the instructions
provided by the manufacturer
.
F
Move off gently and drive for a few
moments, without exceeding 30 mph
(50
km/h).
F
Stop your vehicle and check that the
snow chains are correctly tightened.
It is recommended that before you
leave, you practise fitting the snow
chains on a level and dry surface.
Avoid driving with chains on roads that
have been cleared of snow, to avoid
damaging your vehicle's tyres and the road
surface. If your vehicle is fitted with alloy
wheels, check that no part of the chain or its
fixings is in contact with the wheel rim.use only the chains designed to be fitted to
the type of wheel fitted to your vehicle:
Original
tyre size Maximum link
size.
215/70 R15 12 mm
225/75 R15 16 mm
215/75 R16 16 mm
225/75 R16 16 mm
For more information on snow chains,
contact a P
eugeOt dealer or a qualified
workshop.
6
ACCeSSORIeS
equipment
Page 128 of 276
126PeugeOt & tOtAL,
A PARtNeRSHIP tO DeLI VeR
Bet
te
R PeR
FORMANC
e!
Innovation, the key to success
the tOtAL R esearch and Development and
Peu geOt teams work together to develop high
quality lubricants that meet the requirements of
P
eu
ge
Ot v
ehicles. For you, this is the assurance
that the performance of your engine is optimised
while also ensuring its durability.
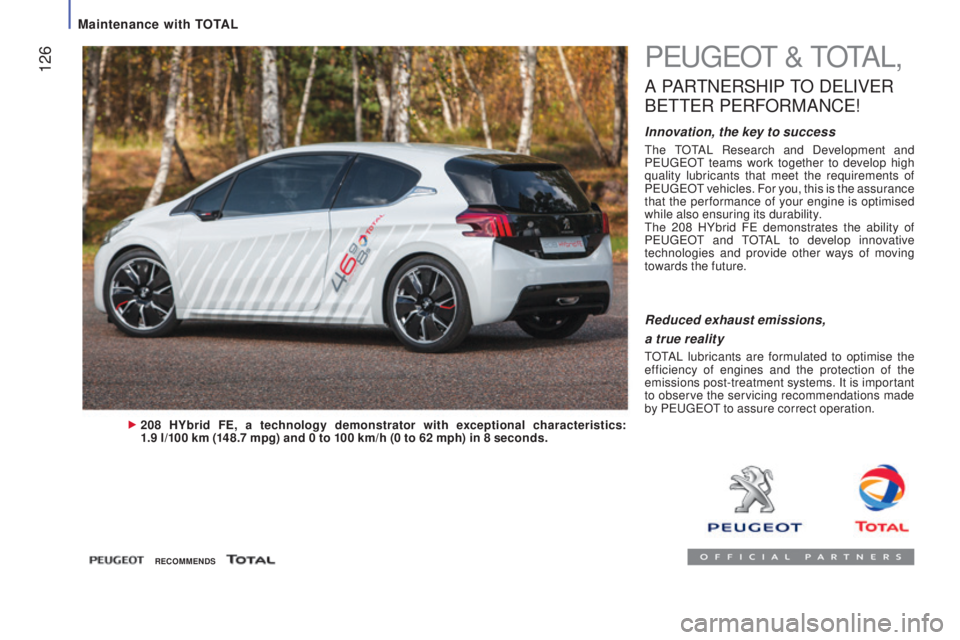
the 2
08 HYbrid F
e d
emonstrates the ability of
P
eu
ge
Ot
and
tOtAL t
o develop innovative
technologies and provide other ways of moving
towards the future.
208 HYbrid FE, a technology demonstrator with exceptional characteristics:
1.9 l/100 km (148.7 mpg) and 0 to 100 km/h (0 to 62 mph) in 8 seconds.
Reduced exhaust emissions,
a true reality
tOtAL lubricants are formulated to optimise the
e fficiency of engines and the protection of the
emissions post-treatment systems. It is important
to observe the servicing recommendations made
by P
eu
ge
Ot t
o assure correct operation.
rEcoMMEndS
Maintenance with tOtAL
Page 129 of 276
127
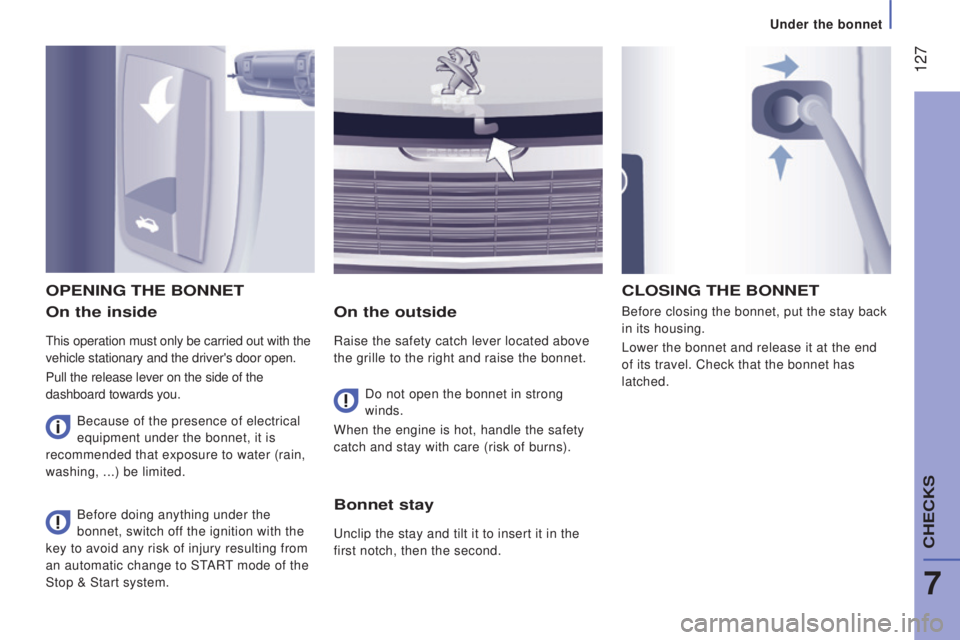
on the inside
this operation must only be carried out with the
vehicle stationary and the driver's door open.
Pull the release lever on the side of the
dashboard towards you.
on the outside
Raise the safety catch lever located above
the grille to the right and raise the bonnet. Before closing the bonnet, put the stay back
in its housing.
Lower the bonnet and release it at the end
of its travel. Check that the bonnet has
latched.
oPEnInG tHE BonnEt
Do not open the bonnet in strong
winds.
When the engine is hot, handle the safety
catch and stay with care (risk of burns).
Before doing anything under the
bonnet, switch off the ignition with the
key to avoid any risk of injury resulting from
an automatic change to S
tARt mode of the
Stop & Start system.
cLoSInG tHE BonnEt
Bonnet stay
unclip the stay and tilt it to insert it in the
first notch, then the second.
Because of the presence of electrical
equipment under the bonnet, it is
recommended that exposure to water (rain,
washing,
...) be limited.
7
under the bonnet
CHeCKS
Page 130 of 276
128
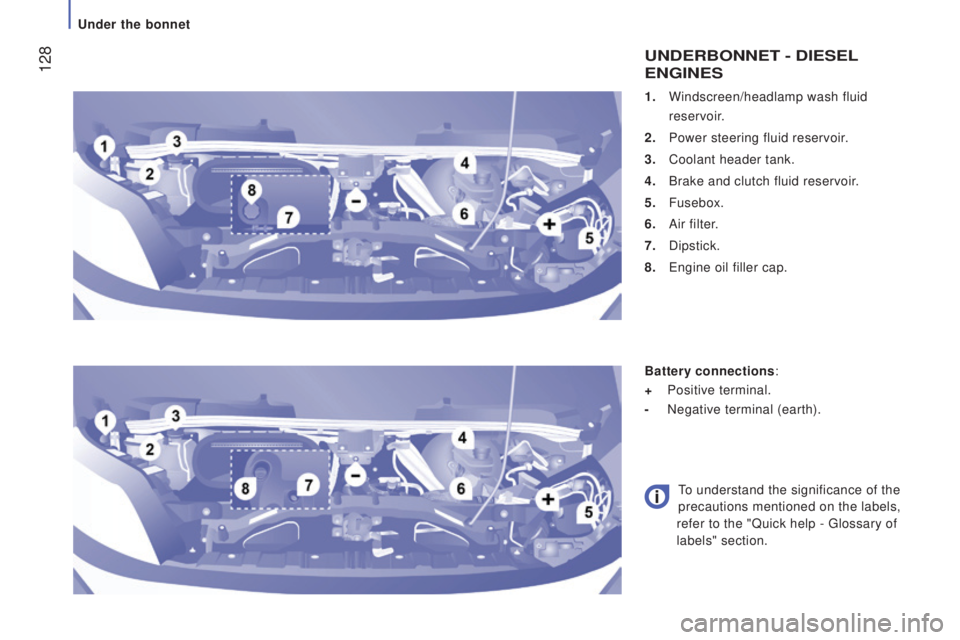
1. Windscreen/headlamp wash fluid
reservoir.
2.
Power steering fluid reservoir.
3.
Coolant header tank.
4.
Brake and clutch fluid reservoir.
5.
Fusebox.
6.
Air filter.
7.
Dipstick.
8.
e
ngine oil filler cap.
undErBonnEt - dIESEL
EnGInES
Battery connections:
+
Positive terminal.
-
Negative terminal (earth).
to understand the significance of the
precautions mentioned on the labels,
refer to the "Quick help -
glossary of
labels" section.
under the bonnet