ECO mode Peugeot Expert 2003 Owner's Manual
[x] Cancel search | Manufacturer: PEUGEOT, Model Year: 2003, Model line: Expert, Model: Peugeot Expert 2003Pages: 128, PDF Size: 5.15 MB
Page 5 of 128
22-04-2003
DOORSI-3
8
Protection fuses under the dashboard F2- F4 - F15
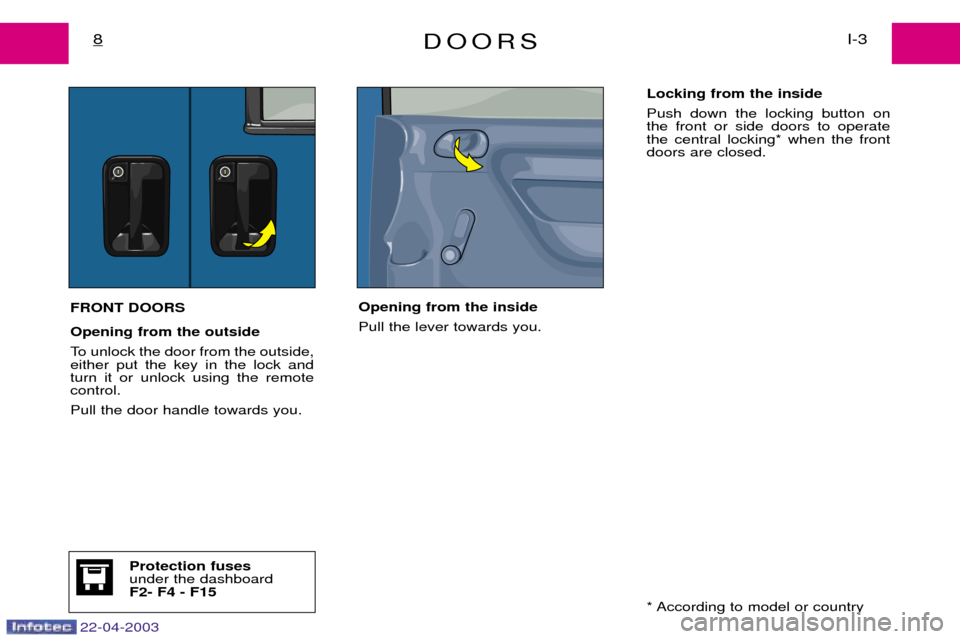
FRONT DOORS Opening from the outside
To unlock the door from the outside, either put the key in the lock andturn it or unlock using the remotecontrol. Pull the door handle towards you. Opening from the inside Pull the lever towards you. Locking from the inside Push down the locking button on the front or side doors to operatethe central locking* when the frontdoors are closed.
* According to model or country
Page 11 of 128
22-04-2003
FUEL QUALITY*I-5
14
A label on the inside of the fuel filler flap indicates the approved fuel quality type.
Petrol engines are designed to operate on 95-octane fuel; however, for improved driving (petrol engines only) we recom- mend 98-octane.
* According to model or country UNLEADED PETROL
DIESEL
Page 19 of 128
22-04-2003
COMBI 5/6-SEATER19I-10
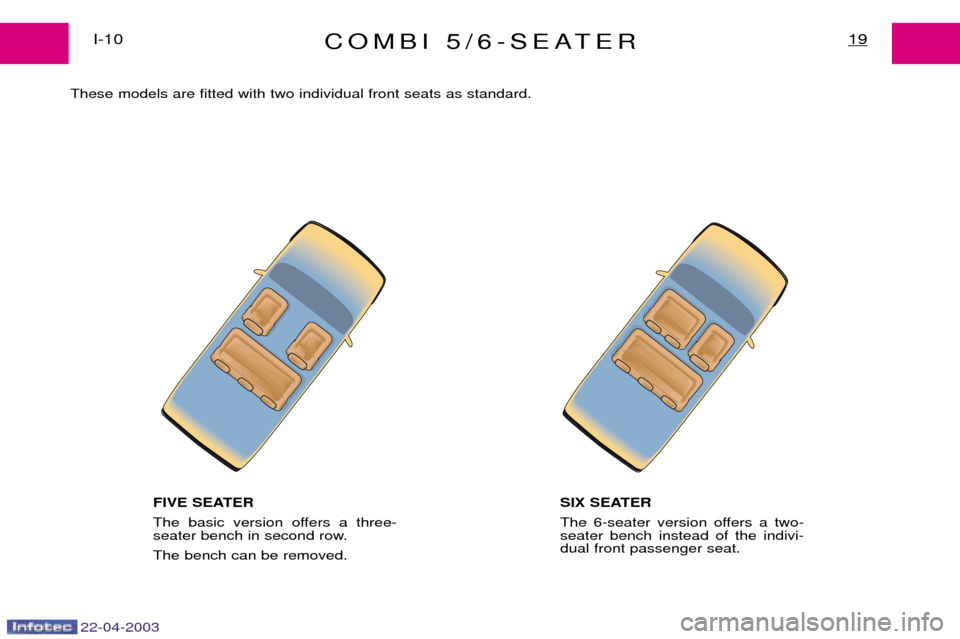
These models are fitted with two individual front seats as standard.
FIVE SEATER
The basic version offers a three-
seater bench in second row. The bench can be removed. SIX SEATER
The 6-seater version offers a two- seater bench instead of the indivi-dual front passenger seat.
Page 24 of 128
22-04-2003
A
INSTRUMENT PANEL*I-12
24
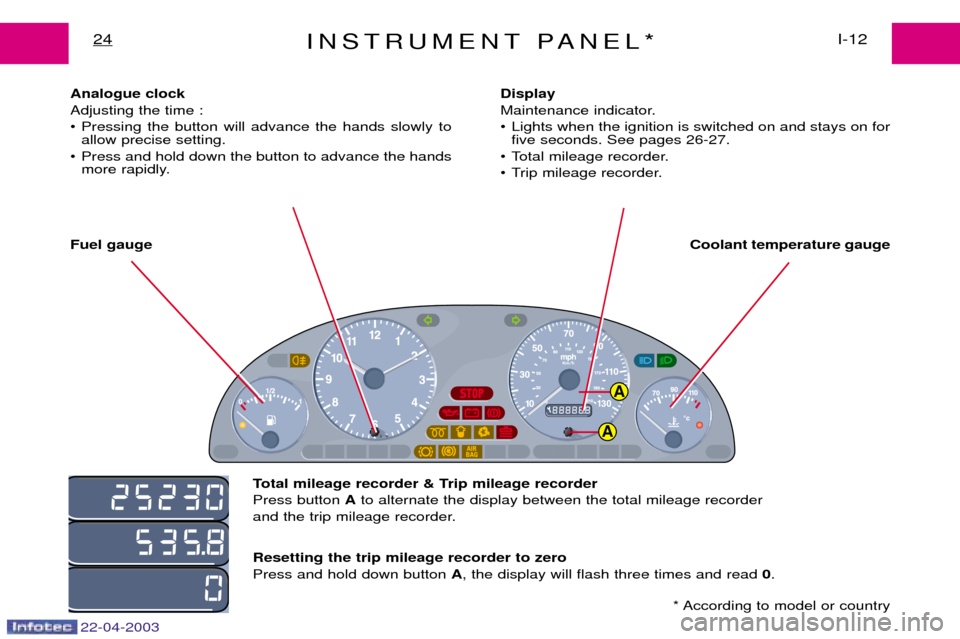
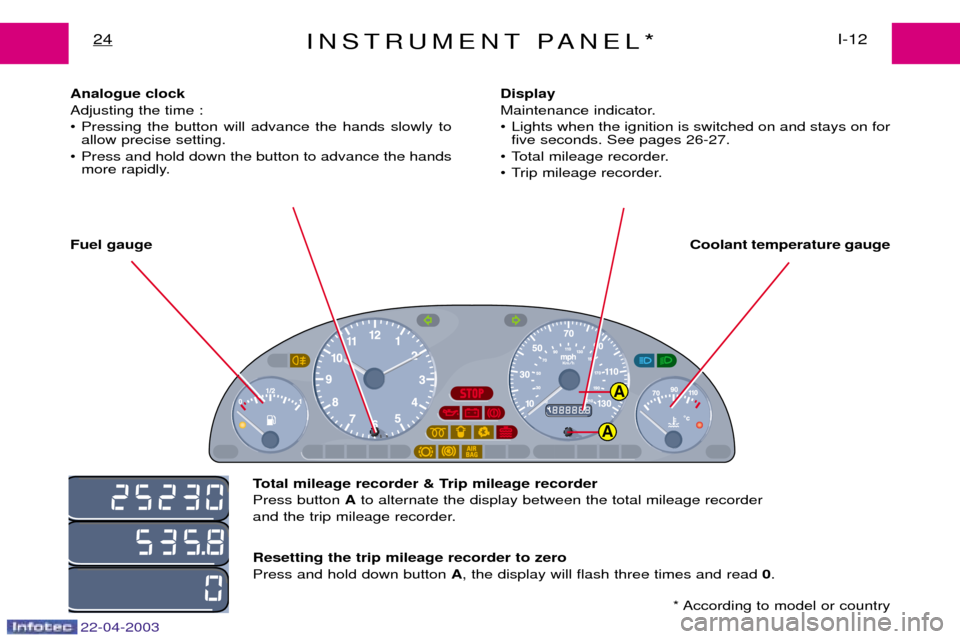
Analogue clock Adjusting the time :
¥ Pressing the button will advance the hands slowly to
allow precise setting.
¥ Press and hold down the button to advance the hands more rapidly.
Fuel gauge Coolant temperature gauge
Display
Maintenance indicator.
¥ Lights when the ignition is switched on and stays on for
five seconds. See pages 26-27.
¥ Total mileage recorder.
¥ Trip mileage recorder.
Total mileage recorder & Trip mileage recorder Press button Ato alternate the display between the total mileage recorder
and the trip mileage recorder. Resetting the trip mileage recorder to zero Press and hold down button A, the display will flash three times and read 0.
* According to model or country
A
Page 27 of 128
22-04-2003
A
INSTRUMENT PANEL*I-12
24
Analogue clock Adjusting the time :
¥ Pressing the button will advance the hands slowly to
allow precise setting.
¥ Press and hold down the button to advance the hands more rapidly.
Fuel gauge Coolant temperature gauge
Display
Maintenance indicator.
¥ Lights when the ignition is switched on and stays on for
five seconds. See pages 26-27.
¥ Total mileage recorder.
¥ Trip mileage recorder.
Total mileage recorder & Trip mileage recorder Press button Ato alternate the display between the total mileage recorder
and the trip mileage recorder. Resetting the trip mileage recorder to zero Press and hold down button A, the display will flash three times and read 0.
* According to model or country
A
Page 28 of 128
22-04-2003
MAINTENANCE INDICATOR*I-12
26
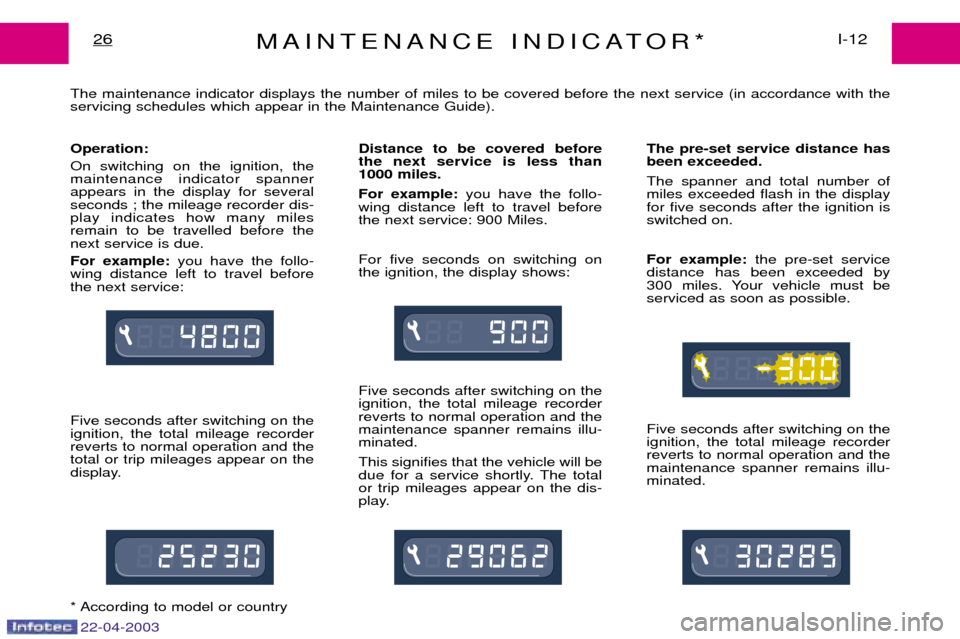
The maintenance indicator displays the number of miles to be covered before the next service (in accordance with the servicing schedules which appear in the Maintenance Guide). Operation: On switching on the ignition, the maintenance indicator spannerappears in the display for severalseconds ; the mileage recorder dis-play indicates how many milesremain to be travelled before thenext service is due. For example: you have the follo-
wing distance left to travel before the next service: Five seconds after switching on the ignition, the total mileage recorderreverts to normal operation and thetotal or trip mileages appear on the
display. Distance to be covered beforethe next service is less than
1000 miles. For example:
you have the follo-
wing distance left to travel before the next service: 900 Miles. For five seconds on switching on the ignition, the display shows: Five seconds after switching on the ignition, the total mileage recorderreverts to normal operation and themaintenance spanner remains illu-minated. This signifies that the vehicle will be
due for a service shortly. The totalor trip mileages appear on the dis-
play. The pre-set service distance hasbeen exceeded. The spanner and total number of miles exceeded flash in the displayfor five seconds after the ignition isswitched on. For example:
the pre-set service
distance has been exceeded by
300 miles. Your vehicle must beserviced as soon as possible. Five seconds after switching on the ignition, the total mileage recorderreverts to normal operation and themaintenance spanner remains illu-minated.
* According to model or country
Page 31 of 128
22-04-2003
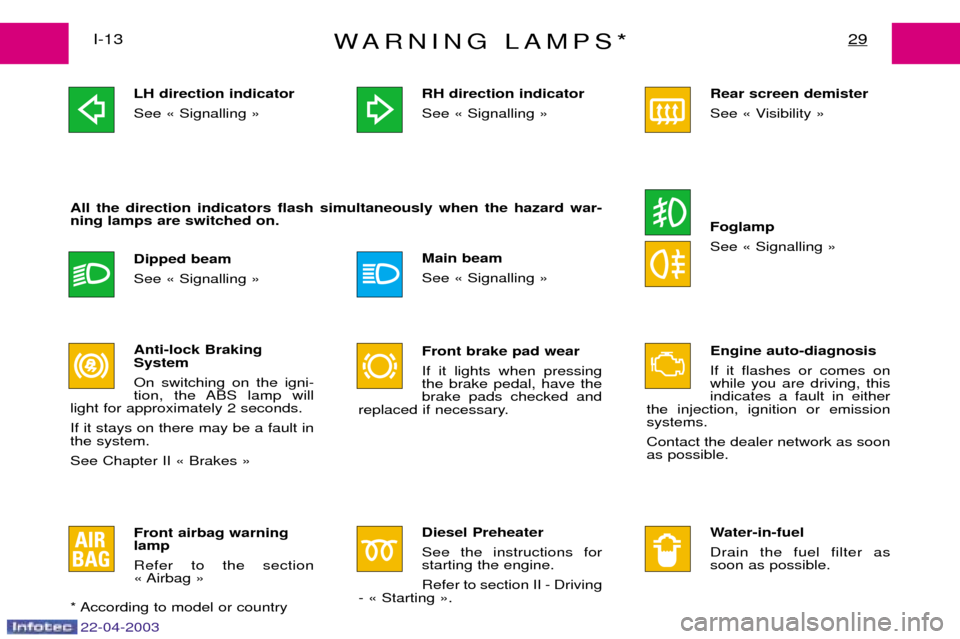
WARNING LAMPS*29I-13LH direction indicator See Ç Signalling È Dipped beam See Ç Signalling È
All the direction indicators flash simultaneously when the hazard war- ning lamps are switched on.
Anti-lock Braking System On switching on the igni-
tion, the ABS lamp will
light for approximately 2 seconds. If it stays on there may be a fault in the system. See Chapter II Ç Brakes È RH direction indicatorSee Ç Signalling È Main beam See Ç Signalling È Front brake pad wear If it lights when pressing the brake pedal, have thebrake pads checked and
replaced if necessary.
Diesel Preheater See the instructions for starting the engine. Refer to section II - Driving
- Ç Starting È. Rear screen demister
See Ç Visibility È Foglamp See Ç Signalling È Engine auto-diagnosis If it flashes or comes on while you are driving, thisindicates a fault in either
the injection, ignition or emissionsystems. Contact the dealer network as soon as possible.
Water-in-fuel Drain the fuel filter as soon as possible.
Front airbag warninglamp Refer to the section
Ç Airbag È
* According to model or country
Page 36 of 128
22-04-2003
VISIBILITYI-15
34
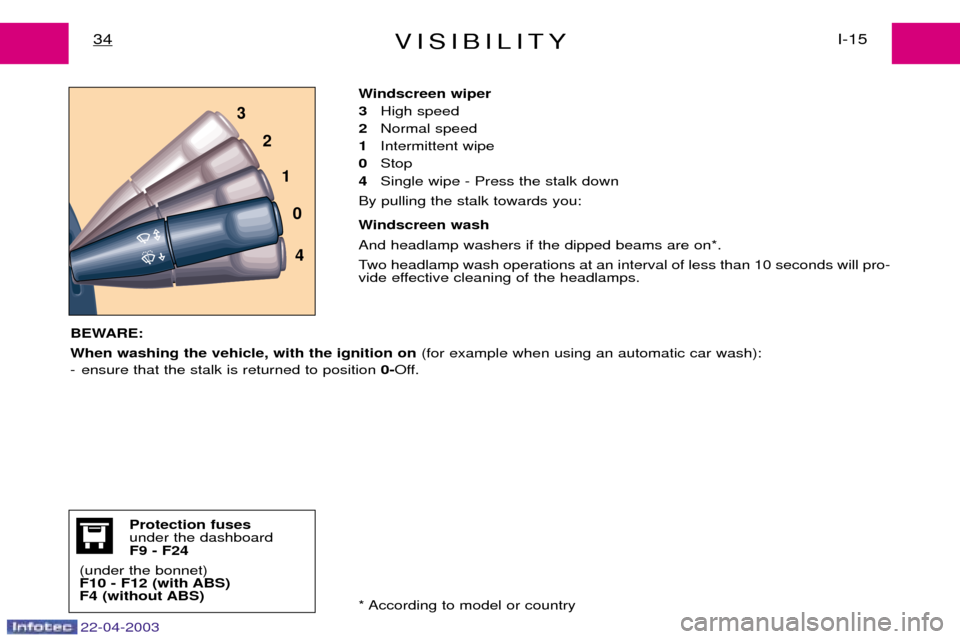
Windscreen wiper
3 High speed
2 Normal speed
1 Intermittent wipe
0 Stop
4 Single wipe - Press the stalk down
By pulling the stalk towards you:
Windscreen wash And headlamp washers if the dipped beams are on*.
Two headlamp wash operations at an interval of less than 10 seconds will pro-
vide effective cleaning of the headlamps.
BEWARE: When washing the vehicle, with the ignition on (for example when using an automatic car wash):
- ensure that the stalk is returned to position 0-Off.
* According to model or country
Protection fuses under the dashboardF9 - F24
(under the bonnet)
F10 - F12 (with ABS)
F4 (without ABS)
1
2
3
4
0
Page 40 of 128
22-04-2003
WINDOWS*I-17
38
AB
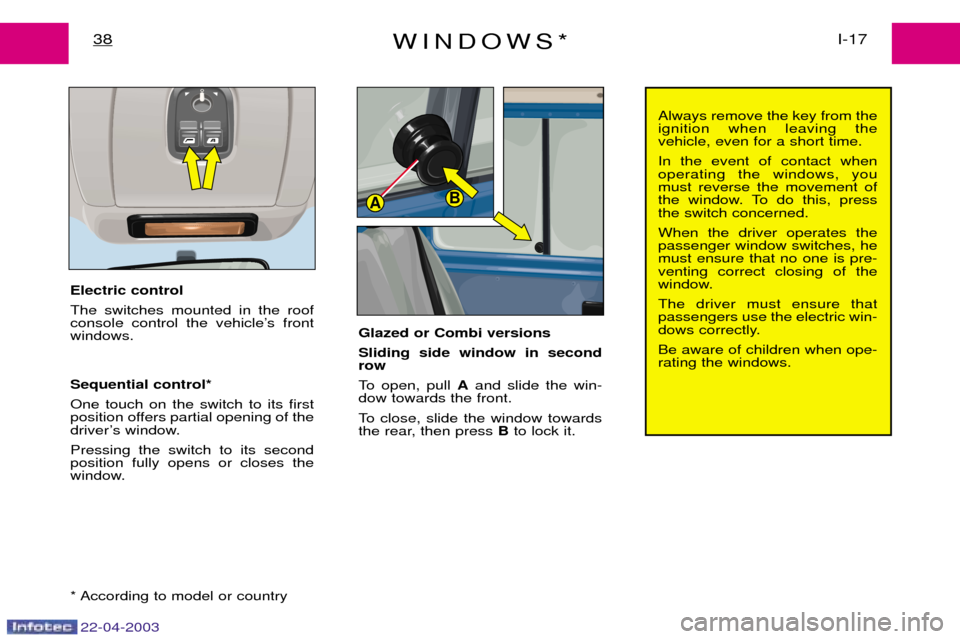
Electric control The switches mounted in the roof
console control the vehicleÕs frontwindows. Sequential control* One touch on the switch to its first
position offers partial opening of the
driverÕs window. Pressing the switch to its second position fully opens or closes the
window. Glazed or Combi versions Sliding side window in second row
To open, pull
Aand slide the win-
dow towards the front.
To close, slide the window towards
the rear, then press Bto lock it.
* According to model or country
Always remove the key from the ignition when leaving thevehicle, even for a short time. In the event of contact when operating the windows, youmust reverse the movement of
the window. To do this, pressthe switch concerned. When the driver operates the passenger window switches, hemust ensure that no one is pre-venting correct closing of the
window. The driver must ensure that passengers use the electric win-
dows correctly. Be aware of children when ope- rating the windows.
Page 42 of 128
CHECKS*57IV-1
Beware:When working under the bonnet, the cooling fan could operate if
the engine is hot (even when switched off). The engine oil level should be checked frequently between services (as recommended by the manufacturer), as well as before long journeys.
Air filter Follow the recommenda- tions in the maintenanceguide.
22-04-2003
Coolant The level should be bet- ween the maximum andminimum marks on the
reservoir. If the engine is hot, wait 15 minutes.Oil quality: see Ç Lubricants and
fluids È.
Never work on the cooling sys- tem if the engine is hot. (see
Ç Levels È).
Windscreen, rear screenand headlamp washerfluid It is recommended to use
manufacturer approved products.
12 volt batterySee Ç Emergency starting
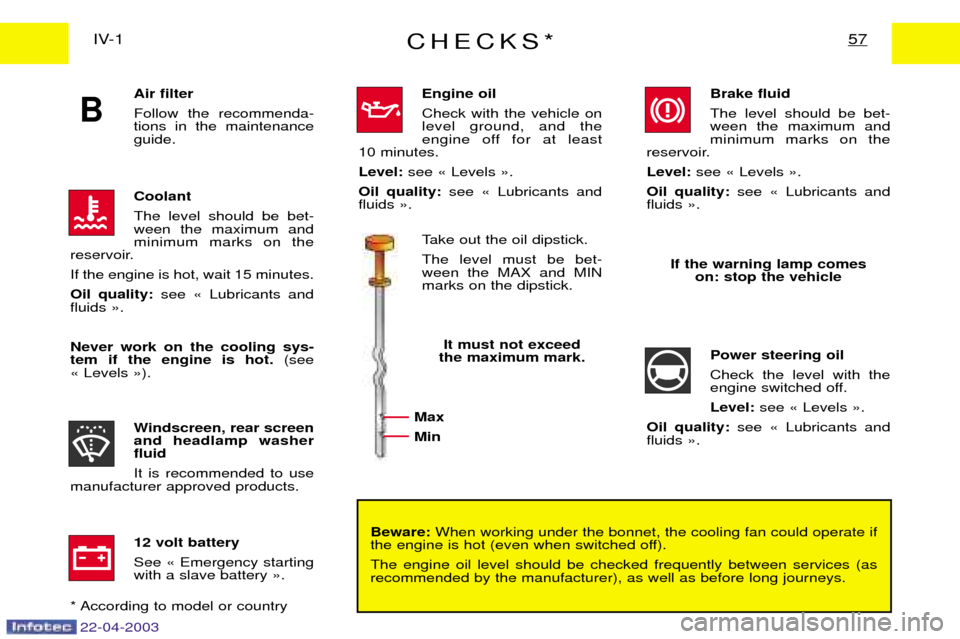
with a slave battery È. Engine oilCheck with the vehicle on level ground, and the
engine off for at least
10 minutes. Level: see Ç Levels È.
Oil quality: see Ç Lubricants and
fluids È.
Take out the oil dipstick.The level must be bet- ween the MAX and MINmarks on the dipstick.
It must not exceed
the maximum mark. Brake fluid The level should be bet- ween the maximum andminimum marks on the
reservoir. Level: see Ç Levels È.
Oil quality: see Ç Lubricants and
fluids È.
If the warning lamp comes on: stop the vehicle
Power steering oilCheck the level with the
engine switched off. Level: see Ç Levels È.
Oil quality: see Ç Lubricants and
fluids È.
B
Max Min
* According to model or country