PORSCHE BOXSTER 2009 2.G Owners Manual
Manufacturer: PORSCHE, Model Year: 2009, Model line: BOXSTER, Model: PORSCHE BOXSTER 2009 2.GPages: 294, PDF Size: 6.89 MB
Page 191 of 294
Mobile Roofs
189
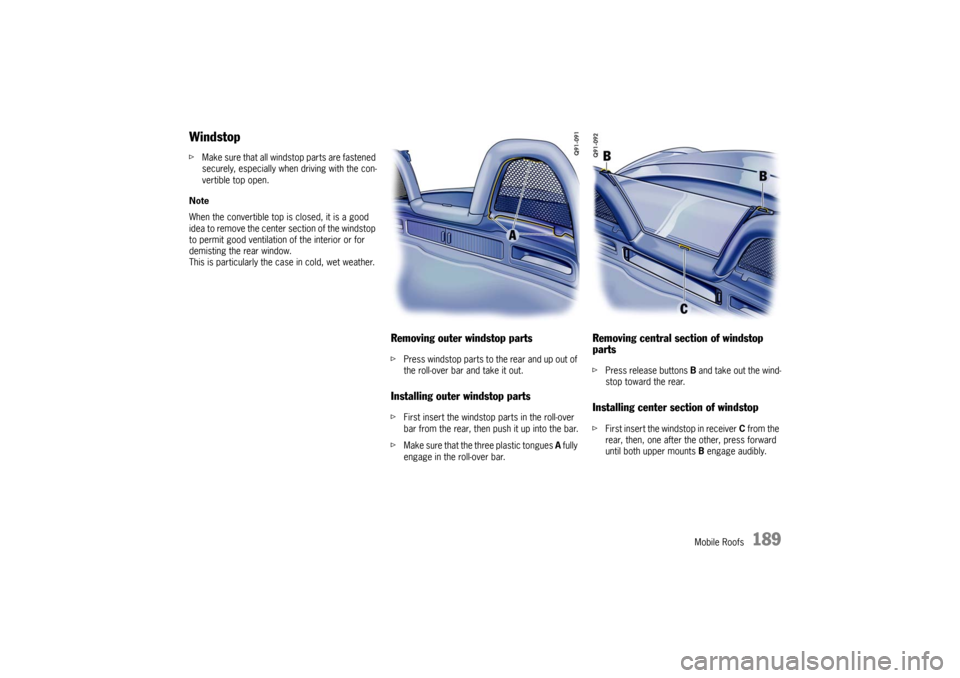
WindstopfMake sure that all windstop parts are fastened
securely, especially when driving with the con-
vertible top open.
Note
When the convertible top is closed, it is a good
idea to remove the center section of the windstop
to permit good ventilation of the interior or for
demisting the rear window.
This is particularly the ca se in cold, wet weather.
Removing outer windstop partsfPress windstop parts to the rear and up out of
the roll-over bar and take it out.Installing outer windstop partsfFirst insert the windstop parts in the roll-over
bar from the rear, then push it up into the bar.
f Make sure that the three plastic tongues A fully
engage in the roll-over bar.
Removing central section of windstop
parts f Press release buttons B and take out the wind-
stop toward the rear. Installing center section of windstopf First insert the windstop in receiver C from the
rear, then, one after the other, press forward
until both upper mounts B engage audibly.
Page 192 of 294
190
Mobile Roofs
HardtopSince the convertible top stays open for a long
time, it must be absolutely dry and clean before
being opened.
This prevents damp stains and abrasion damage.
Your autorized Porsche de aler will be pleased to
advise you about correct hardtop storage.
Note
The inserts for locking of the pivot locks are not
installed on vehicles delivered without a hardtop.
It is essential to have the necessary parts retrofit-
ted by an authorized Porsche dealer before a
hardtop is fitted for the first time.
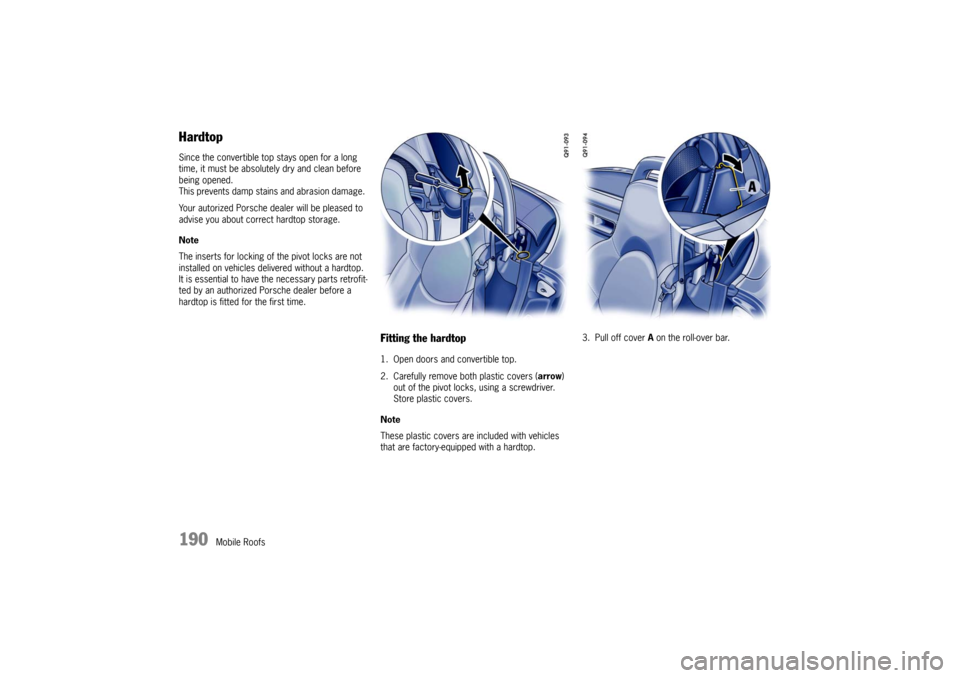
Fitting the hardtop1. Open doors and convertible top.
2. Carefully remove both plastic covers ( arrow)
out of the pivot locks, using a screwdriver.
Store plastic covers.
Note
These plastic covers are included with vehicles
that are factory-equipped with a hardtop. 3. Pull off cover
A on the roll-over bar.
Page 193 of 294
Mobile Roofs
191
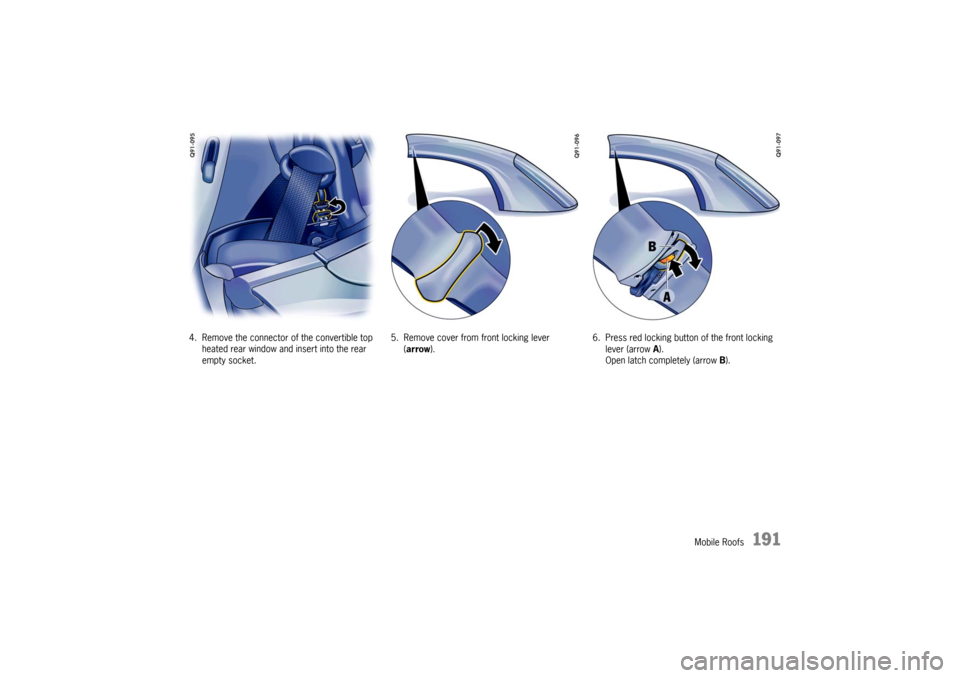
4. Remove the connector of the convertible top heated rear window and insert into the rear
empty socket. 5. Remove cover from front locking lever
(arrow ). 6. Press red locking button of the front locking
lever (arrow A ).
Open latch completely (arrow B).
Page 194 of 294
192
Mobile Roofs
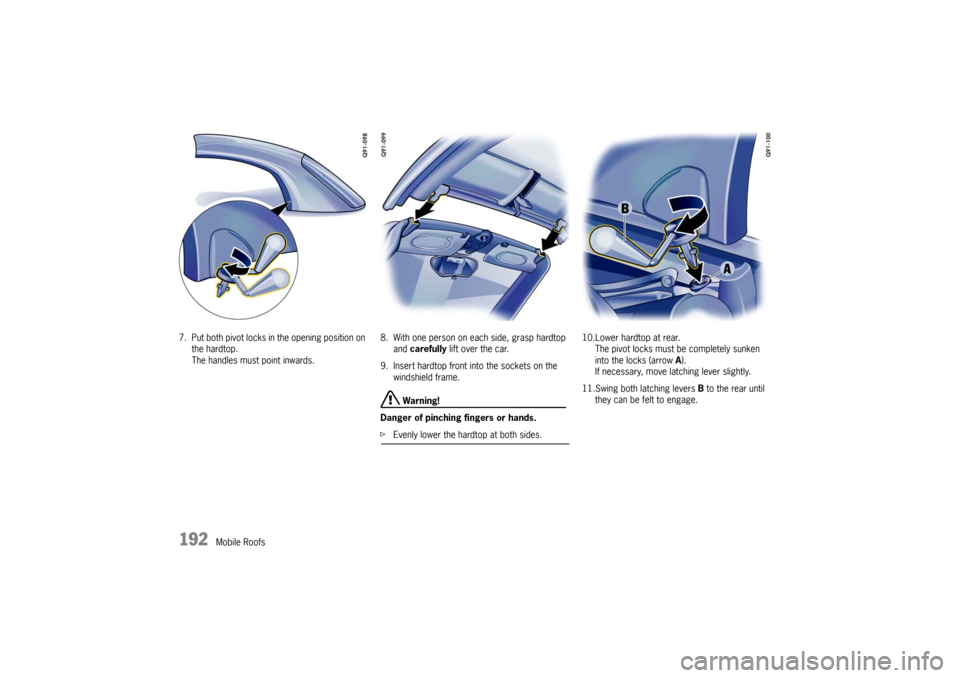
7. Put both pivot locks in the opening position on
the hardtop.
The handles must point inwards. 8. With one person on each side, grasp hardtop
and carefully lift over the car.
9. Insert hardtop front i nto the sockets on the
windshield frame.
Warning!
Danger of pinching fingers or hands.
f Evenly lower the hardtop at both sides. 10.Lower hardtop at rear.
The pivot locks must be completely sunken
into the locks (arrow A).
If necessary, move latching lever slightly.
11.Swing both latching levers B to the rear until
they can be felt to engage.
Page 195 of 294
Mobile Roofs
193
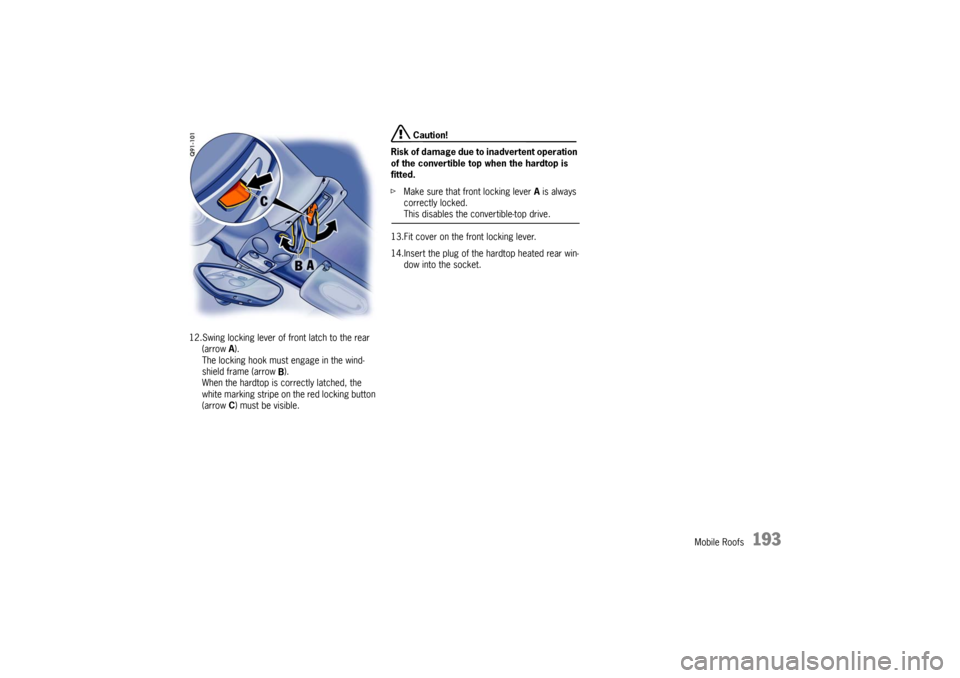
12.Swing locking lever of front latch to the rear (arrow A).
The locking hook must engage in the wind-
shield frame (arrow B).
When the hardtop is correctly latched, the
white marking stripe on the red locking button
(arrow C) must be visible.
Caution!
Risk of damage due to inadvertent operation
of the convertible top when the hardtop is
fitted.
f Make sure that front locking lever A is always
correctly locked.This disables the convertible-top drive.
13.Fit cover on the front locking lever.
14.Insert the plug of the hardtop heated rear win- dow into the socket.
Page 196 of 294
194
Mobile Roofs
Removing the hardtop1. Make sure that the hardtop is placed on a clean, soft surface.
2. Open doors.
3. Remove cover from the front locking lever.
4. Open front latch.
5. Open rear pivot locks (swivel inwards). Unplug plug of the hardtop heated rear win-
dow.
6. With one person on each side, grasp the hard- top.
Lift hardtop at rear and pull out of the sockets
on the windshield frame at front.
Warning!
Danger of pinching fingers or hands.
f Evenly lift the hardtop at both sides.
7. Carefully lift the hardto p up and off the vehicle
to the rear.
8. Close front hardtop latch. Fit cover on the front latch.
9. Close pivot locks on the vehicle with the plastic covers.
10.Remove the connector of the convertible top
heated rear window from the empty socket
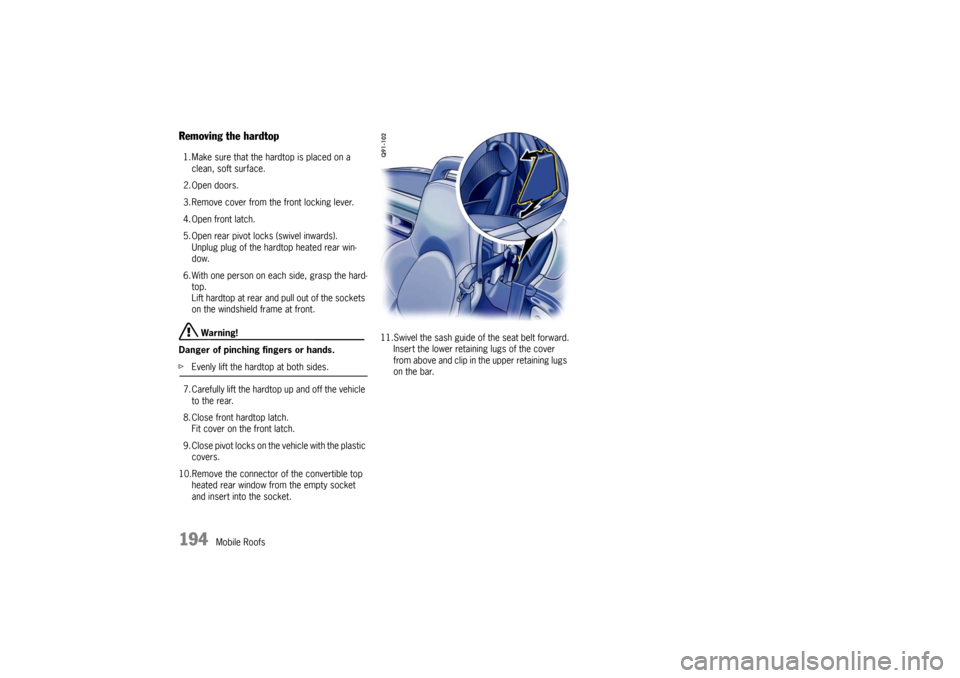
and insert into the socket. 11.Swivel the sash guide of
the seat belt forward.
Insert the lower retaining lugs of the cover
from above and clip in the upper retaining lugs
on the bar.
Page 197 of 294
Maintenance, Car Care
195
Maintenance, Car Care
Exercise Extreme Caution when Working
on your Vehicle ......
................................... 196
Coolant Level ......... ................................... 197
Engine Oil ............. ................................... 199
Engine Oil Level .... ................................... 199
Engine Oil Recommenda tion ....................... 200
Brake Fluid Level .... ................................... 202
Fuel Economy ............. .............................. 204
Operating your Porsche in other Countries .. 204
Fuel Recommendation s .............................. 206
Portable Fuel Containe rs ........................... 207
Fuel Evaporation Control ........................... 207
Emission Control Syst em ........................... 208
How Emission Control Works ..................... 209
Washer Fluid .......... ................................... 210
Power Steering ...... ................................... 211
Air Filter ................ ................................... 211
Combination Filter .. ................................... 211
Fluids/Oils for Manual Transmission
and Porsche Doppelkupplung (PDK) ............ 211
Wiper Blades ........ ................................... 212
Car Care Instructions ................................ 213
Page 198 of 294

196
Maintenance, Car Care
Exercise Extreme Caution when
Working on your Vehicle
Danger!
Ignoring the following instructions may
cause serious personal injury or death.
f The engine compartment of any motor vehicle
is a potentially hazardou s area. If you are not
fully familiar with proper repair procedures, do
not attempt the adjustments described on the
following pages.
This caution also applies to the entire vehicle.
f O n l y w o r k o n y o u r v e h i c l e o u t d o o r s o r i n a w e l l
ventilated area.
f Ensure that there are no open flames in the
area of your vehicle at any time when fuel
fumes might be present. Be especially cau-
tious of such devices such as hot water heat-
ers which ignite a flame intermittently.
f Before working on any part in the engine com-
partment, turn the engine off and let it cool
down sufficiently. Hot engine compartment
components can burn skin on contact.
f Be alert and cautious around engine at all
times while the engine is running.
If work has to be performed with the engine
running, always set the parking brake, and
make sure the shift lever is in neutral position
or the PDK selector lever in position P or N . f
In particular, be very careful to ensure that
items of clothing (ties, shirt, sleeves etc.),
jewelry, long hair, hand or fingers cannot get
caught in the engine-compartment blower, fan,
belts or other moving parts.
The radiator and radiator fans are in the front
of the car.
The engine-compartment blower is mounted in
the engine-compartment.
The fans can start or continue running as a
function of temperature, even with the engine
switched off.
Carry out work in these areas only with the en-
gine off, the ignition switched off, and exercise
extreme caution.
f Your Porsche is equipped with an electronic ig-
nition system. When the ignition is on, high
voltage is present in all wires connected with
the ignition system; therefore, exercise ex-
treme caution when working on any part of the
engine while the ignition is on or the engine is
running.
f Always support your car with safety stands if it
is necessary to work under the car.
f When working under the car without safety
stands but with the wheels on the ground,
make sure the car is on level ground, the
wheels are blocked, and that the engine
cannot be started.
Remove the ignition key. f
Do not smoke or allow an open flame around
the battery or fuel.
Keep a fire extinguisher in close reach.
f Incomplete or improper servicing may cause
problems in the operation of the car. If in doubt
about any servicing, have it done by your
authorized Porsche dealer.
Improper maintenance during the warranty
period may affect your Porsche warranty cov-
erage.
f Supplies of fluids, e.g. engine oil, brake fluid or
coolant, are hazardous to your health.
Keep these fluids out of children’s reach and
dispose of them in accordance with the appro-
priate regulations.
f Some countries require additional tools and
special spare parts to be carried in your vehi-
cle.
Please make enquiries before driving abroad.
Page 199 of 294
Maintenance, Car Care
197
Coolant LevelfPlease see the chapter “EXERCISE EXTREME
CAUTION WHEN WORKING ON YOUR VEHICLE”
on Page 196.
The cooling system is filled at the factory with a
permanent coolant.
It provides year-round protection from corrosion
and freezing down to –31 °F/–35 °C .
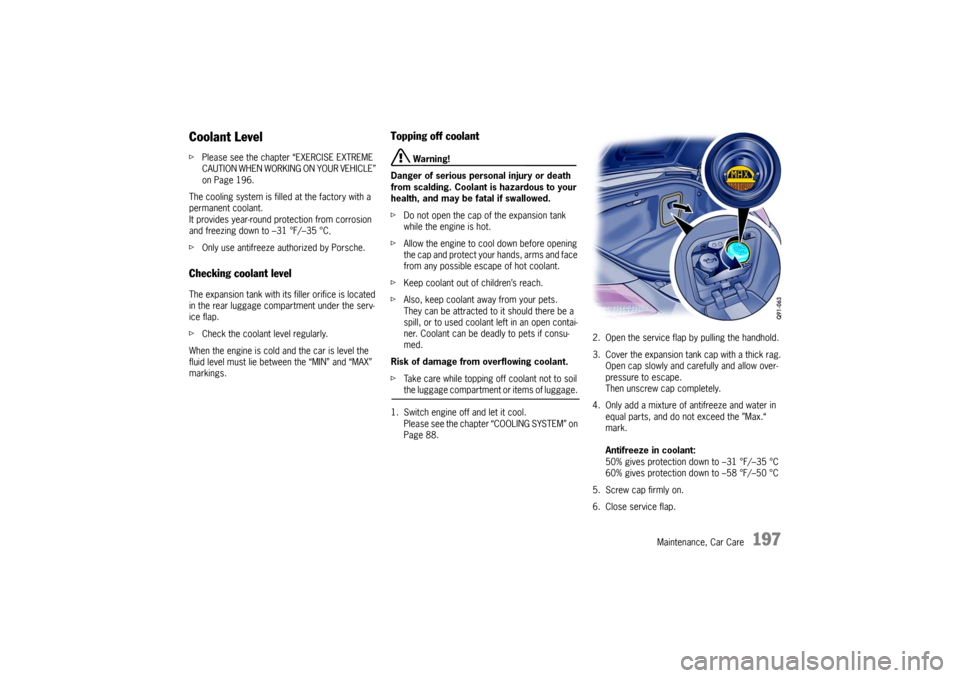
f Only use antifreeze authorized by Porsche. Checking coolant level The expansion tank with its filler orifice is located
in the rear luggage comp artment under the serv-
ice flap.
f Check the coolant level regularly.
When the engine is cold and the car is level the
fluid level must lie between the “MIN” and “MAX”
markings.
Topping off coolant
Warning!
Danger of serious personal injury or death
from scalding. Coolant is hazardous to your
health, and may be fatal if swallowed.
f Do not open the cap of the expansion tank
while the engine is hot.
f Allow the engine to cool down before opening
the cap and protect your hands, arms and face
from any possible escape of hot coolant.
f Keep coolant out of children’s reach.
f Also, keep coolant away from your pets.
They can be attracted to it should there be a
spill, or to used coolant left in an open contai-
ner. Coolant can be deadly to pets if consu-
med.
Risk of damage from overflowing coolant.
f Take care while topping off coolant not to soil the luggage compartment or items of luggage.
1. Switch engine off and let it cool. Please see the chapter “COOLING SYSTEM” on
Page 88. 2. Open the service flap by pulling the handhold.
3. Cover the expansion tank cap with a thick rag.
Open cap slowly and ca refully and allow over-
pressure to escape.
Then unscrew cap completely.
4. Only add a mixture of antifreeze and water in
equal parts, and do not exceed the ”Max.“
mark.
Antifreeze in coolant:
50% gives protection down to –31 °F/–35 °C
60% gives protection down to –58 °F/–50 °C
5. Screw cap firmly on.
6. Close service flap.
Page 200 of 294

198
Maintenance, Car Care
If in an emergency pure water has been added, the
mix ratio must be corrected at an authorized
Porsche dealer.
Marked loss of coolant in
dicates leakage in the
cooling system.
The cause should immediately be remedied at an
authorized Porsche dealer.
Engine-compartment blower,
radiator fan The radiator and radiator fans are in the front of
the car.
The engine-compartment bl ower is mounted in the
engine compartment.
Warning!
Risk of injury.
After the engine is switched off, the engine-
compartment temperature is monitored for
approx. 30 minutes.
During this period, and depending on tem-
perature, the engine-compartment blower
may continue to run or start to run.
f Carry out work in these areas only with the en-
gine off, the ignition off, and exercise extreme
caution.
Risk of injury. The radiator fans in the front
end of the car may be operating or
unexpectedly start operating when the
engine is switched on.
f Carry out work in these areas only with the en-gine switched off.