PORSCHE CAYNNE 2004 1.G Owners Manual
Manufacturer: PORSCHE, Model Year: 2004, Model line: CAYENNE, Model: PORSCHE CAYENNE 2004 1.GPages: 379, PDF Size: 13.91 MB
Page 201 of 379
Driving and Driving Safety
201
Crossing obstacles
Caution!
Risk of damage to the underbody and chas-
sis components if obstacles are traversed
improperly.
fAlways bear in mind the ground clearance of
your vehicle.
fSlowly drive over the middle of tree trunks,
boulders or other obstacles with one of the
front wheels.
fCross the obstacle with the rear wheel in the same way.
Note on operation
fActivate Low Range and engage differential
locks if necessary.Tips on driving
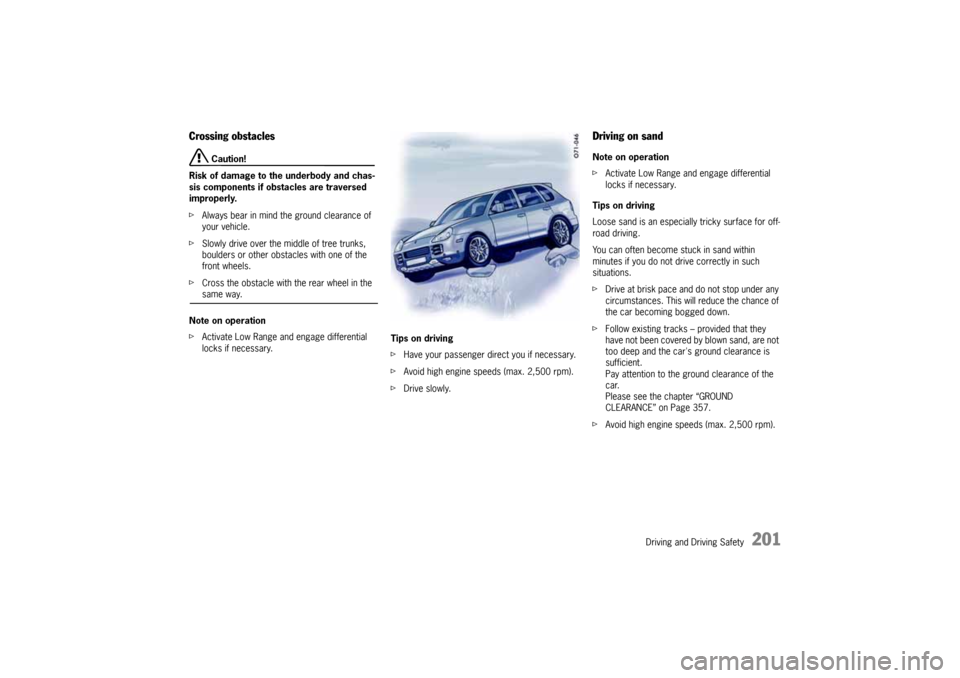
fHave your passenger direct you if necessary.
fAvoid high engine speeds (max. 2,500 rpm).
fDrive slowly.
Driving on sandNote on operation
fActivate Low Range and engage differential
locks if necessary.
Tips on driving
Loose sand is an especially tricky surface for off-
road driving.
You can often become stuck in sand within
minutes if you do not drive correctly in such
situations.
fDrive at brisk pace and do not stop under any
circumstances. This will reduce the chance of
the car becoming bogged down.
fFollow existing tracks – provided that they
have not been covered by blown sand, are not
too deep and the car's ground clearance is
sufficient.
Pay attention to the ground clearance of the
car.
Please see the chapter “GROUND
CLEARANCE” on Page 357.
fAvoid high engine speeds (max. 2,500 rpm).
10_Cayenne_21_KW17.book Seite 201 Donnerstag, 9. April 2009 3:33 15
Page 202 of 379

202
Driving and Driving Safety When driving on slopes with soft sand on vehicles
with Tiptronic S:
fUse the manual select mode M in addition to
the Low Range program.
If your vehicle becomes stuck nevertheless:
fDo not spin the wheels. Instead, use branches,
mats or similar items to provide adequate
traction so that you can drive out of the critical
area.
Track rutsOther vehicles leave ruts in many off-road courses
or gravel roads.
fPay attention to the ground clearance of the
car.
Please see the chapter “GROUND
CLEARANCE” on Page 357.
Caution!
Risk of damage to the vehicle floor when
driving through ruts that are too deep.
fAlways bear in mind the car's ground clearan-
ce.
fDo not drive over ruts that are too deep.
Note on operation
fActivate the Low Range program and engage
differential locks if necessary.
Tips on driving
fIn cases of doubt, drive with one wheel on the
strip of grass between the ruts.
fAvoid high engine speeds (max. 2,500 rpm).
fDrive slowly.
10_Cayenne_21_KW17.book Seite 202 Donnerstag, 9. April 2009 3:33 15
Page 203 of 379
Luggage Compartment, Loadspace and Storage
203 Luggage Compartment, Loadspace and Storage
Folding rear seats forward and returning
to upright position ...................................... 204
Loadspace ................................................ 207
Cargo management system ........................ 208
Luggage Compartment Cover ..................... 211
Luggage safety net .................................... 212
Ski Bag ..................................................... 214
Roof Transport System............................... 216
Off-road roof-mounted Headlights
Cayenne S Transsyberia............................. 217
Car Audio Operation/Tips............................ 218
Porsche Communication Management
(PCM) ........................................................ 220
iPod, USB and AUX..................................... 221
Storage ..................................................... 222
Cupholder.................................................. 226
Ashtray...................................................... 227
Cigarette Lighter ........................................ 228
10_Cayenne_21_KW17.book Seite 203 Donnerstag, 9. April 2009 3:33 15
Page 204 of 379
204
Luggage Compartment, Loadspace and Storage
Folding rear seats forward and
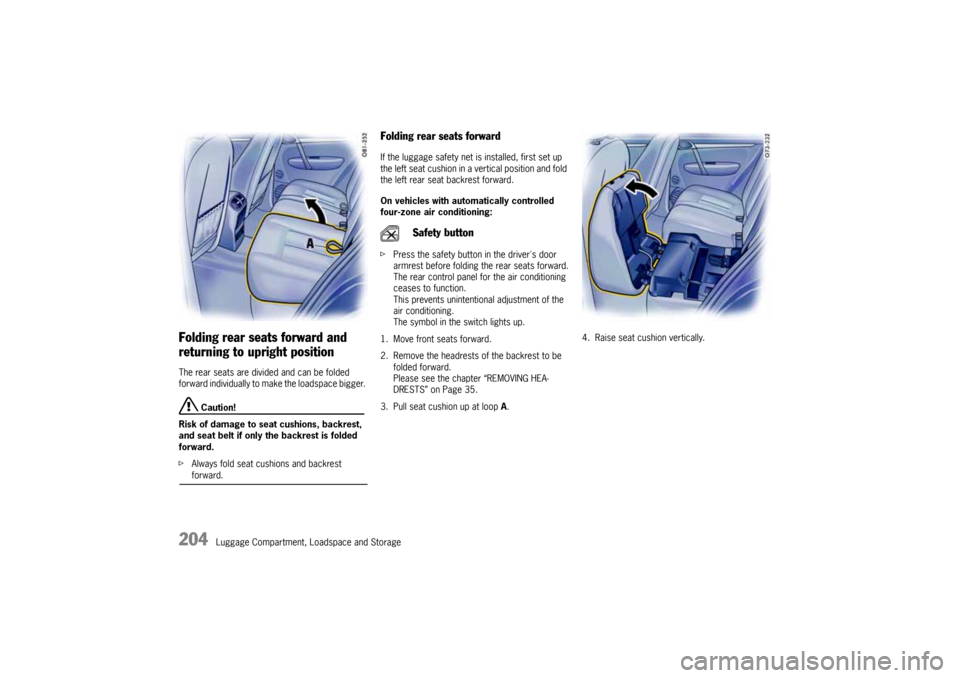
returning to upright positionThe rear seats are divided and can be folded
forward individually to make the loadspace bigger.
Caution!
Risk of damage to seat cushions, backrest,
and seat belt if only the backrest is folded
forward.
fAlways fold seat cushions and backrest forward.
Folding rear seats forwardIf the luggage safety net is installed, first set up
the left seat cushion in a vertical position and fold
the left rear seat backrest forward.
On vehicles with automatically controlled
four-zone air conditioning:
fPress the safety button in the driver's door
armrest before folding the rear seats forward.
The rear control panel for the air conditioning
ceases to function.
This prevents unintentional adjustment of the
air conditioning.
The symbol in the switch lights up.
1. Move front seats forward.
2. Remove the headrests of the backrest to be
folded forward.
Please see the chapter “REMOVING HEA-
DRESTS” on Page 35.
3. Pull seat cushion up at loop A.4. Raise seat cushion vertically.
Safety button
10_Cayenne_21_KW17.book Seite 204 Donnerstag, 9. April 2009 3:33 15
Page 205 of 379
Luggage Compartment, Loadspace and Storage
205
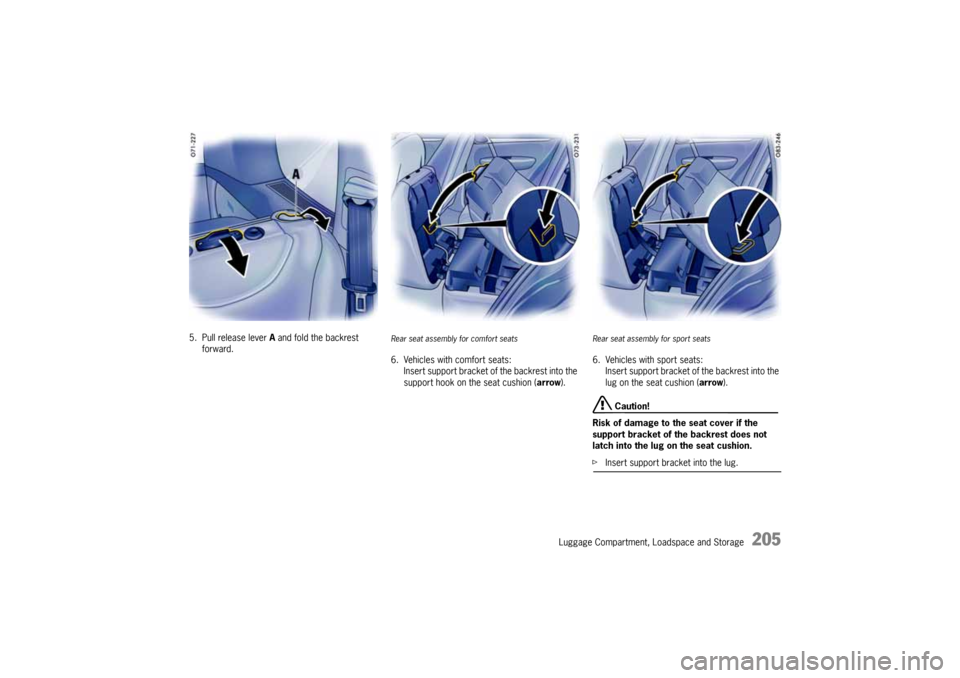
5. Pull release lever A and fold the backrest
forward.
Rear seat assembly for comfort seats6. Vehicles with comfort seats:
Insert support bracket of the backrest into the
support hook on the seat cushion (arrow).
Rear seat assembly for sport seats6. Vehicles with sport seats:
Insert support bracket of the backrest into the
lug on the seat cushion (arrow).
Caution!
Risk of damage to the seat cover if the
support bracket of the backrest does not
latch into the lug on the seat cushion.
fInsert support bracket into the lug.
10_Cayenne_21_KW17.book Seite 205 Donnerstag, 9. April 2009 3:33 15
Page 206 of 379
206
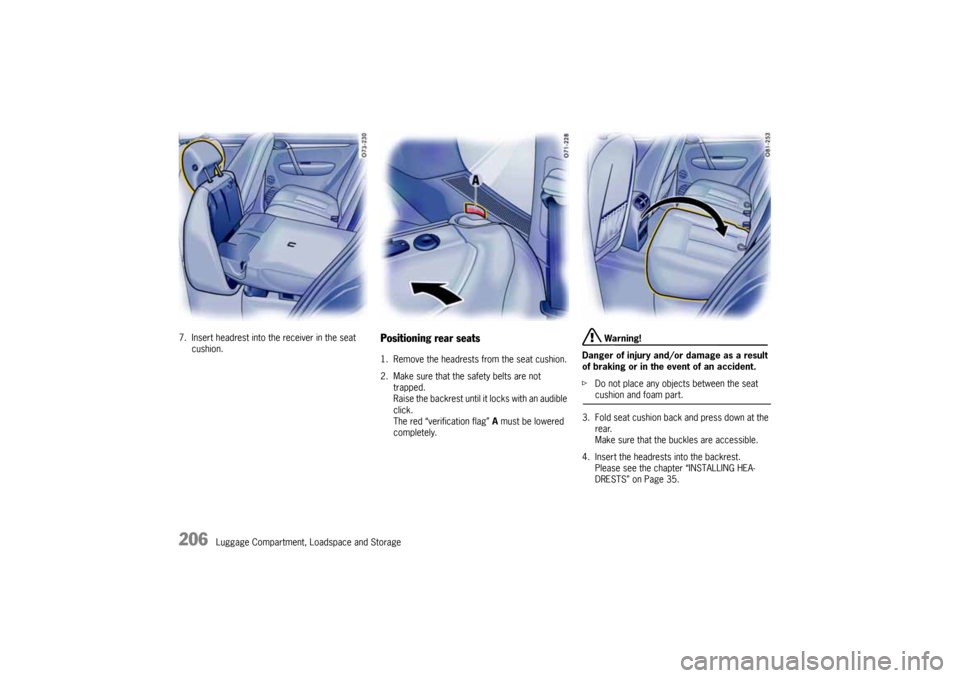
Luggage Compartment, Loadspace and Storage 7. Insert headrest into the receiver in the seat
cushion.
Positioning rear seats1. Remove the headrests from the seat cushion.
2. Make sure that the safety belts are not
trapped.
Raise the backrest until it locks with an audible
click.
The red “verification flag” A must be lowered
completely.
Warning!
Danger of injury and/or damage as a result
of braking or in the event of an accident.
fDo not place any objects between the seat cushion and foam part.
3. Fold seat cushion back and press down at the
rear.
Make sure that the buckles are accessible.
4. Insert the headrests into the backrest.
Please see the chapter “INSTALLING HEA-
DRESTS” on Page 35.
10_Cayenne_21_KW17.book Seite 206 Donnerstag, 9. April 2009 3:33 15
Page 207 of 379
Luggage Compartment, Loadspace and Storage
207
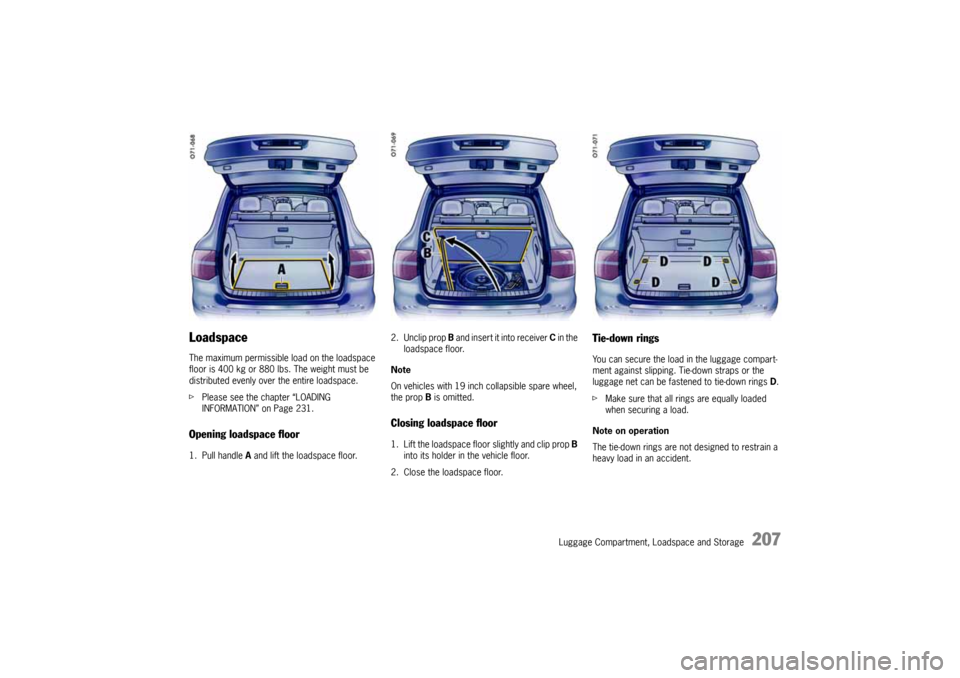
LoadspaceThe maximum permissible load on the loadspace
floor is 400 kg or 880 lbs. The weight must be
distributed evenly over the entire loadspace.
fPlease see the chapter “LOADING
INFORMATION” on Page 231.Opening loadspace floor1. Pull handle A and lift the loadspace floor.2. Unclip prop B and insert it into receiver C in the
loadspace floor.
Note
On vehicles with 19 inch collapsible spare wheel,
the prop B is omitted.
Closing loadspace floor1. Lift the loadspace floor slightly and clip prop B
into its holder in the vehicle floor.
2. Close the loadspace floor.
Tie-down ringsYou can secure the load in the luggage compart-
ment against slipping. Tie-down straps or the
luggage net can be fastened to tie-down rings D.
fMake sure that all rings are equally loaded
when securing a load.
Note on operation
The tie-down rings are not designed to restrain a
heavy load in an accident.
10_Cayenne_21_KW17.book Seite 207 Donnerstag, 9. April 2009 3:33 15
Page 208 of 379
208
Luggage Compartment, Loadspace and Storage
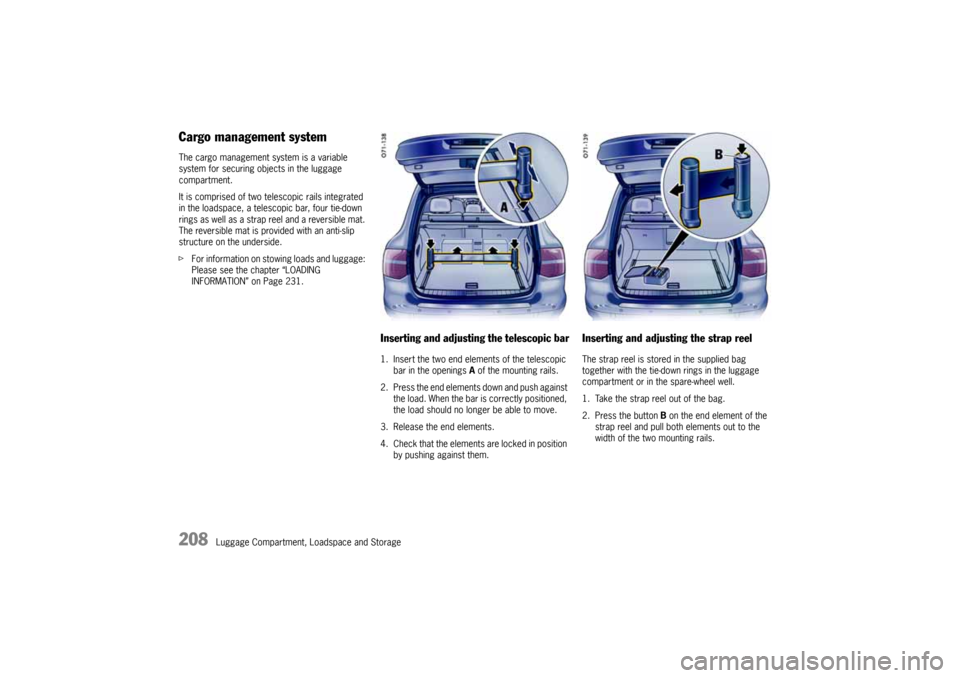
Cargo management systemThe cargo management system is a variable
system for securing objects in the luggage
compartment.
It is comprised of two telescopic rails integrated
in the loadspace, a telescopic bar, four tie-down
rings as well as a strap reel and a reversible mat.
The reversible mat is provided with an anti-slip
structure on the underside.
fFor information on stowing loads and luggage:
Please see the chapter “LOADING
INFORMATION” on Page 231.
Inserting and adjusting the telescopic bar1. Insert the two end elements of the telescopic
bar in the openings A of the mounting rails.
2. Press the end elements down and push against
the load. When the bar is correctly positioned,
the load should no longer be able to move.
3. Release the end elements.
4. Check that the elements are locked in position
by pushing against them.
Inserting and adjusting the strap reelThe strap reel is stored in the supplied bag
together with the tie-down rings in the luggage
compartment or in the spare-wheel well.
1. Take the strap reel out of the bag.
2. Press the button B on the end element of the
strap reel and pull both elements out to the
width of the two mounting rails.
10_Cayenne_21_KW17.book Seite 208 Donnerstag, 9. April 2009 3:33 15
Page 209 of 379
Luggage Compartment, Loadspace and Storage
209
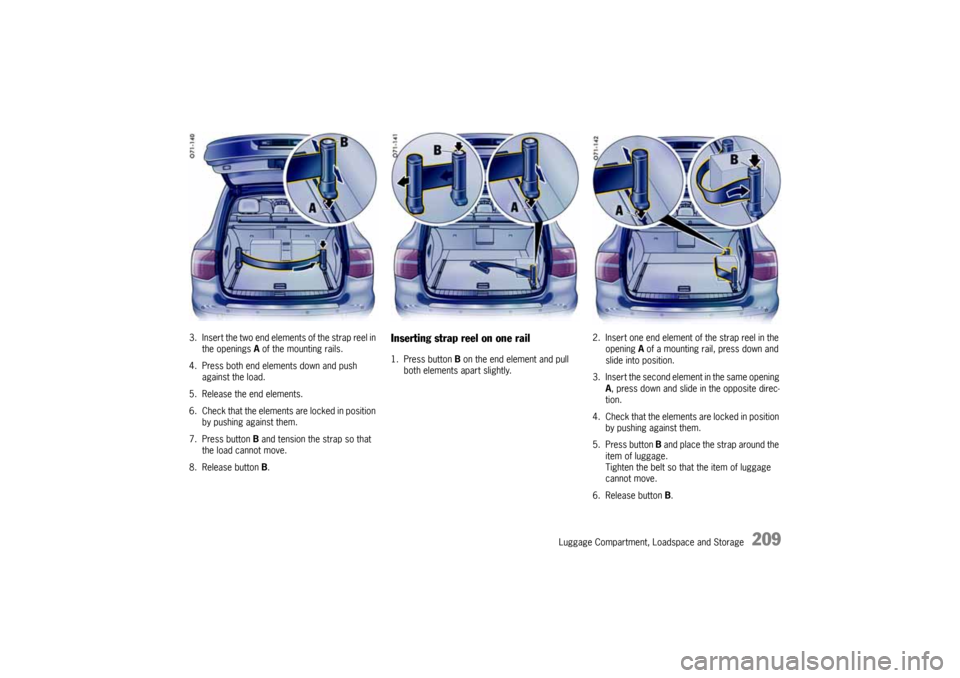
3. Insert the two end elements of the strap reel in
the openings A of the mounting rails.
4. Press both end elements down and push
against the load.
5. Release the end elements.
6. Check that the elements are locked in position
by pushing against them.
7. Press button B and tension the strap so that
the load cannot move.
8. Release button B.
Inserting strap reel on one rail1. Press button B on the end element and pull
both elements apart slightly.2. Insert one end element of the strap reel in the
opening A of a mounting rail, press down and
slide into position.
3. Insert the second element in the same opening
A, press down and slide in the opposite direc-
tion.
4. Check that the elements are locked in position
by pushing against them.
5. Press button B and place the strap around the
item of luggage.
Tighten the belt so that the item of luggage
cannot move.
6. Release button B.
10_Cayenne_21_KW17.book Seite 209 Donnerstag, 9. April 2009 3:33 15
Page 210 of 379
210
Luggage Compartment, Loadspace and Storage
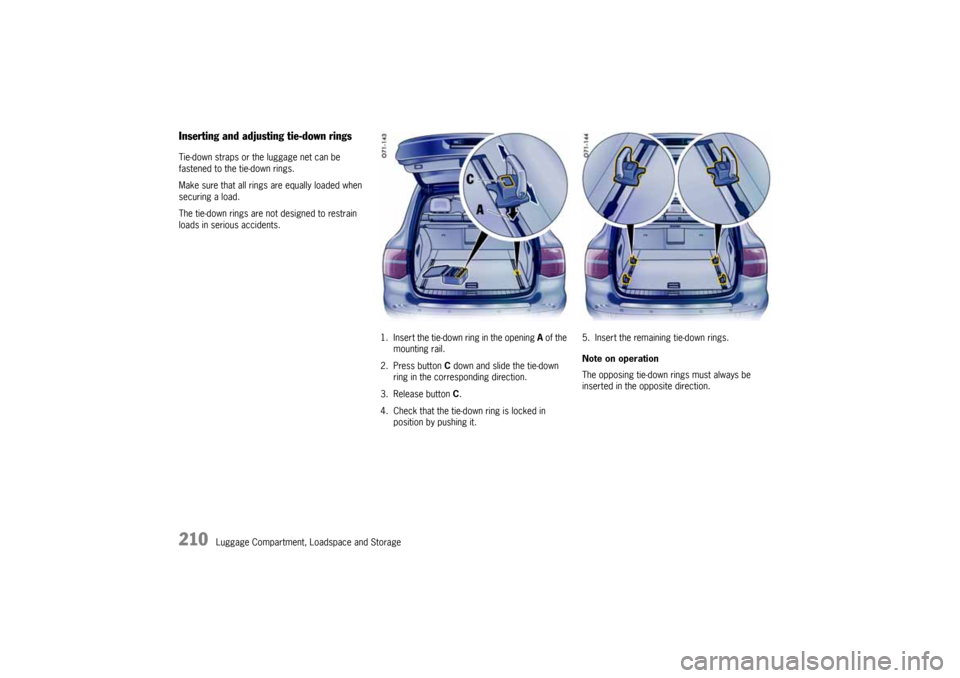
Inserting and adjusting tie-down ringsTie-down straps or the luggage net can be
fastened to the tie-down rings.
Make sure that all rings are equally loaded when
securing a load.
The tie-down rings are not designed to restrain
loads in serious accidents.
1. Insert the tie-down ring in the opening A of the
mounting rail.
2. Press button C down and slide the tie-down
ring in the corresponding direction.
3. Release button C.
4. Check that the tie-down ring is locked in
position by pushing it.5. Insert the remaining tie-down rings.
Note on operation
The opposing tie-down rings must always be
inserted in the opposite direction.10_Cayenne_21_KW17.book Seite 210 Donnerstag, 9. April 2009 3:33 15