PORSCHE CAYNNE 2004 1.G Owners Manual
Manufacturer: PORSCHE, Model Year: 2004, Model line: CAYENNE, Model: PORSCHE CAYENNE 2004 1.GPages: 379, PDF Size: 13.91 MB
Page 161 of 379

Driving and Driving Safety
161
StoppingfWithdraw the ignition key only when the vehicle
is stationary, otherwise the steering lock
engages and the vehicle cannot be steered.
fOnly switch the ignition off when the vehicle
comes to a stop, as there is no steering assis-
tance and brake boost when the engine is
switched off.
fWhen leaving the vehicle, always remove the
ignition key and engage the parking brake.
Engage the parking lock on vehicles with
Tiptronic S (Tiptronic selector lever position
P). Engage first gear or reverse gear on vehic-
les with manual transmission.
The control unit always remains in the ignition
lock in vehicles that have Porsche Entry &
Drive.
Note on operation
The vehicle battery discharges if the ignition key is
left inserted.
Warning!
Danger of injury. Hot engine compartment
components can burn skin on contact.
fBefore working on any part in the engine
compartment, turn the engine off and let it cool
down sufficiently.
Risk of burn injury when standing near or co-
ming into contact with the exhaust pipe.
The exhaust pipe is hot when the vehicle is running
and remains hot for some time after the vehicle is
turned off.
fTo prevent injury, make a point of noting where
your vehicle’s exhaust pipe is, avoid placing
your legs near the exhaust pipe when loading
and unloading cargo in the rear, and closely
supervise children around the vehicle during
time when the exhaust pipe could be hot. A hot exhaust pipe can cause serious burns.Radiator fans
The radiator and radiator fans are in the front of
the car.
Warning!
Danger of injury. After the ignition is
switched off, the engine compartment and
coolant temperatures are monitored for
approx. 30 minutes. During this period, and
depending on temperature, the radiator fan
may continue to run or start to run.
fCarry out work in these areas only with the engine off and exercise extreme caution.
10_Cayenne_21_KW17.book Seite 161 Donnerstag, 9. April 2009 3:33 15
Page 162 of 379

162
Driving and Driving Safety
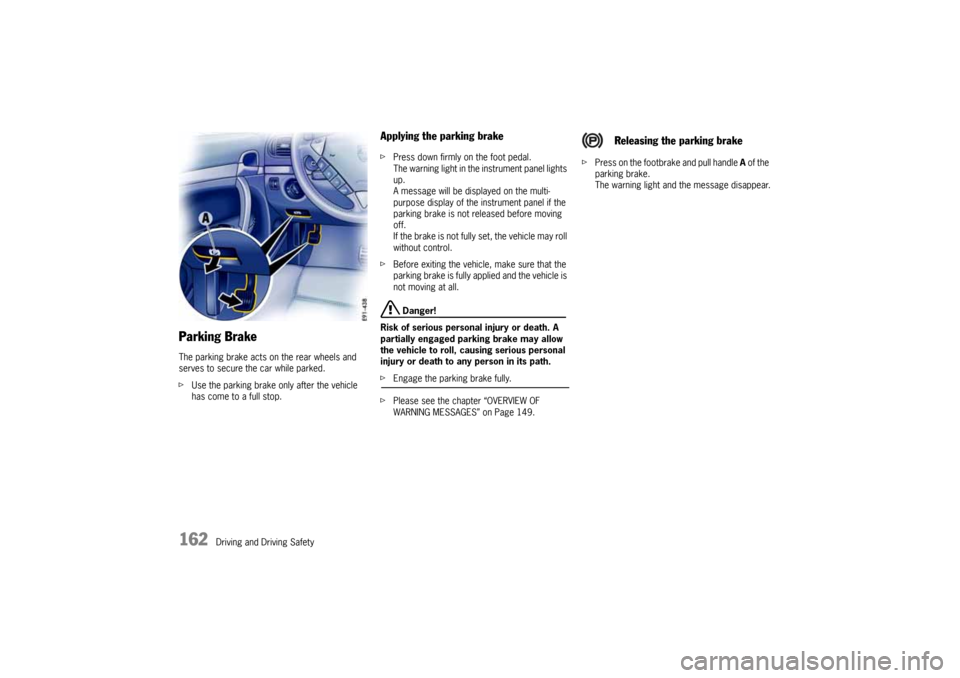
Parking BrakeThe parking brake acts on the rear wheels and
serves to secure the car while parked.
fUse the parking brake only after the vehicle
has come to a full stop.
Applying the parking brakefPress down firmly on the foot pedal.
The warning light in the instrument panel lights
up.
A message will be displayed on the multi-
purpose display of the instrument panel if the
parking brake is not released before moving
off.
If the brake is not fully set, the vehicle may roll
without control.
fBefore exiting the vehicle, make sure that the
parking brake is fully applied and the vehicle is
not moving at all.
Danger!
Risk of serious personal injury or death. A
partially engaged parking brake may allow
the vehicle to roll, causing serious personal
injury or death to any person in its path.
fEngage the parking brake fully.
fPlease see the chapter “OVERVIEW OF
WARNING MESSAGES” on Page 149.fPress on the footbrake and pull handle A of the
parking brake.
The warning light and the message disappear.
Releasing the parking brake
10_Cayenne_21_KW17.book Seite 162 Donnerstag, 9. April 2009 3:33 15
Page 163 of 379

Driving and Driving Safety
163
The warning lights will go out after the parking
brake is fully released.
The warning lights are not an indicator that the
parking brake is fully applied; it is only intended to
be a warning to release the parking brake before
driving the car.
Caution!
A partially engaged brake will overheat the
rear brakes, reduce their effectiveness and
cause excessive wear.
fRelease the parking brake fully.
fWhen parking your car, press down firmly on
the foot pedal.
fMove the Tiptronic selector lever to “P”
(Tiptronic) or move the gearshift lever to
reverse or first gear (Manual transmission).
fOn hills also turn the front wheels towards the
curb.
BrakesfMake it a habit to check the operation of your
brakes before driving.
Keep in mind that the braking distance increases
very rapidly as the speed increases. At 60 mph
(100 km/h), for example, it is not twice but four
times longer than 30 mph (50 km/h). Tire traction
is also less effective when the roads are wet or
slippery.
fTherefore, always maintain a safe distance
from the car in front of you.Vehicles without Porsche Ceramic
Composite Brake (PCCB)Even though the brake discs consist of alloyed
grey cast iron, they will unavoidably start to cor-
rode if your car is parked for an extended period.
The brakes will tend to “rub” as a result.
The nature, extent and effects of corrosion
depend on the amount of time the vehicle was
parked, whether road salt or grit was spread and
whether grease-dissolving agents were used in
car washes.
If the braking comfort is noticeably impaired, we
recommend having the brake system checked by
experts at an authorized Porsche dealer.
Brake system functionYour Porsche is equipped with a power assisted
hydraulic dual circuit brake system with disc
brakes at the front and rear.
Both circuits function independently. One brake
circuit operates the front left and rear right wheel
and the other operates the front right and rear left
wheel.
If one brake circuit has failed, the other will still
operate. However, you will notice an increased
pedal travel when you apply the brakes.Failure of
one brake circuit will cause the stopping distance
to increase.
Warning!
Risk of an accident, resulting in serious per-
sonal injury or death.
In the unlikely event of hydraulic failure of
one brake circuit:
fPush the brake pedal down firmly and hold it in
that position. A mechanical linkage activates
the second circuit, and you will be able to bring
the vehicle to a stop.
fAfter bringing your vehicle to a complete stop,
avoid driving the vehicle and instead have it
towed to the nearest authorized Porsche dealer for repair.
Parking Brake warning
light USA
Parking Brake warning
light Canada
10_Cayenne_21_KW17.book Seite 163 Donnerstag, 9. April 2009 3:33 15
Page 164 of 379

164
Driving and Driving Safety Brake system warning light
You can check the functionality of the brake sys-
tem warning light by switching the ignition to the
“On” position and verifying that the warning light
illuminates.
The warning light in the instrument panel lights up.
A message will be displayed on the multi-purpose
display of the instrument panel if the brake fluid
level is too low, or (if the brake pedal travel has in-
creased) one of the two brake circuits has failed.
A greater braking pressure will be required, stop-
ping distances will be longer and the braking
behavior will change, particularly in curves.
With correctly adjusted brakes and a correctly
working brake system, the pedal travel to the
point of brake application should be 1-3/16 in. to
1-9/16 in. (30 to 40 mm). Whenever the brake
pedal travel exceeds this value, have the brake
system checked.
Brake pedal
Warning!
Risk of an accident, resulting in serious per-
sonal injury or death.
Any obstruction of the brake pedal could in-
crease the stopping distance.
fAlways check the movement of the brake pedal
before driving and make sure that it is not
obstructed by a floor mat or any other object.
fSecure the floor mat to prevent it from sliding
into positions that could interfere with the safe
operation of your vehicle.
Your Porsche dealer will be glad to offer you
floor mats of the correct size including a securing possibility.
Note
In case one of the two brake circuits fails,
increased pedal travel is required to bring your
vehicle to a full stop.
Warning!
To avoid overheating and premature wear of
the brakes:
fBefore descending a steep grade, reduce
speed and shift the transmission into a lower
gear to control speed.
fDo not “ride the brakes” by resting your foot on
the pedal when not intending to apply brake
pressure.
fDo not hold the pedal down too long or too
often. This could cause the brakes to get hot and not function properly.
Brake warning light USA
Brake warning light
Canada
10_Cayenne_21_KW17.book Seite 164 Donnerstag, 9. April 2009 3:33 15
Page 165 of 379

Driving and Driving Safety
165
Brake boosterThe brake booster assists braking only when
the engine is running.
When the car is moving while the engine is not
running, or if the brake booster is defective, more
pressure on the brake pedal is required to bring
the car to a stop.
Moisture, road salt or grit on brakes affects
braking.
Brakes will dry after a few cautious brake applica-
tions.
Warning!
Risk of an accident, resulting in serious per-
sonal injury or death.
Driving through water may reduce the trac-
tion. Moisture on brakes from road water, car
wash, or a coating of road salt or grit may
affect braking efficiency.
fCautiously apply brakes to test brakes after exposure to road water, etc.
Brake wearYour car has excellent brakes, but they are still
subject to wear. The rate at which they wear
depends on how the brakes are used.
fHave the brake system inspected at the inter-
vals recommended in your Maintenance Book-
let.
Brake system warning light
You can check the functionality of the brake sys-
tem warning light by switching the ignition to the
“On” position and verifying that the warning light
illuminates.
A warning message will be displayed on the multi-
purpose display of the instrument panel if the
brake pads are worn, excessively.
fDo not continue to operate the vehicle.
Have your authorized Porsche dealer inspect
or replace the brake pads.
fPlease see the chapter “OVERVIEW OF
WARNING MESSAGES” on Page 149.
Brake pads and brake discsWear on the brake pads and brake discs depends
to a great extent on the driving style and the con-
ditions of use and therefore cannot be expressed
in actual miles on the road.
The high-performance brake system is designed
for optimal braking effect at all speeds and tem-
peratures.
Certain speeds, braking forces and ambient
conditions (such as temperature and humidity)
therefore might cause the brakes to squeal.
Brake wear warning message
10_Cayenne_21_KW17.book Seite 165 Donnerstag, 9. April 2009 3:33 15
Page 166 of 379

166
Driving and Driving Safety New brake pads or linings
New brake pads have to be “broken in”, and there-
fore only attain optimal friction when the car has
covered several hundred miles or km.
The slightly reduced braking ability must be com-
pensated for by pressing the brake pedal harder.
This also applies whenever the brake pads and
brake discs are replaced.
Warning!
fDo not obstruct the pedal travel with floor mats
or other objects.
The brake booster is ready for operation only
while the engine is running.
If the engine is switched off or there is a defect in
the brake booster, much greater force has to be
applied to the pedal when braking.
fPlease see the chapter “TOWING” on
Page 342.
In heavy rain, while driving through water or after
leaving a car wash, the braking action may be
delayed and increased pressure may be required.
fFor this reason, keep further back from the ve-
hicle in front and “dry” the brakes by applying
them at intervals. Make sure that following traf-
fic is not affected.
After a long drive over salted or sanded roads, a
coating may form on the brake discs and pads
that significantly reduces friction and thus braking
action.fEven though the brake discs consist of alloyed
grey cast iron, they will unavoidably start to
corrode if your car is parked for an extended
period. The brakes will tend to “rub” as a
result.
The nature, extent and effects of corrosion
depend on the amount of time the vehicle was
parked, whether road salt or grit was spread
and whether grease-dissolving agents were
used in car washes (not on vehicles with
Porsche Ceramic Composite Brake).
To prevent corrosion of the brake discs, “brake
them dry” before parking the car (not on
vehicles with Porsche Ceramic Composite
Brake).
If the braking comfort is noticeably impaired,
we recommend having the brake system
checked by experts at an authorized Porsche
dealer.
fTo relieve the braking system on downhill
stretches, change down to a lower gear in
enough time to obtain engine braking.
If engine braking is insufficient on steep
stretches, operate the footbrake at intervals.
Continuous braking overheats the brakes and
reduces the braking effect.
fPlease see the chapter “BRAKE-FLUID LEVEL”
on Page 257.
10_Cayenne_21_KW17.book Seite 166 Donnerstag, 9. April 2009 3:33 15
Page 167 of 379

Driving and Driving Safety
167
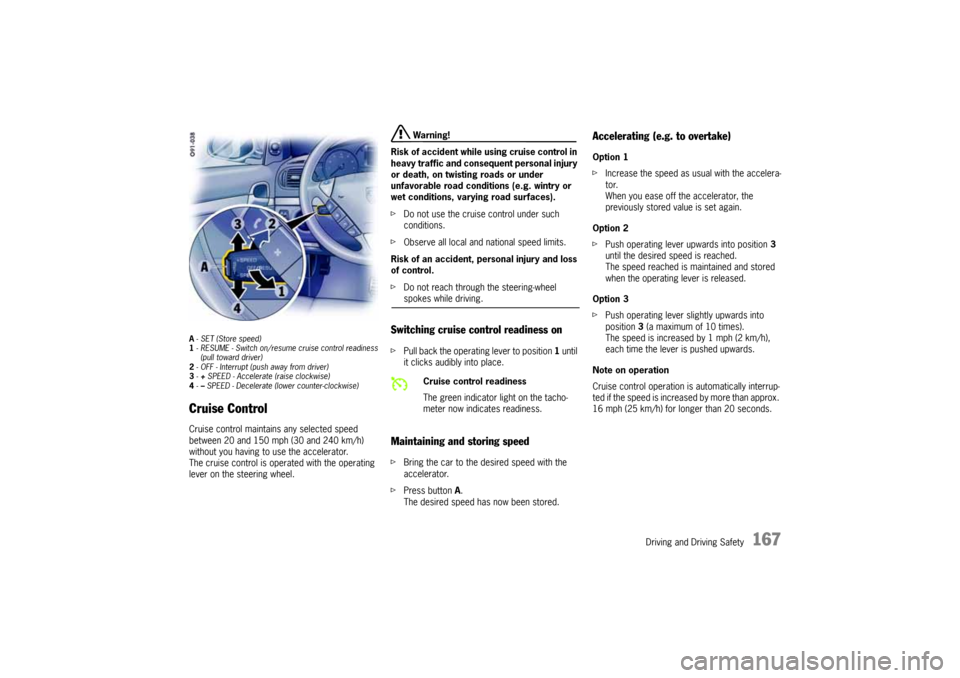
A- SET (Store speed)
1- RESUME - Switch on/resume cruise control readiness
(pull toward driver)
2- OFF - Interrupt (push away from driver)
3-+ SPEED - Accelerate (raise clockwise)
4-– SPEED - Decelerate (lower counter-clockwise)Cruise ControlCruise control maintains any selected speed
between 20 and 150 mph (30 and 240 km/h)
without you having to use the accelerator.
The cruise control is operated with the operating
lever on the steering wheel.
Warning!
Risk of accident while using cruise control in
heavy traffic and consequent personal injury
or death, on twisting roads or under
unfavorable road conditions (e.g. wintry or
wet conditions, varying road surfaces).
fDo not use the cruise control under such
conditions.
fObserve all local and national speed limits.
Risk of an accident, personal injury and loss
of control.
fDo not reach through the steering-wheel spokes while driving.
Switching cruise control readiness onfPull back the operating lever to position 1 until
it clicks audibly into place.Maintaining and storing speedfBring the car to the desired speed with the
accelerator.
fPress button A.
The desired speed has now been stored.
Accelerating (e.g. to overtake)Option 1
fIncrease the speed as usual with the accelera-
tor.
When you ease off the accelerator, the
previously stored value is set again.
Option 2
fPush operating lever upwards into position 3
until the desired speed is reached.
The speed reached is maintained and stored
when the operating lever is released.
Option 3
fPush operating lever slightly upwards into
position 3 (a maximum of 10 times).
The speed is increased by 1 mph (2 km/h),
each time the lever is pushed upwards.
Note on operation
Cruise control operation is automatically interrup-
ted if the speed is increased by more than approx.
16 mph (25 km/h) for longer than 20 seconds.
Cruise control readiness
The green indicator light on the tacho-
meter now indicates readiness.
10_Cayenne_21_KW17.book Seite 167 Donnerstag, 9. April 2009 3:33 15
Page 168 of 379

168
Driving and Driving Safety
DeceleratingOption 1
fPush operating lever down into position 4 until
the desired speed is reached.
The speed reached is maintained and stored
when the operating lever is released.
Option 2
fPush operating lever slightly downwards into
position 4 (a maximum of 10 times).
The speed is reduced by 1 mph (2 km/h), each
time the lever is pushed downwards.
Interrupting cruise control operationThe speed driven before the interruption remains
stored in the memory and can be reactivated by
operating the operating lever. Please see the
chapter “RESUMING THE STORED SPEED” on
Page 168.
fPush the operating lever forward to position 2
(it doesn’t engage) or
fOperate brake or clutch pedal or, on vehicles
with Tiptronic S, select position N.
fPlease see the chapter “TIPTRONIC S” on
Page 170.
Cruise control operation is interrupted
automatically:
– If the set vehicle speed is exceeded by more
than approx. 16 mph (25 km/h) for longer than
20 seconds.
– If the actual vehicle speed falls by approx.
6 mph (10 km/h) below the set vehicle speed
for longer than 5 seconds (e.g. upward
slopes).
– If Porsche Stability Management (PSM)
intervenes for longer than 0.2 seconds.
– If Low Range is switched on.
Resuming the stored speedfPull back the operating lever to position 1.
Note on operation
The stored speed should only be recalled when
traffic conditions and the road surface so permit.Switching cruise control readiness offfPush forward the operating lever to position 2
until it clicks audibly into place.
The memory is cleared and the green
readiness light goes out.
When the vehicle is parked and the ignition
switched off, the memory is cleared.
Tip on driving
On upward or downward slopes, the set speed
cannot always be maintained by cruise control.
fTo obtain sufficient engine braking or a better
engine-speed range, therefore, you have to
change down to a lower gear.
10_Cayenne_21_KW17.book Seite 168 Donnerstag, 9. April 2009 3:33 15
Page 169 of 379

Driving and Driving Safety
169
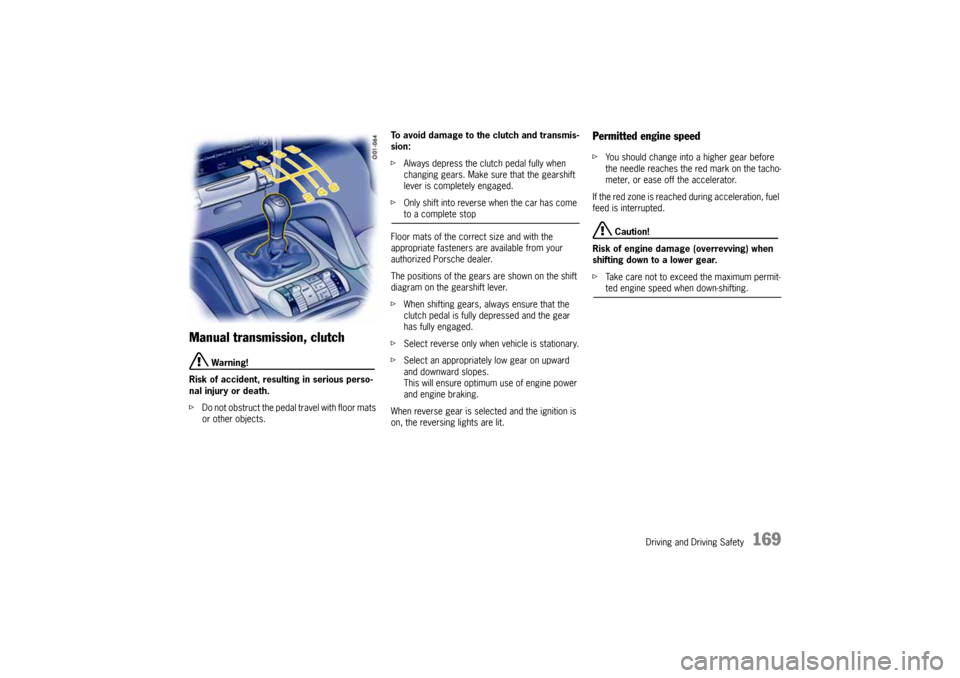
Manual transmission, clutch
Warning!
Risk of accident, resulting in serious perso-
nal injury or death.
fDo not obstruct the pedal travel with floor mats
or other objects.To avoid damage to the clutch and transmis-
sion:
fAlways depress the clutch pedal fully when
changing gears. Make sure that the gearshift
lever is completely engaged.
fOnly shift into reverse when the car has come
to a complete stop
Floor mats of the correct size and with the
appropriate fasteners are available from your
authorized Porsche dealer.
The positions of the gears are shown on the shift
diagram on the gearshift lever.
fWhen shifting gears, always ensure that the
clutch pedal is fully depressed and the gear
has fully engaged.
fSelect reverse only when vehicle is stationary.
fSelect an appropriately low gear on upward
and downward slopes.
This will ensure optimum use of engine power
and engine braking.
When reverse gear is selected and the ignition is
on, the reversing lights are lit.
Permitted engine speedfYou should change into a higher gear before
the needle reaches the red mark on the tacho-
meter, or ease off the accelerator.
If the red zone is reached during acceleration, fuel
feed is interrupted.
Caution!
Risk of engine damage (overrevving) when
shifting down to a lower gear.
fTake care not to exceed the maximum permit-ted engine speed when down-shifting.
10_Cayenne_21_KW17.book Seite 169 Donnerstag, 9. April 2009 3:33 15
Page 170 of 379

170
Driving and Driving Safety
Tiptronic SThe Porsche Tiptronic is a six-speed transmission
and features an “automatic” and a “manual” gear-
shift mode.
In automatic selection mode (selector lever po-
sition D), gear changing is automatic.
Depending on the driving program, you can
change temporarily from automatic to manual
mode using the rocker switches on the steering
wheel.
In manual selection mode (selector lever
position M), you change gear using the rocker
switches on the steering wheel or by pushing the
selector lever forward or back.
The functions of selector lever positions D and M
differ in the on-road program, High Range, and in
the off-road program, Low Range.
You can change between selector lever positions
D and M as you wish while driving.
The currently selected gear is retained if you
change from D to M.
If you change from M to D, the gear-changing map
suitable for your current driving style is selected
and the appropriate gear is selected.
Note on operation
Take care not to operate the rocker switches on
the steering wheel inadvertently, thereby trigger-
ing undesired gear changes.
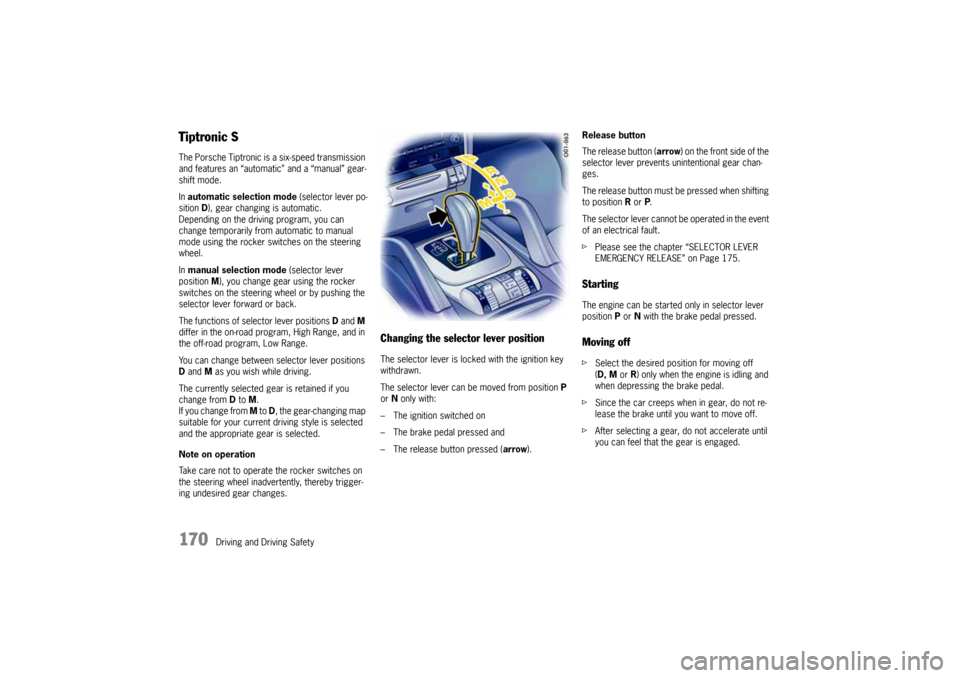
Changing the selector lever positionThe selector lever is locked with the ignition key
withdrawn.
The selector lever can be moved from position P
or N only with:
– The ignition switched on
– The brake pedal pressed and
– The release button pressed (arrow).Release button
The release button (arrow) on the front side of the
selector lever prevents unintentional gear chan-
ges.
The release button must be pressed when shifting
to position R or P.
The selector lever cannot be operated in the event
of an electrical fault.
fPlease see the chapter “SELECTOR LEVER
EMERGENCY RELEASE” on Page 175.
StartingThe engine can be started only in selector lever
position P or N with the brake pedal pressed.Moving offfSelect the desired position for moving off
(D, M or R) only when the engine is idling and
when depressing the brake pedal.
fSince the car creeps when in gear, do not re-
lease the brake until you want to move off.
fAfter selecting a gear, do not accelerate until
you can feel that the gear is engaged.
10_Cayenne_21_KW17.book Seite 170 Donnerstag, 9. April 2009 3:33 15