PORSCHE PANAMERA 2009 1.G Information Manual
Manufacturer: PORSCHE, Model Year: 2009, Model line: PANAMERA, Model: PORSCHE PANAMERA 2009 1.GPages: 343, PDF Size: 7.96 MB
Page 91 of 343
Windows and Slide/Tilt Roof
89
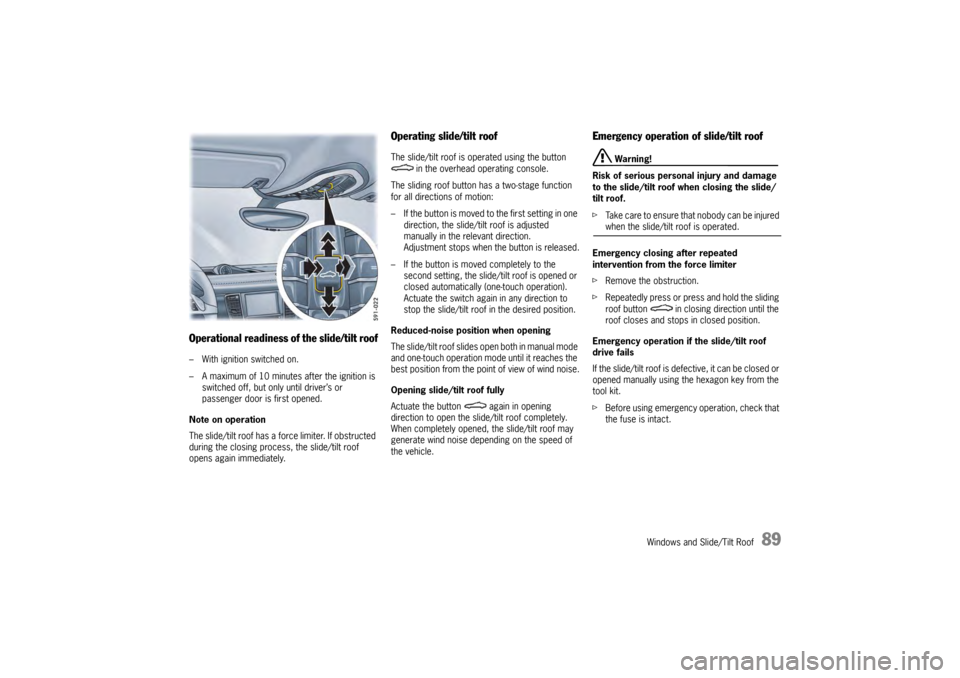
Operational readiness of the slide/tilt roof– With ignition switched on.
– A maximum of 10 minutes after the ignition is switched off, but only until driver’s or
passenger door is first opened.
Note on operation
The slide/tilt roof has a force limiter. If obstructed
during the closing process, the slide/tilt roof
opens again immediately.
Operating slide/tilt roofThe slide/tilt roof is operated using the button in the overhead operating console.
The sliding roof button has a two-stage function
for all directions of motion:
– If the button is moved to the first setting in one
direction, the slide/tilt roof is adjusted
manually in the relevant direction.
Adjustment stops when the button is released.
– If the button is moved completely to the second setting, the slide/tilt roof is opened or
closed automatically (one-touch operation).
Actuate the switch again in any direction to
stop the slide/tilt roof in the desired position.
Reduced-noise position when opening
The slide/tilt roof slides open both in manual mode
and one-touch operation mode until it reaches the
best position from the poi nt of view of wind noise.
Opening slide/tilt roof fully
Actuate the button again in opening
direction to open the slide/tilt roof completely.
When completely opened, the slide/tilt roof may
generate wind noise depending on the speed of
the vehicle.
Emergency operation of slide/tilt roof
Warning!
Risk of serious personal injury and damage
to the slide/tilt roof when closing the slide/
tilt roof.
f Take care to ensure that nobody can be injured when the slide/tilt roof is operated.
Emergency closing after repeated
intervention from the force limiter
f Remove the obstruction.
f Repeatedly press or press and hold the sliding
roof button in clos ing direction until the
roof closes and stops in closed position.
Emergency operation if the slide/tilt roof
drive fails
If the slide/tilt roof is defective, it can be closed or
opened manually using th e hexagon key from the
tool kit.
f Before using emergency operation, check that
the fuse is intact.
Page 92 of 343
90
Windows and Slide/Tilt Roof
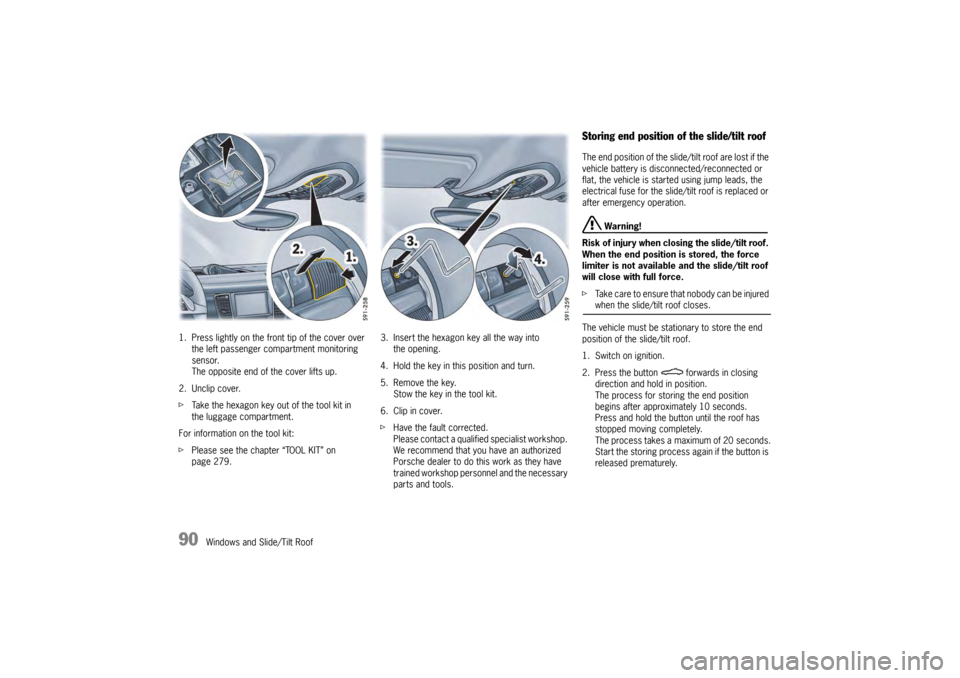
1. Press lightly on the front tip of the cover over
the left passenger compartment monitoring
sensor.
The opposite end of the cover lifts up.
2. Unclip cover.
f Take the hexagon key out of the tool kit in
the luggage compartment.
For information on the tool kit:
f Please see the chapter “TOOL KIT” on
page 279. 3. Insert the hexagon
key all the way into
the opening.
4. Hold the key in this position and turn.
5. Remove the key. Stow the key in the tool kit.
6. Clip in cover.
f Have the fault corrected.
Please contact a qualified specialist workshop.
We recommend that you have an authorized
Porsche dealer to do this work as they have
trained workshop personnel and the necessary
parts and tools.
Storing end position of the slide/tilt roofThe end position of the slide/ tilt roof are lost if the
vehicle battery is disconnected/reconnected or
flat, the vehicle is started using jump leads, the
electrical fuse for the slide/tilt roof is replaced or
after emergency operation.
Warning!
Risk of injury when closing the slide/tilt roof.
When the end position is stored, the force
limiter is not available and the slide/tilt roof
will close with full force.
f Take care to ensure that nobody can be injured when the slide/tilt roof closes.
The vehicle must be stat ionary to store the end
position of the slide/tilt roof.
1. Switch on ignition.
2. Press the button forwards in closing direction and hold in position.
The process for storing the end position
begins after approximately 10 seconds.
Press and hold the button until the roof has
stopped moving completely.
The process takes a maximum of 20 seconds.
Start the storing process again if the button is
released prematurely.
Page 93 of 343
Lights, Turn Signals and Windshield Wipers
91
Lights, Turn Signals and Windshield Wipers
Automatic Driving Light Assistant/
Adaptive Light System
.................................. 92
Instrument lighting... ..................................... 95
Turn Signal/High Beam/Headlight
Flasher Stalk ........... ..................................... 96
Emergency Flasher ...... ................................ 97
Interior Lighting ....... ..................................... 98
Brief Overview – Windshield Wipers ........... 101
Windshield Wiper/Washer Stalk ................... 102
Page 94 of 343
92
Lights, Turn Signals and Windshield WipersNote on operation
If the ignition key is removed and the door is
opened while the lights are on, an audible signal
(gong) warns of possible battery discharge.
In some countries, differences are possible
due to legal requirements.
Automatic Driving Light Assistant/
Adaptive Light SystemThe automatic driving light assistant is a comfort
function. Your Porsche’s driving light (low beam) is
switched on and off automatically depending on
the ambient brightness.
The automatic driving light assistant also controls
the daytime driving lights, the Automatic Coming
Home lights and the dy
namic cornering light.
The automatic driving light assistant is activated
when the light switch is set to the position .
Despite possible support by the driving light
assistant, it is the responsibility of the driver to
switch on the driving ligh t using the conventional
light switch in accordance with the relevant
national regulations.
Activating the headlights using the driving light
assistant therefore does not absolve the driver
of responsibility for correct operation of the
driving light.
Warning!
Risk of accidents if yo u drive your vehicle
without lights.
f Always carefully monitor the automatic driving light control.
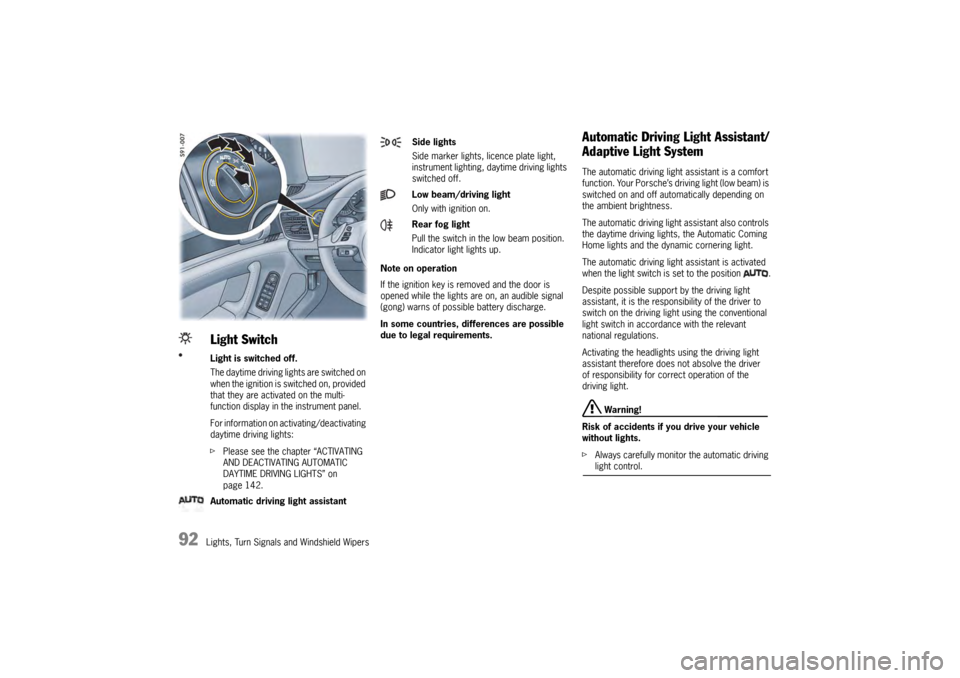
Light SwitchLight is switched off.
The daytime driving lights are switched on
when the ignition is switched on, provided
that they are activated on the multi-
function display in the instrument panel.
For information on activating/deactivating
daytime driving lights:
fPlease see the chapter “ACTIVATING
AND DEACTIVATING AUTOMATIC
DAYTIME DRIVING LIGHTS” on
page 142.
Automatic driving light assistant
Side lights
Side marker lights , licence plate light,
instrument lighting, daytime driving lights
switched off.
Low beam/driving light
Only with ignition on.
Rear fog light
Pull the switch in the low beam position.
Indicator light lights up.
Page 95 of 343

Lights, Turn Signals and Windshield Wipers
93
Note
In the event of a fault in the automatic driving light
assistant/adaptive light system, the warning light
for the adaptive light system lights up in the
instrument panel and a warning message appears
on the multi-function display in the instrument
panel.
For information on indicator lights and warning
lights on the instrument panel:
f Please see the chapter “INSTRUMENT PANEL
USA MODELS” on page 107.
For information on warning messages on the
multi-function display:
f Please see the chapter “OVERVIEW OF
WARNING MESSAGES” on page 152.
Low beam/driving lightIf the light switch is set to the position , the
low beam is switched on automatically in the
following situations:
–Dusk
– Darkness
– Driving through tunnels
–Rain
– Highway driving (daytime driving lights
deactivated)
When the low beam is switched on, the indicator
light on the speedometer lights up.
Note on operation
Fog is not recognized.
f In the event of fog, the headlights must
be switched on manually.
Highway function in daylight
The low beam is switched on automatically at
vehicle speeds of more than approx. 90 mph
(140 km/h) in daylight conditions and when
daytime driving lights are deactivated.
If the vehicle is travelling at speeds of less than
approx. 40 mph (65 km/h), the low beam
switches off after a delay of approx. 4 minutes,
if the external lighting conditions permit. Highway function in darkness
The distribution characteristics of the low beam
change if the vehicle is travelling at speeds of
more than approx. 80 mph (130 km/h) in
darkness.
The light beam becomes longer and the field of
vision increases.
Rain function
The low beam is switched on automatically after
five seconds of continuous wiper operation.
If the wipers have not been used for approx.
4 minutes, the low beam is switched off.
Page 96 of 343
94
Lights, Turn Signals and Windshield Wipers
Automatic headlight levellingWhen the ignition and low beam are switched on,
the level of the headlight beam automatically
changes in accordance with the vehicle load.
The level of the headlight beam is automatically
kept constant during acceleration and braking.
Note on operation
Automatic headlight levellin g is also available
when the light switch is set to the position
(low beam/driving light).
Daytime driving lightsIf the light switch is in po sition (light switched
off), the daytime driving lights are switched on
automatically when the ignition is switched on.
If the light switch is in position , the daytime
driving lights are switched on automatically during
daylight when the ignition is switched on.
If the light switch is in position (low beam/
driving light), the daytime driving lights are not
active.
You can switch the daytime driving lights on and
off on the multi-function display in the instrument
panel (not available in Canada).
Regulations for switching daytime driving lights on
and off vary according to the legal requirements in
each country.
For information on setting the daytime driving
lights:
f Please see the chapter “ACTIVATING AND
DEACTIVATING AUTOMATIC DAYTIME DRIVING
LIGHTS” on page 142.
Static cornering lightThe static cornering light switches on if the
steering wheel is turned sharply.
Note on operation
The static cornering light is also available when
the light switch is set to the position (driving
light/low beam).Dynamic cornering lightAt speeds greater than 5 mph (8 km/h), the low
beam light is swivelled in the direction of the curve
to illuminate the road more clearly, depending on
the speed of the vehicle and the extent to which
the steering wheel is turned.
In the event of a fault in the dynamic cornering
light, the warning light for the adaptive light
system flashes in the instrument panel and
a warning message appears on the multi-function
display in the instrument panel.
For information on indicator lights and warning
lights on the instrument panel:
fPlease see the chapter “INSTRUMENT PANEL
USA MODELS” on page 107.
For information on warning messages on the
multi-function display:
f Please see the chapter “OVERVIEW OF
WARNING MESSAGES” on page 152.
Page 97 of 343
Lights, Turn Signals and Windshield Wipers
95
Automatic Coming Home lights
(Welcome Home function/Entry function)Switching on Automatic Coming Home lights
fSet light switch to .
The following lights remain switched on for
a certain period to allow you to get in and out of
your vehicle safely and with improved visibility in
darkness:
– Daytime driving lights,
– Courtesy lights in the exterior mirrors (on vehicles with comfort memory),
– Front and rear side marker lights,
– Licence plate lights.
Welcome Home function (off delay)
When the vehicle is locked, the lights remain
switched on for the duration of the off delay preset
on the multi-function display.
For information on adjusting the off delay of the
external lights on the multi-function display:
f Please see the chapter “ADJUSTING EXTERIOR
LIGHTS” on page 142. Entry function
When the vehicle is unlocked, the area around the
vehicle is illuminated for the duration of the off
delay preset on the multi-function display.
The lights are switched off when the ignition is
switched on or the light sw
itch is set to a position
other than .
For information on adjusting the off delay of the
external lights on the multi-function display:
f Please see the chapter “ADJUSTING EXTERIOR
LIGHTS” on page 142.
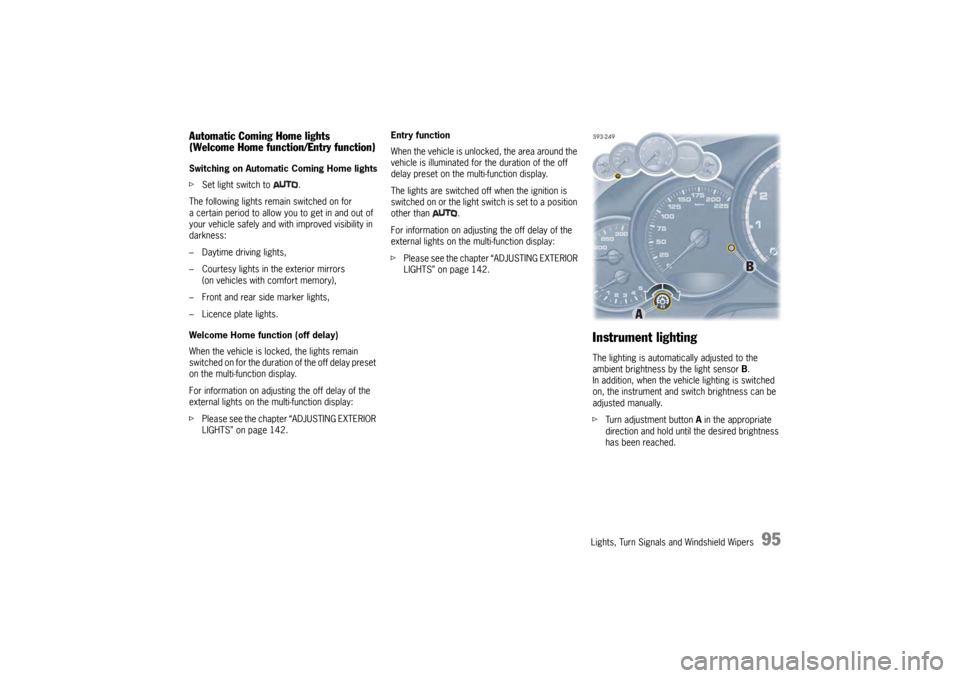
Instrument lightingThe lighting is automatically adjusted to the
ambient brightness by the light sensor B.
In addition, when the vehicle lighting is switched
on, the instrument and switch brightness can be
adjusted manually.
f Turn adjustment button A in the appropriate
direction and hold until the desired brightness
has been reached.
Page 98 of 343
96
Lights, Turn Signals and Windshield Wipers Warning!
Risk of accident when adjusting brightness
while driving. You may lose control of the
vehicle.
f Do not reach through the steering-wheel spokes when driving.
Turn Signal/High Beam/Headlight
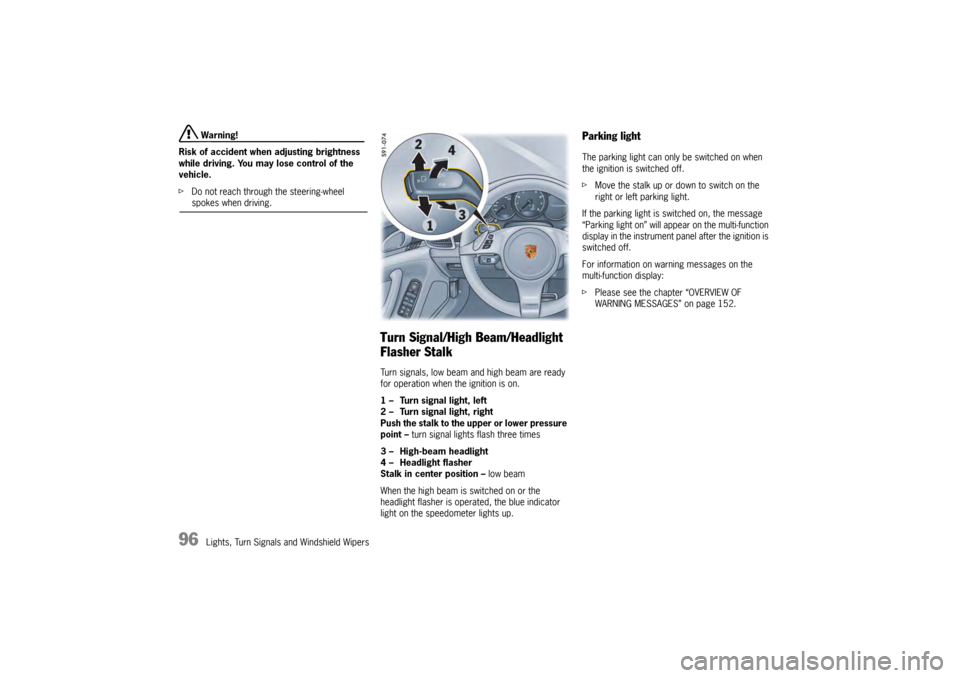
Flasher StalkTurn signals, low beam and high beam are ready
for operation when the ignition is on.
1 – Turn signal light, left
2 – Turn signal light, right
Push the stalk to the upper or lower pressure
point – turn signal lights flash three times
3 – High-beam headlight
4 – Headlight flasher
Stalk in center position – low beam
When the high beam is switched on or the
headlight flasher is operated, the blue indicator
light on the speedometer lights up.
Parking lightThe parking light can only be switched on when
the ignition is switched off.
f Move the stalk up or do wn to switch on the
right or left parking light.
If the parking light is switched on, the message
“Parking light on” will appear on the multi-function
display in the instrument panel after the ignition is
switched off.
For information on warning messages on the
multi-function display:
f Please see the chapter “OVERVIEW OF
WARNING MESSAGES” on page 152.
Page 99 of 343
Lights, Turn Signals and Windshield Wipers
97
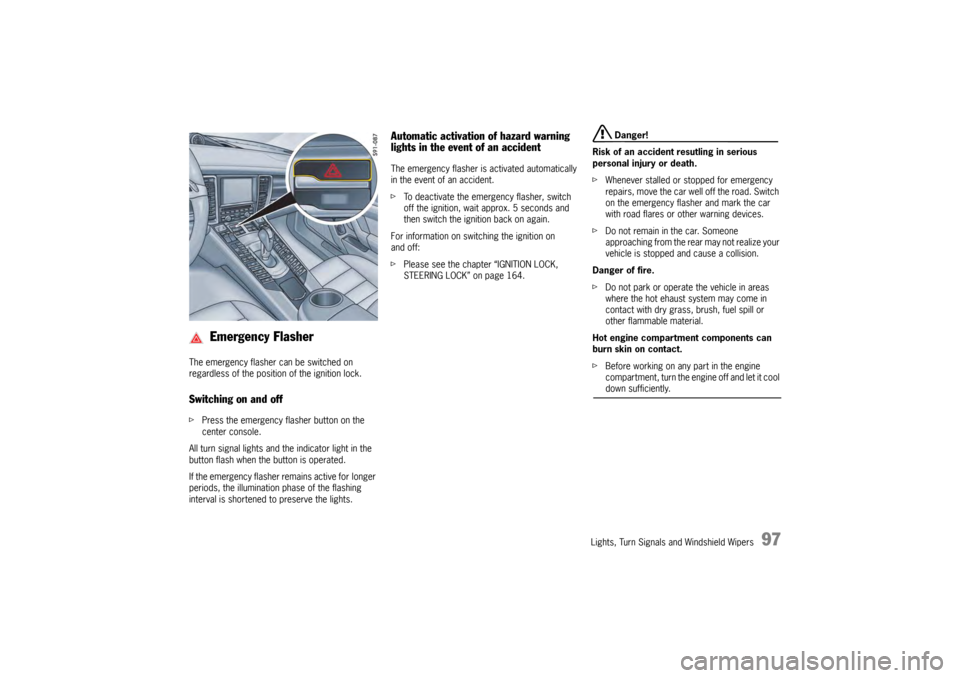
The emergency flasher can be switched on
regardless of the position of the ignition lock.Switching on and offfPress the emergency fl asher button on the
center console.
All turn signal lights and the indicator light in the
button flash when the button is operated.
If the emergency flasher remains active for longer
periods, the illumination phase of the flashing
interval is shortened to preserve the lights.
Automatic activation of hazard warning
lights in the event of an accidentThe emergency flasher is activated automatically
in the event of an accident.
f To deactivate the emergency flasher, switch
off the ignition, wait approx. 5 seconds and
then switch the ignition back on again.
For information on switching the ignition on
and off:
f Please see the chapter “IGNITION LOCK,
STEERING LOCK” on page 164.
Danger!
Risk of an accident resutling in serious
personal injury or death.
f Whenever stalled or stopped for emergency
repairs, move the car well off the road. Switch
on the emergency flasher and mark the car
with road flares or other warning devices.
f Do not remain in the car. Someone
approaching from the rear may not realize your
vehicle is stopped and cause a collision.
Danger of fire.
f Do not park or operate the vehicle in areas
where the hot ehaust system may come in
contact with dry grass, brush, fuel spill or
other flammable material.
Hot engine compartment components can
burn skin on contact.
f Before working on any part in the engine
compartment, turn the engine off and let it cool down sufficiently.
Emergency Flasher
Page 100 of 343
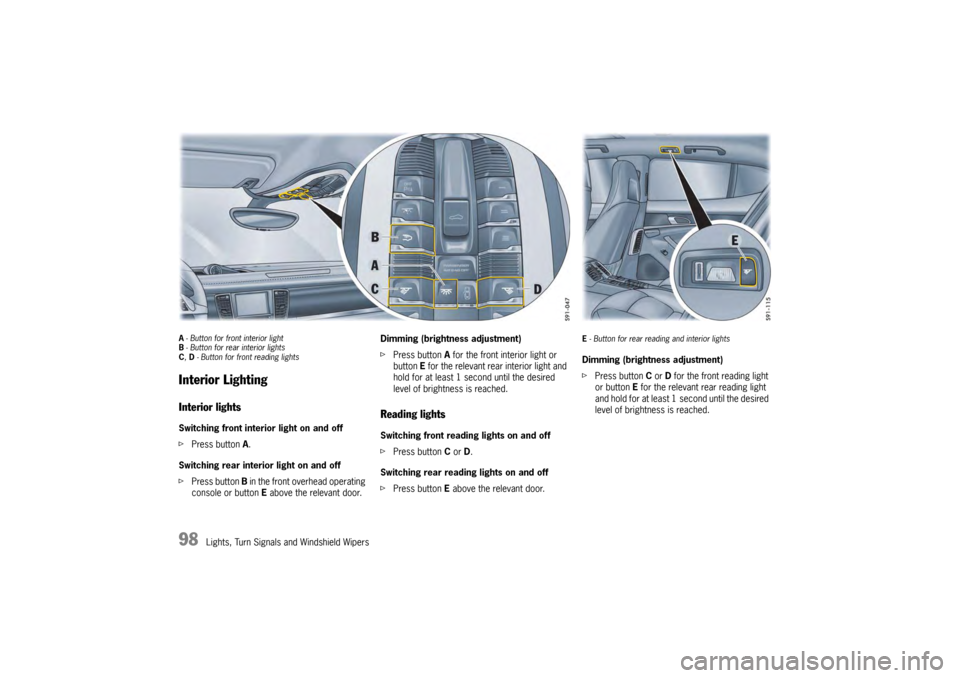
98
Lights, Turn Signals and Windshield Wipers
A- Button for front interior light
B - Button for rear interior lights
C , D - Button for front reading lightsInterior LightingInterior lightsSwitching front interior light on and off
f Press button A.
Switching rear interior light on and off
f Press button B in the front overhead operating
console or button E above the relevant door. Dimming (brightness adjustment)
f
Press button A for the front interior light or
button E for the relevant rear interior light and
hold for at least 1 second until the desired
level of brightness is reached.
Reading lights Switching front reading lights on and off
f Press button C or D.
Switching rear reading lights on and off
f Press button E above the relevant door.
E- Button for rear reading and interior lightsDimming (brightness adjustment)
f Press button C or D for the front reading light
or button E for the relevant rear reading light
and hold for at least 1 second until the desired
level of brightness is reached.