ESP Ram 2500 2020 Owner's Guide
[x] Cancel search | Manufacturer: RAM, Model Year: 2020, Model line: 2500, Model: Ram 2500 2020Pages: 553, PDF Size: 21.99 MB
Page 159 of 553

SAFETY157
Modes Of Operation
Three selectable modes of operation are avail -
able in the Uconnect System.
Refer to “Uconnect Settings” in “Multimedia”
for further information.
Blind Spot Alert Lights Only
When operating in Blind Spot Alert mode, the
BSM system will provide a visual alert in the
appropriate side view mirror based on a
detected object. However, when the system is
operating in Rear Cross Path (RCP) mode, the
system will respond with both visual and
audible alerts when a detected object is
present. Whenever an audible alert is
requested, the radio is muted.
Blind Spot Alert Lights/Chime
When operating in Blind Spot Alert Lights/
Chime mode, the BSM system will provide a
visual alert in the appropriate side view mirror
based on a detected object. If the turn signal is
then activated, and it corresponds to an alert
present on that side of the vehicle, an audible
chime will also be sounded. Whenever a turn
signal and detected object are present on the
same side at the same time, both the visual and
audible alerts will be issued. In addition to the
audible alert the radio (if on) will also be muted. NOTE:
Whenever an audible alert is requested by the
BSM system, the radio is also muted.
When the system is in RCP, the system shall
respond with both visual and audible alerts
when a detected object is present. Whenever
an audible alert is requested, the radio is also
muted. Turn/hazard signal status is ignored;
the RCP state always requests the chime.
Blind Spot Alert Off
When the BSM system is turned off there will be
no visual or audible alerts from either the BSM
or RCP systems.
NOTE:
The BSM system will store the current operating
mode when the vehicle is shut off. Each time
the vehicle is started the previously stored
mode will be recalled and used.
Trailer Merge Assist
NOTE:
When Trailer Merge Assist is activated, Rear
Cross Path is disabled.
NOTE:
When a trailer with an electric brake is
connected to the vehicle, the instrument cluster
display will provide a menu to allow a selection
of the trailer type. There will be two options
provided: Conventional and Goose/Fifth Wheel.
Goose/Fifth Wheel Trailer is incompatible and
when selected, the BSM system will disable
until the trailer is disconnected. If the wrong
option is selected, the system can be reset by
either disconnecting and reconnecting the
trailer harness connector or disabling then
re-enabling the Blind Spot Monitoring System in
the customer settings in the Uconnect. This will
prompt the trailer selection menu again to allow
for the correct selection.
Trailer Merge Assist is a function of the Blind
Spot Monitoring (BSM) system that extends the
blind spot zone to work while pulling a trailer.
Trailer Merge Assist consists of three sub func
-
tions:Automatic Trailer Detection
Trailer Length Detection
Trailer Merge Warning
4
20_DJD2_OM_EN_USC_t.book Page 157
Page 162 of 553
160SAFETY
Le présent appareil est conforme aux CNR
d`Innovation, Science and Economic Develop -
ment applicables aux appareils radio exempts
de licence. L'exploitation est autorisée aux deux
conditions suivantes:
1. l'appareil ne doit pas produire de brouil -
lage, et
2. l'utilisateur de l'appareil doit accepter tout brouillage radioélectrique subi, même si le
brouillage est susceptible d'en comprom -
ettre le fonctionnement.
La operación de este equipo está sujeta a las
siguientes dos condiciones:
1. es posible que este equipo o dispositivo no cause interferencia perjudicial y
2. este equipo o dispositivo debe aceptar cual -
quier interferencia, incluyendo la que
pueda causar su operación no deseada.
NOTE:
Changes or modifications not expressly
approved by the party responsible for compli -
ance could void the user’s authority to operate
the equipment.Forward Collision Warning (FCW) With
Mitigation — If Equipped
The Forward Collision Warning (FCW) system
provides the driver with audible, visual warnings
(within the instrument cluster display), and may
apply a haptic warning in the form of a brake
jerk, to warn the driver when it detects a poten -
tial frontal collision. The warnings are intended
to provide the driver with enough time to react,
avoid or mitigate the potential collision.
NOTE:
FCW monitors the information from the forward
looking sensors as well as Electronic Brake
Controller (EBC), to calculate the probability of a
forward collision. When the system determines
that a forward collision is probable, the driver
will be provided with audible and visual warn-
ings as well as a possible haptic warning in the
form of a brake jerk.
If the driver does not take action based upon
these progressive warnings, then the system
will provide a limited level of active braking to
help slow the vehicle and mitigate the potential
forward collision. If the driver reacts to the warn -
ings by braking and the system determines that
the driver intends to avoid the collision by
braking but has not applied sufficient brake force, the system will compensate and provide
additional brake force as required. When towing
a trailer, the system will also respond to activate
the trailer brakes (if equipped).
If a FCW with Mitigation event begins at a speed
below 32 mph (52 km/h), the system may
provide the maximum braking possible to miti
-
gate the potential forward collision. If the
Forward Collision Warning with Mitigation event
stops the vehicle completely, the system will
hold the vehicle at standstill for two seconds
and then release the brakes.
FCW Message
20_DJD2_OM_EN_USC_t.book Page 160
Page 163 of 553
SAFETY161
When the system determines a collision with
the vehicle in front of you is no longer probable,
the warning message will be deactivated.
NOTE:
The minimum speed for FCW activation is
3 mph (5 km/h).
The FCW alerts may be triggered on objects
other than vehicles such as guard rails or
sign posts based on the course prediction.
This is expected and is a part of normal FCW
activation and functionality.
It is unsafe to test the FCW system. To
prevent such misuse of the system, after four
Active Braking events within a key cycle, the
Active Braking portion of FCW will be deacti -
vated until the next key cycle.
The FCW system is intended for on-road use
only. If the vehicle is taken off-road, the FCW
system should be deactivated to prevent
unnecessary warnings to the surroundings.
FCW may not react to irrelevant objects such
as overhead objects, ground reflections,
objects not in the path of the vehicle,
stationary objects that are far away, oncoming traffic, or leading vehicles with the
same or higher rate of speed.
“FCW will be disabled like ACC, with the
unavailable screens.
During a FCW event when towing a trailer,
your Electronic Brake system will respond, to
activate the trailer brakes (if equipped).
Turning FCW On or Off
The FCW button is located in the Uconnect
display in the control settings. Refer to “Ucon
-
nect Settings” in “Multimedia” in the Owner's
Manual for further information.
To turn the FCW system on, press the forward
collision button once.
To turn the FCW system off, press the forward
collision button once.
NOTE:
When the FCW is “on”, this allows the system
to warn the driver of a possible collision with
the vehicle in front.
When the FCW is “off” prevents the system
from warning the driver of a possible collision
with the vehicle in front. If the FCW is set to
“off”, “FCW OFF" will be displayed in the
instrument cluster display.
When FCW status is set to “Only Warning”
prevents the system from providing limited
active braking, or additional brake support if
the driver is not braking adequately in the
event of a potential frontal collision.
When FCW status is set to “Warning and
Braking” this allows the system to warn the
driver of a possible collision with the vehicle
in front using audible/visual warnings and it
applies autonomous braking.
The FCW system state is defaulted to “Full
On” from one ignition cycle to the next. If the
system is turned off, it will reset to “Full On”
when the vehicle is restarted.
WARNING!
Forward Collision Warning (FCW) is not
intended to avoid a collision on its own, nor
can FCW detect every type of potential
collision. The driver has the responsibility to
avoid a collision by controlling the vehicle via
braking and steering. Failure to follow this
warning could lead to serious injury or death.
4
20_DJD2_OM_EN_USC_t.book Page 161
Page 165 of 553
SAFETY163
Le présent appareil est conforme aux CNR
d`Innovation, Science and Economic Develop -
ment applicables aux appareils radio exempts
de licence. L'exploitation est autorisée aux deux
conditions suivantes:
1. l'appareil ne doit pas produire de brouil -
lage, et
2. l'utilisateur de l'appareil doit accepter tout brouillage radioélectrique subi, même si le
brouillage est susceptible d'en comprom -
ettre le fonctionnement.
La operación de este equipo está sujeta a las
siguientes dos condiciones:
1. es posible que este equipo o dispositivo no cause interferencia perjudicial y
2. este equipo o dispositivo debe aceptar cual -
quier interferencia, incluyendo la que
pueda causar su operación no deseada.
NOTE:
Changes or modifications not expressly
approved by the party responsible for compli -
ance could void the user’s authority to operate
the equipment.Tire Pressure Monitoring System (TPMS)
The Tire Pressure Monitoring System (TPMS)
will warn the driver of a low tire pressure based
on the vehicle recommended cold placard pres -
sure.
NOTE:
The TPMS Warning Light will illuminate in the
instrument cluster and a chime will sound when
tire pressure is low in one or more of the four
active road tires. In addition, the instrument
cluster will display a graphic showing the pres -
sure values of each tire with the low tire pres -
sure values in a different color, or the Uconnect
radio will display a TPMS message, when this
occurs you must increase the tire pressure to
the recommended cold placard pressure in
order for the TPMS Warning Light to turn off.
The tire pressure will vary with temperature by
about 1 psi (7 kPa) for every 12°F (6.5°C). This
means that when the outside temperature
decreases, the tire pressure will decrease. Tire
pressure should always be set based on cold
inflation tire pressure. This is defined as the tire
pressure after the vehicle has not been driven
for at least three hours, or driven less than
1 mile (1.6 km) after a three hour period. The
cold tire inflation pressure must not exceed the maximum inflation pressure molded into the
tire sidewall. Refer to “Tires” in “Servicing And
Maintenance” for information on how to prop
-
erly inflate the vehicle’s tires. The tire pressure
will also increase as the vehicle is driven - this is
normal and there should be no adjustment for
this increased pressure.
The TPMS will warn the driver of a low tire pres -
sure if the tire pressure falls below the low-pres -
sure warning limit for any reason, including low
temperature effects and natural pressure loss
through the tire.
The TPMS will continue to warn the driver of low
tire pressure as long as the condition exists,
and will not turn off until the tire pressure is at
or above the recommended cold placard pres -
sure. Once the low TPMS Warning Light illumi -
nates, you must increase the tire pressure to
the recommended cold placard pressure in
order for the TPMS Warning Light to turn off. The
system will automatically update and the TPMS
Warning Light will turn off once the system
receives the updated tire pressures. The vehicle
may need to be driven for up to 20 minutes
above 15 mph (24 km/h) in order for the TPMS to receive this information.
4
20_DJD2_OM_EN_USC_t.book Page 163
Page 166 of 553
164SAFETY
NOTE:
When filling warm tires, the tire pressure may
need to be increased up to an additional 4 psi
(28 kPa) above the recommended cold placard
pressure in order to turn the TPMS Warning
Light off.
For example, your vehicle may have a recom -
mended cold (parked for more than three hours)
placard pressure of 30 psi (207 kPa). If the
ambient temperature is 68°F (20°C) and the
measured tire pressure is 27 psi (186 kPa), a
temperature drop to 20°F (-7°C) will decrease
the tire pressure to approximately
23 psi (158 kPa). This tire pressure is sufficiently
low enough to turn on the TPMS Warning Light.
Driving the vehicle may cause the tire pressure to
rise to approximately 27 psi (186 kPa), but the
TPMS Warning Light will still be on. In this situa -
tion, the TPMS Warning Light will turn off only
after the tires are inflated to the vehicle’s recom -
mended cold placard pressure value. NOTE:
The TPMS is not intended to replace normal
tire care and maintenance or to provide
warning of a tire failure or condition.
If your vehicle is not equipped with the Tire
Fill Alert feature the TPMS should not be used
as a tire pressure gauge while adjusting your
tire pressure.
Driving on a significantly under-inflated tire
causes the tire to overheat and can lead to
tire failure. Under-inflation also reduces fuel
efficiency and tire tread life, and may affect
the vehicle’s handling and stopping ability.
The TPMS is not a substitute for proper tire
maintenance, and it is the driver’s responsi
-
bility to maintain correct tire pressure using
an accurate tire pressure gauge, even if
under-inflation has not reached the level to
trigger illumination of the TPMS Warning
Light.
Seasonal temperature changes will affect
tire pressure, and the TPMS will monitor the
actual tire pressure in the tire.
CAUTION!
The TPMS has been optimized for the orig -
inal equipment tires and wheels. TPMS
pressures and warning have been estab -
lished for the tire size equipped on your
vehicle. Undesirable system operation or
sensor damage may result when using
replacement equipment that is not of the
same size, type, and/or style. Aftermarket
wheels can cause sensor damage.
Using aftermarket tire sealants may cause
the Tire Pressure Monitoring System
(TPMS) sensor to become inoperable. After
using an aftermarket tire sealant it is
recommended that you take your vehicle to
an authorized dealership to have your
sensor function checked.
After inspecting or adjusting the tire pres -
sure always reinstall the valve stem cap.
This will prevent moisture and dirt from
entering the valve stem, which could
damage the TPMS sensor.
20_DJD2_OM_EN_USC_t.book Page 164
Page 173 of 553

SAFETY171
displayed, and a pressure value will display in
place of the dashes. A system fault can occur
due to any of the following:
Signal interference due to electronic devices
or driving next to facilities emitting the same
radio frequencies as the TPM sensors.
Installing aftermarket window tinting that
contains materials that may block radio wave
signals.
Accumulation of snow or ice around the
wheels or wheel housings.
Using tire chains on the vehicle.
Using wheels/tires not equipped with TPM
sensors.
General Information
The following regulatory statement applies to all
Radio Frequency (RF) devices equipped in this
vehicle:
This device complies with Part 15 of the FCC
Rules and with Innovation, Science and
Economic Development Canada license-exempt
RSS standard(s). Operation is subject to the
following two conditions:
1. This device may not cause harmful interfer
-
ence, and
2. This device must accept any interference received, including interference that may
cause undesired operation.
Le présent appareil est conforme aux CNR
d`Innovation, Science and Economic Develop -
ment applicables aux appareils radio exempts
de licence. L'exploitation est autorisée aux deux
conditions suivantes:
1. l'appareil ne doit pas produire de brouil -
lage, et
2. l'utilisateur de l'appareil doit accepter tout brouillage radioélectrique subi, même si le
brouillage est susceptible d'en comprom -
ettre le fonctionnement.
La operación de este equipo está sujeta a las
siguientes dos condiciones:
1. es posible que este equipo o dispositivo no cause interferencia perjudicial y
2. este equipo o dispositivo debe aceptar cual -
quier interferencia, incluyendo la que
pueda causar su operación no deseada. NOTE:
Changes or modifications not expressly
approved by the party responsible for compli
-
ance could void the user’s authority to operate
the equipment.
OCCUPANT RESTRAINT SYSTEMS
Some of the most important safety features in
your vehicle are the restraint systems:
Occupant Restraint Systems Features
Seat Belt Systems
Supplemental Restraint Systems (SRS) Air
Bags
Child Restraints
Some of the safety features described in this
section may be standard equipment on some
models, or may be optional equipment on
others. If you are not sure, ask an authorized
dealer.
Important Safety Precautions
Please pay close attention to the information in
this section. It tells you how to use your restraint
system properly, to keep you and your passen -
gers as safe as possible.
4
20_DJD2_OM_EN_USC_t.book Page 171
Page 188 of 553

186SAFETY
(Continued)
(Continued)
The SABIC deploys downward, covering the side
windows. An inflating SABIC pushes the outside
edge of the headliner out of the way and covers
the window. The SABICs inflate with enough
force to injure occupants if they are not belted
and seated properly, or if items are positioned
in the area where the SABICs inflate. Children
are at an even greater risk of injury from a
deploying air bag.
The SABICs may help reduce the risk of partial
or complete ejection of vehicle occupants
through side windows in certain side impact
events.
Side Impacts
The Side Air Bags are designed to activate in
certain side impacts. The Occupant Restraint
Controller (ORC) determines whether the
deployment of the Side Air Bags in a particular
impact event is appropriate, based on the
severity and type of collision. The side impact
sensors aid the ORC in determining the appro
-
priate response to impact events. The system is
calibrated to deploy the Side Air Bags on the
impact side of the vehicle during impacts that
require Side Air Bag occupant protection. In side
impacts, the Side Air Bags deploy inde -
pendently; a left side impact deploys the left
Side Air Bags only and a right-side impact deploys the right Side Air Bags only. Vehicle
damage by itself is not a good indicator of
whether or not Side Air Bags should have
deployed.
The Side Air Bags will not deploy in all side colli
-
sions, including some collisions at certain
angles, or some side collisions that do not
impact the area of the passenger compartment.
The Side Air Bags may deploy during angled or
offset frontal collisions where the front air bags
deploy.
Side Air Bags are a supplement to the seat belt
restraint system. Side Air Bags deploy in less
time than it takes to blink your eyes.
WARNING!
Do not mount equipment, or stack luggage
or other cargo up high enough to block the
deployment of the SABICs. The trim
covering above the side windows where the
SABIC and its deployment path are located
should remain free from any obstructions.
In order for the SABICs to work as intended,
do not install any accessory items in your
vehicle which could alter the roof. Do not
add an aftermarket sunroof to your vehicle.
Do not add roof racks that require perma -
nent attachments (bolts or screws) for
installation on the vehicle roof. Do not drill
into the roof of the vehicle for any reason.
WARNING! (Continued)
WARNING!
Occupants, including children, who are up
against or very close to Side Air Bags can be
seriously injured or killed. Occupants,
including children, should never lean on or
sleep against the door, side windows, or
area where the side air bags inflate, even if
they are in an infant or child restraint.
20_DJD2_OM_EN_USC_t.book Page 186
Page 191 of 553

SAFETY189
(Continued)
Enhanced Accident Response System
In the event of an impact, if the communication
network remains intact, and the power remains
intact, depending on the nature of the event,
the Occupant Restraint Controller (ORC) will
determine whether to have the Enhanced Acci -
dent Response System perform the following
functions:
Cut off fuel to the engine (if equipped)
Cut off battery power to the electric motor (if
equipped)
Flash hazard lights as long as the battery has
power
Turn on the interior lights, which remain on
as long as the battery has power or for
15 minutes from the intervention of the
Enhanced Accident Response System
Unlock the power door locks
Your vehicle may also be designed to perform
any of these other functions in response to the
Enhanced Accident Response System:
Turn off the Fuel Filter Heater, Turn off the
HVAC Blower Motor, Close the HVAC Circula -
tion Door
Cut off battery power to the:
Engine
Electric Motor (if equipped)
Electric power steering
Brake booster
Electric park brake
Automatic transmission gear selector
Horn
Front wiper
Headlamp washer pump
NOTE:
After an accident, remember to cycle the ignition
to the STOP (OFF/LOCK) position and remove the
key from the ignition switch to avoid draining the
battery. Carefully check the vehicle for fuel leaks
in the engine compartment and on the ground
near the engine compartment and fuel tank
before resetting the system and starting the
engine. If there are no fuel leaks or damage to the
vehicle electrical devices (e.g. headlights) after an
accident, reset the system by following the proce -
dure described below. If you have any doubt,
contact an authorized dealer.
Enhanced Accident Response System Reset
Procedure
In order to reset the Enhanced Accident
Response System functions after an event, the
ignition switch must be changed from ignition
START or ON/RUN to ignition OFF. Carefully
check the vehicle for fuel leaks in the engine
compartment and on the ground near the
engine compartment and fuel tank before reset -
ting the system and starting the engine.
Maintaining Your Air Bag System
WARNING!
Modifications to any part of the air bag
system could cause it to fail when you need
it. You could be injured if the air bag system
is not there to protect you. Do not modify
the components or wiring, including adding
any kind of badges or stickers to the
steering wheel hub trim cover or the upper
passenger side of the instrument panel. Do
not modify the front bumper, vehicle body
structure, or add aftermarket side steps or
running boards.
4
20_DJD2_OM_EN_USC_t.book Page 189
Page 225 of 553

STARTING AND OPERATING223
NOTE:
Use of Climatized Ultra Low Sulfur Diesel Fuel
or Number 1 Ultra Low Sulfur Diesel Fuel
results in a noticeable decrease in fuel
economy.
Climatized Ultra Low Sulfur Diesel Fuel is a
blend of Number 2 Ultra Low Sulfur and
Number 1 Ultra Low Sulfur Diesel Fuels
which reduces the temperature at which wax
crystals form in fuel.
The fuel grade should be clearly marked on
the pump at the fuel station.
The engine requires the use of “Ultra Low
Sulfur Diesel Fuel”. Use of incorrect fuel
could result in engine and exhaust system
damage. Refer to “Fuel Requirements” in
“Technical Specifications” for further infor -
mation.
If climatized or diesel Number 1 ULSD fuel is
not available, and you are operating below
(20°F/-6°C), in sustained arctic conditions,
Mopar Premium Diesel Fuel Treatment (or
equivalent) is recommended to avoid gelling
(see Fuel Operating Range Chart).
Under some circumstances increased
engine noise may be audible in the seconds
following a cold start. This is most likely to
occur when using fuel that isn't blended for
the ambient temperature present. This may
occur on an unseasonably cold day or when
a truck is fueled in a warmer climate and
driven to a colder climate. The noise can
typically be prevented by using Mopar
Premium Diesel Fuel Treatment as recom-
mended (see Fuel Operating Range Chart).
Engine Oil Usage
Refer to “Dealer Service” in “Servicing And
Maintenance” for the correct engine oil
viscosity.
Winter Front Cover Usage
A Winter front or cold weather cover is to be
used in ambient temperatures below 32°F
(0°C), especially during extended idle condi -
tions. This cover is equipped with four flaps for
managing total grille opening in varying ambient
temperatures. If a Winter front or cold weather
cover is to be used the flaps should be left in the
full open position to allow air flow to the charge
air cooler and automatic transmission oil
cooler. When ambient temperatures drop below
0°F (-17°C) the four flaps need to be closed. A suitable cold weather cover is available from
your Mopar dealer.
Battery Blanket Usage
A battery loses 60% of its cranking power as the
battery temperature decreases to 0°F (-18°C).
For the same decrease in temperature, the
engine requires twice as much power to crank
at the same RPM. The use of 120 VAC powered
battery blankets will greatly increase starting
capability at low temperatures. Suitable battery
blankets are available from your authorized
Mopar dealer.
Engine Warm-Up
Avoid full throttle operation when the engine is
cold. When starting a cold engine, bring the
engine up to operating speed slowly to allow the
oil pressure to stabilize as the engine warms up.
NOTE:
High-speed, no-load running of a cold engine
can result in excessive white smoke and poor
engine performance. No-load engine speeds
should be kept under 1,000 RPM during the
warm-up period, especially in cold ambient
temperature conditions.
5
20_DJD2_OM_EN_USC_t.book Page 223
Page 227 of 553
STARTING AND OPERATING225
1. With the transmission in PARK, the parking
brake applied, and the engine running,
push the speed control switch to the ON
position, then push the SET switch.
2. The engine RPM will go up to 1,100 RPM. To increase the RPM, push and hold the
ACCEL/RESUME switch and the idle speed
will increase to approximately 1,500 RPM.
To decrease the RPM, push and hold the
DECEL switch and the idle speed will
decrease to approximately 1,100 RPM.
3. To cancel the Idle–Up feature, either push the CANCEL switch, push the ON/OFF
switch, or press the brake pedal.
Noise
Diesel engines can create noises that may
seem concerning. The nature of a diesel engine
is compression ignition where compressed air and fuel are mixed and ignited. Weather, baro
-
metric pressure, altitude, and temperature will
affect how fuel is ignited in the engine. Engines
will sound different from day to day or previous
model years. Clicking, ticking, or light knocking
is normal and will change from day to day, as
the engine breaks in, and can vary with changes
in ambient temperature. Clicking sound from
under the hood shortly after vehicle shutdown is
normal as actuators such as the EGR valve are
cycled. Fuel pump noise may increase during
low speed/light load conditions when ambient
temperature is above 100°F (38°C), and when
fuel tank level is below 10% which is a normal
condition of the fuel system and controls
strategy. Diesel equipped vehicles also have an
exhaust after-treatment system to reduce emis -
sions utilizing a DPF (refer to “Odor” in this
section for further information) and a Selective
Reduction Catalyst (SCR). The SCR reduces
Nitrogen Oxides (NOx) using the Diesel Exhaust Fluid (DEF) system. DEF is injected directly into
the SCR through a dosing module. This process
will create a clicking sound and at times, will
make noise even with the vehicle shut off. This
is normal as the DEF dosing module is purging
DEF. If at any time the check engine light is on,
please visit an authorized dealer.
Stopping The Engine
Idle the engine a few minutes before routine
shutdown. After full load operation, idle the
engine three to five minutes before shutting it
down. This idle period will allow the lubricating
oil and coolant to carry excess heat away from
the combustion chamber, bearings, internal
components, and turbocharger. This is espe
-
cially important for turbocharged, charge
air-cooled engines. Refer to the following chart
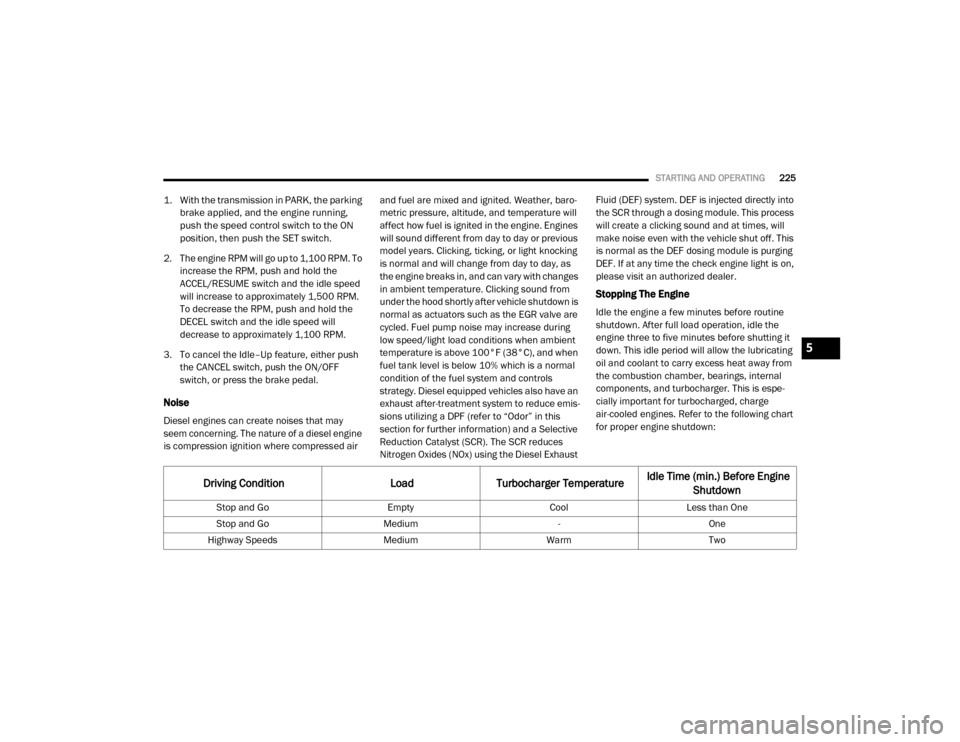
for proper engine shutdown:
Driving Condition Load Turbocharger Temperature Idle Time (min.) Before Engine
Shutdown
Stop and Go EmptyCoolLess than One
Stop and Go Medium -One
Highway Speeds MediumWarmTwo
5
20_DJD2_OM_EN_USC_t.book Page 225