battery Ram 2500 2020 Owner's Guide
[x] Cancel search | Manufacturer: RAM, Model Year: 2020, Model line: 2500, Model: Ram 2500 2020Pages: 553, PDF Size: 21.99 MB
Page 111 of 553

GETTING TO KNOW YOUR INSTRUMENT PANEL109
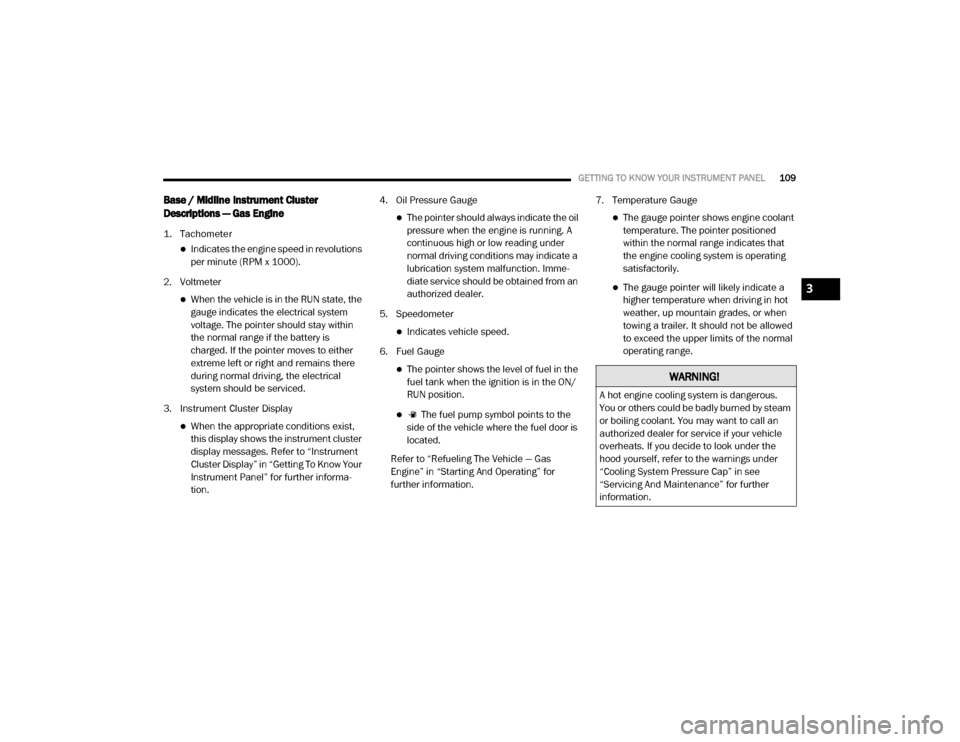
Base / Midline Instrument Cluster
Descriptions — Gas Engine
1. Tachometer
Indicates the engine speed in revolutions
per minute (RPM x 1000).
2. Voltmeter
When the vehicle is in the RUN state, the gauge indicates the electrical system
voltage. The pointer should stay within
the normal range if the battery is
charged. If the pointer moves to either
extreme left or right and remains there
during normal driving, the electrical
system should be serviced.
3. Instrument Cluster Display
When the appropriate conditions exist, this display shows the instrument cluster
display messages. Refer to “Instrument
Cluster Display” in “Getting To Know Your
Instrument Panel” for further informa -
tion. 4. Oil Pressure Gauge
The pointer should always indicate the oil
pressure when the engine is running. A
continuous high or low reading under
normal driving conditions may indicate a
lubrication system malfunction. Imme -
diate service should be obtained from an
authorized dealer.
5. Speedometer
Indicates vehicle speed.
6. Fuel Gauge
The pointer shows the level of fuel in the fuel tank when the ignition is in the ON/
RUN position.
The fuel pump symbol points to the
side of the vehicle where the fuel door is
located.
Refer to “Refueling The Vehicle — Gas
Engine” in “Starting And Operating” for
further information. 7. Temperature Gauge
The gauge pointer shows engine coolant
temperature. The pointer positioned
within the normal range indicates that
the engine cooling system is operating
satisfactorily.
The gauge pointer will likely indicate a higher temperature when driving in hot
weather, up mountain grades, or when
towing a trailer. It should not be allowed
to exceed the upper limits of the normal
operating range.
WARNING!
A hot engine cooling system is dangerous.
You or others could be badly burned by steam
or boiling coolant. You may want to call an
authorized dealer for service if your vehicle
overheats. If you decide to look under the
hood yourself, refer to the warnings under
“Cooling System Pressure Cap” in see
“Servicing And Maintenance” for further
information.
3
20_DJD2_OM_EN_USC_t.book Page 109
Page 122 of 553

120GETTING TO KNOW YOUR INSTRUMENT PANEL
Speedometer
Push and release the up or down arrow button
until the speedometer menu item is highlighted
in the instrument cluster display. Push and
release the right arrow button to cycle the
display between mph and km/h.
Vehicle Info
Push and release the up or down arrow button
until the Vehicle Info menu item is highlighted in
the instrument cluster display. Push and
release the right arrow button to enter the
submenus items of Vehicle Info. Follow the
directional prompts to access or reset any of the
following Vehicle Info submenu items:
Tire Pressure
Coolant Temperature
Transmission Temperature — If Equipped
Oil Temperature
Oil Pressure
Exhaust Brake — If Equipped
Turbo Boost — If Equipped
Oil Life
Fuel Filter Life — If Equipped
Battery Voltage
Gauge Summary
Engine Hours
Driver Assist — If Equipped
The Driver Assist menu displays the status of
the Adaptive Cruise Control (ACC) and Lane -
Sense systems.
Push and release the up or down arrow button
until the Driver Assist menu is displayed in the
instrument cluster display.
Adaptive Cruise Control (ACC) Feature
The instrument cluster display displays the
current ACC system settings. The information
displayed depends on ACC system status.
Push the Adaptive Cruise Control (ACC) on/off
button (located on the steering wheel) until one
of the following displays in the instrument
cluster display:
Adaptive Cruise Control Off
When ACC is deactivated, the display will read
“Adaptive Cruise Control Off.” Adaptive Cruise Control Ready
When ACC is activated but the vehicle speed
setting has not been selected, the display will
read “Adaptive Cruise Control Ready.”
Push the SET + or the SET- button (located on
the steering wheel) and the following will display
in the instrument cluster display:
ACC SET
When ACC is set, the set speed will display in
the instrument cluster.
The ACC screen may display once again if any
ACC activity occurs, which may include any of
the following:
Distance Setting Change
System Cancel
Driver Override
System Off
ACC Proximity Warning
ACC Unavailable Warning
For further information, refer to “Adaptive
Cruise Control (ACC) — If Equipped” in “Starting
And Operating.”
20_DJD2_OM_EN_USC_t.book Page 120
Page 124 of 553

122GETTING TO KNOW YOUR INSTRUMENT PANEL
feature allows you to change what information
is displayed in the instrument cluster as well as
the location that information is displayed.
Current Gear
Off (Default Setting)
On
Odometer
Unit Without Decimal (Default Setting)
Unit With Decimal
Favorite Menu
Speedometer
Vehicle Info
Driver Assist (Show/Hide) — If Equipped
Fuel Economy (Show/Hide)
Trip Info (Show/Hide)
Trailer Tow (Show/Hide)
Audio (Show/Hide)
Messages
Screen Setup
Commercial Settings — If Equipped NOTE:
Menus with (Show/Hide) can push the
Right
arrow button to choose whether to show or hide
this menu in the instrument cluster display.
Upper Left
None
Compass (Default Setting) — If Equipped
Outside Temp — If Equipped
Time
Range To Empty
Average MPG
Current MPG
Trip A Distance
Trip B Distance
Trailer Trip — If Equipped
Trailer Brake — If Equipped
Oil Pressure — If Equipped
Coolant Temperature — If Equipped
Oil Temperature — If Equipped
Battery Voltage — If Equipped
Transmission Temperature — If Equipped
Oil Life — If Equipped
Exhaust Brake — If Equipped
Turbo Boost — If Equipped
Fuel Filter Life — If Equipped
Upper Center
None
Compass
Outside Temp
Time
Range To Empty
Average MPG
Current MPG
Trip A Distance
Trip B Distance
Trailer Trip
Audio
Speedometer (Default Setting)
Menu Title
20_DJD2_OM_EN_USC_t.book Page 122
Page 125 of 553

GETTING TO KNOW YOUR INSTRUMENT PANEL123
Upper Right
None
Compass — If Equipped
Outside Temp (Default Setting) — If Equipped
Time
Range To Empty
Average MPG
Current MPG
Trip A Distance
Trip B Distance
Trailer Trip — If Equipped
Trailer Brake — If Equipped
Oil Pressure — If Equipped
Coolant Temperature — If Equipped
Oil Temperature — If Equipped
Battery Voltage — If Equipped
Transmission Temperature — If Equipped
Oil Life — If Equipped
Exhaust Brake — If Equipped
Turbo Boost — If Equipped
Fuel Filter Life — If Equipped
Left Side — If Equipped
None
Range
Average MPG
Menu Icon (Default Setting)
Coolant Temperature
Oil Temperature
Transmission Temperature
Oil Life
Fuel Filter Life — If Equipped
Right Side — If Equipped
None
Range (Default Setting)
Average MPG
Menu Icon
Coolant Temperature
Oil Temperature
Transmission Temperature
Oil Life
Fuel Filter Life — If Equipped
Lower Left — If Equipped
None
Compass
Outside Temp
Time
Range To Empty
Average MPG
Current MPG
Trip A Distance
Trip B Distance
Trailer Trip
Trailer Brake
Oil Pressure
Coolant Temperature
Oil Temperature
Battery Voltage (Default Setting)
3
20_DJD2_OM_EN_USC_t.book Page 123
Page 126 of 553

124GETTING TO KNOW YOUR INSTRUMENT PANEL
Transmission Temperature
Oil Life
Exhaust Brake — If Equipped
Turbo Boost — If Equipped
Fuel Filter Life — If Equipped
Lower Right — If Equipped
None
Compass
Outside Temp
Time
Range To Empty
Average MPG
Current MPG
Trip A Distance
Trip B Distance
Trailer Trip
Trailer Brake
Oil Pressure (Default Setting)
Coolant Temperature
Oil Temperature
Battery Voltage
Transmission Temperature
Oil Life
Exhaust Brake — If Equipped
Turbo Boost — If Equipped
Fuel Filter Life — If Equipped
Restore Defaults
Cancel (Default Setting)
Right Arrow Button
Commercial Settings — If Equipped
Commercial Settings allows the driver to set
and recall additional features when the trans-
mission is in PARK (P).
Push and release the up and down button until
Commercial Settings displays in the instrument
cluster display.
Follow the prompts to enter the required PIN
and enter the Commercial Settings submenu. Commercial Settings allows you to access the
following features (if equipped):
Backup Alarm
ParkSense
Aux Switches
PIN Setup
NOTE:
If the vehicle’s PIN is forgotten or not known,
see an authorized dealer to have the PIN reset.
Diesel Messages And Warnings — 6.7L
Cummins Diesel Engine
Diesel Particulate Filter (DPF) Messages
The Cummins diesel engine meets all diesel
emissions standards, resulting in one of the
lowest emitting diesel engines ever produced.
To achieve these emissions standards, your
vehicle is equipped with a state-of-the-art
engine and exhaust system. These systems are
seamlessly integrated into your vehicle and
managed by the Powertrain Control Module
(PCM). The PCM manages engine combustion
to allow the exhaust system’s catalyst to trap
and burn Particulate Matter (PM) pollutants,
with no input or interaction on your part.
20_DJD2_OM_EN_USC_t.book Page 124
Page 130 of 553

128GETTING TO KNOW YOUR INSTRUMENT PANEL
value where it stopped when a previous fault
was temporarily remedied, or at a minimum of
50 miles (80 km).
5 MPH Max Speed on Restart, Long Idle or
Refuel Service DEF See Dealer — This
message will continuously display when the
mileage counter reaches zero, and will be
accompanied by a periodic chime.
The vehicle will only be capable of a
maximum speed of 5 MPH upon the first of
the following conditions to occur:
If the vehicle is shutoff and restarted.
If the vehicle is idled for an extended
period of time, approximately one hour or
greater.
If the system detects that the level of fuel in the tank has increased.
5 MPH Max Speed Service DEF System See
Dealer — This message will continuously
display, and will be accompanied by a peri -
odic chime. Although the vehicle can be
started and placed in gear, the vehicle will
only operate at a maximum speed of 5 MPH.
Your vehicle will require towing, see an
authorized dealer for service. NOTE:
When this message is displayed, the engine can
still be started. However, the vehicle will only
operate at a maximum speed of 5 MPH.
Incorrect DEF Detected See Dealer
— This
message will display when the fault is initially
detected, each time the vehicle is started,
and periodically during driving. The message
will be accompanied by a single chime. We
recommend you drive to your nearest autho -
rized dealer and have your vehicle serviced
as soon as possible.
RAM Active Air System
Your vehicle is equipped with an advanced Ram
Active Air system that provides enhanced
performance, especially when towing under
demanding hot or high altitude conditions. If the
instrument cluster display displays the
message “Active Airbox Service Required See
Dealer”, vehicle performance may be reduced
until service is performed by an authorized RAM
dealer.
Battery Saver On/Battery Saver Mode
Message — Electrical Load Reduction
Actions — If Equipped
This vehicle is equipped with an Intelligent
Battery Sensor (IBS) to perform additional moni -
toring of the electrical system and status of the
vehicle battery.
In cases when the IBS detects charging system
failure, or the vehicle battery conditions are
deteriorating, electrical load reduction actions
will take place to extend the driving time and
distance of the vehicle. This is done by reducing
power to or turning off non-essential electrical
loads.
Load reduction is only active when the engine is
running. It will display a message if there is a
risk of battery depletion to the point where the
vehicle may stall due to lack of electrical supply,
or will not restart after the current drive cycle.
When load reduction is activated, the message
“Battery Saver On Some Systems May Have
Reduced Power” will appear in the instrument
cluster.
These messages indicate the vehicle battery
has a low state of charge and continues to lose
electrical charge at a rate that the charging
system cannot sustain.
20_DJD2_OM_EN_USC_t.book Page 128
Page 131 of 553

GETTING TO KNOW YOUR INSTRUMENT PANEL129
NOTE:
The charging system is independent from
load reduction. The charging system
performs a diagnostic on the charging
system continuously.
If the Battery Charge Warning Light is on it
may indicate a problem with the charging
system. Refer to “Warning Lights And
Messages” in “Getting To Know Your Instru-
ment Panel” for further information.
The electrical loads that may be switched off (if
equipped), and vehicle functions which can be
affected by load reduction:
Heated Seats/Vented Seats/Heated Wheel
Rear Defroster And Heated Mirrors
HVAC System
115 Volts AC Power Inverter System
Audio and Telematics System Loss of the battery charge may indicate one or
more of the following conditions:
The charging system cannot deliver enough
electrical power to the vehicle system
because the electrical loads are larger than
the capability of charging system. The
charging system is still functioning properly.
Turning on all possible vehicle electrical
loads (e.g. HVAC to max settings, exterior and
interior lights, overloaded power outlets
+12 Volts, 115 Volts AC, USB ports) during
certain driving conditions (city driving,
towing, frequent stopping).
Installing options like additional lights,
upfitter electrical accessories, audio
systems, alarms and similar devices.
Unusual driving cycles (short trips separated
by long parking periods).
The vehicle was parked for an extended
period of time (weeks, months).
The battery was recently replaced and was
not charged completely.
The battery was discharged by an electrical
load left on when the vehicle was parked.
The battery was used for an extended period
with the engine not running to supply radio,
lights, chargers, +12 Volts portable appli
-
ances like vacuum cleaners, game consoles
and similar devices.
What to do when an electrical load reduction
action message is present (“Battery Saver On”
or “Battery Saver Mode”)
During a trip:
Reduce power to unnecessary loads if
possible:
Turn off redundant lights (interior or exte -
rior).
Check what may be plugged in to power outlets +12 Volts, 115 Volts AC, USB
ports.
Check HVAC settings (blower, tempera -
ture).
Check the audio settings (volume).
3
20_DJD2_OM_EN_USC_t.book Page 129
Page 134 of 553

132GETTING TO KNOW YOUR INSTRUMENT PANEL
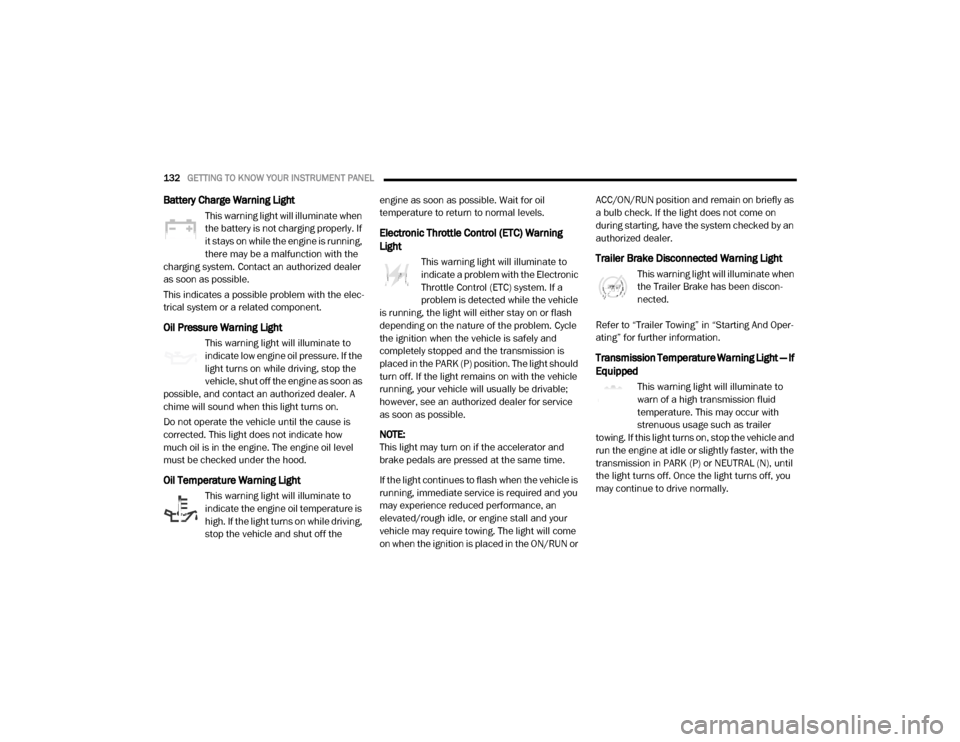
Battery Charge Warning Light
This warning light will illuminate when
the battery is not charging properly. If
it stays on while the engine is running,
there may be a malfunction with the
charging system. Contact an authorized dealer
as soon as possible.
This indicates a possible problem with the elec -
trical system or a related component.
Oil Pressure Warning Light
This warning light will illuminate to
indicate low engine oil pressure. If the
light turns on while driving, stop the
vehicle, shut off the engine as soon as
possible, and contact an authorized dealer. A
chime will sound when this light turns on.
Do not operate the vehicle until the cause is
corrected. This light does not indicate how
much oil is in the engine. The engine oil level
must be checked under the hood.
Oil Temperature Warning Light
This warning light will illuminate to
indicate the engine oil temperature is
high. If the light turns on while driving,
stop the vehicle and shut off the engine as soon as possible. Wait for oil
temperature to return to normal levels.
Electronic Throttle Control (ETC) Warning
Light
This warning light will illuminate to
indicate a problem with the Electronic
Throttle Control (ETC) system. If a
problem is detected while the vehicle
is running, the light will either stay on or flash
depending on the nature of the problem. Cycle
the ignition when the vehicle is safely and
completely stopped and the transmission is
placed in the PARK (P) position. The light should
turn off. If the light remains on with the vehicle
running, your vehicle will usually be drivable;
however, see an authorized dealer for service
as soon as possible.
NOTE:
This light may turn on if the accelerator and
brake pedals are pressed at the same time.
If the light continues to flash when the vehicle is
running, immediate service is required and you
may experience reduced performance, an
elevated/rough idle, or engine stall and your
vehicle may require towing. The light will come
on when the ignition is placed in the ON/RUN or ACC/ON/RUN position and remain on briefly as
a bulb check. If the light does not come on
during starting, have the system checked by an
authorized dealer.Trailer Brake Disconnected Warning Light
This warning light will illuminate when
the Trailer Brake has been discon
-
nected.
Refer to “Trailer Towing” in “Starting And Oper -
ating” for further information.
Transmission Temperature Warning Light — If
Equipped
This warning light will illuminate to
warn of a high transmission fluid
temperature. This may occur with
strenuous usage such as trailer
towing. If this light turns on, stop the vehicle and
run the engine at idle or slightly faster, with the
transmission in PARK (P) or NEUTRAL (N), until
the light turns off. Once the light turns off, you
may continue to drive normally.
20_DJD2_OM_EN_USC_t.book Page 132
Page 144 of 553

142GETTING TO KNOW YOUR INSTRUMENT PANEL
technician in making repairs. Although your
vehicle will usually be drivable and not need
towing, see an authorized dealer for service as
soon as possible.
Onboard Diagnostic System (OBD II)
Cybersecurity
Your vehicle is required to have an Onboard
Diagnostic system (OBD II) and a connection
port to allow access to information related to
the performance of your emissions controls.
Authorized service technicians may need to
access this information to assist with the diag-
nosis and service of your vehicle and emissions
system. For further information, refer to “Cybersecurity”
in “Multimedia”.
EMISSIONS INSPECTION AND
MAINTENANCE PROGRAMS
In some localities, it may be a legal requirement
to pass an inspection of your vehicle's emis
-sions control system. Failure to pass could
prevent vehicle registration.
For states that require an Inspection
and Maintenance (I/M), this check
verifies the “Malfunction Indicator
Light (MIL)” is functioning and is not
on when the engine is running, and that the
OBD II system is ready for testing.
Normally, the OBD II system will be ready. The
OBD II system may not be ready if your vehicle
was recently serviced, recently had a depleted
battery or a battery replacement. If the OBD II
system should be determined not ready for the
I/M test, your vehicle may fail the test.
Your vehicle has a simple ignition actuated test,
which you can use prior to going to the test
station. To check if your vehicle's OBD II system
is ready, you must do the following:
1. Cycle the ignition switch to the ON position, but do not crank or start the engine.
NOTE:
If you crank or start the engine, you will have to
start this test over.
CAUTION!
Prolonged driving with the MIL on could
cause further damage to the emission
control system. It could also affect fuel
economy and driveability. The vehicle must
be serviced before any emissions tests can
be performed.
If the MIL is flashing while the vehicle is
running, severe catalytic converter damage
and power loss will soon occur. Immediate
service is required.
WARNING!
ONLY an authorized service technician
should connect equipment to the OBD II
connection port in order to read the VIN,
diagnose, or service your vehicle.
If unauthorized equipment is connected to
the OBD II connection port, such as a
driver-behavior tracking device, it may:
Be possible that vehicle systems, including safety related systems, could
be impaired or a loss of vehicle control
could occur that may result in an acci -
dent involving serious injury or death.
Access, or allow others to access, infor -
mation stored in your vehicle systems,
including personal information.
20_DJD2_OM_EN_USC_t.book Page 142
Page 145 of 553

GETTING TO KNOW YOUR INSTRUMENT PANEL143
2. As soon as you cycle the ignition switch to
the ON position, you will see the “Malfunc -
tion Indicator Light (MIL)” symbol come on
as part of a normal bulb check.
3. Approximately 15 seconds later, one of two things will happen:
The MIL will flash for about 10 seconds
and then return to being fully illuminated
until you turn OFF the ignition or start the
engine. This means that your vehicle's
OBD II system is not ready and you
should not proceed to the I/M station.
The MIL will not flash at all and will
remain fully illuminated until you place
the ignition in the off position or start the
engine. This means that your vehicle's
OBD II system is ready and you can
proceed to the I/M station. If your OBD II system is not ready,
you should
see an authorized dealer or repair facility. If your
vehicle was recently serviced or had a battery
failure or replacement, you may need to do
nothing more than drive your vehicle as you
normally would in order for your OBD II system
to update. A recheck with the above test routine
may then indicate that the system is now ready.Regardless of whether your vehicle's OBD II
system is ready or not, if the MIL is illuminated
during normal vehicle operation you should
have your vehicle serviced before going to the I/
M station. The I/M station can fail your vehicle
because the MIL is on with the engine running.
3
20_DJD2_OM_EN_USC_t.book Page 143