audio Ram 3500 2020 Owner's Manual
[x] Cancel search | Manufacturer: RAM, Model Year: 2020, Model line: 3500, Model: Ram 3500 2020Pages: 568
Page 12 of 568
10
MULTIMEDIA
UCONNECT SYSTEMS ....................................... 467
CYBERSECURITY ............................................... 467
UCONNECT SETTINGS ....................................... 468
Uconnect 3 Settings ..................................468Uconnect 4/4C/4C NAV Settings .............484
Uconnect 4C NAV With 12-inch
Display Settings .........................................505
SAFETY AND GENERAL INFORMATION .......... 524
Safety Guidelines .......................................524
UCONNECT 3 WITH 5-INCH DISPLAY .............. 525
Introduction ................................................525
Radio Mode ................................................526
Media Mode ...............................................529Phone Mode ...............................................531
STEERING WHEEL AUDIO CONTROLS —
IF EQUIPPED ...................................................... 537
Radio Operation .........................................538
Media Mode ...............................................538
IPOD®/USB/MP3 CONTROL — IF EQUIPPED .. 538
RADIO OPERATION AND MOBILE PHONES ...540
Regulatory And Safety Information........... 540
VOICE RECOGNITION QUICK TIPS ................... 541
Introducing Uconnect ................................ 541
Get Started ................................................. 541
Basic Voice Commands............................. 542Radio .......................................................... 543
Media.......................................................... 543
Phone ......................................................... 543Voice Text Reply — If Equipped ................. 543
Climate (4C/4C NAV) ................................. 544
Navigation (4C NAV) .................................. 544Siri® Eyes Free — If Equipped ................. 545
Using Do Not Disturb ................................ 545
Android Auto™ — If Equipped ................... 545
Apple CarPlay® — If Equipped ................. 546
General Information .................................. 546Additional Information ............................... 547
CUSTOMER ASSISTANCE
SUGGESTIONS FOR OBTAINING SERVICE
FOR YOUR VEHICLE .......................................... 548
Prepare For The Appointment .................. 548Prepare A List............................................. 548
Be Reasonable With Requests ................. 548
IF YOU NEED ASSISTANCE .............................. 548
FCA US LLC Customer Center ................... 549
FCA Canada Inc. Customer Center ........... 549
In Mexico Contact ...................................... 549
Puerto Rico And US Virgin Islands ............ 549
Customer Assistance For The Hearing
Or Speech Impaired (TDD/TTY) ................ 549 Service Contract ....................................... 549
WARRANTY INFORMATION .............................. 550
MOPAR PARTS................................................... 550
REPORTING SAFETY DEFECTS ........................ 550
In The 50 United States And
Washington, D.C. ....................................... 550 In Canada ................................................... 550
PUBLICATION ORDER FORMS ........................ 551
20_DJD2_OM_EN_USC_t.book Page 10
Page 116 of 568

114GETTING TO KNOW YOUR INSTRUMENT PANEL
INSTRUMENT CLUSTER DISPLAY
C
ONTROLS
The instrument cluster display features a driver
interactive display that is located in the
instrument cluster.
Base Instrument Cluster Display Premium Instrument Cluster Display
The instrument cluster display menu items may
consist of the following:
Speedometer
Vehicle Info
Driver Assist — If Equipped
Fuel Economy
Trip Info
Trailer Tow — If Equipped
Audio
Messages
Screen Set Up
Commercial Settings — If Equipped
The system allows the driver to select
information by pushing the following instrument
cluster display control buttons located on the
left side of the steering wheel:
Instrument Cluster Display Control Buttons
1 – Instrument Cluster Display Controls
2 – Instrument Cluster Display Screen
1 – Instrument Cluster Display Controls
2 – Instrument Cluster Display Screen
20_DJD2_OM_EN_USC_t.book Page 114
Page 119 of 568

GETTING TO KNOW YOUR INSTRUMENT PANEL117
System Off
ACC Proximity Warning
ACC Unavailable Warning
For further information, refer to “Adaptive
Cruise Control (ACC) — If Equipped” in “Starting
And Operating.”
LaneSense — If Equipped
The instrument cluster display displays the
current LaneSense system settings. The
information displayed depends on LaneSense
system status and the conditions that need to
be met. For further information, refer to
“LaneSense — If Equipped” in “Starting And
Operating.”
Fuel Economy
Push and release the up or down arrow button
until the Fuel Economy menu item is highlighted
in the instrument cluster display. Push and Hold
the right arrow button to reset Average Fuel
Economy.
Current Fuel Economy Gauge
Average Fuel Economy Value
Range To Empty
Trip A/Trip B
Push and release the up or down arrow button
until the Trip menu item is highlighted in the
instrument cluster display. Push and release
the right arrow button to enter the submenus of
Trip A and Trip B. The Trip A or Trip B information
will display the following:
Distance
Average Fuel Economy
Elapsed Time
Push and hold right arrow button to reset all
information.
Trailer Tow — If Equipped
Push and release the up or down arrow button
until the Trailer Tow menu item is highlighted in
the instrument cluster display. Push and
release the right arrow button and the next
screen will display the following trailer trip
information:
Trip Distance (trailer specific): Push and hold
the right arrow button to reset the distance.
Trailer Brake
Output
Type
Gain
Trailer Tire Pressure — If Equipped
Audio
Push and release the up or down arrow button
until the Audio Menu icon/title is highlighted in
the instrument cluster display. This menu will
display the audio source information, including
the Song name, Artist name, and audio source
with an accompanying graphic.
Phone Call Status
When a call is incoming, a Phone Call Status
pop-up will display on the screen. The pop-up
will remain until the phone is answered or
ignored.
NOTE:
The call status will temporarily replace the
previous media source information displayed
on the screen. When the pop-up is no longer
displayed, the display will return to the last used
screen.
3
20_DJD2_OM_EN_USC_t.book Page 117
Page 120 of 568
118GETTING TO KNOW YOUR INSTRUMENT PANEL
Stored Messages
Push and release the up or down arrow button
until the Messages Menu item is highlighted.
This feature shows the number of stored
warning messages. Push and release the right
or left arrow buttons to cycle through stored
messages.
Screen Setup Menu Item
Push and release the up or down arrow button
until the Screen Setup menu item is highlighted
in the instrument cluster display. Push and
release the right arrow button to enter the
Screen Setup submenu. The Screen Setup
feature allows you to change what information
is displayed in the instrument cluster as well as
the location that information is displayed.
Current Gear — If Equipped
Off (Default Setting)
On
Odometer
Unit Without Decimal (Default Setting)
Unit With Decimal Favorite Menu
Speedometer
Vehicle Info
Driver Assist (Show/Hide) — If Equipped
Fuel Economy (Show/Hide)
Trip Info (Show/Hide)
Trailer Tow (Show/Hide) — If Equipped
Audio (Show/Hide)
Messages
Screen Setup
Commercial Settings — If Equipped
NOTE:
Menus with (Show/Hide) can push the Right
arrow button to choose whether to show or hide
this menu in the instrument cluster display.
Upper Left
None
Compass (Default Setting) — If Equipped
Outside Temp — If Equipped
Time
Range To Empty
Average MPG
Current MPG
Trip A Distance
Trip B Distance
Trailer Trip — If Equipped
Trailer Brake — If Equipped
Oil Pressure — If Equipped
Coolant Temperature — If Equipped
Oil Temperature — If Equipped
Battery Voltage — If Equipped
Transmission Temperature — If Equipped
Oil Life — If Equipped
Exhaust Brake — If Equipped
Turbo Boost — If Equipped
Fuel Filter Life — If Equipped
20_DJD2_OM_EN_USC_t.book Page 118
Page 121 of 568

GETTING TO KNOW YOUR INSTRUMENT PANEL119
Center
None
Compass
Outside Temp
Time
Range To Empty
Average MPG
Current MPG
Trip A Distance
Trip B Distance
Trailer Trip — If Equipped
Audio
Speedometer (Default Setting)
Menu Title
Upper Right
None
Compass — If Equipped
Outside Temp (Default Setting) — If Equipped
Time
Range To Empty
Average MPG
Current MPG
Trip A Distance
Trip B Distance
Trailer Trip — If Equipped
Trailer Brake — If Equipped
Oil Pressure — If Equipped
Coolant Temperature — If Equipped
Oil Temperature — If Equipped
Battery Voltage — If Equipped
Transmission Temperature — If Equipped
Oil Life — If Equipped
Exhaust Brake — If Equipped
Turbo Boost — If Equipped
Fuel Filter Life — If Equipped Left Side — If Equipped
None
Range
Average MPG
Menu Icon (Default Setting)
Coolant Temperature
Oil Temperature
Transmission Temperature
Oil Life
Fuel Filter Life — If Equipped
Right Side — If Equipped
None
Range (Default Setting)
Average MPG
Menu Icon
3
20_DJD2_OM_EN_USC_t.book Page 119
Page 131 of 568

GETTING TO KNOW YOUR INSTRUMENT PANEL129
demanding hot or high altitude conditions. If the
instrument cluster display displays the
message “Active Airbox Service Required See
Dealer”, vehicle performance may be reduced
until service is performed by an authorized RAM
dealer.
BATTERY SAVER ON/BATTERY SAVER
M
ODE MESSAGE — ELECTRICAL LOAD
R
EDUCTION ACTIONS — IF EQUIPPED
This vehicle is equipped with an Intelligent
Battery Sensor (IBS) to perform additional
monitoring of the electrical system and status
of the vehicle battery.
In cases when the IBS detects charging system
failure, or the vehicle battery conditions are
deteriorating, electrical load reduction actions
will take place to extend the driving time and
distance of the vehicle. This is done by reducing
power to or turning off non-essential electrical
loads.
Load reduction is only active when the engine is
running. It will display a message if there is a
risk of battery depletion to the point where the
vehicle may stall due to lack of electrical supply,
or will not restart after the current drive cycle. When load reduction is activated, the message
“Battery Saver On Some Systems May Have
Reduced Power” will appear in the instrument
cluster.
These messages indicate the vehicle battery
has a low state of charge and continues to lose
electrical charge at a rate that the charging
system cannot sustain.
NOTE:The charging system is independent from
load reduction. The charging system
performs a diagnostic on the charging
system continuously.
If the Battery Charge Warning Light is on it
may indicate a problem with the charging
system. Refer to “Warning Lights And
Messages” in “Getting To Know Your Instru
-
ment Panel” for further information.
The electrical loads that may be switched off (if
equipped), and vehicle functions which can be
affected by load reduction:
Heated Seats/Vented Seats/Heated Wheel
Rear Defroster And Heated Mirrors
HVAC System
115 Volts AC Power Inverter System
Audio and Telematics System
Loss of the battery charge may indicate one or
more of the following conditions:
The charging system cannot deliver enough
electrical power to the vehicle system
because the electrical loads are larger than
the capability of charging system. The
charging system is still functioning properly.
Turning on all possible vehicle electrical
loads (e.g. HVAC to max settings, exterior and
interior lights, overloaded power outlets
+12 Volts, 115 Volts AC, USB ports) during
certain driving conditions (city driving,
towing, frequent stopping).
Installing options like additional lights,
upfitter electrical accessories, audio
systems, alarms and similar devices.
Unusual driving cycles (short trips separated
by long parking periods).
The vehicle was parked for an extended
period of time (weeks, months).
3
20_DJD2_OM_EN_USC_t.book Page 129
Page 132 of 568
130GETTING TO KNOW YOUR INSTRUMENT PANEL
The battery was recently replaced and was
not charged completely.
The battery was discharged by an electrical
load left on when the vehicle was parked.
The battery was used for an extended period
with the engine not running to supply radio,
lights, chargers, +12 Volts portable appli-
ances like vacuum cleaners, game consoles
and similar devices.
What to do when an electrical load reduction
action message is present (“Battery Saver On”
or “Battery Saver Mode”)
During a trip:
Reduce power to unnecessary loads if
possible:
Turn off redundant lights (interior or
exterior).
Check what may be plugged in to power
outlets +12 Volts, 115 Volts AC, USB
ports.
Check HVAC settings (blower, tempera -
ture).
Check the audio settings (volume). After a trip:
Check if any aftermarket equipment was
installed (additional lights, upfitter electrical
accessories, audio systems, alarms) and
review specifications if any (load and Ignition
Off Draw currents).
Evaluate the latest driving cycles (distance,
driving time and parking time).
The vehicle should have service performed if
the message is still present during consecu
-
tive trips and the evaluation of the vehicle
and driving pattern did not help to identify the
cause.
WARNING LIGHTS AND MESSAGES
The warning/indicator lights will illuminate in
the instrument panel together with a dedicated
message and/or acoustic signal when
applicable. These indications are indicative and
precautionary and as such must not be
considered as exhaustive. Always refer to the
information in this chapter in the event of a
failure indication. All active telltales will display
first if applicable. The system check menu may
appear different based upon equipment
options and current vehicle status. Some
telltales are optional and may not appear.
RED WARNING LIGHTS
Seat Belt Reminder Warning Light
This warning light indicates when the
driver or passenger seat belt is
unbuckled. When the ignition is first
placed in the ON/RUN or ACC/ON/
RUN position and if the driver’s seat belt is
unbuckled, a chime will sound and the light will
turn on. When driving, if the driver or front
passenger seat belt remains unbuckled, the
Seat Belt Reminder Light will flash or remain on
continuously and a chime will sound.
Refer to “Occupant Restraint Systems” in
“Safety” for further information.
Air Bag Warning Light
This warning light will illuminate to
indicate a fault with the air bag, and
will turn on for four to eight seconds
as a bulb check when the ignition is
placed in the ON/RUN or ACC/ON/RUN
position. This light will illuminate with a single
chime when a fault with the air bag has been
detected, it will stay on until the fault is cleared.
If the light is either not on during startup, stays
20_DJD2_OM_EN_USC_t.book Page 130
Page 248 of 568
246STARTING AND OPERATING
AUXILIARY SWITCHES — IF EQUIPPED
There can be up to six auxiliary switches located
in the lower switch bank of the instrument panel
which can be used to power various electronic
devices and PTO (Power Take Off) – If Equipped.
If Power Take Off is equipped, it will take the
place of the sixth Auxiliary switch. Connections
to the switches are found under the hood in the
connectors attached to the auxiliary Power
Distribution Center.
You have the ability to configure the
functionality of the auxiliary switches via the
instrument cluster display. All switches can now
be configured for setting the switch type
operation to latching or momentary, power
source of either battery or ignition, and ability to
hold last state across key cycles.
NOTE:
Holding last state conditions are met when
switch type is set to latching and power source
is set to ignition.
For further information on using the auxiliary
switches, please refer to the Ram Body Builders
Guide by accessing www.rambodybuilder.com
and choosing the appropriate links.
ACTIVE NOISE CANCELLATION
Your vehicle is equipped with an Active Noise
Cancellation system that cannot be turned off.
This system is designed to address exhaust and
engine noise. The system relies on four
microphones embedded in the headliner, which
monitor exhaust and engine noise, and assists
an onboard frequency generator, which creates
counteracting sound waves in the audio
system’s speakers. This helps keep the vehicle
quiet at idle and during drive. The system is
deactivated when the windows are rolled down.
FOUR-WHEEL DRIVE OPERATION — IF
EQUIPPED
Four-wheel drive trucks are equipped with
either a manually shifted transfer case or an
electronically shifted transfer case. Refer to the
operating instructions for your transfer case,
located in this section for further information.
ELECTRONICALLY SHIFTED TRANSFER
C
ASE (EIGHT SPEED TRANSMISSION) —
I
F EQUIPPED
This is an electronic shift transfer case and is
operated by the 4WD Control Switch (Transfer
Case Switch), which is located on the
instrument panel.
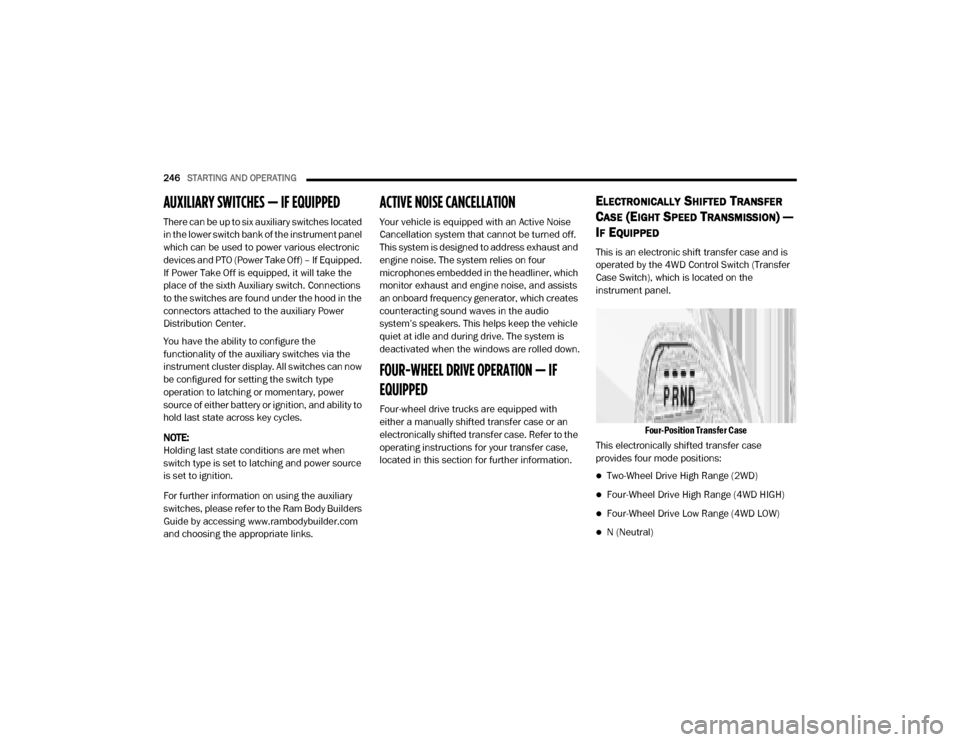
Four-Position Transfer Case
This electronically shifted transfer case
provides four mode positions:
Two-Wheel Drive High Range (2WD)
Four-Wheel Drive High Range (4WD HIGH)
Four-Wheel Drive Low Range (4WD LOW)
N (Neutral)
20_DJD2_OM_EN_USC_t.book Page 246
Page 300 of 568
298STARTING AND OPERATING
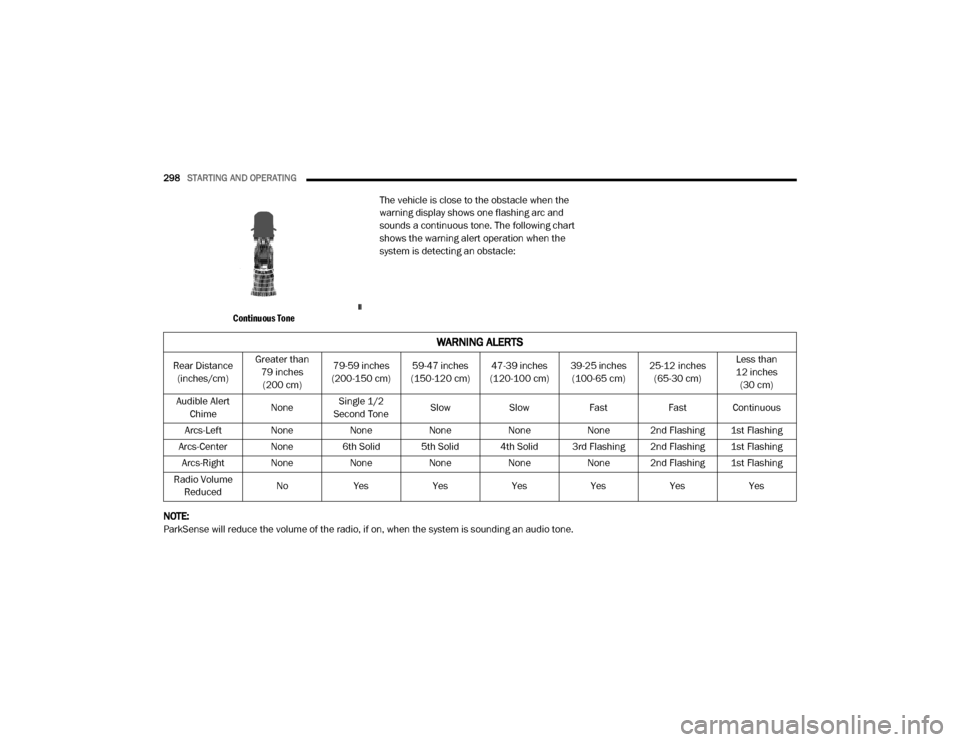
Continuous Tone
The vehicle is close to the obstacle when the
warning display shows one flashing arc and
sounds a continuous tone. The following chart
shows the warning alert operation when the
system is detecting an obstacle:
NOTE:
ParkSense will reduce the volume of the radio, if on, when the system is sounding an audio tone.
WARNING ALERTS
Rear Distance (inches/cm) Greater than
79 inches (200 cm) 79-59 inches
(200-150 cm) 59-47 inches
(150-120 cm) 47-39 inches
(120-100 cm) 39-25 inches
(100-65 cm) 25-12 inches
(65-30 cm) Less than
12 inches (30 cm)
Audible Alert Chime NoneSingle 1/2
Second Tone Slow
Slow FastFast Continuous
Arcs-Left None NoneNoneNoneNone 2nd Flashing 1st Flashing
Arcs-Center None 6th Solid 5th Solid 4th Solid 3rd Flashing 2nd Flashing 1st Flashing Arcs-Right None NoneNoneNoneNone 2nd Flashing 1st Flashing
Radio Volume Reduced No
Yes YesYesYesYesYes
20_DJD2_OM_EN_USC_t.book Page 298
Page 306 of 568

304STARTING AND OPERATING
NOTE:
ParkSense will reduce the volume of the radio, if
on, when the system is sounding an audio tone.
Front Park Assist Audible Alerts
ParkSense will turn off the Front Park Assist
audible alert (chime) after approximately three
seconds when an obstacle has been detected,
the vehicle is stationary, and brake pedal is
applied.
Adjustable Chime Volume Settings
The Front and Rear chime volume settings are
programmable through the Uconnect system.
Refer to “Uconnect Settings” in “Multimedia”
for further information. The chime volume settings include low,
medium, and high. The factory default volume is
medium.
ENABLING AND DISABLING FRONT
A
ND/OR REAR PARKSENSE
Front ParkSense can be enabled and disabled
with the Front ParkSense switch.
Rear ParkSense can be enabled and disabled
with the Rear ParkSense switch. When the gear selector is moved to
REVERSE and the Front or Rear
system is disabled, the instrument
cluster display will show a vehicle
graphic with an “Off” message overlay over the
system that is off (Front or Rear system). This
vehicle graphic will be displayed for as long as
the vehicle is in REVERSE.
The Front or Rear ParkSense switch LED will be
on when Front or Rear ParkSense is disabled or
requires service. The Front or Rear ParkSense
switch LED will be off when the Front or Rear
system is enabled. If the Front or Rear
ParkSense switch is pushed, and the system
WARNING ALERTS FOR FRONT
Front Distance (inches/cm) Greater than 47 inches
(120 cm) 47-39 inches
(120-100 cm) 39-25 inches
(100-65 cm) 25-12 inches
(65-30 cm) Less than 12 inches
(30 cm)
Audible Alert Chime NoneNoneNone FastContinuous
Arcs-Left NoneNoneNone2nd Flashing 1st Flashing
Arcs-Center None4th Solid 3rd Flashing 2nd Flashing 1st Flashing
Arcs-Right NoneNoneNone2nd Flashing 1st Flashing
Radio Volume Reduced No
NoNo Yes Yes
20_DJD2_OM_EN_USC_t.book Page 304