Ram 4500 Chassis Cab 2018 User Guide
Manufacturer: RAM, Model Year: 2018, Model line: 4500 Chassis Cab, Model: Ram 4500 Chassis Cab 2018Pages: 298, PDF Size: 5.88 MB
Page 141 of 298

Materials Added To Fuel
Designated TOP TIER
Detergent Gasoline
contains a higher level
of detergents to further
aide in minimizing en-
gine and fuel system
deposits. When avail-
able, the usage of Top
Tier Detergent gasoline is recommended.
Visit www.toptiergas.com for a list of TOP
TIER Detergent Gasoline Retailers.
Indiscriminate use of fuel system cleaning
agents should be avoided. Many of these
materials intended for gum and varnish re-
moval may contain active solvents or similar
ingredients. These can harm fuel system gas-
ket and diaphragm materials.
REFUELING THE VEHICLE — DIESEL
CHASSIS CAB MODELS
CAUTION!
To avoid fuel spillage and overfilling, do
not “top off” the fuel tank after filling.
NOTE:
• When the fuel nozzle “clicks” or shuts off, the fuel tank is full.
• Tighten the fuel filler cap until you hear a “clicking” sound. This is an indication that
the fuel filler cap is properly tightened.
• Make sure that the fuel filler cap is tight- ened each time the vehicle is refueled.
WARNING!
A fire may result if gasoline is pumped into
a portable container that is inside of a
vehicle. You could be burned. Always
place gas containers on the ground while
filling.
Diesel Exhaust Fluid
Your vehicle is equipped with a Selective
Catalytic Reduction system to meet the very
stringent diesel emissions standards required
by the Environmental Protection Agency.
The purpose of the SCR system is to reduce
levels of NOx (oxides of nitrogen emitted from
engines) that are harmful to our health and
the environment to a near-zero level. Small
quantities of Diesel Exhaust Fluid (DEF) is
injected into the exhaust upstream of a cata-
lyst where, when vaporized, it converts smog-
forming nitrogen oxides (NOx) into harmless
nitrogen (N2) and water vapor (H2O), two
natural components of the air we breathe.
You can operate with the comfort that your
vehicle is contributing to a cleaner, healthier
world environment for this and generations to
come.
System Overview
This vehicle is equipped with a Diesel Ex-
haust Fluid (DEF) injection system and a
Selective Catalytic Reduction (SCR) catalyst
to meet the emission requirements.
139
Page 142 of 298
The DEF injection system consists of the
following components:
• DEF tank
• DEF pump
• DEF injector
• Electronically-heated DEF lines
• DEF control module
• NOx sensors
• Temperature sensors
• SCR catalyst
• UQS Sensor
Refer to “Instrument Cluster Display” in
“Getting To Know Your Instrument Panel” for
system messages and warnings.
NOTE:
• Your vehicle is equipped with a DEF injec-tion system. You may occasionally hear an
audible clicking noise. This is normal op-
eration.
• The DEF pump will run for a period of time after engine shutdown to purge the DEF
system. This is normal operation.Diesel Exhaust Fluid Storage
Diesel Exhaust Fluid (DEF) is considered a
very stable product with a long shelf life. If
DEF is kept in temperatures between 10° and
90°F (-12° and 32°C), it will last a minimum
of one year.
DEF is subject to freezing at the lowest tem-
peratures. For example, DEF may freeze at
temperatures at or below 12° F (-11° C). The
system has been designed to operate in this
environment.
NOTE:
When working with DEF, it is important to
know that:
• Any containers or parts that come into con-tact with DEF must be DEF compatible
(plastic or stainless steel). Copper, brass,
aluminum, iron or non-stainless steel
should be avoided as they are subject to
corrosion by DEF.
• If DEF is spilled, it should be wiped up completely.
Adding Diesel Exhaust Fluid
The DEF gauge (located on the instrument
cluster) will display the level of DEF remain-
ing in the tank. Refer to “Instrument Cluster”
and “Instrument Cluster Descriptions” in
“Getting To Know Your Instrument Panel” for
further information.
NOTE:
• Driving conditions (altitude, vehicle speed,load, etc.) will effect the amount of DEF
that is used in your vehicle.
• Another factor is that outside temperature can affect DEF consumption. In cold con-
ditions, 12° F (-11° C) and below, the DEF
gauge needle can stay on a fixed position
and may not move for extended periods of
time. This is a normal function of the sys-
tem.
• There is an electric heater inside the DEF tank that automatically works when neces-
sary. And if the DEF supply does freeze, the
truck will operate normally until it thaws.
STARTING AND OPERATING
140
Page 143 of 298
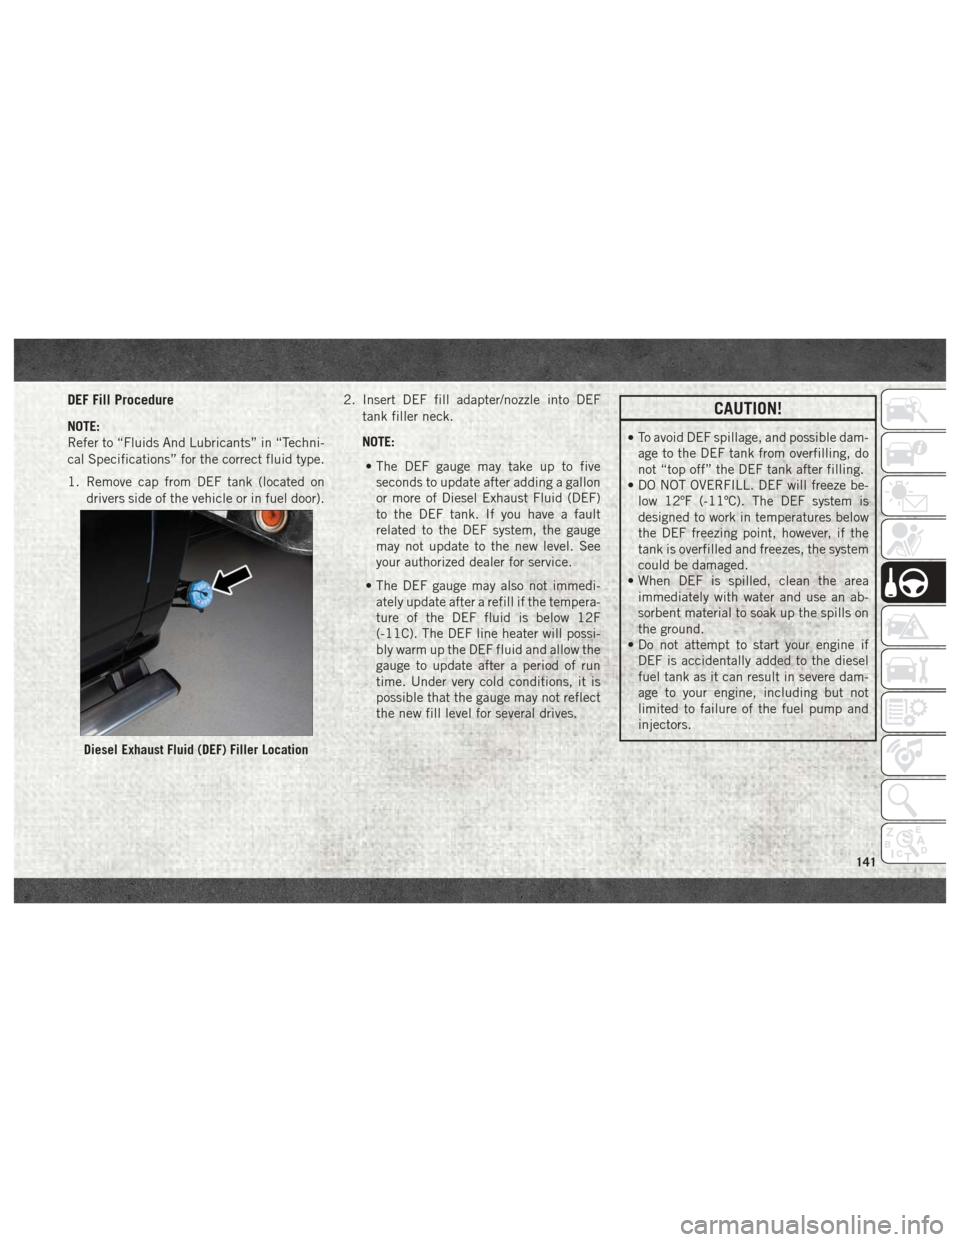
DEF Fill Procedure
NOTE:
Refer to “Fluids And Lubricants” in “Techni-
cal Specifications” for the correct fluid type.
1. Remove cap from DEF tank (located ondrivers side of the vehicle or in fuel door). 2. Insert DEF fill adapter/nozzle into DEF
tank filler neck.
NOTE: • The DEF gauge may take up to five seconds to update after adding a gallon
or more of Diesel Exhaust Fluid (DEF)
to the DEF tank. If you have a fault
related to the DEF system, the gauge
may not update to the new level. See
your authorized dealer for service.
• The DEF gauge may also not immedi- ately update after a refill if the tempera-
ture of the DEF fluid is below 12F
(-11C). The DEF line heater will possi-
bly warm up the DEF fluid and allow the
gauge to update after a period of run
time. Under very cold conditions, it is
possible that the gauge may not reflect
the new fill level for several drives.
CAUTION!
•To avoid DEF spillage, and possible dam-
age to the DEF tank from overfilling, do
not “top off” the DEF tank after filling.
• DO NOT OVERFILL. DEF will freeze be- low 12ºF (-11ºC). The DEF system is
designed to work in temperatures below
the DEF freezing point, however, if the
tank is overfilled and freezes, the system
could be damaged.
• When DEF is spilled, clean the area immediately with water and use an ab-
sorbent material to soak up the spills on
the ground.
• Do not attempt to start your engine if DEF is accidentally added to the diesel
fuel tank as it can result in severe dam-
age to your engine, including but not
limited to failure of the fuel pump and
injectors.
Diesel Exhaust Fluid (DEF) Filler Location
141
Page 144 of 298

CAUTION!
• Never add anything other than DEF tothe tank – especially any form of hydro-
carbon such as diesel fuel, fuel system
additives, gasoline, or any other
petroleum-based product. Even a very
small amount of these, less than
100 parts per million or less than 1 oz.
per 78 gallons (295 liters) will contami-
nate the entire DEF system and will
require replacement. If owners use a
container, funnel or nozzle when refilling
the tank, it should either be new or one
that is has only been used for adding
DEF. Mopar provides an attachable
nozzle with its DEF for this purpose.
3. Stop filling the DEF tank immediately when any of the following happen: DEF
stops flowing from the fill bottle into the
DEF tank, DEF splashes out the filler
neck, or a DEF pump nozzle automatically
shuts off.
4. Reinstall cap onto DEF tank. Filling The Def Tank In Cold Climates
Since DEF will begin to freeze at 12°F
(-11°C), your vehicle is equipped with an
automatic DEF heating system. This allows
the DEF injection system to operate properly
at temperatures below 12°F (-11°C). If your
vehicle is not in operation for an extended
period of time with temperatures below 12°F
(-11°C), the DEF in the tank may freeze. If
the tank is overfilled and freezes, it could be
damaged. Therefore, do not overfill the DEF
tank.
Extra care should be taken when filling with
portable containers to avoid overfilling. Note
the level of the DEF gauge in your instrument
cluster. You may safely add a maximum of
2 gallons (7.5 Liters) of DEF from portable
containers when your DEF gauge is reading ½
full.
TRAILER TOWING
Trailer Towing Weights (Maximum
Trailer Weight Ratings)
NOTE:
For trailer towing information (maximum
trailer weight ratings) refer to the following
website addresses:
•
ramtrucks.com/en/towing_guide/
• ramtruck.ca (Canada)
• rambodybuilder.com
Towing Requirements
To promote proper break-in of your new ve-
hicle drivetrain components, the following
guidelines are recommended.
CAUTION!
• Do not tow a trailer at all during the first
500 miles (805 km) the new vehicle is
driven. The engine, axle or other parts
could be damaged.
STARTING AND OPERATING
142
Page 145 of 298

CAUTION!
• Then, during the first 500 miles(805 km) that a trailer is towed, do not
drive over 50 mph (80 km/h) and do not
make starts at full throttle. This helps
the engine and other parts of the vehicle
wear in at the heavier loads.
Perform the maintenance listed in the
“Scheduled Servicing”. Refer to “Scheduled
Servicing” in “Servicing And Maintenance”
for the proper maintenance intervals. When
towing a trailer, never exceed the GAWR or
GCWR ratings.
WARNING!
Improper towing can lead to a collision.
Follow these guidelines to make your
trailer towing as safe as possible:
• Make certain that the load is secured in the trailer and will not shift during travel.
When trailering cargo that is not fully
secured, dynamic load shifts can occur
that may be difficult for the driver to
WARNING!
control. You could lose control of your
vehicle and have a collision.
• When hauling cargo or towing a trailer,
do not overload your vehicle or trailer.
Overloading can cause a loss of control,
poor performance or damage to brakes,
axle, engine, transmission, steering,
suspension, chassis structure or tires.
• Safety chains must always be used be-
tween your vehicle and trailer. Always
connect the chains to the hook retainers
of the vehicle hitch. Cross the chains
under the trailer tongue and allow
enough slack for turning corners.
• Vehicles with trailers should not be
parked on a grade. When parking, apply
the parking brake on the tow vehicle. Put
the tow vehicle transmission in PARK.
For four-wheel drive vehicles, make sure
the transfer case is not in NEUTRAL.
Always, block or "chock" the trailer
wheels.
• GCWR must not be exceeded.
WARNING!
• Total weight must be distributed between
the tow vehicle and the trailer such that the
following four ratings are not exceeded:
1. GVWR
2. GTW
3. GAWR
4. Tongue weight rating for the trailer hitch utilized.
Towing Requirements — Trailer Brakes
•Do notinterconnect the hydraulic brake
system or vacuum system of your vehicle
with that of the trailer. This could cause
inadequate braking and possible personal
injury.
• An electronically actuated trailer brake controller is required when towing a trailer
with electronically actuated brakes. When
towing a trailer equipped with a hydraulic
surge actuated brake system, an electronic
brake controller is not required.
143
Page 146 of 298
• Trailer brakes are recommended for trailersover 1,000 lbs (453 kg) and required for
trailers in excess of 2,000 lbs (907 kg).
WARNING!
•Do not connect trailer brakes to your vehi-
cle's hydraulic brake lines. It can overload
your brake system and cause it to fail. You
might not have brakes when you need them
and could have a collision.
• Towing any trailer will increase your stopping distance. When towing you
should allow for additional space be-
tween your vehicle and the vehicle in
front of you. Failure to do so could result
in a collision.
CAUTION!
If the trailer weighs more than 1,000 lbs
(453 kg) loaded, it should have its own
brakes and they should be of adequate
capacity. Failure to do this could lead to
accelerated brake lining wear, higher
brake pedal effort, and longer stopping
distances.
Integrated Trailer Brake Module — If Equipped
Your vehicle may have an Integrated Trailer
Brake Module (ITBM) for Electric and Elec-
tric Over Hydraulic (EOH) trailer brakes.
NOTE:
This module has been designed and verified
with electric trailer brakes and new electric
over hydraulic systems. Some previous EOH
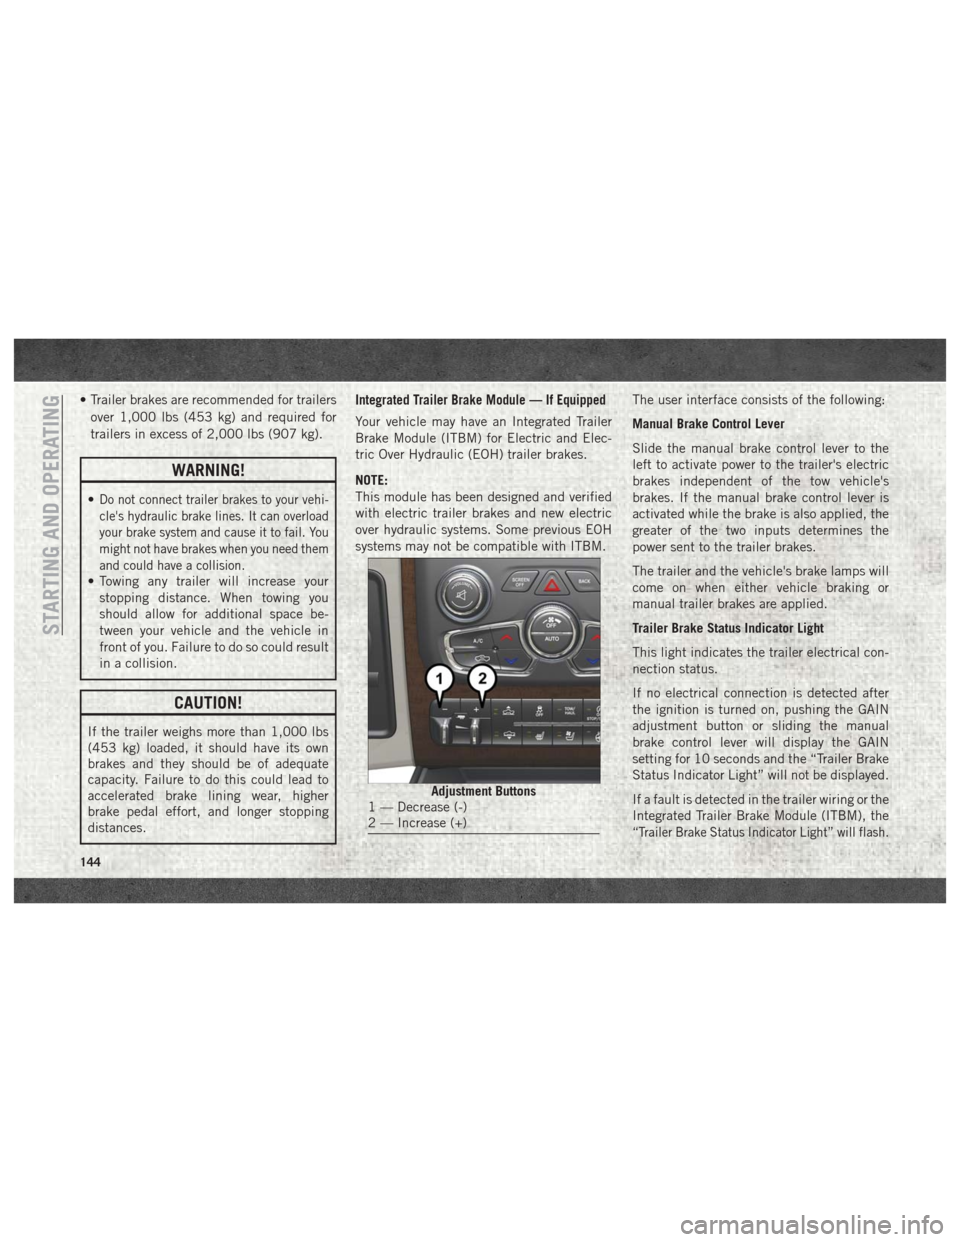
systems may not be compatible with ITBM. The user interface consists of the following:
Manual Brake Control Lever
Slide the manual brake control lever to the
left to activate power to the trailer's electric
brakes independent of the tow vehicle's
brakes. If the manual brake control lever is
activated while the brake is also applied, the
greater of the two inputs determines the
power sent to the trailer brakes.
The trailer and the vehicle's brake lamps will
come on when either vehicle braking or
manual trailer brakes are applied.
Trailer Brake Status Indicator Light
This light indicates the trailer electrical con-
nection status.
If no electrical connection is detected after
the ignition is turned on, pushing the GAIN
adjustment button or sliding the manual
brake control lever will display the GAIN
setting for 10 seconds and the “Trailer Brake
Status Indicator Light” will not be displayed.
If a fault is detected in the trailer wiring or the
Integrated Trailer Brake Module (ITBM), the
“Trailer Brake Status Indicator Light” will flash.
Adjustment Buttons1 — Decrease (-)
2 — Increase (+)
STARTING AND OPERATING
144
Page 147 of 298
GAIN Adjustment Buttons (+/-)
Pushing these buttons will adjust the brake
control power output to the trailer brakes in
0.5 increments. The GAIN setting can be
increased to a maximum of 10 or decreased
to a minimum of 0 (no trailer braking).
GAIN
The GAIN setting is used to set the trailer
brake control for the specific towing condi-
tion and should be changed as towing condi-
tions change. Changes to towing conditions
include trailer load, vehicle load, road condi-
tions and weather.
Adjusting GAIN
NOTE:
This should only be performed in a traffic free
environment at speeds of approximately 20–
25 mph (30–40 km/h).
1. Make sure the trailer brakes are in goodworking condition, functioning normally
and properly adjusted. See your trailer
dealer if necessary. 2. Hook up the trailer and make the electri-
cal connections according to the trailer
manufacturer's instructions.
3. When a trailer with electric/EOH brakes is plugged in, the trailer connected message
should appear in the instrument cluster
display (if the connection is not recog-
nized by the ITBM, braking functions will
not be available), the GAIN setting will
illuminate and the correct type of trailer
must be selected from the instrument
cluster display options.
4. Push the UP or DOWN button on the steering wheel until “TRAILER TOW” ap-
pears on the screen.
5. Push the RIGHT arrow on the steering wheel to enter “TRAILER TOW”.
6. Push the UP or DOWN buttons until the Trailer Brake Type appears on the screen. 7. Push the RIGHT arrow and then push the
UP or DOWN buttons until the proper
Trailer Brake Type appears on the screen.
8. In a traffic-free environment, tow the trailer on a dry, level surface at a speed of
20–25 mph (30–40 km/h) and squeeze
the manual brake control lever
completely.
9. If the trailer wheels lockup (indicated by squealing tires), reduce the GAIN setting;
if the trailer wheels turn freely, increase
the GAIN setting.
Repeat steps 8 and 9 until the GAIN setting
is at a point just below trailer wheel lockup. If
towing a heavier trailer, trailer wheel lockup
may not be attainable even with the maxi-
mum GAIN setting of 10.
145
Page 148 of 298
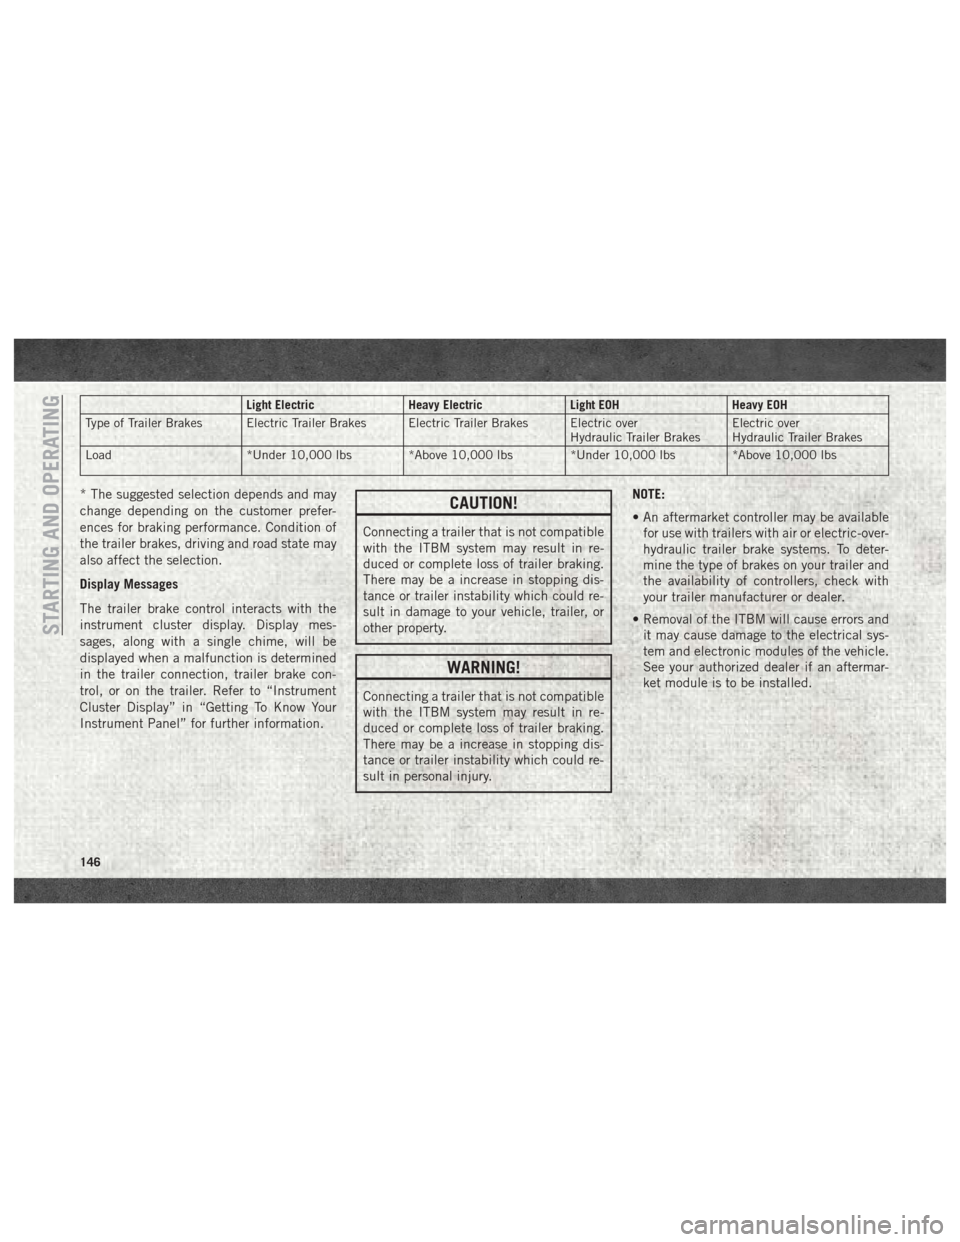
Light ElectricHeavy ElectricLight EOHHeavy EOH
Type of Trailer Brakes Electric Trailer Brakes Electric Trailer Brakes Electric over Hydraulic Trailer BrakesElectric over
Hydraulic Trailer Brakes
Load *Under 10,000 lbs *Above 10,000 lbs *Under 10,000 lbs *Above 10,000 lbs
* The suggested selection depends and may
change depending on the customer prefer-
ences for braking performance. Condition of
the trailer brakes, driving and road state may
also affect the selection.
Display Messages
The trailer brake control interacts with the
instrument cluster display. Display mes-
sages, along with a single chime, will be
displayed when a malfunction is determined
in the trailer connection, trailer brake con-
trol, or on the trailer. Refer to “Instrument
Cluster Display” in “Getting To Know Your
Instrument Panel” for further information.CAUTION!
Connecting a trailer that is not compatible
with the ITBM system may result in re-
duced or complete loss of trailer braking.
There may be a increase in stopping dis-
tance or trailer instability which could re-
sult in damage to your vehicle, trailer, or
other property.
WARNING!
Connecting a trailer that is not compatible
with the ITBM system may result in re-
duced or complete loss of trailer braking.
There may be a increase in stopping dis-
tance or trailer instability which could re-
sult in personal injury. NOTE:
• An aftermarket controller may be available
for use with trailers with air or electric-over-
hydraulic trailer brake systems. To deter-
mine the type of brakes on your trailer and
the availability of controllers, check with
your trailer manufacturer or dealer.
• Removal of the ITBM will cause errors and it may cause damage to the electrical sys-
tem and electronic modules of the vehicle.
See your authorized dealer if an aftermar-
ket module is to be installed.
STARTING AND OPERATING
146
Page 149 of 298

RECREATIONAL TOWING (BEHIND MOTORHOME, ETC.)
Towing This Vehicle Behind Another Vehicle
Towing ConditionWheels OFF The
Ground Two-Wheel Drive
Models Four-Wheel Drive Models
Flat Tow NONENOT ALLOWED See Instructions
• Automatic transmission in PARK
• Manual transmission in gear (NOT in NEUTRAL)
• Transfer case in NEUTRAL (N)
• Tow in forward direction
Dolly Tow Front
NOT ALLOWED
NOT ALLOWED
Rear OK NOT ALLOWED
On Trailer ALLOK OK
NOTE:
• When towing your vehicle, always follow
applicable state and provincial laws. Con-
tact state and provincial Highway Safety
offices for additional details.
Recreational Towing —
Two-Wheel Drive Models
DO NOT flat tow this vehicle. Damage to the
drivetrain will result. Recreational towing (for two-wheel drive
models) is allowed
ONLYif the rear wheels are
OFF the ground. This may be accomplished
using a tow dolly or vehicle trailer. If using a
tow dolly, follow this procedure:
1. Properly secure the dolly to the tow ve- hicle, following the dolly manufacturer's
instructions.
2. Drive the rear wheels onto the tow dolly. 3. Firmly apply the parking brake. Place au-
tomatic transmission in PARK, manual
transmission in gear (not in NEUTRAL).
4. Properly secure the rear wheels to the dolly, following the dolly manufacturer's
instructions.
5. Turn the ignition OFF and remove the key fob.
6. Install a suitable clamping device, de- signed for towing, to secure the front
wheels in the straight position.
147
Page 150 of 298

CAUTION!
• Towing with the rear wheels on theground will cause severe transmission
damage. Damage from improper towing
is not covered under the New Vehicle
Limited Warranty.
• Do not disconnect the driveshaft be-
cause fluid may leak from the transmis-
sion, causing damage to internal parts.
Recreational Towing —
Four-Wheel Drive Models
NOTE:
Both the manual shift and electronic shift
transfer cases must be shifted into NEUTRAL
(N) for recreational towing. Automatic trans-
missions must be shifted into PARK for rec-
reational towing. Manual transmissions must
be placed in gear (NOT in NEUTRAL) for
recreational towing. Refer to the following for
the proper transfer case NEUTRAL (N) shift-
ing procedure for your vehicle.
CAUTION!
• DO NOT dolly tow any 4WD vehicle.Towing with only one set of wheels on
the ground (front or rear) will cause
severe transmission and/or transfer case
damage. Tow with all four wheels either
ON the ground, or OFF the ground (using
a vehicle trailer).
• Tow only in the forward direction. Towing
this vehicle backwards can cause severe
damage to the transfer case.
• Before recreational towing, the transfer
case must be in NEUTRAL. To be certain
the transfer case is fully in NEUTRAL,
perform the procedure outlined under
“Shifting Into NEUTRAL”. Internal
transmission damage will result, if the
transfer case is not in NEUTRAL during
towing.
• Automatic transmissions must be
placed in PARK, and manual transmis-
sions must be placed in gear (not in
Neutral) for recreational towing.
• Towing this vehicle in violation of the
above requirements can cause severe
CAUTION!
transmission and/or transfer case dam-
age. Damage from improper towing is
not covered under the New Vehicle Lim-
ited Warranty.
• Do not disconnect the rear driveshaft
because fluid will leak from the transfer
case, causing damage to internal parts.
• Do not use a bumper-mounted clamp-on
tow bar on your vehicle. The bumper
face bar will be damaged.
Shifting Into NEUTRAL (N)
Use the following procedure to prepare your
vehicle for recreational towing.
WARNING!
You or others could be injured or killed if
you leave the vehicle unattended with the
transfer case in the NEUTRAL (N) position
without first fully engaging the parking
brake. The transfer case NEUTRAL (N)
position disengages both the front and rear
driveshafts from the powertrain, and will
allow the vehicle to roll, even if the auto-
STARTING AND OPERATING
148