Ram 4500 Chassis Cab 2018 User Guide
Manufacturer: RAM, Model Year: 2018, Model line: 4500 Chassis Cab, Model: Ram 4500 Chassis Cab 2018Pages: 298, PDF Size: 5.88 MB
Page 181 of 298
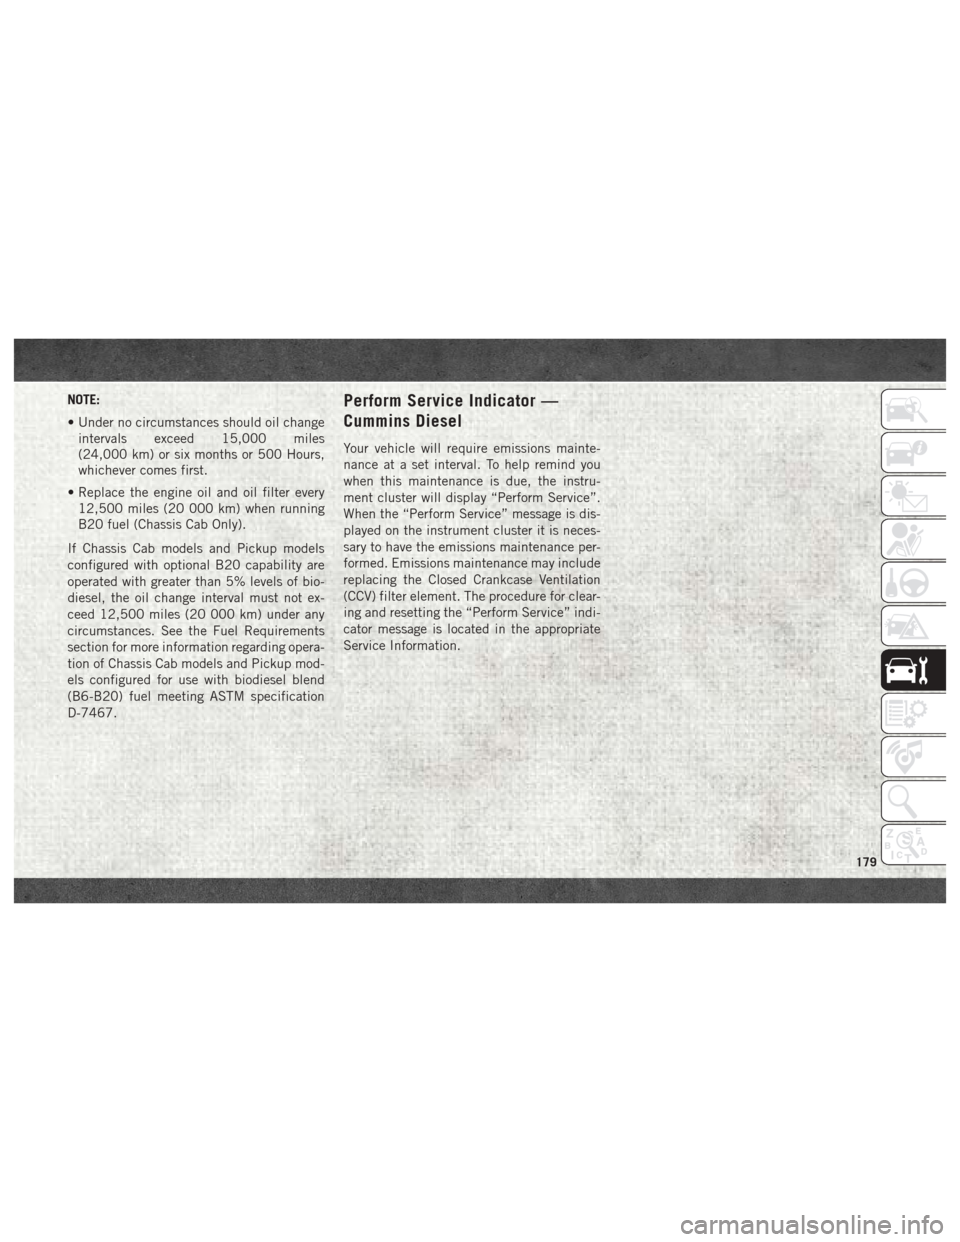
NOTE:
• Under no circumstances should oil changeintervals exceed 15,000 miles
(24,000 km) or six months or 500 Hours,
whichever comes first.
• Replace the engine oil and oil filter every 12,500 miles (20 000 km) when running
B20 fuel (Chassis Cab Only).
If Chassis Cab models and Pickup models
configured with optional B20 capability are
operated with greater than 5% levels of bio-
diesel, the oil change interval must not ex-
ceed 12,500 miles (20 000 km) under any
circumstances. See the Fuel Requirements
section for more information regarding opera-
tion of Chassis Cab models and Pickup mod-
els configured for use with biodiesel blend
(B6-B20) fuel meeting ASTM specification
D-7467.Perform Service Indicator —
Cummins Diesel
Your vehicle will require emissions mainte-
nance at a set interval. To help remind you
when this maintenance is due, the instru-
ment cluster will display “Perform Service”.
When the “Perform Service” message is dis-
played on the instrument cluster it is neces-
sary to have the emissions maintenance per-
formed. Emissions maintenance may include
replacing the Closed Crankcase Ventilation
(CCV) filter element. The procedure for clear-
ing and resetting the “Perform Service” indi-
cator message is located in the appropriate
Service Information.
179
Page 182 of 298
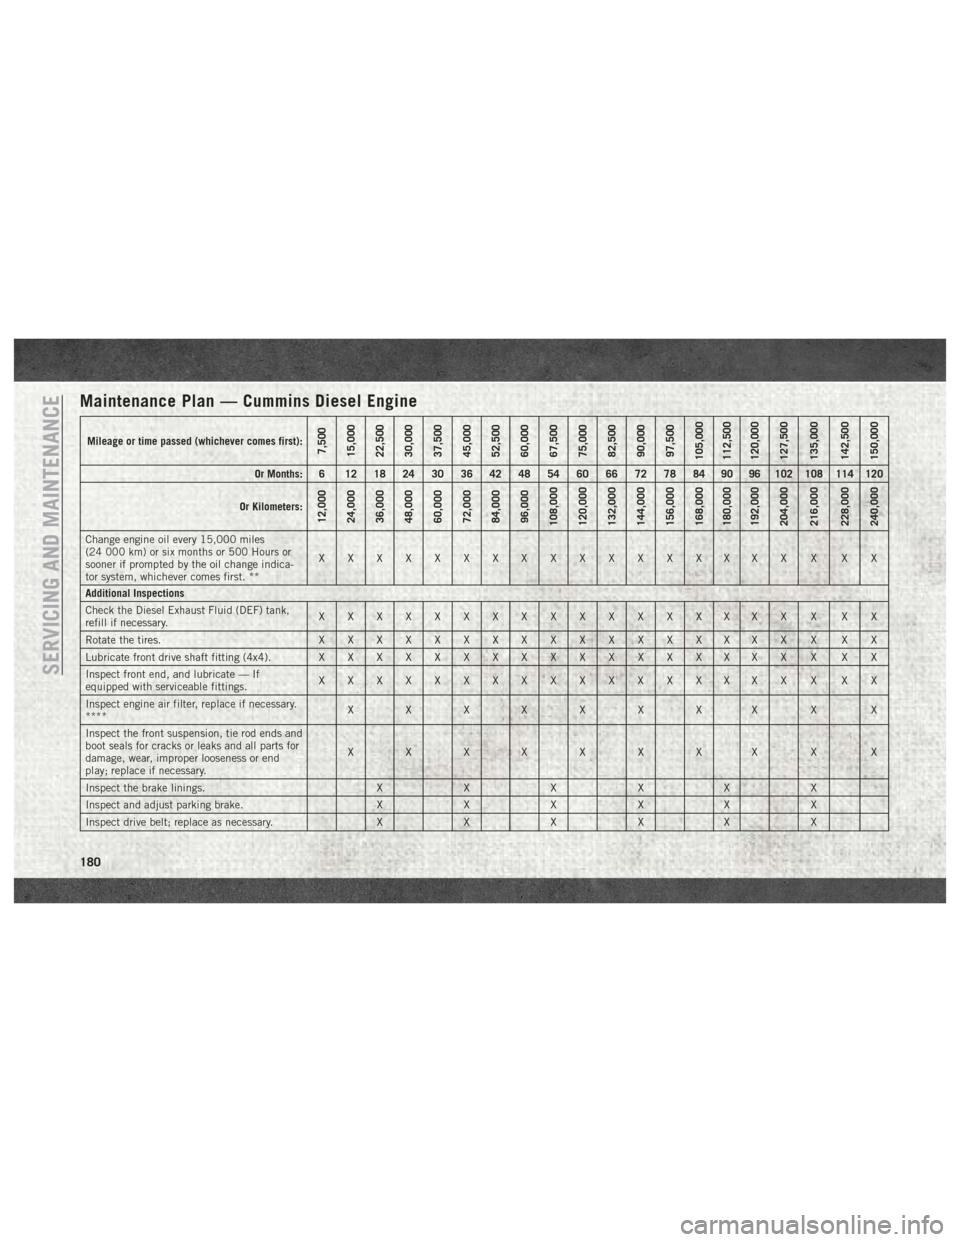
Maintenance Plan — Cummins Diesel Engine
Mileage or time passed (whichever comes first):7,500
15,000
22,500
30,000
37,500
45,000
52,500
60,000
67,500
75,000
82,500
90,000
97,500
105,000
112,500
120,000
127,500
135,000
142,500
150,000
Or Months: 6 12 18 24 30 36 42 48 54 60 66 72 78 84 90 96 102 108 114 120
Or Kilometers:
12,000
24,000
36,000
48,000
60,000
72,000
84,000
96,000
108,000
120,000
132,000
144,000
156,000
168,000
180,000
192,000
204,000
216,000
228,000
240,000
Change engine oil every 15,000 miles
(24 000 km) or six months or 500 Hours or
sooner if prompted by the oil change indica-
tor system, whichever comes first. ** XXXXXXXXXXXXXXXXX X XX
Additional Inspections
Check the Diesel Exhaust Fluid (DEF) tank,
refill if necessary. XXXXXXXXXXXXXXXXX X XX
Rotate the tires. X X X X X X X XXXXXXXXXX X XX
Lubricate front drive shaft fitting (4x4). X X X X X X X XXXXXXXXXX X XX
Inspect front end, and lubricate — If
equipped with serviceable fittings. XXXXXXXXXXXXXXXXX X XX
Inspect engine air filter, replace if necessary.
**** XX XX X X XX X X
Inspect the front suspension, tie rod ends and
boot seals for cracks or leaks and all parts for
damage, wear, improper looseness or end
play; replace if necessary. XX XX X X XX X X
Inspect the brake linings. XXX XX X
Inspect and adjust parking brake. XXX XX X
Inspect drive belt; replace as necessary. XXX XX X
SERVICING AND MAINTENANCE
180
Page 183 of 298

Mileage or time passed (whichever comes first):7,500
15,000
22,500
30,000
37,500
45,000
52,500
60,000
67,500
75,000
82,500
90,000
97,500
105,000
112,500
120,000
127,500
135,000
142,500
150,000
Or Months: 6 12 18 24 30 36 42 48 54 60 66 72 78 84 90 96 102 108 114 120
Or Kilometers:
12,000
24,000
36,000
48,000
60,000
72,000
84,000
96,000
108,000
120,000
132,000
144,000
156,000
168,000
180,000
192,000
204,000
216,000
228,000
240,000
Inspect wheel bearings. XX XX X
Additional Maintenance
Replace cabin air filter. XXX XX X
Replace engine fuel filter element. X X X X X X X X X X
Replace chassis mounted fuel filter element. X X X X X X X X X X
Inspect the front and rear axle surfaces. If
gear oil leakage is suspected, check the fluid
level. If using your vehicle for police, taxi,
fleet, off-road or frequent trailer towing
change the axle fluid. *
Inspect the transfer case fluid (4x4), change
for any of the following: police, taxi, fleet, or
frequent trailer towing. XX XX X
Change the transfer case fluid (4x4). XX
Change automatic transmission fluid
(AS69RC transmission only). XX XX X
Change the automatic transmission fluid and
sump filter (AS69RC transmission only). XX
Change automatic transmission fluid and fil-
ter(s) if using your vehicle for any of the fol-
lowing: police, fleet, or frequent trailer towing
(68RFE transmission only). XX
181
Page 184 of 298
Mileage or time passed (whichever comes first):7,500
15,000
22,500
30,000
37,500
45,000
52,500
60,000
67,500
75,000
82,500
90,000
97,500
105,000
112,500
120,000
127,500
135,000
142,500
150,000
Or Months: 6 12 18 24 30 36 42 48 54 60 66 72 78 84 90 96 102 108 114 120
Or Kilometers:
12,000
24,000
36,000
48,000
60,000
72,000
84,000
96,000
108,000
120,000
132,000
144,000
156,000
168,000
180,000
192,000
204,000
216,000
228,000
240,000
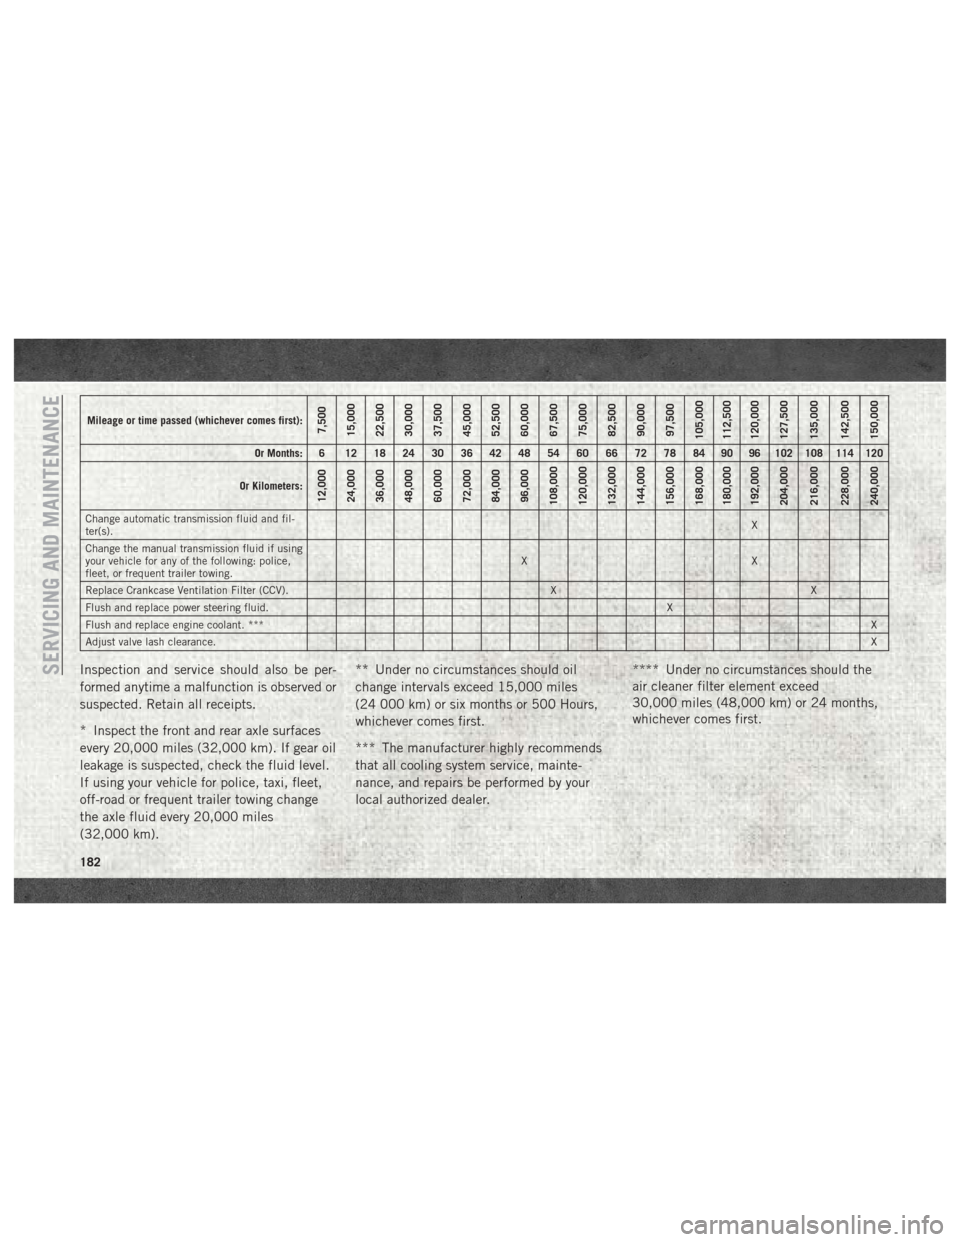
Change automatic transmission fluid and fil-
ter(s). X
Change the manual transmission fluid if using
your vehicle for any of the following: police,
fleet, or frequent trailer towing. XX
Replace Crankcase Ventilation Filter (CCV). X X
Flush and replace power steering fluid. X
Flush and replace engine coolant. *** X
Adjust valve lash clearance. X
Inspection and service should also be per-
formed anytime a malfunction is observed or
suspected. Retain all receipts.
* Inspect the front and rear axle surfaces
every 20,000 miles (32,000 km). If gear oil
leakage is suspected, check the fluid level.
If using your vehicle for police, taxi, fleet,
off-road or frequent trailer towing change
the axle fluid every 20,000 miles
(32,000 km).** Under no circumstances should oil
change intervals exceed 15,000 miles
(24 000 km) or six months or 500 Hours,
whichever comes first.
*** The manufacturer highly recommends
that all cooling system service, mainte-
nance, and repairs be performed by your
local authorized dealer.
**** Under no circumstances should the
air cleaner filter element exceed
30,000 miles (48,000 km) or 24 months,
whichever comes first.SERVICING AND MAINTENANCE
182
Page 185 of 298
WARNING!
• You can be badly injured working on oraround a motor vehicle. Do only service
work for which you have the knowledge
and the right equipment. If you have any
doubt about your ability to perform a
service job, take your vehicle to a com-
petent mechanic.
• Failure to properly inspect and maintain
your vehicle could result in a component
malfunction and effect vehicle handling
and performance. This could cause an
accident.
CAUTION!
***The manufacturer highly recommends
that all cooling system service, mainte-
nance, and repairs be performed by your
local authorized dealer.
183
Page 186 of 298
ENGINE COMPARTMENT
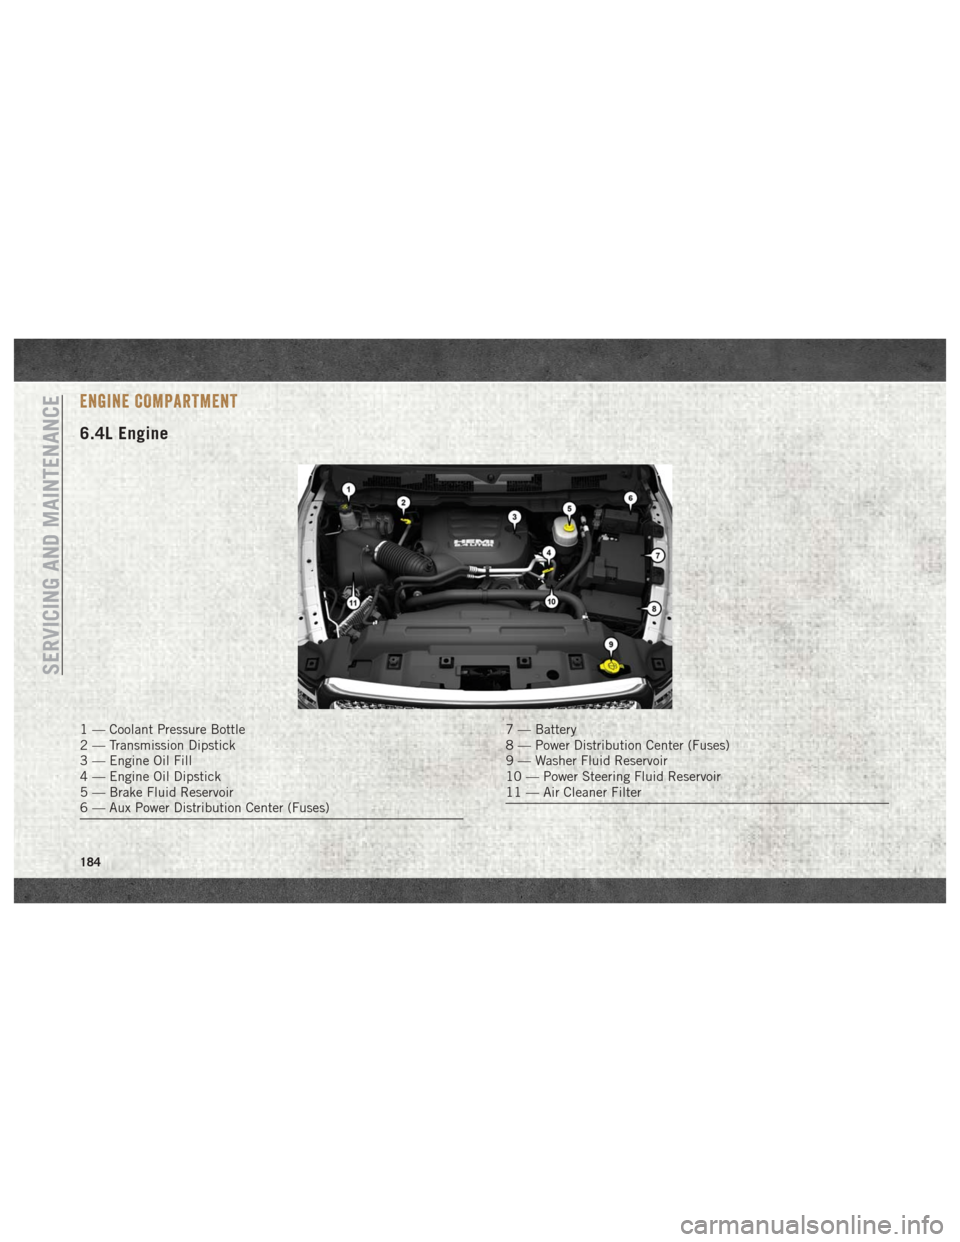
6.4L Engine
1 — Coolant Pressure Bottle
2 — Transmission Dipstick
3 — Engine Oil Fill
4 — Engine Oil Dipstick
5 — Brake Fluid Reservoir
6 — Aux Power Distribution Center (Fuses)7 — Battery
8 — Power Distribution Center (Fuses)
9 — Washer Fluid Reservoir
10 — Power Steering Fluid Reservoir
11 — Air Cleaner Filter
SERVICING AND MAINTENANCE
184
Page 187 of 298
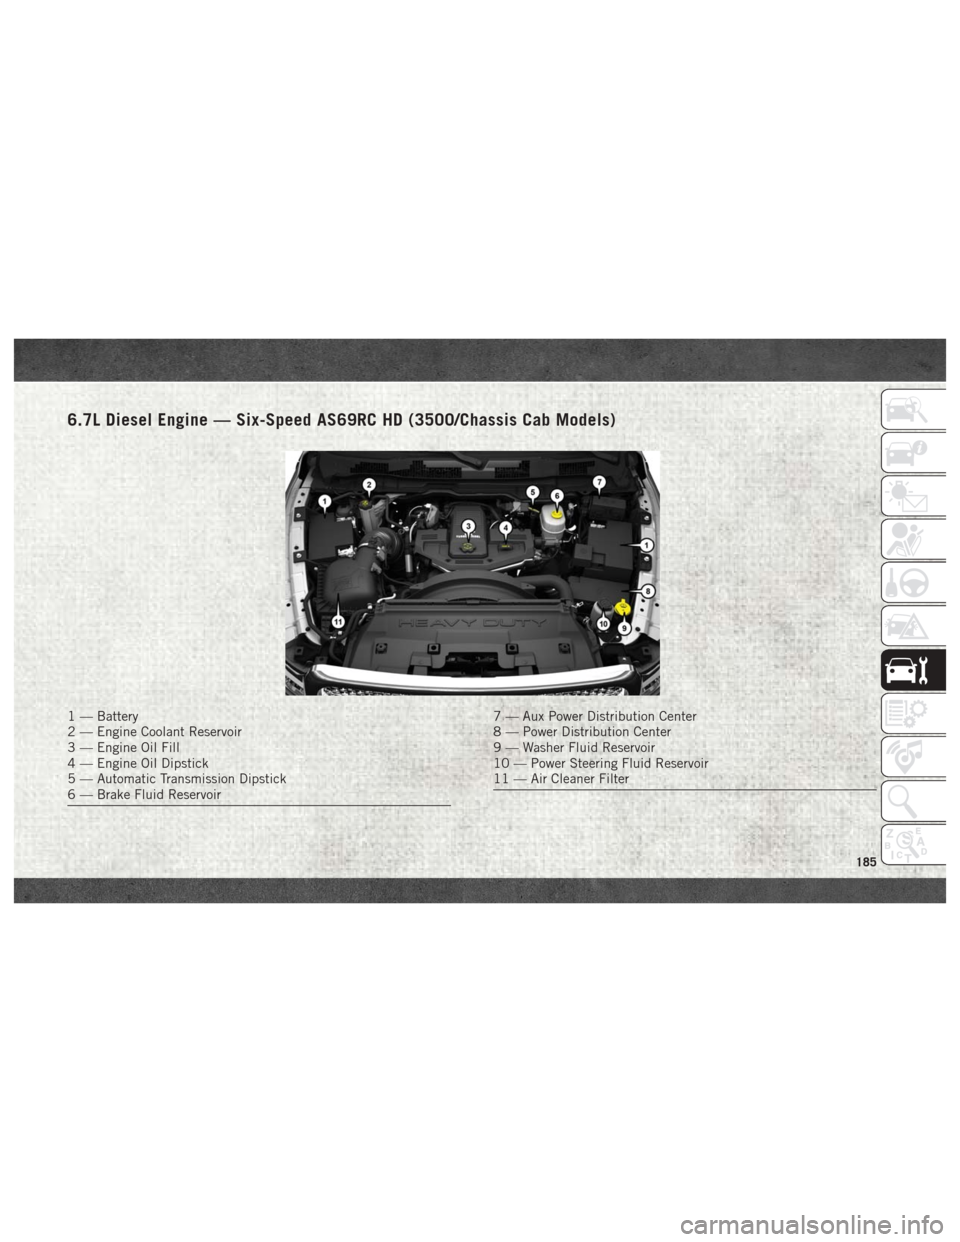
6.7L Diesel Engine — Six-Speed AS69RC HD (3500/Chassis Cab Models)
1 — Battery
2 — Engine Coolant Reservoir
3 — Engine Oil Fill
4 — Engine Oil Dipstick
5 — Automatic Transmission Dipstick
6 — Brake Fluid Reservoir7 — Aux Power Distribution Center
8 — Power Distribution Center
9 — Washer Fluid Reservoir
10 — Power Steering Fluid Reservoir
11 — Air Cleaner Filter
185
Page 188 of 298
DEALER SERVICE — 6.7L DIESEL
ENGINE
Your authorized dealer has the qualified ser-
vice personnel, special tools, and equipment
to perform all service operations in an expert
manner. Service Manuals are available which
include detailed service information for your
vehicle. Refer to these Service Manuals be-
fore attempting any procedure yourself.
NOTE:
Intentional tampering with emissions control
systems may void your warranty and could
result in civil penalties being assessed
against you.
WARNING!
You can be badly injured working on or
around a motor vehicle. Only do service
work for which you have the knowledge
and the proper equipment. If you have any
doubt about your ability to perform a ser-
vice job, take your vehicle to a competent
mechanic.
Engine Air Cleaner Filter
CAUTION!
All air entering the engine intake must be
filtered. The abrasive particles in unfil-
tered air will cause rapid wear to engine
components.
WARNING!
The air induction system (air cleaner,
hoses, etc.) provides a measure of protec-
tion. Do not remove the air induction sys-
tem (air cleaner, hoses, etc.) unless such
removal is necessary for repair or mainte-
nance. Make sure that no one is near the
engine compartment before starting the
vehicle with the air induction system (air
cleaner, hoses, etc.) removed. Failure to
do so can result in serious personal injury.
The condition of the air cleaner filter is moni-
tored by the Engine Control Module. The
“SERVICE AIR FILTER” message will display
in the instrument cluster when service is required. Refer to “Instrument Cluster Dis-
play” in “Getting To Know Your Instrument
Panel” for further information.
The “SERVICE AIR FILTER” message could
be displayed periodically. This is because
engine air flow requirements change based
on driving conditions. As the filter becomes
more restrictive and air flow requirements
increase the “SERVICE AIR FILTER” mes-
sage will be displayed. The message may not
be displayed in subsequent drive cycles if the
same conditions are not met. The air filter
element should be replaced within 250 miles
(402 km) from the first time this message is
displayed to ensure proper engine operation
during all driving conditions.
CAUTION!
Driving with a restricted air filter can
cause engine damage. Driving in dusty
environments for extended periods will
lead to rapid air filter plugging. Action
should be taken as soon as the “SERVICE
AIR FILTER” message is displayed.
SERVICING AND MAINTENANCE
186
Page 189 of 298
If the vehicle experiences a sudden loss of
engine power while being driven in heavy
snow or rain, or when plowing snow, and/or
the “SERVICE AIR FILTER” message is dis-
played on the instrument cluster along with a
chime that repeats every 60 seconds, visually
inspect the air filter for snow/ice build up or
extreme water saturation. If the air filter is
not damaged, remove all snow/ice and rein-
stall air filter. If the air filter is damaged,
replace filter element.
NOTE:
The air filter housing contains a Mass Air
Flow sensor. This sensor is critical to proper
engine operation and component longevity.
Any damage or modification to this sensor
could result in major engine and/or exhaust
aftertreatment damage. We recommend you
use Mopar brand parts.
Even though your vehicle is equipped with an
Air Filter Monitor, a visual inspection of the
air cleaner filter element is recommended
every 15,000 miles (24,000km) or
12 months – whichever occurs first.Under nocircumstances should the air cleaner filter ele-
ment exceed 30,000 miles (48,000 km) or
24 months, whichever comes first.
CAUTION!
Many aftermarket performance air filter
elements do not adequately filter the air
entering the engine. Use of such filters can
severely damage your engine.
Draining Fuel/Water Separator
Filter
There are two fuel filter assemblies. One is
located on the driver's side of the engine. The
best access to this water drain valve is from
under the hood. The second one is on the
under body, located in front of the rear axle
above the drive shaft on pick-up models. The
Chassis Cab models second filter location is
on the frame behind the front axle. The best
access to this water drain valve is from under
the vehicle.
CAUTION!
• Do not drain the fuel/water separator
filter when the engine is running.
• Diesel fuel will damage blacktop paving
surfaces. Drain the filter into an appro-
priate container.
If water is detected in the water separator
while the engine is running, or while the
ignition switch is in the ON position, the
“Water In Fuel Indicator Light” will illumi-
nate and an audible chime will be heard five
times. At this point you should stop the
engine and drain the water from both of the
filters.
CAUTION!
If the “Water In Fuel Indicator Light” re-
mains on, DO NOT START the engine be-
fore you drain water from the fuel filters to
avoid engine damage.
If the “Water In Fuel Indicator Light” comes
on and a single chime is heard while you are
driving, or with the ignition switch in the ON
187
Page 190 of 298
position, there may be a problem with your
water separator wiring or sensor. See your
authorized dealer for service.
Upon proper draining of the water from both
fuel filters, the “Water In Fuel Indicator
Light” will remain illuminated for approxi-
mately 10 seconds. If the water was drained
while the engine was running, the “Water In
Fuel Indicator Light” may remain on for ap-
proximately three minutes.
NOTE:
Care should be taken in disposing of used
fluids from your vehicle. Used fluids, indis-
criminately discarded, can present a problem
to the environment. Contact an authorized
dealer, service station, or government agency
for advice on recycling programs and for
where used fluids and filters can be properly
disposed of in your area.
Drain the fuel/water separator filters when
the “Water In Fuel Indicator Light” is ON.
Within 10 minutes of vehicle shutdown, turn
the engine mounted filter drain valve (located
on the side of the filter assembly) counter-
clockwise 1/4 turn, and turn the under body
mounted filter drain valve (located on thebottom of the filter assembly) counterclock
wise 1 full turn. Then turn the ignition switch
to the ON position, and allow any accumu-
lated water to drain. Leave the drain valve
open until all water and contaminants have
been removed. When clean fuel is visible,
close the drain valves by turning them fully
clockwise, and turn the ignition switch to
OFF.
If more than a couple ounces/milliliters of
fuel have been drained, follow the directions
for “Priming If The Engine Has Run Out Of
Fuel.”
Engine Mounted Fuel Filter
Replacement
NOTE:
• Using a fuel filter that does not meet the
manufacturer's filtration and water separat-
ing requirements can severely impact fuel
system life and reliability.
• The engine mounted filter housing is equipped with a No-Filter-No-Run (NFNR)
feature. Engine will not run if:
1. No filter is installed. 2. Inferior/Non-approved filter is used.
Use of OEM filter is required to ensure
vehicle will run.
CAUTION!
• Diesel fuel will damage blacktop pavingsurfaces. Drain the filter into an appro-
priate container.
• Do not prefill the fuel filter when install-
ing a new fuel filter. There is a possibility
debris could be introduced into the fuel
filter during this action. It is best to
install the filter dry and allow the in-tank
lift pump to prime the fuel system.
1. Ensure engine is turned off.
2. Place drain pan under the fuel filter drain hose.
3. Open the water drain valve 1/4 turn coun- terclockwise and completely drain fuel
and water into the approved container.
4. Close the water drain valve.
5. Remove lid using a socket or strap wrench. Rotate counterclockwise for re-
moval. Remove used o-ring and discard it.
SERVICING AND MAINTENANCE
188