reset RAM CHASSIS CAB 2021 Owner's Manual
[x] Cancel search | Manufacturer: RAM, Model Year: 2021, Model line: CHASSIS CAB, Model: RAM CHASSIS CAB 2021Pages: 463, PDF Size: 21.5 MB
Page 174 of 463

172STARTING AND OPERATING
To adjust the distance setting, push the
Distance Button and release. Each time the
button is pushed, the distance setting increases
by one bar (longer). When the farthest distance
is set, pushing the distance button again will
reset to the shortest distance.
If there is no vehicle ahead, the vehicle will
maintain the set speed. If a slower moving
vehicle is detected in the same lane, the
instrument cluster displays the ACC Set With
Target Detected Indicator Light, and the system
adjusts vehicle speed automatically to maintain
the distance setting, regardless of the set speed.
The vehicle will then maintain the set distance
until:
The vehicle ahead accelerates to a speed
above the set speed.
The vehicle ahead moves out of your lane or
view of the sensor.
The distance setting is changed.
The system disengages. The maximum braking applied by ACC is limited;
however, the driver can always apply the brakes
manually, if necessary. NOTE:
The brake lights will illuminate whenever the
ACC system applies the brakes.
A Proximity Warning wil l alert the driver if ACC
predicts that its maximum braking level is not
sufficient to maintain the set distance. If this
occurs, a visua l alert “BRAKE” will flash in the
instrument cluster display and a chime will
sound while ACC continues to apply its
maximum braking force.
NOTE:
The “BRAKE!” screen in the instrument cluster
display is a warning for the driver to take action
and does not necessarily mean that the
Forward Collision Warning system is applying
the brakes autonomously. Overtake Aid
When driving with ACC engaged and following a
vehicle, the system will provide an additional
acceleration up to the ACC set speed to assist in
passing the vehicle. This additional
acceleration is triggered when the driver
utilizes the left turn signal and will only be
active when passing on the left hand side.
ACC Operation At Stop
If the ACC system brings your vehicle to a
standstill while following the vehicle in front,
your vehicle will resume motion without any
driver intervention if the vehicle in front starts
moving within two seconds.
21_DPF_OM_EN_USC_t.book Page 172
Trailer Detect — If Equipped
When a trailer is detected, the ACC system
automatically defaults to the longest setting
(four bars). The setting can be overridden by
pushing the Distance Button on the steering
wheel.
Page 215 of 463

STARTING AND OPERATING213
The loaded vehicle weight, including the
snowplow system, all aftermarket accessories,
driver, passengers, options, and cargo, must
not exceed either the Gross Vehicle Weight
Rating (GVWR) or Gross Axle Weight Rating
(GAWR). These weights are specified on the
Safety Compliance Certification Label on the
driver's side door opening.
NOTE:
Detach the snowplow when transporting
passengers.
Vehicle front end wheel alignment was
set to specifications at the factory without
consideration for the weight of the plow.
Front end toe-in should be checked and reset
if necessary at the beginning and end of the
snowplow season. This will help prevent uneven
tire wear.
The blade should be lowered whenever the
vehicle is parked.
Maintain and operate your vehicle and snowplow
equipment following the recommendations
provided by the specific snowplow manufacturer.
OVER THE ROAD OPERATION WITH
S
NOWPLOW ATTACHED
The blade restricts air flow to the radiator and
causes the engine to operate at higher than
normal temperatures. Therefore, when
transporting the plow, angle the blade completely
and position it as low as road or surface
conditions permit. Do not exceed 40 mph
(64 km/h). The operator should always maintain
a safe stopping distance and allow adequate
passing clearance.
OPERATING TIPS
Under ideal snow plowing conditions, 20 mph
(32 km/h) should be maximum operating
speed. The operator should be familiar with the
area and surface to be cleaned. Reduce speed
and use extreme caution when plowing
unfamiliar areas or under poor visibility.
GENERAL MAINTENANCE
Snowplows should be maintained in
accordance with the plow manufacturer's
instructions.
Keep all snowplow electrical connections and
battery terminals clean and free of corrosion.
When plowing snow, to avoid transmission and
drivetrain damage, the following precautions
should be observed.
Operate with transfer case in 4L when
plowing small or congested areas where
speeds are not likely to exceed 15 mph
(24 km/h). At higher speeds operate in
4WD High.
Vehicles with automatic transmissions
should use 4WD Low range when plowing
deep or heavy snow for extended periods of
time to avoid transmission overheating.
Do not shift the transmission unless the
engine has returned to idle and wheels have
stopped. Make a practice of stepping on the
brake pedal while shifting the transmission.
4
21_DPF_OM_EN_USC_t.book Page 213
Page 223 of 463
MULTIMEDIA221
NOTE:
FCA US LLC or your dealer may contact you
directly regarding software updates.
To help further improve vehicle security and
minimize the potential risk of a security
breach, vehicle owners should:
Routinely check www.driveuconnect.com
(US Residents) or www.driveuconnect.ca
(Canadian Residents) to learn about
available Uconnect software updates.
Only connect and use trusted media
devices (e.g. personal mobile phones,
USBs, CDs).
Privacy of any wireless and wired
communications cannot be assured. Third
parties may unlawfully intercept information
and private communications without your
consent Ú page 116.
UCONNECT 3.0
INTRODUCTION
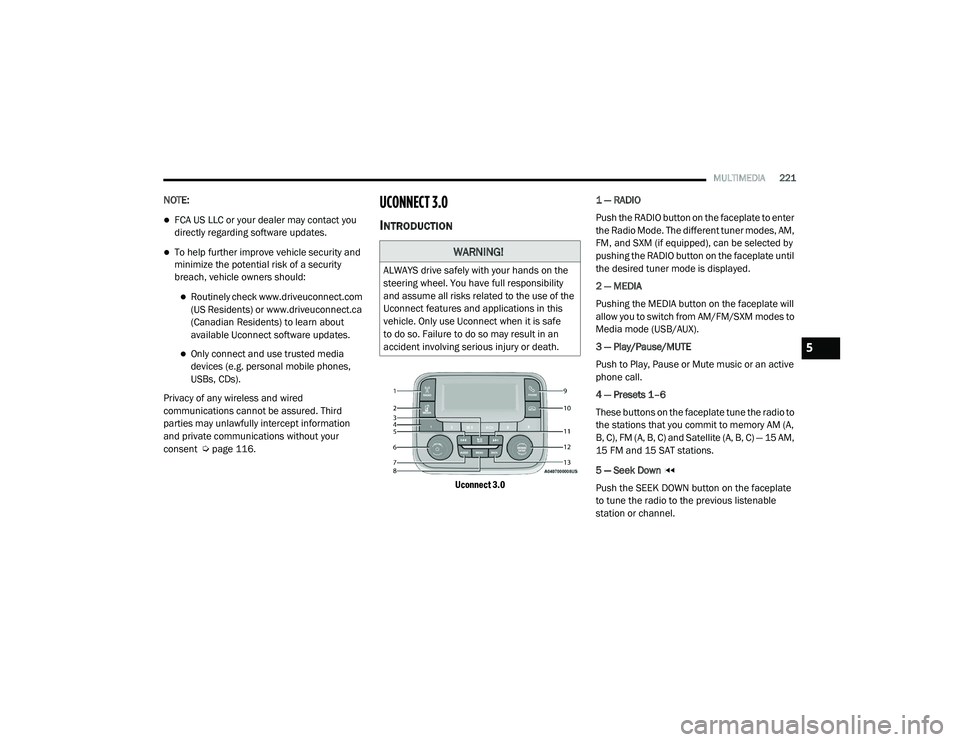
Uconnect 3.0
1 — RADIO
Push the RADIO button on the faceplate to enter
the Radio Mode. The different tuner modes, AM,
FM, and SXM (if equipped), can be selected by
pushing the RADIO button on the faceplate until
the desired tuner mode is displayed.
2 — MEDIA
Pushing the MEDIA button on the faceplate will
allow you to switch from AM/FM/SXM modes to
Media mode (USB/AUX).
3 — Play/Pause/MUTE
Push to Play, Pause or Mute music or an active
phone call.
4 — Presets 1–6
These buttons on the faceplate tune the radio to
the stations that you commit to memory AM (A,
B, C), FM (A, B, C) and Satellite (A, B, C) — 15 AM,
15 FM and 15 SAT stations.
5 — Seek Down
Push the SEEK DOWN button on the faceplate
to tune the radio to the previous listenable
station or channel.
WARNING!
ALWAYS drive safely with your hands on the
steering wheel. You have full responsibility
and assume all risks related to the use of the
Uconnect features and applications in this
vehicle. Only use Uconnect when it is safe
to do so. Failure to do so may result in an
accident involving serious injury or death.
5
21_DPF_OM_EN_USC_t.book Page 221
Page 225 of 463
MULTIMEDIA223
Seek Functions
Seek Up
Push and release the Seek Up button to tune
the radio to the next listenable station or
channel.
During a Seek Up function, if the radio
reaches the starting station after passing
through the entire band two times, the radio
will stop at the station where it began.
Seek Down
Push and release the Seek Down button to
tune the radio to the next listenable station or
channel.
During a Seek Down function, if the radio
reaches the starting station after passing
through the entire band two times, the radio will
stop at the station where it began.
SiriusXM® Satellite Radio Mode — If
Equipped
SiriusXM® Satellite Radio uses direct
satellite-to-receiver broadcasting technology
to provide clear digital sound, coast to coast.
The subscription service provider is SiriusXM®
Satellite Radio. This service offers over 130 channels of music, sports, news,
entertainment, and programming for children,
directly from its satellites and broadcasting
studios. A one-year SiriusXM® Satellite Radio
subscription is included.
Visit siriusxm.com/getallaccess or review your
SiriusXM® Radio pamphlet in your Owner’s
Manual kit for more information.
SiriusXM® and all related marks and logos are
trademarks of SiriusXM® Radio Inc. and its
subsidiaries. SiriusXM® Satellite Radio requires
a subscription, sold separately after the trial
subscription included with vehicle purchase.
Prices and programming are provided by SiriusXM®
and are subject to change. Subscriptions
governed by Terms & Conditions available at
www.siriusxm.com/customeragreement
.
SiriusXM® Radio US service is only available to
those at least 18 years of age in the 48 contiguous
United States, D.C., and PR. Service is available in
Canada; see
www.siriusxm.ca
.
No Subscription
Radios equipped with a Satellite receiver
require a subscription to the SiriusXM® Service.
When the Radio does not have the necessary
subscription, the Radio is able to receive the
Preview channel only.
Acquiring SiriusXM® Subscription
To activate the SiriusXM® Satellite Radio
subscription, US visit siriusxm.com/
getallaccess or call: 1-800-643-2112
Canada visit https://www.siriusxm.ca/ or
call: 1-888-539-7474.
Setting Presets
The Presets are available for all Radio Modes,
and are activated by pushing any of the six
Preset buttons on the faceplate.
When you are receiving a station that you wish
to commit into memory, push and hold the
desired numbered button on the faceplate for
more than two seconds or until you hear a
confirmation beep.
The Radio stores up to 18 presets in each of the
Radio modes.
5
21_DPF_OM_EN_USC_t.book Page 223
Page 239 of 463

MULTIMEDIA237
Doors & Locks
When the Doors & Locks button is pressed on the touchscreen, the system displays the options related to locking and unlocking the vehicle’s doors.
Setting Name Description
Auto Door LocksThis setting will allow you to change if the doors lock automatically when the vehicle reaches
12 mph (19 km/h).
Auto Unlock On Exit This setting will unlock the doors when any of the doors are opened from the inside.
Flash Lights With Lock This setting will allow you to turn the flashing of the lights when the Lock button is pushed on
the key fob on or off.
Sound Horn With Lock This setting will sound the horn when the Lock button is pushed on the key fob. The “Off”
setting will not sound the horn when the Lock button is pushed. The “1st Press” setting will
sound the horn when the Lock button is pushed once. The “2nd Press” setting will sound the
horn when the Lock button is pushed twice.
Sound Horn With Remote Start This setting will sound the horn when the remote start is activated from the key fob.
Remote Door Unlock, Door Lock/1st Press Of Key Fob
Unlocks This setting will change how many pushes of the Unlock button on the key fob are needed to
unlock all the doors. The “Driver Door” setting will only unlock the driver door on the first push
on the Unlock button. The “All Doors” setting will unlock all doors with only one push of the
Unlock button.
Passive Entry This setting will allow you to turn the Passive Entry feature (Keyless Enter-N-Go) on or off.
Personal Settings Linked To Key Fob This setting will recall preset radio stations and driver seat position that have been linked to
the key fob.
5
21_DPF_OM_EN_USC_t.book Page 237
Page 245 of 463
MULTIMEDIA243
SiriusXM® Setup
NOTE:
A subscription to SiriusXM® satellite radio is required for these settings to be functional.
When the SiriusXM® Setup button is pressed on the touchscreen, the system displays options related to SiriusXM® satellite radio. These settings can
be used to skip specific radio channels and restart favorite songs from the beginning.
Reset/Restore Settings To Default
When the Reset/Restore Settings To Default button is pressed on the touchscreen, the system displays the options related to resetting the Uconnect
system back to its default settings. These settings can clear personal data and reset selected settings from other menus.
Setting Name Description
Tune StartThis setting will play the current song from the beginning when you tune to a music channel
using one of the 12 presets.
Channel Skip This setting allows you to set channels that you wish to skip. A channel list will display of the
skipped channels.
Subscription Information This menu provides SiriusXM® subscription information. SiriusXM® Travel Link is a separate
subscription.
Setting Name
Description
Restore SettingsThis setting will return all the previously changed settings to their factory default.
Reset App Drawer This setting will reset the app drawer to its factory default layout.
Clear Personal Data This setting will display a pop-up that gives you the option to clear all personal data from the
system, including Bluetooth® devices and presets.
5
21_DPF_OM_EN_USC_t.book Page 243
Page 249 of 463
MULTIMEDIA247
UCONNECT MODES
STEERING WHEEL AUDIO CONTROLS
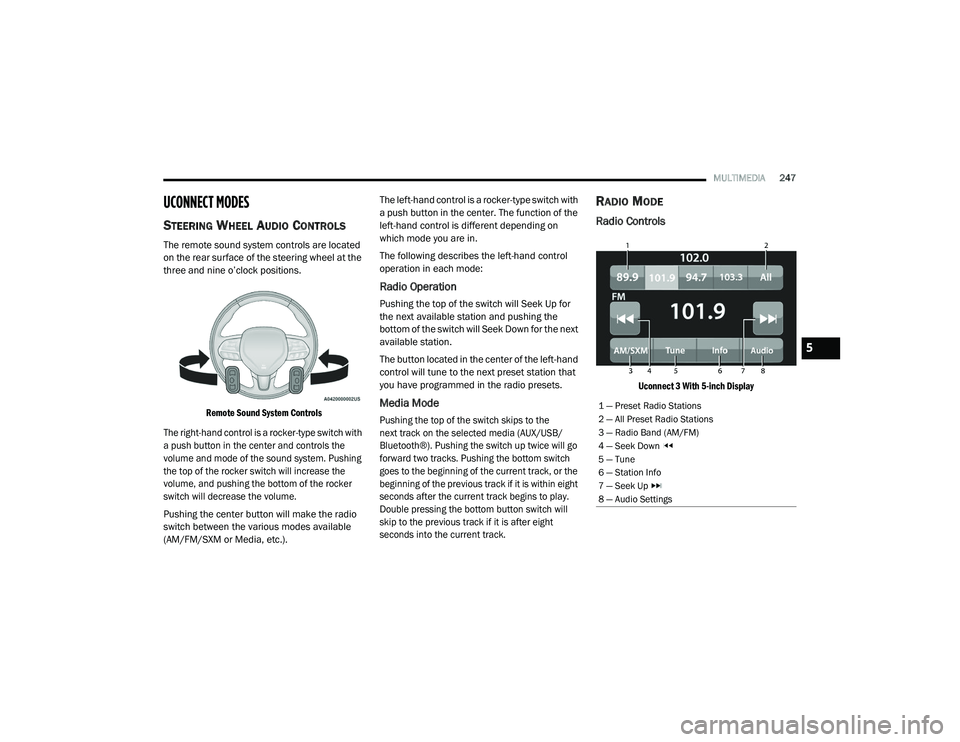
The remote sound system controls are located
on the rear surface of the steering wheel at the
three and nine o’clock positions.
Remote Sound System Controls
The right-hand control is a rocker-type switch with
a push button in the center and controls the
volume and mode of the sound system. Pushing
the top of the rocker switch will increase the
volume, and pushing the bottom of the rocker
switch will decrease the volume.
Pushing the center button will make the radio
switch between the various modes available
(AM/FM/SXM or Media, etc.). The left-hand control is a rocker-type switch with
a push button in the center. The function of the
left-hand control is different depending on
which mode you are in.
The following describes the left-hand control
operation in each mode:
Radio Operation
Pushing the top of the switch will Seek Up for
the next available station and pushing the
bottom of the switch will Seek Down for the next
available station.
The button located in the center of the left-hand
control will tune to the next preset station that
you have programmed in the radio presets.
Media Mode
Pushing the top of the switch skips to the
next track on the selected media (AUX/USB/
Bluetooth®). Pushing the switch up twice will go
forward two tracks. Pushing the bottom switch
goes to the beginning of the current track, or the
beginning of the previous track if it is within eight
seconds after the current track begins to play.
Double pressing the bottom button switch will
skip to the previous track if it is after eight
seconds into the current track.
RADIO MODE
Radio Controls
Uconnect 3 With 5-inch Display
1 — Preset Radio Stations
2 — All Preset Radio Stations
3 — Radio Band (AM/FM)
4 — Seek Down
5 — Tune
6 — Station Info
7 — Seek Up
8 — Audio Settings
5
21_DPF_OM_EN_USC_t.book Page 247
Page 252 of 463
250MULTIMEDIA
No Subscription
Radios equipped with a Satellite receiver
require a subscription to the SiriusXM® Service.
When the Radio does not have the necessary
subscription, the Radio is able to receive the
Preview channel only.
Acquiring SiriusXM® Subscription
To activate the SiriusXM® Satellite Radio
subscription, US residents visit siriusxm.com/
getallaccess or call: 1-800-643-2112
Canadian residents visit https://
www.siriusxm.ca/ or call: 1-888-539-7474.
NOTE:
You will need to provide the SiriusXM® ID (RID)
located at the bottom of the Channel 0 screen.
The Satellite Mode is activated by a press of the
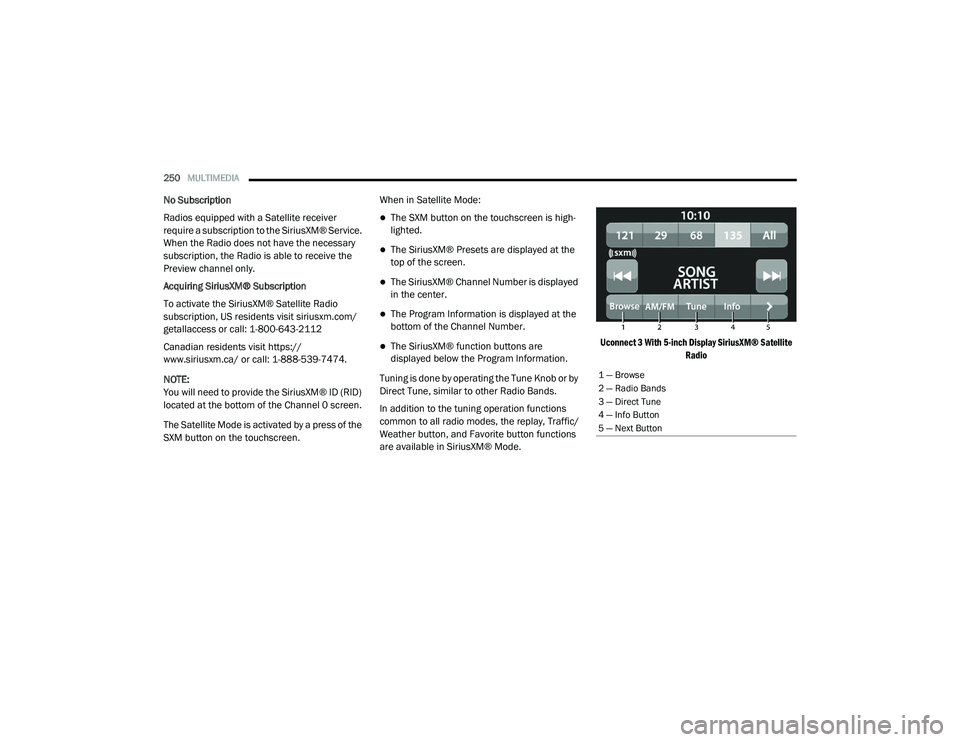
SXM button on the touchscreen. When in Satellite Mode:
The SXM button on the touchscreen is high
-
lighted.
The SiriusXM® Presets are displayed at the
top of the screen.
The SiriusXM® Channel Number is displayed
in the center.
The Program Information is displayed at the
bottom of the Channel Number.
The SiriusXM® function buttons are
displayed below the Program Information.
Tuning is done by operating the Tune Knob or by
Direct Tune, similar to other Radio Bands.
In addition to the tuning operation functions
common to all radio modes, the replay, Traffic/
Weather button, and Favorite button functions
are available in SiriusXM® Mode.
Uconnect 3 With 5-inch Display SiriusXM® Satellite
Radio
1 — Browse
2 — Radio Bands
3 — Direct Tune
4 — Info Button
5 — Next Button
21_DPF_OM_EN_USC_t.book Page 250
Page 254 of 463
252MULTIMEDIA
Favorites
Press the Favorites button on the touchscreen to
activate the favorites menu, which will time out
within 20 seconds in absence of user interaction.
You can exit the Favorites Menu by a press of
the X button.
The favorites feature enables you to set a favorite
artist or song that is currently playing. The radio then
uses this information to alert you when either the
favorite artist or song is being played at any time by
any of the SiriusXM® Channels.
The maximum number of favorites that can be
stored in the Radio is 50.
Favorite Artist: While the song is playing, to set
a favorite artist, press the Favorites button on
the touchscreen and then the Favorite Artist
button on the touchscreen.
Favorite Song: While the song is playing, to set
a favorite song, press the Favorites button on
the touchscreen and then the Favorite Song
button on the touchscreen.
Browse In SXM
Press the Browse button on the touchscreen to
edit Presets, Favorites, Game Zone, and Jump
settings, along with providing the SiriusXM®
Channel List. This Screen contains many submenus. You can
exit submenus to return to a parent menu by
pressing the Back arrow.
All
Press the All button on the Browse Screen.
When pressing the All button, the following
categories become available:
Channel List Press the Channel List to display
all the SiriusXM® Channel Numbers. You can
scroll the Channel List by pressing the Up and
Down arrows, located on the right side of the
screen. Scrolling can also be done by oper
-
ating the Tune/Scroll knob.
Genre List Press the Genre button on the
touchscreen to display a list of Genres. You
can select any desired Genre by pressing the
Genre List. The radio tunes to a channel with
the content in the selected Genre.
Favorites
Press the Favorites button on the Browse
screen.
The Favorites menu provides a means to edit the
Favorites list and to configure the Alert Settings,
along with providing a list of Channels currently
airing any of the items in the Favorites list.
You can scroll the Favorites list by pressing the
Up and Down arrows located at the right side
of the screen. Scrolling can also be done by
operating the Tune/Scroll knob as well.
Remove Favorites
Press the Remove Favorites tab at the top of
the screen. Press the Delete All button on the
touchscreen to delete all of the Favorites or press the
Trash Can icon next to the Favorite to be deleted.
Alert Settings
Press the Alert Settings tab at the top of the
Favorites screen. The Alert Settings menu allows
you to choose from a visual alert or audible and
visual alert when one of your favorites is airing on
any of the SiriusXM® channels.
Game Zone
Press the Game Zone button, located at the left
of the Browse screen. This feature provides
you with the ability to select teams, edit the
selection, and set alerts.
On-Air
Press the On-Air tab at the top of the screen.
The On-Air list provides a list of Channels
currently airing any of the items in the
Selections list, and pressing any of the items
in the list tunes the radio to that channel.
21_DPF_OM_EN_USC_t.book Page 252
Page 255 of 463
MULTIMEDIA253
Add/Delete — If Equipped
Press the Add/Delete button on the touchscreen to
activate the League Scroll list. Press the chosen
league and a scroll list of all teams within the league
will appear, then you can select a team by pressing
the corresponding box. A check mark appears for all
teams that are chosen.
Remove Selection/Trash Can Icon
Press the Remove Selection tab at the top of
the screen. Press the Delete All button on the
touchscreen to delete all of the selections or press
the Trash Can icon next to the selection to be
deleted.
Alert Settings
Press the Alert Setting tab at the top of the
screen. The Alert Settings menu allows you to
choose from “Alert me to on-air games upon
start” or “Alert upon score update” or both when
one or more of your selections is airing on any
of the SiriusXM® channels.
Tune Start
Tune Start begins playing the current song from
the beginning when you tune to a music channel
using one of the 12 presets. This feature occurs
the first time the preset is selected during that
current song.
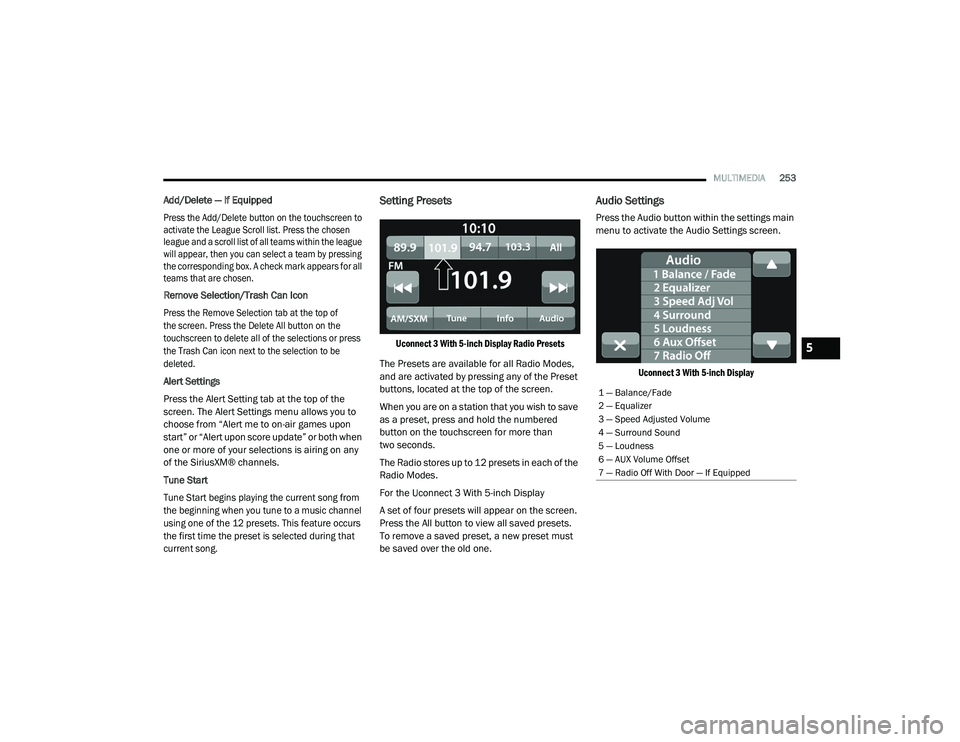
Setting Presets
Uconnect 3 With 5-inch Display Radio Presets
The Presets are available for all Radio Modes,
and are activated by pressing any of the Preset
buttons, located at the top of the screen.
When you are on a station that you wish to save
as a preset, press and hold the numbered
button on the touchscreen for more than
two seconds.
The Radio stores up to 12 presets in each of the
Radio Modes.
For the Uconnect 3 With 5-inch Display
A set of four presets will appear on the screen.
Press the All button to view all saved presets.
To remove a saved preset, a new preset must
be saved over the old one.
Audio Settings
Press the Audio button within the settings main
menu to activate the Audio Settings screen.
Uconnect 3 With 5-inch Display
1 — Balance/Fade
2 — Equalizer
3 — Speed Adjusted Volume
4 — Surround Sound
5 — Loudness
6 — AUX Volume Offset
7 — Radio Off With Door — If Equipped
5
21_DPF_OM_EN_USC_t.book Page 253