ECO mode RAM CHASSIS CAB 2021 Repair Manual
[x] Cancel search | Manufacturer: RAM, Model Year: 2021, Model line: CHASSIS CAB, Model: RAM CHASSIS CAB 2021Pages: 463, PDF Size: 21.5 MB
Page 255 of 463
MULTIMEDIA253
Add/Delete — If Equipped
Press the Add/Delete button on the touchscreen to
activate the League Scroll list. Press the chosen
league and a scroll list of all teams within the league
will appear, then you can select a team by pressing
the corresponding box. A check mark appears for all
teams that are chosen.
Remove Selection/Trash Can Icon
Press the Remove Selection tab at the top of
the screen. Press the Delete All button on the
touchscreen to delete all of the selections or press
the Trash Can icon next to the selection to be
deleted.
Alert Settings
Press the Alert Setting tab at the top of the
screen. The Alert Settings menu allows you to
choose from “Alert me to on-air games upon
start” or “Alert upon score update” or both when
one or more of your selections is airing on any
of the SiriusXM® channels.
Tune Start
Tune Start begins playing the current song from
the beginning when you tune to a music channel
using one of the 12 presets. This feature occurs
the first time the preset is selected during that
current song.
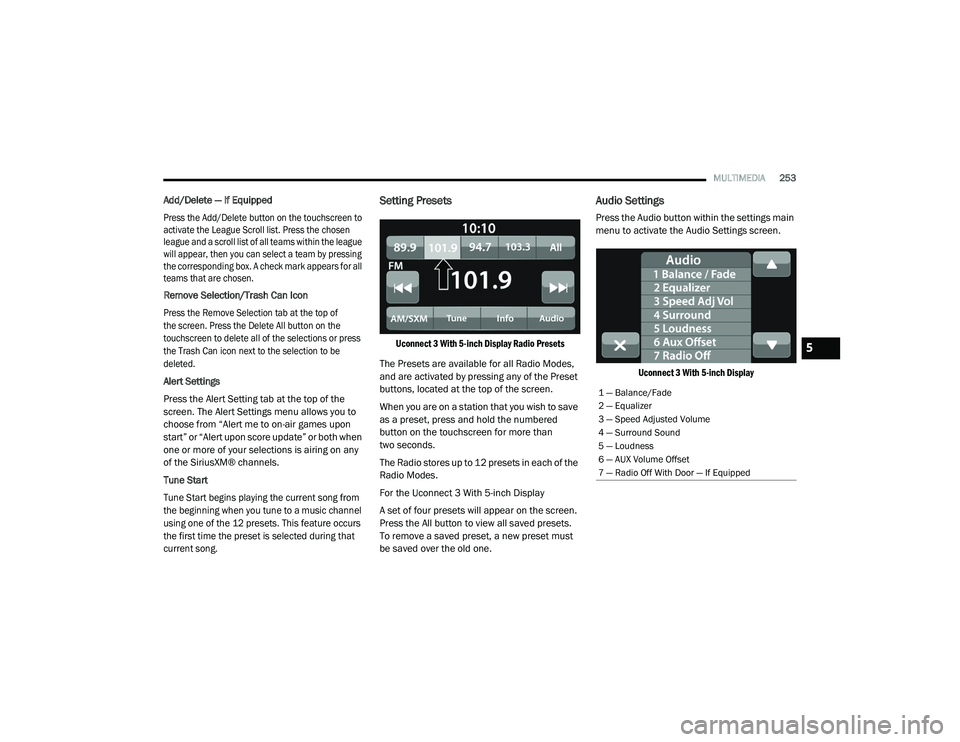
Setting Presets
Uconnect 3 With 5-inch Display Radio Presets
The Presets are available for all Radio Modes,
and are activated by pressing any of the Preset
buttons, located at the top of the screen.
When you are on a station that you wish to save
as a preset, press and hold the numbered
button on the touchscreen for more than
two seconds.
The Radio stores up to 12 presets in each of the
Radio Modes.
For the Uconnect 3 With 5-inch Display
A set of four presets will appear on the screen.
Press the All button to view all saved presets.
To remove a saved preset, a new preset must
be saved over the old one.
Audio Settings
Press the Audio button within the settings main
menu to activate the Audio Settings screen.
Uconnect 3 With 5-inch Display
1 — Balance/Fade
2 — Equalizer
3 — Speed Adjusted Volume
4 — Surround Sound
5 — Loudness
6 — AUX Volume Offset
7 — Radio Off With Door — If Equipped
5
21_DPF_OM_EN_USC_t.book Page 253
Page 257 of 463
MULTIMEDIA255
MEDIA MODE
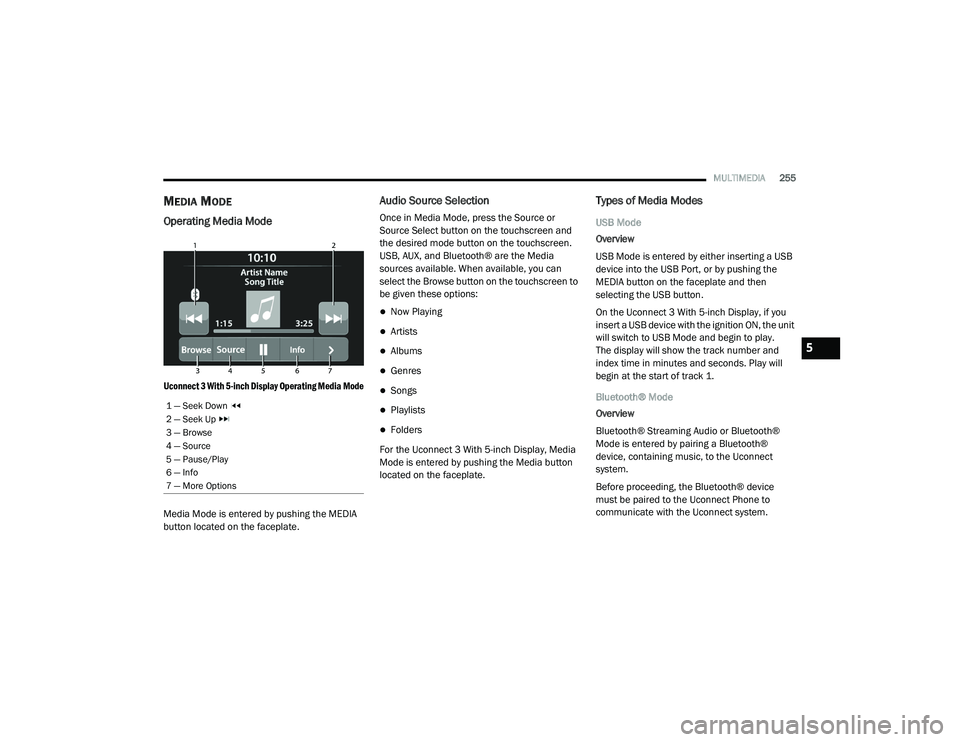
Operating Media Mode
Uconnect 3 With 5-inch Display Operating Media Mode
Media Mode is entered by pushing the MEDIA
button located on the faceplate.
Audio Source Selection
Once in Media Mode, press the Source or
Source Select button on the touchscreen and
the desired mode button on the touchscreen.
USB, AUX, and Bluetooth® are the Media
sources available. When available, you can
select the Browse button on the touchscreen to
be given these options:
Now Playing
Artists
Albums
Genres
Songs
Playlists
Folders
For the Uconnect 3 With 5-inch Display, Media
Mode is entered by pushing the Media button
located on the faceplate.
Types of Media Modes
USB Mode
Overview
USB Mode is entered by either inserting a USB
device into the USB Port, or by pushing the
MEDIA button on the faceplate and then
selecting the USB button.
On the Uconnect 3 With 5-inch Display, if you
insert a USB device with the ignition ON, the unit
will switch to USB Mode and begin to play.
The display will show the track number and
index time in minutes and seconds. Play will
begin at the start of track 1.
Bluetooth® Mode
Overview
Bluetooth® Streaming Audio or Bluetooth®
Mode is entered by pairing a Bluetooth®
device, containing music, to the Uconnect
system.
Before proceeding, the Bluetooth® device
must be paired to the Uconnect Phone to
communicate with the Uconnect system.
1 — Seek Down
2 — Seek Up
3 — Browse
4 — Source
5 — Pause/Play
6 — Info
7 — More Options
5
21_DPF_OM_EN_USC_t.book Page 255
Page 258 of 463
256MULTIMEDIA
On the Uconnect 3 With 5-inch Display, push the
MEDIA button located on the faceplate. Once in
Media Mode, press the Source button on the
touchscreen and select the Bluetooth® button
Úpage 258.
To access Bluetooth® Mode, press the
Bluetooth® button on the left side of the
touchscreen or under the Source Select/Select
Source button (if equipped).
AUX Mode
Overview
Auxiliary Mode (AUX) is entered by inserting an
AUX device using a cable with a 3.5 mm audio
jack into the AUX port or pushing the MEDIA
button on the faceplate and then selecting the
Source button and then the AUX button.
To insert an Auxiliary device, gently insert the
Auxiliary device cable into the AUX Port. If you
insert an Auxiliary device with the ignition and
the radio on, the unit will switch to AUX Mode
and begin to play. Controlling The Auxiliary Device
The control of the Auxiliary device (e.g.,
selecting playlists, play, fast forward, etc.)
cannot be provided by the radio; use the device
controls instead. Adjust the volume with the
Volume button, Volume/Mute rotary knob, or
the On/Off rotary knob, or with the volume of
the attached device.
NOTE:
The radio unit is acting as the amplifier for audio
output from the Auxiliary device. Therefore, if
the volume control on the Auxiliary device is set
too low, there will be insufficient audio signal for
the radio unit to play the music on the device.
Seek Up /Seek Down
In USB Mode, press the Seek Up button on the
touchscreen for the next selection on the USB
device. Press and release the Seek Down
button on the touchscreen to return to the
beginning of the current selection, or to return
to the beginning of the previous selection if the
USB device is within the first three seconds of
the current selection.
In Bluetooth® Mode, press and release the
Seek Up button on the touchscreen for the next
selection on the Bluetooth® device. Press and release the Seek Down button on the
touchscreen to return to the beginning of the
current selection, or return to the beginning of
the previous selection if the Bluetooth® device
is within the first second of the current
selection.
Browse
In USB Mode, press the Browse button on the
touchscreen to display the browse window.
In USB Mode, the left side of the browse window
displays a list of ways you can browse through
the contents of the USB device. If supported by
the device, you can browse by Folder, Artist,
Playlist, Album, Song, etc. Press the desired
button on the touchscreen on the left side of the
screen. The center of the browse window shows
items and its sub-functions, which can be
scrolled through by pressing the Up and Down
buttons to the right. The Tune/Scroll knob can
also be used to scroll.
On the Uconnect 3 With 5-inch Display, rotate the
Browse button on the touchscreen to scroll
through and select a desired track on the device.
Press the Exit button on the touchscreen if you
wish to cancel the Browse function.
21_DPF_OM_EN_USC_t.book Page 256
Page 259 of 463
MULTIMEDIA257
Media Mode
In USB Mode, press the Media button on the
touchscreen to select the desired audio
source: USB.
In Bluetooth® Mode, press the Media button on
the touchscreen to select the desired audio
source: Bluetooth®.
In AUX Mode, press the Media button on
the touchscreen to select the desired audio
source: AUX.
Repeat
In USB Mode, press the Repeat button on the
touchscreen to toggle the repeat functionality.
The Repeat button on the touchscreen is
highlighted when active. The Radio will continue
to play the current track, repeatedly, as long as
the repeat is active. Press the Repeat button
again to enter Repeat All. The radio will continue
to play all the current tracks, repeatedly, as long
as the repeat function is active. To cancel
Repeat, press the Repeat button a third time. Shuffle
In USB Mode, press the Shuffle button on the
touchscreen to play the selections on the USB
device in random order to provide an interesting
change of pace. Press the Shuffle button on the
touchscreen a second time to turn this feature off.
Audio
Audio settings can be accessed by pressing the
Audio button Ú
page 247.
Info
In both Disc and USB Modes, press the Info
button on the touchscreen to display the
current track information. Press the Info or X
button on the touchscreen a second time to
cancel this feature.
Tracks
In both Disc and USB Modes, press the Tracks
button on the touchscreen to display a pop-up
with the Song List. The song currently playing is
indicated by an arrow and lines above and
below the song title. When in the Tracks List
screen you can rotate the Tune/Scroll knob to
highlight a track (indicated by the line above
and below the track name) and then push the
Enter/Browse knob to start playing that track. In Bluetooth® Mode, if the Bluetooth® device
supports this feature, press the Tracks button
on the touchscreen to display a pop-up with
the Song List. The currently playing song is
indicated by a red arrow and lines above and
below the song title.
Pressing the Tracks button on the touchscreen
while the pop-up is displayed will close the pop-up.
Media Voice Commands
Uconnect offers connections via USB,
Bluetooth®, and auxiliary (AUX) ports. Voice
operation is only available for connected USB
and AUX devices.
Push the VR button located on the steering
wheel. After the beep, say one of the following
commands and follow the prompts to switch
your media source or choose an artist.
“
Change source to Bluetooth®”
“Change source to AUX”
“Change source to USB”
“Play artist Beethoven”; “ Play album
Greatest Hits”; “ Play song Moonlight
Sonata”; “ Play genre Classical”
5
21_DPF_OM_EN_USC_t.book Page 257
Page 261 of 463
MULTIMEDIA259
The Phone feature is driven through your
Bluetooth® “Hands-Free Profile” mobile phone.
Uconnect features Bluetooth® technology — the
global standard that enables different electronic
devices to connect to each other without wires or
a docking station. Ensure you phone is turned on
with Bluetooth® active and has been paired to
the Uconnect system. Up to 10 mobile phones or
audio devices are allowed to be linked to the
system. Only one linked (or paired) mobile phone
and one audio device can be used with the
system at a time.
Phone Button
The Phone button on your steering wheel is
used to get into the Phone Mode and make
calls, show recent, incoming or outgoing calls,
view phonebook, etc. When you press the
button you will hear a BEEP. The BEEP is your
signal to give a command.
Voice Command Button
The Voice Command button on your steering
wheel is only used for “barge in” and when you are
already in a call or want to make another call.
The button on your steering wheel is also
used to access the Voice Commands for the
Uconnect Voice Command features if your
vehicle is equipped.Phone Operation
Operation
Voice commands can be used to operate the
Uconnect Phone and to navigate its menu
structure. Voice commands are required after
most Uconnect Phone prompts. There are two
general methods for how Voice Command
works:
1. Say compound commands like “Call John
Smith mobile”.
2. Say the individual commands and allow the system to guide you to complete the task.
You will be prompted for a specific command
and then guided through the available options.
Prior to giving a voice command, one must
wait for the beep, which follows the “Listen”
prompt or another prompt.
For certain operations, compound
commands can be used. For example,
instead of saying “Call” and then “John
Smith” and then “mobile”, the following
compound command can be said: “Call John
Smith mobile.”
For each feature explanation in this section, only
the compound command form of the voice
command is given. You can also break the
commands into parts and say each part of
the command when you are asked for it.
For example, you can use the compound
command form voice command “Search for
John Smith,” or you can break the compound
command form into two voice commands:
“Search Contacts” and when asked, “John
Smith.” Please remember, the Uconnect Phone
works best when you talk in a normal conversa -
tional tone, as if speaking to someone sitting a
few feet/meters away from you.
Natural Speech
Your Uconnect Phone Voice system uses a
Natural Language Voice Recognition (VR)
engine.
Natural speech allows the user to speak
commands in phrases or complete sentences.
The system filters out certain non-word
utterances and sounds such as “ah” and “eh.”
The system handles fill-in words such as “I would
like to”.
5
21_DPF_OM_EN_USC_t.book Page 259
Page 263 of 463
MULTIMEDIA261
NOTE:
If there are no phones currently connected
with the system, a pop-up will appear asking
if you would like to pair a mobile phone.
This pop-up only appears when the user
enters Phone Mode and no other device(s)
have previously been paired. If the system
has a phone previously paired, even if no
phone is currently connected with the
system, this pop-up will not appear.
3. Select “Yes” to begin the pairing process.
4. Search for available devices on your Bluetooth®-enabled mobile phone.
Press the Settings button on your mobile
phone.
Select “Bluetooth®” and ensure it is
enabled. Once enabled, the mobile
phone will begin to search for Bluetooth®
connections.
NOTE:
During the pairing procedure, you may receive a
pop-up on your touchscreen asking you to make
sure the PIN on the touchscreen matches the
PIN from the pop-up on your mobile phone. 5. If “No” is selected, and you still would like to
pair a mobile phone, press the Pairing or
Settings button from the Uconnect Phone
main screen.
Press the Paired Phones button.
Search for available devices on your
Bluetooth®-enabled mobile phone (see
below). When prompted on the phone,
select “Uconnect” and accept the
connection request.
6. Uconnect Phone will display an in-progress screen while the system is connecting.
7. When your mobile phone finds the Uconnect system, select “Uconnect.”
8. When prompted on the mobile phone, accept the connection request from
Uconnect.
9. When the pairing process has successfully completed, the system will prompt you to
choose whether or not this is your favorite
phone. Selecting “Yes” will make this phone
the highest priority. This phone will take
precedence over other paired phones within
range and will connect to the Uconnect
system automatically when entering the vehicle. Only one mobile phone and/or one
Bluetooth® audio device can be connected
to the Uconnect system at a time. If “No” is
selected, simply select “Uconnect” from the
mobile phone/audio device Bluetooth®
screen, and the Uconnect system will
reconnect to the Bluetooth® device.
NOTE:
For phones which are not made a favorite, the
phone priority is determined by the order in
which it was paired. The most recent phone
paired will have the higher priority.
NOTE:
During the pairing procedure, you may receive a
pop-up on your mobile phone for the Uconnect
system to access your “messages” and
“contacts”. Selecting “Ok” or “Allow” will sync
your contacts with the Uconnect system.
You can also use the following VR command to
bring up the Paired Phone screen from any
screen on the radio:
“Show Paired Phones”
5
21_DPF_OM_EN_USC_t.book Page 261
Page 271 of 463
MULTIMEDIA269
The system is designed to keep your eyes on the
road and your hands on the wheel by letting Siri
help you perform useful tasks.
To enable Siri, push and hold, then release the
Uconnect Voice Recognition (VR) button on the
steering wheel. After you hear a double beep,
you can ask Siri to play podcasts and music, get
directions, read text messages, and many other
useful requests.
Bluetooth® Communication Link
Mobile phones may lose connection to the Uconnect
Phone. When this happens, the connection can
generally be re-established by restarting the mobile
phone. Your mobile phone is recommended to
remain in Bluetooth® ON mode.
Power-Up
After switching the ignition key from OFF to either
the ON/RUN or ACC position, or after a language
change, you must wait at least 15 seconds prior
to using the system
Ú
page 449.
RADIO OPERATION AND MOBILE PHONES
Under certain conditions, the mobile phone being
on in your vehicle can cause erratic or noisy
performance from your radio. This condition may be
lessened or eliminated by relocating the mobile
phone antenna. This condition is not harmful to
the radio. If your radio performance does not
satisfactorily “clear” by the repositioning of the
antenna, it is recommended that the radio volume
be turned down or off during mobile phone
operation when not using Uconnect (if equipped).
REGULATORY AND SAFETY
I
NFORMATION
USA/CANADA
Exposure to Radio Frequency Radiation
The radiated output power of the internal
wireless radio is far below the FCC and IC radio
frequency exposure limits. Nevertheless, the
wireless radio will be used in such a manner
that the radio is 8 in (20 cm) or further from the
human body. The internal wireless radio operates within
guidelines found in radio frequency safety
standards and recommendations, which reflect
the consensus of the scientific community.
The radio manufacturer believes the internal
wireless radio is safe for use by consumers.
The level of energy emitted is far less than the
electromagnetic energy emitted by wireless
devices such as mobile phones. However, the
use of wireless radios may be restricted in some
situations or environments, such as aboard
airplanes. If you are unsure of restrictions, you
are encouraged to ask for authorization before
turning on the wireless radio Ú
page 449.
5
21_DPF_OM_EN_USC_t.book Page 269
Page 276 of 463
274SAFETY
Anti-Lock Brake System (ABS) Warning
Light
The yellow ABS Warning Light will turn on when
the ignition is placed in the ON/RUN mode and
may stay on for as long as four seconds.
If the ABS Warning Light remains on or comes
on while driving, it indicates that the anti-lock
portion of the brake system is not functioning
and that service is required. However, the
conventional brake system will continue to
operate normally if the ABS Warning Light is on.
If the ABS Warning Light is on, the brake system
should be serviced as soon as possible to
restore the benefits of Anti-Lock brakes. If the
ABS Warning Light does not come on when the
ignition is placed in the ON/RUN mode, have
the light repaired as soon as possible.
ELECTRONIC BRAKE CONTROL (EBC)
S
YSTEM
Your vehicle is equipped with an advanced
Electronic Brake Control (EBC) system. This
system includes Anti-Lock Brake System (ABS),
Brake Assist System (BAS), Electronic Brake
Force Distribution (EBD), Hill Start Assist (HSA), Electronic Roll Mitigation (ERM), Electronic
Stability Control (ESC), and Traction Control
System (TCS). These systems work together to
enhance both vehicle stability and control in
various driving conditions.
Your vehicle may also be equipped with Trailer
Sway Control (TSC) and Hill Descent Control
(HDC).
Brake Assist System (BAS)
The BAS is designed to optimize the vehicle’s
braking capability during emergency braking
maneuvers. The system detects an emergency
braking situation by sensing the rate and amount
of brake application and then applies optimum
pressure to the brakes. This can help reduce
braking distances. The BAS complements the
Anti-Lock Brake System (ABS). Applying the
brakes very quickly results in the best BAS
assistance. To receive the benefit of the system,
you must apply continuous braking pressure
during the stopping sequence (do not “pump” the
brakes). Do not reduce brake pedal pressure
unless braking is no longer desired. Once the
brake pedal is released, the BAS is deactivated.
Brake System Warning Light
The red Brake System Warning Light will turn on
when the ignition is placed in the ON/RUN mode
and may stay on for as long as four seconds.
If the Brake System Warning Light remains on or
comes on while driving, it indicates that the
brake system is not functioning properly and
that immediate service is required. If the Brake
System Warning Light does not come on when
the ignition is placed in the ON/RUN mode,
have the light repaired as soon as possible.
WARNING!
The Brake Assist System (BAS) cannot prevent
the natural laws of physics from acting on
the vehicle, nor can it increase the traction
afforded by prevailing road conditions.
BAS cannot prevent collisions, including those
resulting from excessive speed in turns, driving
on very slippery surfaces, or hydroplaning.
The capabilities of a BAS-equipped vehicle
must never be exploited in a reckless or
dangerous manner, which could jeopardize
the user's safety or the safety of others.
21_DPF_OM_EN_USC_t.book Page 274
Page 277 of 463
SAFETY275
Electronic Brake Force Distribution (EBD)
EBD manages the distribution of the braking
torque between the front and rear axles by
limiting braking pressure to the rear axle. This is
done to prevent overslip of the rear wheels to
avoid vehicle instability, and to prevent the rear
axle from entering ABS before the front axle.
Electronic Roll Mitigation (ERM)
ERM anticipates the potential for wheel lift by
monitoring the driver’s steering wheel input and
the speed of the vehicle. When ERM determines
that the rate of change of the steering wheel
angle and vehicle’s speed are sufficient to
potentially cause wheel lift, it then applies the
appropriate brake and may also reduce engine
power to lessen the chance that wheel lift will
occur. ERM can only reduce the chance of
wheel lift occurring during severe or evasive
driving maneuvers; it cannot prevent wheel lift
due to other factors, such as road conditions,
leaving the roadway, or striking objects or other
vehicles.
NOTE:
ERM is disabled any time the ESC is in “Full Off”
mode (if equipped). For a complete explanation
of the available ESC modes, see Ú page 275.
Electronic Stability Control (ESC)
ESC enhances directional control and stability
of the vehicle under various driving conditions.
ESC corrects for oversteering or understeering
of the vehicle by applying the brake of the
appropriate wheel(s) to counteract the above
conditions. Engine power may also be reduced
to help the vehicle maintain the desired path.
Oversteer — when the vehicle is turning more
than appropriate for the steering wheel position.
Understeer — when the vehicle is turning less
than appropriate for the steering wheel position.
ESC uses sensors in the vehicle to determine
the vehicle path intended by the driver and
compares it to the actual path of the vehicle.
When the actual path does not match the
intended path, ESC applies the brake of the
appropriate wheel to assist in counteracting the
oversteer or understeer condition.
The ESC Activation/Malfunction Indicator Light
located in the instrument cluster will start to flash
as soon as the ESC system becomes active.
The ESC Activation/Malfunction Indicator Light
also flashes when the TCS is active. If the ESC
Activation/Malfunction Indicator Light begins to
flash during acceleration, ease up on the
accelerator and apply as little throttle as possible.
Be sure to adapt your speed and driving to the
prevailing road conditions.
WARNING!
Many factors, such as vehicle loading, road
conditions and driving conditions, influence
the chance that wheel lift or rollover may occur.
ERM cannot prevent all wheel lift or roll overs,
especially those that involve leaving the
roadway or striking objects or other vehicles.
The capabilities of an ERM-equipped vehicle
must never be exploited in a reckless or
dangerous manner which could jeopardize
the user's safety or the safety of others.
6
21_DPF_OM_EN_USC_t.book Page 275
Page 278 of 463
276SAFETY
(Continued)
ESC Operating Modes
Depending upon model and mode of operation, the
ESC system may have multiple operating modes.
ESC On
This is the normal operating mode for the ESC
system. Whenever the vehicle is started, the ESC
system will be in this mode. This mode should be
used for most driving conditions. Alternate ESC
modes should only be used for specific reasons
as noted in the following paragraphs.
Partial Off
This mode may be useful if the vehicle becomes
stuck. This mode may modify TCS and ESC
thresholds for activation, which allows for more
wheel spin than normally allowed.
To enter the “Partial Off” mode, momentarily
push the ESC OFF button and the ESC OFF
Indicator Light will illuminate. To turn the ESC
on again, momentarily push the ESC OFF button
and the ESC OFF Indicator Light will turn off.WARNING!
Electronic Stability Control (ESC) cannot
prevent the natural laws of physics from acting
on the vehicle, nor can it increase the traction
afforded by prevailing road conditions. ESC
cannot prevent accidents, including those
resulting from excessive speed in turns, driving
on very slippery surfaces, or hydroplaning. ESC
also cannot prevent accidents resulting from
loss of vehicle control due to inappropriate
driver input for the conditions. Only a safe,
attentive, and skillful driver can prevent acci -
dents. The capabilities of an ESC equipped
vehicle must never be exploited in a reckless or
dangerous manner which could jeopardize the
user’s safety or the safety of others.Vehicle modifications, or failure to properly
maintain your vehicle, may change the
handling characteristics of your vehicle, and
may negatively affect the performance of the
ESC system. Changes to the steering system,
suspension, braking system, tire type and size
or wheel size may adversely affect ESC perfor -
mance. Improperly inflated and unevenly worn
tires may also degrade ESC performance.
Any vehicle modification or poor vehicle main -
tenance that reduces the effectiveness of the
ESC system can increase the risk of loss of
vehicle control, vehicle rollover, personal injury
and death.
WARNING! (Continued)
21_DPF_OM_EN_USC_t.book Page 276