wheel RAM CHASSIS CAB 2021 Repair Manual
[x] Cancel search | Manufacturer: RAM, Model Year: 2021, Model line: CHASSIS CAB, Model: RAM CHASSIS CAB 2021Pages: 463, PDF Size: 21.5 MB
Page 216 of 463

214STARTING AND OPERATING
RECREATIONAL TOWING (BEHIND MOTORHOME)
TOWING THIS VEHICLE BEHIND ANOTHER VEHICLE
NOTE:
When towing your vehicle, always follow applicable state and provincial laws. Contact state and provincial Highway Safety offices for additional details.
Towing ConditionWheels OFF The
Ground Two-Wheel Drive
Models Four-Wheel Drive Models
Flat Tow
NONENOT ALLOWED See InstructionsAutomatic transmission in PARK
Transfer case in NEUTRAL (N)
Tow in forward direction
Dolly Tow Front
NOT ALLOWED NOT ALLOWED
Rear OK NOT ALLOWED
On Trailer ALLOK OK
21_DPF_OM_EN_USC_t.book Page 214
Page 217 of 463
STARTING AND OPERATING215
(Continued)
RECREATIONAL TOWING — TWO-WHEEL
D
RIVE MODELS
DO NOT flat tow this vehicle. Damage to the
drivetrain will result.
Recreational towing (for two-wheel drive
models) is allowed ONLY if the rear wheels are
OFF the ground. This may be accomplished
using a tow dolly or vehicle trailer. If using a tow
dolly, follow this procedure:
1. Properly secure the dolly to the tow vehicle, following the dolly manufacturer's
instructions.
2. Drive the rear wheels onto the tow dolly.
3. Firmly apply the parking brake. Place automatic transmission in PARK.
4. Properly secure the rear wheels to the dolly, following the dolly manufacturer's
instructions.
5. Turn the ignition to the OFF position and remove the key fob.
6. Install a suitable clamping device, designed for towing, to secure the front wheels in the
straight position.
RECREATIONAL TOWING —
F
OUR-WHEEL DRIVE MODELS
NOTE:
Both the manual shift and electronically shifted
transfer cases must be shifted into N (Neutral)
for recreational towing. Automatic transmis -
sions must be shifted into PARK for recreational
towing. Refer to the following for the proper
transfer case N (Neutral) shifting procedure for
your vehicle.
CAUTION!
Towing with the rear wheels on the ground
will cause severe transmission damage.
Damage from improper towing is not
covered under the New Vehicle Limited
Warranty.
Do not disconnect the driveshaft because
fluid may leak from the transmission,
causing damage to internal parts.
CAUTION!
DO NOT dolly tow any four-wheel drive
vehicle. Towing with only one set of wheels
on the ground (front or rear) will cause
severe transmission and/or transfer case
damage. Tow with all four wheels either ON
the ground, or OFF the ground (using a
vehicle trailer).
Tow only in the forward direction. Towing
this vehicle backwards can cause severe
damage to the transfer case.
Before recreational towing, the transfer
case must be in NEUTRAL. To be certain the
transfer case is fully in NEUTRAL, perform
the procedure outlined under “Shifting Into
NEUTRAL”. Internal transmission damage
will result, if the transfer case is not in
NEUTRAL during towing.
The transmission must be placed in PARK
for recreational towing.
Towing this vehicle in violation of the above
requirements can cause severe transmis-
sion and/or transfer case damage. Damage
from improper towing is not covered under
the New Vehicle Limited Warranty.
4
21_DPF_OM_EN_USC_t.book Page 215
Page 220 of 463

218STARTING AND OPERATING
NOTE:
With electronically shifted transfer case:
Steps 3 and 4 are requirements that must be
met before pushing the button to shift out of
N (Neutral), and must continue to be met
until the shift has been completed. If any of
these requirements are not met before
pushing the button or are no longer met
during the shift, the N (Neutral) indicator light
will flash continuously until all requirements
are met or until the button is released.
The ignition must be in the ON/RUN mode for
a shift to take place and for the position indi -
cator lights to be operable. If the ignition is
not in the ON/RUN mode, the shift will not
take place and no position indicator lights will
be on or flashing.
A flashing N (Neutral) position indicator light
indicates that shift requirements have not
been met.
DRIVING TIPS
DRIVING ON SLIPPERY SURFACES
Acceleration
Rapid acceleration on snow covered, wet, or
other slippery surfaces may cause the driving
wheels to pull erratically to the right or left. This
phenomenon occurs when there is a difference
in the surface traction under the rear (driving)
wheels.
DRIVING THROUGH WATER
Driving through water more than a few inches/
centimeters deep will require extra caution to
ensure safety and prevent damage to your
vehicle.
Flowing/Rising Water
WARNING!
Rapid acceleration on slippery surfaces is
dangerous. Unequal traction can cause
sudden pulling of the rear wheels. You could
lose control of the vehicle and possibly have a
collision. Accelerate slowly and carefully
whenever there is likely to be poor traction
(ice, snow, wet, mud, loose sand, etc.).
WARNING!
Do not drive on or across a road or path
where water is flowing and/or rising (as in
storm run-off). Flowing water can wear
away the road or path's surface and cause
your vehicle to sink into deeper water.
Furthermore, flowing and/or rising water can
carry your vehicle away swiftly. Failure to
follow this warning may result in injuries that
are serious or fatal to you, your passengers,
and others around you.
21_DPF_OM_EN_USC_t.book Page 218
Page 223 of 463
MULTIMEDIA221
NOTE:
FCA US LLC or your dealer may contact you
directly regarding software updates.
To help further improve vehicle security and
minimize the potential risk of a security
breach, vehicle owners should:
Routinely check www.driveuconnect.com
(US Residents) or www.driveuconnect.ca
(Canadian Residents) to learn about
available Uconnect software updates.
Only connect and use trusted media
devices (e.g. personal mobile phones,
USBs, CDs).
Privacy of any wireless and wired
communications cannot be assured. Third
parties may unlawfully intercept information
and private communications without your
consent Ú page 116.
UCONNECT 3.0
INTRODUCTION
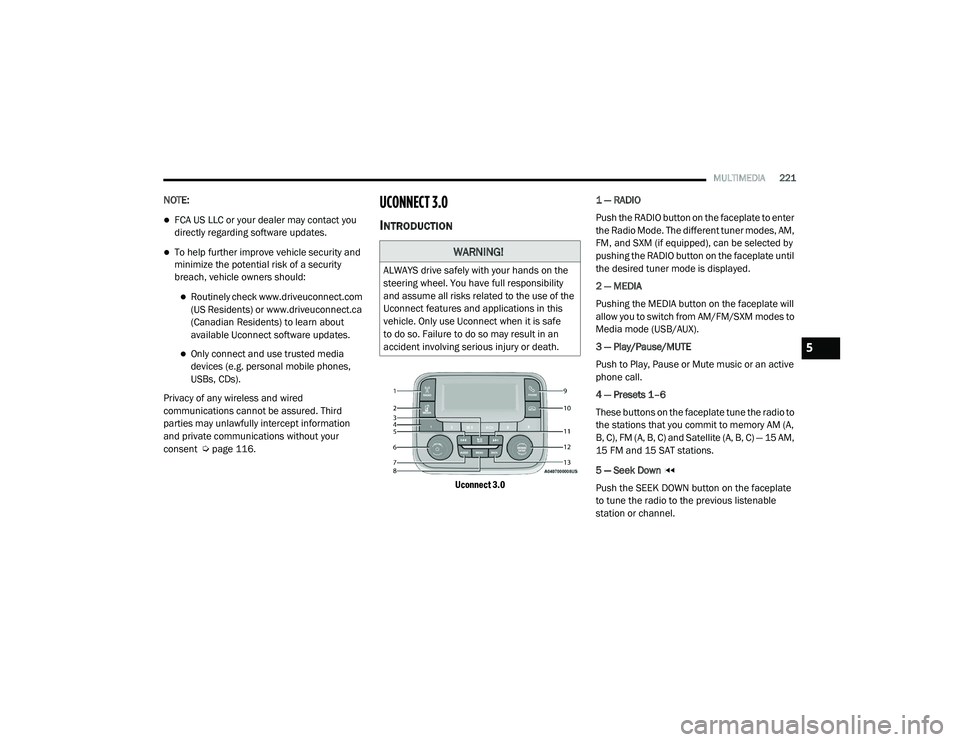
Uconnect 3.0
1 — RADIO
Push the RADIO button on the faceplate to enter
the Radio Mode. The different tuner modes, AM,
FM, and SXM (if equipped), can be selected by
pushing the RADIO button on the faceplate until
the desired tuner mode is displayed.
2 — MEDIA
Pushing the MEDIA button on the faceplate will
allow you to switch from AM/FM/SXM modes to
Media mode (USB/AUX).
3 — Play/Pause/MUTE
Push to Play, Pause or Mute music or an active
phone call.
4 — Presets 1–6
These buttons on the faceplate tune the radio to
the stations that you commit to memory AM (A,
B, C), FM (A, B, C) and Satellite (A, B, C) — 15 AM,
15 FM and 15 SAT stations.
5 — Seek Down
Push the SEEK DOWN button on the faceplate
to tune the radio to the previous listenable
station or channel.
WARNING!
ALWAYS drive safely with your hands on the
steering wheel. You have full responsibility
and assume all risks related to the use of the
Uconnect features and applications in this
vehicle. Only use Uconnect when it is safe
to do so. Failure to do so may result in an
accident involving serious injury or death.
5
21_DPF_OM_EN_USC_t.book Page 221
Page 228 of 463
226MULTIMEDIA
Uconnect System Support:
US residents visit
DriveUconnect.com
or call
1-877-855-8400 (24 hours a day, 7 days a week)
Canadian residents visit DriveUconnect.ca or
call 1-800-465-2001 (English) or
1-800-387-9983 (French)
Monday–Friday: 8:00 am – 8:00 pm, ET
Saturday: 9:00 am – 5:00 pm, ET
Sunday: Closed
Changing The Volume
1. Start a call by pushing the Phone button, then
adjust the volume during a normal call.
2. Use the radio On/Volume rotary knob to adjust the volume to a comfortable level. Please note the volume setting for
Uconnect phone is different than the
audio system volume setting.
Making A Phone Call
1. Push the Phone button on the steering wheel.
2. After the beep, say “dial” or “call” and then
the full name or phone number.
NOTE:
A phone call can also be made by pushing the Phone
button on the radio, and selecting a particular
contact in the phonebook or recent calls.
Mute (Or Unmute) Microphone During Call
Push the “Play/Pause/Mute” button on
the radio or during a call, push the Voice
Recognition button on the steering wheel.
After the beep, say “mute” (or “mute off”).
Pairing A Phone
To begin using your Uconnect Phone, you must
pair your compatible Bluetooth®-enabled mobile
phone. Mobile phone pairing is the process of
establishing a wireless connection between a
cellular phone and the Uconnect system. To complete the pairing process, you will need to
reference your mobile phone Owner's Manual.
Please visit
UconnectPhone.com
for complete
mobile phone compatibility information.
NOTE:
You must have Bluetooth® enabled on your
phone to complete this procedure.
The vehicle must be in PARK.
1. Place the ignition in the ACC or ON/RUN position.
2. Push the Phone button.
NOTE:
If there are no phones currently connected with
the system, a pop-up will appear asking if you
would like to pair a mobile phone.
3. Select “Yes” to begin the pairing process.
4. Search for available devices on your Bluetooth®-enabled mobile phone.
Press the Settings button on your mobile
phone.
Select “Bluetooth®” and ensure it is
enabled. Once enabled, the mobile
phone will begin to search for Bluetooth®
connections.
WARNING!
ALWAYS drive safely with your hands on the
wheel. You have full responsibility and
assume all risks related to the use of the
Uconnect features and applications in this
vehicle. Only use Uconnect when it is safe
to do so. Failure to do so may result in an
accident involving serious injury or death.
21_DPF_OM_EN_USC_t.book Page 226
Page 229 of 463
MULTIMEDIA227
5. If “No” is selected, and you still would like to
pair a mobile phone, press the Settings
button from the Uconnect Phone main
screen.
Select “Paired Phones”, and then select
“Add Device”.
Search for available devices on your
Bluetooth®-enabled mobile phone (see
below). When prompted on the phone,
select “Uconnect” and accept the
connection request.
6. Uconnect Phone will display an in-progress screen while the system is connecting.
7. When your mobile phone finds the Uconnect system, select “Uconnect”.
8. When prompted on the mobile phone, accept the connection request from
Uconnect Phone.
NOTE:
Some mobile phones will require you to enter
the PIN. 9. When the pairing process has successfully
completed, the system will prompt you to
choose whether or not this is your favorite
phone. Selecting “Yes” will make this phone
the highest priority. This phone will take
precedence over other paired phones within
range and will connect to the Uconnect
system automatically when entering the
vehicle. Only one mobile phone and/or one
Bluetooth® audio device can be connected
to the Uconnect system at a time. If “No” is
selected, simply select “Uconnect” from the
mobile phone/audio device Bluetooth®
screen, and the Uconnect system
reconnects to the Bluetooth® device.
NOTE:
Software updates on your phone or the
Uconnect system may interfere with the
Bluetooth® connection. If this happens, simply
repeat the pairing process. However, first, make
sure to delete the device from the list of phones
on your Uconnect system. Next, be sure to
remove Uconnect from the list of devices in your
phone’s Bluetooth® settings.
Phonebook Download — Phonebook
Transfer From Mobile Phone
If equipped and specifically supported by your
phone, Uconnect Phone will ask you if you want
to download names (text names) and number
entries from your mobile phone’s phonebook.
Specific Bluetooth® Phones with Phonebook
Access Profile may support this feature. See
UconnectPhone.com for supported phones.
Receiving A Call — Accept (And End)
1. When an incoming call rings or is announced on Uconnect, push the
Phone button on the faceplate.
2. To end a call, push the Phone button on the steering wheel or the Phone button on the
faceplate.
NOTE:
A phone call can also be accepted and ended by
pushing the steering wheel Phone button.
Transfer Ongoing Call Between Handset
And Vehicle
With a call in progress, use the Browse/Enter
knob to select “transfer” then push the enter
button or push the Phone Pick Up button on the
5
21_DPF_OM_EN_USC_t.book Page 227
Page 230 of 463
228MULTIMEDIA
steering wheel controls during a call, push the
Voice Recognition button on the steering wheel.
After the beep, say “transfer call”.
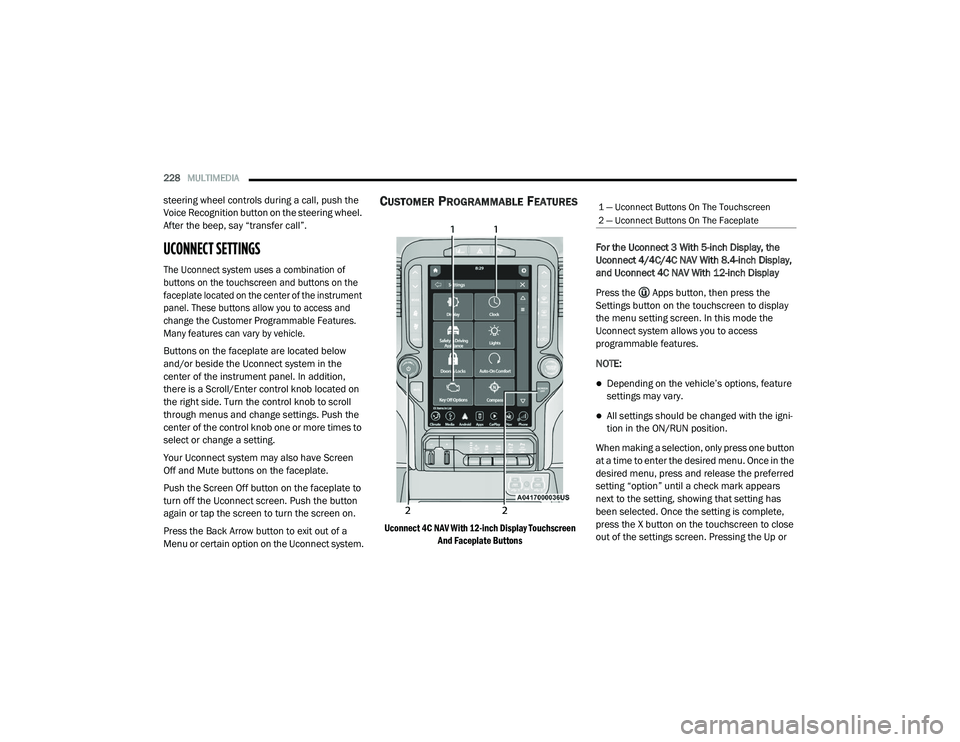
UCONNECT SETTINGS
The Uconnect system uses a combination of
buttons on the touchscreen and buttons on the
faceplate located on the center of the instrument
panel. These buttons allow you to access and
change the Customer Programmable Features.
Many features can vary by vehicle.
Buttons on the faceplate are located below
and/or beside the Uconnect system in the
center of the instrument panel. In addition,
there is a Scroll/Enter control knob located on
the right side. Turn the control knob to scroll
through menus and change settings. Push the
center of the control knob one or more times to
select or change a setting.
Your Uconnect system may also have Screen
Off and Mute buttons on the faceplate.
Push the Screen Off button on the faceplate to
turn off the Uconnect screen. Push the button
again or tap the screen to turn the screen on.
Press the Back Arrow button to exit out of a
Menu or certain option on the Uconnect system.
CUSTOMER PROGRAMMABLE FEATURES
Uconnect 4C NAV With 12-inch Display Touchscreen
And Faceplate Buttons
For the Uconnect 3 With 5-inch Display, the
Uconnect 4/4C/4C NAV With 8.4-inch Display,
and Uconnect 4C NAV With 12-inch Display
Press the Apps button, then press the
Settings button on the touchscreen to display
the menu setting screen. In this mode the
Uconnect system allows you to access
programmable features.
NOTE:
Depending on the vehicle’s options, feature
settings may vary.
All settings should be changed with the igni
-
tion in the ON/RUN position.
When making a selection, only press one button
at a time to enter the desired menu. Once in the
desired menu, press and release the preferred
setting “option” until a check mark appears
next to the setting, showing that setting has
been selected. Once the setting is complete,
press the X button on the touchscreen to close
out of the settings screen. Pressing the Up or
1 — Uconnect Buttons On The Touchscreen
2 — Uconnect Buttons On The Faceplate
21_DPF_OM_EN_USC_t.book Page 228
Page 235 of 463
MULTIMEDIA233
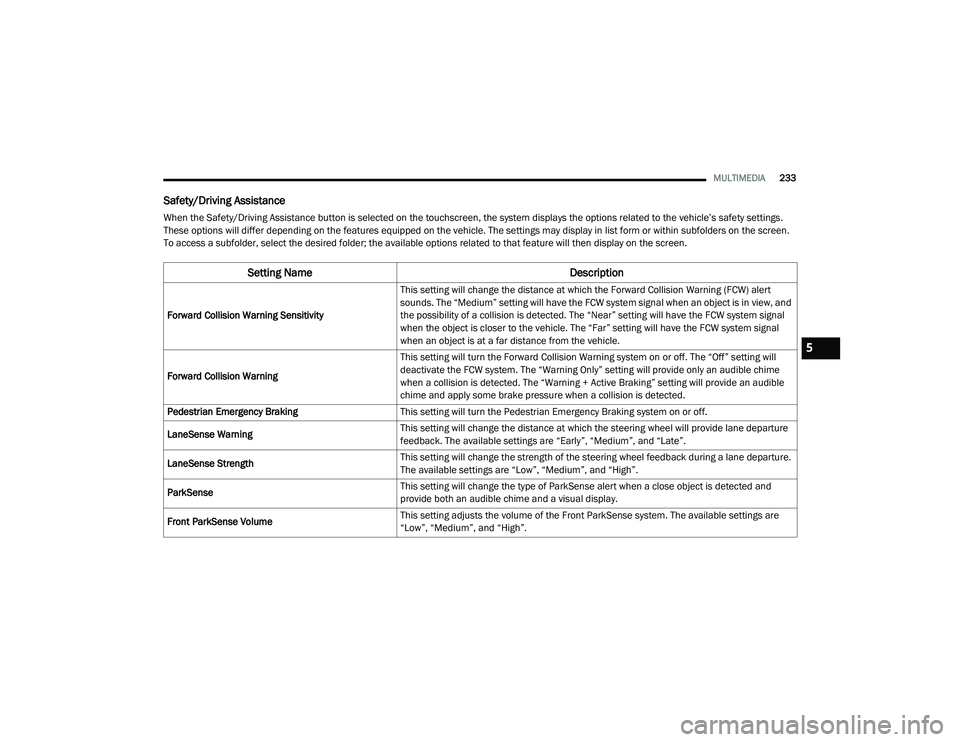
Safety/Driving Assistance
When the Safety/Driving Assistance button is selected on the touchscreen, the system displays the options related to the vehicle’s safety settings.
These options will differ depending on the features equipped on the vehicle. The settings may display in list form or within subfolders on the screen.
To access a subfolder, select the desired folder; the available options related to that feature will then display on the screen.
Setting Name Description
Forward Collision Warning SensitivityThis setting will change the distance at which the Forward Collision Warning (FCW) alert
sounds. The “Medium” setting will have the FCW system signal when an object is in view, and
the possibility of a collision is detected. The “Near” setting will have the FCW system signal
when the object is closer to the vehicle. The “Far” setting will have the FCW system signal
when an object is at a far distance from the vehicle.
Forward Collision Warning This setting will turn the Forward Collision Warning system on or off. The “Off” setting will
deactivate the FCW system. The “Warning Only” setting will provide only an audible chime
when a collision is detected. The “Warning + Active Braking” setting will provide an audible
chime and apply some brake pressure when a collision is detected.
Pedestrian Emergency Braking This setting will turn the Pedestrian Emergency Braking system on or off.
LaneSense Warning This setting will change the distance at which the steering wheel will provide lane departure
feedback. The available settings are “Early”, “Medium”, and “Late”.
LaneSense Strength This setting will change the strength of the steering wheel feedback during a lane departure.
The available settings are “Low”, “Medium”, and “High”.
ParkSense This setting will change the type of ParkSense alert when a close object is detected and
provide both an audible chime and a visual display.
Front ParkSense Volume This setting adjusts the volume of the Front ParkSense system. The available settings are
“Low”, “Medium”, and “High”.
5
21_DPF_OM_EN_USC_t.book Page 233
Page 238 of 463

236MULTIMEDIA
Lights
When the Lights button is pressed on the touchscreen, the system displays the options related to the vehicle’s exterior and interior lights.
NOTE:
When the “Daytime Running Lights” feature is selected, the daytime running lights can be turned on or off. This feature is only allowed by law in the
country of the vehicle purchased.
Setting Name Description
Headlight Off DelayThis setting will allow you to set the amount of time it takes for the headlights to shut off after
the vehicle is turned off. The available settings are “0 sec”, “30 sec”, “60 sec”, and “90 sec”.
Headlight Illumination On Approach This setting will allow you to set the amount of time it takes for the headlights to shut off after
the vehicle is unlocked. The available settings are “0 sec”, “30 sec”, “60 sec”, and “90 sec”.
Headlights with Wipers This setting will turn the headlights on when the wipers are activated.
Daytime Running Lights This setting will allow you to turn the Daytime Running Lights on or off.
Flash Lights With Lock This setting will allow you to turn the flashing of the lights when the Lock button is pushed on
the key fob on or off.
Auto Dim High Beams This setting will allow you to turn the Auto Dim High Beams on or off.
Steering Directed Lights This setting will turn the headlights with the steering wheel. The available options are “On”
and “Off”.
21_DPF_OM_EN_USC_t.book Page 236
Page 240 of 463

238MULTIMEDIA
Power Side Steps
When the Power Side Steps button is pressed on the touchscreen, the system will display the setting related to the lowering of the power side steps.
Seats & Comfort/Auto-On Comfort
When Seats & Comfort/Auto-On Comfort button is pressed on the touchscreen, the system displays the options related to the vehicle’s comfort systems
when remote start has been activated or the vehicle has been started.
Setting Name Description
Power Side Steps
This setting will raise and lower or stow the power side steps. The available options are “Automatic” to
raise and lower the power side steps and “Stow” to deactivate the power side steps.
Setting Name
Description
Auto-On Driver Heated/Ventilated Seat & Heated
Steering Wheel With Vehicle Start
This setting will activate the vehicle’s comfort systems and heated seats (if equipped) or
heated steering wheel (if equipped) when the vehicle is remote started or ignition is started.
The “Off” setting will not activate the comfort systems. The “Remote Start” setting will only
activate the comfort systems when using Remote Start. The “All Start” setting will activate the
comfort systems whenever the vehicle is started.
Easy Exit Seats This setting will automatically move the driver seat rearward when the engine is shut off.
The available settings are “On” and “Off”.
21_DPF_OM_EN_USC_t.book Page 238