RAM PROMASTER 2023 Owners Manual
Manufacturer: RAM, Model Year: 2023, Model line: PROMASTER, Model: RAM PROMASTER 2023Pages: 296, PDF Size: 12.31 MB
Page 131 of 296
STARTING AND OPERATING129
Towing Requirements — Trailer Lights And
Wiring
Whenever you pull a trailer, regardless of the trailer
size, stop lights and turn signals on the trailer are
required for motoring safety.
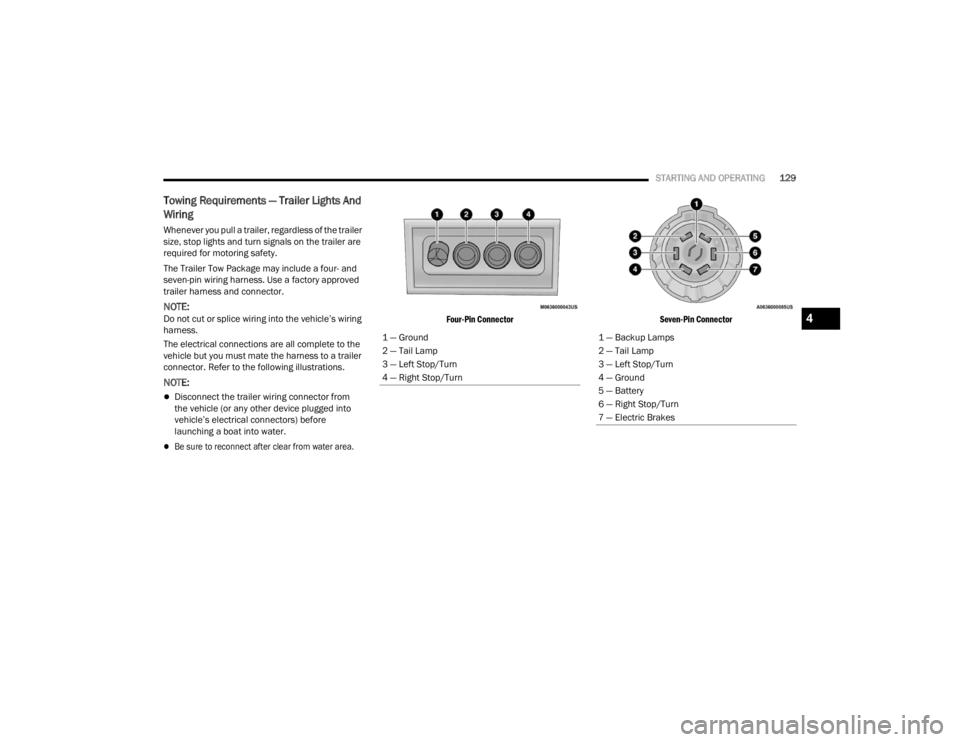
The Trailer Tow Package may include a four- and
seven-pin wiring harness. Use a factory approved
trailer harness and connector.
NOTE:Do not cut or splice wiring into the vehicle’s wiring
harness.
The electrical connections are all complete to the
vehicle but you must mate the harness to a trailer
connector. Refer to the following illustrations.
NOTE:
Disconnect the trailer wiring connector from
the vehicle (or any other device plugged into
vehicle’s electrical connectors) before
launching a boat into water.
Be sure to reconnect after clear from water area.
Four-Pin Connector
Seven-Pin Connector
1 — Ground
2 — Tail Lamp
3 — Left Stop/Turn
4 — Right Stop/Turn
1 — Backup Lamps
2 — Tail Lamp
3 — Left Stop/Turn
4 — Ground
5 — Battery
6 — Right Stop/Turn
7 — Electric Brakes
4
23_VF_OM_EN_USC_t.book Page 129
Page 132 of 296
130STARTING AND OPERATING
TOWING TIPS
Before towing, practice turning, stopping, and
backing up the trailer in an area located away from
heavy traffic.
Automatic Transmission
The DRIVE range can be selected when towing.
The transmission controls include a drive strategy to
avoid frequent shifting when towing. However, if
frequent shifting does occur while in DRIVE, select
TOW/HAUL mode or select a lower gear range (using
the Electronic Range Select (ERS) shift control).
NOTE:Using TOW/HAUL mode or selecting a lower gear
range (using the ERS shift control) while operating
the vehicle under heavy loading conditions will
improve performance and extend transmission life
by reducing excessive shifting and heat buildup.
This action will also provide better engine braking.
When towing a loaded trailer up steep grades at
low speeds, holding your vehicle in FIRST gear
(using the ERS shift control) can help to avoid
transmission overheating.Tow/Haul Mode
To reduce potential for automatic transmission
overheating, activate TOW/HAUL mode when
driving in hilly areas, or select a lower gear range
(using the Electronic Range Select (ERS) shift
control) on more severe grades.
Cruise Control — If Equipped
Do not use on hilly terrain or with heavy loads.
When using the Cruise Control, if you experience
speed drops greater than 10 mph (16 km/h),
disengage until you can get back to cruising
speed.
Use Cruise Control in flat terrain and with light
loads to maximize fuel efficiency.
RECREATIONAL TOWING (BEHIND MOTORHOME)
TOWING THIS VEHICLE BEHIND ANOTHER VEHICLE
Towing Condition Wheels OFF the Ground Automatic Transmission
Flat Tow NONENOT ALLOWED
Dolly Tow Front
OK
Rear NOT ALLOWED
On Trailer ALLOK
NOTE:When towing your vehicle, always follow applicable state and provincial laws. Contact state and provincial Highway Safety offices for additional details.
23_VF_OM_EN_USC_t.book Page 130
Page 133 of 296
STARTING AND OPERATING131
RECREATIONAL TOWING
Recreational towing is allowed
ONLY
if the front wheels
are
OFF
the ground. This may be accomplished using a
tow dolly or vehicle trailer. If using a tow dolly, follow
this procedure:
1. Properly secure the dolly to the tow vehicle, following the dolly manufacturer's
instructions.
2. Drive the front wheels onto the tow dolly.
3. Apply the Electric Park Brake. Place the transmission in PARK.
4. Properly secure the front wheels to the dolly, following the dolly manufacturer's instructions.
5. Release the Electric Park Brake.
DRIVING TIPS
DRIVING ON SLIPPERY SURFACES
Acceleration
Rapid acceleration on snow covered, wet, or other
slippery surfaces may cause the driving wheels to
pull erratically to the right or left. This phenomenon
occurs when there is a difference in the surface
traction under the front (driving) wheels.
Traction
When driving on wet or slushy roads, it is possible
for a wedge of water to build up between the tire
and road surface. This is hydroplaning and may
cause partial or complete loss of vehicle control
and stopping ability. To reduce this possibility, the
following precautions should be observed:
Slow down during rainstorms or when the roads
are slushy.
Slow down if the road has standing water or
puddles.
Replace the tires when tread wear indicators
first become visible.
Keep tires properly inflated.
Maintain sufficient distance between your
vehicle and the vehicle in front of you to avoid a
collision in a sudden stop.
DRIVING THROUGH WATER
Driving through water more than a few inches/
centimeters deep will require extra caution to
ensure safety and prevent damage to your vehicle.
CAUTION!
DO NOT flat tow this vehicle. Damage to the
drivetrain will result. If this vehicle requires
towing, make sure the drive wheels are OFF
the ground.
Towing this vehicle in violation of the above
requirements can cause severe transmission
damage. Damage from improper towing is not
covered under the New Vehicle Limited
Warranty.
WARNING!
Rapid acceleration on slippery surfaces is
dangerous. Unequal traction can cause sudden
pulling of the front wheels. You could lose control of
the vehicle and possibly have a collision. Accelerate
slowly and carefully whenever there is likely to be
poor traction (ice, snow, wet, mud, loose sand, etc.).
4
23_VF_OM_EN_USC_t.book Page 131
Page 134 of 296
132STARTING AND OPERATING
(Continued)
(Continued)
Flowing/Rising Water
Shallow Standing Water
Although your vehicle is capable of driving through
shallow standing water, consider the following
Cautions and Warnings before doing so.
WARNING!
Do not drive on or across a road or path where
water is flowing and/or rising (as in storm
run-off). Flowing water can wear away the road
or path's surface and cause your vehicle to sink
into deeper water. Furthermore, flowing and/or
rising water can carry your vehicle away swiftly.
Failure to follow this warning may result in
injuries that are serious or fatal to you, your
passengers, and others around you.
WARNING!
Driving through standing water limits your
vehicle’s traction capabilities. Do not exceed
5 mph (8 km/h) when driving through
standing water.
Driving through standing water limits your
vehicle’s braking capabilities, which increases
stopping distances. Therefore, after driving
through standing water, drive slowly and
lightly press on the brake pedal several times
to dry the brakes.
Failure to follow these warnings may result in
injuries that are serious or fatal to you, your
passengers, and others around you.
CAUTION!
Always check the depth of the standing water
before driving through it. Never drive through
standing water that is deeper than the bottom
of the tire rims mounted on the vehicle.
Determine the condition of the road or the
path that is under water and if there are any
obstacles in the way before driving through
the standing water.
WARNING!
Do not exceed 5 mph (8 km/h) when driving through standing water. This will minimize
wave effects.
Driving through standing water may cause
damage to your vehicle’s drivetrain compo -
nents. Always inspect your vehicle’s fluids
(i.e., engine oil, transmission, axle, etc.) for
signs of contamination (i.e., fluid that is milky
or foamy in appearance) after driving through
standing water. Do not continue to operate
the vehicle if any fluid appears contaminated,
as this may result in further damage. Such
damage is not covered by the New Vehicle
Limited Warranty.
Getting water inside your vehicle’s engine can
cause it to lock up and stall out, and cause
serious internal damage to the engine. Such
damage is not covered by the New Vehicle
Limited Warranty.
CAUTION!
23_VF_OM_EN_USC_t.book Page 132
Page 135 of 296
133
MULTIMEDIA
UCONNECT SYSTEMS
For detailed information about your Uconnect 5
With 7-inch Display or Uconnect 5 NAV With
10.1-inch Display system, refer to your Uconnect
Radio Instruction Manual.
NOTE:Uconnect screen images are for illustration
purposes only and may not reflect exact software
for your vehicle.
CYBERSECURITY
Depending on applicability, your vehicle may be
able to send or receive information from a wired or
wireless network. This information allows systems
and features in your vehicle to function properly.Your vehicle may be equipped with certain security
features to reduce the risk of unauthorized and
unlawful access to vehicle systems and wireless
communications. Vehicle software technology
continues to evolve over time and FCA US LLC,
working with its suppliers, evaluates and takes
appropriate steps as needed. As always, if you
experience unusual behavior, contact an
authorized dealer immediately, Ú
page 275, or
refer to your Uconnect Radio Instruction Manual
for additional contact information.
The risk of unauthorized and unlawful access to
your vehicle systems may still exist, even if the
most recent version of vehicle software (such as
Uconnect software) is installed.NOTE:To help further improve user experience, features,
stability, etc., and minimize the potential risk of a
security breach, vehicle owners should routinely
check
www.driveuconnect.com (US Residents) or www.driveuconnect.ca (Canadian Residents) to
learn about available Uconnect software updates.
WARNING!
ONLY insert trusted devices/components into
your vehicle. Media of unknown origin could
possibly contain malicious software, and if
installed in your vehicle, it may increase the
possibility for vehicle systems to be breached.
As always, if you experience unusual vehicle
behavior, take your vehicle to an authorized
dealer immediately.
5
23_VF_OM_EN_USC_t.book Page 133
Page 136 of 296
134MULTIMEDIA
UCONNECT SETTINGS
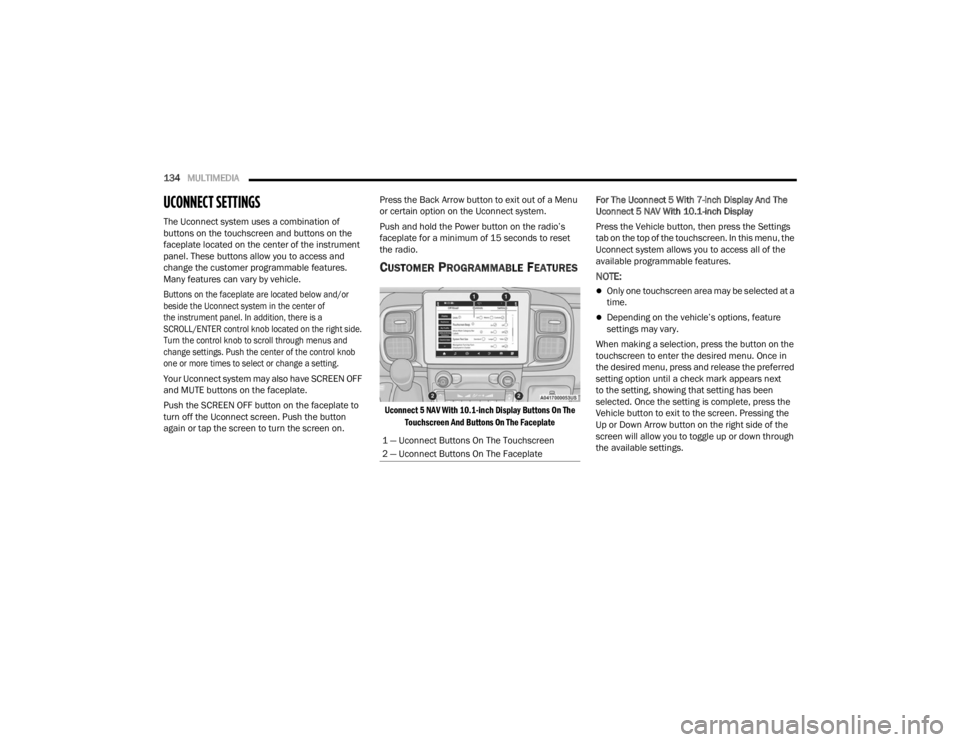
The Uconnect system uses a combination of
buttons on the touchscreen and buttons on the
faceplate located on the center of the instrument
panel. These buttons allow you to access and
change the customer programmable features.
Many features can vary by vehicle.
Buttons on the faceplate are located below and/or
beside the Uconnect system in the center of
the instrument panel. In addition, there is a
SCROLL/ENTER control knob located on the right side.
Turn the control knob to scroll through menus and
change settings. Push the center of the control knob
one or more times to select or change a setting.
Your Uconnect system may also have SCREEN OFF
and MUTE buttons on the faceplate.
Push the SCREEN OFF button on the faceplate to
turn off the Uconnect screen. Push the button
again or tap the screen to turn the screen on. Press the Back Arrow button to exit out of a Menu
or certain option on the Uconnect system.
Push and hold the Power button on the radio’s
faceplate for a minimum of 15 seconds to reset
the radio.
CUSTOMER PROGRAMMABLE FEATURES
Uconnect 5 NAV With 10.1-inch Display Buttons On The
Touchscreen And Buttons On The Faceplate
For The Uconnect 5 With 7-inch Display And The
Uconnect 5 NAV With 10.1-inch Display
Press the Vehicle button, then press the Settings
tab on the top of the touchscreen. In this menu, the
Uconnect system allows you to access all of the
available programmable features.
NOTE:
Only one touchscreen area may be selected at a
time.
Depending on the vehicle’s options, feature
settings may vary.
When making a selection, press the button on the
touchscreen to enter the desired menu. Once in
the desired menu, press and release the preferred
setting option until a check mark appears next
to the setting, showing that setting has been
selected. Once the setting is complete, press the
Vehicle button to exit to the screen. Pressing the
Up or Down Arrow button on the right side of the
screen will allow you to toggle up or down through
the available settings.
1 — Uconnect Buttons On The Touchscreen
2 — Uconnect Buttons On The Faceplate
23_VF_OM_EN_USC_t.book Page 134
Page 137 of 296
MULTIMEDIA135
My Profile
When the My Profile button is pressed on the touchscreen, the system displays options related to the vehicle’s profiles.
NOTE:Depending on the vehicle’s options, feature settings may vary.
Setting Name Description
LanguageThis setting will change the language of the Uconnect system and Instrument Cluster Display.
The available languages are English, French, and Spanish.
Display Mode This setting will adjust the display for the radio to “Auto” or “Manual”. “Manual” allows for more
customization with the radio display.
Display Brightness Headlights On This setting will allow you to set the brightness when the headlights are on. To access this setting,
Display Mode must be set to “Manual”. The “+” setting will increase the brightness; the “-” will
decrease the brightness.
Display Brightness Headlights Off This setting will allow you to set the brightness when the headlights are off. To access this setting,
Display Mode must be set to “Manual”. The “+” setting will increase the brightness; the “-” will
decrease the brightness.
Set Theme This setting will allow you to change the display theme.
Units This setting will allow you to change the units. The available options are “Speed” (MPH or km/h),
“Distance” (mi or km), “Fuel Consumption” (MPG [US], MPG [UK], L/100 km, or km/L), “Pressure”
(psi, kPa, or bar), and “Temperature” (°C or °F) units of measurement independently.
Theme Mode
This setting will allow you to adjust the brightness of your theme. Setting options are “Light”, “Dark” and “Auto”.
Select to show themes in Light or Dark mode. “Auto” changes the theme with the headlights.
Touchscreen Beep This setting will allow you to turn the touchscreen beep on or off.
Show Main Category Bar Labels This setting will allow the main category bar labels to be shown on or off.
Navigation Next Turn Pop-Ups Displayed in Cluster This setting will display Navigation prompts in the Instrument Cluster Display.
Phone Pop-Ups Displayed In Cluster This setting will display smartphone notifications and messages in the Instrument Cluster Display.
5
23_VF_OM_EN_USC_t.book Page 135
Page 138 of 296
136MULTIMEDIA
Time Format This setting will allow you to set the time format (AM/PM). Sync Time With GPS must be “Off” for this
setting to be available. The “12 hrs” setting will set the time to a 12-hour format. The “24 hrs” setting
will set the time to a 24-hour format.
Voice Options This setting will allow you to change the voice options for the radio to “Male” or “Female”.
Wake Up Word This setting will allow you to set the system “Wake Up” word. The available options are “Off”,
“Hey, Uconnect”, and “Hey, Ram”.
Voice Barge-in This setting will allow Voice Barge-in to be turned on or off. For more information about Voice Barge-in,
refer to your Uconnect Radio Instruction Manual.
Show Command List This setting will allow the Command List on the Voice Recognition window to be shown on or off.
Radio Off Delay
This setting will keep certain electrical features running after the engine is turned off. When any door is opened,
the electronics will deactivate. The available settings are “0 sec”, “45 sec”, “5 min”, and “10 min”.
Radio Off With Door This setting will allow you to determine if the radio shuts off when any of the doors are opened.
App Drawer Favoriting Pop-ups This setting will allow you to favorite app drawer pop-ups with “On” and “Off” options.
App Drawer Unfavoritings Pop-ups This setting will allow you to unfavorite app drawer pop-ups with “On” and “Off” options.
New Text Message Pop-ups This setting will allow you to have pop-up notifications for new text messages. Setting options are “On”
and “Off”.
Missed Calls Message
This setting will allow you to have pop-up notifications for missed calls. Setting options are “On” and “Off”.
Navigation Pop-ups
This setting will allow you to have pop-up notifications for Navigation. Setting options are “On” and “Off”.
Navigation Settings This setting will redirect to the list of Navigation settings. Refer to your Uconnect Radio Instruction
Manual for further information.
Audio Settings This setting will open the submenu, containing the audio settings Ú page 147.
Reset App Drawer to Default Order This setting will reset the app drawer to its factory default layout.
Setting Name Description
23_VF_OM_EN_USC_t.book Page 136
Page 139 of 296
MULTIMEDIA137
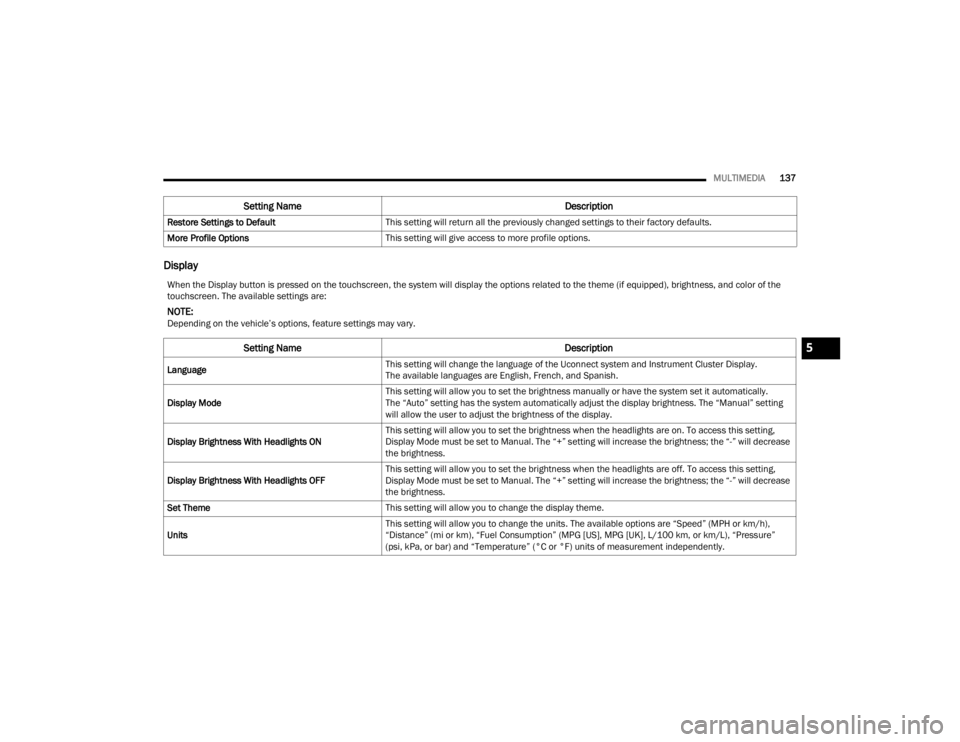
Display
Restore Settings to Default This setting will return all the previously changed settings to their factory defaults.
More Profile Options This setting will give access to more profile options.
Setting Name Description
When the Display button is pressed on the touchscreen, the system will display the options related to the theme (if equipped), brightness, and color of the
touchscreen. The available settings are:
NOTE:Depending on the vehicle’s options, feature settings may vary.
Setting NameDescription
LanguageThis setting will change the language of the Uconnect system and Instrument Cluster Display.
The available languages are English, French, and Spanish.
Display Mode This setting will allow you to set the brightness manually or have the system set it automatically.
The “Auto” setting has the system automatically adjust the display brightness. The “Manual” setting
will allow the user to adjust the brightness of the display.
Display Brightness With Headlights ON This setting will allow you to set the brightness when the headlights are on. To access this setting,
Display Mode must be set to Manual. The “+” setting will increase the brightness; the “-” will decrease
the brightness.
Display Brightness With Headlights OFF This setting will allow you to set the brightness when the headlights are off. To access this setting,
Display Mode must be set to Manual. The “+” setting will increase the brightness; the “-” will decrease
the brightness.
Set Theme This setting will allow you to change the display theme.
Units This setting will allow you to change the units. The available options are “Speed” (MPH or km/h),
“Distance” (mi or km), “Fuel Consumption” (MPG [US], MPG [UK], L/100 km, or km/L), “Pressure”
(psi, kPa, or bar) and “Temperature” (°C or °F) units of measurement independently.
5
23_VF_OM_EN_USC_t.book Page 137
Page 140 of 296
138MULTIMEDIA
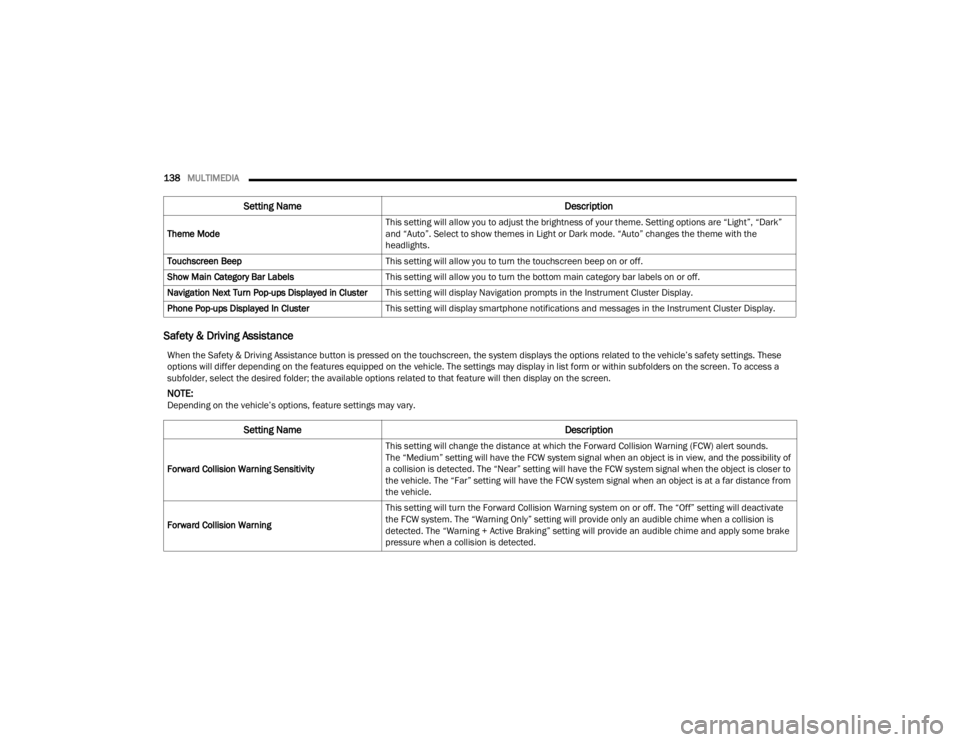
Safety & Driving Assistance
Theme Mode This setting will allow you to adjust the brightness of your theme. Setting options are “Light”, “Dark”
and “Auto”. Select to show themes in Light or Dark mode. “Auto” changes the theme with the
headlights.
Touchscreen Beep This setting will allow you to turn the touchscreen beep on or off.
Show Main Category Bar Labels This setting will allow you to turn the bottom main category bar labels on or off.
Navigation Next Turn Pop-ups Displayed in Cluster This setting will display Navigation prompts in the Instrument Cluster Display.
Phone Pop-ups Displayed In Cluster This setting will display smartphone notifications and messages in the Instrument Cluster Display.
Setting Name Description
When the Safety & Driving Assistance button is pressed on the touchscreen, the system displays the options related to the vehicle’s safety settings. These
options will differ depending on the features equipped on the vehicle. The settings may display in list form or within subfolders on the screen. To access a
subfolder, select the desired folder; the available options related to that feature will then display on the screen.
NOTE:Depending on the vehicle’s options, feature settings may vary.
Setting Name Description
Forward Collision Warning SensitivityThis setting will change the distance at which the Forward Collision Warning (FCW) alert sounds.
The “Medium” setting will have the FCW system signal when an object is in view, and the possibility of
a collision is detected. The “Near” setting will have the FCW system signal when the object is closer to
the vehicle. The “Far” setting will have the FCW system signal when an object is at a far distance from
the vehicle.
Forward Collision Warning This setting will turn the Forward Collision Warning system on or off. The “Off” setting will deactivate
the FCW system. The “Warning Only” setting will provide only an audible chime when a collision is
detected. The “Warning + Active Braking” setting will provide an audible chime and apply some brake
pressure when a collision is detected.
23_VF_OM_EN_USC_t.book Page 138