Air Ram ProMaster City 2018 User Guide
[x] Cancel search | Manufacturer: RAM, Model Year: 2018, Model line: ProMaster City, Model: Ram ProMaster City 2018Pages: 180, PDF Size: 7.52 MB
Page 2 of 180

This guide has been prepared to help you get quickly acquainted with your new RAM brand vehicle
and to provide a convenient reference source for common questions. Howev\
er, it is not a substitute for your Owner’s Manual.
For complete operational instructions, maintenance procedures and import\
ant safety messages, please consult your Owner’s Manual, Navigation/Uconnect manuals found on the website on the back c\
over and
other Warning Labels in your vehicle.
Not all features shown in this guide may apply to your vehicle. For addi\
tional information on accessories
to help personalize your vehicle, visit www.mopar.com (U.S.), www.mopar.ca (Canada) or your local
RAM brand dealer.
DRIVING AND ALCOHOL
Drunken driving is one of the most frequent causes of collisions. Your driving ability can
be seriously impaired with blood alcohol levels far below the legal mini\
mum. If you are drinking, don’t
drive. Ride with a designated non-drinking driver, call a cab, a friend, or use public transportation.
WARNING
Driving after drinking can lead to a collision. Your perceptions are less sharp, your reflexes are slower,
and your judgment is impaired when you have been drinking. Never drink a\
nd then drive.
IMPORTANT
Get warranty and other information online – you can review and print \
or download a copy of the Owner’s Manual, Navigation/Uconnect manuals and the limited warranties provided by FCA US LLC for your
vehicle by visiting www.mopar.com (U.S.) or www.owners.mopar.ca (Canada). Click on the applicable
link in the “Popular Topics” area of the www.mopar.com (U.S.) or www.owners.mopar.ca (Canada)
homepage and follow the instructions to select the applicable year, make and model of your vehicle.
This User Guide is intended to familiarize you with the important featur\
es of your vehicle. Your Owner’s Manual, Navigation/Uconnect manuals and Warranty Booklet can be found by visiting the website on the
back cover of your User Guide. We hope you find these resources useful. U.S. residents can purchase
replacement kits by visiting www.techauthority.com and Canadian residents can purchase replacement
kits by calling 1 800 387-1143.
The driver’s primary responsibility is the safe operation of the vehicle. Driving while distracted can result in loss of vehicle control, resulting in a collision and personal injury. FCA US LLC strongly recommends that the
driver use extreme caution when using any device or feature that may tak\
e their attention off the road. Use of
any electrical devices, such as cellular telephones, computers, portable\
radios, vehicle navigation or other devices, by the driver while the vehicle is moving is dangerous and coul\
d lead to a serious collision. Texting while driving is also dangerous and should never be done while the vehic\
le is moving. If you find yourself
unable to devote your full attention to vehicle operation, pull off the \
road to a safe location and stop your
vehicle. Some states or provinces prohibit the use of cellular telephone\
s or texting while driving. It is always the driver’s responsibility to comply with all local laws.
Page 8 of 180
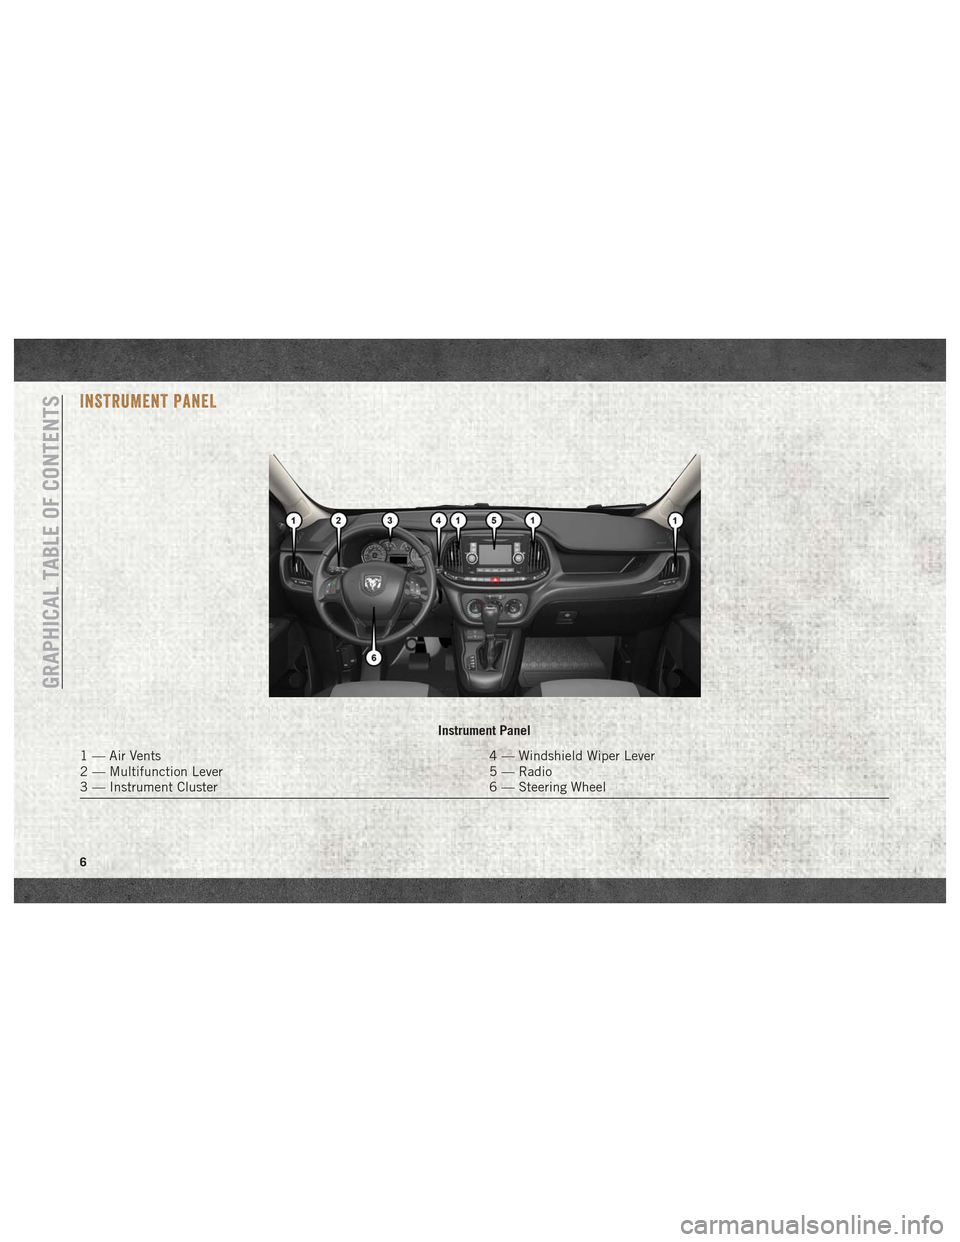
INSTRUMENT PANEL
Instrument Panel
1 — Air Vents4 — Windshield Wiper Lever
2 — Multifunction Lever 5 — Radio
3 — Instrument Cluster 6 — Steering Wheel
GRAPHICAL TABLE OF CONTENTS
6
Page 22 of 180
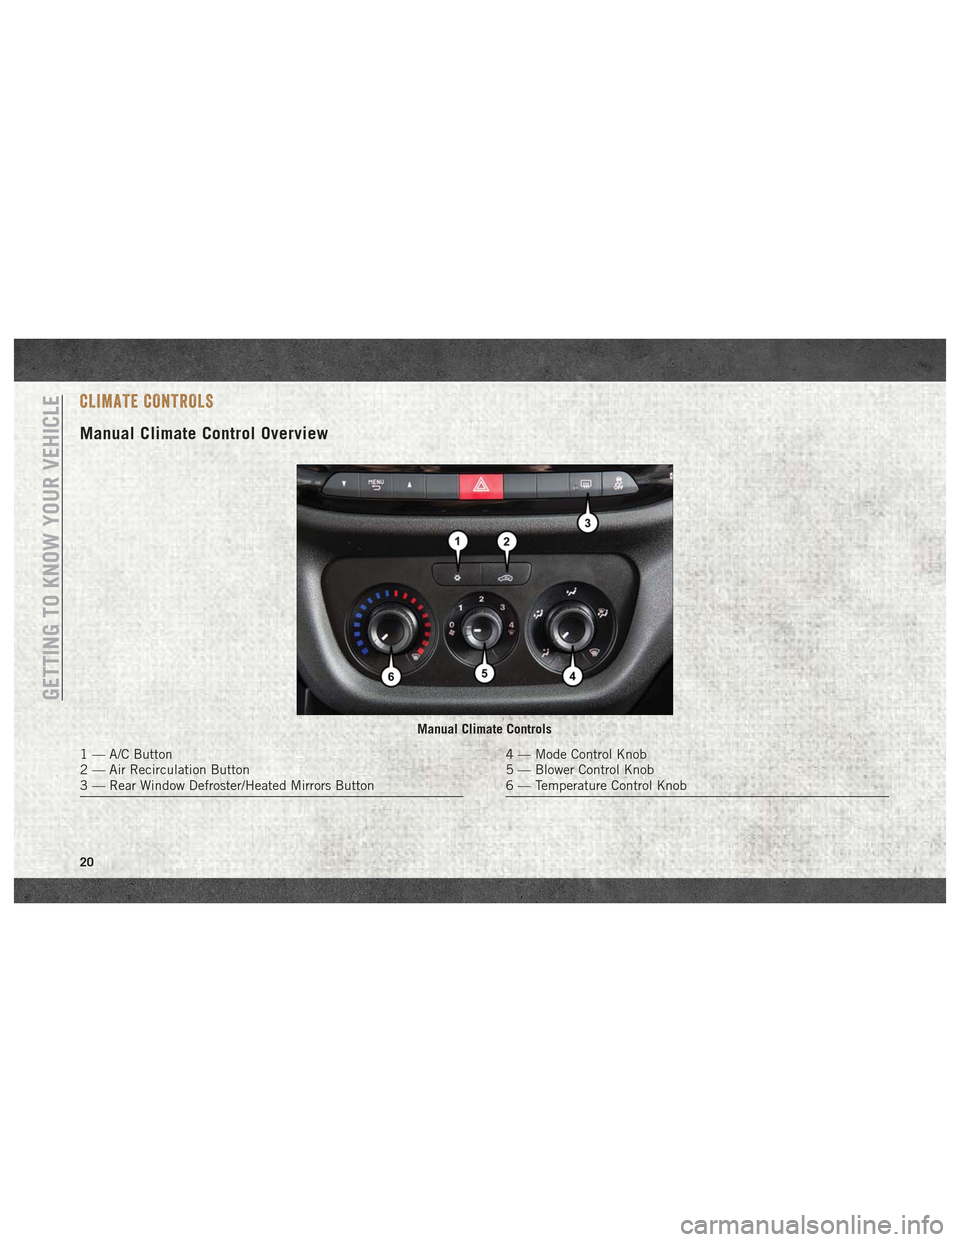
CLIMATE CONTROLS
Manual Climate Control Overview
Manual Climate Controls
1 — A/C Button
2 — Air Recirculation Button
3 — Rear Window Defroster/Heated Mirrors Button4 — Mode Control Knob
5 — Blower Control Knob
6 — Temperature Control Knob
GETTING TO KNOW YOUR VEHICLE
20
Page 23 of 180
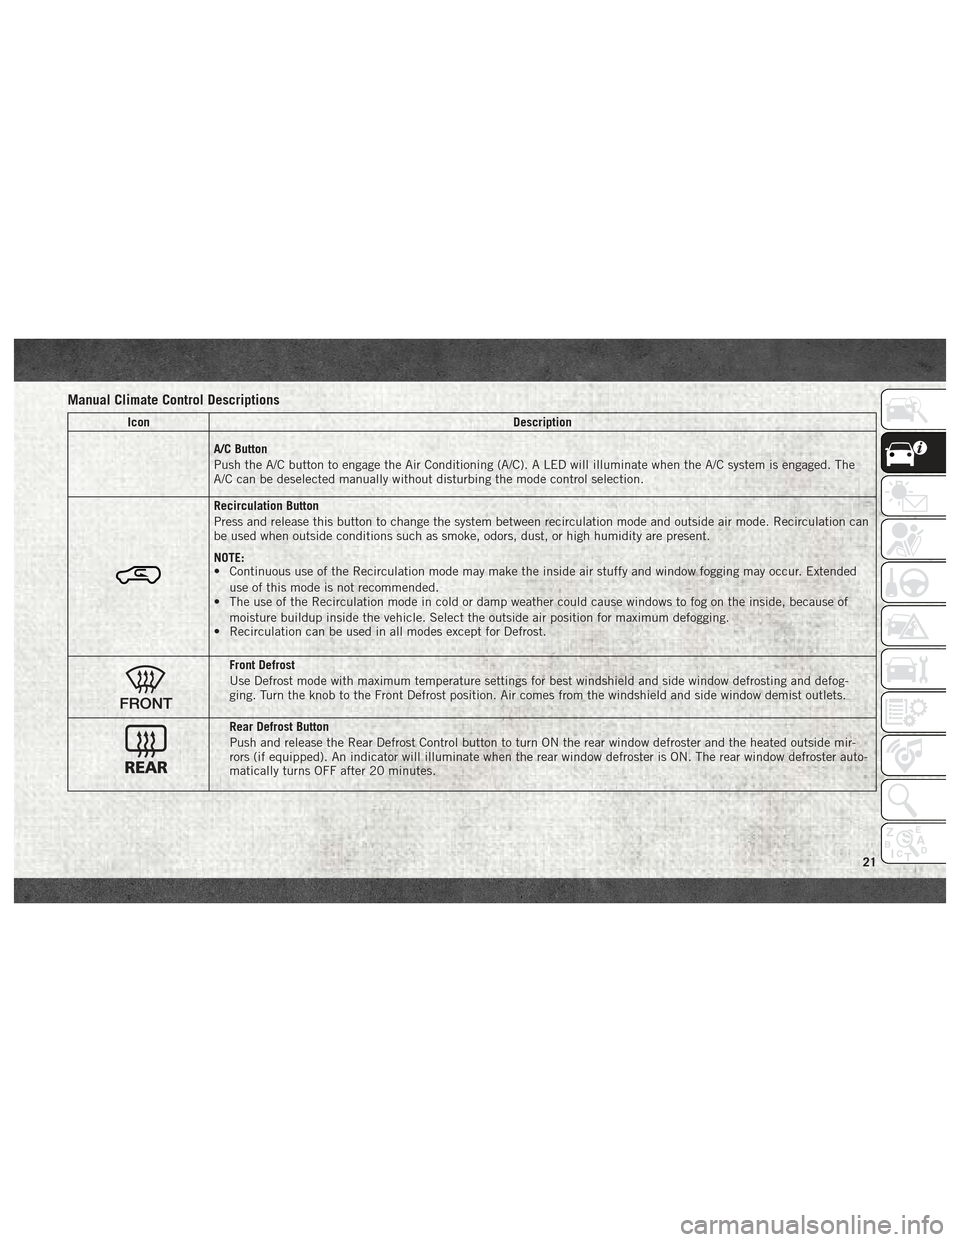
Manual Climate Control Descriptions
IconDescription
A/C Button
Push the A/C button to engage the Air Conditioning (A/C). A LED will illuminate when the A/C system is engaged. The
A/C can be deselected manually without disturbing the mode control selection.
Recirculation Button
Press and release this button to change the system between recirculation mode and outside air mode. Recirculation can
be used when outside conditions such as smoke, odors, dust, or high humidity are present.
NOTE:
• Continuous use of the Recirculation mode may make the inside air stuffy and window fogging may occur. Extended
use of this mode is not recommended.
• The use of the Recirculation mode in cold or damp weather could cause windows to fog on the inside, because of
moisture buildup inside the vehicle. Select the outside air position for maximum defogging.
• Recirculation can be used in all modes except for Defrost.
Front Defrost
Use Defrost mode with maximum temperature settings for best windshield and side window defrosting and defog-
ging. Turn the knob to the Front Defrost position. Air comes from the windshield and side window demist outlets.
Rear Defrost Button
Push and release the Rear Defrost Control button to turn ON the rear window defroster and the heated outside mir-
rors (if equipped). An indicator will illuminate when the rear window defroster is ON. The rear window defroster auto-
matically turns OFF after 20 minutes.
21
Page 24 of 180
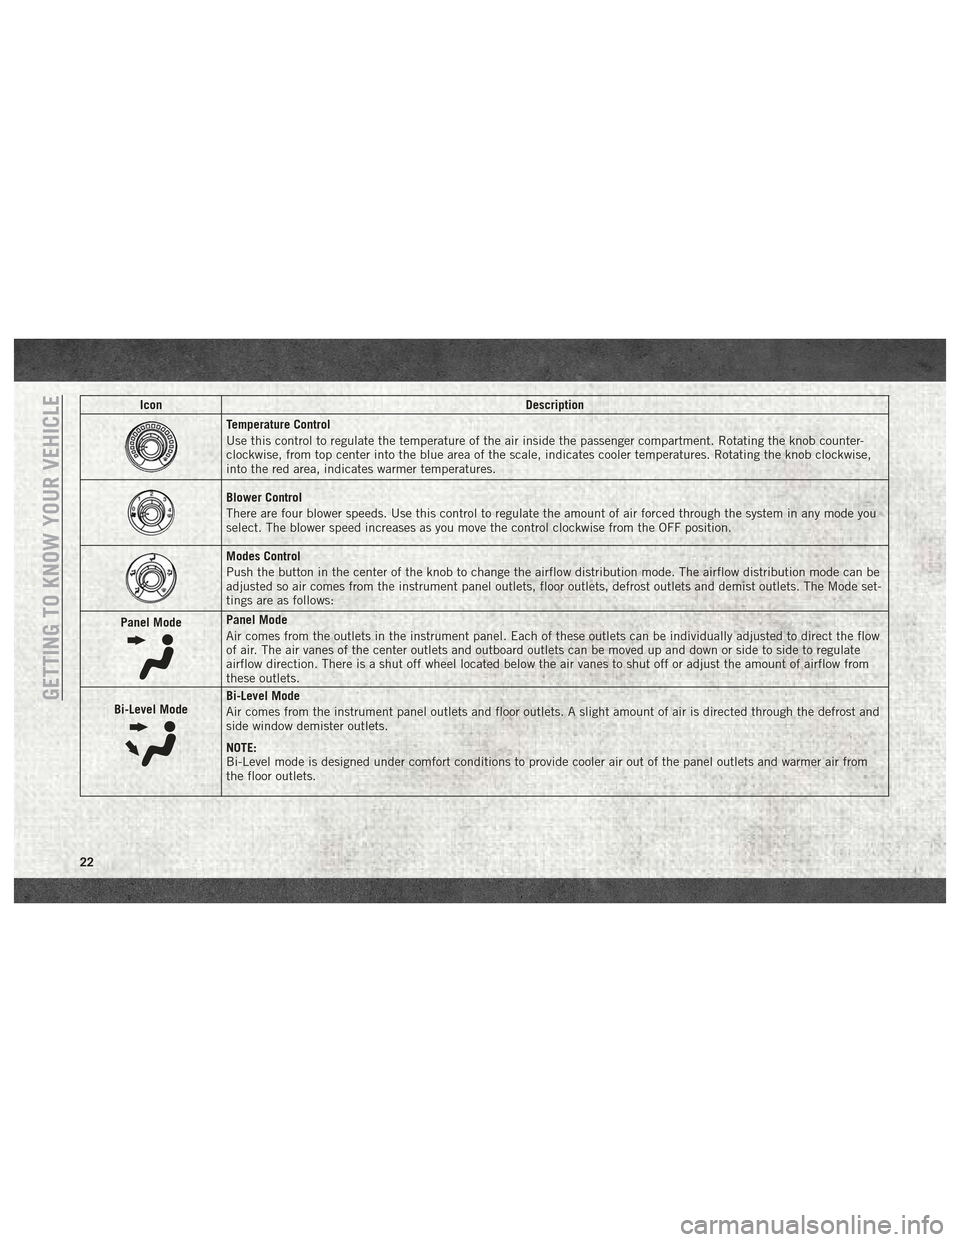
IconDescription
Temperature Control
Use this control to regulate the temperature of the air inside the passenger compartment. Rotating the knob counter-
clockwise, from top center into the blue area of the scale, indicates cooler temperatures. Rotating the knob clockwise,
into the red area, indicates warmer temperatures.
Blower Control
There are four blower speeds. Use this control to regulate the amount of air forced through the system in any mode you
select. The blower speed increases as you move the control clockwise from the OFF position.
Modes Control
Push the button in the center of the knob to change the airflow distribution mode. The airflow distribution mode can be
adjusted so air comes from the instrument panel outlets, floor outlets, defrost outlets and demist outlets. The Mode set-
tings are as follows:
Panel Mode
Panel Mode
Air comes from the outlets in the instrument panel. Each of these outlets can be individually adjusted to direct the flow
of air. The air vanes of the center outlets and outboard outlets can be moved up and down or side to side to regulate
airflow direction. There is a shut off wheel located below the air vanes to shut off or adjust the amount of airflow from
these outlets.
Bi-Level Mode
Bi-Level Mode
Air comes from the instrument panel outlets and floor outlets. A slight amount of air is directed through the defrost and
side window demister outlets.
NOTE:
Bi-Level mode is designed under comfort conditions to provide cooler air out of the panel outlets and warmer air from
the floor outlets.GETTING TO KNOW YOUR VEHICLE
22
Page 25 of 180
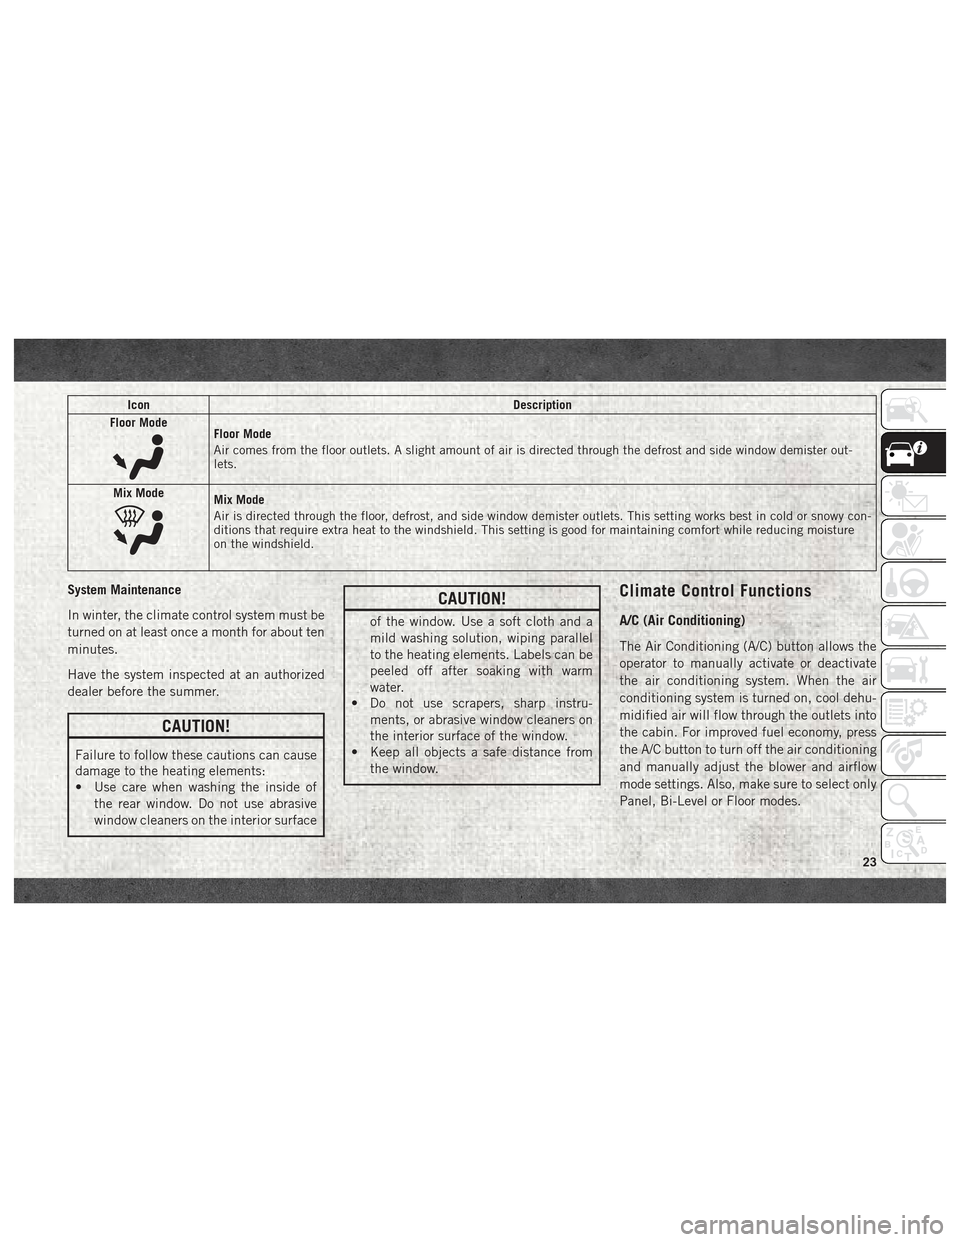
IconDescription
Floor Mode
Floor Mode
Air comes from the floor outlets. A slight amount of air is directed through the defrost and side window demister out-
lets.
Mix Mode
Mix Mode
Air is directed through the floor, defrost, and side window demister outlets. This setting works best in cold or snowy con-
ditions that require extra heat to the windshield. This setting is good for maintaining comfort while reducing moisture
on the windshield.
System Maintenance
In winter, the climate control system must be
turned on at least once a month for about ten
minutes.
Have the system inspected at an authorized
dealer before the summer.
CAUTION!
Failure to follow these cautions can cause
damage to the heating elements:
• Use care when washing the inside of the rear window. Do not use abrasive
window cleaners on the interior surface
CAUTION!
of the window. Use a soft cloth and a
mild washing solution, wiping parallel
to the heating elements. Labels can be
peeled off after soaking with warm
water.
• Do not use scrapers, sharp instru-
ments, or abrasive window cleaners on
the interior surface of the window.
• Keep all objects a safe distance from
the window.
Climate Control Functions
A/C (Air Conditioning)
The Air Conditioning (A/C) button allows the
operator to manually activate or deactivate
the air conditioning system. When the air
conditioning system is turned on, cool dehu-
midified air will flow through the outlets into
the cabin. For improved fuel economy, press
the A/C button to turn off the air conditioning
and manually adjust the blower and airflow
mode settings. Also, make sure to select only
Panel, Bi-Level or Floor modes.
23
Page 26 of 180
NOTE:
• If fog or mist appears on the windshield orside glass, select Defrost mode and in-
crease blower speed if needed.
• If your air conditioning performance seems lower than expected, check the front of the
A/C condenser (located in front of the ra-
diator), for an accumulation of dirt or in-
sects. Clean with a gentle water spray from
the front of the radiator and through the
condenser.
Recirculation
When outside air contains smoke, odors, or
high humidity, or if rapid cooling is desired,
you may wish to recirculate interior air by
pressing the Recirculation control button.
The recirculation indicator will illuminate
when this button is selected. Press the but-
ton a second time to turn off the Recircula-
tion mode and allow outside air into the
vehicle. NOTE:
In cold weather, use of recirculation mode
may lead to excessive window fogging. On
systems with Manual Climate Controls, the
Recirculation mode is not allowed in Defrost
mode to improve window clearing operation.
Recirculation will be disabled automatically
if this mode is selected. Attempting to use
Recirculation while in this mode will cause
the LED in the control button to blink and
then turn off.
Operating Tips
Summer Operation
The engine cooling system must be protected
with a high-quality antifreeze coolant to pro-
vide proper corrosion protection and to pro-
tect against engine overheating. OAT coolant
(conforming to MS.90032) is recommended.
Refer to “Dealer Service” in “Servicing And
Maintenance” in your Owner’s Manual at
www.mopar.com/en-us/care/owners-manual.html
(U.S. Residents) or www.owners.mopar.ca
(Canadian Residents) for proper coolant se-
lection.
Winter Operation
To ensure the best possible heater and de-
froster performance, make sure the engine
cooling system is functioning properly and
the proper amount, type, and concentration
of coolant is used. Refer to “Dealer Service”
in “Servicing And Maintenance” in your Own-
er’s Manual at
www.mopar.com/en-us/
care/owners-manual.html
(U.S. Residents) or
www.owners.mopar.ca (Canadian Residents)
for proper coolant selection. Use of the air
Recirculation mode during Winter months is
not recommended because it may cause win-
dow fogging.
Vacation/Storage
Any time you store your vehicle or keep it out
of service (i.e., vacation) for two weeks or
more, run the air conditioning system at idle
for about five minutes in fresh air with the
blower setting on high. This will ensure ad-
equate system lubrication to minimize the
possibility of compressor damage when the
system is started again.
GETTING TO KNOW YOUR VEHICLE
24
Page 27 of 180
Window Fogging
Vehicle windows tend to fog on the inside of
the glass in mild, rainy and/or humid weather.
Windows may frost on the inside of the glass
in very cold weather. To clear the windows,
select Defrost or Mix mode and increase the
front blower speed. Do not use the Recircu-
lation mode without A/C for long periods, as
fogging may occur.
Outside Air Intake
Make sure the air intake, located directly in
front of the windshield, is free of obstructions
such as leaves. Leaves collected in the air
intake may reduce airflow, can cause odor,
and if they enter the plenum they could plug
the water drains. In Winter months make sure
the air intake is clear of ice, slush and snow.
A/C Air Filter
The climate control system filters outside air
containing dust, pollen and some odors.
Strong odors cannot be totally filtered out.
Refer to “Dealer Service” in “Servicing and
Maintenance” in your Owner’s Manual on
www.mopar.com/en-us/care/owners-manual.html
(U.S. Residents) or www.owners.mopar.ca
(Canadian Residents) for filter replacement
instructions.
HOOD
Opening
To open the hood, two latches must be re-
leased.
1. Pull the release lever located below theinstrument panel and in front of the driv-
er's door.
2. Move to the outside of the vehicle, reach into the opening beneath the center of the
hood and push up the safety latch lever to
release it, before raising the hood.
3. Raise the hood and place the hood prop rod in hood slot to secure the hood in the
open position.
CAUTION!
Be sure to disengage the rod and secure it
in close position before closing the hood.
Damage may occur.
Closing
WARNING!
Be sure the hood is fully latched before
driving your vehicle. If the hood is not fully
latched, it could open when the vehicle is
in motion and block your vision. Failure to
follow this warning could result in serious
injury or death.
CAUTION!
To prevent possible damage, do not slam
the hood to close it. Lower hood to approxi-
mately 12 inches (30 cm) and drop the
hood to close. Make sure hood is fully
closed for both latches. Never drive ve-
hicle unless hood is fully closed, with both
latches engaged.
25
Page 33 of 180
•UP Arrow Button
Push and release the uparrow button to
scroll upward through the main menu and
submenus.
• DOWN Arrow Button
Push and release the downarrow button to
scroll downward through the main menu
and submenus.
NOTE:
If equipped with a Uconnect system, some of
the menu items will be present in the radio
head unit. Refer to “Uconnect Settings” in
“Multimedia” in the Owner’s Manual at
www.mopar.com/en-us/care/owners-manual.html
(U.S. Residents) or www.owners.mopar.ca
(Canadian Residents) for further information.
Dimmer:
With headlights on and without entering in
the menu, push the upordown arrow button
to increase or decrease the brightness of the
instrument panel, graphics and command
buttons. Selecting An Option Of The Main Menu With
Submenu:
1. Briefly push and release the
MENUbutton
to display the first submenu option.
2. Push and release the upordown arrow
button (by single pushes) to scroll through
all the submenu options.
3. Briefly push and release the MENUbutton
to select the displayed submenu option
and to open the relevant setup menu.
4. Push and release the upordown arrow
button (by single pushes) to select the
new setting for this submenu option.
5. Briefly push and release the MENUbutton
to store the new setting and go back to the
previously selected submenu option.
6. Push and hold the MENUbutton to return
to the main menu (short hold) or the main
screen (longer hold).
WARNING LIGHTS AND MESSAGES
Red Warning Lights
— Air Bag Warning Light
This light will turn on for four to eight seconds
as a bulb check when the ignition is placed in
the ON/RUN or MAR/ON/RUN position. If the
light is either not on during startup, stays on,
or turns on while driving, have the system
inspected at an authorized dealer as soon as
possible. This light will illuminate with a
single chime when a fault with the Air Bag
Warning Light has been detected, it will stay
on until the fault is cleared. If the light comes
on intermittently or remains on while driving,
have an authorized dealer service the vehicle
immediately.
— Brake Warning Light
This light monitors various brake functions,
including brake fluid level and parking brake
application. If the brake light turns on it may
indicate that the parking brake is applied,
that the brake fluid level is low, or that there
is a problem with the anti-lock brake system
reservoir.
31
Page 34 of 180
If the light remains on when the parking
brake has been disengaged, and the fluid
level is at the full mark on the master cylinder
reservoir, it indicates a possible brake hy-
draulic system malfunction or that a problem
with the Brake Booster has been detected by
the Anti-Lock Brake System (ABS) / Elec-
tronic Stability Control (ESC) system. In this
case, the light will remain on until the condi-
tion has been corrected. If the problem is
related to the brake booster, the ABS pump
will run when applying the brake, and a brake
pedal pulsation may be felt during each stop.
The dual brake system provides a reserve
braking capacity in the event of a failure to a
portion of the hydraulic system. A leak in
either half of the dual brake system is indi-
cated by the Brake Warning Light, which will
turn on when the brake fluid level in the
master cylinder has dropped below a speci-
fied level.
The light will remain on until the cause is
corrected.NOTE:
The light may flash momentarily during sharp
cornering maneuvers, which change fluid
level conditions. The vehicle should have
service performed, and the brake fluid level
checked.
If brake failure is indicated, immediate repair
is necessary.
WARNING!
Driving a vehicle with the red brake light
on is dangerous. Part of the brake system
may have failed. It will take longer to stop
the vehicle. You could have a collision.
Have the vehicle checked immediately.
Vehicles equipped with the Anti-Lock Brake
System (ABS) are also equipped with Elec-
tronic Brake Force Distribution (EBD). In the
event of an EBD failure, the Brake Warning
Light will turn on along with the ABS Light.
Immediate repair to the ABS system is re-
quired.
Operation of the Brake Warning Light can be
checked by turning the ignition switch from
the OFF position to the ON/RUN position. The light should illuminate for approximately
two seconds. The light should then turn off
unless the parking brake is applied or a brake
fault is detected. If the light does not illumi-
nate, have the light inspected by your autho-
rized dealer.
The light also will turn on when the parking
brake is applied with the ignition switch in
the ON/RUN position.
NOTE:
This light shows only that the parking brake is
applied. It does not show the degree of brake
application.
— Battery Charge Warning Light
This light illuminates when the battery is not
charging properly. If it stays on while the
engine is running, there may be a malfunc-
tion with the charging system. Contact your
authorized dealer as soon as possible.
This indicates a possible problem with the
electrical system or a related component.
— Door Open Warning Light
This indicator will illuminate when one or
more door(s) are not fully closed.
GETTING TO KNOW YOUR INSTRUMENT PANEL
32