RAM PROMASTER CITY 2021 Owners Manual
Manufacturer: RAM, Model Year: 2021, Model line: PROMASTER CITY, Model: RAM PROMASTER CITY 2021Pages: 280, PDF Size: 15.78 MB
Page 151 of 280
SAFETY149
HSA will work in REVERSE and all forward gears
when the activation criteria have been met. The
system will not activate if the vehicle is placed
in NEUTRAL or PARK.
Traction Control System (TCS)
TCS monitors the amount of wheel spin of each
of the driven wheels. If wheel spin is detected,
brake pressure is applied to the slipping
wheel(s) and engine power is reduced to
provide enhanced acceleration and stability. A
feature of the TCS system, Brake Limited
Differential (BLD), functions similarly to a
limited slip differential and controls the wheel
spin across a driven axle. If one wheel on a
driven axle is spinning faster than the other, the
system will apply the brake of the spinning wheel. This will allow more engine torque to be
applied to the wheel that is not spinning. This
feature remains active even if TCS and ESC are
in the “Partial Off” mode Ú
page 146.
Trailer Sway Control (TSC) — If Equipped
TSC uses sensors in the vehicle to recognize an
excessively swaying trailer and will take the
appropriate actions to attempt to stop the sway.
The system may reduce engine power and apply
the brake of the appropriate wheel(s) to
counteract the sway of the trailer.
NOTE:
TSC cannot stop all trailers from swaying.
Always use caution when towing a trailer and
follow the trailer tongue weight recommenda -
tions Ú page 77.
When TSC is functioning, the ESC Activation/
Malfunction Indicator Light will flash, the engine
power may be reduced and you may feel the
brakes being applied to individual wheels to
attempt to stop the trailer from swaying. TSC is
disabled when the ESC system is in the “Partial
Off” mode.
AUXILIARY DRIVING SYSTEMS
Tire Pressure Monitoring System (TPMS)
The Tire Pressure Monitoring System (TPMS)
will warn the driver of a low tire pressure based
on the vehicle recommended cold placard
pressure.
The tire pressure will vary with temperature by
about 1 psi (7 kPa) for every 12°F (6.5°C). This
means that when the outside temperature
decreases, the tire pressure will decrease. Tire
pressure should always be set based on cold
inflation tire pressure. This is defined as the tire
pressure after the vehicle has not been driven
for at least three hours, or driven less than
1 mile (1.6 km) after a three hour period. The
cold tire inflation pressure must not exceed the
maximum inflation pressure molded into the
WARNING!
There may be situations on minor hills with a
loaded vehicle, or while pulling a trailer, when
the system will not activate and slight rolling
may occur. This could cause a collision with
another vehicle or object. Always remember
the driver is responsible for braking the
vehicle.
WARNING!
If TSC activates while driving, slow the vehicle
down, stop at the nearest safe location, and
adjust the trailer load to eliminate trailer
sway.
6
21_VM_OM_EN_USC_t.book Page 149
Page 152 of 280
150SAFETY
tire sidewall. The tire pressure will also increase
as the vehicle is driven — this is normal and
there should be no adjustment for this
increased pressure.
See Úpage 234 on how to properly inflate the
vehicle’s tires.
The TPMS will warn the driver of a low tire
pressure if the tire pressure falls below the
low-pressure warning limit for any reason,
including low temperature effects and natural
pressure loss through the tire.
The TPMS will continue to warn the driver of low
tire pressure as long as the condition exists,
and will not turn off until the tire pressure is at
or above the recommended cold placard
pressure. Once the low tire pressure warning
(TPMS Warning Light) illuminates, you must
increase the tire pressure to the recommended
cold placard pressure in order for the TPMS
Warning Light to turn off. The system will
automatically update and the TPMS Warning
Light will turn off once the system receives the
updated tire pressures. The vehicle may need to
be driven for up to 20 minutes above 15 mph
(24 km/h) in order for the TPMS to receive this
information. NOTE:
When filling warm tires, the tire pressure may
need to be increased up to an additional 4 psi
(28 kPa) above the recommended cold placard
pressure in order to turn the TPMS Warning
Light off.
For example, your vehicle may have a
recommended cold (parked for more than three
hours) placard pressure of 30 psi (207 kPa). If
the ambient temperature is 68°F (20°C) and
the measured tire pressure is 27 psi (186 kPa),
a temperature drop to 20°F (-7°C) will
decrease the tire pressure to approximately
23 psi (158 kPa). This tire pressure is
sufficiently low enough to turn on the TPMS
Warning Light. Driving the vehicle may cause
the tire pressure to rise to approximately 27 psi
(186 kPa), but the TPMS Warning Light will still
be on. In this situation, the TPMS Warning Light
will turn off only after the tires are inflated to the
vehicle’s recommended cold placard pressure
value.CAUTION!
The TPMS has been optimized for the orig
-
inal equipment tires and wheels. TPMS
pressures and warning have been estab -
lished for the tire size equipped on your
vehicle. Undesirable system operation or
sensor damage may result when using
replacement equipment that is not of the
same size, type, and/or style. Aftermarket
wheels can cause sensor damage.
Using aftermarket tire sealants may cause
the Tire Pressure Monitoring System
(TPMS) sensor to become inoperable. After
using an aftermarket tire sealant it is
recommended that you take your vehicle to
an authorized dealership to have your
sensor function checked.
After inspecting or adjusting the tire pres -
sure always reinstall the valve stem cap.
This will prevent moisture and dirt from
entering the valve stem, which could
damage the TPMS sensor.
21_VM_OM_EN_USC_t.book Page 150
Page 153 of 280
SAFETY151
NOTE:
The TPMS is not intended to replace normal
tire care and maintenance or to provide
warning of a tire failure or condition.
The TPMS should not be used as a tire pres -
sure gauge while adjusting your tire pressure.
Driving on a significantly under-inflated tire
causes the tire to overheat and can lead to
tire failure. Under-inflation also reduces fuel
efficiency and tire tread life, and may affect
the vehicle’s handling and stopping ability.
The TPMS is not a substitute for proper tire
maintenance, and it is the driver’s responsi -
bility to maintain correct tire pressure using
an accurate tire pressure gauge, even if
under-inflation has not reached the level to
trigger illumination of the TPMS Warning
Light.
Seasonal temperature changes will affect
tire pressure, and the TPMS will monitor the
actual tire pressure in the tire Ú page 265.
Base System
This is the TPMS warning indicator
located in the instrument cluster.
The TPMS uses wireless technology with wheel
rim mounted electronic sensors to monitor tire
pressure levels. Sensors, mounted to each
wheel as part of the valve stem, transmit tire
pressure readings to the Receiver Module.
NOTE:
It is particularly important for you to check the
tire pressure in all of the tires on your vehicle
regularly and to maintain the proper pressure.
The TPMS consists of the following
components:
Receiver Module
Four Tire Pressure Monitoring sensors
Tire Pressure Monitoring System Warning
Light
Tire Pressure Monitoring Low Pressure
Warnings
The Tire Pressure Monitoring System Warning
Light will illuminate in the instrument cluster, an
audible chime will be activated, and the “Check
tire pressure” text message will display when
one or more of the four active road tire
pressures are low. Should this occur, you
should stop as soon as possible, check the
inflation pressure of each tire on your vehicle,
and inflate each tire to the vehicle’s
recommended cold placard pressure value. The
system will automatically update and the Tire
Pressure Monitoring Light will extinguish once
the updated tire pressures have been received.
The vehicle may need to be driven for up to
20 minutes above 15 mph (24 km/h) to receive
this information.
6
21_VM_OM_EN_USC_t.book Page 151
Page 154 of 280
152SAFETY
Check TPMS Warnings
The Tire Pressure Monitoring Warning Light will
flash on and off for 75 seconds and remain on
solid when a system fault is detected, an
audible chime will be activated and a proper
text message will be displayed. If the ignition
key is cycled, this sequence will repeat
providing the system fault still exists. The Tire
Pressure Monitoring Warning Light will turn off
when the fault condition no longer exists. A
system fault can occur with any of the following
scenarios:
1. Jamming due to electronic devices or
driving next to facilities emitting the same
radio frequencies as the TPM sensors.
2. Installing some form of aftermarket window tinting that affects radio wave signals.
3. Snow or ice around the wheels or wheel housings. 4. Using tire chains on the vehicle.
5. Using wheels/tires not equipped with TPM
sensors.
NOTE:
Your vehicle can be equipped with either a Tire
Service Kit, a compact spare tire or a regular
size spare tire (with or without original TPMS
sensor).
1. Tire Service Kit (original tire sealant – if equipped): After fixing the punctured tire
with original tire sealant, the original
situation will be restored, so system will
turn off the telltale during the normal drive.
2. Compact Spare Tire – if equipped: The compact spare wheel is not equipped with a
TPMS sensor. So when mounted, during the
normal drive the system will turn on the
telltale (flashing for approximately
75 seconds then remains solid). This
condition persists until a wheel equipped
with original TPMS sensor has been
mounted on the vehicle. 3. Regular size spare tire (not equipped with
TPMS sensor): When mounted, during the
normal drive the system will turn on the
telltale (flashing for approximately
75 seconds then remains solid). This
condition persists until a wheel equipped
with original TPMS sensor has been
mounted on the vehicle. Then the system
will be restored and the telltale will turn off
during the normal drive.
4. Regular size spare tire (equipped with TPMS sensor): When mounted, the telltale will
turn off during the normal drive.
5. In all the above cases, please check the replacement tire inflation pressure before
driving your vehicle.
6. In case of tire replacement, if the vehicle is driven for short periods of time, then the
system can take a while to be restored.
NOTE:
For a correct Tire Pressure Monitoring behavior,
please wait for about 20 minutes in key-off
during each tire substitution.
21_VM_OM_EN_USC_t.book Page 152
Page 155 of 280
SAFETY153
OCCUPANT RESTRAINT SYSTEMS
Some of the most important safety features in
your vehicle are the restraint systems:
Occupant Restraint Systems
Seat Belt Systems
Supplemental Restraint Systems (SRS) Air
Bags
Child Restraints
Some of the safety features described in this
section may be standard equipment on some
models, or may be optional equipment on
others. If you are not sure, ask an authorized
dealer.
Important Safety Precautions
Please pay close attention to the information in
this section. It tells you how to use your restraint
system properly, to keep you and your
passengers as safe as possible.
Here are some simple steps you can take to
minimize the risk of harm from a deploying air
bag:
1. Children 12 years old and under should
always ride buckled up in the rear seat of a
vehicle with a rear seat.
2. A child who is not big enough to wear the vehicle seat belt properly must be secured
in the appropriate child restraint or
belt-positioning booster seat in a rear
seating position Ú page 182.
3. If a child from 2 to 12 years old (not in a rear-facing child restraint) must ride in the
front passenger seat, move the seat as far
back as possible and use the proper child
restraint Ú page 182.
4. Never allow children to slide the shoulder belt behind them or under their arm.
5. You should read the instructions provided with your child restraint to make sure that
you are using it properly.
6. All occupants should always wear their lap and shoulder belts properly.
7. The driver and front passenger seats should be moved back as far as practical to allow
the front air bags room to inflate. 8. Do not lean against the door or window. If
your vehicle has side air bags, and
deployment occurs, the side air bags will
inflate forcefully into the space between
occupants and the door and occupants
could be injured.
9. If the air bag system in this vehicle needs to be modified to accommodate a disabled
person, see Ú page 262 for customer
service contact information.
WARNING!
Never place a rear-facing child restraint in
front of an air bag. A deploying passenger
front air bag can cause death or serious
injury to a child 12 years or younger,
including a child in a rear-facing child
restraint.
Never install a rear-facing child restraint in
the front seat of a vehicle. Only use a
rear-facing child restraint in the rear seat. If
the vehicle does not have a rear seat, do
not transport a rear-facing child restraint in
that vehicle.
6
21_VM_OM_EN_USC_t.book Page 153
Page 156 of 280
154SAFETY
Seat Belt Systems
Buckle up even though you are an excellent
driver, even on short trips. Someone on the road
may be a poor driver and could cause a collision
that includes you. This can happen far away
from home or on your own street.
Research has shown that seat belts save lives,
and they can reduce the seriousness of injuries
in a collision. Some of the worst injuries happen
when people are thrown from the vehicle. Seat
belts reduce the possibility of ejection and the
risk of injury caused by striking the inside of the
vehicle. Everyone in a motor vehicle should be
belted at all times.
Enhanced Seat Belt Use Reminder System
(BeltAlert)
Driver and Passenger BeltAlert — If Equipped
BeltAlert is a feature intended to remind the
driver and outboard front seat passenger (if
equipped with outboard front passenger seat
BeltAlert) to buckle their seat belts. The
BeltAlert feature is active whenever the ignition
switch is in the AVV/START or MAR/RUN
position. Initial Indication
If the driver is unbuckled when the ignition
switch is first in the AVV/START or MAR/RUN
position, a chime will signal for a few seconds. If
the driver or outboard front seat passenger (if
equipped with outboard front passenger seat
BeltAlert) is unbuckled when the ignition switch
is first in the AVV/START or MAR/RUN position
the Seat Belt Reminder Light will turn on and
remain on until both outboard front seat belts
are buckled. The outboard front passenger seat
BeltAlert is not active when an outboard front
passenger seat is unoccupied.
BeltAlert Warning Sequence
The BeltAlert warning sequence is activated
when the vehicle is moving above a specified
vehicle speed range and the driver or outboard
front seat passenger is unbuckled (if equipped
with outboard front passenger seat BeltAlert)
(the outboard front passenger seat BeltAlert is
not active when the outboard front passenger
seat is unoccupied). The BeltAlert warning
sequence starts by blinking the Seat Belt
Reminder Light and sounding an intermittent
chime. Once the BeltAlert warning sequence
has completed, the Seat Belt Reminder Light
will remain on until the seat belts are buckled.
The BeltAlert warning sequence may repeat
based on vehicle speed until the driver and
occupied outboard front seat passenger seat
belts are buckled. The driver should instruct all
occupants to buckle their seat belts.
Change of Status
If the driver or outboard front seat passenger (if
equipped with outboard front passenger seat
BeltAlert) unbuckles their seat belt while the
vehicle is traveling, the BeltAlert warning
sequence will begin until the seat belts are
buckled again.
The outboard front passenger seat BeltAlert is
not active when the outboard front passenger
seat is unoccupied. BeltAlert may be triggered
when an animal or other items are placed on
the outboard front passenger seat or when the
seat is folded flat (if equipped). It is
recommended that pets be restrained in the
rear seat (if equipped) in pet harnesses or pet
carriers that are secured by seat belts, and
cargo is properly stowed.
21_VM_OM_EN_USC_t.book Page 154
Page 157 of 280
SAFETY155
(Continued)
BeltAlert can be activated or deactivated by an
authorized dealer. FCA US LLC does not
recommend deactivating BeltAlert.
NOTE:
If BeltAlert has been deactivated and the driver
or outboard front seat passenger (if equipped
with outboard front passenger seat BeltAlert) is
unbuckled the Seat Belt Reminder Light will
turn on and remain on until the driver and
outboard front seat passenger seat belts are
buckled.
Lap/Shoulder Belts
All seating positions in your vehicle are
equipped with lap/shoulder belts.
The seat belt webbing retractor will lock only
during very sudden stops or collisions. This
feature allows the shoulder part of the seat belt
to move freely with you under normal
conditions. However, in a collision the seat belt
will lock and reduce your risk of striking the
inside of the vehicle or being thrown out of the
vehicle.
WARNING!
Relying on the air bags alone could lead to
more severe injuries in a collision. The air
bags work with your seat belt to restrain you
properly. In some collisions, the air bags
won’t deploy at all. Always wear your seat
belt even though you have air bags.
In a collision, you and your passengers can
suffer much greater injuries if you are not
properly buckled up. You can strike the inte -
rior of your vehicle or other passengers, or
you can be thrown out of the vehicle. Always
be sure you and others in your vehicle are
buckled up properly.
It is dangerous to ride in a cargo area,
inside or outside of a vehicle. In a collision,
people riding in these areas are more likely
to be seriously injured or killed.
Do not allow people to ride in any area of
your vehicle that is not equipped with seats
and seat belts.
Be sure everyone in your vehicle is in a seat
and using a seat belt properly. Occupants,
including the driver, should always wear
their seat belts whether or not an air bag is
also provided at their seating position to
minimize the risk of severe injury or death
in the event of a crash.
Wearing your seat belt incorrectly could
make your injuries in a collision much
worse. You might suffer internal injuries, or
you could even slide out of the seat belt.
Follow these instructions to wear your seat
belt safely and to keep your passengers
safe, too.
Two people should never be belted into a
single seat belt. People belted together can
crash into one another in a collision, hurting
one another badly. Never use a lap/
shoulder belt or a lap belt for more than one
person, no matter what their size.
WARNING! (Continued)
6
21_VM_OM_EN_USC_t.book Page 155
Page 158 of 280
156SAFETY
(Continued)
Lap/Shoulder Belt Operating Instructions
1. Enter the vehicle and close the door. Sit back and adjust the seat.
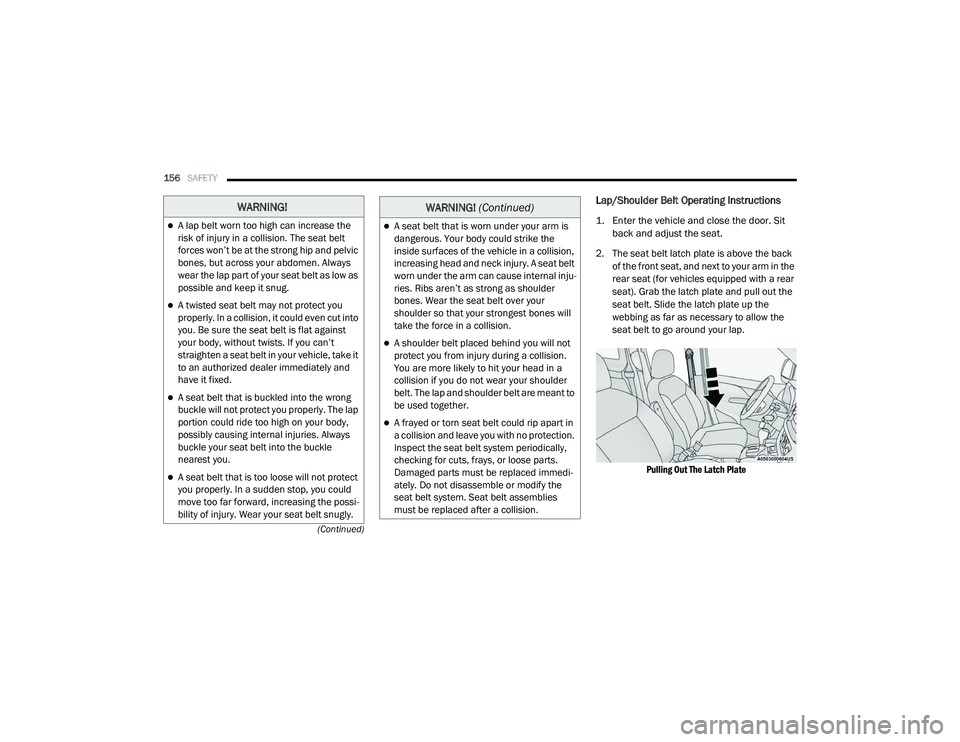
2. The seat belt latch plate is above the back of the front seat, and next to your arm in the
rear seat (for vehicles equipped with a rear
seat). Grab the latch plate and pull out the
seat belt. Slide the latch plate up the
webbing as far as necessary to allow the
seat belt to go around your lap.
Pulling Out The Latch Plate
WARNING!
A lap belt worn too high can increase the
risk of injury in a collision. The seat belt
forces won’t be at the strong hip and pelvic
bones, but across your abdomen. Always
wear the lap part of your seat belt as low as
possible and keep it snug.
A twisted seat belt may not protect you
properly. In a collision, it could even cut into
you. Be sure the seat belt is flat against
your body, without twists. If you can’t
straighten a seat belt in your vehicle, take it
to an authorized dealer immediately and
have it fixed.
A seat belt that is buckled into the wrong
buckle will not protect you properly. The lap
portion could ride too high on your body,
possibly causing internal injuries. Always
buckle your seat belt into the buckle
nearest you.
A seat belt that is too loose will not protect
you properly. In a sudden stop, you could
move too far forward, increasing the possi -
bility of injury. Wear your seat belt snugly.
A seat belt that is worn under your arm is
dangerous. Your body could strike the
inside surfaces of the vehicle in a collision,
increasing head and neck injury. A seat belt
worn under the arm can cause internal inju -
ries. Ribs aren’t as strong as shoulder
bones. Wear the seat belt over your
shoulder so that your strongest bones will
take the force in a collision.
A shoulder belt placed behind you will not
protect you from injury during a collision.
You are more likely to hit your head in a
collision if you do not wear your shoulder
belt. The lap and shoulder belt are meant to
be used together.
A frayed or torn seat belt could rip apart in
a collision and leave you with no protection.
Inspect the seat belt system periodically,
checking for cuts, frays, or loose parts.
Damaged parts must be replaced immedi-
ately. Do not disassemble or modify the
seat belt system. Seat belt assemblies
must be replaced after a collision.
WARNING! (Continued)
21_VM_OM_EN_USC_t.book Page 156
Page 159 of 280
SAFETY157
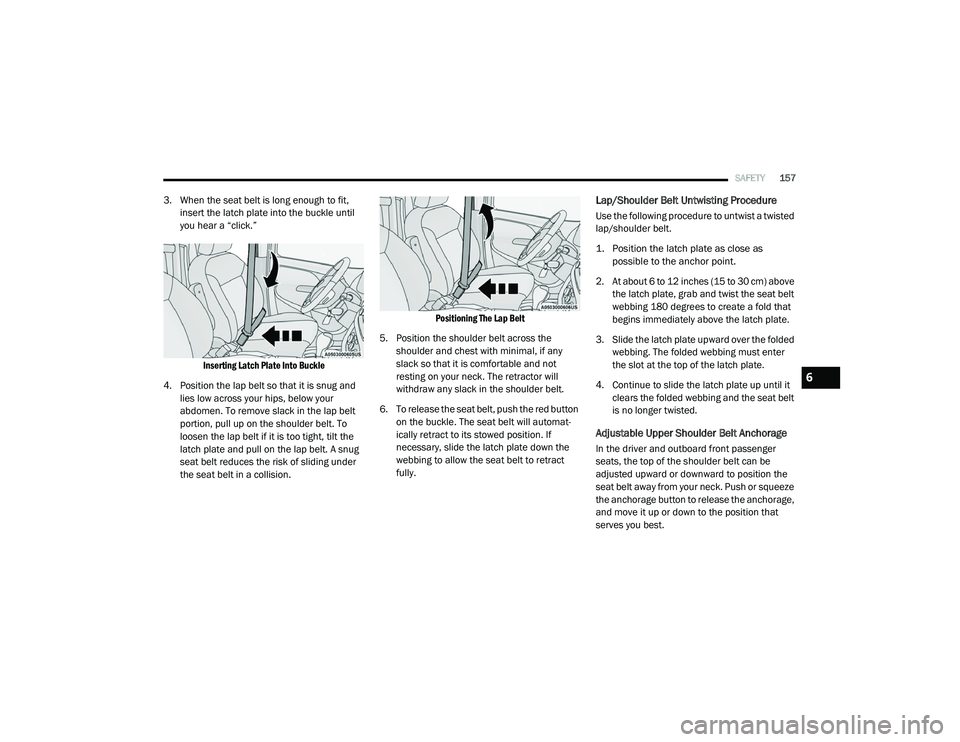
3. When the seat belt is long enough to fit,
insert the latch plate into the buckle until
you hear a “click.”
Inserting Latch Plate Into Buckle
4. Position the lap belt so that it is snug and lies low across your hips, below your
abdomen. To remove slack in the lap belt
portion, pull up on the shoulder belt. To
loosen the lap belt if it is too tight, tilt the
latch plate and pull on the lap belt. A snug
seat belt reduces the risk of sliding under
the seat belt in a collision.
Positioning The Lap Belt
5. Position the shoulder belt across the shoulder and chest with minimal, if any
slack so that it is comfortable and not
resting on your neck. The retractor will
withdraw any slack in the shoulder belt.
6. To release the seat belt, push the red button on the buckle. The seat belt will automat -
ically retract to its stowed position. If
necessary, slide the latch plate down the
webbing to allow the seat belt to retract
fully.Lap/Shoulder Belt Untwisting Procedure
Use the following procedure to untwist a twisted
lap/shoulder belt.
1. Position the latch plate as close as possible to the anchor point.
2. At about 6 to 12 inches (15 to 30 cm) above the latch plate, grab and twist the seat belt
webbing 180 degrees to create a fold that
begins immediately above the latch plate.
3. Slide the latch plate upward over the folded webbing. The folded webbing must enter
the slot at the top of the latch plate.
4. Continue to slide the latch plate up until it clears the folded webbing and the seat belt
is no longer twisted.
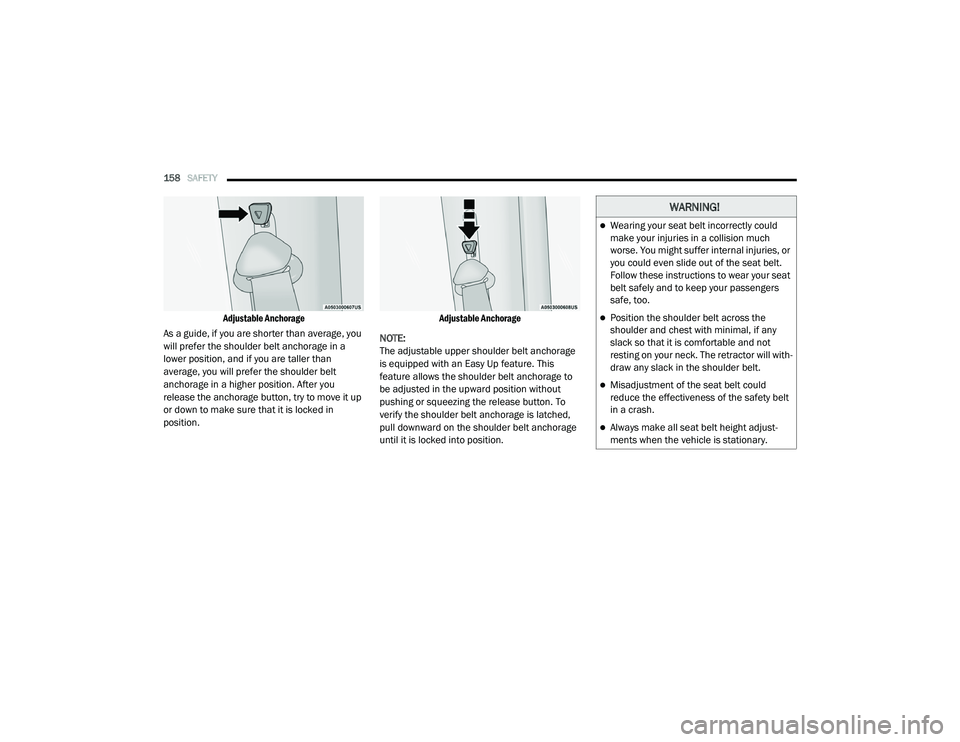
Adjustable Upper Shoulder Belt Anchorage
In the driver and outboard front passenger
seats, the top of the shoulder belt can be
adjusted upward or downward to position the
seat belt away from your neck. Push or squeeze
the anchorage button to release the anchorage,
and move it up or down to the position that
serves you best.
6
21_VM_OM_EN_USC_t.book Page 157
Page 160 of 280
158SAFETY
Adjustable Anchorage
As a guide, if you are shorter than average, you
will prefer the shoulder belt anchorage in a
lower position, and if you are taller than
average, you will prefer the shoulder belt
anchorage in a higher position. After you
release the anchorage button, try to move it up
or down to make sure that it is locked in
position.
Adjustable Anchorage
NOTE:
The adjustable upper shoulder belt anchorage
is equipped with an Easy Up feature. This
feature allows the shoulder belt anchorage to
be adjusted in the upward position without
pushing or squeezing the release button. To
verify the shoulder belt anchorage is latched,
pull downward on the shoulder belt anchorage
until it is locked into position.
WARNING!
Wearing your seat belt incorrectly could
make your injuries in a collision much
worse. You might suffer internal injuries, or
you could even slide out of the seat belt.
Follow these instructions to wear your seat
belt safely and to keep your passengers
safe, too.
Position the shoulder belt across the
shoulder and chest with minimal, if any
slack so that it is comfortable and not
resting on your neck. The retractor will with -
draw any slack in the shoulder belt.
Misadjustment of the seat belt could
reduce the effectiveness of the safety belt
in a crash.
Always make all seat belt height adjust -
ments when the vehicle is stationary.
21_VM_OM_EN_USC_t.book Page 158