check engine RENAULT ALASKAN 2017 Owner's Manual
[x] Cancel search | Manufacturer: RENAULT, Model Year: 2017, Model line: ALASKAN, Model: RENAULT ALASKAN 2017Pages: 340, PDF Size: 6.93 MB
Page 122 of 340
WARNING
• Fuel is extremely flammable and highly explo-
sive under certain conditions. You could be
burned or seriously injured if it is misused or
mishandled. Always stop the engine and do
not smoke or allow open flames or sparks
near the vehicle when refuelling.
• Fuel may be under pressure. Turn the cap a
half of
aturn, and wait for any “hissing” sound
to stop to prevent fuel from spraying out and
possibly causing personal injury. Then remove
the cap.
• Use only an original equipment type fuel filler
cap as
areplacement. It has abuilt-in safety
valve needed for proper operation of the fuel
system and emission control system. An in-
correct cap can result in aserious malfunc-
tion and possible injury. OPENING FUEL FILLER LID
Fuel filler lid opener switch
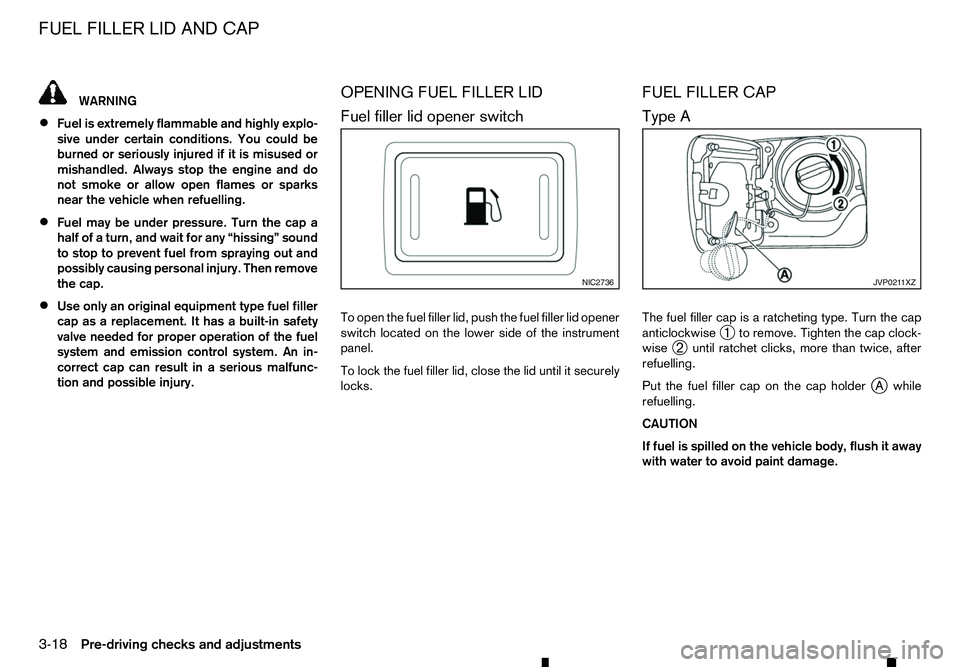
To open the fuel filler lid, push the fuel filler lid opener
switch located on the lower side of the instrument
panel.
To lock the fuel filler lid, close the lid until it securely
locks. FUEL FILLER CAP
Type A
The fuel filler cap is
aratcheting type. Turn the cap
anticlockwise ➀to remove. Tighten the cap clock-
wise ➁until ratchet clicks, more than twice, after
refuelling.
Put the fuel filler cap on the cap holder j
Aw hile
refuelling.
CAUTION
If fuel is spilled on the vehicle body, flush it away
with water to avoid paint damage. NIC2736 JVP021 1XZ
FUEL FILLER LID AND CAP
3-18
Pre-driving checks and adjustments
Page 202 of 340
5
Starting and driving
Starting and driving
Running-in schedule ................................................ 5-2
Before starting engine.............................................. 5-2
Precautions when starting and driving ...................... 5-3 Exhaust gas (carbon monoxide) .......................... 5-3
AdBlue® Selective Catalytic Reduction (SCR)
system (where fitted for diesel engine model) ...... 5-3
Diesel Particulate Filter (DPF) (where fitted) ............. 5-5 Automatic regeneration ....................................... 5-6
On-road and off-road driving precautions ................. 5-6 Driving safety precautions ................................... 5-6
Turbocharger system ............................................... 5-8
Care when driving ................................................... 5-8 Engine cold start period ...................................... 5-8
Loading luggage ................................................. 5-8
Driving in wet conditions ..................................... 5-8
Driving in winter conditions ................................. 5-8
Tyre Pressure Monitoring System (TPMS) (where
fitted) ....................................................................... 5-9 Meter information................................................ 5-12
Activation............................................................ 5-12
New and repositioned TPMS sensors
(including fitment of alternative wheels) ............... 5-12
Adjusting TPMS target pressure ......................... 5-13
Tyre pressure units ............................................. 5-13
[Check cold tyre] message ................................. 5-13
TPMS temperature calibration............................. 5-13
Ignition switch (models without Remote Control
Key system) ............................................................. 5-14
Manual Transmission (MT) .................................. 5-14
Key positions ...................................................... 5-14 Steering lock ...................................................... 5-14
Push-button ignition switch (models with Remote
Control Key system) ................................................ 5-15 Precautions on push-button ignition switch
operation ............................................................ 5-15
Remote Control Key system................................ 5-15
Automatic Transmission (AT) .............................. 5-16
Steering lock ...................................................... 5-16
Ignition switch positions ...................................... 5-16
Remote Control Key battery discharge ................ 5-17
Starting engine (models without Remote Control
Key system) ............................................................. 5-18
Starting engine (models with Remote Control Key
system).................................................................... 5-18
Driving the vehicle.................................................... 5-19 Driving with Automatic Transmission (AT) ........... 5-19
Driving with Manual Transmission (MT) ............... 5-22
Stop/Start System (where fitted) .............................. 5-23
Stop/Start System display................................... 5-24
Stop/Start OFF switch ....................................... 5-25
Four-Wheel Drive (4WD) (where fitted) .................... 5-26 Part time 4WD system ........................................ 5-26
4WD mode switch operation............................... 5-30
4WD mode indicator........................................... 5-30
4WD warning ..................................................... 5-31
Tyre recommendation for 4WD ........................... 5-32
Rear differential locking system (where fitted)........... 5-32
Electronic Stability Programme (ESP) system
(where fitted) ........................................................... 5-33
Page 204 of 340
During the first 1,600 km (1,000 miles), follow these
recommendations to obtain maximum engine per-
formance and ensure the future reliability and
economy of your new vehicle. Failure to follow these
recommendations may result in shortened engine
life and reduced engine performance.
• Do not drive at
aconstant speed, either fast or
slow, for long periods of time.
• Do not run the engine over 4,000 rpm.
• Do not accelerate at full throttle in any gear.
• Do not start quickly.
• Do not brake hard as much as possible.
• Do not tow
atrailer for at least the first 800 km
(500 miles). WARNING
The driving characteristics of your vehicle will
change remarkably by any additional load and its
distribution, as well as by adding optional equip-
ment (trailer coupling, roof rail, etc.). Your driv-
ing style and speed must be adjusted according
to the circumstances. Especially when carrying
heavy loads, your speed must be reduced ad-
equately.
• Make sure the area around the vehicle is clear.
• Check fluid levels such as engine oil, coolant,
brake (and clutch) fluid, window washer fluid as
frequently as possible, at least whenever you
refuel.
• Visually inspect tyres for their appearance and
condition. Measure and check the tyre pressure
for proper inflation.
• Check that all windows and lights are clean.
• Adjust the seat and head restraint positions.
• Adjust the inside and outside rearview mirror po-
sitions.
• Fasten your seat belt and ask all passengers to
do the same.
• Check that all doors are closed.
• Check the operation of the warning lights when
the ignition switch is placed in the “ON” position. •
Maintenance items in the “8. Maintenance and
do-it-yourself” section should be checked peri-
odically.
RUNNING-IN SCHEDULE
BEFORE STARTING ENGINE
5-2 Starting and driving
Page 206 of 340
AdBlue® warning display
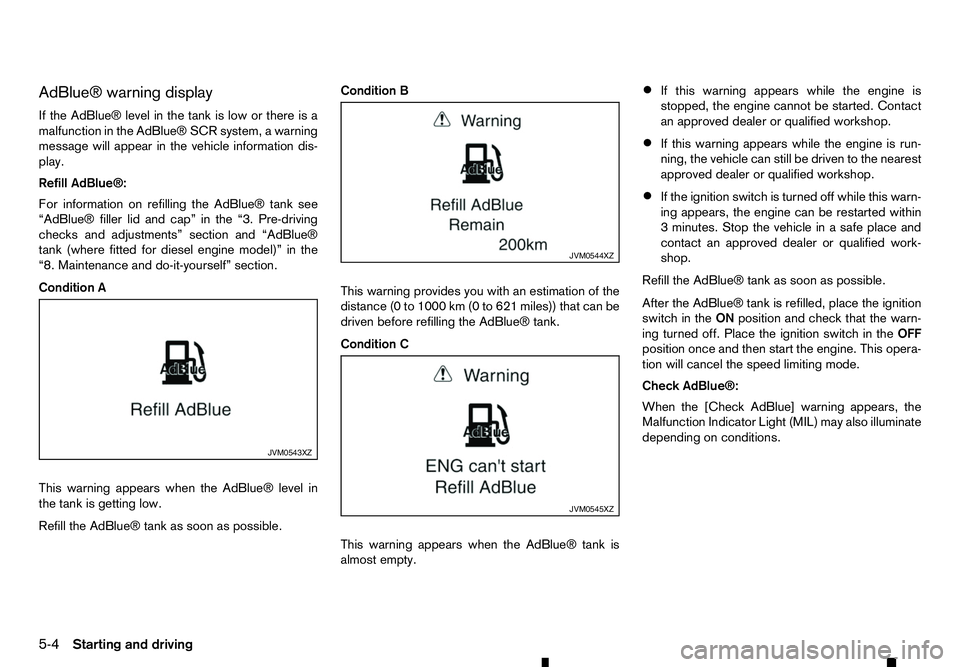
If the AdBlue® level in the tank is low or there is a malfunction in the AdBlue® SCR system, awarning
message will appear in the vehicle information dis- play.
Refill AdBlue®:
For information on refilling the AdBlue® tank see
“AdBlue® filler lid and cap” in the “3. Pre-driving
checks and adjustments” section and “AdBlue®
tank (where fitted for diesel engine model)” in the
“8. Maintenance and do-it-yourself” section.
Condition A
This warning appears when the AdBlue® level in
the tank is getting low.
Refill the AdBlue® tank as soon as possible. Condition B
This warning provides you with an estimation of the
distance (0 to 1000 km (0 to 621 miles)) that can be
driven before refilling the AdBlue® tank.
Condition C
This warning appears when the AdBlue® tank is
almost empty.•
If this warning appears while the engine is
stopped, the engine cannot be started. Contact
an approved dealer or qualified workshop.
• If this warning appears while the engine is run-
ning, the vehicle can still be driven to the nearest
approved dealer or qualified workshop.
• If the ignition switch is turned off while this warn-
ing appears, the engine can be restarted within
3m
inutes. Stop the vehicle in asafe place and
contact an approved dealer or qualified work-
shop.
Refill the AdBlue® tank as soon as possible.
After the AdBlue® tank is refilled, place the ignition
switch in the ONposition and check that the warn-
ing turned off. Place the ignition switch in the OFF
position once and then start the engine. This opera-
tion will cancel the speed limiting mode.
Check AdBlue®:
When the [Check AdBlue] warning appears, the
Malfunction Indicator Light (MIL) may also illuminate
depending on conditions. JVM0543XZ JVM0544XZ
JVM0545XZ
5-4 Starting and driving
Page 207 of 340
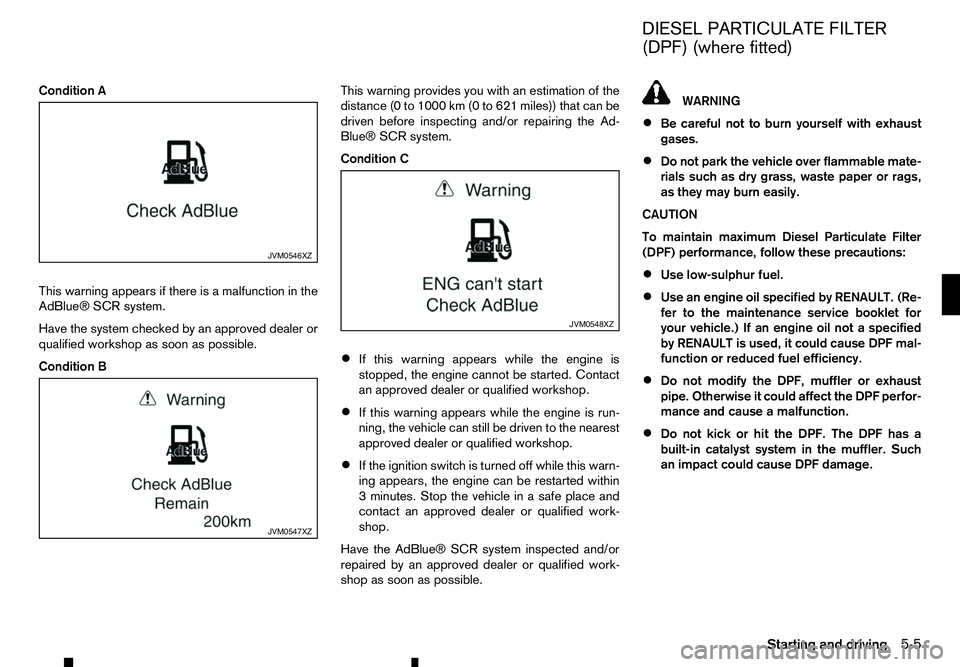
Condition A
This warning appears if there is amalfunction in the
AdBlue® SCR system.
Have the system checked by an approved dealer or
qualified workshop as soon as possible.
Condition B This warning provides you with an estimation of the
distance (0 to 1000 km (0 to 621 miles)) that can be
driven before inspecting and/or repairing the Ad-
Blue® SCR system.
Condition C
• If this warning appears while the engine is
stopped, the engine cannot be started. Contact
an approved dealer or qualified workshop.
• If this warning appears while the engine is run-
ning, the vehicle can still be driven to the nearest
approved dealer or qualified workshop.
• If the ignition switch is turned off while this warn-
ing appears, the engine can be restarted within
3m
inutes. Stop the vehicle in asafe place and
contact an approved dealer or qualified work-
shop.
Have the AdBlue® SCR system inspected and/or
repaired by an approved dealer or qualified work-
shop as soon as possible. WARNING
• Be careful not to burn yourself with exhaust
gases.
• Do not park the vehicle over flammable mate-
rials such as dry grass, waste paper or rags,
as they may burn easily.
CAUTION
To maintain maximum Diesel Particulate Filter
(DPF) performance, follow these precautions:
• Use low-sulphur fuel.
• Use an engine oil specified by RENAULT. (Re-
fer to the maintenance service booklet for
your vehicle.) If an engine oil not
aspecified
by RENAULT is used, it could cause DPF mal-
function or reduced fuel efficiency.
• Do not modify the DPF, muffler or exhaust
pipe. Otherwise it could affect the DPF perfor-
mance and cause
amalfunction.
• Do not kick or hit the DPF. The DPF has a
built-in catalyst system in the muffler. Such
an impact could cause DPF damage. JVM0546XZ
JVM0547XZ JVM0548XZ
DIESEL PARTICULATE FILTER
(DPF) (where fitted)
Starting and driving 5-5
Page 210 of 340
•
Be sure to check the brakes immediately af-
ter driving in mud or water. See “Brake
system” later in this section for wet brakes.
• Avoid parking your vehicle on steep hills. If
you get out of the vehicle and it rolls forward,
backward or sideways, you could be injured.
• Whenever you drive off-road through sand,
mud or water as deep as the wheel hub, more
frequent maintenance may be required. See
the maintenance information in
aseparate
maintenance booklet.
• Rinse the underside of the vehicle with fresh
water after driving through mud or sand. Re-
move any brush or sticks that are trapped. The turbocharger system uses engine oil for lubrica-
tion and cooling of its rotating components. The tur-
bocharger turbine turns at extremely high speeds
and it can reach an extremely high temperature. It is
essential to maintain
aflow of clean oil through the
turbocharger system. Asudden interruption to the
oil supply may cause amalfunction in the turbo-
charger.
To ensure prolonged life and performance of the
turbocharger, it is essential to comply with the fol-
lowing maintenance procedure:
CAUTION
• Change the engine oil of the turbo-charged
diesel engine as prescribed. See the sepa-
rately provided maintenance booklet for addi-
tional information.
• Use only the recommended engine oil. For
details, refer to the maintenance service
booklet for your vehicle.
• If the engine has been operating at high rpm
for an extended period of time, let it idle for a
few minutes prior to shutdown.
• Do not accelerate the engine to high rpm im-
mediately after starting it.
• When starting the engine at ambient tempera-
tures below −5°C (23°F), an engine protection
mode may be activated. During this time, the
engine output is reduced. The engine protec-
tion mode is switched off automatically after
am
aximum of 3minutes (provided the accel-
erator pedal is released completely). Driving your vehicle to fit the circumstances is es-
sential for your safety and comfort. As
adriver, you
should be the one who knows best how to drive in
the given circumstances.
ENGINE COLD START PERIOD
Due to the higher engine speeds, when the engine
is cold, extra caution must be exercised when se-
lecting agear during the engine warm-up period
after starting the engine.
LOADING LUGGAGE
Loads and their distribution and the attachment of
equipment (roof baggage carriers, etc.) will consid-
erably change the driving characteristics of the ve-
hicle. Your driving style and speed must be adjusted
according to the circumstances.
DRIVING IN WET CONDITIONS
• Avoid accelerating or stopping suddenly.
• Avoid sharp turning or lane changing suddenly.
• Avoid following too close to the vehicle in front.
When water covers the road surface with water
puddles, small water streams, etc., reduce speed to
prevent hydroplaning which can cause skidding and
loss of control. Worn tyres will increase this risk.
DRIVING IN WINTER CONDITIONS • Drive cautiously.
• Avoid accelerating or stopping suddenly.
• Avoid sharp turning or lane changing suddenly.
TURBOCHARGER SYSTEM CARE WHEN DRIVING
5-8 Starting and driving
Page 221 of 340
DRIVING WITH AUTOMATIC
TRANSMISSION (AT)
The Automatic Transmission (AT) in your vehicle is
electronically controlled to produce maximum power
and smooth operation.
The recommended operating procedures for this
transmission are shown on the following pages. Fol-
low these procedures for maximum vehicle perfor-
mance and driving enjoyment. WARNING
Do not downshift abruptly on slippery roads. This
may cause aloss of control.
CAUTION
• The cold engine idle speed is high, so use
caution when shifting into aforward or re-
verse gear before the engine has warmed up.
• Avoid revving up the engine while the vehicle
is stopped. This could cause unexpected ve-
hicle movement.
• Never shift to either the
P(Park) or R(Re-
verse) position while the vehicle is moving
forward and P(Park) or D(Drive) position
while the vehicle is reversing. This could cause an accident or damage the transmis-
sion. •
Except in an emergency, do not shift to the N
(Neutral) position while driving. Coasting with
the transmission in the
N(Neutral) position
may cause serious damage to the transmis-
sion.
• Start the engine in either the
P(Park) or N
(Neutral) position. The engine will not start in
any other gear position. If it does, have your
vehicle checked by an approved dealer or
qualified workshop.
• Shift into the
P(Park) position and apply the
parking brake when at astandstill for longer
than ashort waiting period.
• Keep the engine at idling speed while shifting
from the
N(Neutral) position to any driving
position.
• To avoid possible damage to your vehicle;
when stopping the vehicle on an uphill grade,
do not hold the vehicle by depressing the ac-
celerator pedal. The footbrake should be used
for this purpose.
Starting vehicle
1. After starting the engine, fully depress the foot- brake pedal before attempting to move the shift
lever out of the P(Park) position.
2. Keep the footbrake pedal depressed and move the shift lever into adriving position.
3. Release the parking brake, the footbrake pedal, and then gradually start the vehicle in motion. The AT is designed so the footbrake pedal MUST
be depressed before shifting from the
P(Park)
position to any driving position while the ignition
switch is in the “ON” position.
The shift lever cannot be moved out of the P
(Park) position and into any of the other gear
positions if the ignition switch is placed in the
“LOCK”, “OFF” or “ACC” position.
CAUTION
• DEPRESS THE FOOTBRAKE PEDAL
-Shifting
the shift lever to D(Drive), R(Reverse), or
manual shift mode without depressing the
footbrake pedal causes the vehicle to move
slowly when the engine is running. Make sure
the footbrake pedal is depressed fully and the
vehicle is stopped before shifting the shift le-
ver.
• MAKE SURE OF THE SHIFT LEVER POSITION
-M
ake sure the shift lever is in the desired
position. D(Drive) and manual shift mode are
used to move forward and R(Reverse) to re-
verse. Depress the accelerator pedal to start
the vehicle and merge with traffic (avoid
abrupt starting and spinning the wheels).
• WARM UP THE ENGINE
-Due to the higher
idle speeds when the engine is cold, extra
caution must be exercised when shifting the
shift lever into the driving position immedi-
ately after starting the engine.
DRIVING THE VEHICLE
Starting and driving5-19
Page 223 of 340
Shift ranges up or down one by one as follows:
M1
→
←M2→
←M3→
←M4→
←M5→
←M6→
←M7
M7(
7th):
Use this position for all normal forward driving at
highway speeds.
M6( 6th) andM5(5th):
Use these positions when driving up long slopes, or
for engine braking when driving down long slopes.
M4( 4th),M3(3rd) andM2(2nd):
Use these positions for hill climbing or engine brak-
ing on downhill grades.
M1( 1st):
Use this position when climbing steep hills slowly or
driving slowly through deep snow, or for maximum
engine braking on steep downhill grades.
• Remember not to drive at high speeds for ex-
tended periods of time in lower than 7th gear.
This reduces fuel economy.
• Moving the shift lever to the same side twice will
shift the ranges in succession. However, if this
motion is rapidly done, the second shifting may
not be completed properly.
• In the manual shift mode, the transmission
may not shift to the selected gear or may au-
tomatically shift to the other gear. This helps
maintain driving performance and reduces the
chance of vehicle damage or loss of control. •
When the transmission does not shift to the
selected gear, the Automatic Transmission
(AT) position indicator light (in the vehicle in-
formation display) will blink and the buzzer
will sound.
• In the manual shift mode, the transmission
automatically shifts down to 1st gear before
the vehicle comes to
astop. When accelerat-
ing again, it is necessary to shift up to the
desired range.
Accelerator downshift -inD(Drive)
position
For passing or climbing hills, depress the accelera-
tor pedal to the floor. This shifts the transmission
down into alower gear, depending on the vehicle
speed.
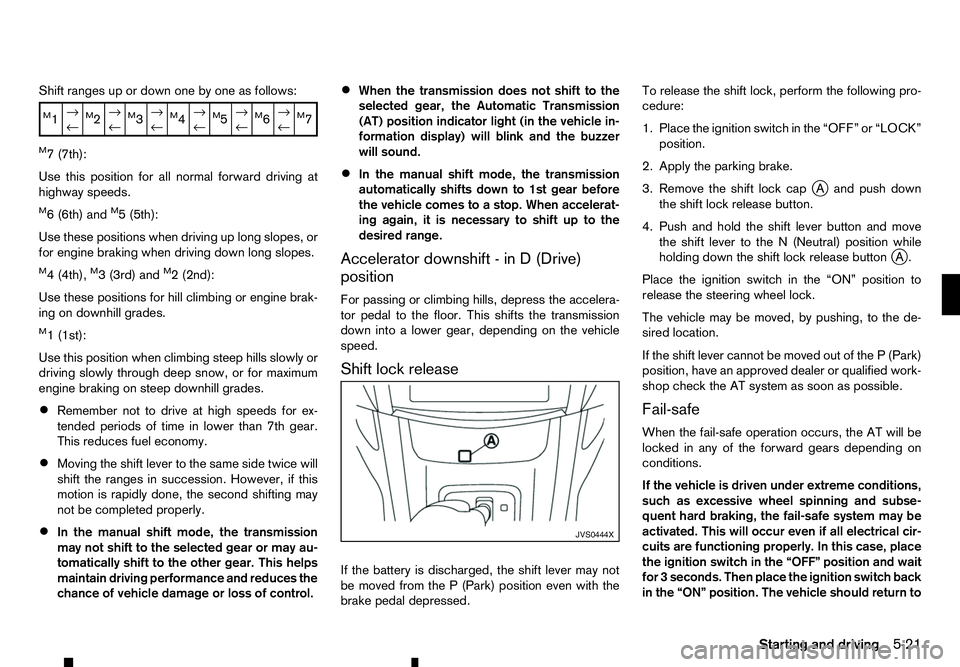
Shift lock release
If the battery is discharged, the shift lever may not
be moved from the P(Park) position even with the
brake pedal depressed. To release the shift lock, perform the following pro-
cedure:
1. Place the ignition switch in the “OFF” or “LOCK”
position.
2. Apply the parking brake.
3. Remove the shift lock cap jAa nd push down
the shift lock release button.
4. Push and hold the shift lever button and move the shift lever to the N(Neutral) position while
holding down the shift lock release button j
A.
Place the ignition switch in the “ON” position to
release the steering wheel lock.
The vehicle may be moved, by pushing, to the de-
sired location.
If the shift lever cannot be moved out of the P(Park)
position, have an approved dealer or qualified work-
shop check the AT system as soon as possible.
Fail-safe
When the fail-safe operation occurs, the AT will be
locked in any of the forward gears depending on
conditions.
If the vehicle is driven under extreme conditions,
such as excessive wheel spinning and subse-
quent hard braking, the fail-safe system may be
activated. This will occur even if all electrical cir-
cuits are functioning properly. In this case, place
the ignition switch in the “OFF” position and wait
for 3seconds. Then place the ignition switch back
in the “ON” position. The vehicle should return to JVS0444X
Starting
and driving
5-21
Page 224 of 340
its normal operating condition. If it does not re-
turn to its normal operating condition, have an
approved dealer or qualified workshop check the
transmission and repair it if necessary.
DRIVING WITH MANUAL
TRANSMISSION (MT) WARNING
• Do not downshift abruptly on slippery roads.
This may cause aloss of control.
• Do not over-rev the engine when shifting to a
lower gear. This may cause
aloss of vehicle
control or engine damage.
CAUTION
• Do not rest your foot on the clutch pedal while
driving. This may damage the clutch system.
• Fully depress the clutch pedal before shifting
to help prevent transmission damage.
• Stop the vehicle completely before shifting
into the
R(Reverse) position.
• When the vehicle is stopped for
aperiod of
time, for example, waiting at stoplights, shift
to the N(Neutral) position and release the
clutch pedal with the footbrake pedal
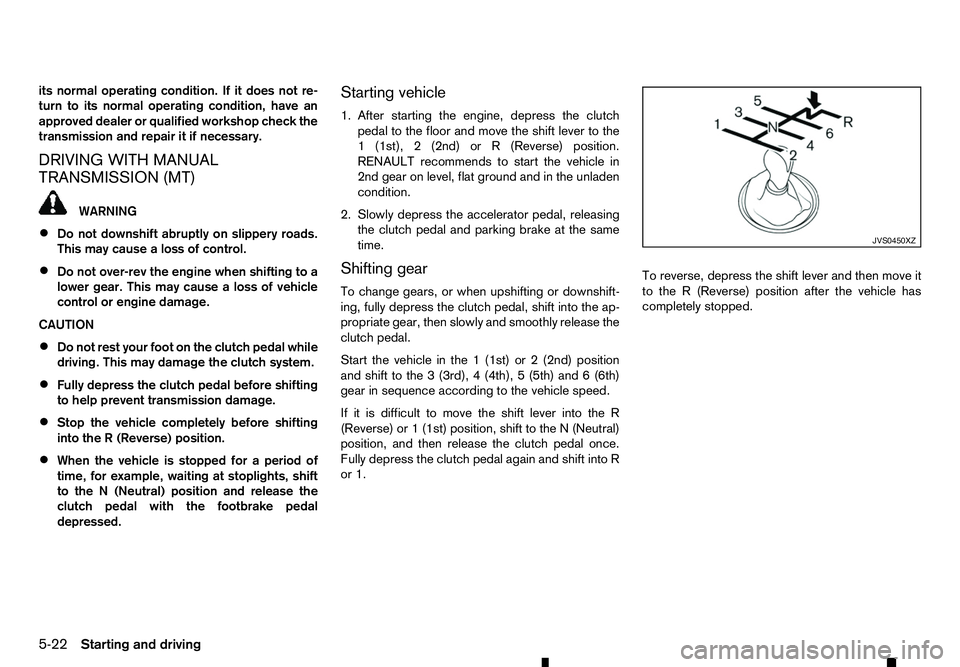
depressed. Starting vehicle
1. After starting the engine, depress the clutch
pedal to the floor and move the shift lever to the
1( 1st), 2(2nd) or R(Reverse) position.
RENAULT recommends to start the vehicle in
2nd gear on level, flat ground and in the unladen
condition.
2. Slowly depress the accelerator pedal, releasing the clutch pedal and parking brake at the same
time.
Shifting gear
To change gears, or when upshifting or downshift-
ing, fully depress the clutch pedal, shift into the ap-
propriate gear, then slowly and smoothly release the
clutch pedal.
Start the vehicle in the 1(1st) or 2(2nd) position
and shift to the 3(3rd), 4(4th), 5(5th) and 6(6th)
gear in sequence according to the vehicle speed.
If it is difficult to move the shift lever into the R
(Reverse) or 1(1st) position, shift to the N(Neutral)
position, and then release the clutch pedal once.
Fully depress the clutch pedal again and shift into R
or 1. To reverse, depress the shift lever and then move it
to the
R(Reverse) position after the vehicle has
completely stopped. JVS0450XZ
5-22 Starting and driving
Page 227 of 340
The CO2 or fuel saved and the engine stop time
mode shows the following items:
• The CO2 saved shows the estimated quantity of
CO2 exhaust emissions that were prevented by
the Stop/Start System every time the engine is
automatically stopped.
• The engine stop time shows the time that the
engine has been stopped for by the Stop/Start
System.
For more information, see “Stop/Start System
(where fitted)” earlier in this section.
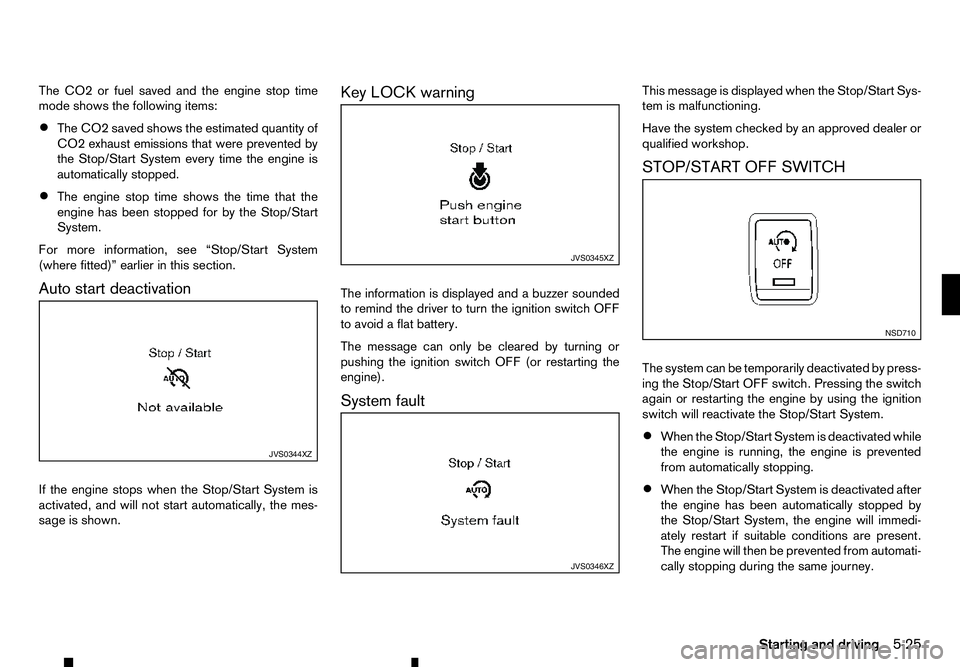
Auto start deactivation
If the engine stops when the Stop/Start System is
activated, and will not start automatically, the mes-
sage is shown. Key LOCK warning
The information is displayed and
abuzzer sounded
to remind the driver to turn the ignition switch OFF
to avoid aflat battery.
The message can only be cleared by turning or
pushing the ignition switch OFF (or restarting the
engine).
System fault This message is displayed when the Stop/Start Sys-
tem is malfunctioning.
Have the system checked by an approved dealer or
qualified workshop.
STOP/START OFF SWITCH
The system can be temporarily deactivated by press-
ing the Stop/Start OFF switch. Pressing the switch
again or restarting the engine by using the ignition
switch will reactivate the Stop/Start System.
•
When the Stop/Start System is deactivated while
the engine is running, the engine is prevented
from automatically stopping.
• When the Stop/Start System is deactivated after
the engine has been automatically stopped by
the Stop/Start System, the engine will immedi-
ately restart if suitable conditions are present.
The engine will then be prevented from automati-
cally stopping during the same journey. JVS0344XZ JVS0345XZ
JVS0346XZ NSD710
Starting and driving
5-25