stop start RENAULT ALASKAN 2017 Service Manual
[x] Cancel search | Manufacturer: RENAULT, Model Year: 2017, Model line: ALASKAN, Model: RENAULT ALASKAN 2017Pages: 340, PDF Size: 6.93 MB
Page 251 of 340
When leaving your vehicle unoccupied:
• Always take the key with you
-even when leav-
ing the vehicle in your own garage.
• Close all windows completely and lock all doors.
• Always park your vehicle where it can be seen.
Park in
awell lit area during the night.
• If the security system is equipped, use it
-even
for ashort period.
• Never leave children or pets in the vehicle unat-
tended.
• Never leave valuables inside the vehicle. Always
take valuables with you.
• Never leave the vehicle documents in the ve-
hicle.
• Never leave articles on
aroof rail. Remove them
from the rack and keep and lock them inside the
vehicle.
• Never leave the spare key in the vehicle. WARNING
If the engine is not running or is turned off while
driving, the power assist for the steering will not
work. The steering will be much harder to oper-
ate.
The power assisted steering is designed to use a
hydraulic pump driven by the engine, to assist steer-
ing.
If the engine stops or the drive belt breaks, you will
still have control of the vehicle. However, greater
steering effort is needed, especially in sharp turns
and at low speeds. The brake system has two separate hydraulic cir-
cuits. If one circuit malfunctions, you will still have
braking ability at two wheels.
BRAKE PRECAUTIONS
Vacuum assisted brakes
The brake booster aids braking by using engine
vacuum. If the engine stops, you can stop the ve-
hicle by depressing the footbrake pedal. However,
greater foot pressure on the footbrake pedal will be
required to stop the vehicle. The stopping distance
will be longer.
If the engine is not running or is turned off while driv-
ing, the power assisted brakes will not function.
Braking will be harder. WARNING
Do not coast with the engine stopped.
Using brakes
Avoid resting your foot on the footbrake pedal while
driving. This will overheat the brakes, wear out the
brake linings/pads faster, and increase fuel con-
sumption.
To help reduce brake wear and to prevent the brakes
from overheating, reduce speed and downshift to a
lower gear before going down aslope or long grade.
Overheated brakes may reduce braking perfor-
mance and could result in loss of vehicle control.
VEHICLE SECURITY
POWER STEERING SYSTEM BRAKE SYSTEM
Starting and driving5-49
Page 252 of 340
While driving on
aslippery surface, be careful when
braking, accelerating or downshifting. Abrupt brak-
ing or acceleration could cause the wheels to skid
and result in an accident.
Wet brakes
When the vehicle is washed or driven through wa-
ter, the brakes may get wet. As aresult, your brak-
ing distance will be longer and the vehicle may pull
to one side during braking.
To dry the brakes, drive the vehicle at asafe speed
while lightly depressing the footbrake pedal to heat
up the brakes. Do this until the brakes return to nor-
mal. Avoid driving the vehicle at high speeds until
the brakes function correctly.
Parking brake running-in
Break in the parking brake shoes whenever the
stopping effect of the parking brake is weakened or
whenever the parking brake shoes and/or drums/
rotors are replaced, in order to assure the best brak-
ing performance.
This procedure is described in the vehicle service
manual and can be performed by an approved dealer
or qualified workshop.
ANTI-LOCK BRAKING SYSTEM (ABS) WARNING
The Anti-lock Braking System (ABS) is
asophis-
ticated device, but it cannot prevent accidents
resulting from careless or dangerous driving
techniques. It can help maintain vehicle control during braking on slippery surfaces. Remember
that stopping distances on slippery surfaces will
be longer than on normal surfaces even with ABS.
Stopping distances may also be longer on rough,
gravel or snow covered roads, or if you are using
tyre chains. Always maintain
asafe distance from
the vehicle in front of you. Ultimately, the driver
is responsible for safety.
Tyre type and condition may also affect braking
effectiveness.
• When replacing tyres, install the specified size
of tyres on all four wheels.
• When installing
aspare tyre, make sure that it
is the proper size and type as specified on the
tyre placard. (See “Vehicle identification” in
the “9. Technical information” section.)
• For detailed information, see “Tyres and
wheels” in the “9. Technical information” sec-
tion.
The Anti-lock Braking System (ABS) controls the
brakes so the wheels do not lock during hard brak-
ing or when braking on slippery surfaces. The sys-
tem detects the rotation speed at each wheel and
varies the brake fluid pressure to prevent each wheel
from locking and sliding. By preventing each wheel
from locking, the system helps the driver maintain
steering control and helps to minimise swerving and
spinning on slippery surfaces. Using system
Depress the brake pedal and hold it down. Depress
the brake pedal with firm steady pressure, but do
not pump the brakes. The ABS will operate to pre-
vent the wheels from locking up. Steer the vehicle to
avoid obstacles. WARNING
Do not pump the brake pedal. Doing so may re-
sult in increased stopping distances.
Self-test feature
The ABS includes electronic sensors, electric
pumps, hydraulic solenoids and acomputer. The
computer has abuilt-in diagnostic feature that tests
the system each time you start the engine and move
the vehicle at alow speed in forward or reverse.
When the self-test occurs, you may hear a“clunk”
noise and/or feel apulsation in the brake pedal. This
is normal and does not indicate amalfunction. If the
computer senses amalfunction, it switches the ABS
off and illuminates the ABS warning light on the
instrument panel. The brake system then operates
normally, but without anti-lock assistance. If the ABS
warning light illuminates during the self-test or while
driving, have the vehicle checked by an approved
dealer or qualified workshop.
Normal operation
The ABS operates at speeds above 5to10km/h (3
to 6M PH). The speed varies according to road con-
ditions.
5-50 Starting and driving
Page 253 of 340
When the ABS senses that one or more wheels are
close to locking up, the actuator rapidly applies and
releases hydraulic pressure. This action is similar to
pumping the brakes very quickly. You may feel a
pulsation in the brake pedal and hear anoise from
under the bonnet or feel avibration from the actua-
tor when it is operating. This is normal and indicates
that the ABS is operating properly. However, the
pulsation may indicate that road conditions are haz-
ardous and extra care is required while driving.
When the differential lock (where fitted) is engaged,
the ABS warning light illuminates. This indicates that
the anti-lock function is not fully operating. (See
“Rear differential locking system (where fitted)” ear-
lier in this section for the rear differential lock func-
tion.) WARNING
• Whatever the condition, drive with caution.
Accelerate and decelerate with great care. If
accelerating or decelerating too fast, the drive
wheels will lose even more traction.
• Allow more stopping distance in cold weather
driving. Braking should be started sooner than
on dry pavement.
• Keep at
agreater distance from the vehicle in
front of you on slippery roads.
• Wet ice (0°C, 32°F and freezing rain), very cold
snow and ice can be slick and very difficult to
drive on. The vehicle will have
alot less trac-
tion or grip under these conditions. Try to
avoid driving on wet ice until the road is salted
or sanded.
• Watch for slippery spots (glaring ice). These
may appear on an otherwise clear road in
shaded areas. If
apatch of ice is seen ahead,
brake before reaching it. Try not to brake while
actually on the ice, and avoid any sudden
steering manoeuvres.
• Do not use cruise control on slippery roads.
• Snow can trap dangerous exhaust gas under
your vehicle. Keep snow clear of the exhaust
pipe and from around your vehicle. BATTERY
If the battery is not fully charged during extremely
cold weather conditions, the battery fluid may freeze
and damage the battery. To maintain maximum effi-
ciency, the battery should be checked regularly. For
details, see “Battery” in the “8. Maintenance and
do-it-yourself” section of this manual.
ENGINE COOLANT
If the vehicle is to be left outside without anti-freeze,
drain the cooling system, including the engine block.
Refill before operating the vehicle. For details, see
“Engine cooling system” in the “8. Maintenance and
do-it-yourself” section of this manual.
TYRE EQUIPMENT
1. If you have snow tyres installed on the front/rear
wheels of your vehicle, they should be of the
same size, loading range, construction and type
(bias, bias-belted or radial) as the rear/front tyres.
2. If the vehicle is to be operated in severe winter conditions, snow tyres should be installed on all
four wheels.
3. For additional traction on icy roads, studded tyres may be used. However, some countries, prov-
inces and states prohibit their use. Check local,
state and provincial laws before installing stud-
ded tyres.
Skid and traction capabilities of studded snow
tyres, on wet or dry surfaces, may be poorer
than that of non-studded snow tyres.
COLD WEATHER DRIVING
Starting and driving5-51
Page 255 of 340
6
In case of emergency
In case of emergency
Hazard warning flasher switch ................................. 6-2
Flat tyre ................................................................... 6-2 Stopping vehicle ................................................. 6-2
Changing flat tyre (for models with spare tyre) .... 6-2
Repairing flat tyre (for models with emergency
tyre puncture repair kit) ....................................... 6-6 Jump starting ........................................................... 6-10
Push starting ........................................................... 6-12
If your vehicle overheats........................................... 6-12
Towing your vehicle ................................................. 6-13
Towing precautions ............................................ 6-13
Towing recommended by RENAULT................... 6-13
Page 282 of 340
The radiator is fitted with
apressure cap. To prevent
engine damage, use only aGenuine RENAULT ra-
diator cap or its equivalent when replacement is
required.
CHECKING ENGINE COOLANT
LEVEL
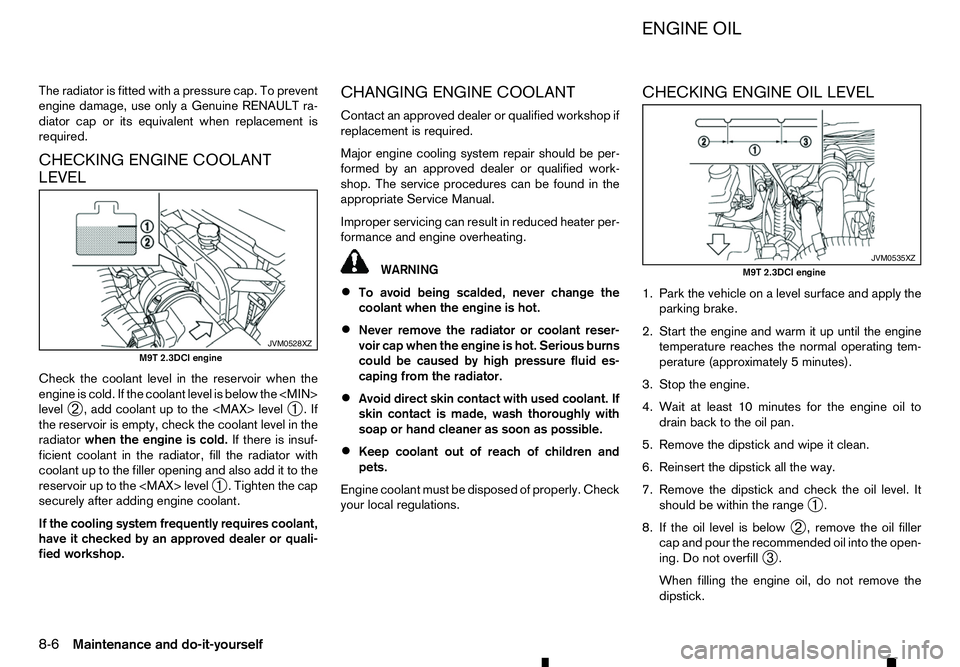
Check the coolant level in the reservoir when the
engine is cold. If the coolant level is below the
level ➁,a
dd coolant up to the
➀.If
the reservoir is empty, check the coolant level in the
radiator when the engine is cold. If there is insuf-
ficient coolant in the radiator, fill the radiator with
coolant up to the filler opening and also add it to the
reservoir up to the
ighten the cap
securely after adding engine coolant.
If the cooling system frequently requires coolant,
have it checked by an approved dealer or quali-
fied workshop. CHANGING ENGINE COOLANT
Contact an approved dealer or qualified workshop if
replacement is required.
Major engine cooling system repair should be per-
formed by an approved dealer or qualified work-
shop. The service procedures can be found in the
appropriate Service Manual.
Improper servicing can result in reduced heater per-
formance and engine overheating.
WARNING
• To avoid being scalded, never change the
coolant when the engine is hot.
• Never remove the radiator or coolant reser-
voir cap when the engine is hot. Serious burns
could be caused by high pressure fluid es-
caping from the radiator.
• Avoid direct skin contact with used coolant. If
skin contact is made, wash thoroughly with
soap or hand cleaner as soon as possible.
• Keep coolant out of reach of children and
pets.
Engine coolant must be disposed of properly. Check
your local regulations. CHECKING ENGINE OIL LEVEL
1. Park the vehicle on
alevel surface and apply the
parking brake.
2. Start the engine and warm it up until the engine temperature reaches the normal operating tem-
perature (approximately 5minutes).
3. Stop the engine.
4. Wait at least 10 minutes for the engine oil to drain back to the oil pan.
5. Remove the dipstick and wipe it clean. 6. Reinsert the dipstick all the way.
7. Remove the dipstick and check the oil level. It should be within the range ➀.
8. If the oil level is below ➁,r
emove the oil filler
cap and pour the recommended oil into the open-
ing. Do not overfill ➂.
When filling the engine oil, do not remove the
dipstick. JVM0528XZ
M9T 2.3DCI engine JVM0535XZ
M9T 2.3DCI engine
ENGINE OIL
8-6 Maintenance and do-it-yourself
Page 286 of 340
2. While depressing the footbrake pedal, start the
engine. The pedal height should drop alittle.
3. With the footbrake pedal depressed, stop the engine. Keep the pedal depressed for about 30
seconds. The pedal height should not change.
4. Run the engine for 1minute without depressing
the footbrake pedal, then turn it off. Depress the
footbrake pedal several times. The pedal travel
distance will decrease gradually with each de-
pression as the vacuum is released from the
booster.
If the brakes do not operate properly, have the
brakes checked by an approved dealer or qualified
workshop. WARNING
• Use only new fluid from
asealed container.
Old, inferior, or contaminated fluid may dam-
age the brake system. The use of improper
fluids can damage the brake system and af-
fect the vehicle’s stopping ability.
• Clean the filler cap before removing.
• Brake fluid is poisonous and should be stored
carefully in marked containers out of the reach
of children.
CAUTION
• Refilling and checking the brake system
should be left to an approved dealer or quali-
fied workshop who will have the necessary
brake fluid and technical knowledge.
• Do not spill the fluid on painted surfaces. This
will damage the paint. If fluid is spilled, wash
with water.
For details of recommended fluids, refer to the main-
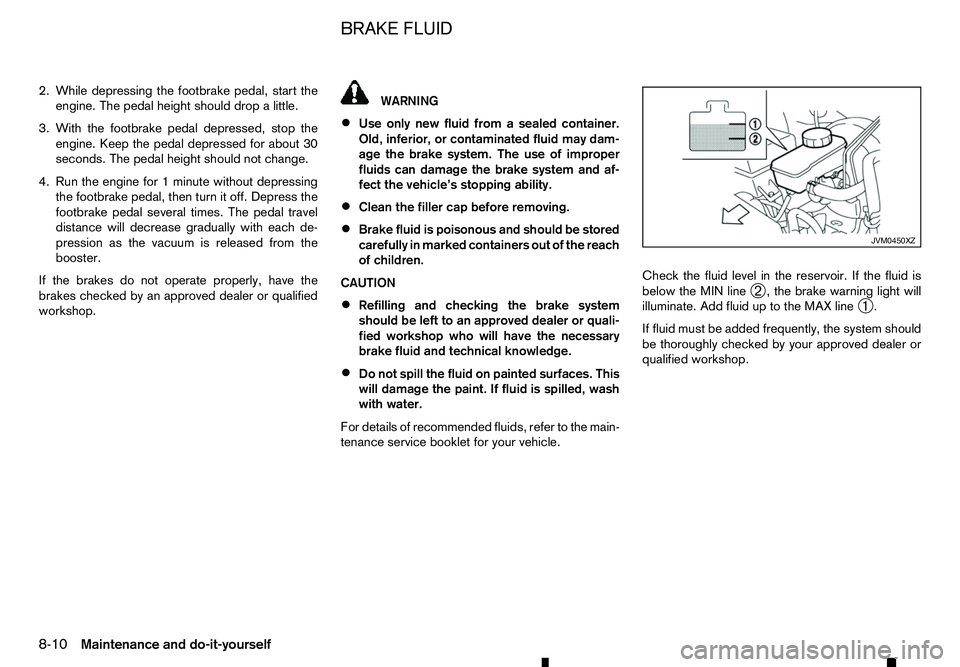
tenance service booklet for your vehicle. Check the fluid level in the reservoir. If the fluid is
below the MIN line
➁,t
he brake warning light will
illuminate. Add fluid up to the MAX line ➀.
If fluid must be added frequently, the system should
be thoroughly checked by your approved dealer or
qualified workshop. JVM0450XZ
BRAKE FLUID
8-10 Maintenance and do-it-yourself
Page 291 of 340
•
Recommended battery: CR2025 or equiva-
lent
• Do not touch the internal circuit and electric
terminals as doing so could cause
amalfunc-
tion.
• Make sure that the
%side faces the bottom
of the case.
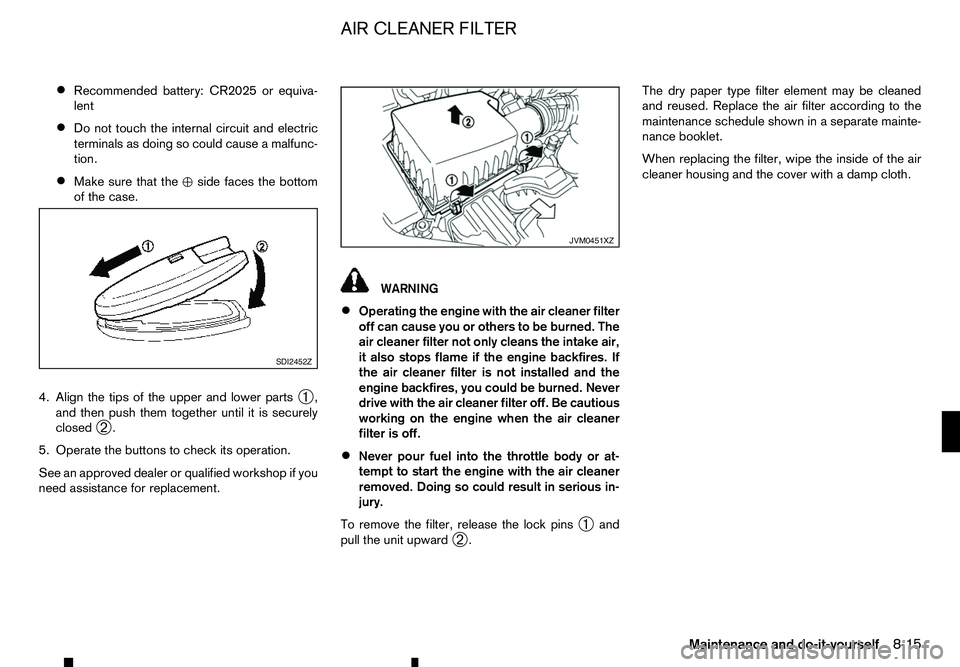
4. Align the tips of the upper and lower parts ➀,
and then push them together until it is securely
closed ➁.
5. Operate the buttons to check its operation.
See an approved dealer or qualified workshop if you
need assistance for replacement. WARNING
• Operating the engine with the air cleaner filter
off can cause you or others to be burned. The
air cleaner filter not only cleans the intake air,
it also stops flame if the engine backfires. If
the air cleaner filter is not installed and the engine backfires, you could be burned. Never
drive with the air cleaner filter off. Be cautious
working on the engine when the air cleaner
filter is off.
• Never pour fuel into the throttle body or at-
tempt to start the engine with the air cleaner
removed. Doing so could result in serious in-
jury.
To remove the filter, release the lock pins ➀and
pull the unit upward ➁. The dry paper type filter element may be cleaned
and reused. Replace the air filter according to the
maintenance schedule shown in
aseparate mainte-
nance booklet.
When replacing the filter, wipe the inside of the air
cleaner housing and the cover with adamp cloth. SDI2452Z JVM0451XZ
AIR CLEANER FILTER
Maintenance and do-it-yourself8-15
Page 330 of 340
Starting
–J
ump starting ................................................................. 6-10
–P ush starting ................................................................. 6-12
–W ithout Remote Control Key ......................................... 5-18
Steering
–P hone operating buttons ................................................ 4-64
–P ower steering system .................................................. 5-49
–S teering wheel switches for phone control ..................... 4-64
Steering wheel .................................................................... 3-23
–A djustment .................................................................... 3-23
–S witches —Audio control ............................................. 4-58
–S witches —Hands-free telephone control ............ 4-59, 4-65
Stop/Start System ............................................................... 5-23
–D isplay ........................................................................V
.. 5-24
–O FF switch ................................................................... 5-25
Storage ........................................................................V
....... 2-39
–C ard holder ................................................................... 2-41
–C onsole box .................................................................. 2-39
–C onsole side pockets .................................................... 2-40
–C up holders .................................................................. 2-40
–G love box ...................................................................... 2-39
–R oof rail ........................................................................V
2-41
–S unglasses holder ......................................................... 2-40
Sun visors ........................................................................V
... 2-41
–C ard holder ................................................................... 2-41
Sunroof ........................................................................V
....... 2-42
–O peration ...................................................................... 2-42
Sunshade ........................................................................V
.... 2-42
Supplemental Restraint System (SRS) ................................. 1-29
–O verview ........................................................................V
. 0-2
–R epair and replacement procedure ................................ 1-40
Switches
–D efogger ....................................................................... 2-34
–E lectronic Stability Programme (ESP) OFF switch ......... 5-35
–F og lights ...................................................................... 2-33
–H azard indicator flasher switch ........................................ 6-2
–H eadlight cleaner .......................................................... 2-35 –H
ill descent control ........................................................ 5-38
–I gnition switch ............................................................... 5-14
–I nterior lights ................................................................. 2-43
–P arking sensor system ................................................... 5-47
–S eat adjustment .............................................................. 1-3
–S eat heating .................................................................... 1-5
–S teering-wheel —Audio ................................................ 4-58
–W iper and washer ......................................................... 2-34
T Tailgate ........................................................................V
....... 3-20
Theft warning system .......................................................... 3-15
Tools ........................................................................V
............. 6-2
Touchscreen Navigation ...................................................... 4-57
Towing
–P recautions ................................................................... 6-13
–R ecommendations ......................................................... 6-13
–R ecommended towing for four-wheel drive (4WD)
models ........................................................................V
.. 6-15
–R ecommended towing for two-wheel drive (2WD)
models ........................................................................V
.. 6-13
–T railer ........................................................................V
.... 5-48
–Y our vehicle .................................................................. 6-13
Trailer
–B rakes ........................................................................V
.. 5-48
–P recautions ................................................................... 5-48
–S afety chains ................................................................. 5-48
–T owing ........................................................................V
.. 5-48
–T railer detection ............................................................. 5-48
–T yre pressure ................................................................ 5-48
Transferring registration to another country ............................ 9-7
Transmission
–A utomatic transmission fluid (ATF) ................................... 8-8
Transmitter
–R adio ........................................................................V
...... 9-8
10-8 Index