RENAULT ESPACE 2012 J81 / 4.G Manual PDF
Manufacturer: RENAULT, Model Year: 2012, Model line: ESPACE, Model: RENAULT ESPACE 2012 J81 / 4.GPages: 267, PDF Size: 8.95 MB
Page 71 of 267
rear view mirrors ................................... (up to the end of the DU)
1.65
ENG_UD1768_1
Rétroviseurs (X81 - Renault)
ENG_NU_932-3_X81ph3_Renault_1
rear VIeW MIrrOrs
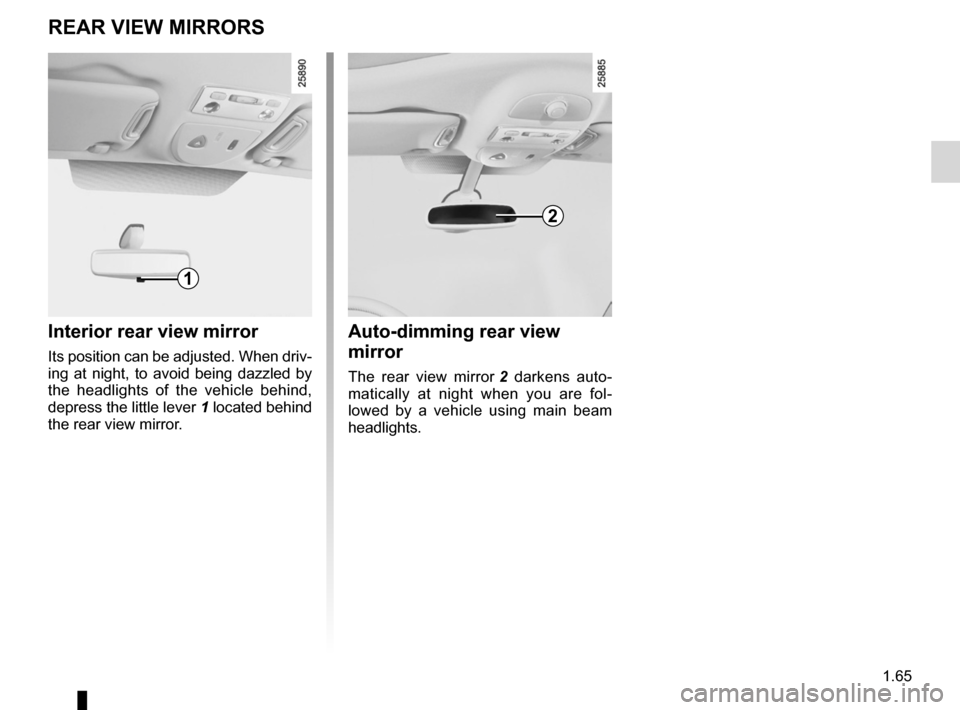
Interior rear view mirror
Its position can be adjusted. When driv-
ing at night, to avoid being dazzled by
the headlights of the vehicle behind,
depress the little lever 1 located behind
the rear view mirror.
auto-dimming rear view
mirror
The rear view mirror 2 darkens auto -
matically at night when you are fol -
lowed by a vehicle using main beam
headlights.
1
2
Page 72 of 267
indicators .............................................. (up to the end of the DU)
indicators: direction indicators .......................... (up to the end of the DU)
lights: direction indicators .......................... (up to the end of the DU)
hazard warning lights signal ................. (up to the end of the DU)
signals and lights .................................. (up to the end of the DU)
hazard warning lights signal ................. (up to the end of the DU)
1.66
ENG_UD20352_1
Avertisseurs sonores et lumineux (X81 - J81 - Renault)
ENG_NU_932-3_X81ph3_Renault_1
Audible and visual signals
aUdIBLe and VIsUaL sIGnaLs
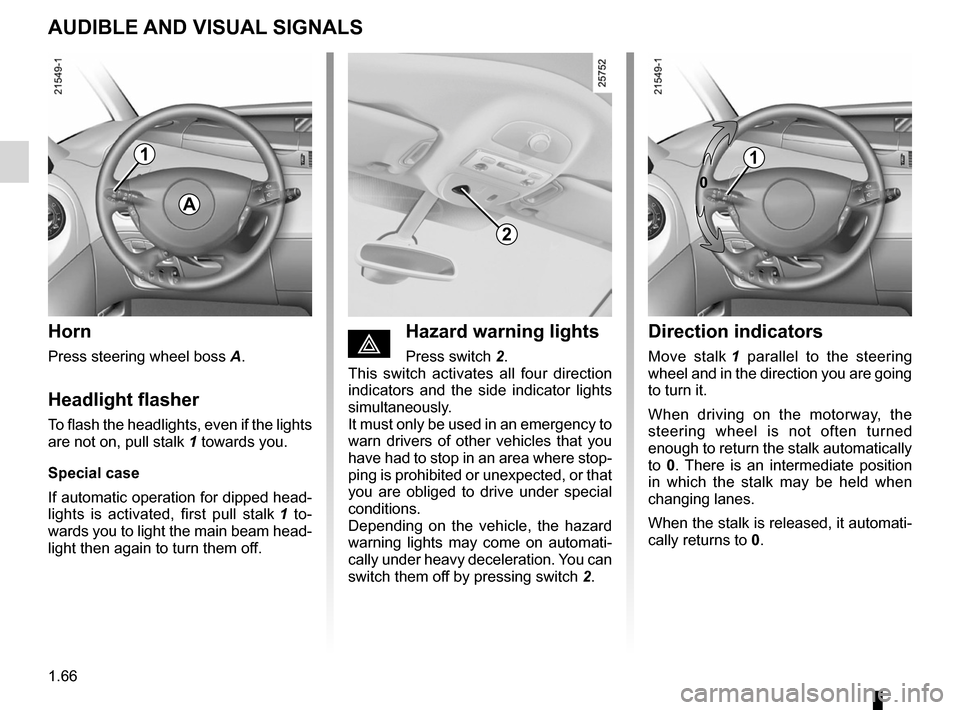
Horn
Press steering wheel boss A.
Headlight flasher
To flash the headlights, even if the lights
are not on, pull stalk 1 towards you.
special case
If automatic operation for dipped head -
lights is activated, first pull stalk 1 to -
wards you to light the main beam head -
light then again to turn them off.
éHazard warning lights
Press switch 2.
This switch activates all four direction
indicators and the side indicator lights
simultaneously.
It must only be used in an emergency to
warn drivers of other vehicles that you
have had to stop in an area where stop-
ping is prohibited or unexpected, or that
you are obliged to drive under special
conditions.
Depending on the vehicle, the hazard
warning lights may come on automati -
cally under heavy deceleration. You can
switch them off by pressing switch 2.
direction indicators
Move stalk 1 parallel to the steering
wheel and in the direction you are going
to turn it.
When driving on the motorway, the
steering wheel is not often turned
enough to return the stalk automatically
to 0. There is an intermediate position
in which the stalk may be held when
changing lanes.
When the stalk is released, it automati-
cally returns to 0.
a
1
2
0
1
Page 73 of 267

lights:dipped beam headlights ................................... (current page)
lights: side lights ......................................................... (current page)
1.67
ENG_UD20353_1
Eclairage et signalisation extérieure (X81 - J81 - Renault)
ENG_NU_932-3_X81ph3_Renault_1
Lighting and exterior signals
eXTerIOr LIGHTInG and sIGnaLs (1/3)
kdipped beam
headlights
automatic operation
With the engine running, the dipped
beam headlights are switched on or off
automatically depending on the level of
ambient light, without the need to oper-
ate stalk 1 (position 0).
This function can be deactivated or re-
activated.
– To deactivate it, with the ignition
on and engine switched off , turn
stalk 1 twice consecutively from po -
sition 0 to side lights. This action is
confirmed by an audible signal.
– To activate it, with the ignition
switched on and engine running or
off, turn stalk 1 twice consecutively
from position 0 to side lights. This
action is confirmed by an audible
signal.
– To select the main beam headlights,
pull stalk 1 towards you. To return to
the dipped beam headlight position,
pull the stalk towards you again.
– The lights go out when the engine
is stopped, when the driver’s door is
opened or when the vehicle is locked
with the RENAULT card.
Manual operation
Turn the end of stalk 1 until the symbol
is opposite mark 3.
An indicator light lights up on the instru-
ment panel in all cases.
daytime running lights
The daytime running lights come on
when the engine is started if stalk 1 is
in position 0.
If the dipped beam headlights oper -
ate automatically, the daytime running
lights only come on if the side lights are
off
1
2
1
3
uside lights
Turn the end of stalk 1 until the
symbol is opposite mark 3.
The instrument panel lights up, the
brightness can be adjusted by using
control knob 2.
Page 74 of 267
warning buzzer ...................................................... (current page)
lights: fog lights .......................................................... (current page)
lights: main beam headlights ...................................... (current page)
1.68
ENG_UD20353_1
Eclairage et signalisation extérieure (X81 - J81 - Renault)
ENG_NU_932-3_X81ph3_Renault_1
Jaune NoirNoir texte
eXTerIOr LIGHTInG and sIGnaLs (2/3)
áMain beam headlights
With the dipped beam head -
lights lit, pull the switch stalk towards
you.
When the main beam headlights are
lit, an indicator light on the instrument
panel comes on.
To return to the dipped beam headlight
position, pull the stalk towards you.
eswitching off the lights
Return stalk 1 to its original po-
sition.
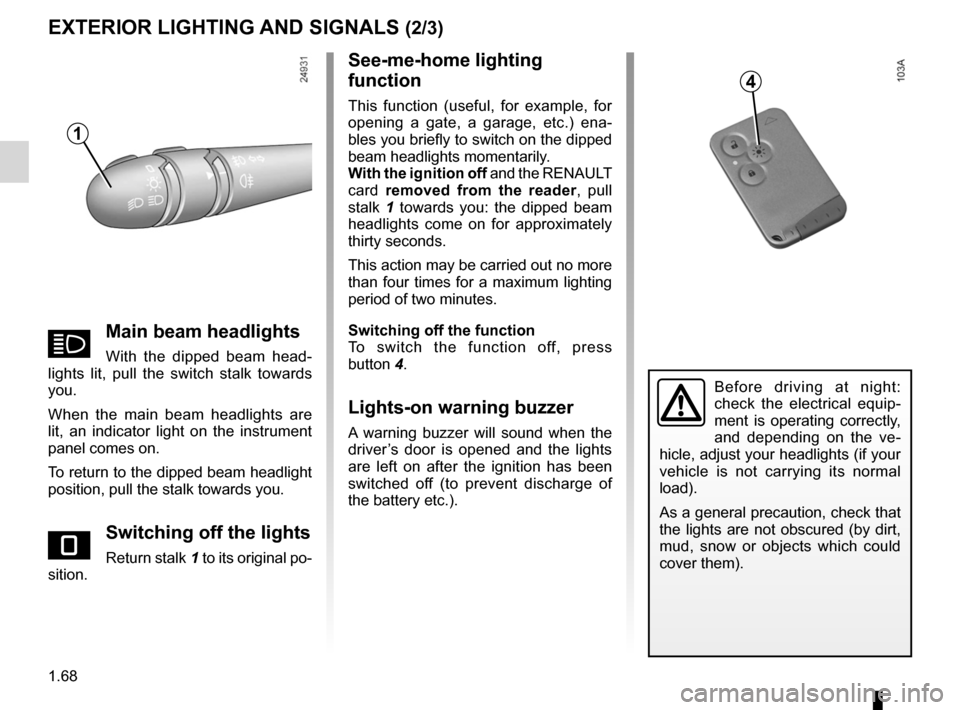
see-me-home lighting
function
This function (useful, for example, for
opening a gate, a garage, etc.) ena -
bles you briefly to switch on the dipped
beam headlights momentarily.
With the ignition off and the RENAULT
card removed from the reader , pull
stalk 1 towards you: the dipped beam
headlights come on for approximately
thirty seconds.
This action may be carried out no more
than four times for a maximum lighting
period of two minutes.
switching off the function
To switch the function off, press
button 4.
Lights-on warning buzzer
A warning buzzer will sound when the
driver’s door is opened and the lights
are left on after the ignition has been
switched off (to prevent discharge of
the battery etc.).
Before driving at night:
check the electrical equip -
ment is operating correctly,
and depending on the ve -
hicle, adjust your headlights (if your
vehicle is not carrying its normal
load).
As a general precaution, check that
the lights are not obscured (by dirt,
mud, snow or objects which could
cover them).
1
4
Page 75 of 267
fog lights ................................................................ (current page)
JauneNoirNoir texte
1.69
ENG_UD20353_1
Eclairage et signalisation extérieure (X81 - J81 - Renault)
ENG_NU_932-3_X81ph3_Renault_1
eXTerIOr LIGHTInG and sIGnaLs (3/3)
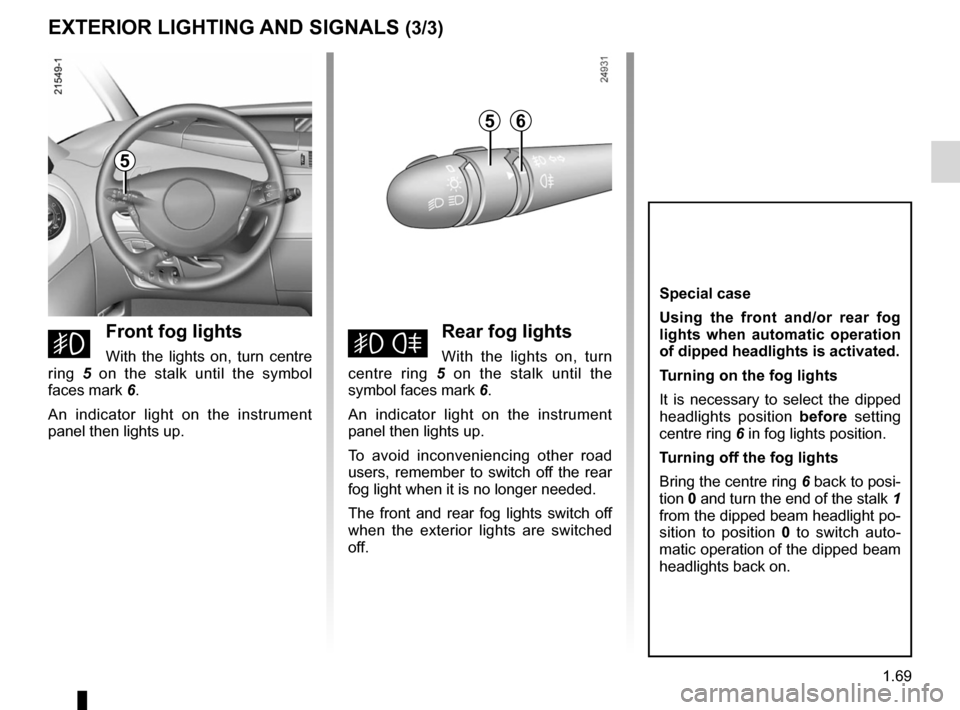
gfront fog lights
With the lights on, turn centre
ring 5 on the stalk until the symbol
faces mark 6.
An indicator light on the instrument
panel then lights up.hrear fog lights
With the lights on, turn
centre ring 5 on the stalk until the
symbol faces mark 6.
An indicator light on the instrument
panel then lights up.
To avoid inconveniencing other road
users, remember to switch off the rear
fog light when it is no longer needed.
The front and rear fog lights switch off
when the exterior lights are switched
off.
special case
Using the front and/or rear fog
lights when automatic operation
of dipped headlights is activated.
Turning on the fog lights
It is necessary to select the dipped
headlights position before setting
centre ring 6 in fog lights position.
Turning off the fog lights
Bring the centre ring 6 back to posi-
tion 0 and turn the end of the stalk 1
from the dipped beam headlight po-
sition to position 0 to switch auto -
matic operation of the dipped beam
headlights back on.
5
56
Page 76 of 267
lights:adjusting ......................................... (up to the end of the DU)
lights adjustment ...................................... (up to the end of the DU)
headlight beam adjustment .................. (up to the end of the DU)
signals and lights .................................. (up to the end of the DU)
1.70
ENG_UD1771_1
Réglage électrique de la hauteur des faisceaux (X81 - Renault)
ENG_NU_932-3_X81ph3_Renault_1
Réglage des projecteurs
eLecTrIc BeaM HeIGHT adJUsTMenT
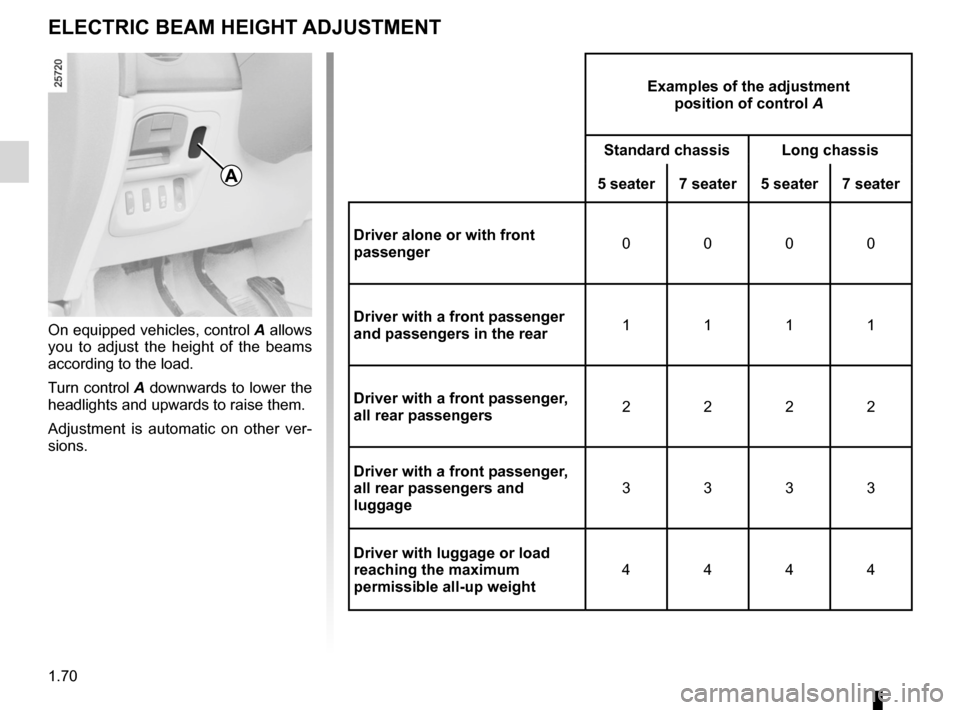
On equipped vehicles, control A allows
you to adjust the height of the beams
according to the load.
Turn control A downwards to lower the
headlights and upwards to raise them.
Adjustment is automatic on other ver -
sions.
examples of the adjustment position of control A
standard chassis Long chassis
5 seater 7 seater5 seater7 seater
driver alone or with front
passenger 0
000
driver with a front passenger
and passengers in the rear 1
111
driver with a front passenger,
all rear passengers 2
222
driver with a front passenger,
all rear passengers and
luggage 3
333
driver with luggage or load
reaching the maximum
permissible all-up weight 4
444
a
Page 77 of 267
wipers ................................................... (up to the end of the DU)
windscreen washer ............................... (up to the end of the DU)
1.71
ENG_UD20355_1
Essuie-vitre/lave-vitre avant (X81 - J81 - Renault)
ENG_NU_932-3_X81ph3_Renault_1
Wash/Wipe
WIndscreen W asH/WIPe (1/2)
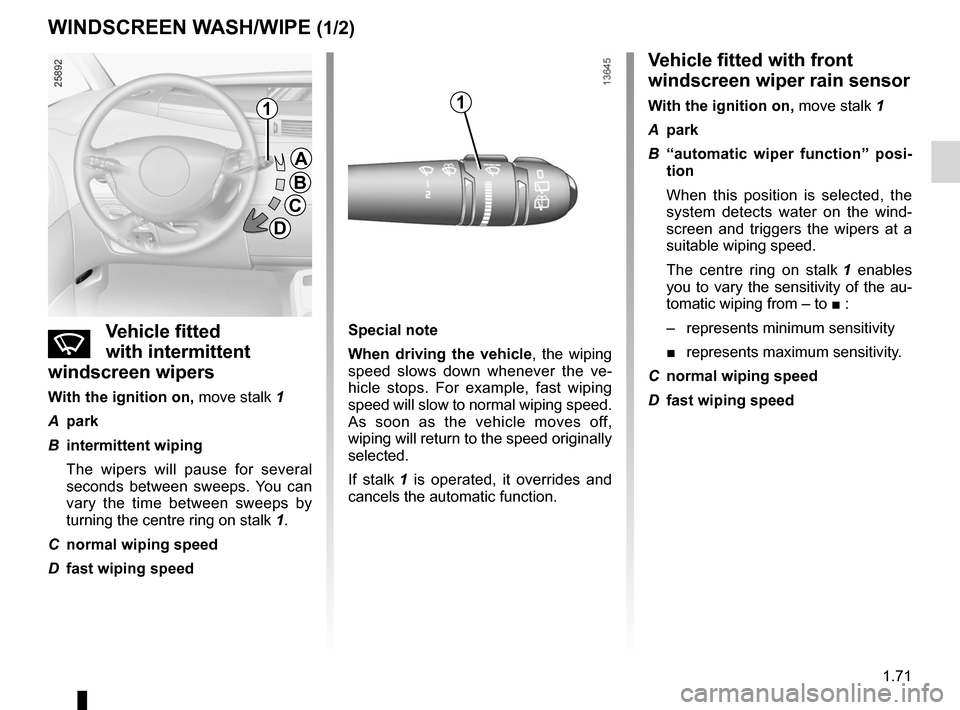
nVehicle fitted
with intermittent
windscreen wipers
With the ignition on, move stalk 1
A park
B intermittent wiping
The wipers will pause for several
seconds between sweeps. You can
vary the time between sweeps by
turning the centre ring on stalk 1.
C normal wiping speed
D fast wiping speed
Vehicle fitted with front
windscreen wiper rain sensor
With the ignition on, move stalk 1
A park
B “automatic wiper function” posi -
tion
When this position is selected, the
system detects water on the wind -
screen and triggers the wipers at a
suitable wiping speed.
The centre ring on stalk 1 enables
you to vary the sensitivity of the au-
tomatic wiping from – to ■ :
– represents minimum sensitivity
■ represents maximum sensitivity.
C normal wiping speed
D fast wiping speed1
a
B
c
d
special note
When driving the vehicle , the wiping
speed slows down whenever the ve -
hicle stops. For example, fast wiping
speed will slow to normal wiping speed.
As soon as the vehicle moves off,
wiping will return to the speed originally
selected.
If stalk 1 is operated, it overrides and
cancels the automatic function.
1
Page 78 of 267
1.72
ENG_UD20355_1
Essuie-vitre/lave-vitre avant (X81 - J81 - Renault)
ENG_NU_932-3_X81ph3_Renault_1
WIndscreen W asH/WIPe (2/2)
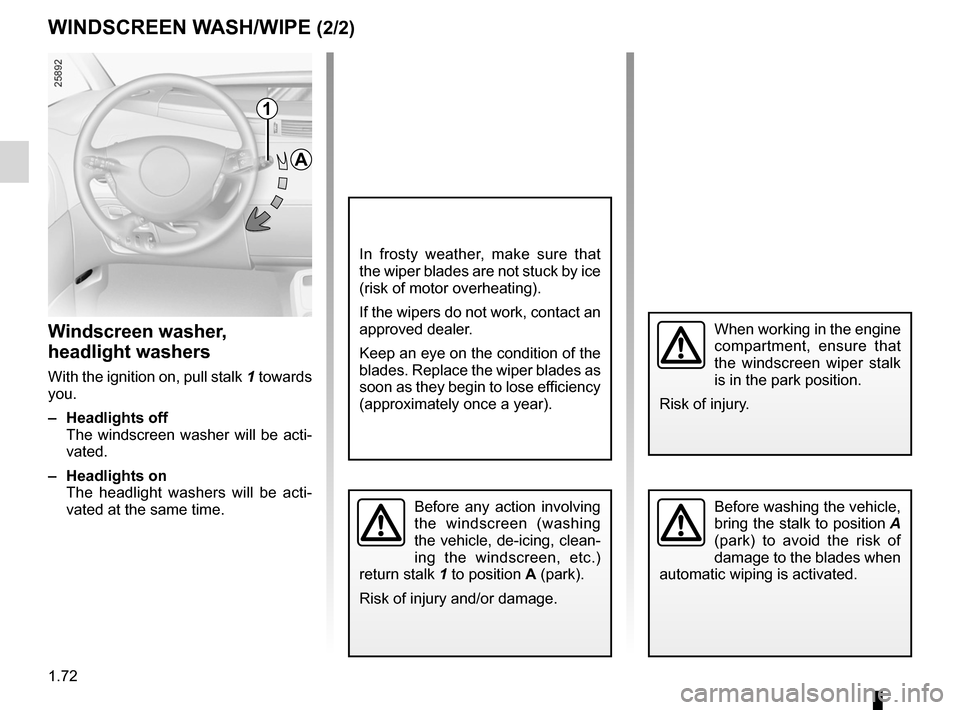
Windscreen washer,
headlight washers
With the ignition on, pull stalk 1 towards
you.
– Headlights off
The windscreen washer will be acti-
vated.
– Headlights on
The headlight washers will be acti -
vated at the same time.
1
a
Before washing the vehicle,
bring the stalk to position A
(park) to avoid the risk of
damage to the blades when
automatic wiping is activated.Before any action involving
the windscreen (washing
the vehicle, de-icing, clean -
ing the windscreen, etc.)
return stalk 1 to position a (park).
Risk of injury and/or damage.
When working in the engine
compartment, ensure that
the windscreen wiper stalk
is in the park position.
Risk of injury.
In frosty weather, make sure that
the wiper blades are not stuck by ice
(risk of motor overheating).
If the wipers do not work, contact an
approved dealer.
Keep an eye on the condition of the
blades. Replace the wiper blades as
soon as they begin to lose efficiency
(approximately once a year).
Page 79 of 267
wipers ................................................... (up to the end of the DU)
windscreen washer ............................... (up to the end of the DU)
1.73
ENG_UD20356_1
Essuie-vitre/lave-vitre arrière (X81 - J81 - Renault)
ENG_NU_932-3_X81ph3_Renault_1
rear screen W asH/WIPe
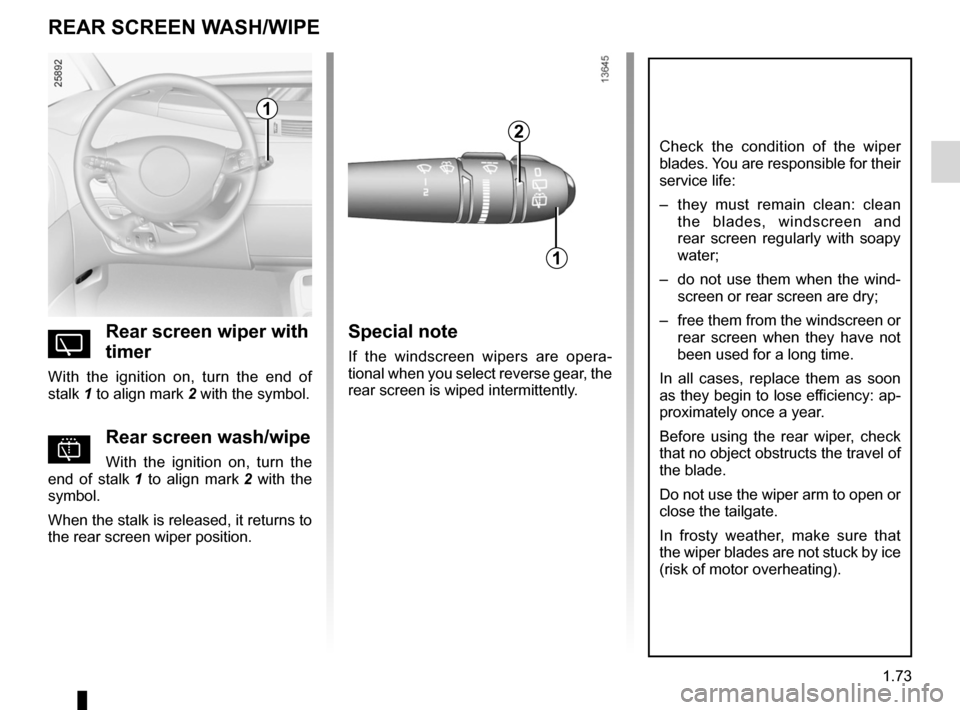
Yrear screen wiper with
timer
With the ignition on, turn the end of
stalk 1 to align mark 2 with the symbol.
prear screen wash/wipe
With the ignition on, turn the
end of stalk 1 to align mark 2 with the
symbol.
When the stalk is released, it returns to
the rear screen wiper position.
special note
If the windscreen wipers are opera -
tional when you select reverse gear, the
rear screen is wiped intermittently.
1
2
1
Check the condition of the wiper
blades. You are responsible for their
service life:
– they must remain clean: clean
the blades, windscreen and
rear screen regularly with soapy
water;
– do not use them when the wind-
screen or rear screen are dry;
– free them from the windscreen or
rear screen when they have not
been used for a long time.
In all cases, replace them as soon
as they begin to lose efficiency: ap-
proximately once a year.
Before using the rear wiper, check
that no object obstructs the travel of
the blade.
Do not use the wiper arm to open or
close the tailgate.
In frosty weather, make sure that
the wiper blades are not stuck by ice
(risk of motor overheating).
Page 80 of 267
fuel tank capacity .................................. (up to the end of the DU)
fuel grade ............................................... (up to the end of the DU)
fuel filling ................................................ (up to the end of the DU)
fuel filler cap ......................................... (up to the end of the DU)
fuel tank capacity ........................................... (up to the end of the DU)
1.74
ENG_UD24089_2
Réservoir à carburant (X81 - J81 - Renault)
ENG_NU_932-3_X81ph3_Renault_1
Jaune NoirNoir texte
Fuel tank (filling with fuel)
fUeL T anK (1/3)
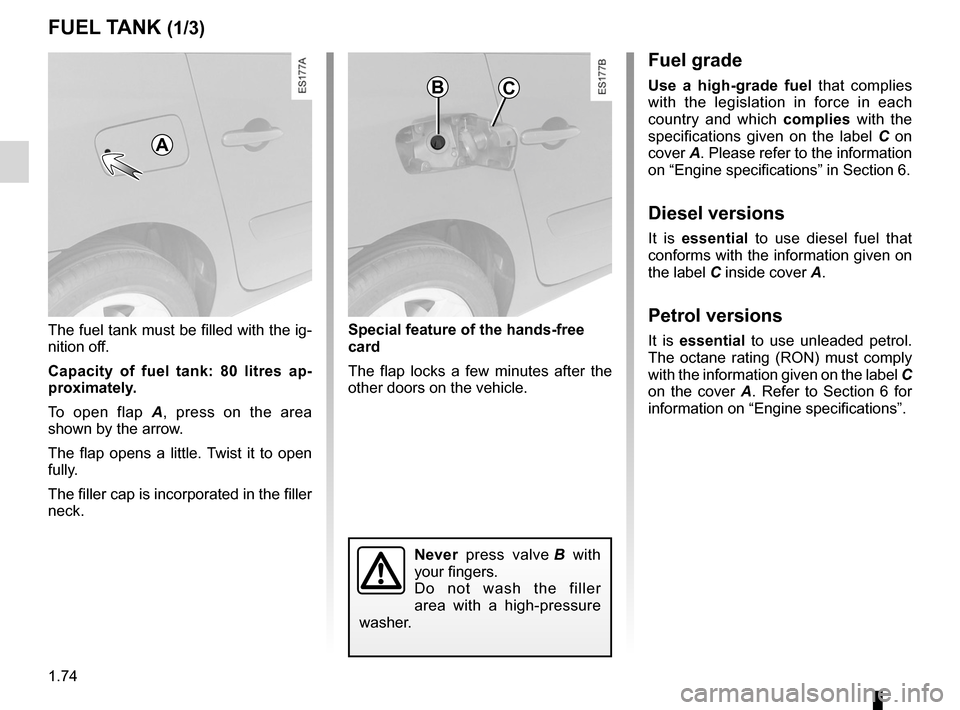
The fuel tank must be filled with the ig-
nition off.
capacity of fuel tank: 80 litres ap -
proximately.
To open flap A , press on the area
shown by the arrow.
The flap opens a little. Twist it to open
fully.
The filler cap is incorporated in the filler
neck.
a
B
n ever press valve B with
your fingers.
Do not wash the filler
area with a high-pressure
washer.
fuel grade
Use a high-grade fuel that complies
with the legislation in force in each
country and which complies with the
specifications given on the label C on
cover A. Please refer to the information
on “Engine specifications” in Section 6.
diesel versions
It is essential to use diesel fuel that
conforms with the information given on
the label C inside cover A.
Petrol versions
It is essential to use unleaded petrol.
The octane rating (RON) must comply
with the information given on the label C
on the cover A . Refer to Section 6 for
information on “Engine specifications”.
special feature of the hands-free
card
The flap locks a few minutes after the
other doors on the vehicle.
c