RENAULT KANGOO ZERO EMISSION 2012 X61 / 2.G Owners Manual
Manufacturer: RENAULT, Model Year: 2012, Model line: KANGOO ZERO EMISSION, Model: RENAULT KANGOO ZERO EMISSION 2012 X61 / 2.GPages: 213, PDF Size: 6.08 MB
Page 111 of 213
2.20
ENG_UD25285_4
Aide au parking (X61 - F61 - Renault)
ENG_NU_911-4_F61e_Renault_2
Prolonged deactivation of the
system
You can deactivate the system perma-
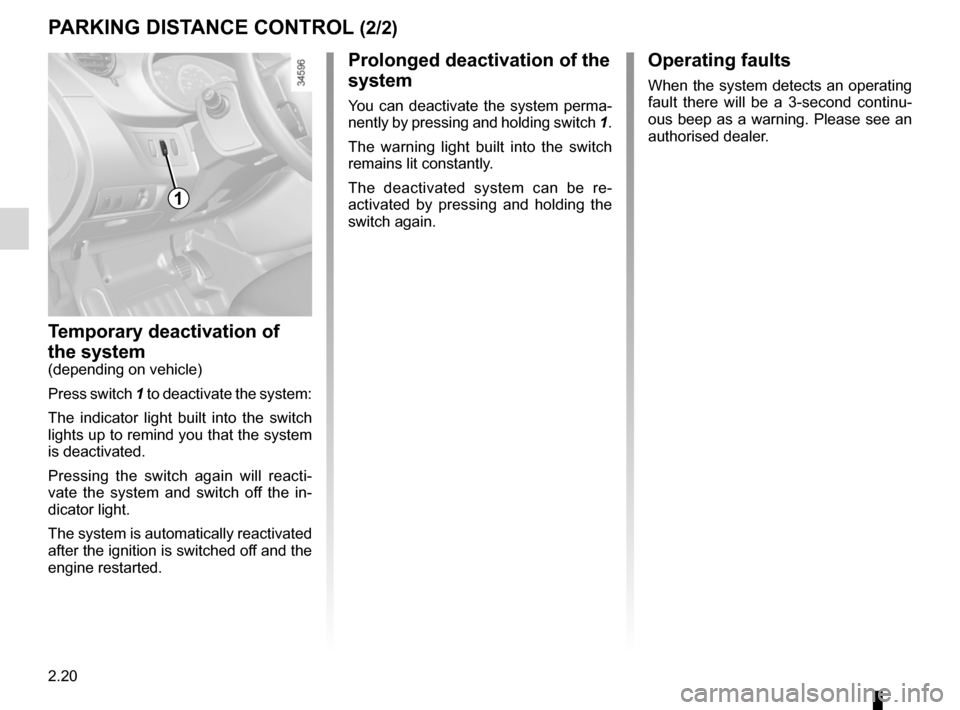
nently by pressing and holding switch 1.
The warning light built into the switch
remains lit constantly.
The deactivated system can be re -
activated by pressing and holding the
switch again.
t emporary deactivation of
the system
(depending on vehicle)
Press switch 1 to deactivate the system:
The indicator light built into the switch
lights up to remind you that the system
is deactivated.
Pressing the switch again will reacti -
vate the system and switch off the in -
dicator light.
The system is automatically reactivated
after the ignition is switched off and the
engine restarted.
P arking DiStancE cOntrOl (2/2)
1
Operating faults
When the system detects an operating
fault there will be a 3-second continu -
ous beep as a warning. Please see an
authorised dealer.
Page 112 of 213
3.1
ENG_UD29094_4
Sommaire 3 (X61 - F61 - Renault)
ENG_NU_911-4_F61e_Renault_3
Section 3: Your comfort
Air vents: air outlets . . . . . . . . . . . . . . . . . . . . . . . . . . . . . . . . . . . . . . . . . . . . . . . . . . . . . . . . . . . . . . 3.2
Air conditioning, heating . . . . . . . . . . . . . . . . . . . . . . . . . . . . . . . . . . . . . . . . . . . . . . . . . . . . . . . . . . 3.4
programming . . . . . . . . . . . . . . . . . . . . . . . . . . . . . . . . . . . . . . . . . . . . . . . . . . . . . . . . . . . . . 3.7
Additional heating . . . . . . . . . . . . . . . . . . . . . . . . . . . . . . . . . . . . . . . . . . . . . . . . . . . . . . . . . . . . . . . 3.9
Air conditioning: information and advice on use . . . . . . . . . . . . . . . . . . . . . . . . . . . . . . . . . . . . . . . . 3.11
Interior lighting . . . . . . . . . . . . . . . . . . . . . . . . . . . . . . . . . . . . . . . . . . . . . . . . . . . . . . . . . . . . . . . . . . 3.12
Sun visor/Mirror . . . . . . . . . . . . . . . . . . . . . . . . . . . . . . . . . . . . . . . . . . . . . . . . . . . . . . . . . . . . . . . . . 3.14
Electric windows . . . . . . . . . . . . . . . . . . . . . . . . . . . . . . . . . . . . . . . . . . . . . . . . . . . . . . . . . . . . . . . . 3.15
Half-opening window . . . . . . . . . . . . . . . . . . . . . . . . . . . . . . . . . . . . . . . . . . . . . . . . . . . . . . . . . . . . . 3.16
Ashtrays. . . . . . . . . . . . . . . . . . . . . . . . . . . . . . . . . . . . . . . . . . . . . . . . . . . . . . . . . . . . . . . . . . . . . . . 3.17
Passenger compartment storage space and fittings . . . . . . . . . . . . . . . . . . . . . . . . . . . . . . . . . . . . . 3.18
Rear bench seat . . . . . . . . . . . . . . . . . . . . . . . . . . . . . . . . . . . . . . . . . . . . . . . . . . . . . . . . . . . . . . . . 3.21
Transporting objects in the boot . . . . . . . . . . . . . . . . . . . . . . . . . . . . . . . . . . . . . . . . . . . . . . . . . . . . 3.24
Towbar . . . . . . . . . . . . . . . . . . . . . . . . . . . . . . . . . . . . . . . . . . . . . . . . . . . . . . . . . . . . . . . . . . . . . . . . 3.25
Luggage net . . . . . . . . . . . . . . . . . . . . . . . . . . . . . . . . . . . . . . . . . . . . . . . . . . . . . . . . . . . . . . . . . . . . 3.26
Page 113 of 213

air vents ................................................ (up to the end of the DU)
rear screen demisting ......................................................... (current page)
ventilation ............................................. (up to the end of the DU)
3.2
ENG_UD21028_2
Aérateurs (sorties d’air) (X61 - F61 - Renault)
ENG_NU_911-4_F61e_Renault_3
Jaune NoirNoir texte
Air vents: air outlets
Air vents: air outlets (1/2)
13412
556
2
1 Demister outlets, side windows.
2 Side air vents.
3 Demisting outlets for the windscreen.
4 Centre air vents.
5 Footwell vents.
6 Control panel
Page 114 of 213
JauneNoirNoir texte
3.3
ENG_UD21028_2
Aérateurs (sorties d’air) (X61 - F61 - Renault)
ENG_NU_911-4_F61e_Renault_3
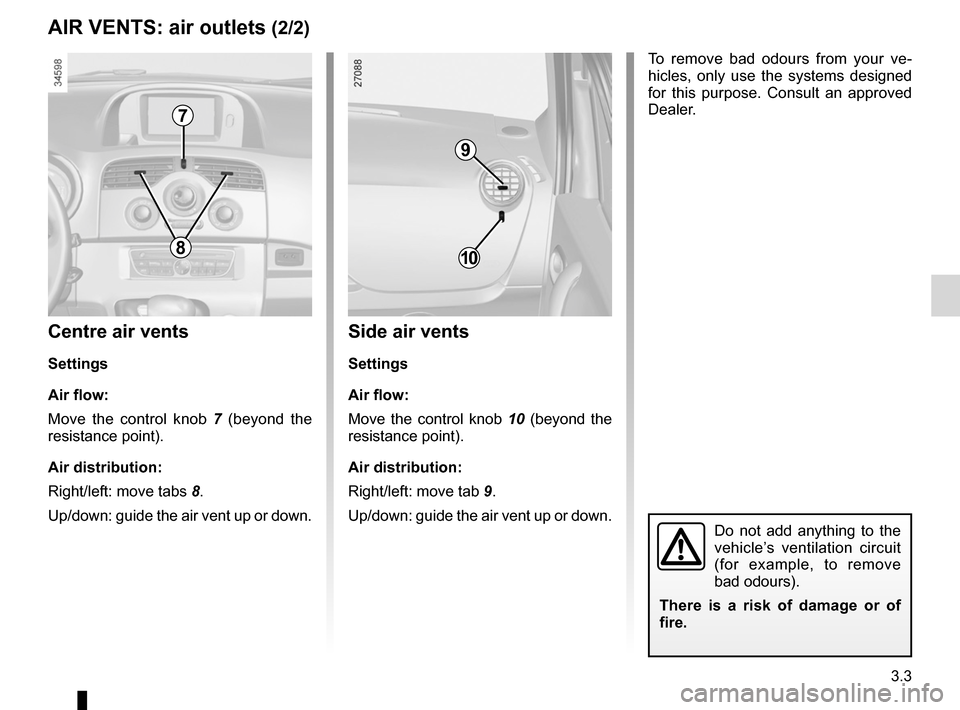
Centre air vents
settings
Air flow:
Move the control knob 7 (beyond the
resistance point).
Air distribution:
Right/left: move tabs 8.
Up/down: guide the air vent up or down.
Air vents: air outlets (2/2)
9
10
7
8
side air vents
settings
Air flow:
Move the control knob 10 (beyond the
resistance point).
Air distribution:
Right/left: move tab 9.
Up/down: guide the air vent up or down.
Do not add anything to the
vehicle’s ventilation circuit
(for example, to remove
bad odours).
t here is a risk of damage or of
fire.
To remove bad odours from your ve -
hicles, only use the systems designed
for this purpose. Consult an approved
Dealer.
Page 115 of 213
air conditioning ..................................... (up to the end of the DU)
heating system ..................................... (up to the end of the DU)
air conditioning ..................................... (up to the end of the DU)
ventilation ............................................. (up to the end of the DU)
3.4
ENG_UD25325_3
Chauffage, climatisation (X61 électrique - Renault)
ENG_NU_911-4_F61e_Renault_3
Jaune NoirNoir texte
Air conditioning, heating
switching air conditioning on
or off
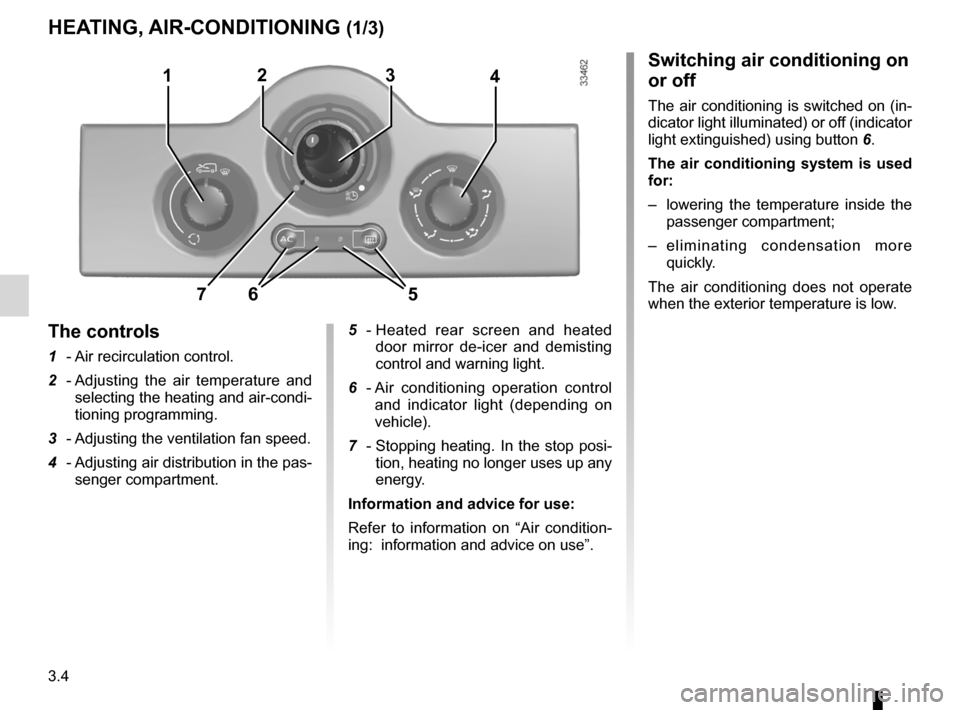
The air conditioning is switched on (in-
dicator light illuminated) or off (indicator
light extinguished) using button 6.
the air conditioning system is used
for:
– lowering the temperature inside the
passenger compartment;
– e l i m i n a t i n g c o n d e n s a t i o n m o r e
quickly.
The air conditioning does not operate
when the exterior temperature is low.
5 - Heated rear screen and heated
door mirror de-icer and demisting
control and warning light.
6 - Air conditioning operation control
and indicator light (depending on
vehicle).
7 - Stopping heating. In the stop posi-
tion, heating no longer uses up any
energy.
information and advice for use:
Refer to information on “Air condition -
ing: information and advice on use”.
the controls
1 - Air recirculation control.
2 -
Adjusting the air temperature and
selecting the heating and air-condi-
tioning programming.
3 - Adjusting the ventilation fan speed.
4 -
Adjusting air distribution in the pas-
senger compartment.
HeA tinG, Air-ConditioninG (1/3)
1423
657
Page 116 of 213
de-icing .................................................................. (current page)
windscreen de-icing/demisting .............................. (current page)
JauneNoirNoir texte
3.5
ENG_UD25325_3
Chauffage, climatisation (X61 électrique - Renault)
ENG_NU_911-4_F61e_Renault_3
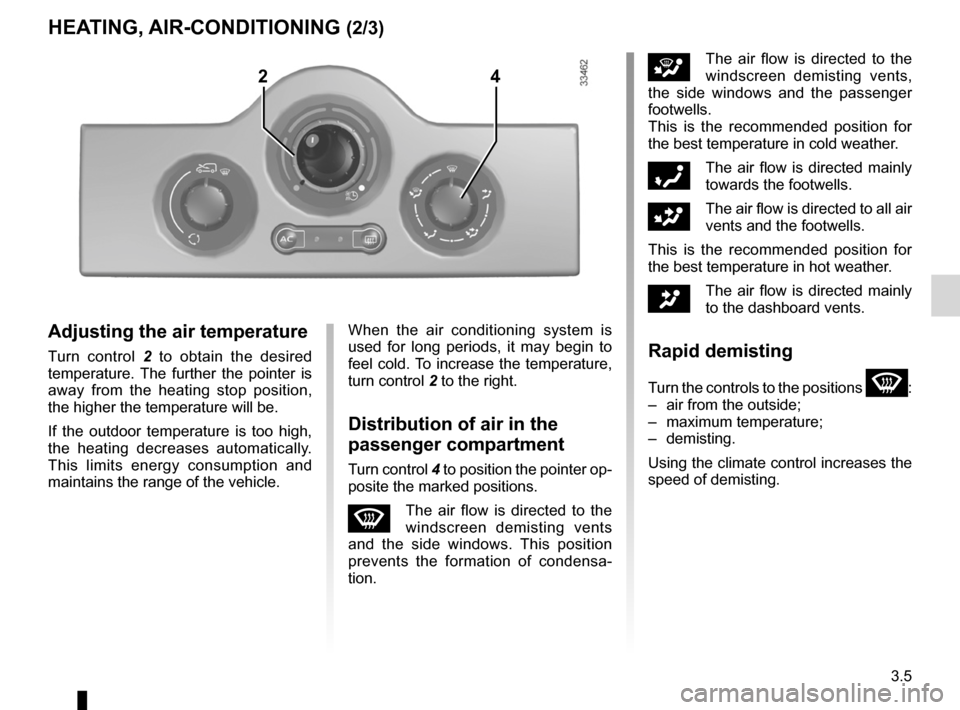
iThe air flow is directed to the
windscreen demisting vents,
the side windows and the passenger
footwells.
This is the recommended position for
the best temperature in cold weather.
óThe air flow is directed mainly
towards the footwells.
GThe air flow is directed to all air
vents and the footwells.
This is the recommended position for
the best temperature in hot weather.
JThe air flow is directed mainly
to the dashboard vents.
rapid demisting
Turn the controls to the positions W:
– air from the outside;
– maximum temperature;
– demisting.
Using the climate control increases the
speed of demisting.
Adjusting the air temperature
Turn control 2 to obtain the desired
temperature. The further the pointer is
away from the heating stop position,
the higher the temperature will be.
If the outdoor temperature is too high,
the heating decreases automatically.
This limits energy consumption and
maintains the range of the vehicle.
HeA tinG, Air-ConditioninG (2/3)
When the air conditioning system is
used for long periods, it may begin to
feel cold. To increase the temperature,
turn control 2 to the right.
distribution of air in the
passenger compartment
Turn control 4 to position the pointer op-
posite the marked positions.
WThe air flow is directed to the
windscreen demisting vents
and the side windows. This position
prevents the formation of condensa -
tion.
24
Page 117 of 213
3.6
ENG_UD25325_3
Chauffage, climatisation (X61 électrique - Renault)
ENG_NU_911-4_F61e_Renault_3
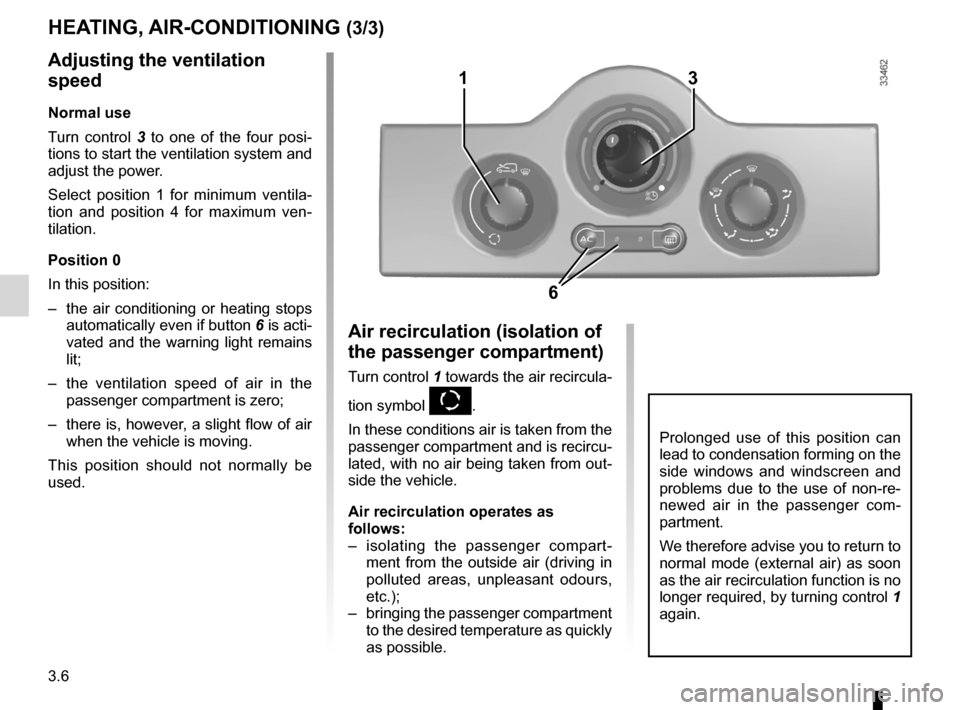
Adjusting the ventilation
speed
normal use
Turn control 3 to one of the four posi -
tions to start the ventilation system and
adjust the power.
Select position 1 for minimum ventila -
tion and position 4 for maximum ven -
tilation.
Position 0
In this position:
– the air conditioning or heating stops
automatically even if button 6 is acti-
vated and the warning light remains
lit;
– the ventilation speed of air in the
passenger compartment is zero;
– there is, however, a slight flow of air
when the vehicle is moving.
This position should not normally be
used.
HeA tinG, Air-ConditioninG (3/3)
Air recirculation (isolation of
the passenger compartment)
Turn control 1 towards the air recircula -
tion symbol
K.
In these conditions air is taken from the
passenger compartment and is recircu-
lated, with no air being taken from out-
side the vehicle.
Air recirculation operates as
follows:
– isolating the passenger compart -
ment from the outside air (driving in
polluted areas, unpleasant odours,
etc.);
– bringing the passenger compartment
to the desired temperature as quickly
as possible.
Prolonged use of this position can
lead to condensation forming on the
side windows and windscreen and
problems due to the use of non-re-
newed air in the passenger com -
partment.
We therefore advise you to return to
normal mode (external air) as soon
as the air recirculation function is no
longer required, by turning control 1
again.
3
6
1
Page 118 of 213

heating system ..................................... (up to the end of the DU)
heating, air conditioning: programming (up to the end of the DU)
ventilation ............................................. (up to the end of the DU)
3.7
ENG_UD23009_2
Chauffage, climatisation : préchambrage (X61 électrique - Renault)
ENG_NU_911-4_F61e_Renault_3
programming
Air ConditioninG/HeA tinG: programming (1/2)
Adjusting the programming
This function enables the electric net -
work (and the not the traction battery)
to be used under certain conditions, in
order to obtain a comfortable tempera-
ture prior to using the vehicle.
It triggers the heating in cold weather
and the fan in warm weather.
1
operating conditions
– the ignition must be switched off;
– the battery charging must be finished
for the function to be triggered;
– the vehicle has to be plugged into
the mains;
and
– control 1 must be position
ṗ.
2
In cold weather (< 0°C), you are rec-
ommended to position control 2 in
air recirculation position. This ena -
bles greater efficiency and lower
energy consumption in the passen-
ger compartment ambient tempera-
ture.
Page 119 of 213
3.8
ENG_UD23009_2
Chauffage, climatisation : préchambrage (X61 électrique - Renault)
ENG_NU_911-4_F61e_Renault_3
Air ConditioninG/HeA tinG: programming (2/2)
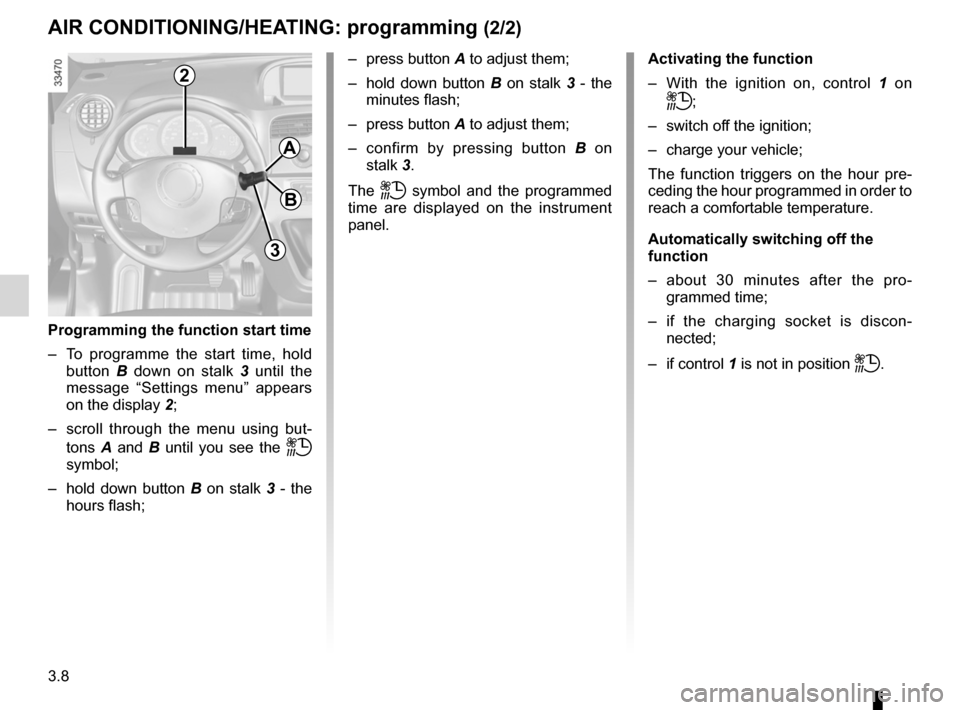
Activating the function
– With the ignition on, control 1 on
ṗ;
– switch off the ignition;
– charge your vehicle;
The function triggers on the hour pre -
ceding the hour programmed in order to
reach a comfortable temperature.
Automatically switching off the
function
– about 30 minutes after the pro -
grammed time;
– if the charging socket is discon -
nected;
– if control 1 is not in position
ṗ.
2
3
A
B
Programming the function start time
– To programme the start time, hold
button B down on stalk 3 until the
message “Settings menu” appears
on the display 2;
– scroll through the menu using but -
tons A and B until you see the
ṗ
symbol;
– hold down button B on stalk 3 - the
hours flash; –
press button A to adjust them;
– hold down button B on stalk 3 - the
minutes flash;
– press button A to adjust them;
– confirm by pressing button B on
stalk 3.
The
ṗ symbol and the programmed
time are displayed on the instrument
panel.
Page 120 of 213
heating system ..................................... (up to the end of the DU)
additional heating ................................. (up to the end of the DU)
3.9
ENG_UD23010_2
Chauffage additionnel (X61 électrique - Renault)
ENG_NU_911-4_F61e_Renault_3
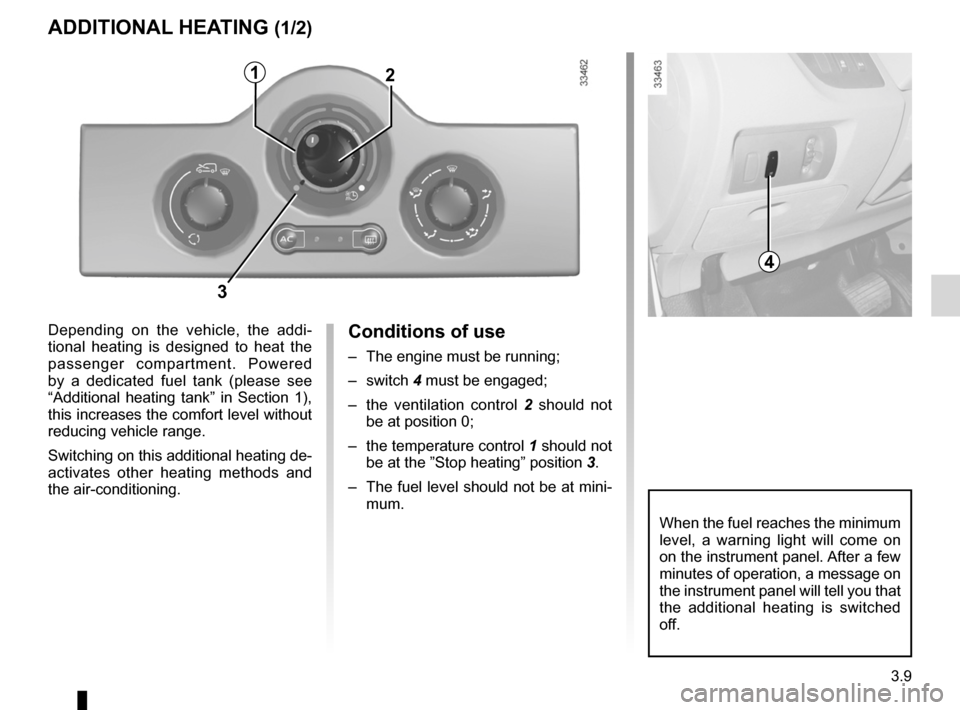
Conditions of use
– The engine must be running;
– switch 4 must be engaged;
– the ventilation control 2 should not
be at position 0;
– the temperature control 1 should not
be at the ”Stop heating” position 3.
– The fuel level should not be at mini-
mum.
Additional heating
AdditionAl HeA tinG (1/2)
Depending on the vehicle, the addi -
tional heating is designed to heat the
passenger compartment. Powered
by a dedicated fuel tank (please see
“Additional heating tank” in Section 1),
this increases the comfort level without
reducing vehicle range.
Switching on this additional heating de-
activates other heating methods and
the air-conditioning.
2
When the fuel reaches the minimum
level, a warning light will come on
on the instrument panel. After a few
minutes of operation, a message on
the instrument panel will tell you that
the additional heating is switched
off.
3
4
1