RENAULT LAGUNA COUPE 2012 X91 / 3.G Owners Manual
Manufacturer: RENAULT, Model Year: 2012, Model line: LAGUNA COUPE, Model: RENAULT LAGUNA COUPE 2012 X91 / 3.GPages: 221, PDF Size: 7.16 MB
Page 141 of 221
transporting objectsin the luggage compartment ........... (up to the end of the DU)
towing rings .......................................... (up to the end of the DU)
towing towing equipment ............................ (up to the end of the DU)
towing equipment fitting ............................................... (up to the end of the DU)
towing a caravan .................................. (up to the end of the DU)
roof bars ............................................... (up to the end of the DU)
3.23
ENG_UD29089_6
Transport d’objets : dans le coffre / attelage (X91 - D91 - Renault)
ENG_NU_939-3_D91_Renault_3
Transporting objects:
in the boot
A
Always position the heavi -
est items directly on the
floor. Use the lashing points
on the floor of the luggage
compartment, if these are fitted to
the vehicle. The luggage should be
loaded in such a way that no items
will be thrown forward and strike the
occupants if the driver has to brake
suddenly. Fasten the rear seat belts,
even if the seats are not occupied.
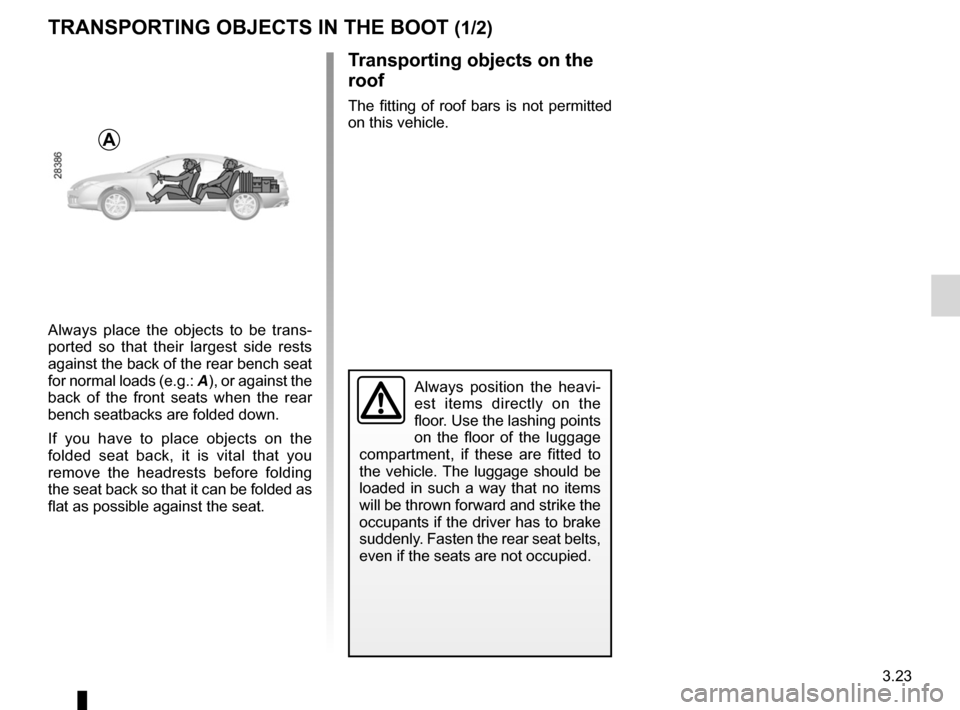
Always place the objects to be trans -
ported so that their largest side rests
against the back of the rear bench seat
for normal loads (e.g.: A), or against the
back of the front seats when the rear
bench seatbacks are folded down.
If you have to place objects on the
folded seat back, it is vital that you
remove the headrests before folding
the seat back so that it can be folded as
flat as possible against the seat.
Transporting objects on the
roof
The fitting of roof bars is not permitted
on this vehicle.
TRANSPoRTINg oBjEcTS IN ThE BooT (1/2)
Page 142 of 221
3.24
ENG_UD29089_6
Transport d’objets : dans le coffre / attelage (X91 - D91 - Renault)
ENG_NU_939-3_D91_Renault_3
towbar
TRANSPoRTINg oBjEcTS IN ThE BooT (2/2)/T oWINg
Permissible nose weight, maxi -
mum permissible towing weight,
braked and unbraked: refer to
the information on “Weights” in
Section 6.
For fitting and conditions of use,
refer to the equipment’s fitting in -
structions.
Please keep these instructions with
the rest of the vehicle documenta -
tion.
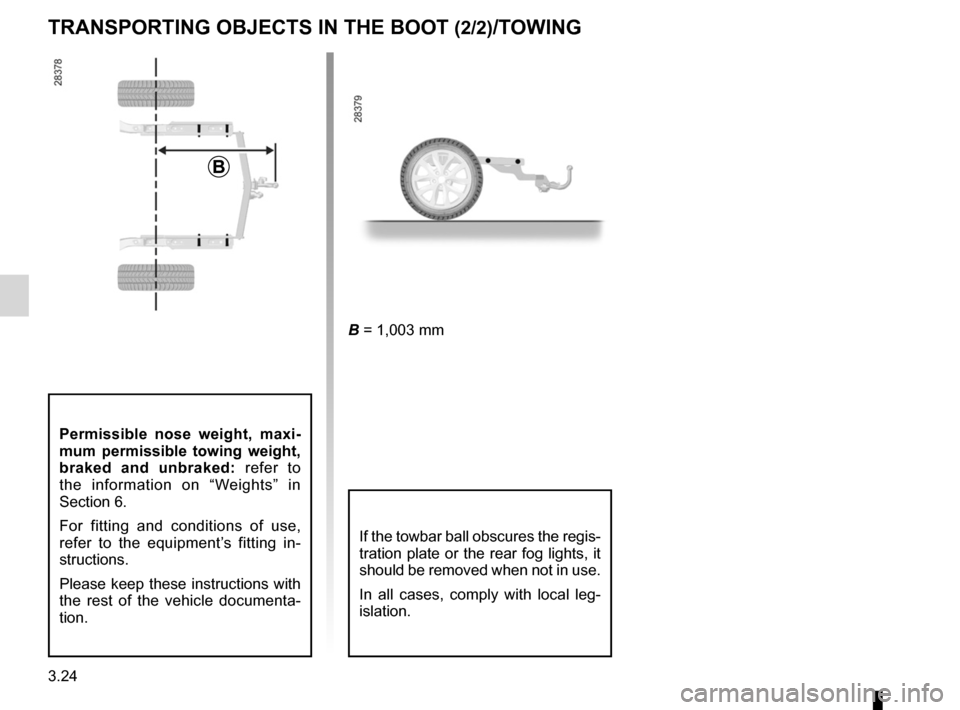
B = 1,003 mm
If the towbar ball obscures the regis-
tration plate or the rear fog lights, it
should be removed when not in use.
In all cases, comply with local leg -
islation.
B
Page 143 of 221
multimedia equipment .......................... (up to the end of the DU)
telephone .............................................. (up to the end of the DU)
navigation system ................................. (up to the end of the DU)
hands-free telephone integrated control
(up to the end of the DU)
navigation ............................................. (up to the end of the DU)
radio...................................................... (up to the end of the DU)
3.25
ENG_UD19990_3
Equipement Multimédia (X91 - B91 - K91 - Renault)
ENG_NU_939-3_D91_Renault_3
Multimedia equipment
Mul TIMEDIA EquIPMENT
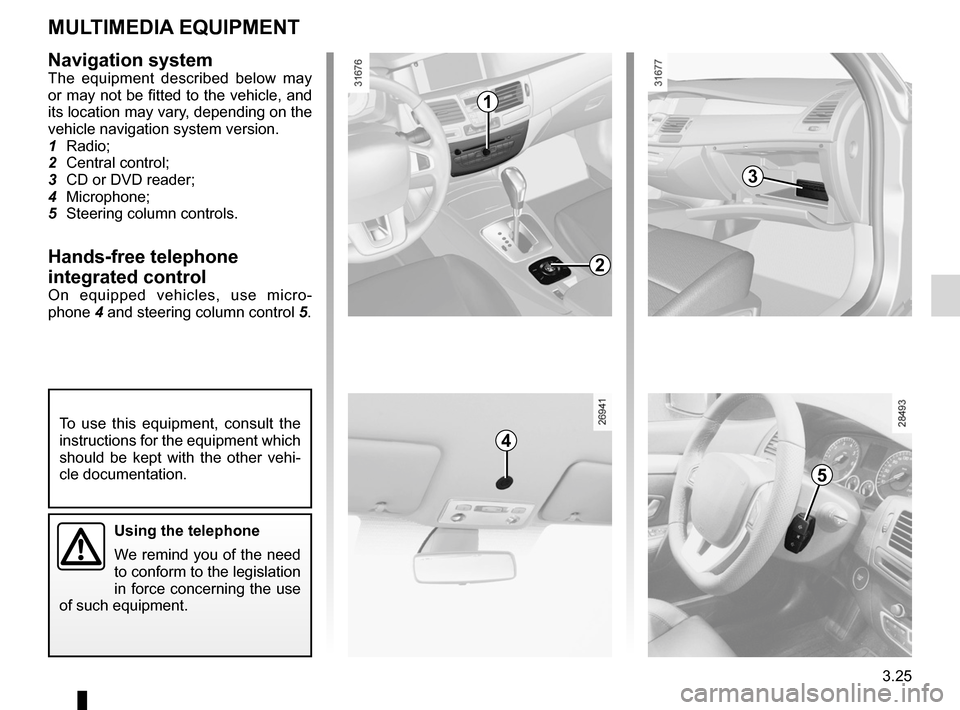
Navigation systemThe equipment described below may
or may not be fitted to the vehicle, and
its location may vary, depending on the
vehicle navigation system version.
1 Radio;
2 Central control;
3 CD or DVD reader;
4 Microphone;
5 Steering column controls.
hands-free telephone
integrated control
On equipped vehicles, use micro -
phone 4 and steering column control 5.
To use this equipment, consult the
instructions for the equipment which
should be kept with the other vehi -
cle documentation.
1
2
3
4
5
using the telephone
We remind you of the need
to conform to the legislation
in force concerning the use
of such equipment.
Page 144 of 221

3.26
ENG_UD20783_6
Filler NU (X06 - C06 - S06 - X35 - L35 - X44 - C44 - G44 - X45 - H45 - X65 - L65 - S65 - X73 - B73 - X74 - B74 - K74 - X77 - J77 - F77 - R77 - X81 - J81 - X84 - B84 - C84
ENG_NU_939-3_D91_Renault_3
Page 145 of 221
4.1
ENG_UD29930_4
Sommaire 4 (X91 - D91 - Renault)
ENG_NU_939-3_D91_Renault_4
Section 4: Maintenance
Bonnet . . . . . . . . . . . . . . . . . . . . . . . . . . . . . . . . . . . . . . . . . . . . . . . . . . . . . . . . . . . . . . . . . . . . . . . . 4.2
Engine oil level: . . . . . . . . . . . . . . . . . . . . . . . . . . . . . . . . . . . . . . . . . . . . . . . . . . . . . . . . . . . . . . . . . 4.4
general information . . . . . . . . . . . . . . . . . . . . . . . . . . . . . . . . . . . . . . . . . . . . . . . . . . . . . . . . 4.4
Engine oil level: topping up, filling . . . . . . . . . . . . . . . . . . . . . . . . . . . . . . . . . . . . . . . . . . . . . . . . . . . 4.6
Engine oil change . . . . . . . . . . . . . . . . . . . . . . . . . . . . . . . . . . . . . . . . . . . . . . . . . . . . . . . . . . . . . . . 4.7
Levels: . . . . . . . . . . . . . . . . . . . . . . . . . . . . . . . . . . . . . . . . . . . . . . . . . . . . . . . . . . . . . . . . . . . . . . . . 4.8
engine coolant . . . . . . . . . . . . . . . . . . . . . . . . . . . . . . . . . . . . . . . . . . . . . . . . . . . . . . . . . . . . 4.8
brake fluid . . . . . . . . . . . . . . . . . . . . . . . . . . . . . . . . . . . . . . . . . . . . . . . . . . . . . . . . . . . . . . . . 4.9
windscreen/headlight washer reservoir . . . . . . . . . . . . . . . . . . . . . . . . . . . . . . . . . . . . . . . . . 4.10
Filters . . . . . . . . . . . . . . . . . . . . . . . . . . . . . . . . . . . . . . . . . . . . . . . . . . . . . . . . . . . . . . . . . . . . . . . . . 4.10
Tyre pressure. . . . . . . . . . . . . . . . . . . . . . . . . . . . . . . . . . . . . . . . . . . . . . . . . . . . . . . . . . . . . . . . . . . 4.11
Battery . . . . . . . . . . . . . . . . . . . . . . . . . . . . . . . . . . . . . . . . . . . . . . . . . . . . . . . . . . . . . . . . . . . . . . . . 4.12
Bodywork maintenance . . . . . . . . . . . . . . . . . . . . . . . . . . . . . . . . . . . . . . . . . . . . . . . . . . . . . . . . . . . 4.14
Interior trim maintenance . . . . . . . . . . . . . . . . . . . . . . . . . . . . . . . . . . . . . . . . . . . . . . . . . . . . . . . . . . 4.16
Page 146 of 221
bonnet................................................... (up to the end of the DU)
maintenance: mechanical ...................................... (up to the end of the DU)
4.2
ENG_UD29099_2
Capot moteur (X91 - D91 - Renault)
ENG_NU_939-3_D91_Renault_4
Jaune NoirNoir texte
Bonnet
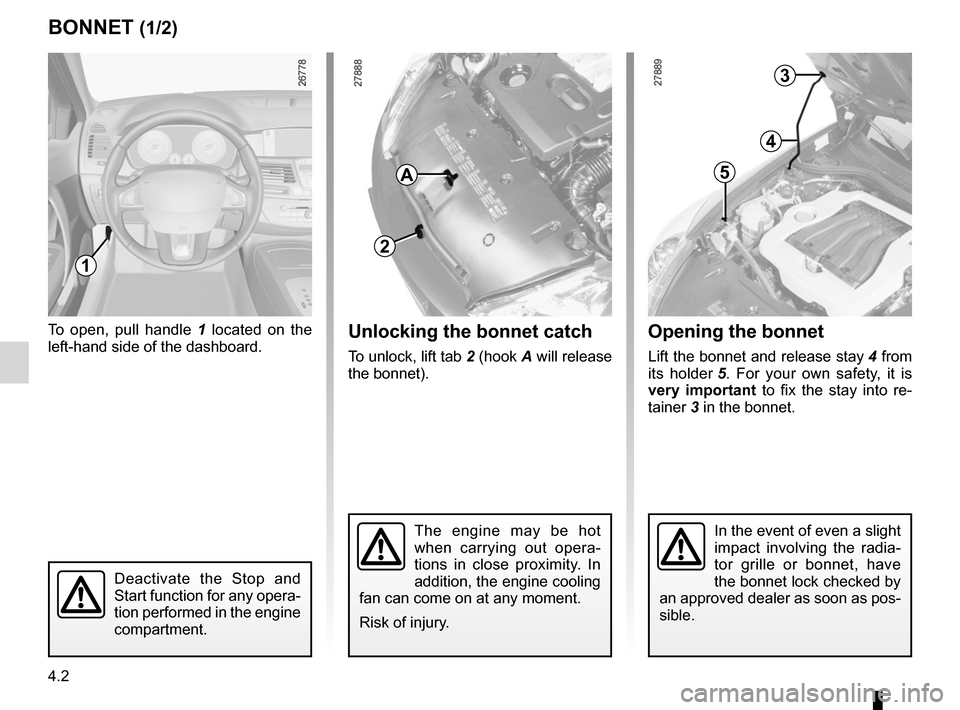
Opening the bonnet
Lift the bonnet and release stay 4 from
its holder 5 . For your own safety, it is
very important to fix the stay into re -
tainer 3 in the bonnet.
To open, pull handle
1 located on the
left-hand side of the dashboard.
BOnnet (1/2)
1
2
A
In the event of even a slight
impact involving the radia -
tor grille or bonnet, have
the bonnet lock checked by
an approved dealer as soon as pos-
sible.The engine may be hot
when carrying out opera -
tions in close proximity. In
addition, the engine cooling
fan can come on at any moment.
Risk of injury.
3
4
5
Unlocking the bonnet catch
To unlock, lift tab 2 (hook A will release
the bonnet).
Deactivate the Stop and
Start function for any opera -
tion performed in the engine
compartment.
Page 147 of 221
JauneNoirNoir texte
4.3
ENG_UD29099_2
Capot moteur (X91 - D91 - Renault)
ENG_NU_939-3_D91_Renault_4
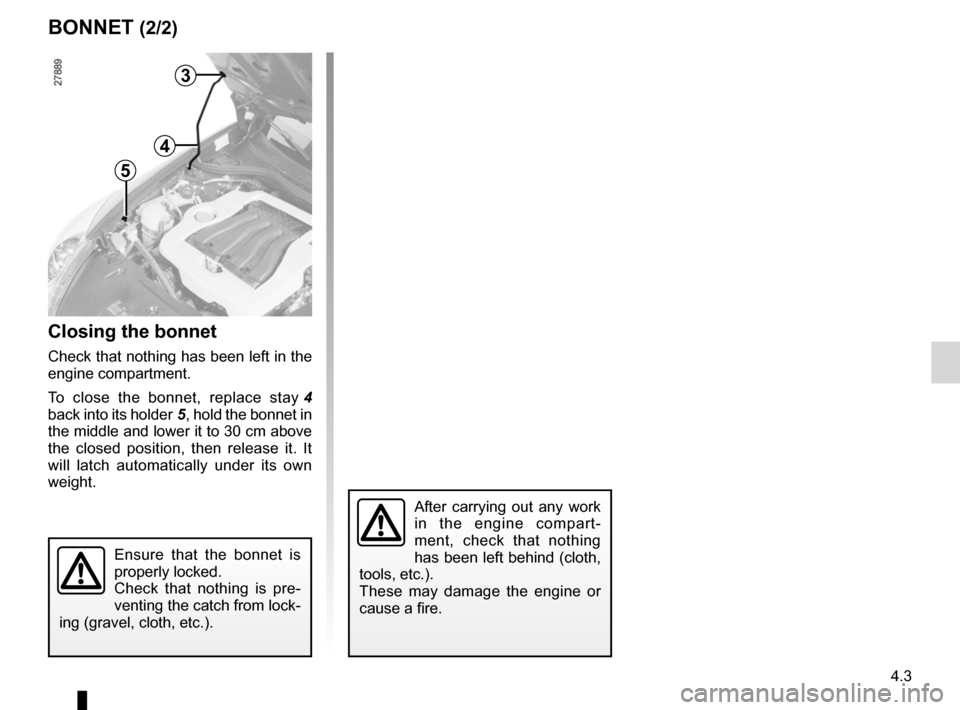
Closing the bonnet
Check that nothing has been left in the
engine compartment.
To close the bonnet, replace stay 4
back into its holder 5, hold the bonnet in
the middle and lower it to 30 cm above
the closed position, then release it. It
will latch automatically under its own
weight.
3
4
5
Ensure that the bonnet is
properly locked.
Check that nothing is pre -
venting the catch from lock-
ing (gravel, cloth, etc.).
BOnnet (2/2)
After carrying out any work
in the engine compart -
ment, check that nothing
has been left behind (cloth,
tools, etc.).
These may damage the engine or
cause a fire.
Page 148 of 221
engine oil ............................................................... (current page)
oil change .............................................................. (current page)
levels: engine oil ......................................................... (current page)
4.4
ENG_UD28951_8
Niveau huile moteur : généralités (X91 - B91 - K91 - D91 - Renault)
ENG_NU_939-3_D91_Renault_4
Jaune NoirNoir texte
Engine oil level:
general information
enGIne OIL LeVeL: general information (1/2)
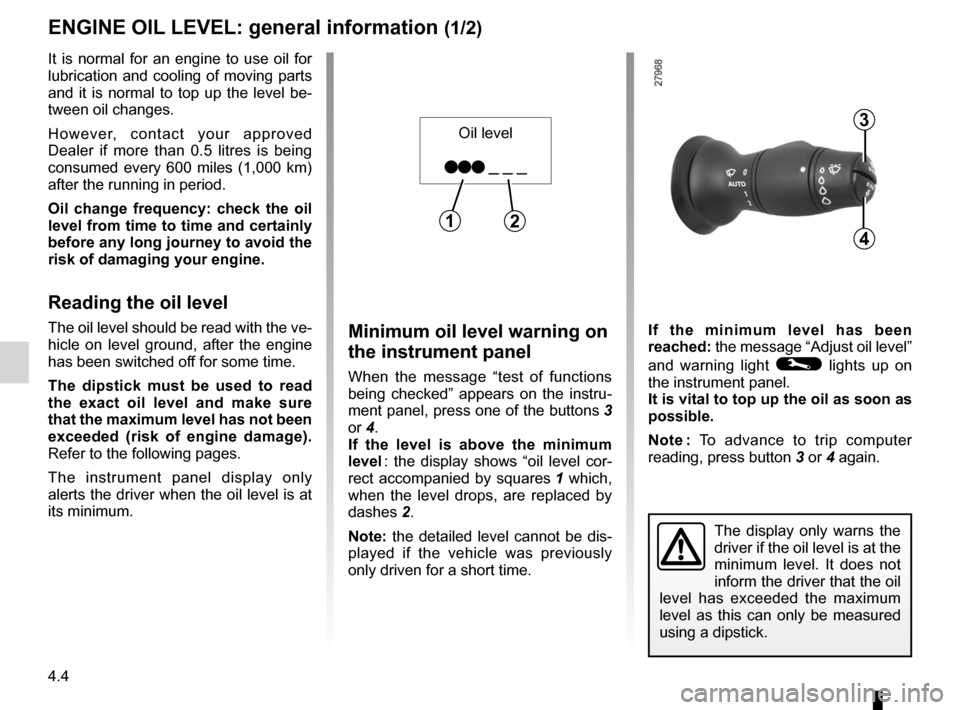
Minimum oil level warning on
the instrument panel
When the message “test of functions
being checked” appears on the instru -
ment panel, press one of the buttons 3
or 4.
If the level is above the minimum
level : the display shows “oil level cor -
rect accompanied by squares 1 which,
when the level drops, are replaced by
dashes 2.
note: the detailed level cannot be dis-
played if the vehicle was previously
only driven for a short time. If the minimum level has been
reached: the message “Adjust oil level”
and warning light © lights up on
the instrument panel.
It is vital to top up the oil as soon as
possible.
n ote : To advance to trip computer
reading, press button 3 or 4 again.
The display only warns the
driver if the oil level is at the
minimum level. It does not
inform the driver that the oil
level has exceeded the maximum
level as this can only be measured
using a dipstick.
It is normal for an engine to use oil for
lubrication and cooling of moving parts
and it is normal to top up the level be-
tween oil changes.
However, contact your approved
Dealer if more than 0.5 litres is being
consumed every 600 miles (1,000 km)
after the running in period.
Oil change frequency: check the oil
level from time to time and certainly
before any long journey to avoid the
risk of damaging your engine.
Reading the oil level
The oil level should be read with the ve-
hicle on level ground, after the engine
has been switched off for some time.
t he dipstick must be used to read
the exact oil level and make sure
that the maximum level has not been
exceeded (risk of engine damage).
Refer to the following pages.
The instrument panel display only
alerts the driver when the oil level is at
its minimum.
3
4
Oil level
12
Page 149 of 221
JauneNoirNoir texte
4.5
ENG_UD28951_8
Niveau huile moteur : généralités (X91 - B91 - K91 - D91 - Renault)
ENG_NU_939-3_D91_Renault_4
Once the operation has been com -
pleted, ensure that the dipstick is
pushed in as far as it will go or that the
cap-type dipstick is completely screwed
in.
enGIne OIL LeVeL: general information (2/2)
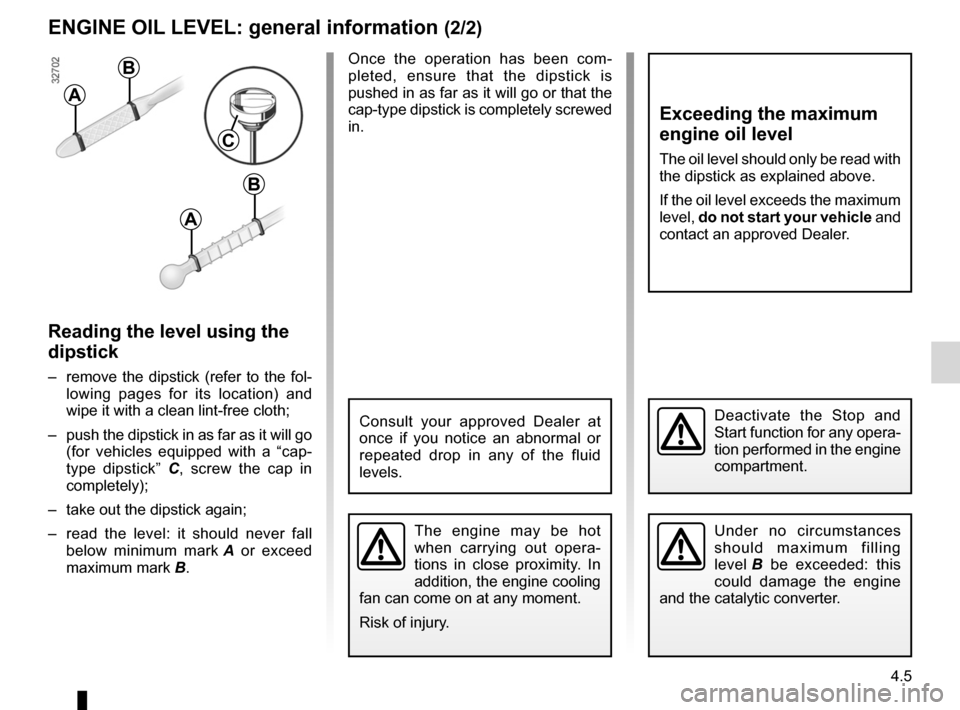
Reading the level using the
dipstick
– remove the dipstick (refer to the fol-
lowing pages for its location) and
wipe it with a clean lint-free cloth;
– push the dipstick in as far as it will go
(for vehicles equipped with a “cap -
type dipstick” C , screw the cap in
completely);
– take out the dipstick again;
– read the level: it should never fall
below minimum mark A or exceed
maximum mark B.
Consult your approved Dealer at
once if you notice an abnormal or
repeated drop in any of the fluid
levels.
The engine may be hot
when carrying out opera -
tions in close proximity. In
addition, the engine cooling
fan can come on at any moment.
Risk of injury.
A
B
C
B
A
exceeding the maximum
engine oil level
The oil level should only be read with
the dipstick as explained above.
If the oil level exceeds the maximum
level, do not start your vehicle and
contact an approved Dealer.
Under no circumstances
should maximum filling
level B be exceeded: this
could damage the engine
and the catalytic converter.
Deactivate the Stop and
Start function for any opera -
tion performed in the engine
compartment.
Page 150 of 221
engine oil capacity ................................ (up to the end of the DU)
4.6
ENG_UD29100_2
Niveau huile moteur : appoint, remplissage (X91 - D91 - Renault)
ENG_NU_939-3_D91_Renault_4
Jaune NoirNoir texte
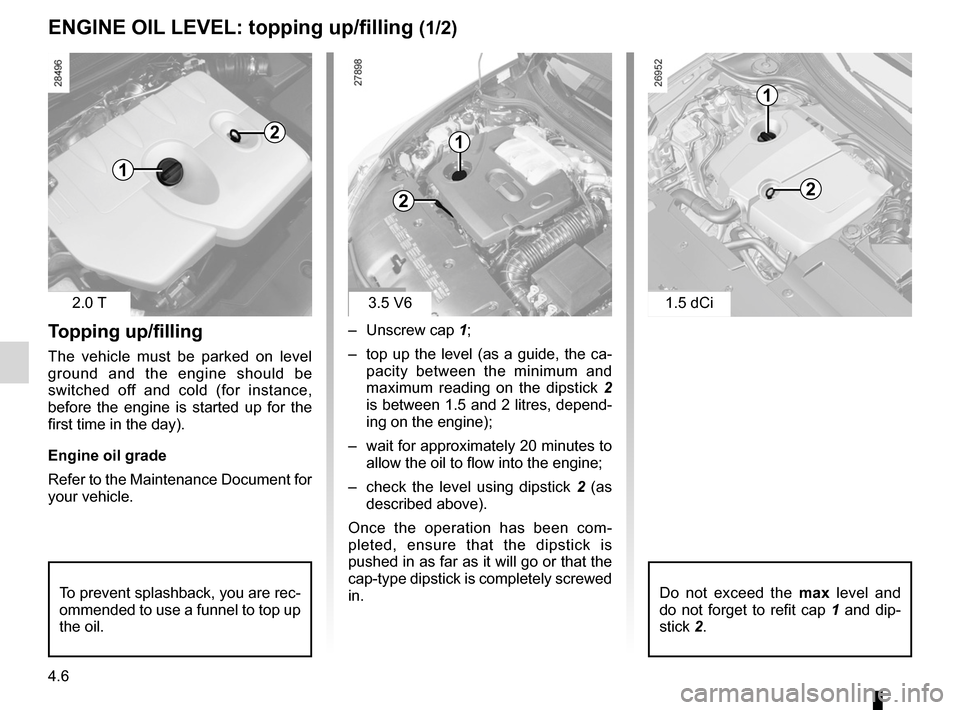
– Unscrew cap 1;
– top up the level (as a guide, the ca-
pacity between the minimum and
maximum reading on the dipstick 2
is between 1.5 and 2 litres, depend-
ing on the engine);
– wait for approximately 20 minutes to
allow the oil to flow into the engine;
– check the level using dipstick 2 (as
described above).
Once the operation has been com -
pleted, ensure that the dipstick is
pushed in as far as it will go or that the
cap-type dipstick is completely screwed
in.
Engine oil level: topping up, filling
enGIne OIL LeVeL: topping up/filling (1/2)
t opping up/filling
The vehicle must be parked on level
ground and the engine should be
switched off and cold (for instance,
before the engine is started up for the
first time in the day).
engine oil grade
Refer to the Maintenance Document for
your vehicle.
1
21
2
3.5 V62.0 T
To prevent splashback, you are rec-
ommended to use a funnel to top up
the oil.Do not exceed the max level and
do not forget to refit cap 1 and dip-
stick 2.
1
2
1.5 dCi