wiring RENAULT SCENIC 2012 J95 / 3.G Engine And Peripherals EDC16CP33 Workshop Manual
[x] Cancel search | Manufacturer: RENAULT, Model Year: 2012, Model line: SCENIC, Model: RENAULT SCENIC 2012 J95 / 3.GPages: 510, PDF Size: 2.98 MB
Page 472 of 510

13B-472
AFTER REPAIRCarry out a road test, then check with the diagnostic tool.
V12 MR-372-J84-13B300$170.mif
DIESEL INJECTION
Fault finding – Fault Finding Chart13B
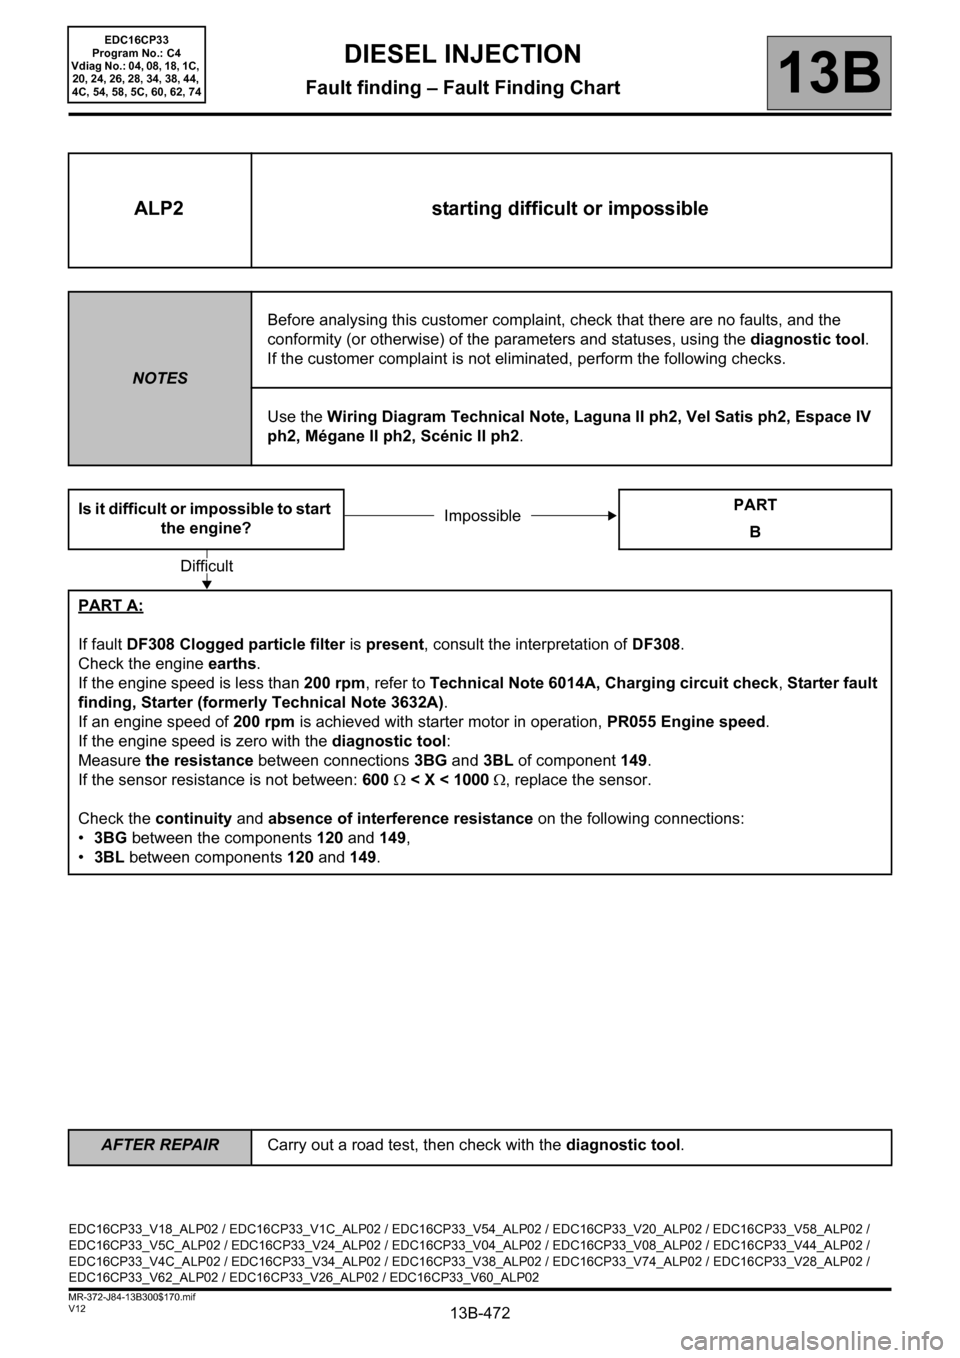
ALP2 starting difficult or impossible
NOTESBefore analysing this customer complaint, check that there are no faults, and the
conformity (or otherwise) of the parameters and statuses, using the diagnostic tool.
If the customer complaint is not eliminated, perform the following checks.
Use the Wiring Diagram Technical Note, Laguna II ph2, Vel Satis ph2, Espace IV
ph2, Mégane II ph2, Scénic II ph2.
Is it difficult or impossible to start
the engine?PART
B
PART A:
If fault DF308 Clogged particle filter is present, consult the interpretation of DF308.
Check the engine earths.
If the engine speed is less than 200 rpm, refer to Technical Note 6014A, Charging circuit check, Starter fault
finding, Starter (formerly Technical Note 3632A).
If an engine speed of 200 rpm is achieved with starter motor in operation, PR055 Engine speed.
If the engine speed is zero with the diagnostic tool:
Measure the resistance between connections 3BG and 3BL of component 149.
If the sensor resistance is not between: 600 Ω < X < 1000 Ω, replace the sensor.
Check the continuity and absence of interference resistance on the following connections:
•3BG between the components 120 and 149,
•3BL between components 120 and 149.
Impossible
Difficult
EDC16CP33_V18_ALP02 / EDC16CP33_V1C_ALP02 / EDC16CP33_V54_ALP02 / EDC16CP33_V20_ALP02 / EDC16CP33_V58_ALP02 /
EDC16CP33_V5C_ALP02 / EDC16CP33_V24_ALP02 / EDC16CP33_V04_ALP02 / EDC16CP33_V08_ALP02 / EDC16CP33_V44_ALP02 /
EDC16CP33_V4C_ALP02 / EDC16CP33_V34_ALP02 / EDC16CP33_V38_ALP02 / EDC16CP33_V74_ALP02 / EDC16CP33_V28_ALP02 /
EDC16CP33_V62_ALP02 / EDC16CP33_V26_ALP02 / EDC16CP33_V60_ALP02
EDC16CP33
Program No.: C4
Vdiag No.: 04, 08, 18, 1C,
20, 24, 26, 28, 34, 38, 44,
4C, 54, 58, 5C, 60, 62, 74
Page 473 of 510

13B-473
AFTER REPAIRCarry out a road test, then check with the diagnostic tool.
V12 MR-372-J84-13B300$170.mif
DIESEL INJECTION
Fault finding – Fault Finding Chart13B
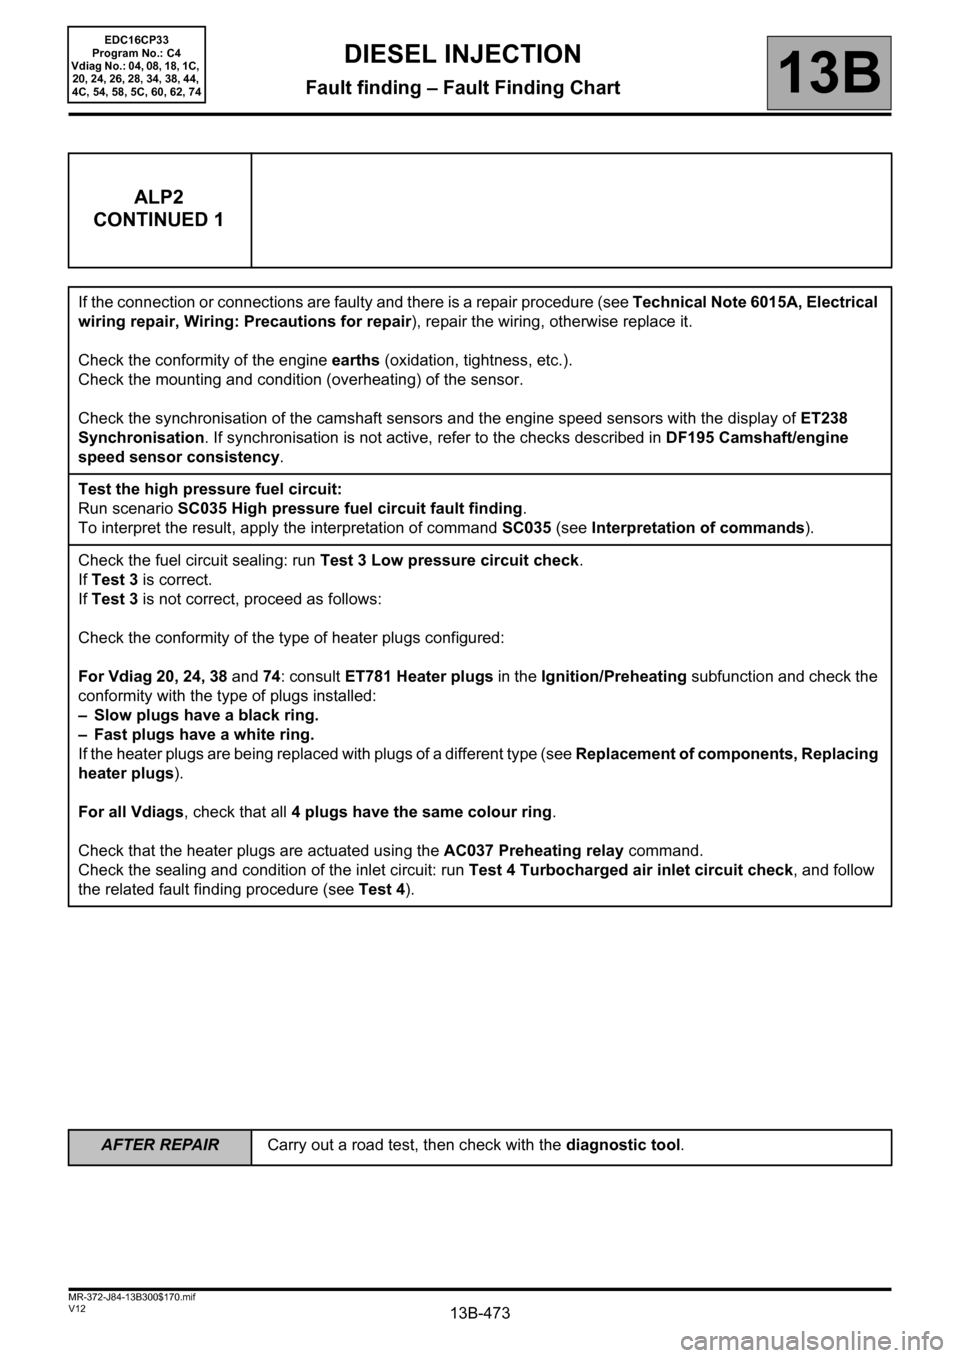
ALP2
CONTINUED 1
If the connection or connections are faulty and there is a repair procedure (see Technical Note 6015A, Electrical
wiring repair, Wiring: Precautions for repair), repair the wiring, otherwise replace it.
Check the conformity of the engine earths (oxidation, tightness, etc.).
Check the mounting and condition (overheating) of the sensor.
Check the synchronisation of the camshaft sensors and the engine speed sensors with the display of ET238
Synchronisation. If synchronisation is not active, refer to the checks described in DF195 Camshaft/engine
speed sensor consistency.
Test the high pressure fuel circuit:
Run scenario SC035 High pressure fuel circuit fault finding.
To interpret the result, apply the interpretation of command SC035 (see Interpretation of commands).
Check the fuel circuit sealing: run Test 3 Low pressure circuit check.
If Test 3 is correct.
If Test 3 is not correct, proceed as follows:
Check the conformity of the type of heater plugs configured:
For Vdiag 20, 24, 38 and 74: consult ET781 Heater plugs in the Ignition/Preheating subfunction and check the
conformity with the type of plugs installed:
– Slow plugs have a black ring.
– Fast plugs have a white ring.
If the heater plugs are being replaced with plugs of a different type (see Replacement of components, Replacing
heater plugs).
For all Vdiags, check that all 4 plugs have the same colour ring.
Check that the heater plugs are actuated using the AC037 Preheating relay command.
Check the sealing and condition of the inlet circuit: run Test 4 Turbocharged air inlet circuit check, and follow
the related fault finding procedure (see Test 4).
EDC16CP33
Program No.: C4
Vdiag No.: 04, 08, 18, 1C,
20, 24, 26, 28, 34, 38, 44,
4C, 54, 58, 5C, 60, 62, 74
Page 480 of 510

13B-480
AFTER REPAIRCarry out a road test, then check with the diagnostic tool.
V12 MR-372-J84-13B300$170.mif
DIESEL INJECTION
Fault finding – Fault Finding Chart13B
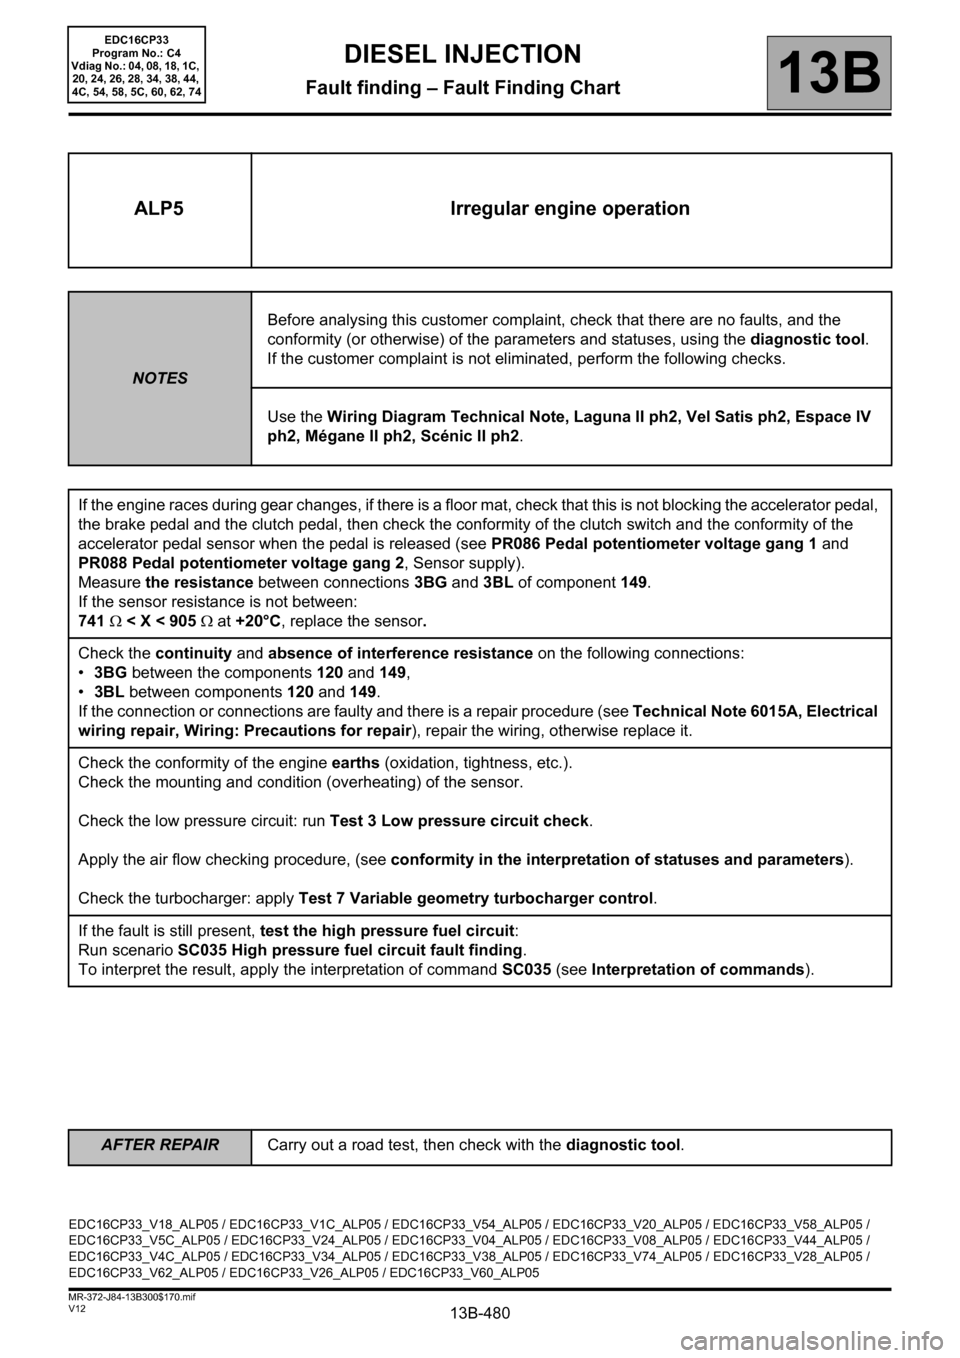
ALP5 Irregular engine operation
NOTESBefore analysing this customer complaint, check that there are no faults, and the
conformity (or otherwise) of the parameters and statuses, using the diagnostic tool.
If the customer complaint is not eliminated, perform the following checks.
Use the Wiring Diagram Technical Note, Laguna II ph2, Vel Satis ph2, Espace IV
ph2, Mégane II ph2, Scénic II ph2.
If the engine races during gear changes, if there is a floor mat, check that this is not blocking the accelerator pedal,
the brake pedal and the clutch pedal, then check the conformity of the clutch switch and the conformity of the
accelerator pedal sensor when the pedal is released (see PR086 Pedal potentiometer voltage gang 1 and
PR088 Pedal potentiometer voltage gang 2, Sensor supply).
Measure the resistance between connections 3BG and 3BL of component 149.
If the sensor resistance is not between:
741 Ω < X < 905 Ω at +20°C, replace the sensor.
Check the continuity and absence of interference resistance on the following connections:
•3BG between the components 120 and 149,
•3BL between components 120 and 149.
If the connection or connections are faulty and there is a repair procedure (see Technical Note 6015A, Electrical
wiring repair, Wiring: Precautions for repair), repair the wiring, otherwise replace it.
Check the conformity of the engine earths (oxidation, tightness, etc.).
Check the mounting and condition (overheating) of the sensor.
Check the low pressure circuit: run Test 3 Low pressure circuit check.
Apply the air flow checking procedure, (see conformity in the interpretation of statuses and parameters).
Check the turbocharger: apply Test 7 Variable geometry turbocharger control.
If the fault is still present, test the high pressure fuel circuit:
Run scenario SC035 High pressure fuel circuit fault finding.
To interpret the result, apply the interpretation of command SC035 (see Interpretation of commands).
EDC16CP33_V18_ALP05 / EDC16CP33_V1C_ALP05 / EDC16CP33_V54_ALP05 / EDC16CP33_V20_ALP05 / EDC16CP33_V58_ALP05 /
EDC16CP33_V5C_ALP05 / EDC16CP33_V24_ALP05 / EDC16CP33_V04_ALP05 / EDC16CP33_V08_ALP05 / EDC16CP33_V44_ALP05 /
EDC16CP33_V4C_ALP05 / EDC16CP33_V34_ALP05 / EDC16CP33_V38_ALP05 / EDC16CP33_V74_ALP05 / EDC16CP33_V28_ALP05 /
EDC16CP33_V62_ALP05 / EDC16CP33_V26_ALP05 / EDC16CP33_V60_ALP05
EDC16CP33
Program No.: C4
Vdiag No.: 04, 08, 18, 1C,
20, 24, 26, 28, 34, 38, 44,
4C, 54, 58, 5C, 60, 62, 74
Page 484 of 510

13B-484
AFTER REPAIRCarry out a road test, then check with the diagnostic tool.
V12 MR-372-J84-13B300$170.mif
DIESEL INJECTION
Fault finding – Fault Finding Chart13B
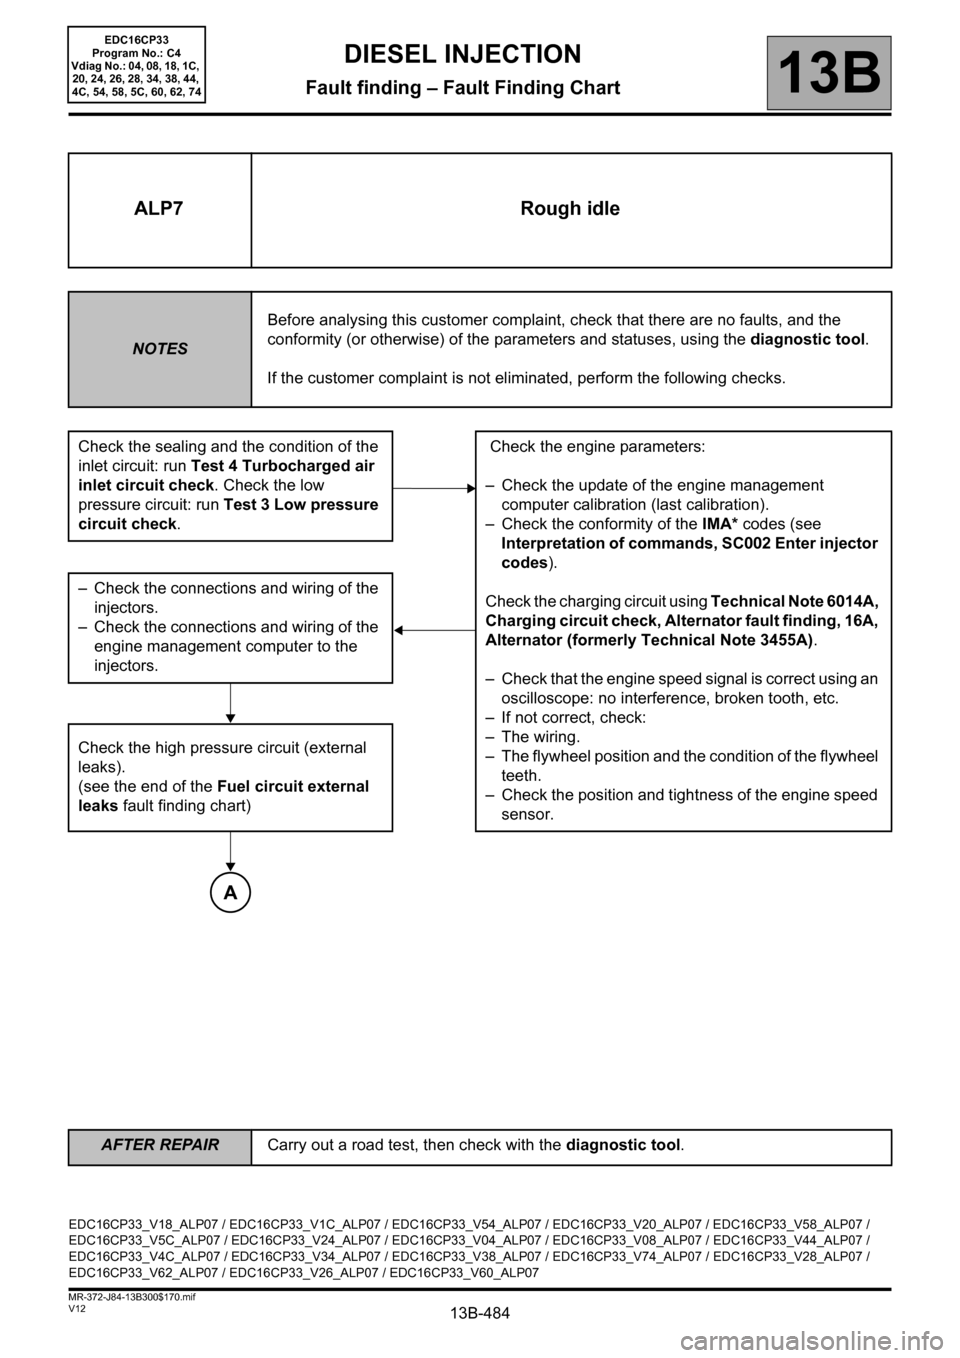
ALP7 Rough idle
NOTESBefore analysing this customer complaint, check that there are no faults, and the
conformity (or otherwise) of the parameters and statuses, using the diagnostic tool.
If the customer complaint is not eliminated, perform the following checks.
Check the sealing and the condition of the
inlet circuit: run Test 4 Turbocharged air
inlet circuit check. Check the low
pressure circuit: run Test 3 Low pressure
circuit check. Check the engine parameters:
– Check the update of the engine management
computer calibration (last calibration).
– Check the conformity of the IMA* codes (see
Interpretation of commands, SC002 Enter injector
codes).
Check the charging circuit using Technical Note 6014A,
Charging circuit check, Alternator fault finding, 16A,
Alternator (formerly Technical Note 3455A).
– Check that the engine speed signal is correct using an
oscilloscope: no interference, broken tooth, etc.
– If not correct, check:
– The wiring.
– The flywheel position and the condition of the flywheel
teeth.
– Check the position and tightness of the engine speed
sensor. – Check the connections and wiring of the
injectors.
– Check the connections and wiring of the
engine management computer to the
injectors.
Check the high pressure circuit (external
leaks).
(see the end of the Fuel circuit external
leaks fault finding chart)
A
EDC16CP33_V18_ALP07 / EDC16CP33_V1C_ALP07 / EDC16CP33_V54_ALP07 / EDC16CP33_V20_ALP07 / EDC16CP33_V58_ALP07 /
EDC16CP33_V5C_ALP07 / EDC16CP33_V24_ALP07 / EDC16CP33_V04_ALP07 / EDC16CP33_V08_ALP07 / EDC16CP33_V44_ALP07 /
EDC16CP33_V4C_ALP07 / EDC16CP33_V34_ALP07 / EDC16CP33_V38_ALP07 / EDC16CP33_V74_ALP07 / EDC16CP33_V28_ALP07 /
EDC16CP33_V62_ALP07 / EDC16CP33_V26_ALP07 / EDC16CP33_V60_ALP07
EDC16CP33
Program No.: C4
Vdiag No.: 04, 08, 18, 1C,
20, 24, 26, 28, 34, 38, 44,
4C, 54, 58, 5C, 60, 62, 74