RENAULT SCENIC 2014 J95 / 3.G Petrol Injection - Sagem3000 Workshop Manual
Manufacturer: RENAULT, Model Year: 2014, Model line: SCENIC, Model: RENAULT SCENIC 2014 J95 / 3.GPages: 181
Page 151 of 181

PETROL INJECTION
Fault finding – Interpretation of statuses17B
17B - 151V12 MR-372-J84-17B000$540.mif
SAGEM 3000
Program No.: A7
Vdiag No.: 44, 48
ET415
(CONTINUED 4)
STATUS 10Monitoring by injection computer
Status ET415 becomes STATUS 10 when driving with cruise control active (ET042
Cruise control/speed limiter: CRUISE CONTROL) if the injection computer detects a
fault anywhere in the engine management system, or an engine speed that is too high
or too low.
This signal is conveyed on the multiplex line and deactivates the cruise control.
Carry out a multiplex network test, then run fault finding on the injection computer.
Deal with present or stored faults (see Interpretation of faults).
Reinitialise status ET415 on the injection computer by running command RZ007
“Fault memory”.
If status 10 continues, contact the Techline.
AFTER REPAIRDeal with any other faults. Clear the fault memory.
Switch off the ignition and carry out a road test followed by a test with the diagnostic
tool.
1JSAA741.0
Page 152 of 181
PETROL INJECTION
Fault finding – Interpretation of statuses17B
17B - 152V12 MR-372-J84-17B000$540.mif
SAGEM 3000
Program No.: A7
Vdiag No.: 44, 48
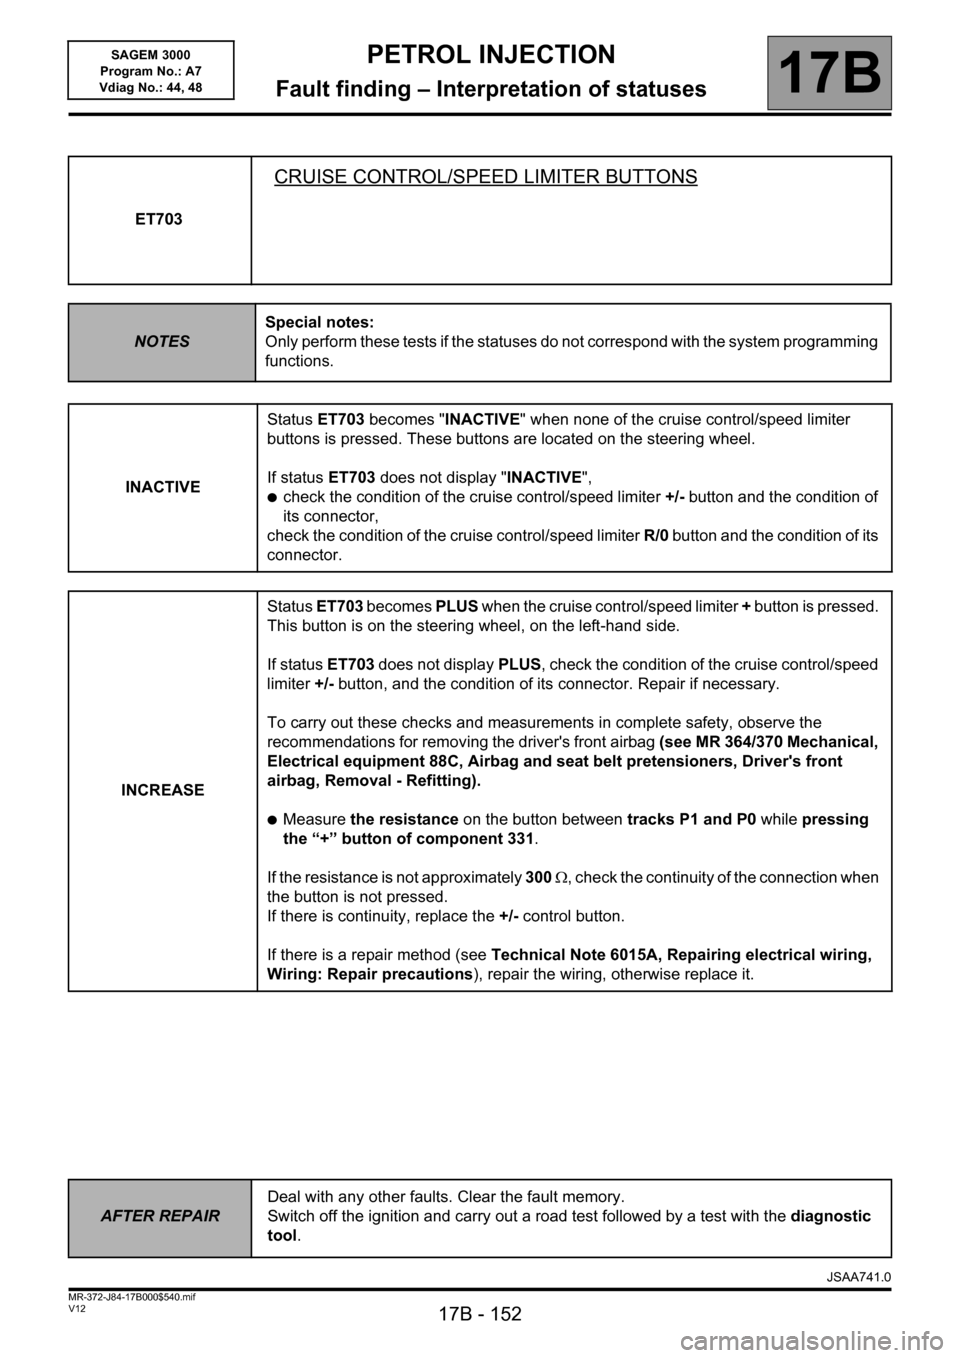
ET703
CRUISE CONTROL/SPEED LIMITER BUTTONS
NOTESSpecial notes:
Only perform these tests if the statuses do not correspond with the system programming
functions.
INACTIVEStatus ET703 becomes "INACTIVE" when none of the cruise control/speed limiter
buttons is pressed. These buttons are located on the steering wheel.
If status ET703 does not display "INACTIVE",
●check the condition of the cruise control/speed limiter +/- button and the condition of
its connector,
check the condition of the cruise control/speed limiter R/0 button and the condition of its
connector.
INCREASEStatus ET703 becomes PLUS when the cruise control/speed limiter + button is pressed.
This button is on the steering wheel, on the left-hand side.
If status ET703 does not display PLUS, check the condition of the cruise control/speed
limiter +/- button, and the condition of its connector. Repair if necessary.
To carry out these checks and measurements in complete safety, observe the
recommendations for removing the driver's front airbag (see MR 364/370 Mechanical,
Electrical equipment 88C, Airbag and seat belt pretensioners, Driver's front
airbag, Removal - Refitting).
●Measure the resistance on the button between tracks P1 and P0 while pressing
the “+” button of component 331.
If the resistance is not approximately 300 , check the continuity of the connection when
the button is not pressed.
If there is continuity, replace the +/- control button.
If there is a repair method (see Technical Note 6015A, Repairing electrical wiring,
Wiring: Repair precautions), repair the wiring, otherwise replace it.
AFTER REPAIRDeal with any other faults. Clear the fault memory.
Switch off the ignition and carry out a road test followed by a test with the diagnostic
tool.
JSAA741.0
Page 153 of 181

PETROL INJECTION
Fault finding – Interpretation of statuses17B
17B - 153V12 MR-372-J84-17B000$540.mif
SAGEM 3000
Program No.: A7
Vdiag No.: 44, 48
ET703
CONTINUED 1
DECREASEStatus ET703 becomes MINUS when the cruise control/speed limiter - button is pressed.
This button is on the steering wheel, on the left-hand side.
If status ET703 does not change to MINUS, check the condition of the cruise control/
speed limiter “+/-” button, and the condition of its connector. Repair if necessary.
To carry out these checks and measurements in complete safety, observe the
recommendations for removing the driver's front airbag (see MR 364/370 Mechanical,
Electrical equipment 88C, Airbag and seat belt pretensioners, Driver's front
airbag, Removal - Refitting).
Repair if necessary.
Measure the resistance on the button between tracks P1 and P0 while pressing the
“-” button of component 331.
If the resistance is not approximately 100 , check the continuity of the connection when
the button is in rest position.
If there is continuity, replace the “+/-” control button.
If there is a repair method (see Technical Note 6015A, Repairing electrical wiring,
Wiring: Repair precautions), repair the wiring, otherwise replace it.
SUSPENDStatus ET703 becomes SUSPEND when the cruise control/speed limiter R button is
pressed. This button is located on the steering wheel, to the right.
If status ET703 does not change to SUSPEND, check the condition of the cruise control/
speed limiter R/0 button, and the condition of its connector.
To carry out these checks and measurements in complete safety, observe the
recommendations for removing the driver's front airbag (see MR 364/370 Mechanical,
Electrical equipment 88C, Airbag and seat belt pretensioners, Driver's front
airbag, Removal - Refitting).
Measure the resistance on the button between tracks P1 and P0 while pressing the
“0” button of component 331.
If the resistance is not approximately 0 , replace the R/0 control button.
If there is continuity, replace the “R/0” control button.
If there is a repair method (see Technical Note 6015A, Repairing electrical wiring,
Wiring: Repair precautions), repair the wiring, otherwise replace it.
AFTER REPAIRDeal with any other faults. Clear the fault memory.
Switch off the ignition and carry out a road test followed by a test with the diagnostic
tool.
JSAA741.0
Page 154 of 181

PETROL INJECTION
Fault finding – Interpretation of statuses17B
17B - 154V12 MR-372-J84-17B000$540.mif
SAGEM 3000
Program No.: A7
Vdiag No.: 44, 48
ET703
CONTINUED 2
RESUMEStatus ET703 becomes RESUME when the cruise control/speed limiter R button is
pressed. This button is located on the steering wheel, to the right.
If status ET703 does not change to RESUME, check the condition of the cruise control/
speed limiter R/0 button, and the condition of its connector.
Repair if necessary.
To carry out these checks and measurements in complete safety, observe the
recommendations for removing the driver's front airbag (see MR 364/370 Mechanical,
Electrical equipment 88C, Airbag and seat belt pretensioners, Driver's front
airbag, Removal - Refitting).
Measure the resistance on the button between tracks P1 and P0 while pressing the
“R” button of component 331.
If the resistance is not approximately 900 , check the continuity of the connection when
the button is not pressed.
If there is continuity, replace the “R/0” control button.
If there is a repair procedure (see Technical Note 6015A, Repairing electrical wiring,
Wiring: Precautions for repair), repair the wiring, otherwise replace it.
AFTER REPAIRDeal with any other faults. Clear the fault memory.
Switch off the ignition and carry out a road test followed by a test with the diagnostic
tool.
JSAA741.0
Page 155 of 181
PETROL INJECTION
Fault finding – Interpretation of statuses17B
17B - 155V12 MR-372-J84-17B000$540.mif
SAGEM 3000
Program No.: A7
Vdiag No.: 44, 48
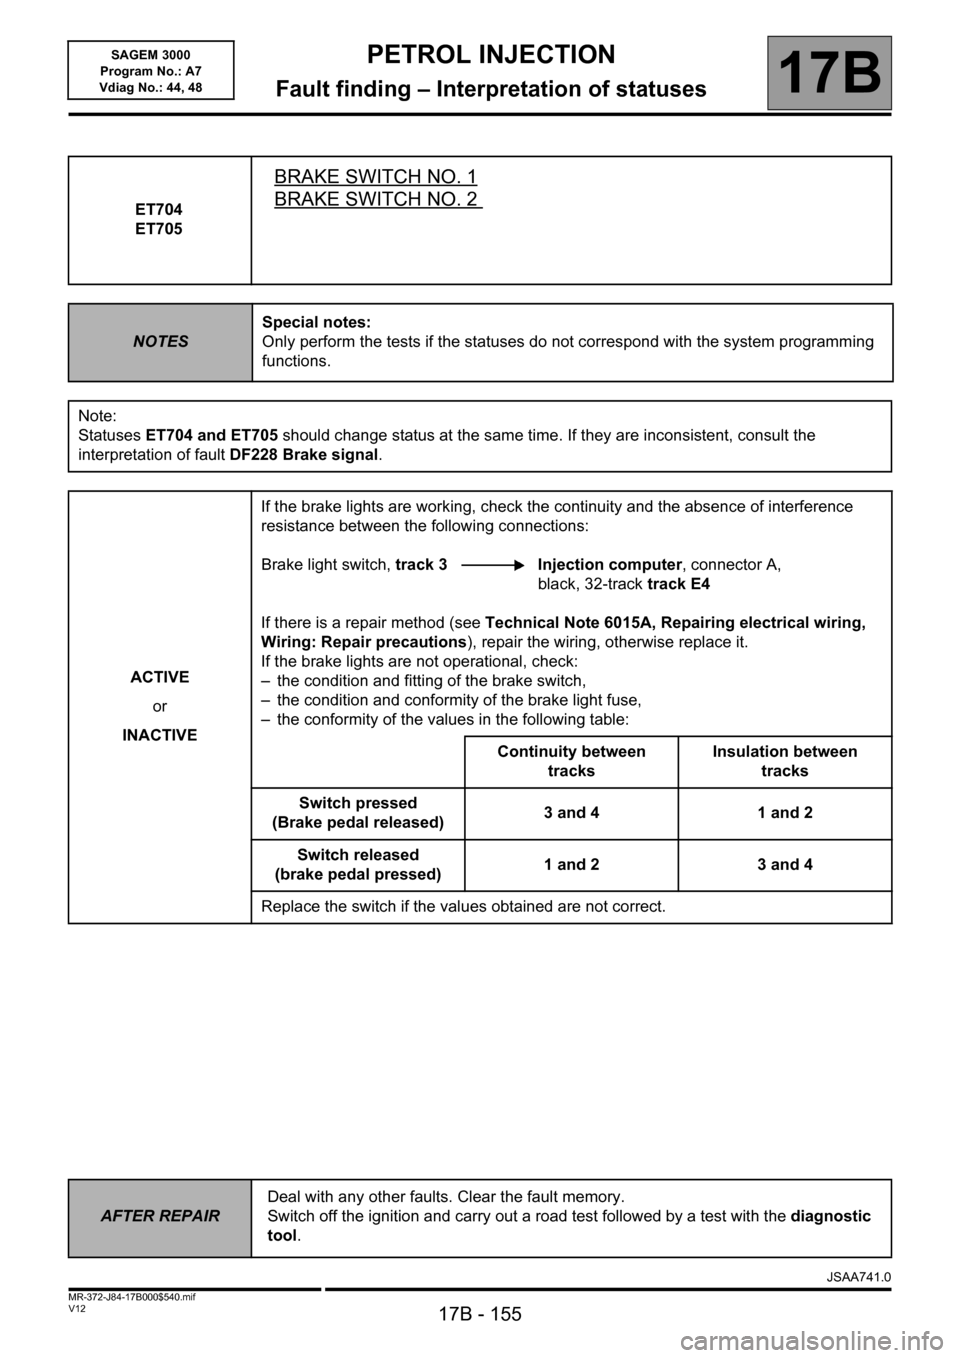
ET704
ET705
BRAKE SWITCH NO. 1
BRAKE SWITCH NO. 2
NOTESSpecial notes:
Only perform the tests if the statuses do not correspond with the system programming
functions.
Note:
Statuses ET704 and ET705 should change status at the same time. If they are inconsistent, consult the
interpretation of fault DF228 Brake signal.
ACTIVE
or
INACTIVEIf the brake lights are working, check the continuity and the absence of interference
resistance between the following connections:
Brake light switch, track 3 Injection computer, connector A,
black, 32-track track E4
If there is a repair method (see Technical Note 6015A, Repairing electrical wiring,
Wiring: Repair precautions), repair the wiring, otherwise replace it.
If the brake lights are not operational, check:
– the condition and fitting of the brake switch,
– the condition and conformity of the brake light fuse,
– the conformity of the values in the following table:
Continuity between
tracksInsulation between
tracks
Switch pressed
(Brake pedal released)3 and 4 1 and 2
Switch released
(brake pedal pressed)1 and 2 3 and 4
Replace the switch if the values obtained are not correct.
AFTER REPAIRDeal with any other faults. Clear the fault memory.
Switch off the ignition and carry out a road test followed by a test with the diagnostic
tool.
1JSAA741.0
Page 156 of 181

PETROL INJECTION
Fault finding – Parameter summary table17B
17B - 156V12 MR-372-J84-17B000$630.mif
SAGEM 3000
Program No.: A7
Vdiag No.: 44, 48PETROL INJECTION
Fault finding – Parameter summary table
*OCR: Opening cycle ratioTool parameter Diagnostic tool title
PR001Advance
PR010Idle speed regulation setpoint
PR014Idling speed correction
PR015Engine torque
PR018Estimated air flow
PR028Pedal position (gang 1)
PR029Pedal position (gang 2)
PR030Accelerator pedal position
PR032Inlet pressure
PR035Atmospheric pressure
PR037Refrigerant pressure
PR041Turbocharging pressure
PR055Engine speed
PR058Air temperature
PR064Coolant temperature
PR071Computer feed voltage
PR089Vehicle speed
PR090Idle speed regulation programming value
PR091Theoretical idle speed regulation OCR
PR095Anti-pinking correction
PR096Motorised throttle upper stop programmed value.
PR097Motorised throttle lower stop programmed value.
PR098Upstream oxygen sensor voltage
PR099Downstream oxygen sensor voltage
PR100Torque lapse
PR101Duration of injection
PR102Canister bleed solenoid valve OCR*
JSAA741.0
MR-372-J84-17B000$630.mif
Page 157 of 181

PETROL INJECTION
Fault finding – Parameter summary table17B
17B - 157V12 MR-372-J84-17B000$630.mif
SAGEM 3000
Program No.: A7
Vdiag No.: 44, 48
*OCR: Opening cycle ratio
*AT: automatic transmission
*SV: Solenoid valveTool parameter Diagnostic tool title
PR103Instantaneous fuel consumption
PR105OBD fault warning light lit mileage counter
PR106Mileage counter fault warning light lit
PR111Motorised throttle position corrected value.
PR112No load programmed value
PR113Lower throttle stop after applying offset
PR116Motorised throttle corrected position setpoint
PR118Measured throttle position gang 1
PR119Measured throttle position gang 2
PR122Torque received by AT* converter
PR123Estimated driver demand engine torque
PR124Resistant engine torque transmitted via multiplex line
PR125Power absorbed by the air conditioning compressor
PR127Heating resistor max. authorised power
PR130Cruise control setpoint.
PR138Richness correction
PR141Integral idling speed regulation correction
PR143Self-adapting richness gain
PR144Self-adapting richness offset
PR846Turbocharging solenoid valve opening cycle ratio
JSAA741.0
Page 158 of 181
PETROL INJECTION
Fault finding – Interpretation of parameters17B
17B - 158V12 MR-372-J84-17B000$675.mif
SAGEM 3000
Program No.: A7
Vdiag No.: 44, 48PETROL INJECTION
Fault finding – Interpretation of parameters
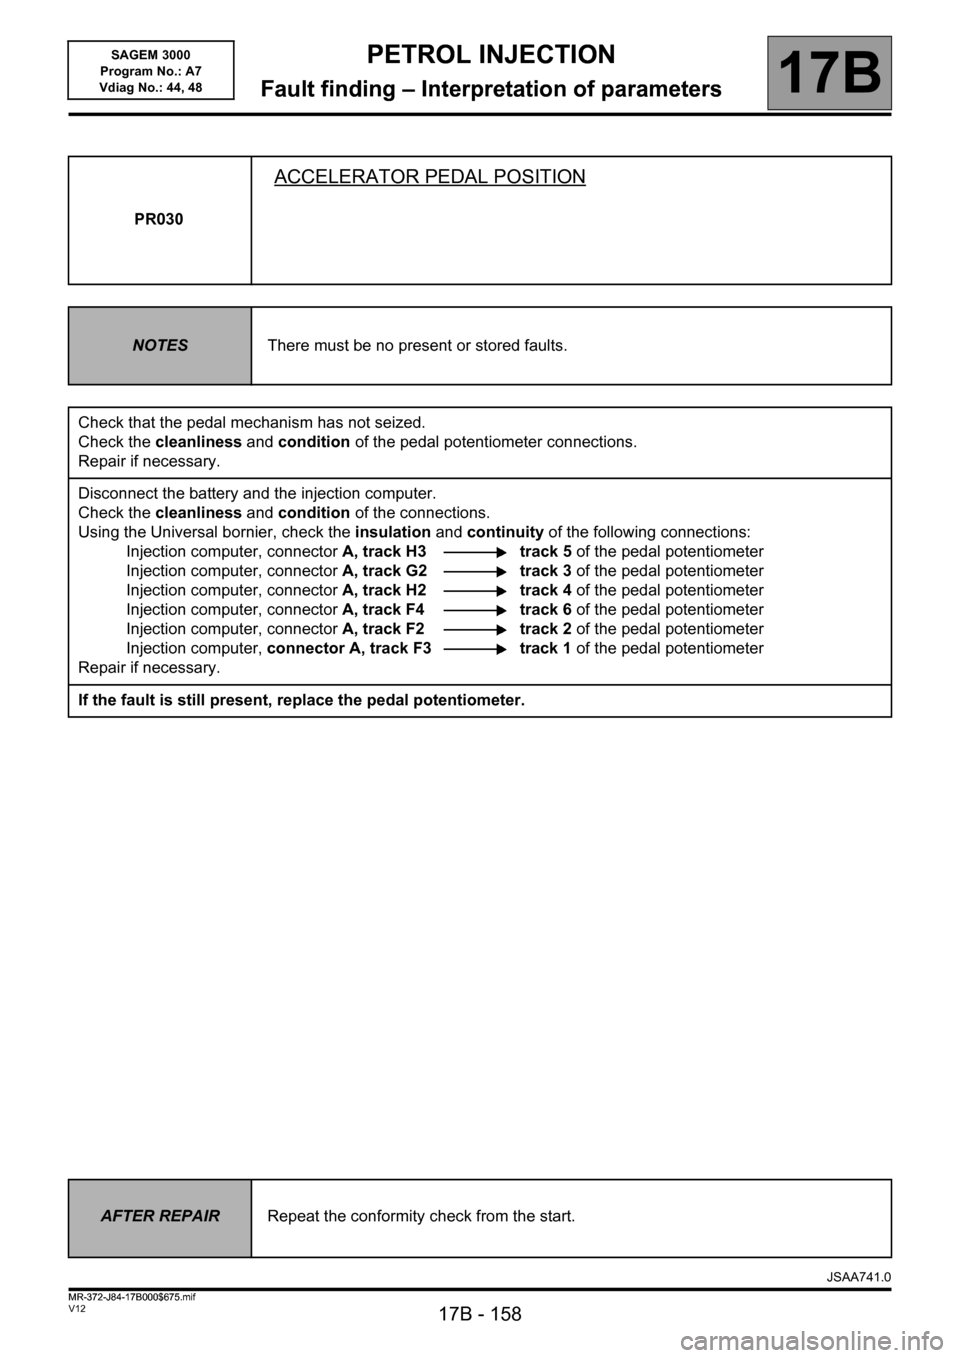
PR030
ACCELERATOR PEDAL POSITION
NOTESThere must be no present or stored faults.
Check that the pedal mechanism has not seized.
Check the cleanliness and condition of the pedal potentiometer connections.
Repair if necessary.
Disconnect the battery and the injection computer.
Check the cleanliness and condition of the connections.
Using the Universal bornier, check the insulation and continuity of the following connections:
Injection computer, connectorA, track H3 track 5 of the pedal potentiometer
Injection computer, connectorA, track G2 track 3 of the pedal potentiometer
Injection computer, connectorA, track H2 track 4 of the pedal potentiometer
Injection computer, connector A, track F4 track 6 of the pedal potentiometer
Injection computer, connectorA, track F2 track 2 of the pedal potentiometer
Injection computer, connector A, track F3 track 1 of the pedal potentiometer
Repair if necessary.
If the fault is still present, replace the pedal potentiometer.
AFTER REPAIRRepeat the conformity check from the start.
JSAA741.0
MR-372-J84-17B000$675.mif
Page 159 of 181
PETROL INJECTION
Fault finding – Interpretation of parameters17B
17B - 159V12 MR-372-J84-17B000$675.mif
SAGEM 3000
Program No.: A7
Vdiag No.: 44, 48
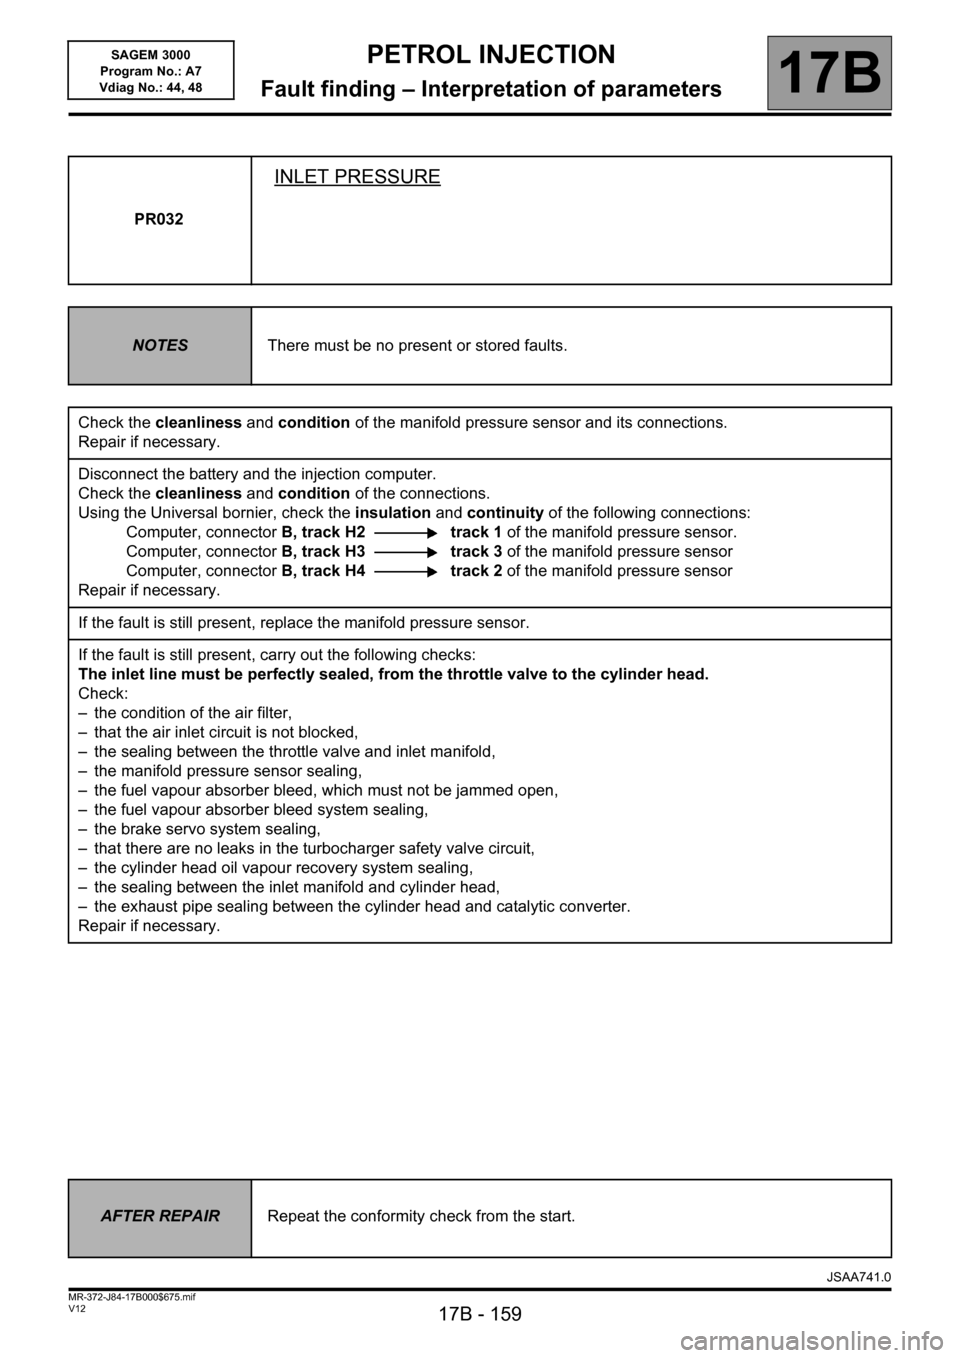
PR032
INLET PRESSURE
NOTESThere must be no present or stored faults.
Check the cleanliness and condition of the manifold pressure sensor and its connections.
Repair if necessary.
Disconnect the battery and the injection computer.
Check the cleanliness and condition of the connections.
Using the Universal bornier, check the insulation and continuity of the following connections:
Computer, connectorB, track H2 track 1 of the manifold pressure sensor.
Computer, connectorB, track H3 track 3 of the manifold pressure sensor
Computer, connectorB, track H4 track 2 of the manifold pressure sensor
Repair if necessary.
If the fault is still present, replace the manifold pressure sensor.
If the fault is still present, carry out the following checks:
The inlet line must be perfectly sealed, from the throttle valve to the cylinder head.
Check:
– the condition of the air filter,
– that the air inlet circuit is not blocked,
– the sealing between the throttle valve and inlet manifold,
– the manifold pressure sensor sealing,
– the fuel vapour absorber bleed, which must not be jammed open,
– the fuel vapour absorber bleed system sealing,
– the brake servo system sealing,
– that there are no leaks in the turbocharger safety valve circuit,
– the cylinder head oil vapour recovery system sealing,
– the sealing between the inlet manifold and cylinder head,
– the exhaust pipe sealing between the cylinder head and catalytic converter.
Repair if necessary.
AFTER REPAIRRepeat the conformity check from the start.
JSAA741.0
Page 160 of 181
PETROL INJECTION
Fault finding – Interpretation of parameters17B
17B - 160V12 MR-372-J84-17B000$675.mif
SAGEM 3000
Program No.: A7
Vdiag No.: 44, 48
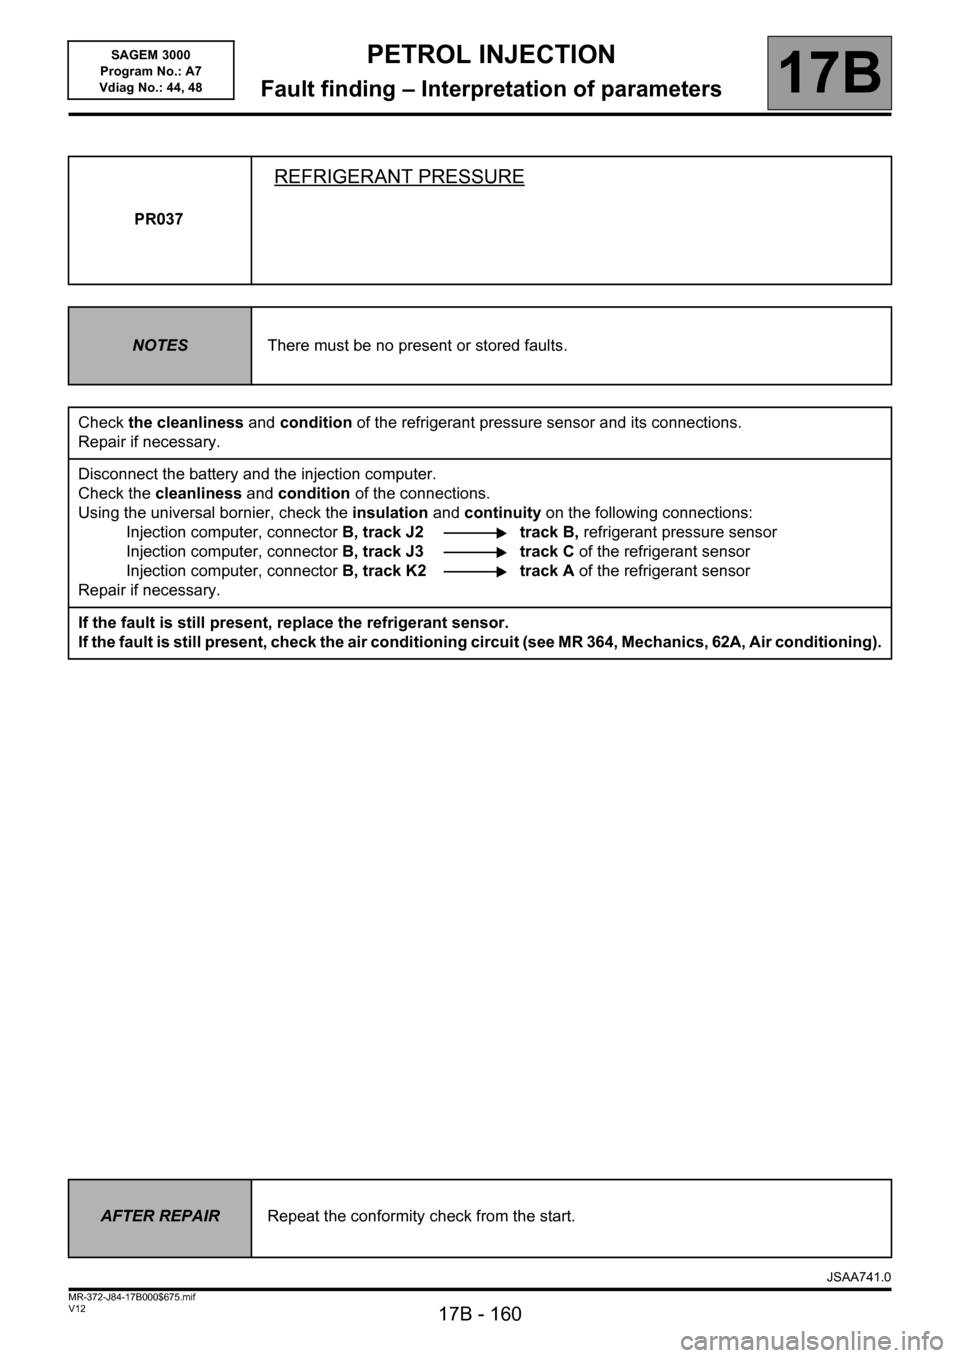
PR037
REFRIGERANT PRESSURE
NOTESThere must be no present or stored faults.
Check the cleanliness and condition of the refrigerant pressure sensor and its connections.
Repair if necessary.
Disconnect the battery and the injection computer.
Check the cleanliness and condition of the connections.
Using the universal bornier, check the insulation and continuity on the following connections:
Injection computer, connectorB, track J2 track B, refrigerant pressure sensor
Injection computer, connectorB, track J3 track C of the refrigerant sensor
Injection computer, connectorB, track K2 track A of the refrigerant sensor
Repair if necessary.
If the fault is still present, replace the refrigerant sensor.
If the fault is still present, check the air conditioning circuit (see MR 364, Mechanics, 62A, Air conditioning).
AFTER REPAIRRepeat the conformity check from the start.
JSAA741.0