SAAB 9-5 2009 Owners Manual
Manufacturer: SAAB, Model Year: 2009, Model line: 9-5, Model: SAAB 9-5 2009Pages: 272, PDF Size: 21.53 MB
Page 121 of 272
121 Interior equipment and trunk
Opening a garage door
To operate, simply press and release the
programmed button. Activation will now
occur for the trained device (i.e. garage door
opener, gate operator, security system,
entry door lock, home/office lighting, etc.).
For convenience, the hand-held transmitter
of the device may also be used at any time.
Rearview auto-dimming
mirrors
3
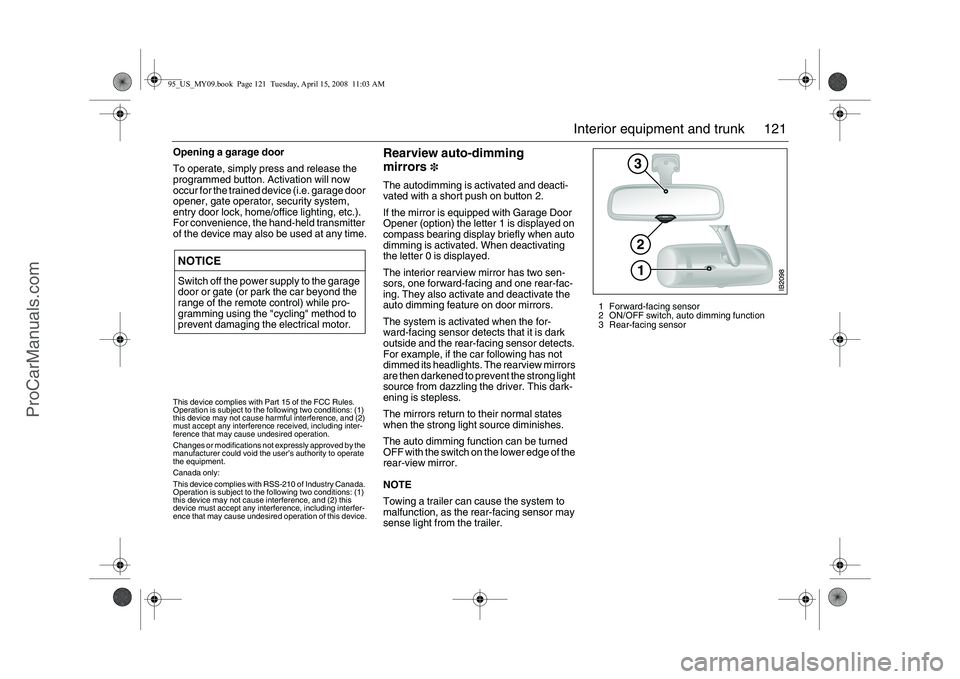
The autodimming is activated and deacti-
vated with a short push on button 2.
If the mirror is equipped with Garage Door
Opener (option) the letter 1 is displayed on
compass bearing display briefly when auto
dimming is activated. When deactivating
the letter 0 is displayed.
The interior rearview mirror has two sen-
sors, one forward-facing and one rear-fac-
ing. They also activate and deactivate the
auto dimming feature on door mirrors.
The system is activated when the for-
ward-facing sensor detects that it is dark
outside and the rear-facing sensor detects.
For example, if the car following has not
dimmed its headlights. The rearview mirrors
are then darkened to prevent the strong light
source from dazzling the driver. This dark-
ening is stepless.
The mirrors return to their normal states
when the strong light source diminishes.
The auto dimming function can be turned
OFF with the switch on the lower edge of the
rear-view mirror.
NOTE
Towing a trailer can cause the system to
malfunction, as the rear-facing sensor may
sense light from the trailer.
NOTICESwitch off the power supply to the garage
door or gate (or park the car beyond the
range of the remote control) while pro-
gramming using the "cycling" method to
prevent damaging the electrical motor.
1 Forward-facing sensor
2 ON/OFF switch, auto dimming function
3 Rear-facing sensor
This device complies with Part 15 of the FCC Rules.
Operation is subject to the following two conditions: (1)
this device may not cause harmful interference, and (2)
must accept any interference received, including inter-
ference that may cause undesired operation.
Changes or modifications not expressly approved by the
manufacturer could void the user’s authority to operate
the equipment.
Canada only:
This device complies with RSS-210 of Industry Canada.
Operation is subject to the following two conditions: (1)
this device may not cause interference, and (2) this
device must accept any interference, including interfer-
ence that may cause undesired operation of this device.95_US_MY09.book Page 121 Tuesday, April 15, 2008 11:03 AM
ProCarManuals.com
Page 122 of 272
122 Interior equipment and trunkCompass The compass is integrated in the rearview
mirror. The compass bearing is displayed in
the top right-hand corner of the mirror and is
updated every other second. The compass
displays the car’s direction of travel: N, NE,
E, etc.
Switch the compass display on and off by
pressing button 5 for 3 seconds.
Changing zones
The earth’s magnetic fields vary depending
on one’s position on the globe. If you drive
your car from one magnetic zone to another
the compass setting will need to be changed
to ensure a correct bearing.
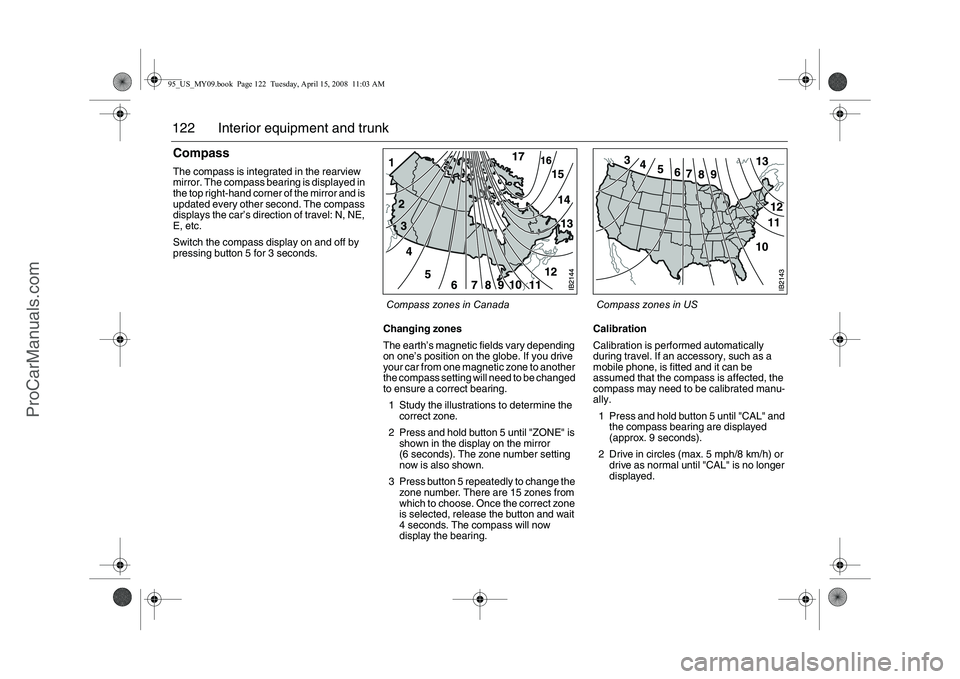
1 Study the illustrations to determine the
correct zone.
2 Press and hold button 5 until "ZONE" is
shown in the display on the mirror
(6 seconds). The zone number setting
now is also shown.
3 Press button 5 repeatedly to change the
zone number. There are 15 zones from
which to choose. Once the correct zone
is selected, release the button and wait
4 seconds. The compass will now
display the bearing.Calibration
Calibration is performed automatically
during travel. If an accessory, such as a
mobile phone, is fitted and it can be
assumed that the compass is affected, the
compass may need to be calibrated manu-
ally.
1 Press and hold button 5 until "CAL" and
the compass bearing are displayed
(approx. 9 seconds).
2 Drive in circles (max. 5 mph/8 km/h) or
drive as normal until "CAL" is no longer
displayed.
Compass zones in US Compass zones in Canada
95_US_MY09.book Page 122 Tuesday, April 15, 2008 11:03 AM
ProCarManuals.com
Page 123 of 272
123 Interior equipment and trunk
Moonroof3 The moonroof is operated by the switch on
the overhead panel above the rearview mir-
ror. The moonroof can be opened partially
or fully.
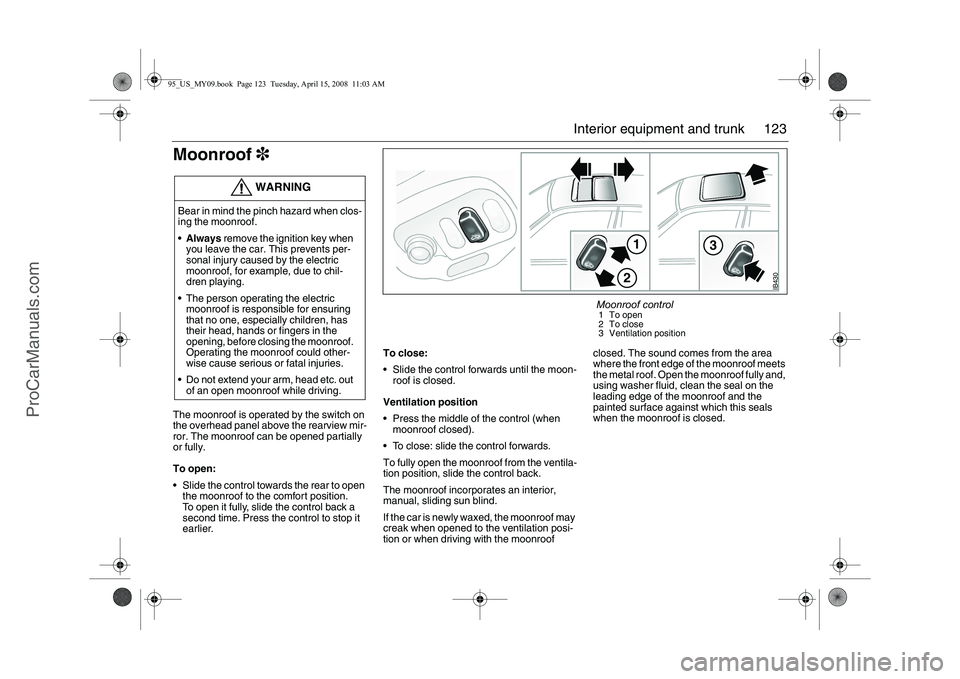
To open:
Slide the control towards the rear to open
the moonroof to the comfort position.
To open it fully, slide the control back a
second time. Press the control to stop it
earlier. To close:
Slide the control forwards until the moon-
roof is closed.
Ventilation position
Press the middle of the control (when
moonroof closed).
To close: slide the control forwards.
To fully open the moonroof from the ventila-
tion position, slide the control back.
The moonroof incorporates an interior,
manual, sliding sun blind.
If the car is newly waxed, the moonroof may
creak when opened to the ventilation posi-
tion or when driving with the moonroof closed. The sound comes from the area
where the front edge of the moonroof meets
the metal roof. Open the moonroof fully and,
using washer fluid, clean the seal on the
leading edge of the moonroof and the
painted surface against which this seals
when the moonroof is closed.
WARNING
Bear in mind the pinch hazard when clos-
ing the moonroof.
Always remove the ignition key when
you leave the car. This prevents per-
sonal injury caused by the electric
moonroof, for example, due to chil-
dren playing.
The person operating the electric
moonroof is responsible for ensuring
that no one, especially children, has
their head, hands or fingers in the
opening, before closing the moonroof.
Operating the moonroof could other-
wise cause serious or fatal injuries.
Do not extend your arm, head etc. out
of an open moonroof while driving.
IB430
1
3
2
Moonroof control 1 To open
2 To close
3 Ventilation position
95_US_MY09.book Page 123 Tuesday, April 15, 2008 11:03 AM
ProCarManuals.com
Page 124 of 272
124 Interior equipment and trunkEmergency operation of
moonroofIn an emergency (e.g. if there is an electrical
failure) the moonroof can be operated by a
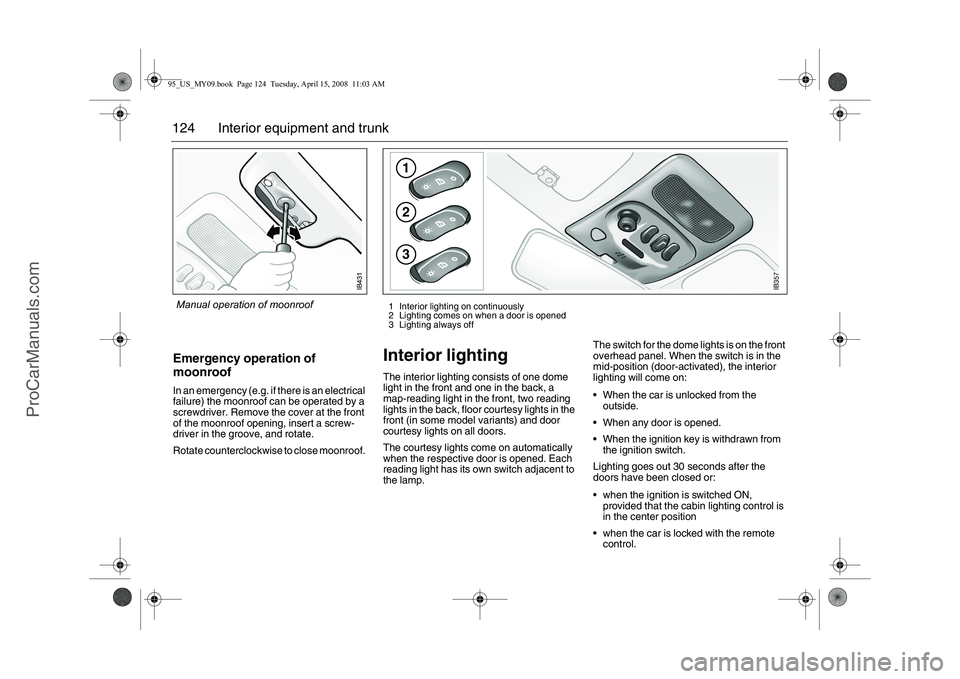
screwdriver. Remove the cover at the front
of the moonroof opening, insert a screw-
driver in the groove, and rotate.
Rotate counterclockwise to close moonroof.
Interior lighting The interior lighting consists of one dome
light in the front and one in the back, a
map-reading light in the front, two reading
lights in the back, floor courtesy lights in the
front (in some model variants) and door
courtesy lights on all doors.
The courtesy lights come on automatically
when the respective door is opened. Each
reading light has its own switch adjacent to
the lamp.The switch for the dome lights is on the front
overhead panel. When the switch is in the
mid-position (door-activated), the interior
lighting will come on:
When the car is unlocked from the
outside.
When any door is opened.
When the ignition key is withdrawn from
the ignition switch.
Lighting goes out 30 seconds after the
doors have been closed or:
when the ignition is switched ON,
provided that the cabin lighting control is
in the center position
when the car is locked with the remote
control.
IB431
Manual operation of moonroof
123
IB357
1 Interior lighting on continuously
2 Lighting comes on when a door is opened
3 Lighting always off
95_US_MY09.book Page 124 Tuesday, April 15, 2008 11:03 AM
ProCarManuals.com
Page 125 of 272
125 Interior equipment and trunk
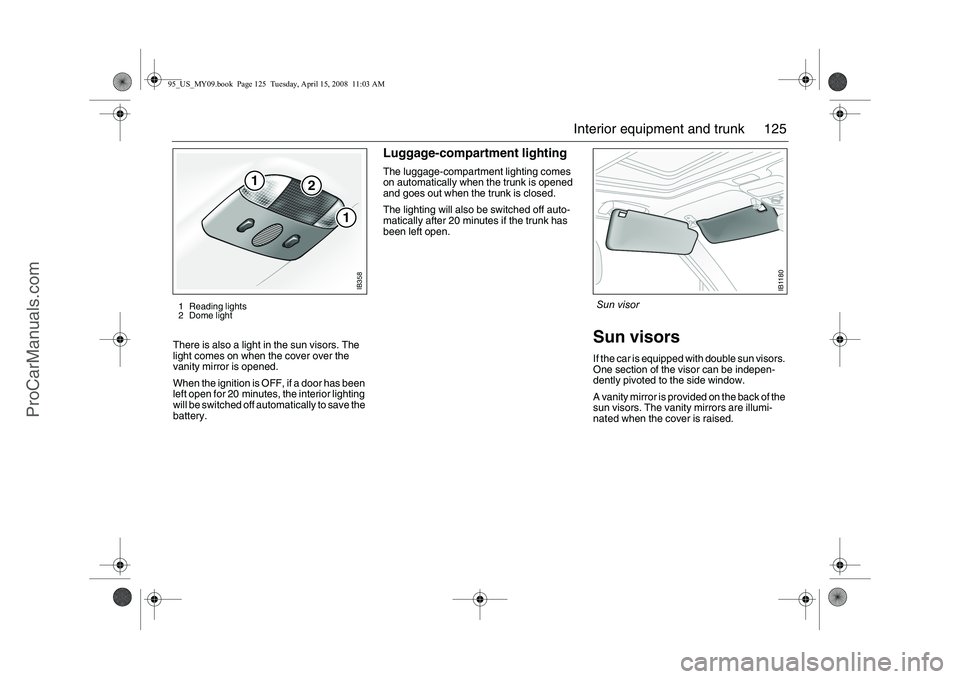
There is also a light in the sun visors. The
light comes on when the cover over the
vanity mirror is opened.
When the ignition is OFF, if a door has been
left open for 20 minutes, the interior lighting
will be switched off automatically to save the
battery.
Luggage-compartment lightingThe luggage-compartment lighting comes
on automatically when the trunk is opened
and goes out when the trunk is closed.
The lighting will also be switched off auto-
matically after 20 minutes if the trunk has
been left open.
Sun visorsIf the car is equipped with double sun visors.
One section of the visor can be indepen-
dently pivoted to the side window.
A vanity mirror is provided on the back of the
sun visors. The vanity mirrors are illumi-
nated when the cover is raised.
1
2
1
IB358
1 Reading lights
2 Dome light
IB1180
Sun visor
95_US_MY09.book Page 125 Tuesday, April 15, 2008 11:03 AM
ProCarManuals.com
Page 126 of 272
126 Interior equipment and trunkPower Outlet3You can use the electrical socket to charge
a mobile phone, for example.
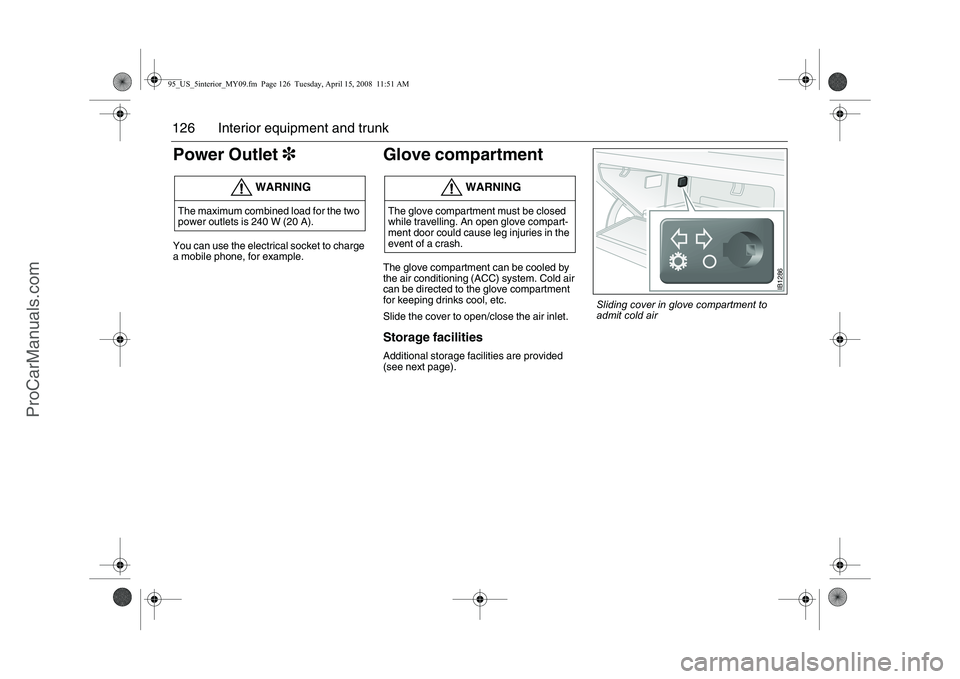
Glove compartment The glove compartment can be cooled by
the air conditioning (A CC) system. Cold air
can be directed to the glove compartment
for keeping drinks cool, etc.
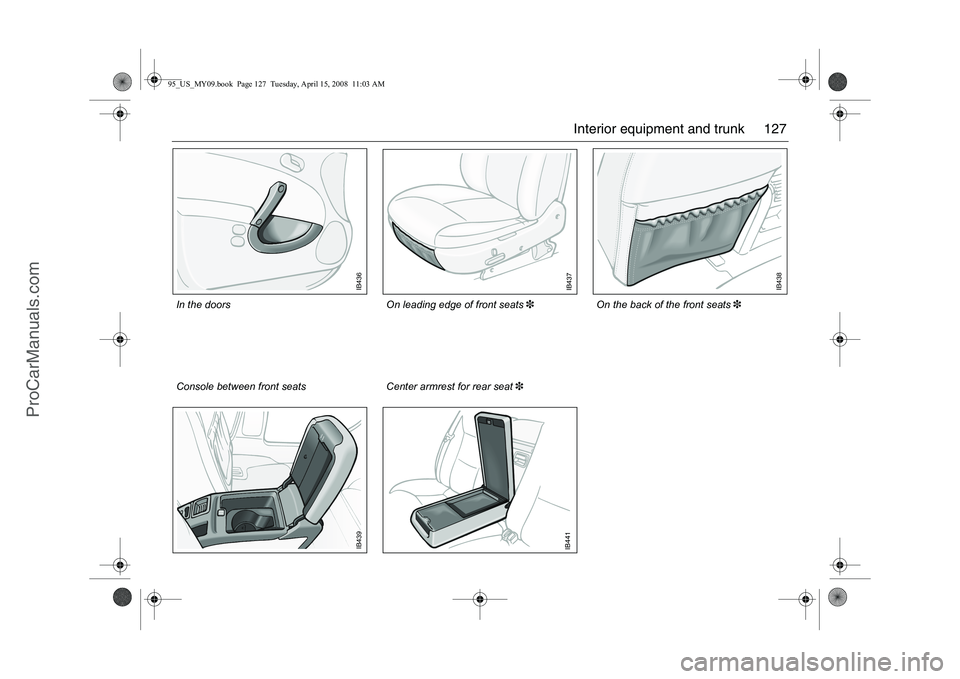
Slide the cover to open/close the air inlet. Storage facilitiesAdditional storage facilities are provided
(see next page).
WARNING
The maximum combined load for the two
power outlets is 240 W (20 A).
WARNING
The glove compartment must be closed
while travelling. An open glove compart-
ment door could cause leg injuries in the
event of a crash.
IB1286
Sliding cover in glove compartment to
admit cold air
95_US_5interior_MY09.fm Page 126 Tuesday, April 15, 2008 11:51 AM
ProCarManuals.com
Page 127 of 272
127 Interior equipment and trunk
IB436
IB437
IB439
IB441
IB438
On the back of the front seats3
Center armrest for rear seat3 On leading edge of front seats3
Console between front seats In the doors
95_US_MY09.book Page 127 Tuesday, April 15, 2008 11:03 AM
ProCarManuals.com
Page 128 of 272
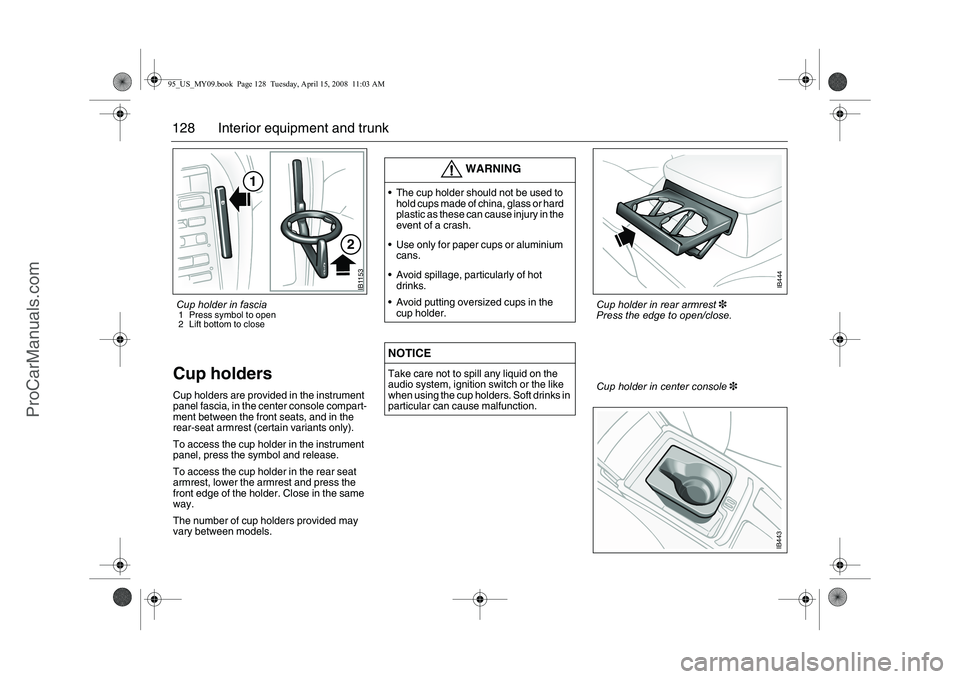
128 Interior equipment and trunkCup holders Cup holders are provided in the instrument
panel fascia, in the center console compart-
ment between the front seats, and in the
rear-seat armrest (certain variants only).
To access the cup holder in the instrument
panel, press the symbol and release.
To access the cup holder in the rear seat
armrest, lower the armrest and press the
front edge of the holder. Close in the same
way.
The number of cup holders provided may
vary between models.
WARNING
The cup holder should not be used to
hold cups made of china, glass or hard
plastic as these can cause injury in the
event of a crash.
Use only for paper cups or aluminium
cans.
Avoid spillage, particularly of hot
drinks.
Avoid putting oversized cups in the
cup holder.NOTICETake care not to spill any liquid on the
audio system, ignition switch or the like
when using the cup holders. Soft drinks in
particular can cause malfunction.
IB1153
1
2
Cup holder in center console3
IB443
Cup holder in rear armrest3
Press the edge to open/close.
IB444
Cup holder in fascia 1 Press symbol to open
2 Lift bottom to close 95_US_MY09.book Page 128 Tuesday, April 15, 2008 11:03 AM
ProCarManuals.com
Page 129 of 272
129 Interior equipment and trunk
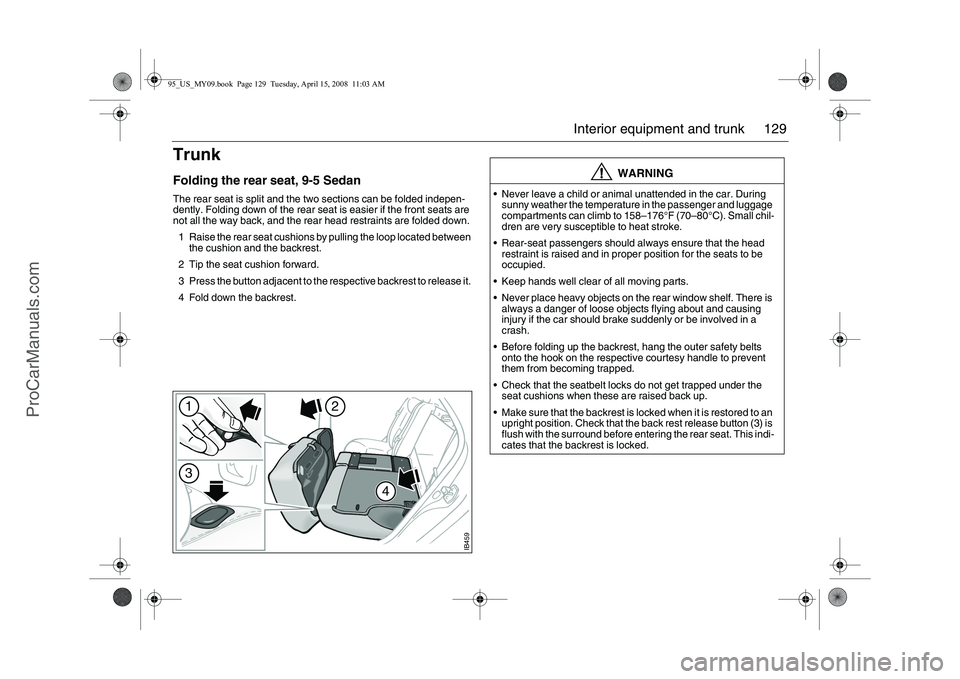
TrunkFolding the rear seat, 9-5 SedanThe rear seat is split and the two sections can be folded indepen-
dently. Folding down of the rear seat is easier if the front seats are
not all the way back, and the rear head restraints are folded down.
1 Raise the rear seat cushions by pulling the loop located between
the cushion and the backrest.
2 Tip the seat cushion forward.
3 Press the button adjacent to the respective backrest to release it.
4 Fold down the backrest.
WARNING
Never leave a child or animal unattended in the car. During
sunny weather the temperature in the passenger and luggage
compartments can climb to 158–176°F (70–80°C). Small chil-
dren are very susceptible to heat stroke.
Rear-seat passengers should always ensure that the head
restraint is raised and in proper position for the seats to be
occupied.
Keep hands well clear of all moving parts.
Never place heavy objects on the rear window shelf. There is
always a danger of loose objects flying about and causing
injury if the car should brake suddenly or be involved in a
crash.
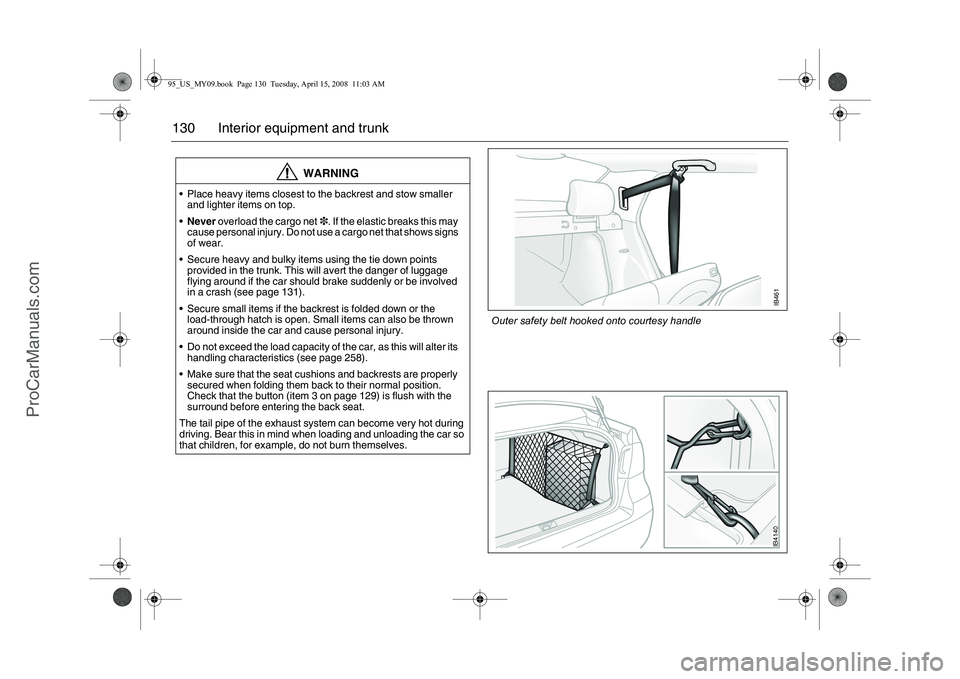
Before folding up the backrest, hang the outer safety belts
onto the hook on the respective courtesy handle to prevent
them from becoming trapped.
Check that the seatbelt locks do not get trapped under the
seat cushions when these are raised back up.
Make sure that the backrest is locked when it is restored to an
upright position. Check that the back rest release button (3) is
flush with the surround before entering the rear seat. This indi-
cates that the backrest is locked.
IB459
1
2
4
3
95_US_MY09.book Page 129 Tuesday, April 15, 2008 11:03 AM
ProCarManuals.com
Page 130 of 272
130 Interior equipment and trunk
WARNING
Place heavy items closest to the backrest and stow smaller
and lighter items on top.
Never overload the cargo net3. If the elastic breaks this may
cause personal injury. Do not use a cargo net that shows signs
of wear.
Secure heavy and bulky items using the tie down points
provided in the trunk. This will avert the danger of luggage
flying around if the car should brake suddenly or be involved
in a crash (see page 131).
Secure small items if the backrest is folded down or the
load-through hatch is open. Small items can also be thrown
around inside the car and cause personal injury.
Do not exceed the load capacity of the car, as this will alter its
handling characteristics (see page 258).
Make sure that the seat cushions and backrests are properly
secured when folding them back to their normal position.
Check that the button (item 3 on page 129) is flush with the
surround before entering the back seat.
The tail pipe of the exhaust system can become very hot during
driving. Bear this in mind when loading and unloading the car so
that children, for example, do not burn themselves.
IB4140IB461
Outer safety belt hooked onto courtesy handle
95_US_MY09.book Page 130 Tuesday, April 15, 2008 11:03 AM
ProCarManuals.com