Seat Alhambra 2014 Owner's Manual
Manufacturer: SEAT, Model Year: 2014, Model line: Alhambra, Model: Seat Alhambra 2014Pages: 381, PDF Size: 5.75 MB
Page 161 of 381
159
Air conditioning
Controls
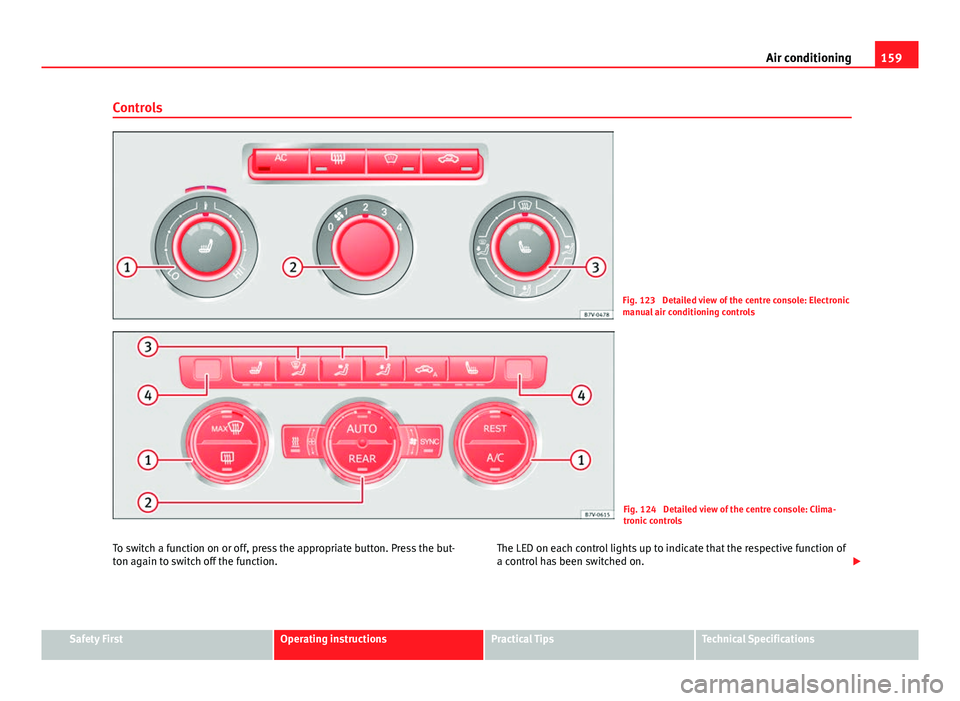
Fig. 123 Detailed view of the centre console: Electronic
manual air conditioning controls
Fig. 124 Detailed view of the centre console: Clima-
tronic controls
To switch a function on or off, press the appropriate button. Press the but-
ton again to switch off the function. The LED on each control lights up to indicate that the respective function of
a control has been switched on.
Safety FirstOperating instructionsPractical TipsTechnical Specifications
Page 162 of 381
160Air conditioning
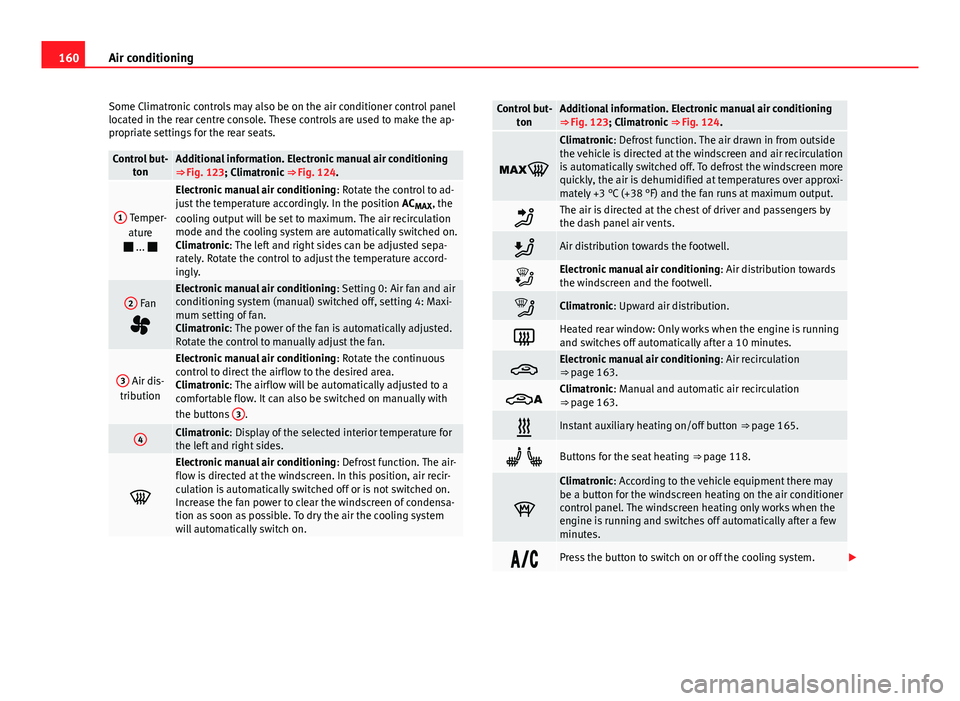
Some Climatronic controls may also be on the air conditioner control panel
located in the rear centre console. These controls are used to make the ap-
propriate settings for the rear seats.
Control but- tonAdditional information. Electronic manual air conditioning
⇒ Fig. 123; Climatronic ⇒ Fig. 124.
1 Temper-
ature
...
Electronic manual air conditioning : Rotate the control to ad-
just the temperature accordingly. In the position AC
MAX , the
cooling output will be set to maximum. The air recirculation
mode and the cooling system are automatically switched on.
Climatronic: The left and right sides can be adjusted sepa-
rately. Rotate the control to adjust the temperature accord-
ingly.
2 Fan
Electronic manual air conditioning : Setting 0: Air fan and air
conditioning system (manual) switched off, setting 4: Maxi-
mum setting of fan.
Climatronic: The power of the fan is automatically adjusted.
Rotate the control to manually adjust the fan.
3 Air dis-
tribution
Electronic manual air conditioning : Rotate the continuous
control to direct the airflow to the desired area.
Climatronic: The airflow will be automatically adjusted to a
comfortable flow. It can also be switched on manually with
the buttons 3
.
4Climatronic: Display of the selected interior temperature for
the left and right sides.
Electronic manual air conditioning
: Defrost function. The air-
flow is directed at the windscreen. In this position, air recir-
culation is automatically switched off or is not switched on.
Increase the fan power to clear the windscreen of condensa-
tion as soon as possible. To dry the air the cooling system
will automatically switch on.
Control but- tonAdditional information. Electronic manual air conditioning
⇒ Fig. 123; Climatronic ⇒ Fig. 124.
Climatronic: Defrost function. The air drawn in from outside
the vehicle is directed at the windscreen and air recirculation
is automatically switched off. To defrost the windscreen more
quickly, the air is dehumidified at temperatures over approxi-
mately +3 °C (+38 °F) and the fan runs at maximum output.
The air is directed at the chest of driver and passengers by
the dash panel air vents.
Air distribution towards the footwell.
Electronic manual air conditioning : Air distribution towards
the windscreen and the footwell.
Climatronic: Upward air distribution.
Heated rear window: Only works when the engine is running
and switches off automatically after a 10 minutes.
Electronic manual air conditioning : Air recirculation
⇒ page 163.
Climatronic: Manual and automatic air recirculation
⇒ page 163.
Instant auxiliary heating on/off button ⇒ page 165.
Buttons for the seat heating ⇒ page 118.
Climatronic: According to the vehicle equipment there may
be a button for the windscreen heating on the air conditioner
control panel. The windscreen heating only works when the
engine is running and switches off automatically after a few
minutes.
Press the button to switch on or off the cooling system.
Page 163 of 381
161
Air conditioning
Control but-
tonAdditional information. Electronic manual air conditioning
⇒ Fig. 123; Climatronic ⇒ Fig. 124.
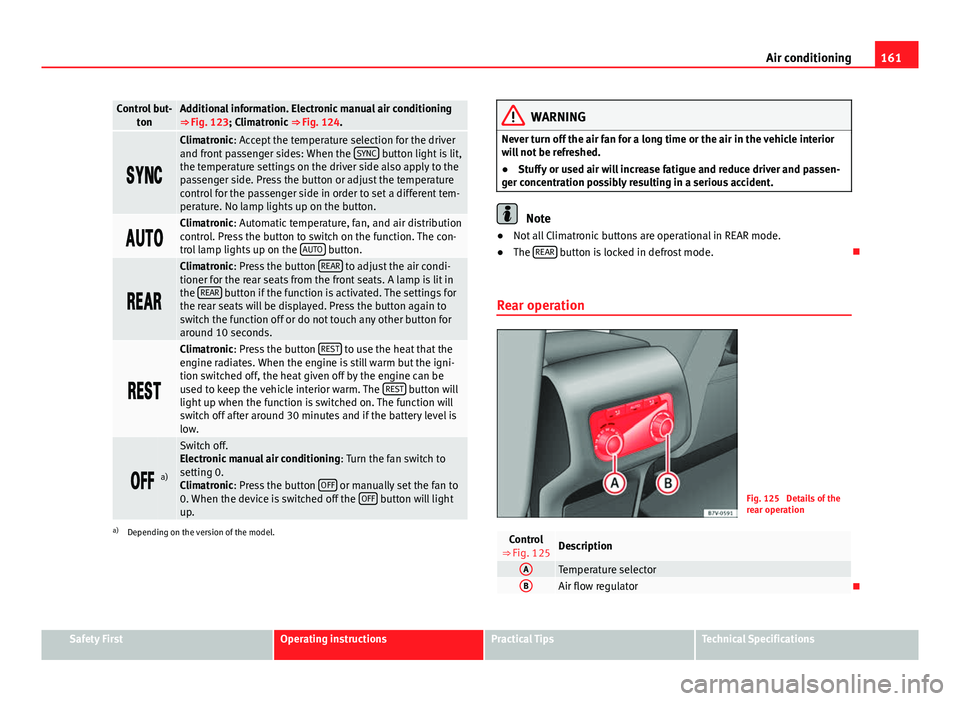
Climatronic: Accept the temperature selection for the driver
and front passenger sides: When the SYNC button light is lit,
the temperature settings on the driver side also apply to the
passenger side. Press the button or adjust the temperature
control for the passenger side in order to set a different tem-
perature. No lamp lights up on the button.
Climatronic: Automatic temperature, fan, and air distribution
control. Press the button to switch on the function. The con-
trol lamp lights up on the AUTO
button.
Climatronic: Press the button REAR to adjust the air condi-
tioner for the rear seats from the front seats. A lamp is lit in
the REAR
button if the function is activated. The settings for
the rear seats will be displayed. Press the button again to
switch the function off or do not touch any other button for
around 10 seconds.
Climatronic: Press the button REST to use the heat that the
engine radiates. When the engine is still warm but the igni-
tion switched off, the heat given off by the engine can be
used to keep the vehicle interior warm. The REST
button will
light up when the function is switched on. The function will
switch off after around 30 minutes and if the battery level is
low.
a)
Switch off.
Electronic manual air conditioning : Turn the fan switch to
setting 0.
Climatronic: Press the button OFF
or manually set the fan to
0. When the device is switched off the OFF button will light
up.
a) Depending on the version of the model.
WARNING
Never turn off the air fan for a long time or the air in the vehicle interior
will not be refreshed.
● Stuffy or used air will increase fatigue and reduce driver and passen-
ger concentration possibly resulting in a serious accident.
Note
● Not all Climatronic buttons are operational in REAR mode.
● The REAR
button is locked in defrost mode.
Rear operation
Fig. 125 Details of the
rear operation
Control
⇒ Fig. 125Description
ATemperature selectorBAir flow regulator
Safety FirstOperating instructionsPractical TipsTechnical Specifications
Page 164 of 381
162Air conditioning
Air conditioner user instructions
The interior cooling system only works when the engine is running and fan
is switched on.
The air conditioner operates most effectively with the windows and the elec-
tric sliding panoramic roof closed. However, if the vehicle has heated up af-
ter standing in the sun for some time, the air inside can be cooled more
quickly by opening the windows and the sliding electric panoramic sunroof
briefly.
Setting for conditions of optimal visibility
When the air conditioning is switched on, the temperature and the air hu-
midity in the vehicle interior drop. Hence, when the outside air humidity is
high, the windows do not mist over and comfort for the vehicle occupants is
improved:
Electronic manual air conditioning
●Switch off the air recirculation ⇒ page 163.
● Set the fan to the required setting.
● Turn the temperature control to the centre position.
● Open and direct all the air outlets in the dash panel ⇒ page 163.
● Turn the air distribution control to the required position.
With Climatronic
● Press the AUTO
button.
● Set the temperature to +22 °C (+72 °F).
● Open and direct all the air outlets in the dash panel ⇒ page 163.
Climatronic: Switching the measuring units for temperature on the radio
display or the navigation system installed with the default settings
Switching the temperature indication from Celsius to Fahrenheit on the ra-
dio display or the navigation system is carried out in the menu on the in-
strument panel ⇒ page 67. The cooling system does not switch on
If the air conditioning system cannot be switched on, this may be caused by
the following:
●
The engine is not running.
● The fan is switched off.
● The air conditioning fuse is blown.
● The outside temperature is lower than approximately +3 °C (+38 °F).
● The air conditioner compressor has been temporarily switched off be-
cause the engine coolant temperature is too high.
● Another fault in the vehicle. Have the air conditioner checked by a speci-
alised workshop.
Things to note
If the humidity and temperature outside the vehicle are high, condensation
can drip off the vaporiser in the cooling system and form a pool underneath
the vehicle. This is normal and does not indicate a leak!
Note
After starting the engine, any residual humidity in the air conditioner could
mist over the windscreen. Switch on the defrost function as soon as possi-
ble to clear the windscreen of condensation.
Page 165 of 381
163
Air conditioning
Air vents
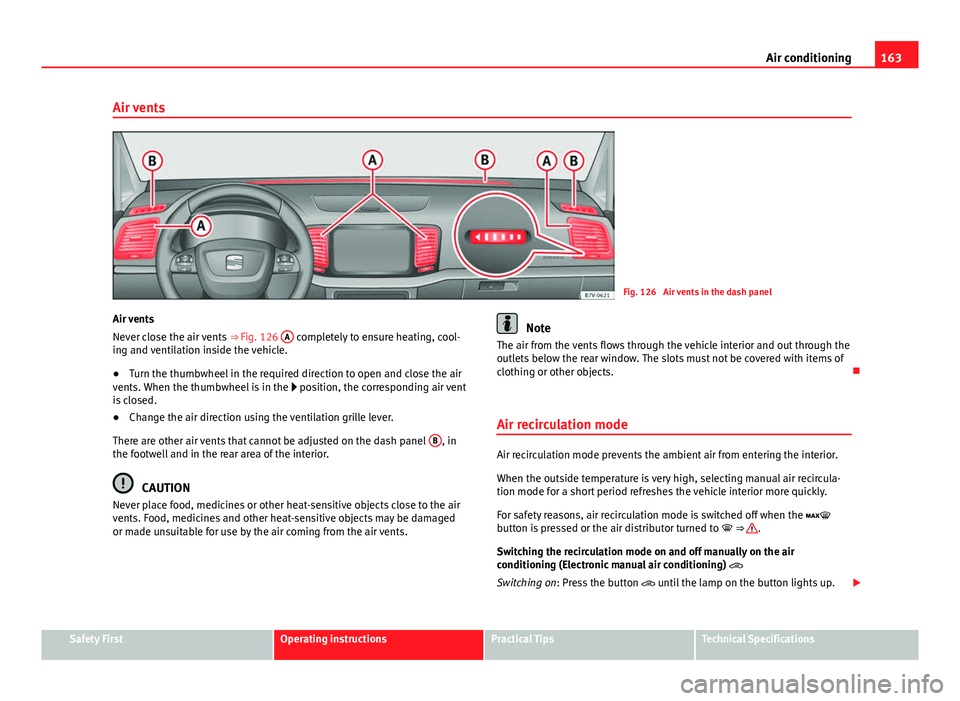
Fig. 126 Air vents in the dash panel
Air vents
Never close the air vents ⇒ Fig. 126 A
completely to ensure heating, cool-
ing and ventilation inside the vehicle.
● Turn the thumbwheel in the required direction to open and close the air
vents. When the thumbwheel is in the position, the corresponding air vent
is closed.
● Change the air direction using the ventilation grille lever.
There are other air vents that cannot be adjusted on the dash panel B
, in
the footwell and in the rear area of the interior.
CAUTION
Never place food, medicines or other heat-sensitive objects close to the air
vents. Food, medicines and other heat-sensitive objects may be damaged
or made unsuitable for use by the air coming from the air vents.
Note
The air from the vents flows through the vehicle interior and out through the
outlets below the rear window. The slots must not be covered with items of
clothing or other objects.
Air recirculation mode
Air recirculation mode prevents the ambient air from entering the interior.
When the outside temperature is very high, selecting manual air recircula-
tion mode for a short period refreshes the vehicle interior more quickly.
For safety reasons, air recirculation mode is switched off when the
button is pressed or the air distributor turned to ⇒
.
Switching the recirculation mode on and off manually on the air
conditioning (Electronic manual air conditioning)
Switching on: Press the button until the lamp on the button lights up.
Safety FirstOperating instructionsPractical TipsTechnical Specifications
Page 166 of 381
164Air conditioning
Switching off: Press the button until the lamp on the button switches off.
Switching the recirculation mode on and off manually on the
Climatronic
Switching on: Press the button until the lamp on the button lights up.
Switching off: Press the button until the lamp on the button switches
off.
Automatic air recirculation mode
Fresh air enters the vehicle interior in position . If the system detects a
high concentration of hazardous substances in the ambient air, air recircu-
lation mode is switched on automatically. When the level of impurities
drops to within a normal range, recirculation mode is switched off.
The system is unable to detect unpleasant smells.
With the following outside temperatures and conditions the air recirculation
does not switch on automatically:
● The cooling system is switched on (the AC
button is lit up) and the out-
side temperature is below +3 °C (+38 °F).
● The cooling system and the windscreen wipers are switched off and the
outside temperature is below +10 °C (+50 °F).
● The cooling system is switched off and the outside temperature is below
+15 °C (+59 °F). The windscreen wiper is switched on.
Switching the automatic air recirculation mode on and off
Switching on: Press the button until the right lamp on the button lights
up.
Switching off: Press the button until all the lamps on the button are
switched off. Switching the automatic air recirculation mode off temporarily
●
Press the button once to temporarily switch to manual air recircula-
tion mode in the event of unpleasant smells from outside. The left indicator
lamp turns on.
● After more than two seconds, press the button again to restart auto-
matic air recirculation. The right indicator lamp turns on.
WARNING
Stuffy or used air will increase fatigue and reduce driver concentration
possibly resulting in a serious accident.
● Never use recirculation mode for long periods as it does not refresh
the air inside the vehicle.
● If the cooling system is switched off and air recirculation mode
switched on, the windows can mist over very quickly, considerably limit-
ing visibility.
● Switch air recirculation mode off when it is not required.
CAUTION
Do not smoke when air recirculation is switched on in vehicles with an air
conditioner. The smoke taken in could lie on the cooling system vaporiser
and on the activated charcoal cartridge of the dust and pollen filter, leading
to a permanently unpleasant smell.
Note
Climatronic: Air recirculation mode switches on to prevent exhaust gas from
entering the vehicle interior when it is in reverse and while the automatic
windscreen wash and wipe is working.
Page 167 of 381
165
Air conditioning
Auxiliary heater* (additional heater) Introduction
The auxiliary heater is powered by fuel from the vehicle's fuel tank and can
be used while the vehicle is in motion and at a standstill. Select the mode
required (heat or fan) ⇒ page 167 on the instrument panel.
In winter, the auxiliary heater can be used in heat mode before switching on
the ignition to remove any ice, mist or snow from the windscreen (thin lay-
ers only).
Additional information and warnings:
● SEAT information system ⇒ page 62
● Refuelling ⇒ page 268
WARNING
The auxiliary heater fumes contain carbon dioxide, an odourless and col-
ourless toxic gas. Carbon monoxide can cause people to lose conscious-
ness. It can also cause death.
● Never switch on the auxiliary heater or leave it running in places that
are enclosed or unventilated.
● Never program the independent heating system to be activated and
operated in closed, unventilated areas.
WARNING
The components of the auxiliary heater exhaust system heat up a great
deal. This could cause a fire.
● Always park your vehicle so that no part of the exhaust system can
come in contact with flammable materials (such as dried grass).
CAUTION
Never place food, medicines or other heat-sensitive objects close to the air
vents. Food, medicines and other heat-sensitive objects may be damaged
or made unsuitable for use by the air coming from the air vents.
Switching the auxiliary heater on and off
Switching the auxiliary heater on:
Manually using the instant on/off button.⇒ page 159
ONManually using the remote control.⇒ page 166
Automatically at the programmed and enabled on
time.⇒ page 167
Switching the auxiliary heater off:
Manually using the instant on/off button for the
air conditioner.⇒ page 159
OFFManually using the remote control.⇒ page 166 Automatically after the programmed time.⇒ page 167
Automatically when the light comes on (fuel re-
serve).⇒ page 268
Automatically when the battery power drops to a
very low level.⇒ page 292
Things to note
After switching the auxiliary heater off, it continues to run for a short period
to completely burn any fuel remaining in the auxiliary heater. The exhaust
gases are also extracted from the system.
Safety FirstOperating instructionsPractical TipsTechnical Specifications
Page 168 of 381
166Air conditioning
Remote control
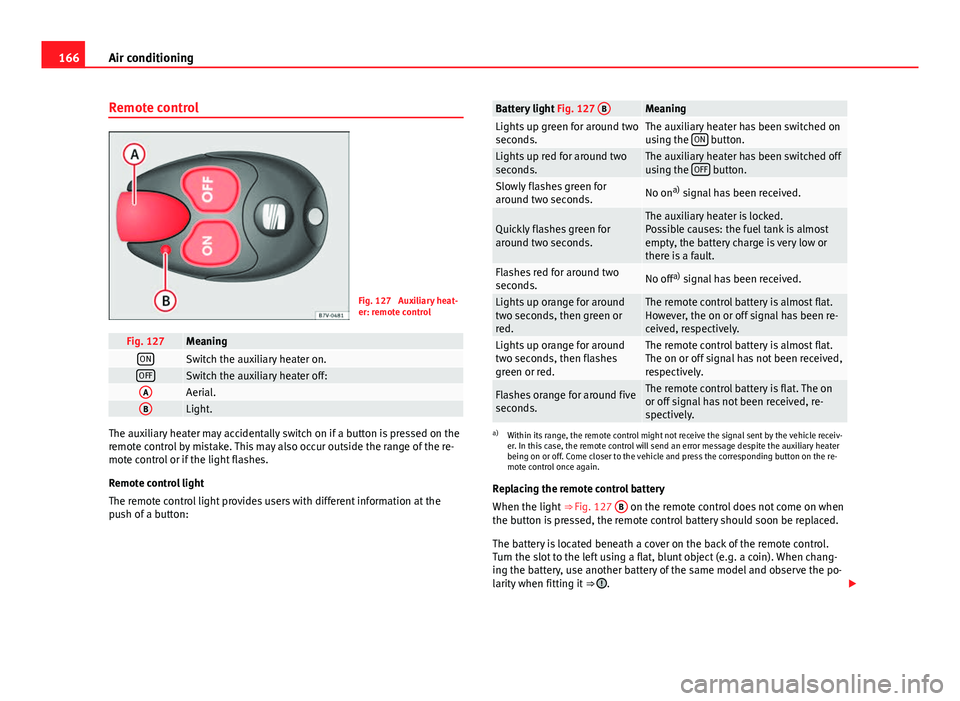
Fig. 127 Auxiliary heat-
er: remote control
Fig. 127MeaningONSwitch the auxiliary heater on.OFFSwitch the auxiliary heater off:AAerial.BLight.
The auxiliary heater may accidentally switch on if a button is pressed on the
remote control by mistake. This may also occur outside the range of the re-
mote control or if the light flashes.
Remote control light
The remote control light provides users with different information at the
push of a button:
Battery light Fig. 127 BMeaningLights up green for around two
seconds.The auxiliary heater has been switched on
using the ON button.Lights up red for around two
seconds.The auxiliary heater has been switched off
using the OFF button.Slowly flashes green for
around two seconds.No ona)
signal has been received.
Quickly flashes green for
around two seconds.The auxiliary heater is locked.
Possible causes: the fuel tank is almost
empty, the battery charge is very low or
there is a fault.
Flashes red for around two
seconds.No off a)
signal has been received.
Lights up orange for around
two seconds, then green or
red.The remote control battery is almost flat.
However, the on or off signal has been re-
ceived, respectively.
Lights up orange for around
two seconds, then flashes
green or red.The remote control battery is almost flat.
The on or off signal has not been received,
respectively.
Flashes orange for around five
seconds.The remote control battery is flat. The on
or off signal has not been received, re-
spectively.
a) Within its range, the remote control might not receive the signal sent by the vehicle receiv-
er. In this case, the remote control will send an error message despite the auxiliary heater
being on or off. Come closer to the vehicle and press the corresponding button on the re-
mote control once again.
Replacing the remote control battery
When the light ⇒ Fig. 127 B
on the remote control does not come on when
the button is pressed, the remote control battery should soon be replaced.
The battery is located beneath a cover on the back of the remote control.
Turn the slot to the left using a flat, blunt object (e.g. a coin). When chang-
ing the battery, use another battery of the same model and observe the po-
larity when fitting it ⇒
.
Page 169 of 381
167
Air conditioning
Range
The receiver is in the interior of the vehicle. The remote control, when fitted
with new batteries, has a range of several hundred metres. Obstacles be-
tween the remote control and the vehicle, bad weather conditions and dis-
charged batteries can considerably reduce the range of the remote control.
An optimum range is obtained by keeping the remote control vertical, with
the aerial ⇒ Fig. 127 A
pointing upwards. When doing so, do not cover the
aerial with your fingers or with the palm of your hand.
There must be a minimum distance of two metres between the remote con-
trol and the vehicle.
CAUTION
● The radio frequency remote control contains electronic components.
Therefore, avoid getting the remote control wet and from being knocked
and protect it from direct sunlight.
● Use of inappropriate batteries may damage the remote control. For this
reason, always replace the dead battery with another of the same voltage,
size and specifications.
For the sake of the environment
● Please dispose of old batteries so that they do not harm the environ-
ment.
● The remote control battery may contain perchlorate. Observe the legal
requirements for their disposal.
Programming the auxiliary heater
The heater or ventilation inside the vehicle can be programmed for a certain
period. Before programming, check that the day is correctly set in the
Auxiliary heat-
er - day of the week menu ⇒
.
Enabling the Auxiliary heater menu on the instrument panel
● From the main menu, select the Auxiliary heater submenu and press the
OK
button on the windscreen wiper lever.
● OR: press the or arrow buttons on the multi-function steering
wheel until the Auxiliary heater menu is displayed.
Menu optionsDescription
Switching on
Switching off
The auxiliary heater can be set to come on automati-
cally if required. To do so, select a timer:
– The timer is displayed marked with a .
– Only one timer can be selected. If a timer has been
selected, Prog. ON will be displayed on the screen. If
no timer has been selected, the instrument panel dis-
play will show Prog. OFF.
– To modify the programmed timer, select another tim-
er or select the Off option.
Timer 1
Timer 2
Timer 3Three different timers (hh.mm) can later be selected
using the On option. If the auxiliary heater is to be
switched on for just a certain day of the week, select
the day of the week and the time for the auxiliary heat-
er to come on.
DurationThe operating time may vary between 10 and 60 mi-
nutes and can be set to 5-minute intervals.
Operating modeSet to heat or ventilate the vehicle interior when the
auxiliary heater is switched on.
DaySet the current day of the week.
Factory settingsThe predefined factory values for the functions of this
menu are restored.
BackThis returns to the main menu.
Safety FirstOperating instructionsPractical TipsTechnical Specifications
Page 170 of 381
168Air conditioning
Checking programming
If the timer has been switched on after switching the ignition off, the instant
on button
will remain lit for around ten seconds.
WARNING
Never program the independent heating system to be activated and oper-
ated in closed, unventilated areas. The auxiliary heater fumes contain
carbon dioxide, an odourless and colourless toxic gas. Carbon monoxide
can cause people to lose consciousness. It can also cause death.
Operating instructions
The auxiliary heater exhaust system located below the vehicle must be kept
clear of snow, mud and other objects. The exhaust gases must not be ob-
structed in any way. The exhaust gases generated by the auxiliary heater are
removed via an exhaust pipe fitted underneath the vehicle.
On heating the vehicle interior, depending on the outside temperature the
warm air is first directed at the windscreen and then to the rest of the vehi-
cle interior through the air vents. If the air vents are turned towards the win-
dows, for example, the form of air distribution may be affected.
Depending on the outside temperature, the temperature at which the auxili-
ary heater warms the vehicle interior may be somewhat higher if the heating
or air conditioner temperature control is set to maximum before switching
the heating on.
Depending on the engine, vehicles with auxiliary heater may be fitted with a
second battery in the luggage compartment that is responsible for powering
the auxiliary heater. Cases in which the auxiliary heater will not switch on
●
The auxiliary heater requires about as much power as the dipped beam
headlights. If the battery charge is low, the auxiliary heater will switch off
automatically or will not even switch on. This avoids problems when starting
the engine.
● The heater will switch just once each time. The timer will also have to be
switched back on every time it is required.
Note
● Noise will be heard while the auxiliary heater is running.
● When the air humidity is high and the outside temperature low, the
heating system may evaporate condensation from the auxiliary heater. In
this case, steam may be released from underneath the vehicle. This is com-
pletely normal and there is no need to suspect a fault!
● If the auxiliary heater runs several times over a prolonged period, the ve-
hicle battery may run flat. To re-charge the battery, drive the vehicle for a
long distance. In general: drive for as much time as the auxiliary heating
was working.