Seat Alhambra 2017 Owner's Manual
Manufacturer: SEAT, Model Year: 2017, Model line: Alhambra, Model: Seat Alhambra 2017Pages: 320, PDF Size: 6.88 MB
Page 171 of 320
Transport and practical equipment
WARNING
Improper use of the drink holders can cause
injury .
● Nev
er place hot drinks in the drink holders.
During s
udden braking or driving manoeu-
vres, the hot drink could be spilled and lead
to scalding.
● Ensure that no bottles or other object are
dropped in the driv
er footwell, as they could
get under the pedals and obstruct their work-
ing.
● Never place heavy containers, food or other
heavy o
bjects in the drink holder. In the
event of an accident, these heavy objects
could be “thrown around” the vehicle interior
and cause serious injuries. WARNING
Closed bottles inside the vehicle could ex-
plode or c r
ack due to the heat or the cold.
● Never leave a closed bottle in the vehicle if
the inside t
emperature is too high or too low. CAUTION
Do not leave open cans in the drink holders
when the v ehic
le is in motion. They could
spill during braking, for example, and cause
damage to the vehicle and the electrical sys-
tem. Note
The drink holders can be removed for clean-
ing. Drink holders in front centre console
Fig. 189
Front centre console: drink holder ●
To open, mo v
e the c
over backwards
››› Fig. 189.
● To close, move the cover forwards. Drink ho
lders, rear* Fig. 190
Centre console, rear section: folding
out the drink
ho
lder Opening and closing the drink holder in the
r
e
ar c
entre console
● To open, move the drink
holder downwards
in the direction of the arrow ››› Fig. 190.
● To close, lift the drink holder.
The third r
ow of seats has a drink holder in
the side trim compartment on the rear left.
169
Technical data
Advice
Operation
Emergencies
Safety
Page 172 of 320
Operation
Ashtray and cigarette lighter* Ashtr a
y Fig. 191
Front centre console: ashtray closed There are ashtrays located on the front of the
c
entr
e c
onsole ››› Fig. 191 and on the rear lin-
ing of the rear door.
Opening and closing the ashtray
● To open, lift the ashtray cover.
● To
close, push the ashtray cover down.
Emptyin
g the ashtray
● Remove the ashtray from the drink holder
or lining of the door b
y pulling it upwards.
● After emptying the ashtray, insert it from
above int
o the drink holder or door lining. WARNING
Incorrect use of the ashtray may cause a fire
or burn s
and other serious injuries.
● Never put paper or other flammable objects
in the ashtra
y. Cigarette lighter
Fig. 192
Front centre console: lighter Depending on the vehicle equipment, there
m
a
y
be a lighter to the front of the centre
console ››› Fig. 192 or in the compartment to
the front of the centre console.
● Push the button on the cigarette lighter in-
ward
s with the ignition on ››› Fig. 192.
● Wait for the lighter to pop out slightly.
● Pull out the cigarette lighter and light the
cigar
ette on the glowing coil ››› .
● Replace the cigarette lighter in its insert. WARNING
Undue use of the cigarette lighter may cause
a fire or b urn
s and other serious injuries.
● The cigarette lighter must only be used to
light cig
arettes or similar.
● Never leave children unsupervised in the
vehicl
e. The cigarette lighter can be used
when the ignition is switched on. Note
The cigarette lighter can also be used with
the 12 v o
lt power socket ››› page 170. Power sockets
Intr oduction Electrical equipment can be connected to the
po
w
er soc
kets in the vehicle.
All connected appliances should be in per-
fect working order without any faults. WARNING
Improper use of the power sockets or electri-
ca l
devices could lead to a fire and cause seri-
ous injuries.
● Never leave children unsupervised in the
vehicl
e. The power sockets and equipment
connected to them can be used when the ig-
nition is switched on. 170
Page 173 of 320
Transport and practical equipment
●
Shoul d a c
onnected electrical device over-
heat, switch it off and unplug it immediately. CAUTION
● To av oid d
amage to the vehicle's electrical
system, never connect equipment that gener-
ates electrical current, such as solar panels
or battery chargers, to the 12 volt power
sockets in order to charge the vehicle's bat-
tery.
● Only use accessories with approved elec-
tromagnetic
compatibility according to cur-
rent regulations.
● To avoid damage due to voltage variations,
switc
h off all devices connected to the 12 V
power sockets before switching the ignition
on or off and before starting the engine.
● Never connect an appliance to the 12 volt
power soc
ket that consumes more than the
power indicated in watts. Exceeding the max-
imum power absorption could damage the ve-
hicle's electrical system. For the sake of the environment
Do not leave the engine running when the ve-
hicl e i
s at a standstill. Note
● Us in
g devices with the engine stopped and
the ignition switched on will drain the bat-
tery. ●
Unshiel ded equipment
can cause interfer-
ence on the radio equipment and the vehi-
cle's electrical system.
● Interference can occur on the radio's AM
wave
band if electrical appliances are used
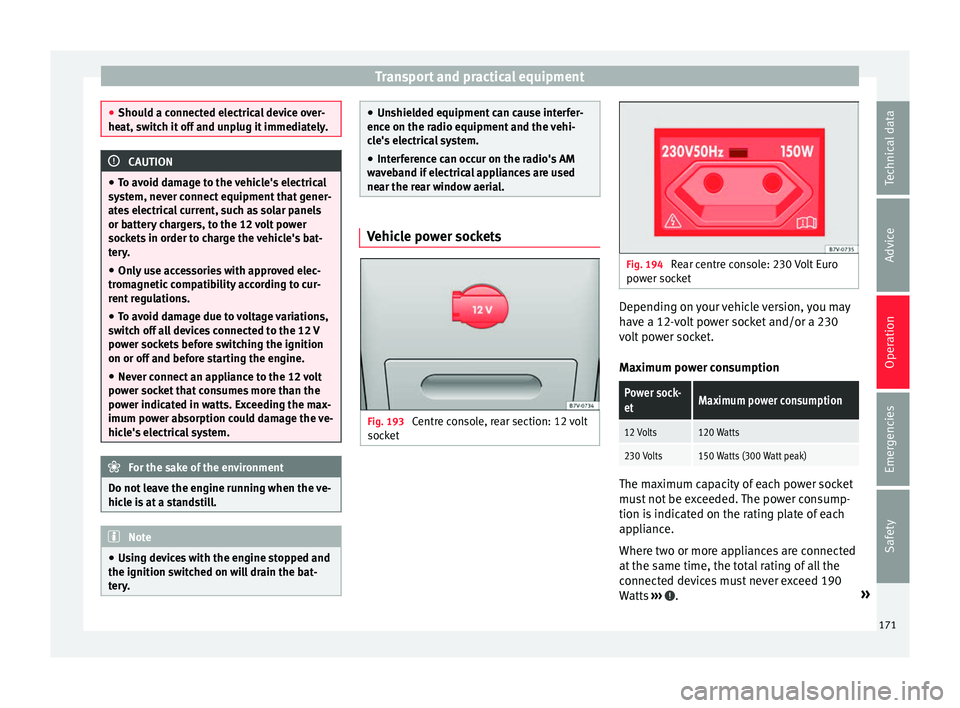
near the rear window aerial. Vehicle power sockets
Fig. 193
Centre console, rear section: 12 volt
soc k
et Fig. 194
Rear centre console: 230 Volt Euro
pow er soc
ket Depending on your vehicle version, you may
h
av
e a 12-
volt power socket and/or a 230
volt power socket.
Maximum power consumption
Power sock-
etMaximum power consumption
12 Volts120 Watts
230 Volts150 Watts (300 Watt peak) The maximum capacity of each power socket
mu
s
t
not be exceeded. The power consump-
tion is indicated on the rating plate of each
appliance.
Where two or more appliances are connected
at the same time, the total rating of all the
connected devices must never exceed 190
Watts ››› .
»
171
Technical data
Advice
Operation
Emergencies
Safety
Page 174 of 320
Operation
12 volt power socket
The 12 v
o
lt power socket will only work with
the ignition on.
Using electrical appliances with the engine
stopped and the ignition switched on will
drain the battery. Therefore, electrical devi-
ces connected to the power socket can only
be used when the engine is running.
To prevent voltage variations from causing
damage, switch off the electrical consumer
connected to the 12 volt power socket before
switching the ignition on or off and before
starting the engine.
12 volt power sockets can be found in the fol-
lowing locations in the vehicle:
● Compartment in the centre of the centre
conso
le.
● Compartment in the front centre console.
● Storage compartment in the front central
armres
t.
● Rear centre console ›››
Fig. 193.
● At the rear right of the luggage compart-
ment.
230 V
olt Euro power socket*
The power socket only works when the en-
gine is running ››› .
C onn e
cting an electrical appliance: plug the
device into the power socket as far as possi-
ble to unlock the built-in childproof lock. The current only flows when the childproof lock is
unloc
ked.
LED on the power socket ››› Fig. 194
Steady green light:The childproof lock is un-
locked. The power socket can
now be used.
Flashing red light:There is some kind of fault
(e.g. disconnection due to ex-
cess current or temperature). Heat protection
The 230
V
o
lt Euro power connector converter
switches off automatically when a certain
temperature is exceeded. This disconnect
prevents overheating in the event of an in-
crease in power consumption of the connec-
ted appliance and where the atmospheric
temperature is too high. The inverter will
switch on again automatically after it has
cooled down. Appliances that are switched
on and connected to the power socket will
start up again. Therefore, switch off all elec-
trical appliances connected to the power
socket when the current converter switches
off due to overheating. WARNING
High voltage in the electrical installation!
● Liquids must not be spilt over the power
sock et
. ●
Do not p lug a
dapters or extension cords in-
to the 230 Volt Euro power connector. Other-
wise, the built-in child safety device will
switch off and the connector will become live.
● Do not plug current conductors such as a
knitting needle int
o the 230 Volt Euro power
connector. CAUTION
● Alw a
ys follow the operating instructions for
the appliances to be connected!
● Never exceed the maximum power rating as
this c
ould damage the vehicle's general elec-
trical system.
● 12 volt power socket:
– Only u
se accessories with approved elec-
tromagnetic compatibility according to
current regulations.
– Never power the socket.
● 230 Volt Euro power socket:
– Do not plug in dev
ices or connectors that
are too heavy (e.g. a transformer) into the
power socket.
– Do not connect lamps which contain a ne-
on tube.
– Only plug appliances with a voltage that
matches the power socket voltage into
the power socket.
– Where devices have with a high start-up
current, surge protection prevents them
from switching on. In this case, unplug 172
Page 175 of 320
Air conditioning
the device and try plugging it back in af-
ter ar
ou
nd 10 seconds. Note
● Some ap pli
ances may not work properly in
the 230 Volt Euro power connector due to a
lack of power (Watts).
● The 230 Watt Euro power connector can be
modified for 115 W
att appliances and vice
versa. Consult a specialist shop for advice on
accessories to adapt the connector. SEAT rec-
ommends taking your car in for technical
service. Air conditioning
Air c onditionin
g
Intr
oduction Viewing Climatronic information
The fact
or
y-fitted radio or navigation system
screen briefly displays information relating to
Climatronic.
The units of temperature measurement is dis-
played on the factory-installed radio or navi-
gation system and, depending on the vehicle
equipment, can be set using the Configu-
ration menu on the instrument panel. WARNING
Reduced visibility through the windows in-
cr e
ases the risk of serious accidents.
● Ensure that all windows are free of ice and
snow and th
at they are not fogged up pre-
venting a clear view of everything outside.
● The maximum heat output required to de-
fros
t windows quickly is only available when
the engine has reached its normal running
temperature. Only drive when you have good
visibility.
● Always ensure that you use the air condi-
tioner and heated r
ear window to maintain
good visibility.
● Never leave the air recirculation on for a
long period of time. If
the cooling system is switched off and air recirculation mode
swit
c
hed on, the windows can mist over very
quickly, considerably limiting visibility.
● Switch air recirculation mode off when it is
not requir
ed. WARNING
Stuffy or used air will increase fatigue and re-
duc e driv er c
oncentration possibly resulting
in a serious accident.
● Never leave the fresh air fan turned off or
use the air rec
irculation for long periods of
time; the air in the vehicle interior will not be
refreshed. CAUTION
● Swit c
h the air conditioner off if you think it
may be broken. This will avoid additional
damage. Have the air conditioner checked by
a specialised workshop.
● Repairs to the air conditioner require spe-
cia
list knowledge and special tools. SEAT rec-
ommends taking your car in for technical
service.
● Do not smoke when air recirculation is
switc
hed on in vehicles with an air condition-
er. The smoke taken in could lie on the cool-
ing system vaporiser and on the activated
charcoal cartridge of the dust and pollen fil-
ter, leading to a permanently unpleasant
smell. » 173
Technical data
Advice
Operation
Emergencies
Safety
Page 176 of 320
Operation
Note
● When the coo lin
g system is turned off, air
coming from the outside will not be dried. To
avoid fogging up the windows, SEAT recom-
mends leaving the cooler (compressor) on. To
do this, press the A/C button. The button
lamp shou l
d light up.
● If the humidity and temperature outside the
vehicl
e are high, condensation can drip off
the evaporator in the cooling system and
form a pool underneath the vehicle, this is
completely normal and there is no need to
suspect a leak.
● Keep the air intake slots in front of the
winds
creen free of snow, ice and leaves to en-
sure heating and cooling are not impaired,
and to prevent the windows from misting
over. Controls
Read the additional information carefully
› ›
›
page 36
To switch a function on or off, press the ap-
propriate button. Press the button again to
switch off the function.
The LED on each control lights up to indicate
that the respective function of a control has
been switched on.
Some Climatronic controls may also be on
the air conditioner control panel located in
the rear centre console. These controls are used to make the appropriate settings for the
rear se
ats. Note
● Not a l
l Climatronic buttons are operational
in REAR mode.
● The REAR button is locked in defrost mode.
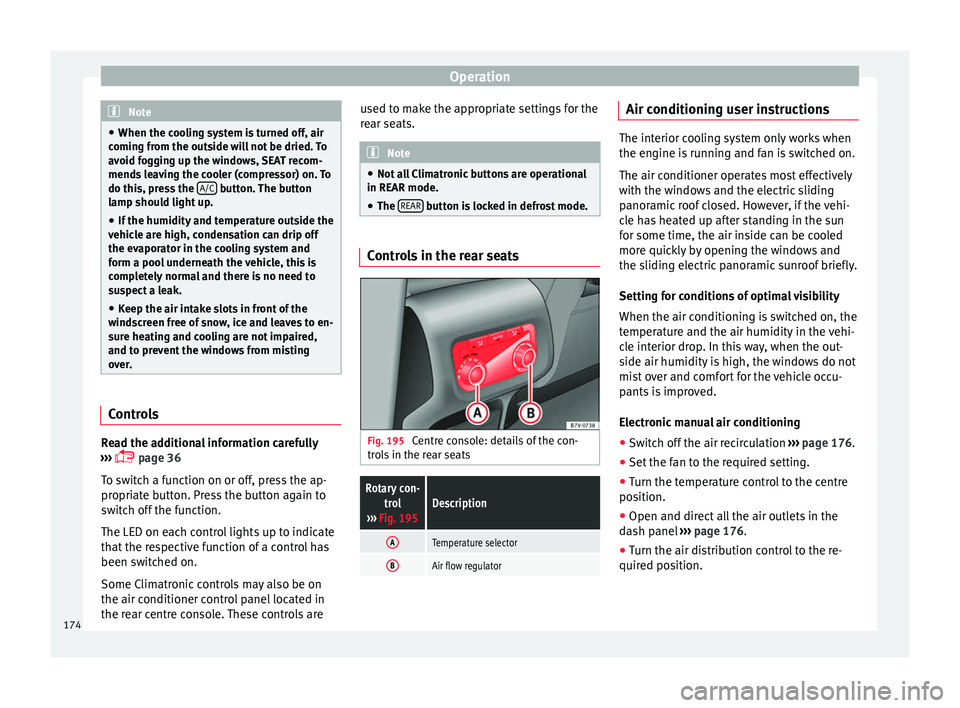
Controls in the rear seats
Fig. 195
Centre console: details of the con-
tr o
l
s in the rear seats
Rotary con-
trol
››› Fig. 195Description
ATemperature selector
BAir flow regulator Air conditioning user instructions
The interior cooling system only works when
the engine i
s
running and fan is switched on.
The air conditioner operates most effectively
with the windows and the electric sliding
panoramic roof closed. However, if the vehi-
cle has heated up after standing in the sun
for some time, the air inside can be cooled
more quickly by opening the windows and
the sliding electric panoramic sunroof briefly.
Setting for conditions of optimal visibility
When the air conditioning is switched on, the
temperature and the air humidity in the vehi-
cle interior drop. In this way, when the out-
side air humidity is high, the windows do not
mist over and comfort for the vehicle occu-
pants is improved.
Electronic manual air conditioning
● Switch off the air recirculation ››
›
page 176.
● Set the fan to the required setting.
● Turn the temperature control to the centre
position.
● Open and dir
ect all the air outlets in the
dash p
anel ›››
page 176.
● Turn the air distribution control to the re-
quired pos
ition.
174
Page 177 of 320
Air conditioning
With Climatronic
● Press the A
UT
O button.
● Set the temperature to +22°C (+72°F).
● Open and direct all the air outlets in the
d a
sh p
anel ››› page 176.
Climatronic: Switching the measuring units
for temperature on the radio display or the
navigation system installed with the default
settings
Switching the temperature indication from
Celsius to Fahrenheit on the radio display or
the navigation system is carried out in the
menu on the instrument panel
››› page 30. The cooling system does not switch on
If the air conditionin
g system cannot be
switched on, this may be caused by the fol-
lowing:
● The engine is not running.
● The fan is switched off.
● The air conditioning fuse is blown.
● The outside temperature is lower than ap-
prox
imately +3°C (+38°F).
● The air conditioner compressor has been
temporari
ly switched off because the engine
coolant temperature is too high.
● Another fault in the vehicle. Have the air
conditioner chec
ked by a specialised work-
shop. Special features
If the humidity and t
emperature outside the
vehicle are high, condensation can drip off
the vaporiser in the cooling system and form
a pool underneath the vehicle. This is normal
and does not indicate a leak! Note
After starting the engine, any residual humid-
ity in the air c onditioner c
ould mist over the
windscreen. Switch on the defrost function as
soon as possible to clear the windscreen of
condensation. 175
Technical data
Advice
Operation
Emergencies
Safety
Page 178 of 320
Operation
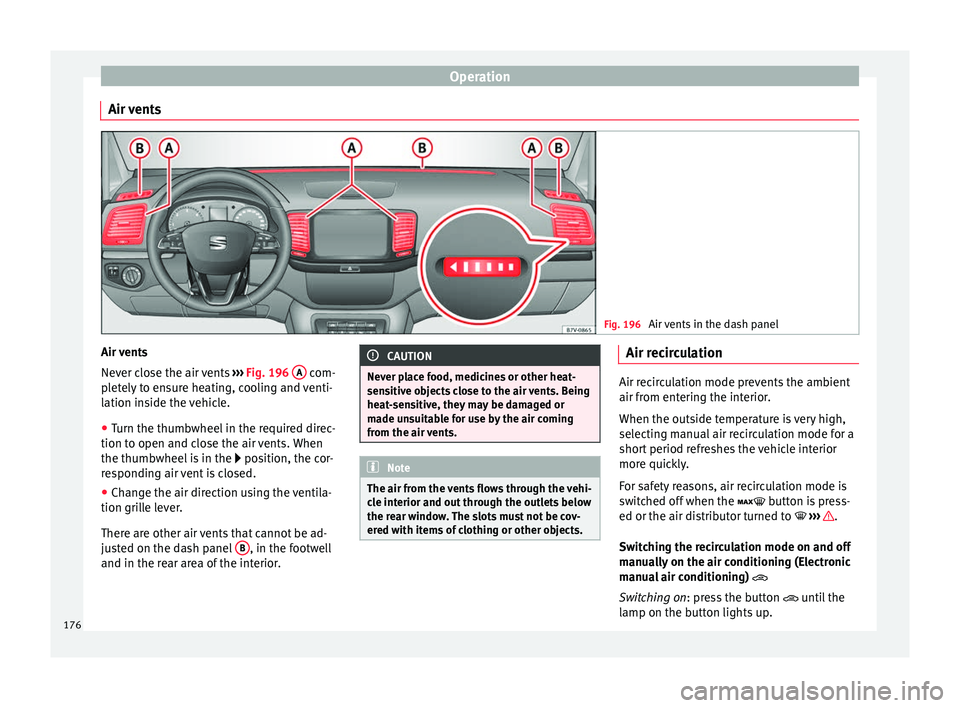
Air vents Fig. 196
Air vents in the dash panel Air vents
Nev
er c
lo
se the air vents ››› Fig. 196 A com-
p l
et
ely to ensure heating, cooling and venti-
lation inside the vehicle.
● Turn the thumbwheel in the required direc-
tion to open and clo
se the air vents. When
the thumbwheel is in the position, the cor-
responding air vent is closed.
● Change the air direction using the ventila-
tion grill
e lever.
There are other air vents that cannot be ad-
justed on the dash panel B , in the footwell
and in the r ear ar
ea of the interior. CAUTION
Never place food, medicines or other heat-
sens itiv
e objects close to the air vents. Being
heat-sensitive, they may be damaged or
made unsuitable for use by the air coming
from the air vents. Note
The air from the vents flows through the vehi-
cl e int
erior and out through the outlets below
the rear window. The slots must not be cov-
ered with items of clothing or other objects. Air recirculation
Air recirculation mode prevents the ambient
air from ent
erin
g the interior.
When the outside temperature is very high,
selecting manual air recirculation mode for a
short period refreshes the vehicle interior
more quickly.
For safety reasons, air recirculation mode is
switched off when the button is press-
ed or the air distributor turned to ››› .
Swit c
hing the recirculation mode on and off
manually on the air conditioning (Electronic
manual air conditioning)
Switching on: press the button until the
lamp on the button lights up.
176
Page 179 of 320
Air conditioning
Switching off: pr e
s s the button until the
lamp on the button switches off.
Switching the recirculation mode on and off
manually on the Climatronic
Switching on: press the button until the
lamp on the button lights up.
Switching off: press the button until the
lamp on the button switches off.
Automatic air recirculation mode
Fresh air enters the vehicle interior in posi-
tion . If the system detects a high con-
centration of hazardous substances in the
ambient air, air recirculation mode is switch-
ed on automatically. When the level of impur-
ities drops to within a normal range, recircu-
lation mode is switched off.
The system is unable to detect unpleasant
smells.
With the following outside temperatures and
conditions the air recirculation does not
switch on automatically:
● The cooling system is switched on (the ACbutton is lit up) and the outside temperature
i
s
belo
w +3°C (+38°F).
● The cooling system and the windscreen
wipers
are switched off and the outside tem-
perature is below +10°C (+50°F). ●
The coolin
g system is switched off and the
outside temperature is below +15°C (+59°F).
The windscreen wiper is switched on.
Switching the automatic air recirculation
mode on and off
Switching on: press the button until the
right lamp on the button lights up.
Switching off: press the button until all
the lamps on the button are switched off.
Switching the automatic air recirculation
mode off temporarily
● Press the button onc
e to temporarily
switch to manual air recirculation mode in
the event of unpleasant smells from outside.
The left indicator lamp turns on.
● After more than two seconds, press the
button ag
ain to restart automatic air recircu-
lation. The right indicator lamp turns on. WARNING
Observe the safety warnings ›››
in Intro-
duction on pag e 173
.
● If the cooling system is switched off and air
recir
culation mode switched on, the windows
can mist over very quickly, considerably limit-
ing visibility.
● Switch air recirculation mode off when it is
not requir
ed. CAUTION
Do not smoke when air recirculation is
swit c
hed on in vehicles with an air condition-
er. The smoke taken in could lie on the cool-
ing system vaporiser and on the activated
charcoal cartridge of the dust and pollen fil-
ter, leading to a permanently unpleasant
smell. Note
Climatronic: air recirculation mode switches
on to pr ev
ent exhaust gas from entering the
vehicle interior when it is in reverse and
while the automatic windscreen wipers are
working. Auxiliary heater* (additional
he
at
er)
Intr
oduction The auxiliary heater is powered by fuel from
the
v
ehic
le's fuel tank and can be used while
the vehicle is in motion and at a standstill.
Select the mode required ( heat or fan )
››› page 179 on the dash panel.
In winter, the auxiliary heater can be used in
heat mode before switching on the ignition
to remove any ice, mist or snow from the
windscreen (thin layers only). »
177
Technical data
Advice
Operation
Emergencies
Safety
Page 180 of 320

Operation
WARNING
The auxiliary heater fumes contain carbon di-
ox ide, an odourl
ess and colourless toxic gas.
Carbon monoxide can cause people to lose
consciousness. It can also cause death.
● Never switch on the auxiliary heater or
leav
e it running in places that are enclosed or
unventilated.
● Never program the independent heating
syst
em to be activated and operated in
closed, unventilated areas. WARNING
The components of the auxiliary heater ex-
hau s
t system heat up a great deal. This could
cause a fire.
● Always park your vehicle so that no part of
the exhau
st system can come in contact with
flammable materials (such as dried grass). CAUTION
Never place food, medicines or other heat-
sens itiv
e objects close to the air vents. Food,
medicines and other heat-sensitive objects
may be damaged or made unsuitable for use
by the air coming from the air vents. Switching the auxiliary heater on and
off
Switching the auxiliary heater on:
Manually using the instant on/off
button.›››
page
174
ONManually using the remote control.››› page
178
Automatically at the programmed
and enabled on time.››› page
179
Switching the auxiliary heater off:
Manually using the instant on/off
button for the air conditioner.›››
page
174
OFFManually using the remote control.››› page
178
Automatically after the programmed
time.››› page
179
Automatically when the light comes
on (fuel reserve).››› page
261
Automatically when the battery pow-
er drops to a very low level.››› page
280 Special feature
Af
t
er sw
itching the auxiliary heater off, it con-
tinues to run for a short period to completely
burn any fuel remaining in the auxiliary heat- er. The exhaust gases are also extracted from
the syst
em.
Remote control Fig. 197
Auxiliary heater: remote control
Fig. 197Meaning
ONSwitch the auxiliary heater on.
OFFSwitch the auxiliary heater off:
AAerial.
BLight. The auxiliary heater may accidentally switch
on if
a b
utt
on is pressed on the remote con-
trol by mistake. This may also occur outside
the range of the remote control or if the light
flashes.
178