Seat Ateca 2017 Workshop Manual
Manufacturer: SEAT, Model Year: 2017, Model line: Ateca, Model: Seat Ateca 2017Pages: 328, PDF Size: 6.36 MB
Page 51 of 328

The essentials
● Zone B : You can add oil but keep the level
in th at
zone.
● Zone C : Add oil up to zone
B .
T op
ping up engine oil
● Unscrew cap from oil filler opening.
● Add oil slowly.
● At the same time, check the level to ensure
you do not
add too much.
● When the oil level reaches at least zone B ,
u n
screw the engine oil filler cap carefully.
Oil properties
Engine typeSpecification
Petrol without flexible service
intervalVW 502 00/VW 504
00
Petrol with flexible service in-
terval (LongLife)VW 504 00
Diesel. Engines without Particu-
late filter (DPF)VW 505 01/VW 506
01/VW 507 00
Diesel. Particulate Filter En-
gines (DPF).
With or without flexible service
interval (with and without Long-
Life) a)VW 507 00
a)
Only use recommended oils, otherwise you may damage the
engine.
Engine oil additives
No type of additive should be mixed with the
engine oil. The deterioration caused by these
additives is not covered by the warranty.
››› in Changing engine oil on page 286
››› page 284 Coolant
Fig. 61
Engine compartment: coolant expan-
s ion t
ank cap. The coolant tank is located in the engine
c
omp
artment ›››
page 282.
When the engine is cold, replace the coolant
when the level is below . Coolant specifications
The engine c
ooling system is supplied from
the factory with a specially treated mixture of
water and at least 40 % of the additive G13
(TL-VW 774 J), purple. This mixture gives the
necessary frost protection down to -25°C
(-13°F) and protects the light alloy parts of
the engine cooling system against corrosion.
It also prevents scaling and considerably rai-
ses the boiling point of the coolant.
To protect the cooling system, the percentage
of additive must always be at least 40 %,
even in warm climates where anti-freeze pro-
tection is not required.
If for weather reasons further protection is
necessary, the proportion of additive may be
increased, but only up to 60 %; otherwise an-
tifreeze protection will diminish and this will
worsen cooling.
When the coolant is topped up, use a mixture
of distilled water and at least 40 % of the
G13 or G12 plus-plus (TL-VW 774 G) additive
(both are purple) to obtain an optimum anti-
corrosion protection ››› in Topping up cool-
ant on p ag
e 287. The mixture of G13 with
G12 plus (TL-VW 774 F), G12 (red) or G11
(green-blue) engine coolants will significant-
ly reduce anti-corrosion protection and
should therefore be avoided ››› in Topping
up c oo
lant on page 287. » 49
Page 52 of 328

The essentials
››› in Topping up coolant on page 287
››› page 286 Brake fluid
Fig. 62
Engine compartment: brake fluid res-
er v
oir cap The brake fluid reservoir is located in the en-
gine c
omp
artment ›››
page 282.
The level should be between the and
marks. If it is below , please visit a Techni-
cal Service.
››› in Topping up brake fluid on
page 288
››› page 287 Windscreen washer
Fig. 63
In the engine compartment: wind-
s c
reen washer reservoir top. The windscreen washer reservoir is located in
the en
gine c
ompartment ›››
page 282.
To top up, mix water with a product recom-
mended by SEAT.
In cold temperatures, add anti-freeze.
››› in Checking and topping up the
windscreen washer reservoir on
page 288
››› page 288 Battery
The battery is located in the engine compart-
ment
›
›› page 282. It does not require maintenance. It is checked as part of the In-
spection
Service.
››› in Important safety warnings for
handling a vehicle battery on page 290
››› page 289 50
Page 53 of 328
The essentials
Emergencies F u
ses
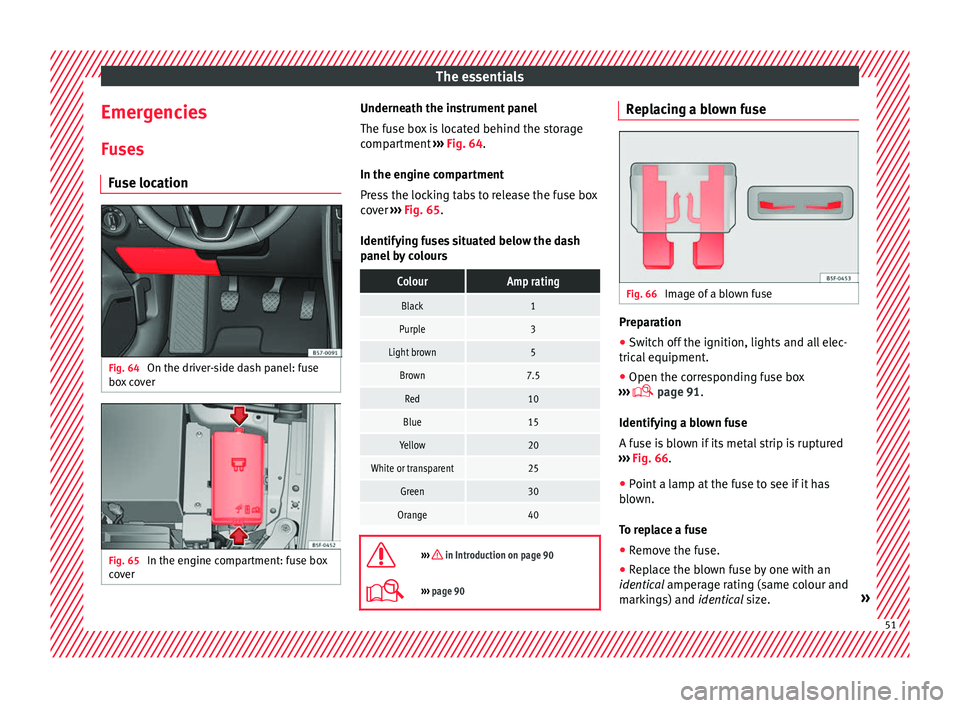
Fuse location Fig. 64
On the driver-side dash panel: fuse
bo x
cover Fig. 65
In the engine compartment: fuse box
c o
ver Underneath the instrument panel
The f
u
se box is located behind the storage
compartment ››› Fig. 64.
In the engine compartment
Press the locking tabs to release the fuse box
cover ››› Fig. 65.
Identifying fuses situated below the dash
panel by colours
ColourAmp rating
Black1
Purple3
Light brown5
Brown7.5
Red10
Blue15
Yellow20
White or transparent25
Green30
Orange40
››› in Introduction on page 90
›››
page 90 Replacing a blown fuse
Fig. 66
Image of a blown fuse Preparation
● Switch off the ignition, lights and all elec-
tric al
equipment.
● Open the corresponding fuse box
››
› page 91.
Identifying a blown fuse
A fuse is blown if its metal strip is ruptured
››› Fig. 66.
● Point a lamp at the fuse to see if it has
blo
wn.
To replace a fuse
● Remove the fuse.
● Replace the blown fuse by one with an
identic
al amperage rating (same colour and
markings) and identical size. » 51
Page 54 of 328
The essentials
● Rep
lace the cover again or close the fuse
box lid.
Bulbs Bu
lbs (12 V)
Light source used for each function
Halogen headlightsType
Daytime running light/side
lightLED (it cannot be re-
placed)
Dipped beam headlightsH7 LL
Main beam headlightsH7 LL
Turn signalPY21W
Full-LED main headlights
No bulbs may be replaced. All functions are with LEDs
Front fog lightType
Fog/cornering lights*H8
Rear lightsType
Brake light/tail lightP21W LL
Side lightsP21W LL
Turn signalPY21W LL
Rear lightsType
Retro fog lightP21W LL
Reverse lightsW16W
LED rear lightsType
Turn signalPY21W LL
Reverse lightsW16W
The remaining functions work with LEDs
›››
page 93 Action in the event of a punc-
t
ur
e
What to do first ●
Park the vehicle on a horizontal surface
and in a s af
e place as far away from traffic as
possible.
● Apply the handbrake.
● Switch on the hazard warning lights.
● Manual gearbox: select
the 1st gear.
● Automatic gearbox: Mov
e the selector lever
to position P.
● If you are towing a trailer, unhitch it from
your
vehicle. ●
Have the
vehicle tool kit ›››
page 83
and the spare wheel* ready
››› page 298.
● Observe the applicable legislation for each
cou
ntry (reflective vest, warning triangles,
etc.).
● All occupants should leave the vehicle and
wait
in a safe place (for instance behind the
roadside crash barrier). WARNING
● Alw
ays observe the above steps and pro-
tect yourself and other road users.
● If you change the wheel on a slope, block
the wheel on the op
posite side of the car with
a stone or similar to prevent the vehicle from
moving. 52
Page 55 of 328

The essentials
Repairing a tyre with the anti-punc-
t ur
e kit Fig. 67
Standard representation: contents of
the anti-p u
ncture kit. The anti-puncture kit is located under the
floor p
anel
in the luggage compartment.
Sealing the tyre
● Unscrew the tyre valve cap and insert. Use
the ››
› Fig. 67 1 tool to remove the insert.
Pl ac
e it on a clean surface.
● Shake the tyre sealant bottle vigorously
››
› Fig. 67 10 .
● Screw the inflator tube ››
› Fig. 67 3 into
the se al
ant bottle. The bottle's seal will break
automatically. ●
Remo
ve the lid from the filling tube
››› Fig. 67 3 and screw the open end of the
t ube int
o the tyre valve.
● With the tyre sealant bottle upside down,
fil
l the tyre with the contents of the sealant
bottle.
● Remove the bottle from the valve.
● Place the insert back into the tyre valve us-
ing the t
ool ››› Fig. 67 1 .
Infl atin
g the tyre
● Screw the compressor tyre inflator tube
››
› Fig. 67 5 into the tyre valve.
● Check that the air bleed screw is closed
› ›
› Fig. 67 7 .
● Start the engine and leave it running.
● Insert the connector ››
› Fig. 67 9 into the
v ehic
le's 12-volt socket ›››
page 148.
● Turn the air compressor on with the ON/OFF
swit
ch ››› Fig. 67 8 .
● Keep the air compressor running until it
r e
aches 2.0 to 2.5 bar
(29-36 psi/200-250 kPa). a maximum of 8
minutes.
● Disconnect the air compressor.
● If it does not reach the pressure indicated,
un
screw the tyre inflator tube from the valve.
● Move the vehicle 10m so that the sealant is
di s
tributed throughout the tyre. ●
Sc r
ew the compressor tyre inflator into the
valve.
● Repeat the inflation process.
● If the indicated pressure still cannot be
re
ached, the tyre is too badly damaged. Stop
and request assistance from an authorised
technician.
● Disconnect the air compressor. Unscrew
the tyr
e inflator tube from the tyre valve.
● When the tyre pressure is between 2.5 and
2.0 bar
s, continue driving without exceeding
80 km/h (50 mph).
● Check the pressure again after 10 minutes
››
› page 85.
››› in TMS (Tyre Mobility System)* on
page 83
››› page 83 53
Page 56 of 328
The essentials
Changing a wheel V ehic
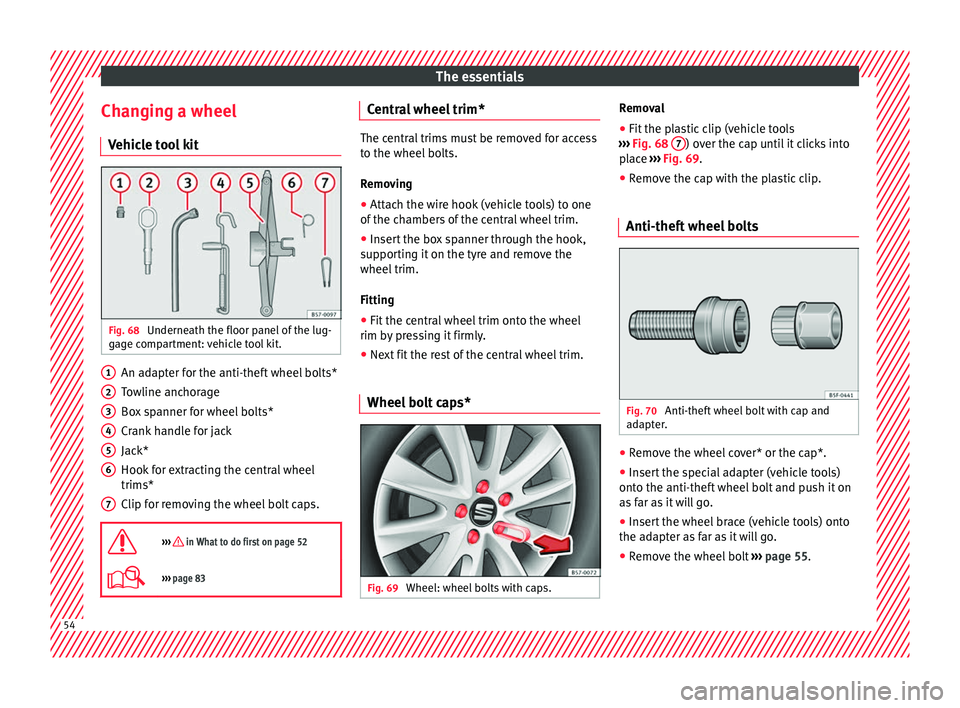
le tool kit Fig. 68
Underneath the floor panel of the lug-
g ag
e compartment: vehicle tool kit. An adapter for the anti-theft wheel bolts*
T
o
wline anchorage
Box spanner for wheel bolts*
Crank handle for jack
Jack*
Hook for extracting the central wheel
trims*
Clip for removing the wheel bolt caps.
››› in What to do first on page 52
››› page 83 1
2
3
4
5
6
7 Central wheel trim*
The central trims must be removed for access
t
o the wheel
bolts.
Removing
● Attach the wire hook (vehicle tools) to one
of the c
hambers of the central wheel trim.
● Insert the box spanner through the hook,
sup
porting it on the tyre and remove the
wheel trim.
Fitting
● Fit the central wheel trim onto the wheel
rim b y
pressing it firmly.
● Next fit the rest of the central wheel trim.
Wheel bolt caps* Fig. 69
Wheel: wheel bolts with caps. Removal
● Fit the plastic clip (vehicle tools
› ›
› Fig. 68 7 ) over the cap until it clicks into
p l
ace ››› Fig. 69.
● Remove the cap with the plastic clip.
Anti-theft wheel bolts Fig. 70
Anti-theft wheel bolt with cap and
a d
apter. ●
Remove the wheel cover* or the cap*.
● Insert the special adapter (vehicle tools)
ont o the anti-thef
t wheel bolt and push it on
as far as it will go.
● Insert the wheel brace (vehicle tools) onto
the ad
apter as far as it will go.
● Remove the wheel bolt ››
› page 55 .54
Page 57 of 328

The essentials
Note
Make a note of the code number of the anti-
thef t
wheel bolt and keep it in a safe place,
but not in your vehicle. If you need a new
adapter, you can obtain it from the SEAT Offi-
cial Service, indicating the code number. Loosening the wheel bolts
Fig. 71
Wheel: loosen the wheel bolts. ●
Insert the box spanner (vehicle tools) onto
the wheel bo
lt as far as it will go. An adapter
is required to unscrew or tighten the anti-
theft wheel bolts ›››
page 54.
● Turn the wheel bolt approximately one turn
to the l
eft ›››
Fig. 71 (arrow). To apply the re-
quired torque, hold the wheel brace at the
end. If it is not possible to loosen a wheel
bolt, carefully apply pressure with one foot
on the end of the box spanner. Hold on to the
vehicle for support and take care not to slip. WARNING
Slightly loosen the wheel bolts (one turn) be-
f or
e raising the vehicle with the jack*. If not,
an accident may occur. Lifting the vehicle
Fig. 72
Crossbar: marks. Fig. 73
Strut: mounting the jack on the vehi-
c l
e. ●
Plac
e the jack* (vehicle tools) on firm
ground. If necessary use a large, strong
board or similar support. If the surface is slip-
pery (for example tiles) place the jack on a
rubber mat or similar to prevent it from slip-
ping ››› .
● Find the support point on the strut (sunken
ar e
a) closest to the wheel to be changed
››› Fig. 72.
● Turn the jack* crank handle, located below
the strut
support point, to raise it until the
tab 1
› ››
Fig. 73
is below the housing provi-
ded.
● Align the jack* so that tab 1 “grips” onto
the hou s
ing provided on the strut and the
mobile base 2 is resting on the ground. The
b a
se plate 2 should fall vertically with re-
s pect
to the support point 1 .
● Continue turning the jack* until the wheel
i s
slightly lifted off the ground. WARNING
● Mak
e sure that the jack* remains stable. If
the surface is slippery or soft, the jack* could
slip or sink, respectively, with the resultant
risk of injury.
● Only raise the vehicle with the jack* sup-
plied b
y the manufacturer. Other vehicles
could slip, with the consequent risk of injury.
● Only mount the jack* on the support points
des
igned for this purpose on the strut, and
always align the jack correctly. If you do not, » 55
Page 58 of 328

The essentials
the jack* could slip as it does not have an
a
dequat
e grip on the vehicle: risk of injury!
● The height of the parked vehicle can
ch
ange as a result of variations in tempera-
ture and loading. CAUTION
The vehicle must not be raised on the cross-
b ar
. Only place the jack* on the points de-
signed for this purpose on the strut. Other-
wise, the vehicle may be damaged. Removing and fitting a wheel
Change the wheel after loosening the wheel
bo
lts
and raising the vehicle with the jack.
Taking off the wheel ● Unscrew the wheel bolts using the box
sp
anner and place them on a clean surface.
● Take off the wheel.
Puttin
g on the spare wheel
When fitting tyres with a compulsory rotation
direction, observe the instructions in
››› page 56.
● Mount the wheel.
● Screw on the wheel bolts in position and
tight en them loo
sely with a box spanner.
● Carefully lower the vehicle using the jack*. ●
Tight en the wheel
bolts in diagonal pairs
using the wheel brace.
The wheel bolts should be clean and turn
easily. Before fitting the spare wheel, inspect
the wheel condition and hub mounting surfa-
ces. These surfaces must be clean before fit-
ting the wheel.
Tyres with compulsory direction of ro-
tation A directional tread pattern can be identified
b
y
the arrows on the sidewall that point in
the direction of rotation. Always observe the
direction of rotation indicated when fitting
the wheel to guarantee optimum properties
of this type of tyres with regard to grip,
noises, wear and aquaplaning.
If it is absolutely necessary to fit the spare
tyre* against the direction of rotation, drive
with care as this means the tyre does not of-
fer optimum driving properties. This is of par-
ticular importance when the road surface is
wet.
To return to directional tread tires, replace
the punctured tyre as soon as possible and
restore the obligatory direction of rotation of
all tyres. Subsequent work ●
Alloy wheels: rep
lace the wheel bolt caps.
● Plate wheels: fit the c
entral wheel rim again
››› page 54.
● Return all tools to their proper storing loca-
tion.
● If the replaced wheel does not fit in the
sp
are wheel housing, store it safely in the
luggage compartment ›››
page 149.
● Check the tyre pressure of the newly moun-
ted ty
re as soon as possible.
● In vehicles fitted with a tyre pressure indi-
c at
or, adjust the pressure and store the read-
ing in the radio/Easy Connect system*
››› page 295.
● Have the tightening torque of the wheel
bolts
checked as soon as possible with a tor-
que wrench (it should be 140 Nm). Mean-
while, drive carefully.
● Have the flat tyre replaced as quickly as
pos
sible.
Snow chains Use Snow chains should only be used on the
fr
on
t wheels.56
Page 59 of 328
The essentials
Check that they are correctly seated after
driv in
g for a few yards; correct the position if
necessary, in accordance with the manufac-
turer's fitting instructions. Keep your speed
below 50 km/h (30 mph).
If there is a danger of being trapped despite
having mounted the chains, it is best to disa-
ble the driving wheels (ASR) in the ESC
››› page 174, Switching on/off the ESC
and ASR.
Snow chains will improve braking ability as
well as traction in winter conditions.
For technical reasons snow chains may only
be used with the following wheel rim/tyre
combination.
215/60 R16Chains with links of maximum 15 mm
215/55 R17Chains with links of maximum 15 mm
215/50 R18Chains with links of maximum 15 mm
Other dimensions do not allow chains Remove any central wheel trims and the rim
rin
g bef
ore fitting snow chains.
Remove the chains when roads are free of
snow. Driving characteristics worsen, and the
wheels become damaged quickly and may
even be rendered unusable. Emergency towing of the vehi-
cl
e
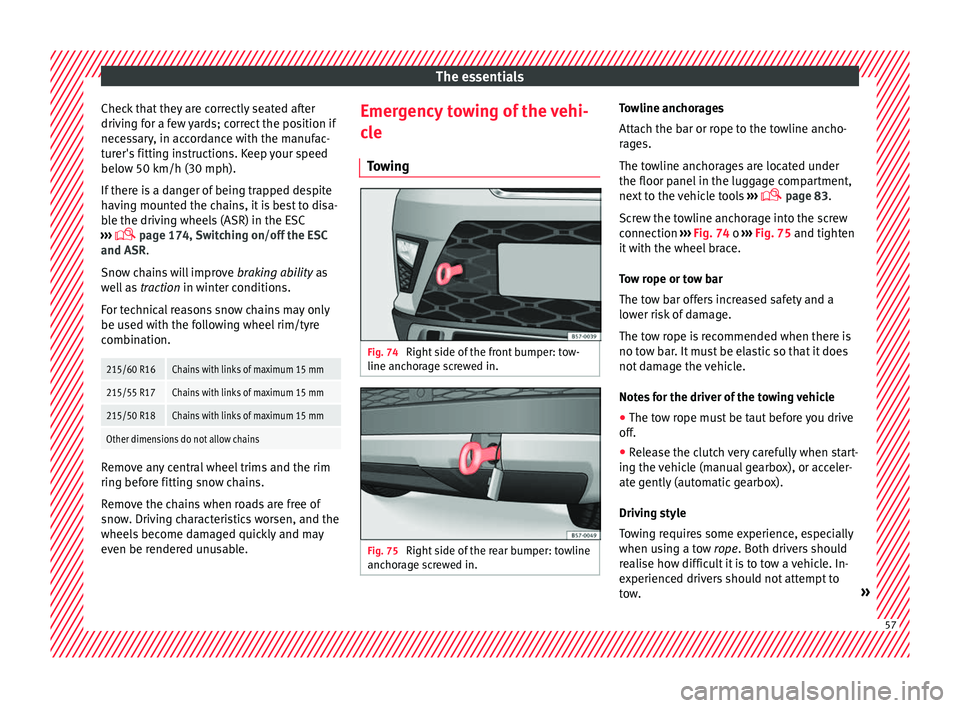
Towing Fig. 74
Right side of the front bumper: tow-
line anc hor
age screwed in. Fig. 75
Right side of the rear bumper: towline
anc hor
age screwed in. Towline anchorages
Att
ac
h the bar or rope to the towline ancho-
rages.
The towline anchorages are located under
the floor panel in the luggage compartment,
next to the vehicle tools ›››
page 83.
Screw the towline anchorage into the screw
connection ››› Fig. 74 o ››› Fig. 75 and tighten
it with the wheel brace.
Tow rope or tow bar
The tow bar offers increased safety and a
lower risk of damage.
The tow rope is recommended when there is
no tow bar. It must be elastic so that it does
not damage the vehicle.
Notes for the driver of the towing vehicle
● The tow rope must be taut before you drive
off.
● R
elease the clutch very carefully when start-
ing the
vehicle (manual gearbox), or acceler-
ate gently (automatic gearbox).
Driving style
Towing requires some experience, especially
when using a tow rope. Both drivers should
realise how difficult it is to tow a vehicle. In-
experienced drivers should not attempt to
tow. » 57
Page 60 of 328
The essentials
Do not pull too hard with the towing vehicle
and t ak
e care to avoid jerking the tow rope.
When towing on an unpaved road, there is al-
ways a risk of overloading and damaging the
anchorage points.
Switch on the ignition so that the turn sig-
nals, windscreen wipers and windscreen
washer can work. Ensure that the steering
wheel is unlocked and moves freely.
Place the gear lever in neutral on vehicles
with a manual gearbox. With an automatic
gearbox, place the lever in N.
To brake, press the brake pedal firmly. The
brake servo does not work when the engine
is switched off.
The power steering only works when the igni-
tion is switched on and the vehicle is moving,
provided that the battery is sufficiently charg-
ed. Otherwise, it will need more force.
Ensure that the tow rope remains taut at all
times.
››› in Introduction on page 86
››› page 86 Tow-starting
If the engine will not start, first try starting it
u
s
ing the battery of another vehicle
››› page 58. You should only attempt to tow-
start a vehicle if charging the battery does
not work. This is done by leveraging wheel
movement.
When tow-starting a vehicle with a petrol en-
gine, do not tow it more than a short dis-
tance, otherwise unburned fuel can enter the
catalytic converter.
● Engage 2nd or 3rd gear before moving off.
● Press the clutch and hold the pedal down.
● Switch the ignition on.
● Once both vehicles are moving, release the
c lut
ch.
● As soon as the engine has started, press
the clut
ch and move the gear lever to neutral.
How to jump start Jump le
ads The jump lead must have a sufficient wire
c
r
oss section.
If the engine fails to start because of a dis-
charged battery, the battery can be connec-
ted to the battery of another vehicle to start
the engine. Jump leads must comply with standard
DIN
72553 (see cab
le manufacturer's instruc-
tions). The wire cross section must be at least
25 mm 2
for petrol engines and at least
35 mm 2
for diesel engines. Note
● The v
ehicles must not touch each other,
otherwise electricity could flow as soon as
the positive terminals are connected.
● The discharged battery must be properly
connect
ed to the on-board network.58