Seat Ateca 2017 Repair Manual
Manufacturer: SEAT, Model Year: 2017, Model line: Ateca, Model: Seat Ateca 2017Pages: 328, PDF Size: 6.36 MB
Page 61 of 328
The essentials
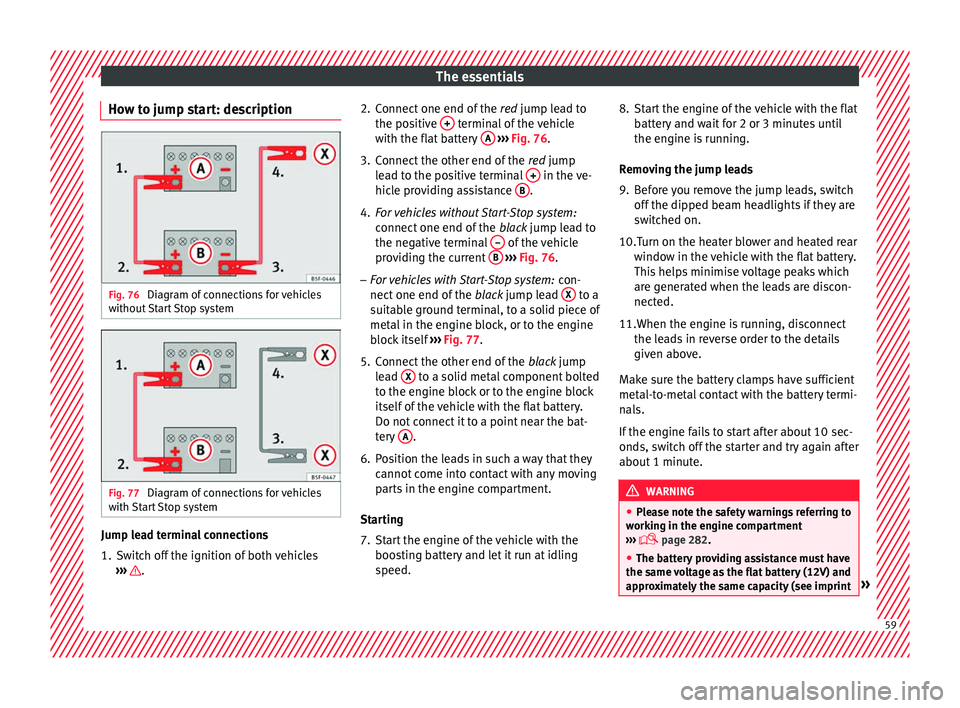
How to jump start: description Fig. 76
Diagram of connections for vehicles
w ithout
Start Stop system Fig. 77
Diagram of connections for vehicles
w ith
Start Stop system Jump lead terminal connections
1. Switch off the ignition of both vehicles
››
› . 2. Connect one end of the
re
d jump lead to
the positive + terminal of the vehicle
w ith the fl
at battery A
› ››
Fig. 76 .
3. Connect the other end of the re
d jump
lead to the positive terminal + in the ve-
hic l
e providing assistance B .
4. For vehicles without Start-Stop system:
connect
one end of the black jump lead to
the negative terminal – of the vehicle
pr o
viding the current B
› ››
Fig. 76 .
– For vehicles with Start-Stop system: con-
nect
one end of the black jump lead X to a
s uit
able ground terminal, to a solid piece of
metal in the engine block, or to the engine
block itself ››› Fig. 77.
5. Connect the other end of the blac
k jump
lead X to a solid metal component bolted
t o the en
gine block or to the engine block
itself of the vehicle with the flat battery.
Do not connect it to a point near the bat-
tery A .
6. Position the leads in such a way that they cannot
come into contact with any moving
parts in the engine compartment.
Starting
7. Start the engine of the vehicle with the boos
ting battery and let it run at idling
speed. 8. Start the engine of the vehicle with the flat
batt
ery and wait for 2 or 3 minutes until
the engine is running.
Removing the jump leads
9. Before you remove the jump leads, switch off the dip
ped beam headlights if they are
switched on.
10.Turn on the heater blower and heated rear windo
w in the vehicle with the flat battery.
This helps minimise voltage peaks which
are generated when the leads are discon-
nected.
11.When the engine is running, disconnect the le
ads in reverse order to the details
given above.
Make sure the battery clamps have sufficient
metal-to-metal contact with the battery termi-
nals.
If the engine fails to start after about 10 sec-
onds, switch off the starter and try again after
about 1 minute. WARNING
● Ple
ase note the safety warnings referring to
working in the engine compartment
››› page 282.
● The battery providing assistance must have
the same
voltage as the flat battery (12V) and
approximately the same capacity (see imprint » 59
Page 62 of 328
The essentials
on battery). Failure to comply could result in
an e
xp
losion.
● Never use jump leads when one of the bat-
terie
s is frozen. Danger of explosion! Even af-
ter the battery has thawed, battery acid could
leak and cause chemical burns. If a battery
freezes, it should be replaced.
● Keep sparks, flames and lighted cigarettes
aw
ay from batteries, danger of explosion.
Failure to comply could result in an explo-
sion.
● Observe the instructions provided by the
manuf
acturer of the jump leads.
● Do not connect the negative cable from the
other v
ehicle directly to the negative terminal
of the flat battery. The gas emitted from the
battery could be ignited by sparks. Danger of
explosion.
● Do not attach the negative cable from the
other v
ehicle to parts of the fuel system or to
the brake line.
● The non-insulated parts of the battery
cl
amps must not be allowed to touch. The
jump lead attached to the positive battery
terminal must not touch metal parts of the ve-
hicle, this can cause a short circuit.
● Position the leads in such a way that they
cannot
come into contact with any moving
parts in the engine compartment.
● Do not lean on the batteries. This could re-
su
lt in chemical burns. Note
The vehicles must not touch each other, oth-
er w
ise electricity could flow as soon as the
positive terminals are connected. Changing the wiper blades
W ind
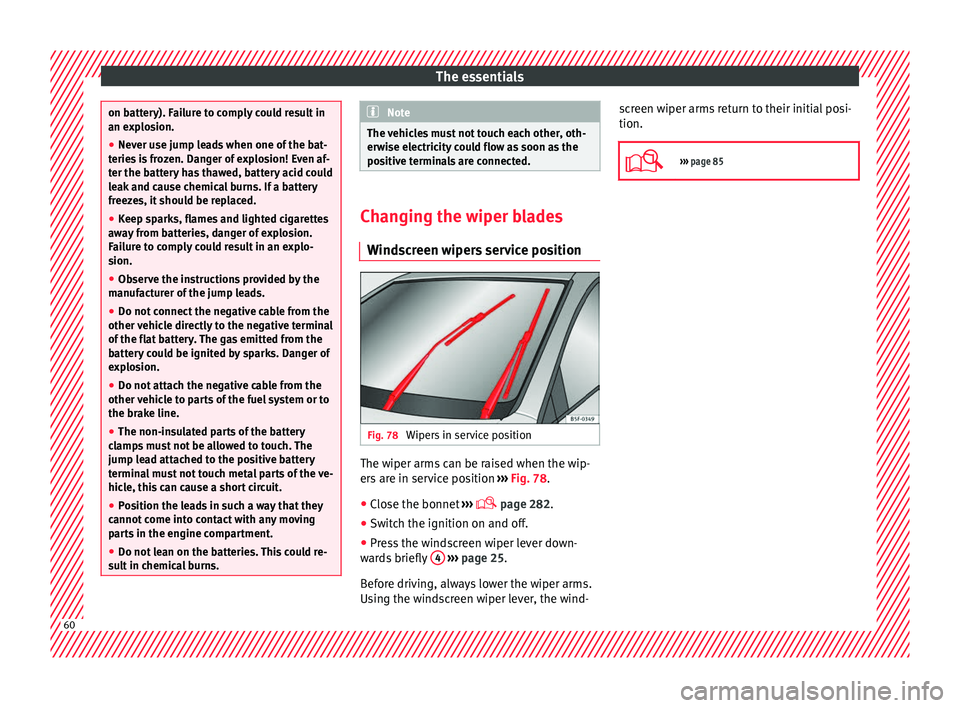
screen wipers service position Fig. 78
Wipers in service position The wiper arms can be raised when the wip-
er
s
are in service position ››› Fig. 78.
● Close the bonnet ››
›
page 282.
● Switch the ignition on and off.
● Press the windscreen wiper lever down-
war
ds briefly 4
› ››
page 25.
Before driving, always lower the wiper arms.
Using the windscreen wiper lever, the wind- screen wiper arms return to their initial posi-
tion.
››› page 85 60
Page 63 of 328

The essentials
Changing the windscreen and rear
w indo
w wiper blades Fig. 79
Changing the windscreen wiper
b l
ades Fig. 80
Changing the rear wiper blade Raising and lowering windscreen wiper arms
● Place the windscreen wipers in the service
po s
ition ››› page 60.
● Grip the wiper arms only
by the blade's fas-
tening point. Cleaning windscreen wiper blades
●
Raise the wiper arms.
● Use a soft cloth to remove dust and dirt
from the w
indscreen wiper blades.
● If the blades are very dirty, a sponge or
damp c
loth may be used ››› in Changing
the w ind
screen and rear window wiper
blades on page 86.
Changing the windscreen wiper blades
● Lift and unfold the wiper arms.
● Press and hold release button ››
› Fig. 79 1 and pull gently on the wiper blade in the di-
r
ection of
the arrow.
● Fit a new wiper blade of the same l
ength
and design on to the wiper arm and hook it
into place.
● Rest the wiper arms back onto the wind-
sc
reen.
Changing the rear wiper blade
● Raising/lowering the wiper arm.
● Turn the blade slightly ››
› Fig. 80 (arrow
A ).
● Hold down the release button 1 while
g ently
pulling the blade in the direction of ar-
row B .
● Insert a new blade of the same l
ength and
type in the rear wiper arm in the opposite di-
rection to the arrow B and hook into place
b utt
on 1 .●
Rep
lace the wiper arm on the rear window.
››› in Changing the windscreen and
rear window wiper blades on page 86
››› page 85 61
Page 64 of 328
Safety
Safety
Saf e driv
ing
Safety first! WARNING
● Thi s
manual contains important informa-
tion about the operation of the vehicle, both
for the driver and the passengers. The other
sections of the on-board documentation also
contain further information that you should
be aware of for your own safety and for the
safety of your passengers.
● Ensure that the on-board documentation is
kept
in the vehicle at all times. This is espe-
cially important when lending or selling the
vehicle to another person. Advice about driving
B ef
ore starting every trip For your own safety and the safety of your
p
a
ssengers, always note the following points
before every trip:
– Make sure that the vehicle's lights and turn
sign
als are working properly.
– Check tyre pressure. –
Ens
ure that all windows provide a clear and
good view of the surroundings.
– Make sure all luggage is secured
››
› page 149.
– Make sure that no objects can interfere
with the ped
als.
– Adjust front seat, head restraint and mir-
ror
s properly according to your size.
– Ensure that the passengers in the rear
seats
always have the head restraints in
the in-use position ››› page 66.
– Instruct passengers to adjust the head re-
str
aints according to their height.
– Protect children with appropriate child
seats
and properly applied seat belts
››› page 79.
– Assume the correct sitting position. Instruct
your p
assengers also to assume a proper
sitting position. ››› page 63.
– Fasten your seat belt securely. Instruct your
pa
ssengers also to fasten their seat belts
properly. ››› page 68.
What affects driving safety? As a driver, you are responsible for yourself
and
y
our passengers. When your concentra-
tion or driving safety is affected by any cir- cumstance, you endanger yourself as well as
others
on the road ››› , for this reason:
– Always pay attention to traffic and do not
g et
distracted by passengers or telephone
calls.
– Never drive when your driving ability is im-
pair
ed (e.g. by medication, alcohol, drugs).
– Observe traffic laws and speed limits.
– Always reduce your speed as appropriate
for r
oad, traffic and weather conditions.
– When travelling long distances, take
bre
aks regularly - at least every two hours.
– If possible, avoid driving when you are tired
or str
essed. WARNING
When driving safety is impaired during a trip,
the ri sk
of injury and accidents increases. Safety equipment
Never put your safety or the safety of your
p
a
ssengers in danger. In the event of an acci-
dent, the safety equipment may reduce the
risk of injury. The following list includes most
of the safety equipment in your SEAT:
● Three-point seat belts
● belt tension limiters for the front and rear
side se
ats,
62
Page 65 of 328
Safe driving
● Belt
tensioners for the front seats
● Front airbags
● knee airbags,
● Side airbags in the front seat backrests
● Head-protection airbags
● “ISOFIX” anchor points for child seats in
the re
ar side seats with the “ISOFIX” system,
● Height-adjustable front head restraints
● Rear head restraints with in-use position
and non-use po
sition
● Adjustable steering column
The saf
ety equipment mentioned above
works together to provide you and your pas-
sengers with the best possible protection in
the event of an accident. However, these
safety systems can only be effective if you
and your passengers are sitting in a correct
position and use this equipment properly.
Safety is everyone's business! Correct position for passengers
Corr
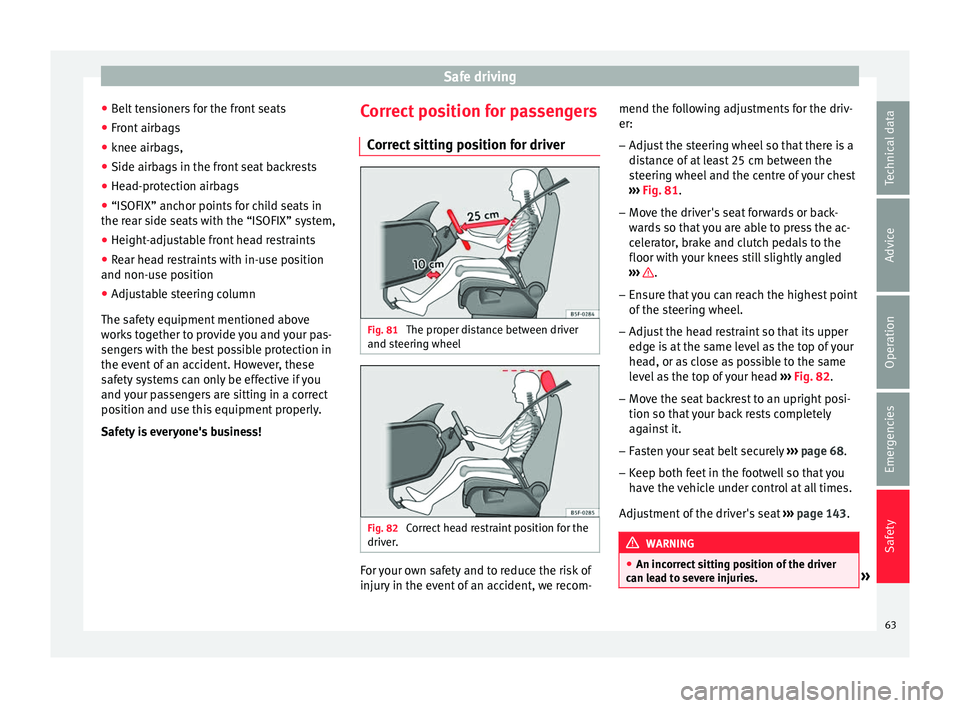
ect sitting position for driver Fig. 81
The proper distance between driver
and s t
eering wheel Fig. 82
Correct head restraint position for the
driv er
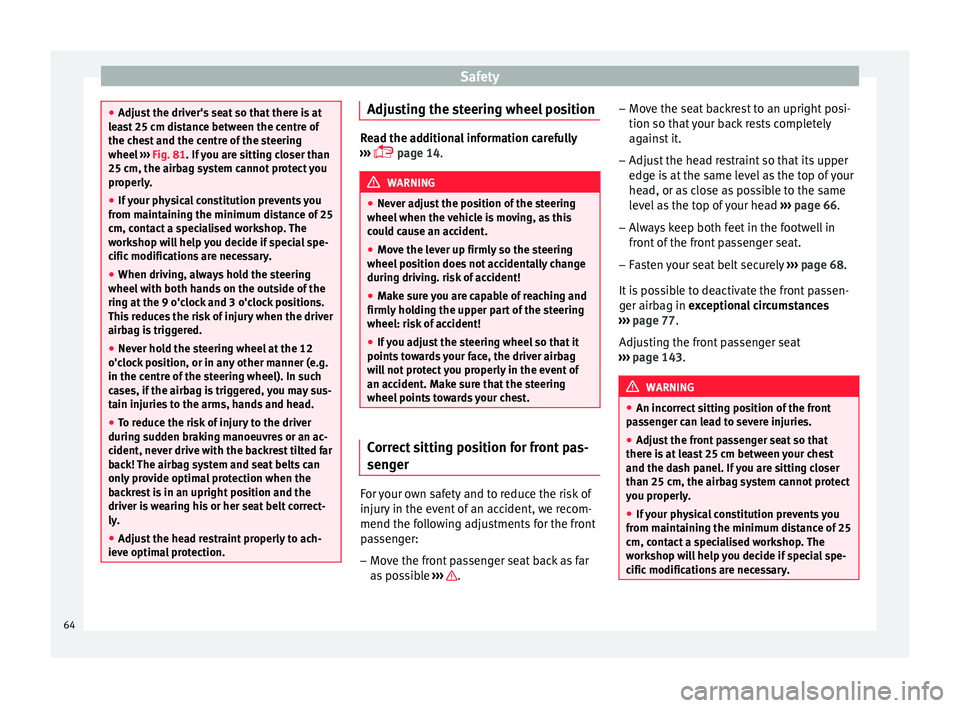
. For your own safety and to reduce the risk of
injur
y
in the event of an accident, we recom- mend the following adjustments for the driv-
er:
– Adjust the steering wheel so that there is a
dis
tance of at least 25 cm between the
steering wheel and the centre of your chest
››› Fig. 81.
– Move the driver's seat forwards or back-
war
ds so that you are able to press the ac-
celerator, brake and clutch pedals to the
floor with your knees still slightly angled
››› .
– Ensure that you can reach the highest point
of the s
teering wheel.
– Adjust the head restraint so that its upper
edge i
s at the same level as the top of your
head, or as close as possible to the same
level as the top of your head ››› Fig. 82.
– Move the seat backrest to an upright posi-
tion so that
your back rests completely
against it.
– Fasten your seat belt securely ››
› page 68.
– Keep both feet in the footwell so that you
hav
e the vehicle under control at all times.
Adjustment of the driver's seat ››› page 143. WARNING
● An inc orr
ect sitting position of the driver
can lead to severe injuries. » 63
Technical data
Advice
Operation
Emergencies
Safety
Page 66 of 328
Safety
●
Adju s
t the driver's seat so that there is at
least 25 cm distance between the centre of
the chest and the centre of the steering
wheel ››› Fig. 81. If you are sitting closer than
25 cm, the airbag system cannot protect you
properly.
● If your physical constitution prevents you
from m
aintaining the minimum distance of 25
cm, contact a specialised workshop. The
workshop will help you decide if special spe-
cific modifications are necessary.
● When driving, always hold the steering
wheel w
ith both hands on the outside of the
ring at the 9 o'clock and 3 o'clock positions.
This reduces the risk of injury when the driver
airbag is triggered.
● Never hold the steering wheel at the 12
o'cloc
k position, or in any other manner (e.g.
in the centre of the steering wheel). In such
cases, if the airbag is triggered, you may sus-
tain injuries to the arms, hands and head.
● To reduce the risk of injury to the driver
during s
udden braking manoeuvres or an ac-
cident, never drive with the backrest tilted far
back! The airbag system and seat belts can
only provide optimal protection when the
backrest is in an upright position and the
driver is wearing his or her seat belt correct-
ly.
● Adjust the head restraint properly to ach-
ieve optim
al protection. Adjusting the steering wheel position
Read the additional information carefully
› ›
› page 14. WARNING
● Nev er a
djust the position of the steering
wheel when the vehicle is moving, as this
could cause an accident.
● Move the lever up firmly so the steering
wheel po
sition does not accidentally change
during driving. risk of accident!
● Make sure you are capable of reaching and
firmly
holding the upper part of the steering
wheel: risk of accident!
● If you adjust the steering wheel so that it
points
towards your face, the driver airbag
will not protect you properly in the event of
an accident. Make sure that the steering
wheel points towards your chest. Correct sitting position for front pas-
sen
g
er For your own safety and to reduce the risk of
injur
y
in the event of an accident, we recom-
mend the following adjustments for the front
passenger:
– Move the front passenger seat back as far
as
possible ››› .–
Mo v
e the seat backrest to an upright posi-
tion so that your back rests completely
against it.
– Adjust the head restraint so that its upper
edge i
s at the same level as the top of your
head, or as close as possible to the same
level as the top of your head ››› page 66.
– Always keep both feet in the footwell in
front
of the front passenger seat.
– Fasten your seat belt securely ››
› page 68.
It is possible to deactivate the front passen-
ger airbag in exceptional circumstances
››› page 77.
Adjusting the front passenger seat
››› page 143. WARNING
● An inc orr
ect sitting position of the front
passenger can lead to severe injuries.
● Adjust the front passenger seat so that
there i
s at least 25 cm between your chest
and the dash panel. If you are sitting closer
than 25 cm, the airbag system cannot protect
you properly.
● If your physical constitution prevents you
from m
aintaining the minimum distance of 25
cm, contact a specialised workshop. The
workshop will help you decide if special spe-
cific modifications are necessary. 64
Page 67 of 328

Safe driving
●
Alw
ays keep your feet in the footwell when
the vehicle is moving; never rest them on the
dash panel, out the window or on the seat. An
incorrect sitting position exposes you to an
increased risk of injury in case of a sudden
braking or an accident. If the airbag is trig-
gered, you could sustain severe injuries due
to an incorrect sitting position.
● To reduce the risk of injury to the front pas-
seng
er in events such as sudden braking ma-
noeuvres or an accident, never travel with the
backrest tilted far back! The airbag system
and seat belts can only provide optimal pro-
tection when the backrest is in an upright po-
sition and the front passenger is wearing his
or her seat belt properly. The further the seat
backrests are tilted to the rear, the greater
the risk of injury due to incorrect positioning
of the belt web or to the incorrect sitting po-
sition!
● Adjust the head restraint correctly in order
to ac
hieve maximum protection. Correct sitting position for rear seat
p
a
ssengers To reduce the risk of injury in the event of a
s
ud
den braking manoeuvre or an accident,
passengers on the rear seat bench must con-
sider the following:
– Sit up straight.
– Adjust the head restraint to the correct po-
sition ›
›› page 66. –
Alw
ays keep both feet in the footwell in
front of the rear seat.
– Fasten your seat belt securely ››
› page 68.
– Use an appropriate child restraint system
when y
ou take children in the vehicle
››› page 79. WARNING
● If the p
assengers in the rear seats are not
sitting properly, they could sustain severe in-
juries.
● Adjust the head restraint correctly in order
to ac
hieve maximum protection.
● Seat belts can only provide optimal protec-
tion when seat
backrests are in an upright
position and the vehicle occupants are wear-
ing their seat belts correctly. If passengers In
the rear seats are not sitting in an upright po-
sition, the risk of injury due to incorrect posi-
tioning of the seat belt increases. Examples of incorrect sitting posi-
tion
s Seat belts can provide optimal protection on-
ly
when the belt
webs are properly posi-
tioned. Incorrect sitting positions substan-
tially reduce the protective function of seat
belts and increase the risk of injury due to in-
correct seat belt position. As the driver, you
are responsible for all passengers, especially
children. –
Never al
low anyone to assume an incorrect
sitting position in the vehicle while travel-
ling ››› .
The f o
llowing list contains examples of sit-
ting positions that could be dangerous for all
vehicle occupants. The list is not complete,
but we would like to make you aware of this
issue.
Therefore, whenever the vehicle is in motion:
● Never stand in the vehicle.
● Never stand on the seats.
● Never kneel on the seats.
● Never tilt your seat backrest far to the rear.
● Never lean against the dash panel.
● Never lie on the rear bench.
● Never sit on the front edge of a seat.
● Never sit sideways.
● Never lean out of a window.
● Never put your feet out of a window.
● Never put your feet on the dash panel.
● Never put your feet on the surface of a seat.
● Do not allow anyone to travel in the foot-
wel
l.
● Never travel without wearing the seat belt.
● Do not allow anyone to travel in the lug-
gag
e compartment. »
65
Technical data
Advice
Operation
Emergencies
Safety
Page 68 of 328
Safety
WARNING
● An y
incorrect sitting position increases the
risk of severe injuries. Sitting in an incorrect
position exposes the vehicle occupants to se-
vere injuries if airbags are triggered, by strik-
ing a vehicle occupant who has assumed an
incorrect sitting position.
● Before the vehicle moves, assume the prop-
er sittin
g position and maintain it throughout
the trip. Before every trip, instruct your pas-
sengers to sit properly and to stay in this po-
sition during the trip ››› page 63, Correct posi-
tion for passengers. Correct adjustment of front head re-
s
tr
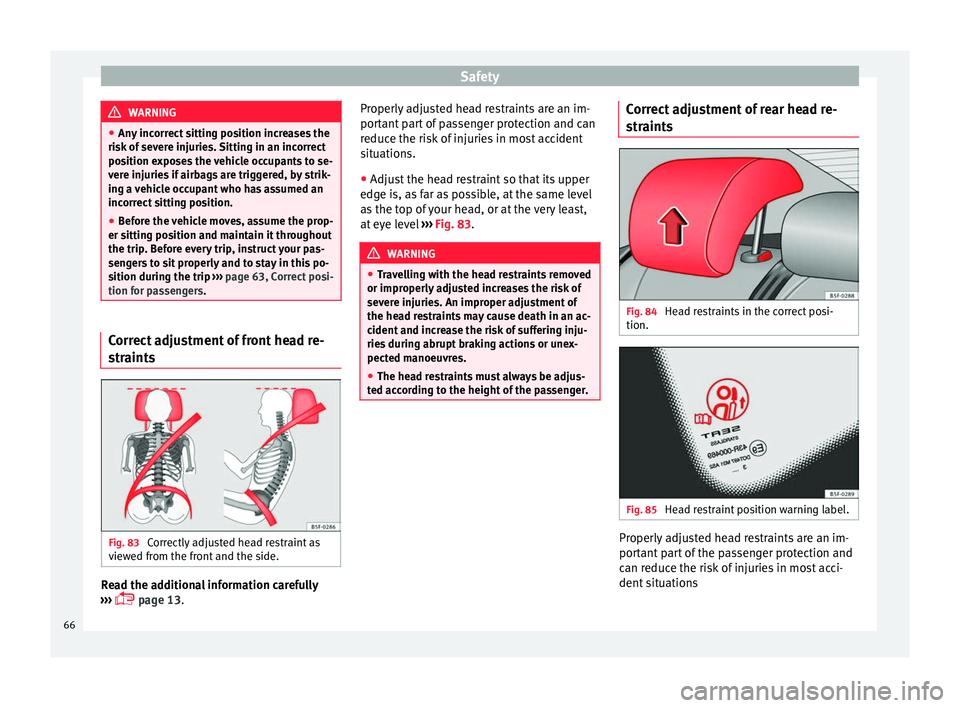
aints Fig. 83
Correctly adjusted head restraint as
v iew
ed from the front and the side. Read the additional information carefully
› ›
› page 13. Properly adjusted head restraints are an im-
port
ant part of passenger protection and can
reduce the risk of injuries in most accident
situations.
● Adjust the head restraint so that its upper
edge i
s, as far as possible, at the same level
as the top of your head, or at the very least,
at eye level ››› Fig. 83. WARNING
● Tr
avelling with the head restraints removed
or improperly adjusted increases the risk of
severe injuries. An improper adjustment of
the head restraints may cause death in an ac-
cident and increase the risk of suffering inju-
ries during abrupt braking actions or unex-
pected manoeuvres.
● The head restraints must always be adjus-
ted ac
cording to the height of the passenger. Correct adjustment of rear head re-
s
tr
aints Fig. 84
Head restraints in the correct posi-
tion. Fig. 85
Head restraint position warning label. Properly adjusted head restraints are an im-
por
t
ant part of the passenger protection and
can reduce the risk of injuries in most acci-
dent situations
66
Page 69 of 328

Safe driving
Rear head restraints – The rear head restraints have 2 positions:
use
and non-use.
– One position for use
(head restraint raised)
››› Fig. 84. In this position, the head re-
straints are used normally, protecting pas-
sengers along with the rear seat belts.
– And one position for non-use
(head re-
straint lowered).
– To fit the head restraints in position for use,
pu
ll on the edges with both hands in the
direction of the arrow. WARNING
● Under no c ir
cumstances should the rear
passengers travel while the head restraints
are in the non-use position. See the warning
label located on the rear side fixed window
››› Fig. 85.
● Do not swap the centre rear head restraint
with either of
the outer seat rear head re-
straints. Risk of injury in case of an accident! CAUTION
Note the instructions on the adjustment of
the he a
d restraints ››› page 143. Pedal area
P ed
als –
Ensure that you can always press the accel-
er at
or, brake and clutch pedals unimpaired
to the floor.
– Ensure that the pedals can return unim-
pair
ed to their initial positions.
– Ensure that the floor mats are securely fas-
tened durin
g the trip and do not obstruct
the pedals ››› .
On ly
use floor mats which leave the pedals
clear and which are secured to prevent them
from slipping. You can obtain suitable floor
mats from a specialised dealership. Fasten-
ers* for floor mats are fitted in the footwells.
If a brake circuit fails, the brake pedal must
be pressed down thoroughly in order to stop
the vehicle.
Wear suitable footwear
Always wear shoes which support your feet
properly and give you a good feeling for the
pedals. WARNING
● Re
stricting pedal operation can lead to crit-
ical situations while driving. ●
Nev er l
ay or fit floor mats or other floor cov-
erings over the original floor mats. This
would reduce the pedal area and could ob-
struct the pedals. Risk of accident.
● Never place objects in the driver footwell.
An ob
ject could move into the pedal area and
impair pedal operation. In the event of a sud-
den driving or braking manoeuvre, you will
not be able to operate the brake, clutch or ac-
celerator pedal. Risk of accident! 67Technical data
Advice
Operation
Emergencies
Safety
Page 70 of 328
Safety
Seat belts
Wh y
wear a seat belt?
Number of seats Your vehicle has
five
seats, two in the front
and three in the rear. Each seat is equipped
with a three-point seat belt.
In some versions, your vehicle is approved
only for four seats. Two front seats and two
rear seats. WARNING
● Nev er tr
ansport more than the permitted
amount of people in your vehicle.
● Every vehicle occupant must properly fas-
ten and w
ear the seat belt belonging to his or
her seat. Children must be protected with an
appropriate child restraint system. Seat belt lamp*
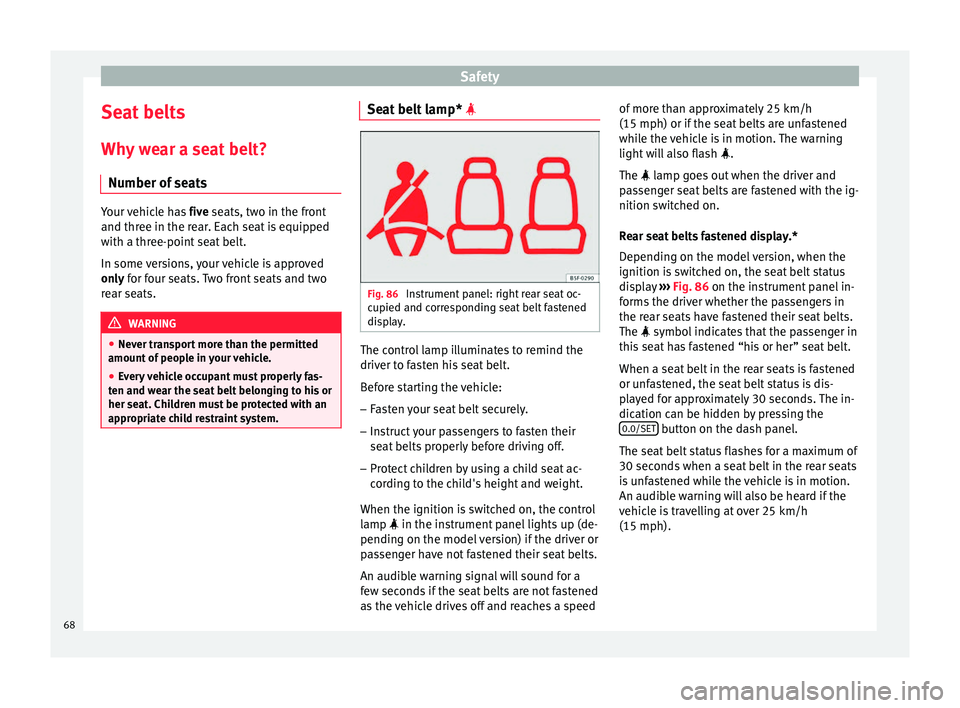
Fig. 86
Instrument panel: right rear seat oc-
c upied and c
orresponding seat belt fastened
display. The control lamp illuminates to remind the
driv
er t
o fasten his seat belt.
Before starting the vehicle: – Fasten your seat belt securely.
– Instruct your passengers to fasten their
seat
belts properly before driving off.
– Protect children by using a child seat ac-
cor
ding to the child's height and weight.
When the ignition is switched on, the control
lamp in the instrument panel lights up (de-
pending on the model version) if the driver or
passenger have not fastened their seat belts.
An audible warning signal will sound for a
few seconds if the seat belts are not fastened
as the vehicle drives off and reaches a speed of more than approximately 25 km/h
(15 mph) or if the se
at belts are unfastened
while the vehicle is in motion. The warning
light will also flash .
The lamp goes out when the driver and
passenger seat belts are fastened with the ig-
nition switched on.
Rear seat belts fastened display.*
Depending on the model version, when the
ignition is switched on, the seat belt status
display ››› Fig. 86 on the instrument panel in-
forms the driver whether the passengers in
the rear seats have fastened their seat belts.
The symbol indicates that the passenger in
this seat has fastened “his or her” seat belt.
When a seat belt in the rear seats is fastened
or unfastened, the seat belt status is dis-
played for approximately 30 seconds. The in-
dication can be hidden by pressing the 0.0/SET button on the dash panel.
The se at
belt status flashes for a maximum of
30 seconds when a seat belt in the rear seats
is unfastened while the vehicle is in motion.
An audible warning will also be heard if the
vehicle is travelling at over 25 km/h
(15 mph).
68