technical specifications Seat Exeo ST 2011 Owners Manual
[x] Cancel search | Manufacturer: SEAT, Model Year: 2011, Model line: Exeo ST, Model: Seat Exeo ST 2011Pages: 319, PDF Size: 5.12 MB
Page 185 of 319
183
Driving
The gearbox selects the gear ratio and shifts up or down automatically ac-
cording to the gear change programmes stored in the control unit
⇒ page 187.
If desired, you can also select the gears manually (tiptronic mode)
⇒ page 188.
Please note that in vehicles with a multitronic® gearbox, torque is transmit-
ted via a multi-plate clutch, and not via a torque converter as on convention-
al automatics. This means that the vehicle will not “creep” as much as con-
ventional automatics when the engine is idling if you stop temporarily with
the selector lever in position D, S or R.
Vehicles with tiptronic gearbox
The vehicle is equipped with an electronically controlled 7-speed automatic
gearbox. The gearbox changes up and down automatically.
If desired, you can also select the gears manually (tiptronic mode)
⇒ page 188. Driving instructions
The gears are changed automatically.
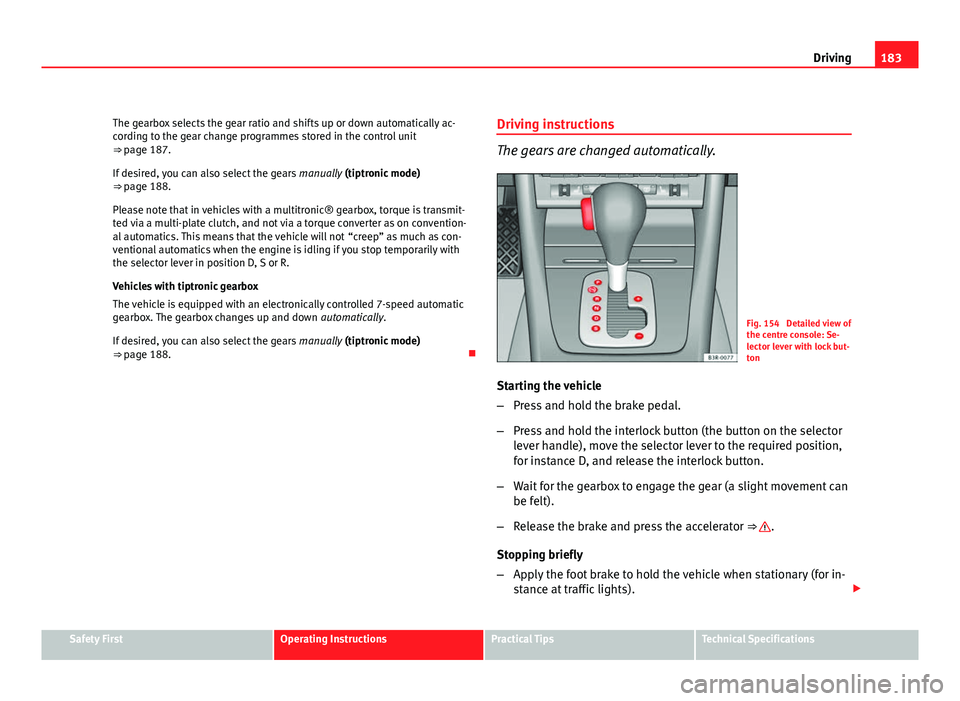
Fig. 154 Detailed view of
the centre console: Se-
lector lever with lock but-
ton
Starting the vehicle
– Press and hold the brake pedal.
– Press and hold the interlock button (the button on the selector
lever handle), move the selector lever to the required position,
for instance D, and release the interlock button.
– Wait for the gearbox to engage the gear (a slight movement can
be felt).
– Release the brake and press the accelerator ⇒
.
Stopping briefly
– Apply the foot brake to hold the vehicle when stationary (for in-
stance at traffic lights).
Safety FirstOperating InstructionsPractical TipsTechnical Specifications
Page 187 of 319
185
Driving
To move the selector lever to position R, press in the interlock button and at
the same time press the brake pedal. Depending on the model, one or two
reverse lights will come on in selector lever position R (when ignition is
switched on).
N - Neutral (idling)
In this position the gearbox is in neutral ⇒
.
D - Drive (forward)
In this position, the gearbox selects the optimal transmission ratio depend-
ing on the engine load, speed and the dynamic gear regulation programme
(DRP).
Press the brake pedal when moving the selector lever from N to D if the ve-
hicle is stationary or at speeds below 5 km/h ⇒
.
Under certain circumstances (e.g. when driving in mountains or towing a
trailer or caravan) it can be advantageous to switch temporarily to tiptronic
mode ⇒ page 188, so that the gear ratios can be selected manually to suit
the driving conditions.
S - Sport position
To drive in sports mode, select the position S. The engine power reserve is
used to its maximum. When accelerating the gear shifts will be noticeable.
Press the brake pedal when moving the selector lever from N to S if the vehi-
cle is stationary or at speeds below 5 km/h ⇒
.
WARNING
● Never move the selector lever to R or P when driving. Failure to do so
could result in an accident.
● In selector position D or S the vehicle must always be held with the
foot brake when the engine is running. This is because an automatic
gearbox still transmits power even at idling speed, and the vehicle tends
WARNING (Continued)
to “creep”. The throttle must on no account be opened inadvertently (for
instance by hand from the engine compartment) when a gear is engaged
with the vehicle stationary. The vehicle could otherwise start moving im-
mediately (in some cases even if the parking brake is engaged) and pos-
sibly cause an accident.
● To avoid accidents, apply the parking brake and put the selector lever
in position P before opening the bonnet and working on the vehicle with
the engine running. Please observe the important safety warnings
⇒ page 226, Work in the engine compartment.
Note
● Applies to vehicles with tiptronic gearbox:
● If the lever is moved accidentally to N when driving, release the accelera-
tor and let the engine speed drop to idling before selecting D or S again.
● For the sake of fuel economy (and the environment), the gearbox ratios
on some models are designed so that maximum speed is only obtained
when the gear lever is in position S.
Safety FirstOperating InstructionsPractical TipsTechnical Specifications
Page 189 of 319
187
Driving
Vehicles with tiptronic gearbox
When the accelerator pedal is pressed right down past the point of resist-
ance at full throttle, the gearbox will shift down to a lower gear, depending
on road speed and engine speed. The upshift to the next higher gear is de-
layed until the engine reaches maximum rpm.
WARNING
Please note that if the road surface is slippery or wet, the kick-down fea-
ture could cause the driving wheels to spin, which could result in skid-
ding.
Dynamic gear control programme (DCP)
The automatic gearbox is controlled electronically.
The vehicle is equipped with an electronically controlled gearbox. The gear
ratios are selected automatically according to preset gearshift programmes.
When you drive at moderate speeds the gearbox will select the most eco-
nomical shift programme. It will then change up early and delay the down-
shifts to give better fuel economy.
If you drive at higher speeds with heavy acceleration, if you open the throt-
tle quickly, or if you use the kick-down or the vehicle's maximum speed, the
gearbox will automatically select the sport programme.
The gearbox is self-adapting, and continuously selects the most suitable
shift programme. At the same time, the driver can also make the gearbox
switch to the sport programme by pressing the accelerator quickly. This
makes the gearbox shift down into a lower gear ratio, allowing a more rapid
acceleration (for instance to pass another vehicle), without having to press
the accelerator all the way down into the kick-down position. After the gear-
box has shifted back up it returns to the original programme, depending on
your style of driving. Vehicles with multitronic® gearbox: the gearbox continuously adapts the
gear ratios to gradients. If the brake pedal is pressed on a downhill gradient
the gearbox automatically shifts to a lower gear ratio. This increases the en-
gine braking effect.
Vehicles with tiptronic gearbox: in mountainous areas, the gearbox adapts
the gears for uphill and downhill gradients. This helps to avoid constant
gear changes on uphill gradients.
Safety FirstOperating InstructionsPractical TipsTechnical Specifications
Page 191 of 319
189
Driving
Back-up programme
A back-up system is in place if a fault should occur in the
control system.
The automatic gearbox switches to the back-up programme if a fault should
occur in the control system. This is indicated by a gear pinion symbol which
lights up on the instrument panel display.
It is still possible to move the selector lever to all positions. The manual
shift programme (tiptronic) is not available when the back-up programme is
active.
Vehicles with tiptronic gearbox: When the selector lever is in position D or S
or in the manual shift programme, the gearbox will remain in 3rd gear if 1st,
2nd or 3rd gears were engaged when the fault occurred. The gearbox will
remain in 5th gear if 4th, 5th or 6th gears were engaged. The gearbox will
then engage 3rd gear when you drive away from a standstill or after the en-
gine is restarted.
It will still be possible to use reverse gear in the normal way. However, the
electronic lock for reverse gear will be switched off.
CAUTION
Should the gearbox ever switch into the back-up programme, you should
take the vehicle to a technical service or qualified workshop as soon as pos-
sible. Steering wheel with paddle levers
The paddle levers on the steering wheel enable the driver to
manually select pre-programmed ratios or gears.
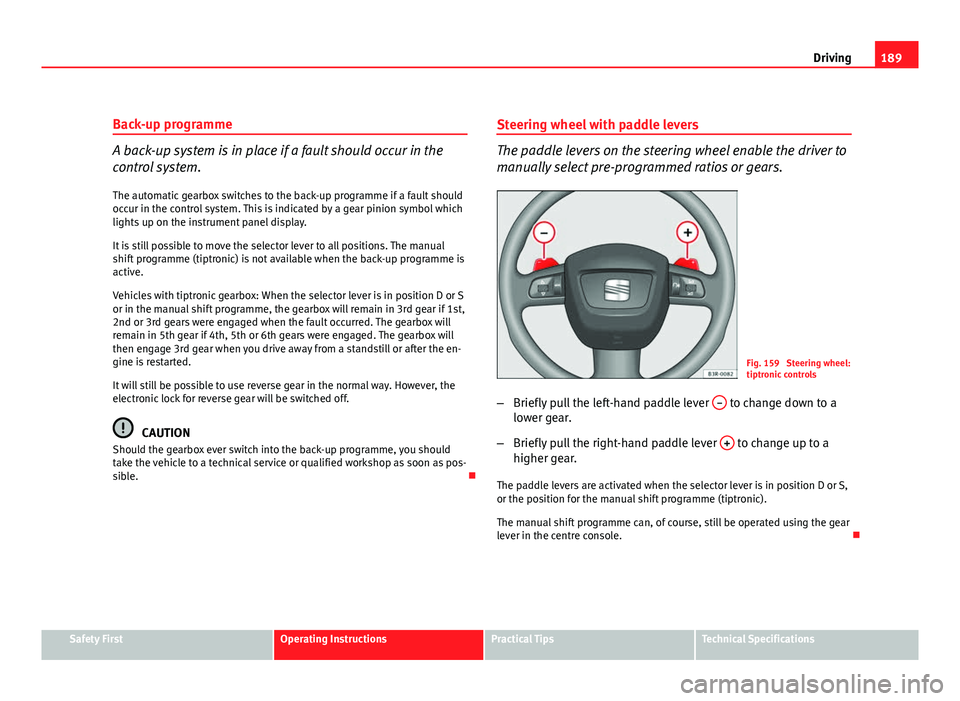
Fig. 159 Steering wheel:
tiptronic controls
– Briefly pull the left-hand paddle lever –
to change down to a
lower gear.
– Briefly pull the right-hand paddle lever +
to change up to a
higher gear.
The paddle levers are activated when the selector lever is in position D or S,
or the position for the manual shift programme (tiptronic).
The manual shift programme can, of course, still be operated using the gear
lever in the centre console.
Safety FirstOperating InstructionsPractical TipsTechnical Specifications
Page 193 of 319
191
Intelligent technology
If required, the ESP can also be enabled and disabled manually by briefly
pressing the ESP
button ⇒
fig. 160. The ESP warning lamp lights up when
the system is switched off, see ⇒ page 68.
In general, the ESP should be left switched on at all times. In particular cir-
cumstances where a certain amount of wheel slip is desirable, it may be ad-
visable to switch off the ESP. Examples:
● when driving with snow chains
● when driving in deep snow or on loose surfaces
● when rocking the vehicle backwards and forwards to free it.
The ESP should be switched on again afterwards as soon as possible.
WARNING
The ESP is not able to overcome the physical limits of adhesion. Even
with ESP, you should always adjust your speed to suit the conditions.
Please bear this in mind, especially on wet or slippery road surfaces. Do
not let the extra safety features tempt you into taking any risks when
driving. Failure to do so could result in an accident.
Anti-lock brake system (ABS)
ABS prevents the wheels from locking up under braking.
The anti-lock brake system (ABS) is an important part of the vehicle's active
safety system. However, the ABS will not necessarily guarantee shorter
stopping distances in all conditions. For instance, on loose gravel or fresh
snow on top of an icy surface (conditions which anyway require extreme
care and reduced speed), the stopping distance with ABS may even be
slightly longer. How the ABS works
The system runs an automatic self-check when the vehicle reaches a road
speed of about 6 km/h. This may be accompanied by a noise from the ABS
pump.
When one of the wheels is turning very slowly in relation to the road speed
and is close to locking up, the system will reduce the brake pressure on that
wheel. The driver is made aware of this adjustment process by a
vibration of
the brake pedal and an audible noise. This is a deliberate warning to the
driver that one or more of the wheels is tending to lock up and the ABS con-
trol function has intervened. In this situation it is important to keep the
brake pedal fully depressed so the ABS can regulate the brake application,
but do not “pump” the brake pedal.
WARNING
The grip provided by ABS is still subject to the physical limits of adhe-
sion. Always bear this in mind, especially on wet or slippery roads. If you
notice that the ABS is working (to counteract locked wheels under brak-
ing), you should reduce speed immediately to suit the road and traffic
conditions. Do not let the extra safety features tempt you into taking any
risks when driving. Failure to do so could result in an accident.
Note
If a malfunction should occur in the ABS, this is indicated by a warning lamp
⇒ page 67.
Safety FirstOperating InstructionsPractical TipsTechnical Specifications
Page 195 of 319
193
Intelligent technology
Note
If the ABS warning lamp lights up, this can also mean there is a fault in the
EDL. Take the vehicle to a specialised workshop as soon as possible.
Traction control system (TCS)
The traction control system prevents the drive wheels from
spinning when the vehicle is accelerating. General notes
The traction control system (TCS) is one of the functions incorporated in the
Electronic Stability Programme (ESP).
The traction control system (TCS) helps the vehicle to start moving, acceler-
ate or climb a gradient in slippery conditions where this may otherwise be
difficult or even impossible.
How it works
The TCS acts automatically, without the driver's intervention. With the aid of
the ABS sensors ⇒ page 191, the TCS monitors the speed of the drive
wheels. If the wheels start to spin, the engine speed is reduced automati-
cally to match the amount of grip available. The system is active across the
entire speed range.
The TCS works in conjunction with the ABS. If a malfunction occurs in the
ABS, the TCS will also be inoperative.
Note
To ensure that the TCS works properly, all four wheels must be fitted with
identical tyres. The difference in size of the wheels may lead to an unde-
sired reduction in engine power. Also see ⇒ page 247.Brakes
General notes
New brake pads
New brake pads do not provide optimal performance during the first 200
km; first they must be “run in”. However, the reduced braking capacity may
be compensated by pressing on the brake pedal a little harder. Avoid over-
loading the brakes during run-in.
Wear
The rate of wear on the brake pads depends a great deal on how you drive
and the conditions in which the vehicle is operated. Negative factors are, for
instance, city traffic, frequent short trips or hard driving with abrupt starts
and stops.
Wet roads or road salt
In certain conditions, such as in heavy rain, or after washing the vehicle or
driving through water, the full braking effect can be delayed by moisture (or
in winter by ice) on the discs and brake pads. In this case the brakes should
be dried by pressing the brake pedal several times.
When the speed is over 80 km/h and the windscreen wipers are on, the
brake system moves the pads towards the brake discs for a few seconds.
This occurs - without the driver knowing - at regular intervals and allows a
faster response from the brakes when driving on wet roads.
The effectiveness of the brakes can also be temporarily reduced if the vehi-
cle is driven for some distance without using the brakes when there is a lot
of salt on the road in winter. In this case, the layer of salt on the brake discs
and pads has to wear off before braking.
Corrosion
There may be a tendency for corrosion to form on the discs and dirt to build
up on the brake pads if the vehicle is used infrequently or the brakes are
not used very often.
Safety FirstOperating InstructionsPractical TipsTechnical Specifications
Page 197 of 319
195
Intelligent technology
Power steering does not work if the engine is off. In this case the steering
wheel requires much more force to turn.
If the steering is held at its turning limit when the vehicle is stationary, this
will place an excessive load on the power steering system. Turning the
steering wheel to its limit places a load on the system, which causes noise.
It will also reduce the idling speed of the engine.
CAUTION
When the engine is running, do not turn the steering wheel to its limit for
more than 15 seconds. Otherwise, there is a risk of damaging the power
steering.
Note
● If the power steering should fail at any time or the engine is switched off
(for instance when being towed), the vehicle can still be steered. However,
more effort will be required to turn the steering wheel.
● If the system is leaking or malfunctioning, please take the vehicle to a
specialised workshop as soon as possible.
● The power steering system requires a special hydraulic fluid. The fluid
reservoir is located at the front of the engine compartment on the left
⇒ page 296. The correct fluid level in the reservoir is important for the pow-
er steering to function properly. The hydraulic fluid level is checked at the
Inspection Service.
Servotronic*
The servotronic system electronically adjusts the power as-
sisted steering.
In vehicles equipped with servotronic power steering the degree of power
assistance ⇒ page 194 is adjusted
electronically according to road speed. If a fault should occur in the
servotronic system, the power steering will still
operate. The degree of power assistance will, however, no longer adapt to
different speeds. If the electronic regulating system is not working properly,
this is most noticeable when turning the steering wheel at low speeds (for
instance when parking), as more effort will be required than usual. The fault
should be corrected by a specialised workshop as soon as possible.
Safety FirstOperating InstructionsPractical TipsTechnical Specifications
Page 199 of 319
197
Driving and the environment
WARNING (Continued)
● On steep slopes, if brakes are excessively used, they will overheat.
Before driving down a long steep slope, it is advisable to reduce speed
and change down into a lower gear or range (depending on the type of
transmission). This makes use of engine braking and relieves the brakes.
● Never let the brakes “drag” by applying light pressure. Continuous
braking will cause the brakes to overheat and the braking distance will
increase. Apply and then release the brakes alternately.
● Never let the vehicle run with the engine switched off. The braking
distance is increased considerably when the brake servo is not active.
● If the brake fluid loses its viscosity and is subjected to heavy use, va-
pour bubbles can form in the brake system. This reduces the efficiency of
the brakes.
● Non-standard or damaged front spoilers could restrict the airflow to
the brakes and cause them to overheat. Before purchasing accessories
please observe the relevant instructions ⇒ page 220, Technical modifi-
cations.
● If a brake circuit fails, the braking distance will be increased consider-
ably. Contact a specialised workshop immediately and avoid unnecessa-
ry journeys.
Exhaust gas purification system Catalytic converter*
To maintain the useful life of the catalytic converter
– Use only unleaded petrol with petrol engines, as lead damages
the catalytic converter.
– Do not let the fuel get too low in the tank. –
For engine oil changes, do not replenish with too much engine
oil ⇒ page 229.
– Never tow the vehicle to start it, use jump leads if necessary
⇒ page 286.
If you notice misfiring, uneven running or loss of power when the vehicle is
moving, reduce speed immediately and have the vehicle inspected at the
nearest specialised workshop. In general, the exhaust gas warning lamp
will light up when any of the described symptoms occur ⇒ page 66. If this
happens, unburnt fuel can enter the exhaust system and escape into the en-
vironment. The catalytic converter can also be damaged by overheating.
WARNING
The catalytic converter reaches very high temperatures! There is a risk of
fire.
● Never park where the catalytic converter could come into contact with
dry grass or flammable materials under the vehicle.
● Do not apply additional underseal or anti-corrosion coatings to the
exhaust pipes, catalytic converter or the heat shields on the exhaust sys-
tem. These materials could catch fire when the vehicle is being driven.
CAUTION
Never run the fuel tank completely dry because the irregularity of the fuel
supply may cause ignition problems. This allows unburnt fuel to enter the
exhaust system, which could cause overheating and damage the catalytic
converter.
For the sake of the environment
Even when the emission control system is working perfectly, there may be a
smell of sulphur from the exhaust gas under some conditions. This depends
on the sulphur content of the fuel used. Quite often the problem can be
solved by changing to another brand of fuel.
Safety FirstOperating InstructionsPractical TipsTechnical Specifications
Page 201 of 319
199
Driving and the environment
Avoid idling
It is worthwhile switching off the engine when waiting in a traffic jam, at lev-
el crossings or at traffic lights with a long red phase. The fuel saved after
only 30 - 40 seconds is greater than the amount of fuel needed to restart
the engine.
The engine takes a long time to warm up when it is idling. Mechanical wear
and pollutant emissions are also especially high during this initial warm-up
phase. It is therefore best to drive off immediately after starting the engine.
Avoid running the engine at high speed.
Periodic maintenance
Periodic maintenance work guarantees that, before beginning a journey,
you will not consume more than the required amount of fuel. A well-serviced
engine gives you the benefit of improved fuel efficiency as well as maxi-
mum reliability and an enhanced resale value.
A badly serviced engine can consume up to 10% more fuel than necessary.
Avoid short journeys
To reduce the consumption and emission of polluting gases, the engine and
the exhaust filtration systems should reach the optimum service tempera-
ture.
With the engine cold, fuel consumption is proportionally higher. The engine
does not warm up and fuel consumption does not normalise until having
driven approximately four kilometres. This is why we recommend avoiding
short trips whenever possible.
Maintain the correct tyre pressures
Bear in mind that keeping the tyres at an adequate pressure saves fuel. If
the tyre pressure is just one bar too low, fuel consumption can increase by
as much as 5%. Due to the greater rolling resistance, under-inflation also
increases tyre wear and impairs handling.
The tyre pressures should always be checked when the tyres are cold.Do not use
winter tyres all year round as they increase fuel consumption by
up to 10%.
Avoid unnecessary weight
Every kilo of extra weight will put up the fuel consumption, so it is worth
checking the luggage compartment occasionally to make sure that no un-
necessary loads are being transported.
A roof rack is often left in place for the sake of convenience, even when it is
no longer needed. At a speed of 100-120 km/h your vehicle will use about
12% more fuel as a result of the extra wind resistance caused by the roof
rack even when it is not in use.
Save electricity
The engine activates the alternator, which produces electricity. With the
need for electricity, fuel consumption is also increased. Because of this, al-
ways turn off electrical components when you do not need them. Examples
of components that use a lot of electricity are: the fan at high speeds, the
rear window heating or the seat heaters*.
Note
● If you vehicle has Start-Stop, it is not recommended to disconnect this
function.
● It is recommended to close the windows when driving at more than 60
km/h
● Do not drive with your foot resting on the clutch pedal, as the pressure
can make the plate spin, more fuel will be used and it can burn the clutch
plate lining, causing a serious fault.
● Do not hold the vehicle on a hill with the clutch, use the foot brake or
hand brake, using the latter to start. The fuel consumption will be lower and
you will prevent the clutch plate from being damaged.
● On descents, use the engine brake, changing to the gear that is more
suitable for the slope. The fuel consumption will be lower and the brakes
will not suffer.
Safety FirstOperating InstructionsPractical TipsTechnical Specifications
Page 203 of 319
201
Trailer towing
Trailer towing Trailer towing
Technical requirements
The towing bracket must meet certain technical require-
ments.
Your vehicle is intended mainly for transporting passengers and luggage.
However, if suitably equipped, it can also be used to tow a trailer or cara-
van.
If your vehicle has been factory-supplied with a towing bracket, all of the
necessary technical and legal aspects for trailing towing have been taking
into account during manufacturing.
Your vehicle is fitted with a 13-pole socket for the electrical connection be-
tween the trailer and the vehicle. If the trailer has a 7-pole connector you
can use an adapter cable. This can be purchased at an Authorised Service.
If a towing bracket is to be fitted after the vehicle is purchased, this must be
done according to the instructions of the towing bracket manufacturer
⇒ page 209.
WARNING
If a towing bracket is retrofitted, the installation should be carried out by
a qualified workshop.
● Particularly in high outdoor temperatures, it is not possible to drive
up long steep gradients without a suitable cooling system. The engine
would heat up.
● Incorrect installation can result in a safety risk!
Notes on towing
There are a number of points which need to be checked be-
fore towing a trailer or caravan.
– Observe the maximum permitted trailer weights ⇒ page 296.
Trailer weight
Never exceed the maximum permitted trailer weight.
If you do not load the trailer up to the maximum permitted trailer weight,
you can then climb correspondingly steeper gradients.
The maximum trailer weights listed are only applicable for altitudes up to
1000 m above sea level. With increasing altitude the engine power and
therefore the vehicle's climbing ability are impaired because of the reduced
air density. The maximum trailer weight has to be reduced accordingly. The
weight of the vehicle and trailer must be reduced by about 10% for every
subsequent 1000 m (or part thereof). This figure refers to the combined
weight of the (loaded) vehicle and (loaded) trailer.
The figures for the drawbar load that appear on the identification plate of
the towing bracket are for certification purposes only. The correct figures for
your specific model, which may be lower than these figures for the towing
bracket, are given in the registration documents and on ⇒ page 289. Also
refer to ⇒ page 296.
Distributing the load
Distribute loads in the trailer so that heavy objects are as near to the axle as
possible. Loads carried in the trailer must be secured to prevent them mov-
ing.
Safety FirstOperating InstructionsPractical TipsTechnical Specifications