technical specifications Seat Exeo ST 2011 Owner's manual
[x] Cancel search | Manufacturer: SEAT, Model Year: 2011, Model line: Exeo ST, Model: Seat Exeo ST 2011Pages: 319, PDF Size: 5.12 MB
Page 205 of 319
203
Trailer towing
Equipment and accessories
Before mounting equipment and accessories (e.g. bicycle
rack) please observe the following notes.
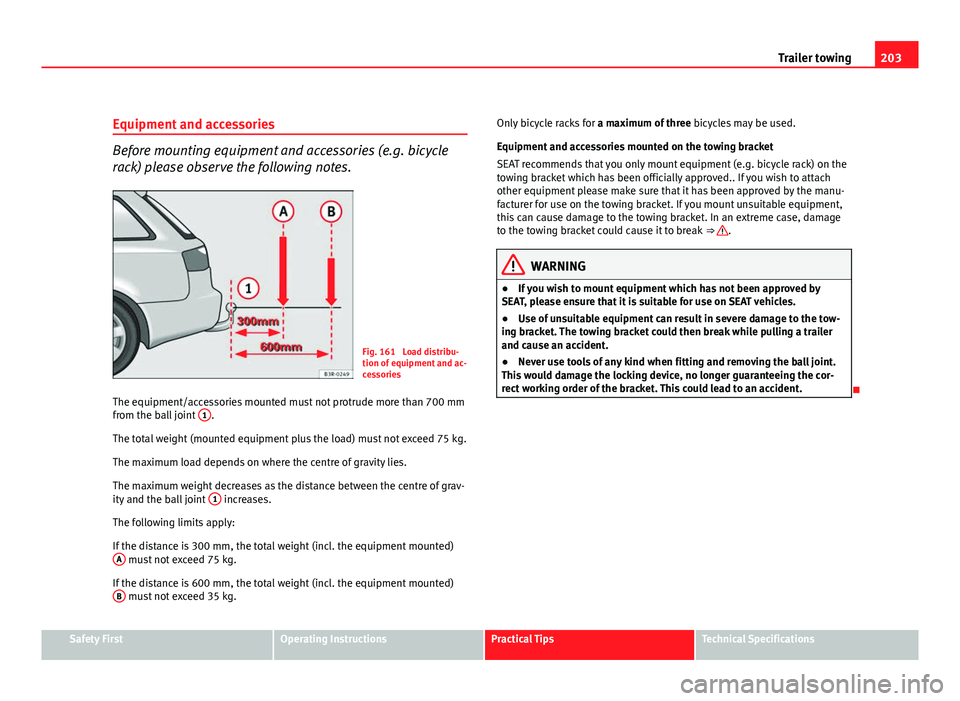
Fig. 161 Load distribu-
tion of equipment and ac-
cessories
The equipment/accessories mounted must not protrude more than 700 mm
from the ball joint 1
.
The total weight (mounted equipment plus the load) must not exceed 75 kg.
The maximum load depends on where the centre of gravity lies.
The maximum weight decreases as the distance between the centre of grav-
ity and the ball joint 1
increases.
The following limits apply:
If the distance is 300 mm, the total weight (incl. the equipment mounted) A
must not exceed 75 kg.
If the distance is 600 mm, the total weight (incl. the equipment mounted) B
must not exceed 35 kg. Only bicycle racks for
a maximum of three bicycles may be used.
Equipment and accessories mounted on the towing bracket
SEAT recommends that you only mount equipment (e.g. bicycle rack) on the
towing bracket which has been officially approved.. If you wish to attach
other equipment please make sure that it has been approved by the manu-
facturer for use on the towing bracket. If you mount unsuitable equipment,
this can cause damage to the towing bracket. In an extreme case, damage
to the towing bracket could cause it to break ⇒
.
WARNING
● If you wish to mount equipment which has not been approved by
SEAT, please ensure that it is suitable for use on SEAT vehicles.
● Use of unsuitable equipment can result in severe damage to the tow-
ing bracket. The towing bracket could then break while pulling a trailer
and cause an accident.
● Never use tools of any kind when fitting and removing the ball joint.
This would damage the locking device, no longer guaranteeing the cor-
rect working order of the bracket. This could lead to an accident.
Safety FirstOperating InstructionsPractical TipsTechnical Specifications
Page 207 of 319
205
Trailer towing
Fitting the ball joint (step 1)
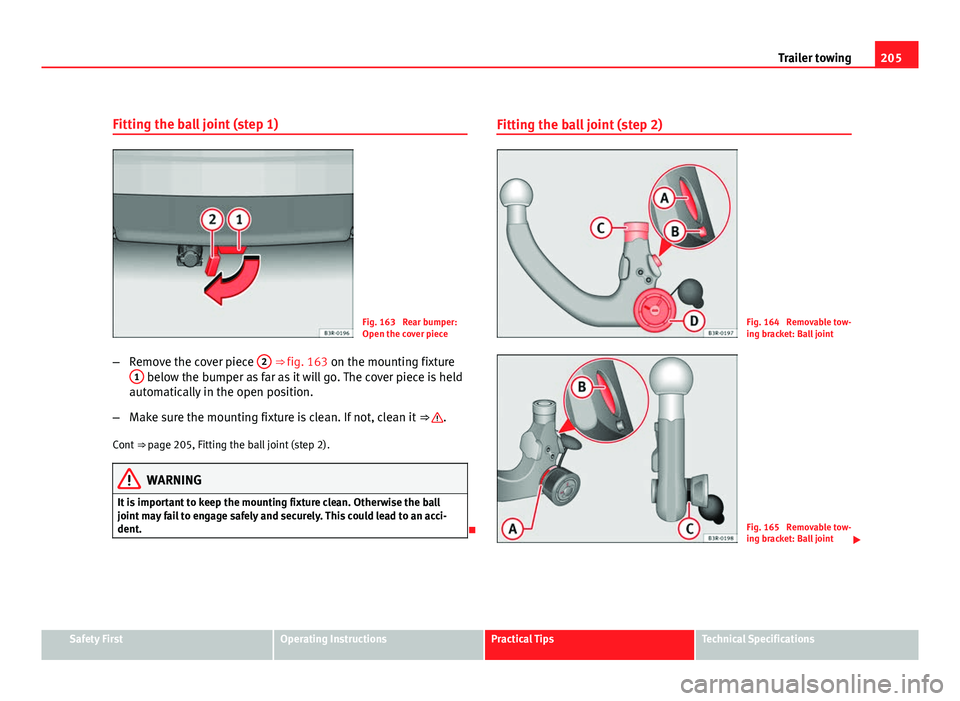
Fig. 163 Rear bumper:
Open the cover piece
– Remove the cover piece 2
⇒ fig. 163 on the mounting fixture
1 below the bumper as far as it will go. The cover piece is held
automatically in the open position.
– Make sure the mounting fixture is clean. If not, clean it ⇒
.
Cont ⇒ page 205, Fitting the ball joint (step 2).
WARNING
It is important to keep the mounting fixture clean. Otherwise the ball
joint may fail to engage safely and securely. This could lead to an acci-
dent.
Fitting the ball joint (step 2)
Fig. 164 Removable tow-
ing bracket: Ball joint
Fig. 165 Removable tow-
ing bracket: Ball joint
Safety FirstOperating InstructionsPractical TipsTechnical Specifications
Page 209 of 319
207
Trailer towing
– Pull out the knob in direction A
, hold and turn in direction Buntil the locking pin 2 engages and the release pin 3 moves
out visibly ⇒ .
Inserting the ball joint
– With the spring mechanism in the ready position, insert the ball
joint into the mounting fixture and push it upwards ⇒ fig. 167
in the direction indicated (arrow) ⇒
. It should lock into posi-
tion automatically. You should now clearly hear it click into
place.
– Lock the ball joint by turning the key to the green marking.
– Remove the key.
Cont ⇒ page 207, Fitting the ball joint (step 4).
WARNING
● If it is not possible to set the spring mechanism to the ready position
as described above, do not use the ball joint. Please contact a qualified
workshop.
● To avoid injury, keep your hands away from the knob or cover piece
when inserting the ball joint in the mounting fixture. Otherwise, you
could be injured.
Fitting the ball joint (step 4)
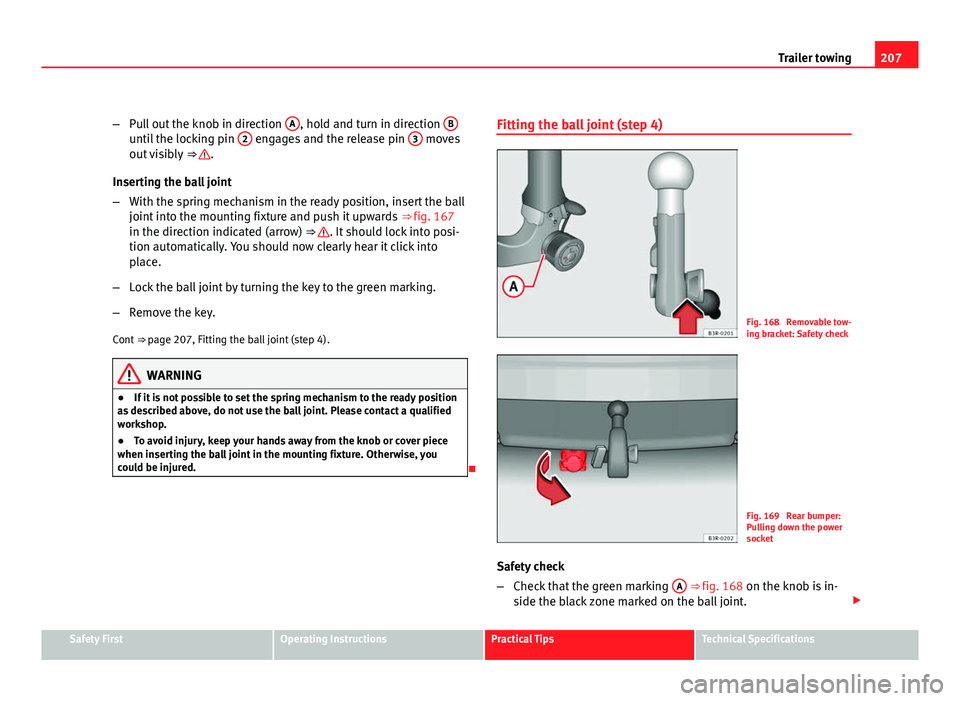
Fig. 168 Removable tow-
ing bracket: Safety check
Fig. 169 Rear bumper:
Pulling down the power
socket
Safety check
– Check that the green marking A
⇒ fig. 168 on the knob is in-
side the black zone marked on the ball joint.
Safety FirstOperating InstructionsPractical TipsTechnical Specifications
Page 211 of 319
209
Trailer towing
– Take hold of the ball joint and pull out the knob in direction A
.
– Keep hold of the knob and turn it as far as it will go in direction
B
.
– Release the knob. The spring mechanism will remain in the
ready position ⇒
.
– Pull the ball joint down out of the mounting fixture 1
⇒ fig. 171. The cover piece will cover the mounting fixture auto-
matically 2.
– Put away the ball joint attachment under the floor panel in the
luggage compartment.
– Move the socket back up to its original position.
WARNING
● To avoid injury, keep your hands away from the locking pin and the
release pin when releasing the locking mechanism.
● Make sure that the cover piece is properly engaged on the mounting
fixture on the vehicle. Otherwise the ball joint may fail to engage secure-
ly if dirt accumulates in the mounting fixture.
Fitting a towing bracket*
It is possible to fit a towing bracket to the rear of the vehicle.
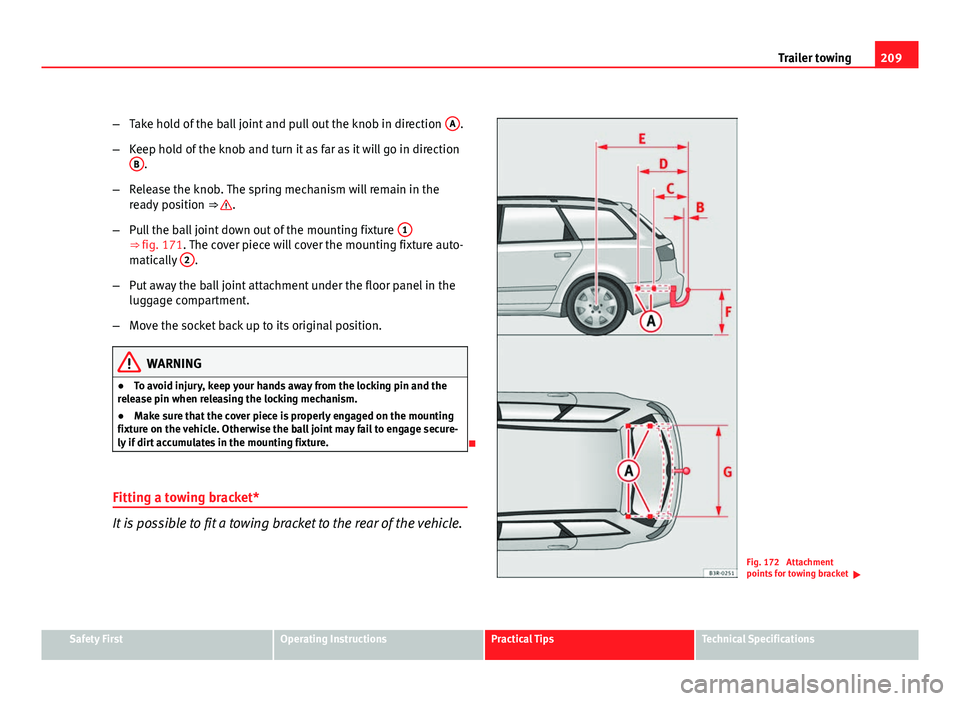
Fig. 172 Attachment
points for towing bracket
Safety FirstOperating InstructionsPractical TipsTechnical Specifications
Page 213 of 319
211
Vehicle maintenance and cleaning
Vehicle maintenance and cleaning General notes
Regular washing and care help maintain the value of your
vehicle.Vehicle maintenance
Regular care and washing help to maintain the value of the vehicle. This
may also be one of the requirements for acknowledging warranty claims in
the event of bodywork corrosion or paint defects.
The best way to protect your vehicle against the harmful effects of the envi-
ronment is through correct maintenance and frequent washing. The longer
substances such as insect remains, bird droppings, resinous tree sap, road
dirt, industrial deposits, tar, soot or road salt and other aggressive materi-
als remain on the vehicle, the more damage they do to the paintwork. High
temperatures (for instance in strong sunlight) further intensify the corrosive
effect.
After winter, a period when salt is put on the roads, it is important to have
the underside of the vehicle washed thoroughly.
Products for vehicle maintenance
Car care products are available in your Authorised Service Centre. Keep the
product instructions until you have used them up.
WARNING
● Car care products can be toxic. Because of this, they must always be
kept closed in their original container. Keep them out of the reach of chil-
dren. Failure to comply could result in poisoning.
● Always read and observe the instructions and warnings on the pack-
age before using vehicle care products. Improper use could cause health
problems or damage the vehicle. The use of certain products may pro-
duce noxious vapours; they should be used in well ventilated areas.
● Never use fuel, turpentine, engine oil, nail varnish remover or other
volatile fluids. These are toxic and highly flammable. Risk of fire and ex-
plosion.
● Before washing your vehicle, or carrying out any maintenance, switch
the engine off, apply the handbrake firmly and remove the key from the
ignition.
CAUTION
Never attempt to remove dirt, mud or dust if the surface of the vehicle is dry.
Never use a dry cloth or sponge for cleaning purposes. This could damage
the paintwork or the windows of your vehicle. Soak dirt, mud or dust with
plenty of water.
For the sake of the environment
● When purchasing products for your vehicle maintenance, select the
ones which are not harmful to the environment.
● The waste from car care products should not be disposed of with ordina-
ry household waste. Observe the disposal information on the package.
Safety FirstOperating InstructionsPractical TipsTechnical Specifications
Page 215 of 319
213
Vehicle maintenance and cleaning
CAUTION
● Never remove dirt, mud or dust if the vehicle surface is dry. Never use a
dry cloth or sponge for cleaning purposes. This could scratch the paintwork
or glass on your vehicle.
● Washing the vehicle in low temperatures: when washing the vehicle
with a hose, do not direct water into the lock cylinders or the gaps around
the doors, tailgate, or sunroof. Risk of freezing.
For the sake of the environment
To protect environment, the vehicle should be washed only in specially pro-
vided wash bays. This prevents toxic, oil-laden waste water entering the
sewerage system. In some places, washing vehicles outside wash bays is
prohibited.
Note
Do not wash the vehicle in direct sunlight.
Washing the vehicle with a high pressure cleaner
Be particularly careful when using a high pressure cleaner!
– Always observe the instructions for the high-pressure cleaner,
particularly those concerning the pressure and the spraying
distance.
– Increase the spraying distance for soft materials and painted
bumpers.
– Do not use a high pressure cleaner to remove ice or snow from
windows ⇒ page 214.
– Never use concentrated jet nozzles (“rotating jets”) ⇒
. –
After washing, avoid sudden and sharp braking. “Dry” the
brakes by braking several times ⇒ page 196.
WARNING
● Never wash tyres with a concentrated jet (“rotating nozzle”). Even at
large spraying distances and short cleaning times, visible and invisible
damage can occur to the tyres. This may cause an accident.
● Water, ice and salt on the brakes can reduce braking efficiency. Risk
of accident.
CAUTION
● Do not use water hotter than 60 °C. This could damage the vehicle.
● To avoid damage to the vehicle, keep a sufficient distance from sensitive
materials such as flexible hoses, plastic, soundproofing material, etc. This
is also important for bumpers painted in the colour of the bodywork. The
closer the nozzle is to the surface, the greater the wear on the material.
Vehicle paint maintenance
Regular waxing protects the paintwork. You need to apply wax to your vehicle if water does not form small drops
and run off the paintwork when it is clean.
Good quality hard wax products are available at your Authorised Service
Centre.
Regular wax applications help to protect the paintwork from environmental
contaminants ⇒ page 211. It is also effective in protecting against minor
scratches.
Even if a wax solution is used regularly in the vehicle washing tunnel, it is
advisable to protect the paint with a hard wax coating at least twice a year.
Safety FirstOperating InstructionsPractical TipsTechnical Specifications
Page 217 of 319
215
Vehicle maintenance and cleaning
CAUTION
● Never use warm or hot water to remove snow and ice from windows and
mirrors. This could cause the glass to crack!
● The heating element for the rear window is located on the inner side of
the window. To prevent damage, do not put stickers on the heating ele-
ments inside the window.
Cleaning windscreen wiper blades
Clean wiper blades improve visibility.
1. Use a soft cloth to remove dust and dirt from the windscreen wiper blades.
2. Use window cleaner to clean the windscreen wiper blades. Use a sponge or a cloth to remove stubborn dirt.
Rubber seals maintenance
If rubber seals are well looked after, they will not freeze so
quickly. 1. Use a soft cloth to remove dust and dirt from the rubber seals.
2. Apply a specialist care product to the rubber seals.
The rubber strips on the doors, windows, bonnet and tailgate will remain
pliable and last longer if they are treated with a suitable care product (for
example silicone spray). Caring for rubber seals will also prevent premature ageing and leaks. The
doors will be easier to open. If rubber seals are well looked after, they will
not freeze so quickly in winter.
Door lock cylinders
The door lock cylinders can freeze up in winter.
To de-ice the lock cylinders you should only use spray with lubricating and
anti-corrosive properties.
Cleaning chrome parts
1. Clean chrome parts with a damp cloth.
2. Polish chrome parts with a soft, dry cloth. If this does not provide satisfying results, use a specialist chrome cleaning
product. Chrome cleaning products will remove stains from the surface.
CAUTION
To prevent scratching chrome surfaces:
● Never use an abrasive cleaning product on chrome.
● Do not clean or polish chrome parts in a sandy or dusty environment.
Steel wheel rims
– Clean steel wheel rims regularly using a separate sponge.
Safety FirstOperating InstructionsPractical TipsTechnical Specifications
Page 219 of 319
217
Vehicle maintenance and cleaning
Cleaning the engine compartment
Take special care when cleaning the engine compartment.
Anti-corrosion treatment
The engine compartment and the surface of the power unit are given anti-
corrosion treatment at the factory.
Good corrosion protection is particularly important in winter when the vehi-
cle is frequently driven on salted roads. To prevent the salt corroding the ve-
hicle, the entire engine compartment should be thoroughly cleaned before
and after winter.
Your Authorised Service Centre has got the necessary equipment to provide
the correct cleaning and preserving products. For this reason, we recom-
mend having this work performed by them.
The anti-corrosion protection is usually removed if the engine compartment
is cleaned with grease removing solutions, or if you have the engine
cleaned. On commissioning this work, ensure that all surfaces, seams,
joints and components in the engine compartment are given anti-corrosion
treatment.
WARNING
● When working in the engine compartment, always observe the safety
warnings ⇒ page 226.
● Before opening the bonnet, switch the engine off, apply the hand-
brake firmly and always remove the key from the ignition.
● Allow the engine to cool before you clean the engine compartment.
● Do not clean the vehicle underbody, wheel arches or wheel trims
without protecting your hands and arms. You may cut yourself on sharp-
edged metal parts. Failure to comply could result in injury.
WARNING (Continued)
● Moisture, ice and salt on the brakes may affect braking efficiency.
Risk of accident. Directly after washing, avoid sudden and sharp braking.
● Never touch the radiator fan. It is temperature-controlled and could
start automatically, even when the key is removed from the ignition!
For the sake of the environment
Fuel, grease and oil deposits could be removed when the engine is washed.
The polluted water must be cleaned in an oil separator. For this reason, en-
gine washing should be carried out only by a specialised workshop or a pet-
rol station.
Vehicle interior maintenance Plastic parts and dash panel cleaning
– Use a clean, damp cloth to clean plastic parts and the dash
panel.
– If this does not provide satisfactory results, use a special sol-
vent-free plastic cleaning product.
WARNING
Never clean the dash panel and the airbag module surface with cleaners
containing solvents. Solvents cause the surface to become porous. If the
airbag triggered, plastic parts could become detached and cause inju-
ries.
Safety FirstOperating InstructionsPractical TipsTechnical Specifications
Page 221 of 319
219
Vehicle maintenance and cleaning
Seat belt cleaning
A dirty belt may not work properly.
Check all seat belts regularly and keep them clean.
Seat belt cleaning
– Pull the dirty seat belt right out and unroll it.
– Clean dirty seat belts with a gentle soap solution.
– Allow it to dry.
– Do not roll the seat belt up until it is dry.
If large stains form on the belts, it will not retract correctly into the automat-
ic belt retractor.
WARNING
● Do not use chemical cleaning agents on the seat belts, as this can im-
pair the strength of the webbing. Ensure that belts do not come into con-
tact with corrosive fluids.
● Check the condition of the seat belts at regular intervals. If you notice
that the belt webbing, fittings, retractor mechanism or buckle of any of
the belts is damaged, the belt must be replaced by a specialist work-
shop.
● Do not attempt to repair a damaged seat belt yourself. The seat belts
must not be removed or modified in any way.
CAUTION
After cleaning, allow seat belts to dry completely before rolling them up.
Otherwise, the belt retractors could become damaged.
Safety FirstOperating InstructionsPractical TipsTechnical Specifications
Page 222 of 319
220Accessories, parts replacement and modifications
Accessories, parts replacement and modifications
Accessories and spare parts
Always consult an Authorised Service Centre before purchas-
ing accessories and parts.Your vehicle is designed to offer a high standard of active and passive safe-
ty.
Before purchasing accessories and parts, and before making technical
changes to your vehicle, we recommend you to consult your Authorised
Service Centre.
SEAT dealerships will be happy to provide you with the latest information
about the use, legal requirements and recommendations from the manufac-
turer regarding accessories and parts.
We recommend you use only SEAT Approved Accessories®
and SEAT Ap-
proved Spare Parts ®
. This way, SEAT can guarantee that the product in
question is suitable, reliable and safe. SEAT Authorised Service Centres
have the necessary experience and facilities to ensure that parts are correct-
ly and professionally installed.
Despite a continuous observation of the market, SEAT is not able to assess
the reliability, safety and suitability of those parts SEAT has not approved.
For this reason, SEAT cannot assume responsibility for any non-genuine
parts used, even if these parts have been approved by an official testing
agency or are covered by an official approval certificate.
Any equipment subsequently installed which has a direct effect on the driv-
er's control of the vehicle (e.g. cruise control system or electronically-con-
trolled suspension) must be approved by SEAT and bear the e mark (the Eu-
ropean Union's authorisation symbol). If any
additional electrical components are fitted which do not serve to con-
trol the vehicle itself (e.g. refrigerator box, laptop or ventilator fan), these
must bear the CE mark (European Union manufacturer conformity declara-
tion).
WARNING
Accessories, for example telephone holders or cup holders, should never
be fitted on the covers, or within the working range, of the airbags. Oth-
erwise, there is a danger of injury if the airbag is triggered in an accident.
Technical modifications
Modifications must always be carried out according to our
specifications.
Unauthorised modifications to the electronic components or software in the
vehicle may cause malfunctions. Due to the way the electronic components
are linked together in networks, other indirect systems may be affected by
the faults. This can seriously impair safety, lead to excessive wear of compo-
nents, and also invalidate your vehicle registration documents.
SEAT Authorised Service Centres cannot be held liable for any damage
caused by modifications and/or work incorrectly performed.
For this reason, we recommend having all work performed by a SEAT Author-
ised Technical Service using Genuine SEAT®
Spare Parts.