technical specifications Seat Ibiza SC 2012 Owners Manual
[x] Cancel search | Manufacturer: SEAT, Model Year: 2012, Model line: Ibiza SC, Model: Seat Ibiza SC 2012Pages: 280, PDF Size: 3.67 MB
Page 185 of 280
183
Accessories, replacement of parts and modifications
Accessories, replacement of parts and modifications
Accessories and spare parts
Always consult a SEAT dealership before purchasing acces-
sories and parts.
Your vehicle is designed to offer a high standard of active and passive safe-
ty.
Before purchasing accessories and parts, and before making technical
changes to your vehicle, we recommend you to consult your SEAT Technical
Service.
SEAT dealerships will be happy to provide you with the latest information
about the use, legal requirements and recommendations from the manufac-
turer regarding accessories and parts.
We recommend you use only SEAT Approved Accessories®
and SEAT Ap-
proved Spare Parts ®
. This way, SEAT can guarantee that the product in
question is suitable, reliable and safe. SEAT Technical Services have the
necessary experience and facilities to ensure that parts are correctly and
professionally installed.
Despite a continuous observation of the market, SEAT is not able to assess
the reliability, safety and suitability of those parts SEAT has not approved.
For this reason, SEAT cannot assume responsibility for any non-genuine
parts used, even if these parts have been approved by an official testing
agency or are covered by an official approval certificate.
Any equipment subsequently installed which has a direct effect on the driv-
er's control of the vehicle (e.g. cruise control system or electronically-con-
trolled suspension) must be approved by SEAT and bear the e mark (the Eu-
ropean Union's authorisation symbol). If any
additional electrical components are fitted which do not serve to con-
trol the vehicle itself (e.g. refrigerator box, laptop or ventilator fan), these
must bear the CE mark (European Union manufacturer conformity declara-
tion).
WARNING
Accessories, for example telephone holders or cup holders, should never
be fitted on the covers, or within the working range, of the airbags. Oth-
erwise, there is a danger of injury if the airbag is triggered in an accident.
Technical modifications
Modifications must always be carried out according to our
specifications.
Unauthorised modifications to the electronic components or software in the
vehicle may cause malfunctions. Due to the way the electronic components
are linked together in networks, other indirect systems may be affected by
the faults. This can seriously impair safety, lead to excessive wear of compo-
nents, and also invalidate your vehicle registration documents.
The SEAT Technical Service cannot be held liable for any damage caused by
modifications and/or work incorrectly performed.
For this reason, we recommend having all work performed by a SEAT Techni-
cal Service using SEAT Original Spare Parts ®
.
Safety FirstOperating InstructionsPractical TipsTechnical Specifications
Page 187 of 280
185
Accessories, replacement of parts and modifications
Note
Please observe the operating instructions of your mobile telephone/two-
way radio.
Fitting a towing bracket*
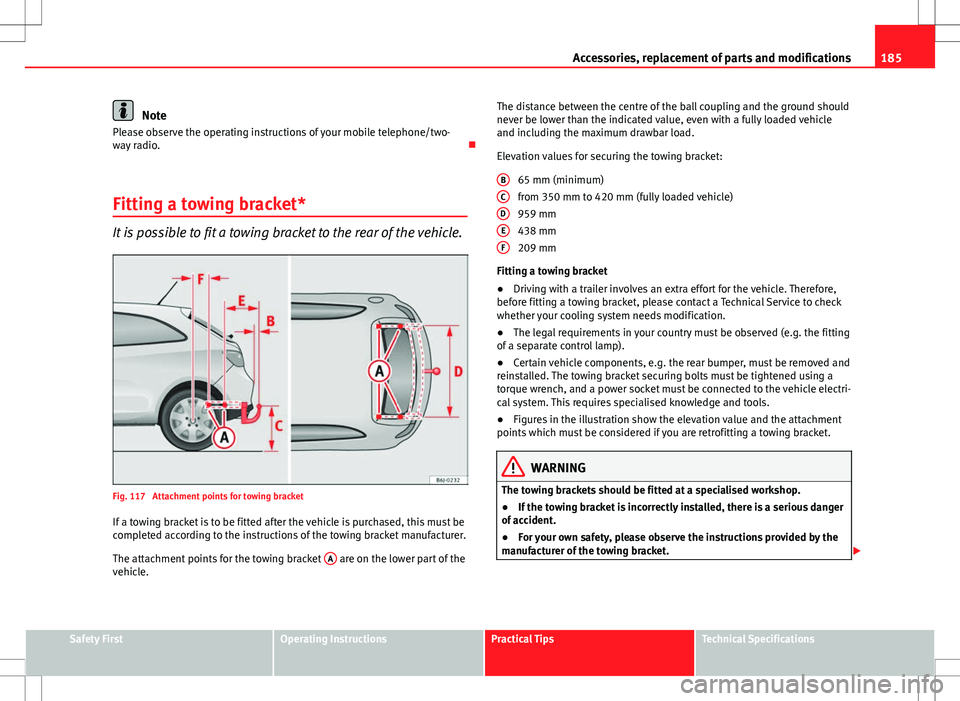
It is possible to fit a towing bracket to the rear of the vehicle.
Fig. 117 Attachment points for towing bracket If a towing bracket is to be fitted after the vehicle is purchased, this must be
completed according to the instructions of the towing bracket manufacturer.
The attachment points for the towing bracket A
are on the lower part of the
vehicle. The distance between the centre of the ball coupling and the ground should
never be lower than the indicated value, even with a fully loaded vehicle
and including the maximum drawbar load.
Elevation values for securing the towing bracket:
65 mm (minimum)
from 350 mm to 420 mm (fully loaded vehicle)
959 mm
438 mm
209 mm
Fitting a towing bracket
● Driving with a trailer involves an extra effort for the vehicle. Therefore,
before fitting a towing bracket, please contact a Technical Service to check
whether your cooling system needs modification.
● The legal requirements in your country must be observed (e.g. the fitting
of a separate control lamp).
● Certain vehicle components, e.g. the rear bumper, must be removed and
reinstalled. The towing bracket securing bolts must be tightened using a
torque wrench, and a power socket must be connected to the vehicle electri-
cal system. This requires specialised knowledge and tools.
● Figures in the illustration show the elevation value and the attachment
points which must be considered if you are retrofitting a towing bracket.
WARNING
The towing brackets should be fitted at a specialised workshop.
● If the towing bracket is incorrectly installed, there is a serious danger
of accident.
● For your own safety, please observe the instructions provided by the
manufacturer of the towing bracket.
BCDEF
Safety FirstOperating InstructionsPractical TipsTechnical Specifications
Page 189 of 280
187
Checking and refilling levels
Checking and refilling levels Refuelling
The tank flap is released manually. The tank holds approxi-
mately 45 litres.
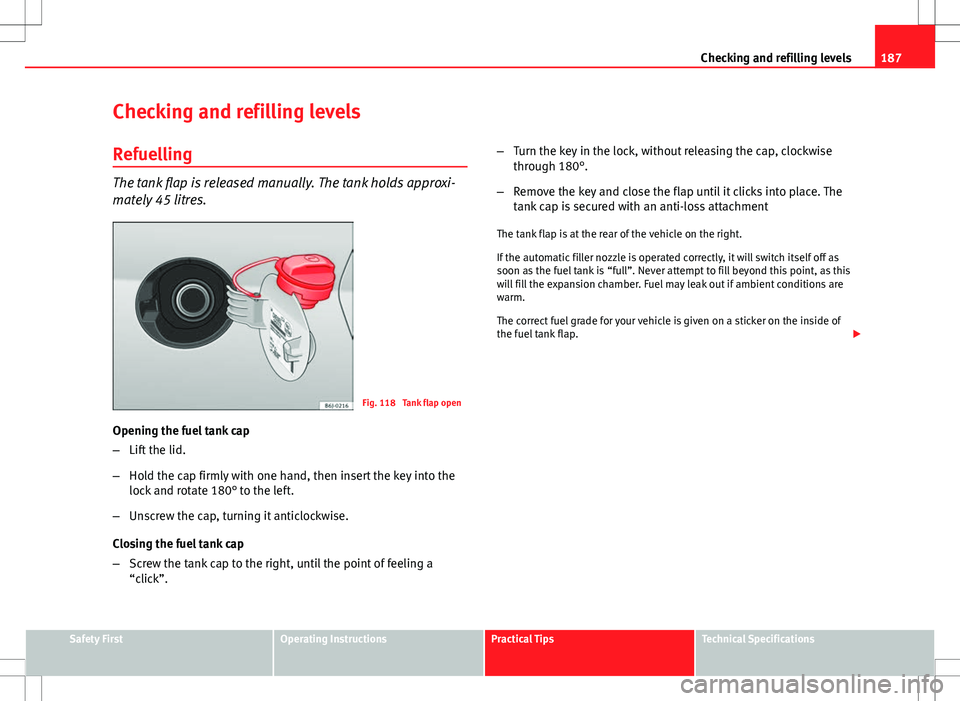
Fig. 118 Tank flap open
Opening the fuel tank cap
– Lift the lid.
– Hold the cap firmly with one hand, then insert the key into the
lock and rotate 180° to the left.
– Unscrew the cap, turning it anticlockwise.
Closing the fuel tank cap
– Screw the tank cap to the right, until the point of feeling a
“click”. –
Turn the key in the lock, without releasing the cap, clockwise
through 180°.
– Remove the key and close the flap until it clicks into place. The
tank cap is secured with an anti-loss attachment
The tank flap is at the rear of the vehicle on the right.
If the automatic filler nozzle is operated correctly, it will switch itself off as
soon as the fuel tank is “full”. Never attempt to fill beyond this point, as this
will fill the expansion chamber. Fuel may leak out if ambient conditions are
warm.
The correct fuel grade for your vehicle is given on a sticker on the inside of
the fuel tank flap.
Safety FirstOperating InstructionsPractical TipsTechnical Specifications
Page 191 of 280
189
Checking and refilling levels
LPG system*
Refuelling with LPG
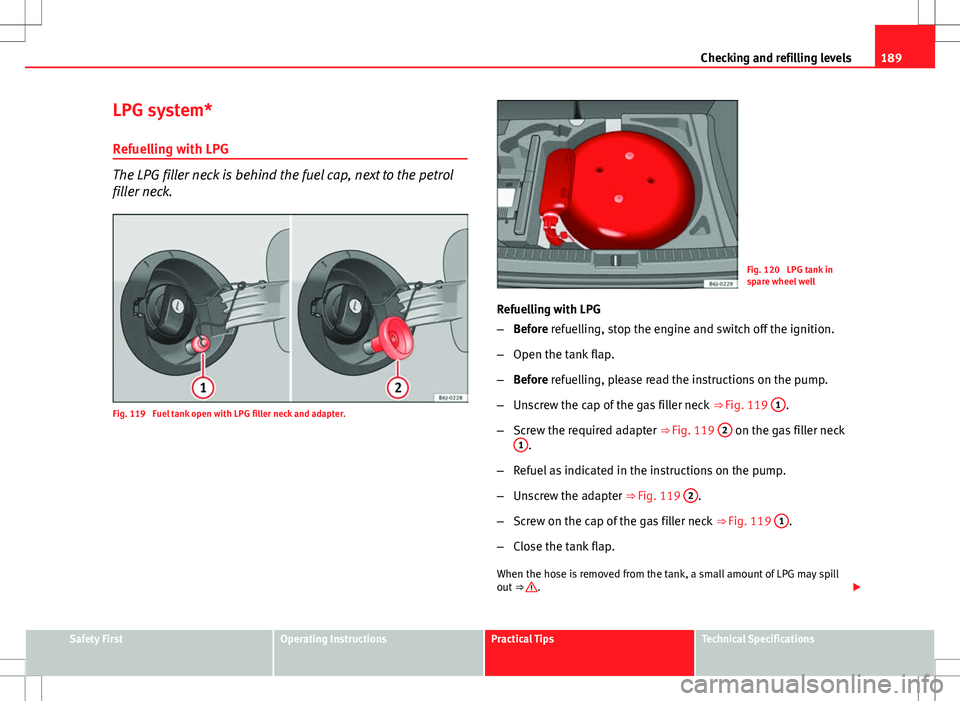
The LPG filler neck is behind the fuel cap, next to the petrol
filler neck.
Fig. 119 Fuel tank open with LPG filler neck and adapter.
Fig. 120 LPG tank in
spare wheel well
Refuelling with LPG
– Before refuelling, stop the engine and switch off the ignition.
– Open the tank flap.
– Before refuelling, please read the instructions on the pump.
– Unscrew the cap of the gas filler neck ⇒ Fig. 119 1
.
– Screw the required adapter ⇒ Fig. 119 2
on the gas filler neck
1.
– Refuel as indicated in the instructions on the pump.
– Unscrew the adapter ⇒ Fig. 119 2
.
– Screw on the cap of the gas filler neck ⇒ Fig. 119 1
.
– Close the tank flap.
When the hose is removed from the tank, a small amount of LPG may spill
out ⇒
.
Safety FirstOperating InstructionsPractical TipsTechnical Specifications
Page 193 of 280
191
Checking and refilling levels
Note
The four most common types of adapter in Europe are the ACME adapter 1,
the Dish Coupling adapter 2, the bayonet adapter 3 and the EURO adapt-
er 4. On the whole, we recommend you carry all four adapters in your vehi-
cle, as some countries use more than one type of filling system. The intro-
duction of a single system (Euronozzle) throughout Europe is being studied.
LPG fuel
LPG is an alternative vehicle fuel and is a blend of propane and butane.
The success of LPG is due to the strict regulations concerning exhaust gas
emissions. Compared to other fossil fuels, LPG is characterised by its re-
duced emissions.
LPG quality and consumption
Quality requirements for LPG are regulated for all Europe in DIN EN 589 and
permit the use of LPG throughout Europe.
A difference is drawn between winter gas and summer gas. Winter gas has a
higher proportion of propane gas. As a result, the driving range of winter
gas may be lower (due to increased consumption) than that of summer gas.
LPG supplier network
The number of LPG pumps is constantly increasing.
Lists of existing LPG pumps may be found on Internet.
LPG safety
A series of collision tests performed on this vehicle while running with LPG
have confirmed its high level of safety. The safety of the LPG system guarantees operation without risk. The follow-
ing safety measures have been adopted:
●
The LPG tank has a solenoid valve which closes automatically when the
engine is switched off (ignition off) or when running on petrol.
● A solenoid type main valve disconnects the supply of gas to the engine
compartment when the engine is switched off or running on petrol.
● A safety valve in the LPG tank with pipes to the outside prevents the gas
from entering the vehicle interior.
● All anchorage points and materials have been designed to ensure the
maximum possible levels of safety.
The condition of the LPG system should be checked regularly to guarantee
safe driving conditions ⇒
. These checks are included in the Maintenance
Programme.
WARNING
● If there is a smell of gas or a suspected leak, stop the vehicle immedi-
ately and switch off the ignition. Open the doors to ventilate the vehicle.
Do not carry on driving! Take the vehicle to a specialised workshop and
have the fault repaired.
● Immediately extinguish any cigarettes and remove from the vehicle
any objects which might produce a spark or cause a fire, and switch off
immediately if gas is smelt or a leak is detected.
● LPG tanks are subject to pressure and must be checked regularly. The
owner of the vehicle must check that these services are performed cor-
rectly.
● When parking the vehicle in a closed area (for example in a garage),
make sure that there is adequate ventilation, either natural or mechani-
cal, to neutralise the LPG in the event of a leak.
Note
For any fault in the LPG system, please refer to the SEAT web page, which
lists the workshops authorised to repair these faults.
Safety FirstOperating InstructionsPractical TipsTechnical Specifications
Page 195 of 280
193
Checking and refilling levels
Winter driving
Diesel can thicken in winter.
Winter-grade diesel
When using “summer-grade diesel fuel”, difficulties may be experienced at
temperatures below 0°C because the fuel thickens due to wax separation.
Therefore, “winter-grade diesel fuel” is available in some countries during
the cold months. It can be used at temperatures as low as -22°C.
In countries with different climatic conditions the diesel fuel generally sold
has different temperature characteristics. Check with the Technical Services
or filling stations in the country concerned regarding the type of diesel fuels
available.
Filter pre-heater
Your vehicle is fitted with a fuel filter glow plug system, making it well
equipped for operation in winter. This ensures that the fuel system remains
operational to approx. -24°C, provided you use winter-grade diesel which is
safe to -15°C.
However, if the fuel has waxed to such an extent that the engine will not
start at temperatures of under -24°C, simply place the vehicle in a warm
place for a while.
CAUTION
Do not mix fuel additives (thinners or similar products) with diesel fuel. Working in the engine compartment
Safety instructions on working in the engine compartment
Any work carried out in the engine compartment or on the
engine must be carried out cautiously.
Before starting any work on the engine or in the engine compart-
ment:
1. Switch off the engine and remove the key from the ignition.
2. Apply the handbrake.
3. Move the gear lever to neutral or the selector lever to position P.
4. Wait for the engine to cool down.
5. Keep children away from the vehicle.
6. Raise the bonnet ⇒ page 195.
You should not do any work in the engine compartment unless you know ex-
actly how to carry out the jobs and have the correct tools! Have the work car-
ried out by a specialised workshop if you are uncertain.
All service fluids and consumables, e.g. coolant, engine oil, spark plugs
and batteries, are under constant development. SEAT provides a constant
flow of information to the Technical Services concerning modifications. For
this reason, we recommend you to have service fluids and consumables re-
placed by a Technical Service. Please observe the relevant instructions
⇒ page 183. The engine compartment of the vehicle is a hazardous area
⇒
.
Safety FirstOperating InstructionsPractical TipsTechnical Specifications
Page 197 of 280
195
Checking and refilling levels
For the sake of the environment
Service fluids leaks are harmful to the environment. For this reason you
should make regular checks on the ground underneath your vehicle. If you
find spots of oil or other fluids, have your vehicle inspected in a specialised
workshop.
Opening the bonnet
The bonnet is released from inside the vehicle.
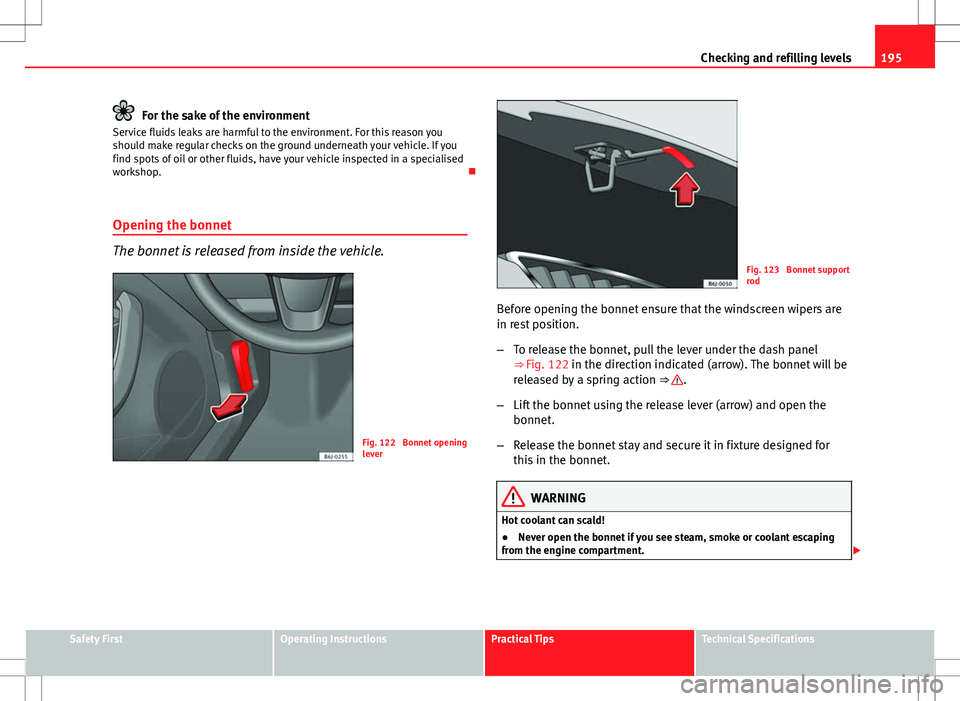
Fig. 122 Bonnet opening
lever
Fig. 123 Bonnet support
rod
Before opening the bonnet ensure that the windscreen wipers are
in rest position.
– To release the bonnet, pull the lever under the dash panel
⇒ Fig. 122 in the direction indicated (arrow). The bonnet will be
released by a spring action ⇒
.
– Lift the bonnet using the release lever (arrow) and open the
bonnet.
– Release the bonnet stay and secure it in fixture designed for
this in the bonnet.
WARNING
Hot coolant can scald!
● Never open the bonnet if you see steam, smoke or coolant escaping
from the engine compartment.
Safety FirstOperating InstructionsPractical TipsTechnical Specifications
Page 198 of 280
196Checking and refilling levels
WARNING (Continued)
● Wait until no more steam, smoke or coolant is emitted from the bon-
net, then carefully open the bonnet.
● When working in the engine compartment, always observe the safety
warnings ⇒ page 193.
Closing the bonnet
– Slightly raise the bonnet
– Release the bonnet stay and replace it in its support.
– At a height of about 30 cm let it fall so it is locked.
If the bonnet does not close, do not press downwards. Open it once more
and let it fall as before.
WARNING
If the bonnet is not closed properly, it could open while you are driving
and completely obscure your view of the road. Risk of accident.
● After closing the bonnet, always check that it is properly secured. The
bonnet must be flush with the surrounding body panels.
● If you notice that the bonnet latch is not secured when the vehicle is
moving, stop the vehicle immediately and close the bonnet properly.
Risk of accident.
Engine oil
General notes
The engine comes with a special, multi-grade oil that can be used all year
round.
Because the use of high-quality oil is essential for the correct operation of
the engine and its long useful life, when topping up or changing oil, use on-
ly those oils that comply with VW standards.
The specifications (VW standards) set out in the following page should ap-
pear on the container of the service oil; when the container displays the
specific standards for petrol and diesel engines together, it means that the
oil can be used for both types of engines.
We recommend that the oil change, indicated in the Maintenance Pro-
gramme, be performed by a Technical Service or a specialised workshop.
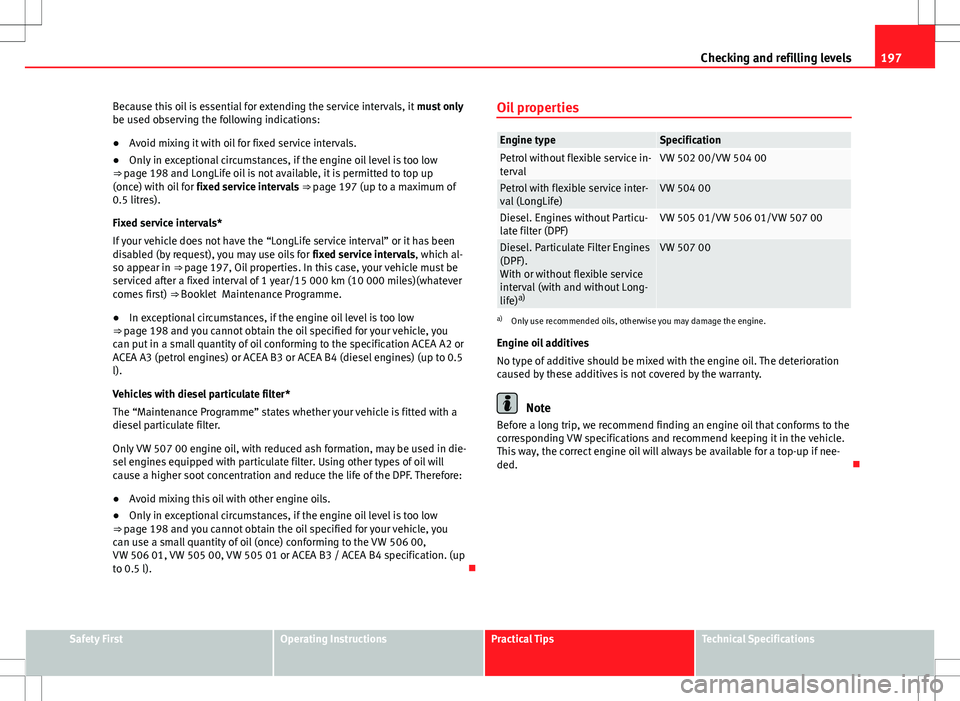
The correct oil specifications for your engine are listed in ⇒ page 197, Oil
properties.
Service intervals
Service intervals can be flexible (LongLife service) or fixed (dependent on
time/distance travelled).
If the PR code that appears on the back of the “Maintenance Programme”
booklet is QG1, this means that your vehicle has the LongLife service pro-
grammed. If it has the codes QG0 or QG2 the interval service is dependent
on time/distance travelled.
Flexible service intervals (LongLife service intervals*)
Special oils and processes have been developed which, depending on the
characteristics and individual driving profiles, enable the extension of the
oil change service (LongLife service intervals).
Page 199 of 280
197
Checking and refilling levels
Because this oil is essential for extending the service intervals, it must only
be used observing the following indications:
● Avoid mixing it with oil for fixed service intervals.
● Only in exceptional circumstances, if the engine oil level is too low
⇒ page 198 and LongLife oil is not available, it is permitted to top up
(once) with oil for fixed service intervals ⇒ page 197 (up to a maximum of
0.5 litres).
Fixed service intervals*
If your vehicle does not have the “LongLife service interval” or it has been
disabled (by request), you may use oils for fixed service intervals, which al-
so appear in ⇒ page 197, Oil properties. In this case, your vehicle must be
serviced after a fixed interval of 1 year/15 000 km (10 000 miles)(whatever
comes first) ⇒ Booklet Maintenance Programme.
● In exceptional circumstances, if the engine oil level is too low
⇒ page 198 and you cannot obtain the oil specified for your vehicle, you
can put in a small quantity of oil conforming to the specification ACEA A2 or
ACEA A3 (petrol engines) or ACEA B3 or ACEA B4 (diesel engines) (up to 0.5
l).
Vehicles with diesel particulate filter*
The “Maintenance Programme” states whether your vehicle is fitted with a
diesel particulate filter.
Only VW 507 00 engine oil, with reduced ash formation, may be used in die-
sel engines equipped with particulate filter. Using other types of oil will
cause a higher soot concentration and reduce the life of the DPF. Therefore:
● Avoid mixing this oil with other engine oils.
● Only in exceptional circumstances, if the engine oil level is too low
⇒ page 198 and you cannot obtain the oil specified for your vehicle, you
can use a small quantity of oil (once) conforming to the VW 506 00,
VW 506 01, VW 505 00, VW 505 01 or ACEA B3 / ACEA B4 specification. (up
to 0.5 l). Oil properties
Engine typeSpecificationPetrol without flexible service in-
tervalVW 502 00/VW 504 00
Petrol with flexible service inter-
val (LongLife)VW 504 00
Diesel. Engines without Particu-
late filter (DPF)VW 505 01/VW 506 01/VW 507 00
Diesel. Particulate Filter Engines
(DPF).
With or without flexible service
interval (with and without Long-
life)
a)VW 507 00
a)
Only use recommended oils, otherwise you may damage the engine.
Engine oil additives
No type of additive should be mixed with the engine oil. The deterioration
caused by these additives is not covered by the warranty.
Note
Before a long trip, we recommend finding an engine oil that conforms to the
corresponding VW specifications and recommend keeping it in the vehicle.
This way, the correct engine oil will always be available for a top-up if nee-
ded.
Safety FirstOperating InstructionsPractical TipsTechnical Specifications
Page 201 of 280
199
Checking and refilling levels
Topping up engine oil
Top up gradually with small quantities of engine oil.
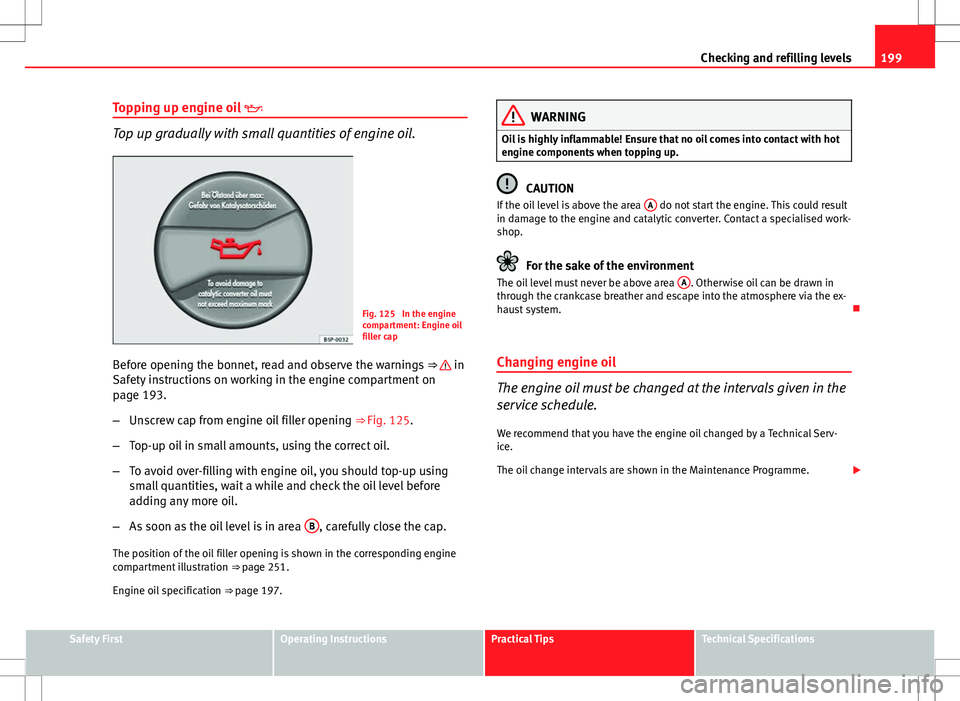
Fig. 125 In the engine
compartment: Engine oil
filler cap
Before opening the bonnet, read and observe the warnings ⇒
in
Safety instructions on working in the engine compartment on
page 193.
– Unscrew cap from engine oil filler opening ⇒ Fig. 125.
– Top-up oil in small amounts, using the correct oil.
– To avoid over-filling with engine oil, you should top-up using
small quantities, wait a while and check the oil level before
adding any more oil.
– As soon as the oil level is in area B
, carefully close the cap.
The position of the oil filler opening is shown in the corresponding engine
compartment illustration ⇒ page 251.
Engine oil specification ⇒ page 197.
WARNING
Oil is highly inflammable! Ensure that no oil comes into contact with hot
engine components when topping up.
CAUTION
If the oil level is above the area A do not start the engine. This could result
in damage to the engine and catalytic converter. Contact a specialised work-
shop.
For the sake of the environment
The oil level must never be above area A. Otherwise oil can be drawn in
through the crankcase breather and escape into the atmosphere via the ex-
haust system.
Changing engine oil
The engine oil must be changed at the intervals given in the
service schedule. We recommend that you have the engine oil changed by a Technical Serv-
ice.
The oil change intervals are shown in the Maintenance Programme.
Safety FirstOperating InstructionsPractical TipsTechnical Specifications