Seat Ibiza SC 2012 Workshop Manual
Manufacturer: SEAT, Model Year: 2012, Model line: Ibiza SC, Model: Seat Ibiza SC 2012Pages: 280, PDF Size: 3.67 MB
Page 51 of 280
49
Child safety
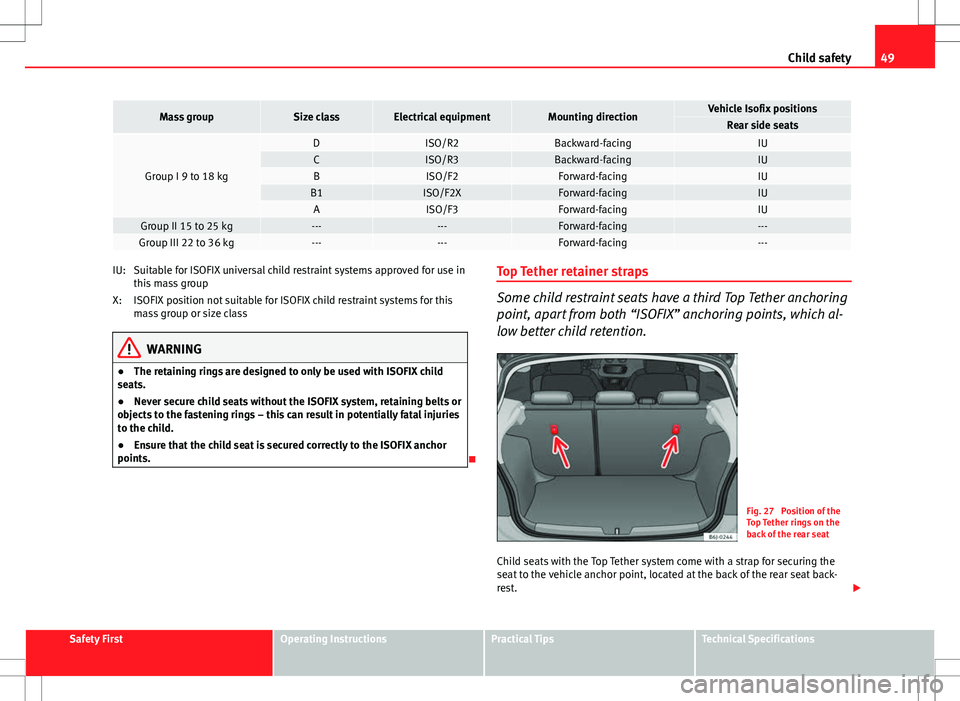
Mass groupSize classElectrical equipmentMounting directionVehicle Isofix positionsRear side seats
Group I 9 to 18 kg
DISO/R2Backward-facingIUCISO/R3Backward-facingIUBISO/F2Forward-facingIUB1ISO/F2XForward-facingIUAISO/F3Forward-facingIUGroup II 15 to 25 kg------Forward-facing---Group III 22 to 36 kg------Forward-facing---
Suitable for ISOFIX universal child restraint systems approved for use in
this mass group
ISOFIX position not suitable for ISOFIX child restraint systems for this
mass group or size class
WARNING
● The retaining rings are designed to only be used with ISOFIX child
seats.
● Never secure child seats without the ISOFIX system, retaining belts or
objects to the fastening rings – this can result in potentially fatal injuries
to the child.
● Ensure that the child seat is secured correctly to the ISOFIX anchor
points.
IU:
X:
Top Tether retainer straps
Some child restraint seats have a third Top Tether anchoring
point, apart from both “ISOFIX” anchoring points, which al-
low better child retention.
Fig. 27 Position of the
Top Tether rings on the
back of the rear seat
Child seats with the Top Tether system come with a strap for securing the
seat to the vehicle anchor point, located at the back of the rear seat back-
rest.
Safety FirstOperating InstructionsPractical TipsTechnical Specifications
Page 52 of 280
50Child safety
The retainer strap is used to reduce forwards movements of the safety seat
in a crash, helping reduce the risk of injuries to the head from hitting the
inside of the vehicle.
It is foreseen that an EU Directive will introduce requirements related to the
retention of child restraint systems by means of ISOFIX and Top Tether an-
chorages (probably compulsory for new types from 2010), which will entail
improved retention of the child restraint seat and less head movement in
case of frontal collisions.
Use of retainer straps on rear-facing seats
At present there are very few rear-facing child safety seats fitted with a re-
tainer strap. Please carefully read and follow the safety seat manufacturer's
instructions for information on how to install the retainer strap properly.
WARNING
An undue installation of the safety seat will increase the risk of injury in
the event of a crash.
● Never tie the retainer strap to a hook in the luggage compartment.
● Never secure or tie luggage or other items to the lower anchorages
(ISOFIX) or the upper ones (Top Tether).
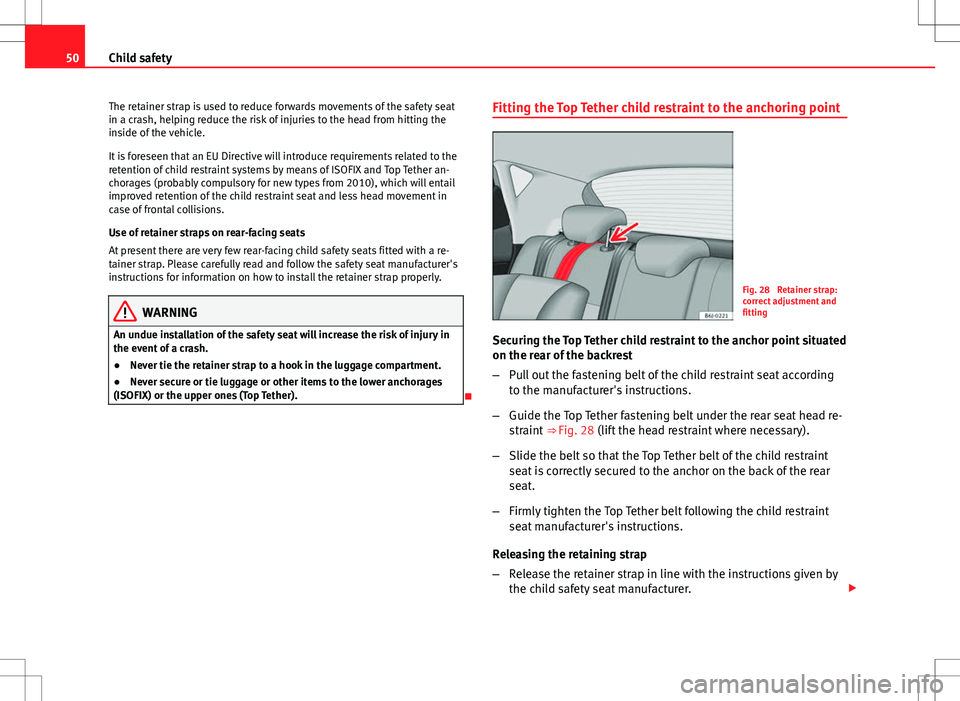
Fitting the Top Tether child restraint to the anchoring point
Fig. 28 Retainer strap:
correct adjustment and
fitting
Securing the Top Tether child restraint to the anchor point situated
on the rear of the backrest
– Pull out the fastening belt of the child restraint seat according
to the manufacturer's instructions.
– Guide the Top Tether fastening belt under the rear seat head re-
straint ⇒ Fig. 28 (lift the head restraint where necessary).
– Slide the belt so that the Top Tether belt of the child restraint
seat is correctly secured to the anchor on the back of the rear
seat.
– Firmly tighten the Top Tether belt following the child restraint
seat manufacturer's instructions.
Releasing the retaining strap
– Release the retainer strap in line with the instructions given by
the child safety seat manufacturer.
Page 53 of 280
51
Child safety
– Push the lock and release it from the anchoring support.
WARNING
Read and bear in mind all the WARNINGS ⇒ page 49.
Safety FirstOperating InstructionsPractical TipsTechnical Specifications
Page 54 of 280
52Cockpit
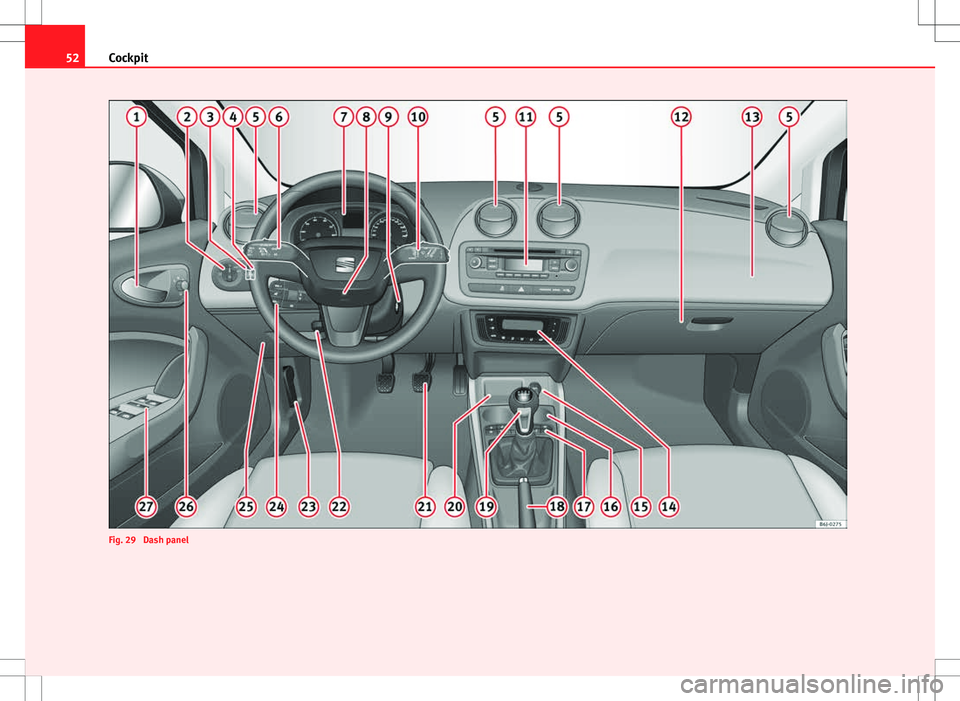
Fig. 29 Dash panel
Page 55 of 280
53
Cockpit
Operating Instructions Cockpit
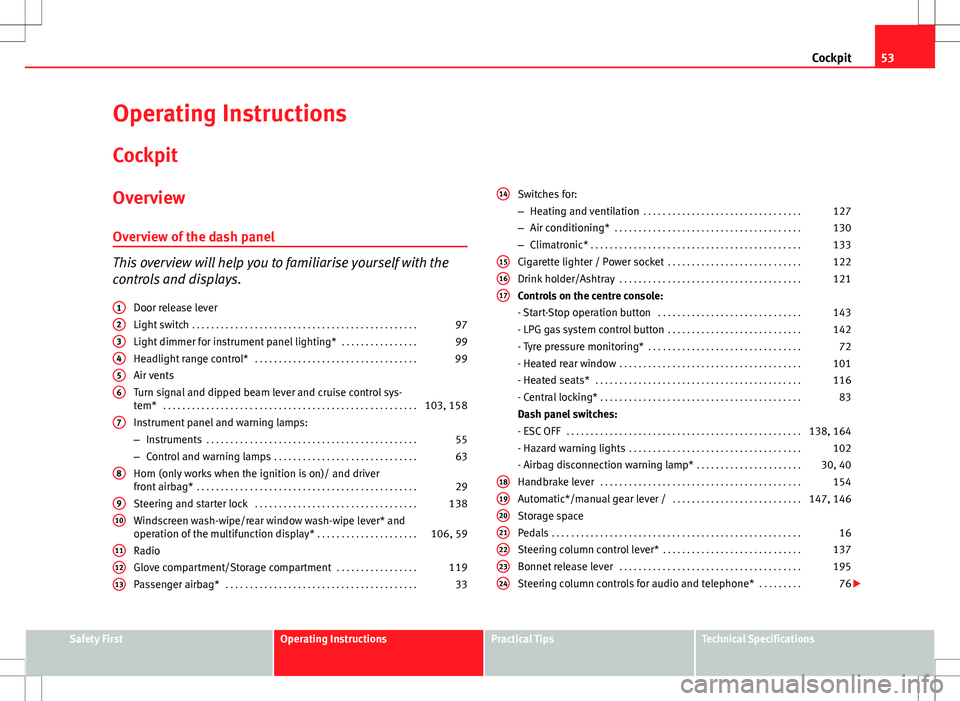
Overview Overview of the dash panel
This overview will help you to familiarise yourself with the
controls and displays. Door release lever
Light switch . . . . . . . . . . . . . . . . . . . . . . . . . . . . . . . . . . . . . . . . . . . . . . . 97
Light dimmer for instrument panel lighting* . . . . . . . . . . . . . . . .99
Headlight range control* . . . . . . . . . . . . . . . . . . . . . . . . . . . . . . . . . . 99
Air vents
Turn signal and dipped beam lever and cruise control sys-
tem* . . . . . . . . . . . . . . . . . . . . . . . . . . . . . . . . . . . . . . . . . . . . . . . . . . . . . 103, 158
Instrument panel and warning lamps:
– Instruments . . . . . . . . . . . . . . . . . . . . . . . . . . . . . . . . . . . . . . . . . . . . 55
– Control and warning lamps . . . . . . . . . . . . . . . . . . . . . . . . . . . . . . 63
Horn (only works when the ignition is on)/ and driver
front airbag* . . . . . . . . . . . . . . . . . . . . . . . . . . . . . . . . . . . . . . . . . . . . . . 29
Steering and starter lock . . . . . . . . . . . . . . . . . . . . . . . . . . . . . . . . . . 138
Windscreen wash-wipe/rear window wash-wipe lever* and
operation of the multifunction display* . . . . . . . . . . . . . . . . . . . . .106, 59
Radio
Glove compartment/Storage compartment . . . . . . . . . . . . . . . . .119
Passenger airbag* . . . . . . . . . . . . . . . . . . . . . . . . . . . . . . . . . . . . . . . . 33
1
23456
7
8
910
111213
Switches for:
–
Heating and ventilation . . . . . . . . . . . . . . . . . . . . . . . . . . . . . . . . . 127
– Air conditioning* . . . . . . . . . . . . . . . . . . . . . . . . . . . . . . . . . . . . . . . 130
– Climatronic* . . . . . . . . . . . . . . . . . . . . . . . . . . . . . . . . . . . . . . . . . . . . 133
Cigarette lighter / Power socket . . . . . . . . . . . . . . . . . . . . . . . . . . . . 122
Drink holder/Ashtray . . . . . . . . . . . . . . . . . . . . . . . . . . . . . . . . . . . . . . 121
Controls on the centre console:
- Start-Stop operation button . . . . . . . . . . . . . . . . . . . . . . . . . . . . . . 143
- LPG gas system control button . . . . . . . . . . . . . . . . . . . . . . . . . . . . 142
- Tyre pressure monitoring* . . . . . . . . . . . . . . . . . . . . . . . . . . . . . . . . 72
- Heated rear window . . . . . . . . . . . . . . . . . . . . . . . . . . . . . . . . . . . . . . 101
- Heated seats* . . . . . . . . . . . . . . . . . . . . . . . . . . . . . . . . . . . . . . . . . . . 116
- Central locking* . . . . . . . . . . . . . . . . . . . . . . . . . . . . . . . . . . . . . . . . . . 83
Dash panel switches:
- ESC OFF . . . . . . . . . . . . . . . . . . . . . . . . . . . . . . . . . . . . . . . . . . . . . . . . . 138, 164
- Hazard warning lights . . . . . . . . . . . . . . . . . . . . . . . . . . . . . . . . . . . . 102
- Airbag disconnection warning lamp* . . . . . . . . . . . . . . . . . . . . . .30, 40
Handbrake lever . . . . . . . . . . . . . . . . . . . . . . . . . . . . . . . . . . . . . . . . . . 154
Automatic*/manual gear lever / . . . . . . . . . . . . . . . . . . . . . . . . . . .147, 146
Storage space
Pedals . . . . . . . . . . . . . . . . . . . . . . . . . . . . . . . . . . . . . . . . . . . . . . . . . . . . 16
Steering column control lever* . . . . . . . . . . . . . . . . . . . . . . . . . . . . . 137
Bonnet release lever . . . . . . . . . . . . . . . . . . . . . . . . . . . . . . . . . . . . . . 195
Steering column controls for audio and telephone* . . . . . . . . .76
14
151617
18192021222324
Safety FirstOperating InstructionsPractical TipsTechnical Specifications
Page 56 of 280
54Cockpit
Fuse housing . . . . . . . . . . . . . . . . . . . . . . . . . . . . . . . . . . . . . . . . . . . . . 224
Control for adjusting electric exterior mirrors* . . . . . . . . . . . . . . .110
Electric window controls* . . . . . . . . . . . . . . . . . . . . . . . . . . . . . . . . . . 92
Note
Some of the items of equipment listed here are fitted only on certain model
versions or are optional extras.
252627
Page 57 of 280
55
Cockpit
Instruments Instrument overview
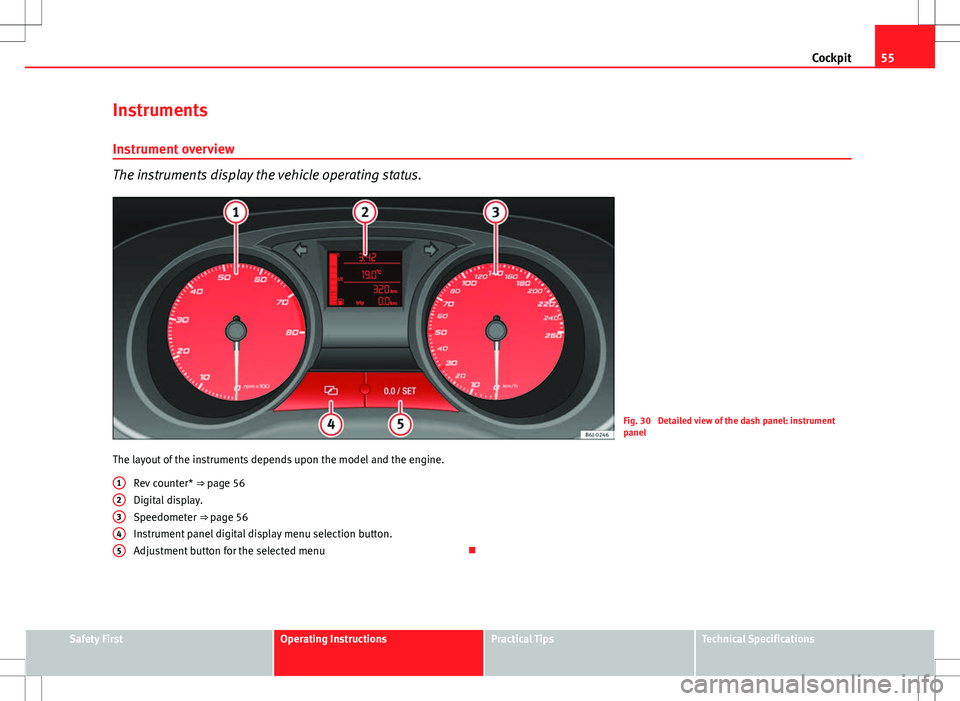
The instruments display the vehicle operating status.
Fig. 30 Detailed view of the dash panel: instrument
panel
The layout of the instruments depends upon the model and the engine. Rev counter* ⇒ page 56
Digital display.
Speedometer ⇒ page 56
Instrument panel digital display menu selection button.
Adjustment button for the selected menu
12345
Safety FirstOperating InstructionsPractical TipsTechnical Specifications
Page 58 of 280
56Cockpit
Rev counter
The rev counter displays the engine speed in revolutions per
minute.
The start of the red zone ⇒ Fig. 30 1
indicates the maximum engine speed
operating at service temperature. However, it is advisable to change up into
a higher gear, move the selector lever to D or lift your foot off the accelerator
before the needle reaches the red zone.
CAUTION
To prevent possible engine malfunctions, the rev counter needle should not
reach the red zone. The start of the red zone on the dial is different for some
engine versions.
For the sake of the environment
Changing up into higher gears sooner, following the recommended gear in-
dications ⇒ Fig. 33 will help you to reduce fuel consumption, emissions and
also engine noise.
Speedometer
The speedometer is equipped with a digital odometer and a trip recorder, in
addition to a service intervals display.
During the running-in period, the instructions shown on ⇒ page 167
should be followed. LPG system*
LPG gauge
Fig. 31 Instrument pan-
el: gas gauge.
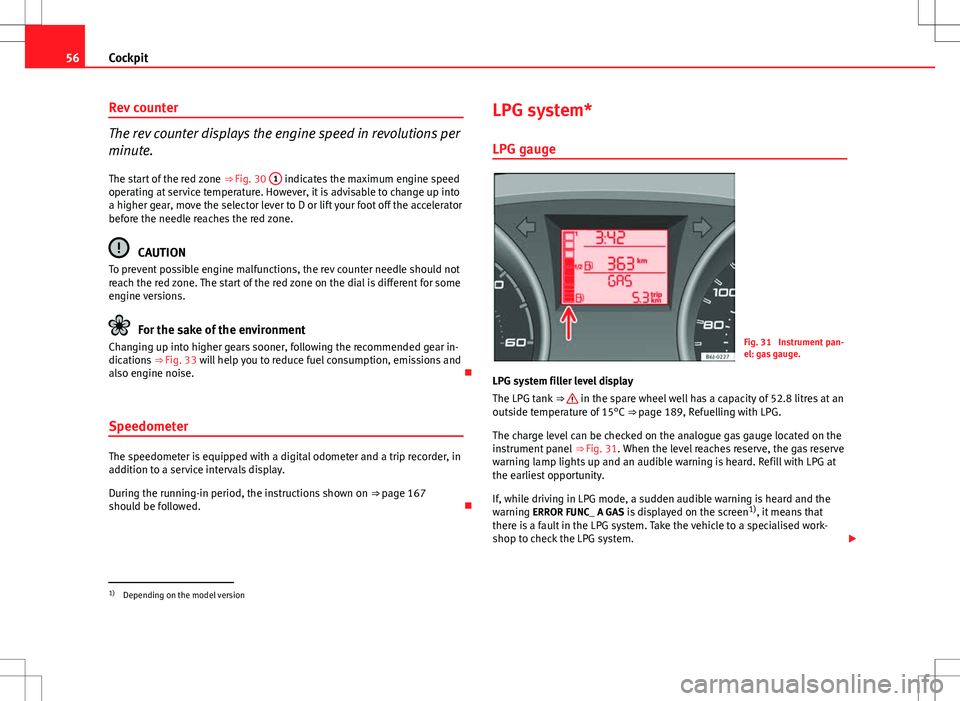
LPG system filler level display
The LPG tank ⇒
in the spare wheel well has a capacity of 52.8 litres at an
outside temperature of 15°C ⇒ page 189, Refuelling with LPG.
The charge level can be checked on the analogue gas gauge located on the
instrument panel ⇒ Fig. 31. When the level reaches reserve, the gas reserve
warning lamp lights up and an audible warning is heard. Refill with LPG at
the earliest opportunity.
If, while driving in LPG mode, a sudden audible warning is heard and the
warning ERROR FUNC_ A GAS is displayed on the screen 1)
, it means that
there is a fault in the LPG system. Take the vehicle to a specialised work-
shop to check the LPG system.
1)
Depending on the model version
Page 59 of 280
57
Cockpit
WARNING
LPG is a highly explosive and inflammable substance. It may cause se-
vere burns and other injury.
● Due care must be taken to avoid any risk of fire or explosion.
● When parking the vehicle in a closed area (for example in a garage),
make sure that there is adequate ventilation, either natural or mechani-
cal, to neutralise the LPG in the event of a leak.
Note
● The values shown in the average fuel consumption and distance to emp-
ty indications on the multifunction display (MFI) 1)
on the instrument panel 2)
are approximate values only.
● Two different consumption values are given on the MFI, depending on
whether the vehicle is running in GAS or Petrol mode.
● Please check the fuel level on the fuel level gauge on the instrument
panel ⇒ page 57
● If frequent short journeys are made, especially when the outside tem-
perature is low, the vehicle will tend to run on petrol more often than on
LPG. Therefore, the petrol tank may empty before the LPG tank. Digital instrument panel display
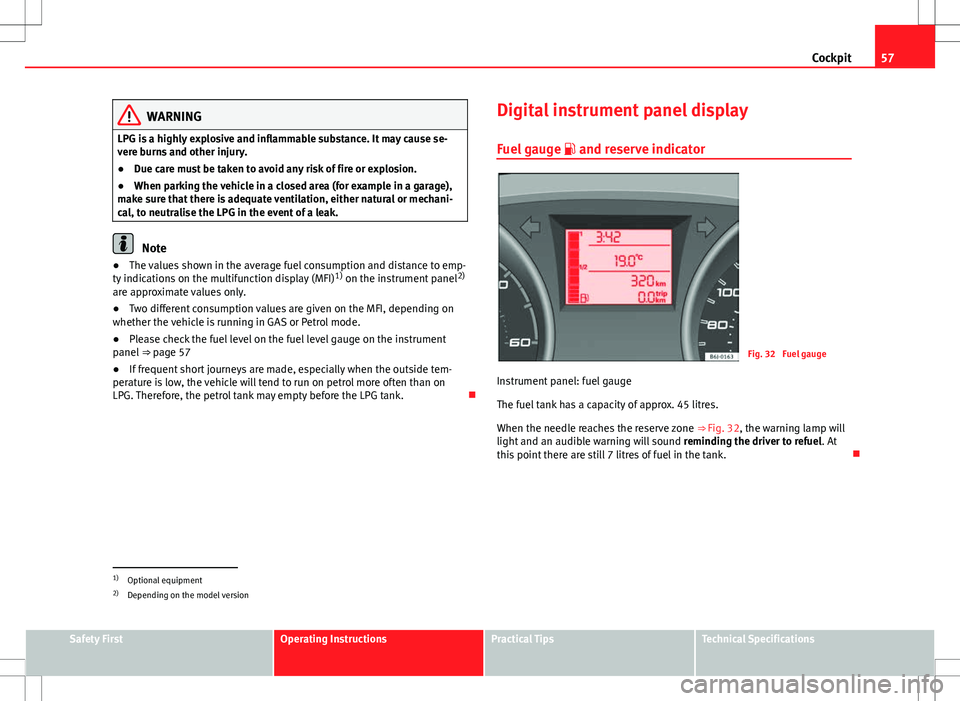
Fuel gauge and reserve indicator
Fig. 32 Fuel gauge
Instrument panel: fuel gauge
The fuel tank has a capacity of approx. 45 litres.
When the needle reaches the reserve zone ⇒ Fig. 32, the warning lamp will
light and an audible warning will sound reminding the driver to refuel. At
this point there are still 7 litres of fuel in the tank.
1)
Optional equipment
2) Depending on the model version
Safety FirstOperating InstructionsPractical TipsTechnical Specifications
Page 60 of 280
58Cockpit
Digital clock*
–To set the hour, press button 4 ⇒ Fig. 30. The “hour” option
flashes on the digital display and is set using button 5 “set”
⇒ Fig. 30.
– To set the minutes, press button 4
again and select the mi-
nute option. Set from button 5 “set”.
Once the operation has been carried out, the system memorises the time.
Outside temperature indicator
The outside temperature is displayed when the ignition is
switched on. In addition to the outside temperature display, an ice crystal is displayed
and, if vehicle speed is over 10 km/h (6 mph), a warning tone is heard at
temperatures dropping from between +4°C and -7°C and at temperatures
rising from -5°C up to +6°C.
The lighting of the crystal symbol aims to warn the driver of the risk of ice,
so that he/she proceeds with due care.
When the vehicle is stationary or travelling at very low speeds, the tempera-
ture displayed may be slightly higher than the actual outside temperature
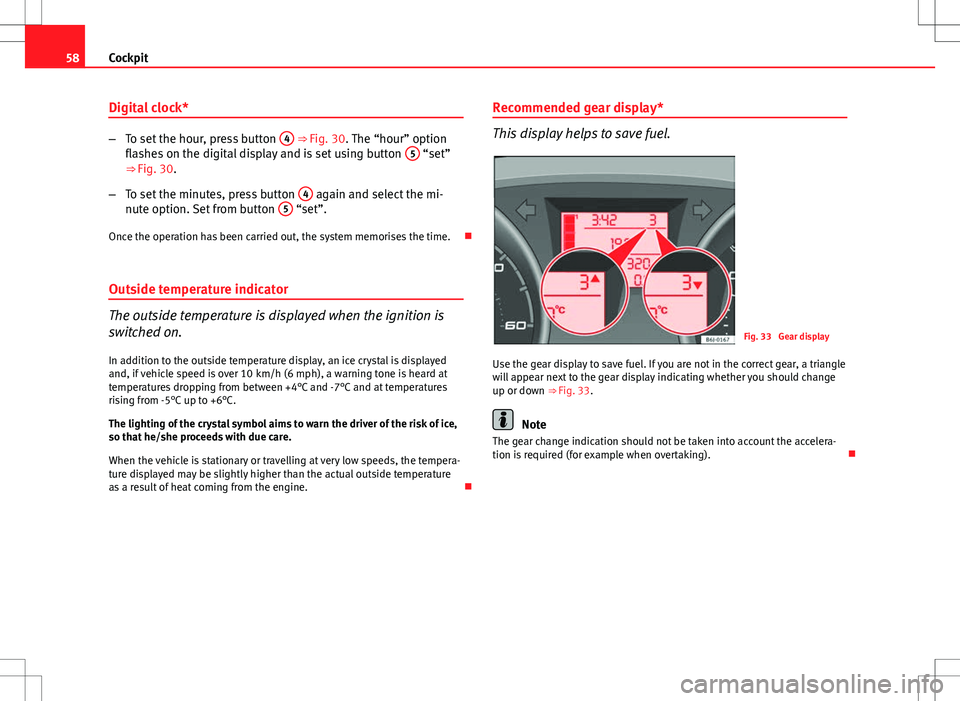
as a result of heat coming from the engine. Recommended gear display*
This display helps to save fuel.
Fig. 33 Gear display
Use the gear display to save fuel. If you are not in the correct gear, a triangle
will appear next to the gear display indicating whether you should change
up or down ⇒ Fig. 33.
Note
The gear change indication should not be taken into account the accelera-
tion is required (for example when overtaking).